
Visual Studio 2015 Succinctly®

CHAPTER 8
Visual Studio 2015 for ASP.NET and Azure
Building applications for web and cloud environments is the core business for many thousands of developers. As the web and cloud environments evolve continuously and concurrently, Microsoft is aware that developers need appropriate tools to be on the market quickly and efficiently. Based on .NET Core 5, the recent release of ASP.NET 5 marks a new era for web development; ASP.NET is now an open source platform able to run on multiple operating systems, such as Linux and Mac OSX, and projects you create only use the necessary libraries via NuGet packages, rather than relying on the full .NET Framework. This is known as cloud-optimized ASP.NET; it makes it easier to deploy web applications to Microsoft Azure. Moreover, Microsoft Azure offers powerful new services and tools with every update. All these important improvements and new features make Visual Studio 2015 the perfect place to build web applications with ASP.NET and Microsoft Azure. This chapter explains what’s new from a development environment perspective to help you increase your productivity.
Note: Explaining ASP.NET 5 and Microsoft Azure in detail would require entire books, so providing guidance on how you build applications is not possible in this context. ASP.NET has a totally revisited infrastructure and many new features that make a brief summary impossible in this book. Instead, learn more at the official sites for ASP.NET and Microsoft Azure, including full documentation about both technologies.
Chapter Prerequisites
All you need to work with ASP.NET 5 is already included in Visual Studio 2015, assuming you selected the web development tools among the available installation options. In order to complete this chapter, you need both of the following for Microsoft Azure:
- A Microsoft Azure subscription—If you are an MSDN subscriber, you can activate an Azure subscription included in your plan; if you do not have an Azure subscription, you can get a free trial for 30 days.
- The Azure SDK for Visual Studio 2015, which can be obtained via the free Microsoft Web Platform Installer tool. At publication, the current version for the Azure SDK is 2.5.1.
Assuming you have installed all the necessary components and activated a Microsoft Azure subscription, you are ready to discover the new features in Visual Studio 2015.
Visual Studio 2015 for ASP.NET 5
The most interesting tools added to support ASP.NET 5 on .NET Core 5 in Visual Studio 2015 are basically new project templates, a new project system, an enhanced IntelliSense to support multi-framework targeting, and the updated NuGet manager.
Tip: This chapter doesn’t cover how to manage NuGet packages since it was discussed in Chapter 7. Just remember that the previous chapter applies to ASP.NET as well..
ASP.NET 5 Core Project Templates
Visual Studio 2015 adds five new project templates to support ASP.NET 5 Core. In particular, two new project templates have been added to the Web node of the New Project dialog; they are the Class Library (Package) and the Console Application (Package) (see Figure 65).
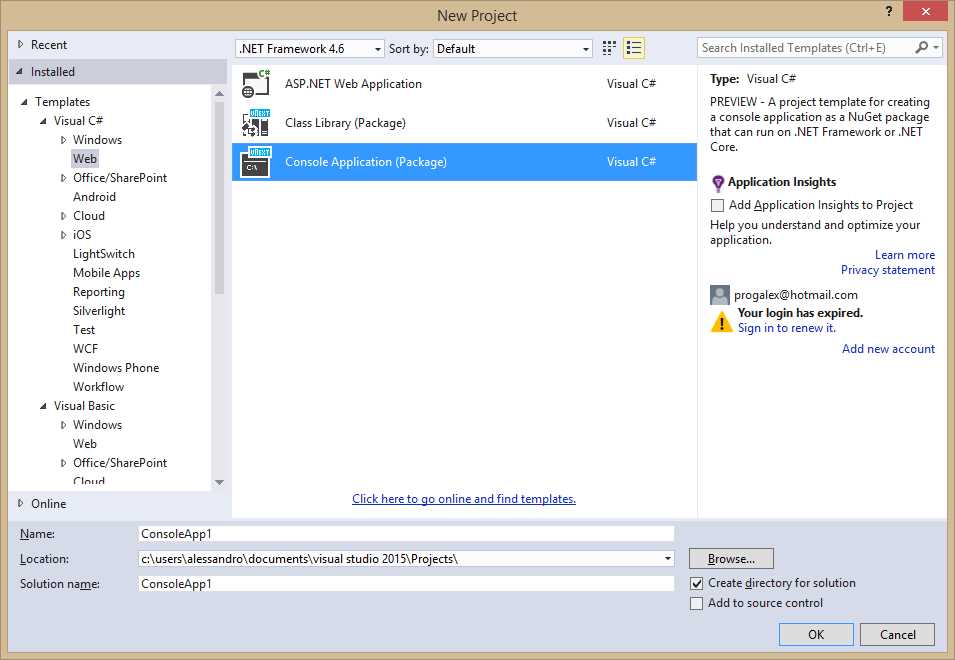
- ASP.NET 5 Class Library and Console Application new project templates.
Both the Class Library and Console Application templates produce assemblies that can run on multiple platforms when you use ASP.NET 5 Core. Three other project templates have been added to the New ASP.NET Project dialog, which appears when you select the ASP.NET Web Application template in the New Project dialog. Specifically, you now have a new group called ASP.NET 5 Preview Templates, containing the Empty, Web Site, and Web API project templates, as shown in Figure 66.

- ASP.NET 5 new project templates.
Tip: When you install the Azure SDK 2.5.1 or higher, another project template called Azure Mobile App is added to the ASP.NET 4.6 templates.
What the ASP.NET 5 Starter Web template does is create a basic web application based on MVC 6, including some identity models, controllers, views, and support for Entity Framework migrations. Figure 67 shows what happens when you create a new Starter Web project. You can see how Visual Studio 2015 provides an important list of links for learning what’s new; it also displays a new project system in the Solution Explorer.
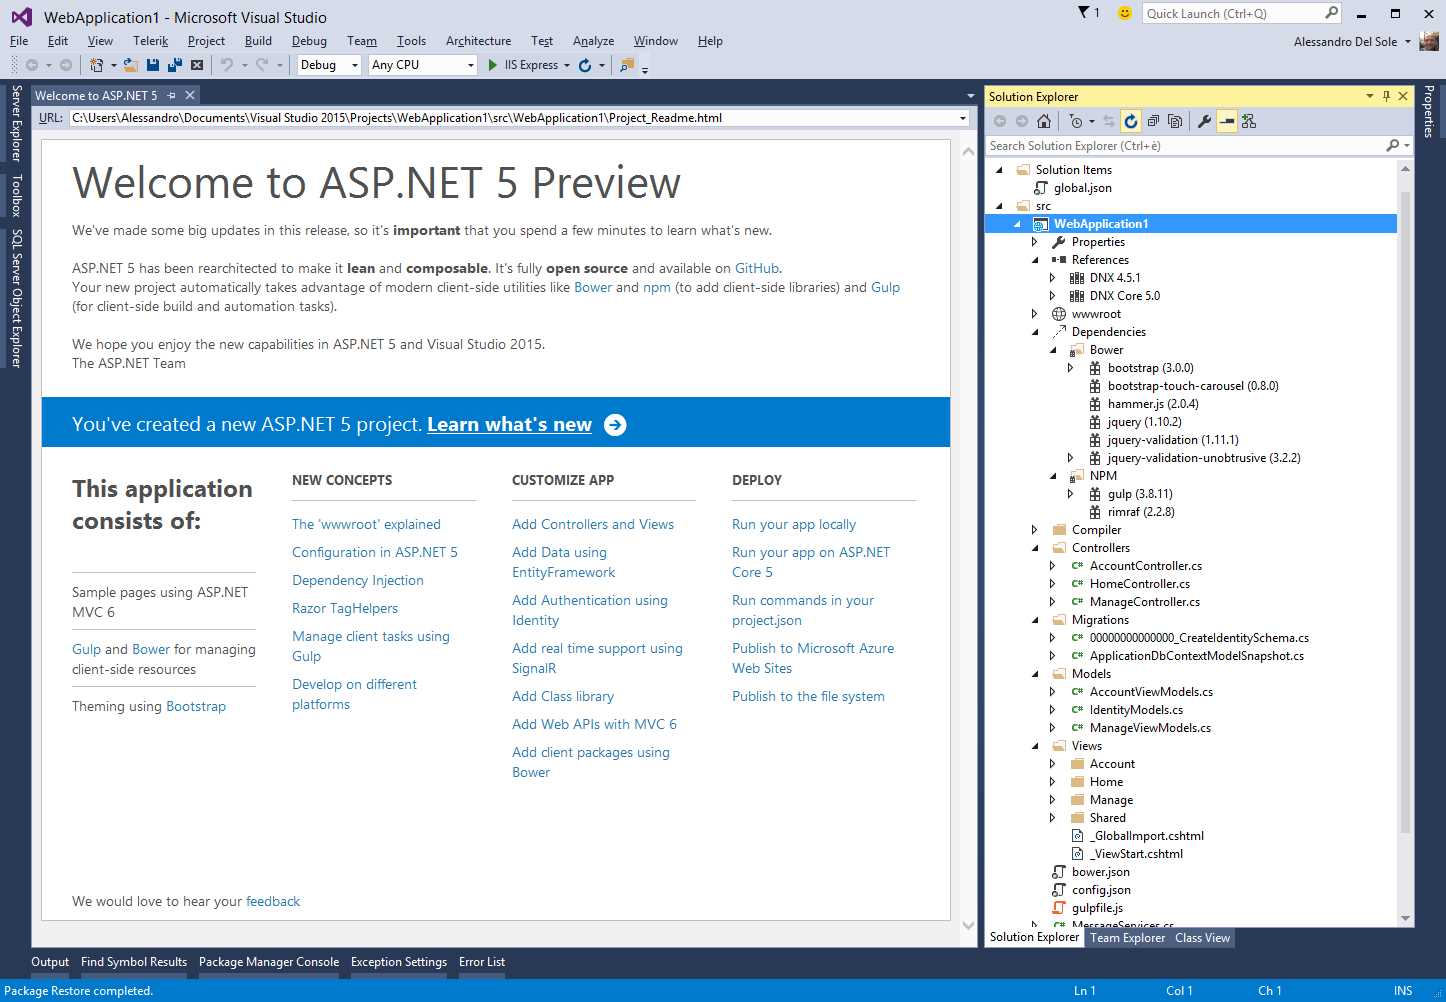
- Creating a Starter Web project.
If you are familiar with ASP.NET MVC, you will be able to reuse your skills about models, views, and controllers. This project template also supports Web API to build RESTful HTTP services. The big differences are instead related to the new project system.
A New Project System
As you can see by expanding all project items in Solution Explorer, ASP.NET 5 Core projects have a new structure. This new project system allows cleaner separation between static files and code files, automated project management, and better package management.
The wwwroot Node
The wwwroot node contains all static code files, such as assets, fonts, CSS files, JavaScript files, and HTML files. Code files, like C# and Razor files, should never go in this folder because wwwroot provides a clean separation between code files and static files.
The Dependencies Node
The Dependencies node contains dependencies for Bower and NPM. Bower is basically a client package manager for the Web and allows installing and restoring client-side packages, including JavaScript and CSS libraries. Bower works on the client, so you will still use NuGet on server-side frameworks like MVC 6. NPM is instead a package manager originally built for Node.js. Visual Studio 2015 automatically uses Bower to install packages and generates a list of packages in the Bower.json file that you can find in Solution Explorer. You can manually edit Bower.json by adding dependencies to the dependencies node. Supposing you want to use the RequireJS library, you can start typing and get IntelliSense help to choose among available libraries, as shown in Figure 68. Not limited to this, you get IntelliSense support to choose one of the available versions (see Figure 69).

- Editing the Bower.json file with IntelliSense support.

- IntelliSense helps you choose one of the available versions.
Once you have completed your edits, right-click the Bower subfolder in Solution Explorer and select Restore Packages (see Figure 70).
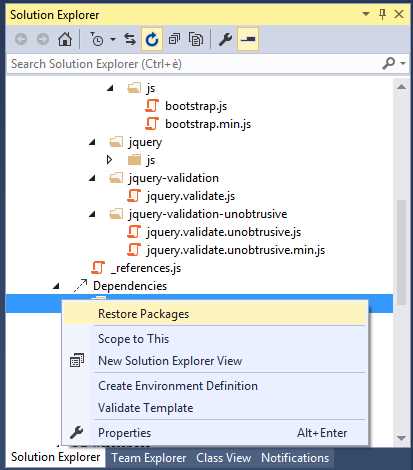
- Restoring the appropriate packages after editing Bower.json.
In Solution Explorer you will also see a file called package.json, which contains the list of dependencies for NPM. The NPM subfolder contains additional JSON files specific to Grunt. Grunt is a JavaScript-based task runner that helps automate routine development tasks. The official ASP.NET web site has an interesting example showing how to use Grunt with the Starter Web project template. Such an example also explains how to use additional tooling specific to Grunt, such as the Task Runner Explorer window.
New Project Files and JSON Files
ASP.NET 5 Core projects have different organization for files and configuration information. In particular, the differences include the following:
- Project files have the .kproj extension. The project file no longer contains any directory items or references because Visual Studio 2015 automatically includes the necessary files.
- The project.json file contains the list of reference and package dependencies, version definitions, framework configurations, compile options, build events, package creation meta-data, and commands. Having all this information in a JSON file is very useful because it can be edited manually on projects that run on Linux and MacOS and that do not have Visual Studio 2015 installed.
- The config.json file is used instead of Web.config and contains all the application and server configuration information. Of course, Web.config is still there for ASP.NET 4.5 projects.
The References Node
The Reference node displays all frameworks listed in project.json. By default, selected (and displayed) frameworks are DNX 4.5.1 and DNX Core 5.0. Each framework contains the code required to bootstrap and run an application within a .NET execution environment, and is represented by a node that can be expanded to show the list of packages per framework.
The Compiler Node
The Compiler node contains code files for pre-compilation directives based on the Razor engine.
IntelliSense Improvements
IntelliSense is another place that has improvements in Visual Studio 2015 for ASP.NET 5 Core. For instance, since you may target multiple frameworks, such as ASP.NET 5 and ASP.NET Core 5, IntelliSense can mix suggestions to show a warning when a member is not supported in one framework, as demonstrated in Figure 71.
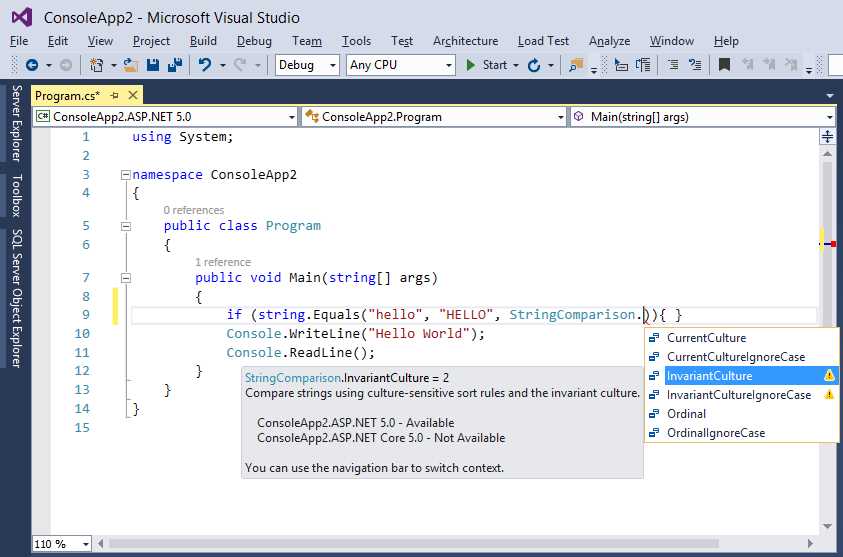
- IntelliSense can target multiple frameworks.
Not limited to this, the Error List window can show errors for specific frameworks, as demonstrated in Figure 72, which reflects the code shown in Figure 71.
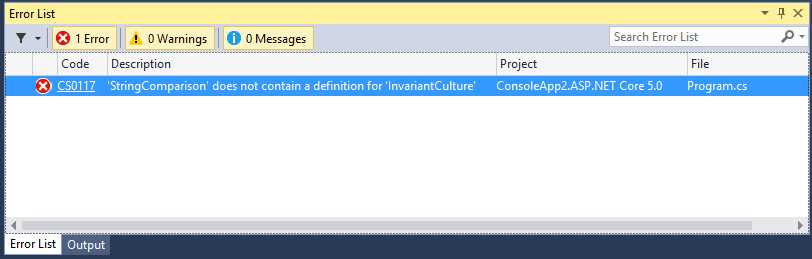
- The Error List shows per-framework errors.
IntelliSense has specific support for bower.json and package.json files and introduces support for the <link rel="import"/> element in the HTML editor, which is part of the Web Components Standard, as demonstrated in Figure 73.
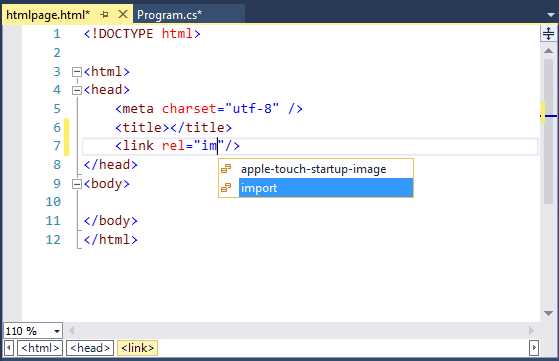
- IntelliSense updates for the HTML editor.
Visual Studio 2015 For Microsoft Azure
At the beginning of this chapter, you were invited to install the latest SDK for Microsoft Azure, which extends Visual Studio 2015 to interact with the Azure platform from within the IDE. Now you will get guidance on the most relevant new features that will make your life easier when working with Azure from Visual Studio.
Tip: When you install the Azure SDK 2.5.1 or higher, another project template called Azure Mobile App is added to the ASP.NET 4.6 templates.
Note: As for previous versions, the current Azure SDK adds not only many features to Visual Studio, but it provides additional tools and services. In this book we focus on features that are available in Visual Studio 2015‘s IDE. For a comprehensive list of new features, you can read the Azure SDK 2.5.1 for .NET Release Notes. Also, this chapter mentions many services and platforms that Microsoft Azure exposes; in this case, hyperlinks to official pages and documentation are provided, while the book focuses on new tooling.
Quick Starts
Quick Starts provide a collection of sample projects, which demonstrate the usage of various Azure services and APIs. They are available in the Cloud > QuickStarts node in the New Project dialog as demonstrated in Figure 74.

- Quick Starts projects for Azure.
Quick Starts projects are also organized in sub-nodes, called AppServices, Compute, and DataServices. Each project provides a fully functional sample, demonstrating how to use APIs that are specific to the targeted service. This means that the sample code contains very detailed comments and examples on how to interact with the desired service in code. For instance, the following listing is a significant excerpt from the code generated by the Azure Blob Storage template, and shows how to interact with your Azure Blob Storage account.
namespace DataBlobStorage3Sample { using Microsoft.WindowsAzure; using Microsoft.WindowsAzure.Storage; using Microsoft.WindowsAzure.Storage.Blob; using System; using System.Collections.Generic; using System.IO; using System.Linq; using System.Threading.Tasks; /// <summary> /// Azure Storage Blob Sample - Demonstrate how to use the Blob Storage service. /// Blob storage stores unstructured data such as text, binary data, documents or media files. /// Blobs can be accessed from anywhere in the world via HTTP or HTTPS. /// /// Note: This sample uses the .NET 4.5 asynchronous programming model to demonstrate how to call the Storage Service using the /// storage client libraries asynchronous API's. When used in real applications, this approach enables you to improve the /// responsiveness of your application. Calls to the storage service are prefixed by the await keyword. /// /// Documentation References: /// - What is a Storage Account - http://azure.microsoft.com/en-us/documentation/articles/storage-whatis-account/ /// - Getting Started with Blobs - http://azure.microsoft.com/en-us/documentation/articles/storage-dotnet-how-to-use-blobs/ /// - Blob Service Concepts - http://msdn.microsoft.com/en-us/library/dd179376.aspx /// - Blob Service REST API - http://msdn.microsoft.com/en-us/library/dd135733.aspx /// - Blob Service C# API - http://go.microsoft.com/fwlink/?LinkID=398944 /// - Delegating Access with Shared Access Signatures - http://azure.microsoft.com/en-us/documentation/articles/storage-dotnet-shared-access-signature-part-1/ /// - Storage Emulator - http://msdn.microsoft.com/en-us/library/azure/hh403989.aspx /// - Asynchronous Programming with Async and Await - http://msdn.microsoft.com/en-us/library/hh191443.aspx /// </summary> public class Program { // ************************************************************************************************************************* // Instructions: This sample can be run using either the Azure Storage Emulator that installs as part of this SDK - or by // updating the App.Config file with your AccountName and Key. // // To run the sample using the Storage Emulator (default option) // 1. Start the Azure Storage Emulator (once only) by pressing the Start button or the Windows key and searching for it // by typing "Azure Storage Emulator". Select it from the list of applications to start it. // 2. Set breakpoints and run the project using F10. // // To run the sample using the Storage Service: // 1. Open the app.config file and comment out the connection string for the emulator (UseDevelopmentStorage=True) and // uncomment the connection string for the storage service (AccountName=[]...) // 2. Create a Storage Account through the Azure Portal and provide your [AccountName] and [AccountKey] in // the App.Config file. See http://go.microsoft.com/fwlink/?LinkId=325277 for more information // 3. Set breakpoints and run the project using F10. // // ************************************************************************************************************************* static void Main(string[] args) { Console.WriteLine("Azure Storage Blob Sample\n "); // Block blob basics. Console.WriteLine("Block Blob Sample"); BasicStorageBlockBlobOperationsAsync().Wait(); // Page blob basics. Console.WriteLine("\nPage Blob Sample"); BasicStoragePageBlobOperationsAsync().Wait(); Console.WriteLine("Press any key to exit"); Console.ReadLine(); } /// <summary> /// Basic operations to work with block blobs. /// </summary> /// <returns>Task<returns> private static async Task BasicStorageBlockBlobOperationsAsync() { const string ImageToUpload = "HelloWorld.png"; // Retrieve storage account information from connection string. // How to create a storage connection string - http://msdn.microsoft.com/en-us/library/azure/ee758697.aspx CloudStorageAccount storageAccount = CreateStorageAccountFromConnectionString(CloudConfigurationManager.GetSetting("StorageConnectionString")); // Create a blob client for interacting with the blob service. CloudBlobClient blobClient = storageAccount. CreateCloudBlobClient(); // Create a container for organizing blobs within the storage account. Console.WriteLine("1. Creating Container"); CloudBlobContainer container = blobClient. GetContainerReference("democontainerblockblob"); try { await container.CreateIfNotExistsAsync(); } catch (StorageException) { Console.WriteLine("If you are running with the default configuration please make sure you have started the storage emulator. Press the Windows key and type Azure Storage to select and run it from the list of applications - then restart the sample."); Console.ReadLine(); throw; } // To view the full Quick Start code, create a new Azure Blob Storage Quick // Start in Visual Studio 2015. } |
As you can see, the code offers samples about the most important tasks that you need to accomplish with the selected scenario. All available Quick Starts behave this way.
Azure Resource Manager Tools
The Azure SDK introduces a new tool called Azure Resource Manager. This new tool basically helps you create both a web project and a deployment project that contains the necessary artifacts to provision Azure resources, creating the appropriate environment for the application on your behalf. You use the Azure Resource Manager by taking advantage of a new project template called Cloud Deployment Project. This project template is available in the Cloud node of the New Project dialog, as shown in Figure 75. Notice the rich template description on the right side of the dialog.

- The Cloud Deployment Project template.
The Cloud Deployment Project uses templates on the Azure Gallery, which allows deep customizations but also reduces cost and effort when moving between environments. Such templates make it easy to configure the application deployment by simply specifying some information from your subscription. To understand how this works, create a new project using this template. You will be asked to select one of the available Azure Gallery templates, as shown in Figure 76.

- The Azure Gallery templates.
Note: In future releases of the Azure SDK, Microsoft should also add more templates to target services like networking, storage, and virtual machines.
For the current example, select the Website + SQL template (see Figure 76). Next, you will be asked to specify an ASP.NET project template. Just select the Empty one, as it serves as an example. Then the project is ready; in Solution Explorer you will see two projects: the ASP.NET project and an Azure Resource Manager Deployment project, whose name ends with .Deployment. If you expand subfolders in this project you will see the following:
- A reference to the ASP.NET project, a PowerShell script which is responsible for publishing resources to Azure (Publish-AzureResourceGroup.ps1).
- A deployment template (WebSiteDeploy.json).
- A parameter file containing values that the configuration file uses (WebSiteDeploy.param.dev.json).
- A deployment tool (AzCopy.exe).
Supposing you have your ASP.NET project ready to do some tasks, you can now prepare for deployment to Azure. When you deploy a Cloud Deployment Project, you deploy it to a Azure Resource Group, which is a logical grouping of resources including (but not limited to) web sites, databases, and storages. Right-click the .Deployment project name and select Deploy > New Deployment. In the New Deployment dialog (see Figure 77), select the Resource group option, which is specific to the current scenario, and click OK.
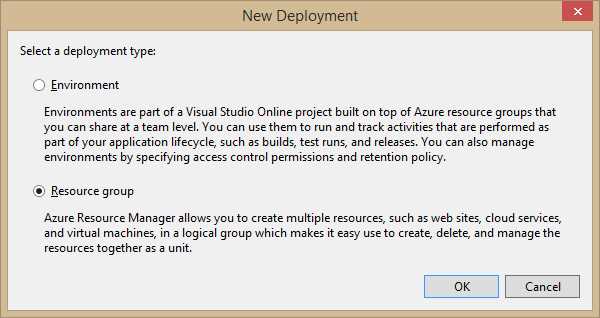
- The New Deployment dialog.
You will now see the Deploy to Resource Group dialog (see Figure 78), whose fields will be automatically filled by Visual Studio with appropriate values, except for the Resource group box, which requires specifying a resource group. This can be one of the default or previously created groups.
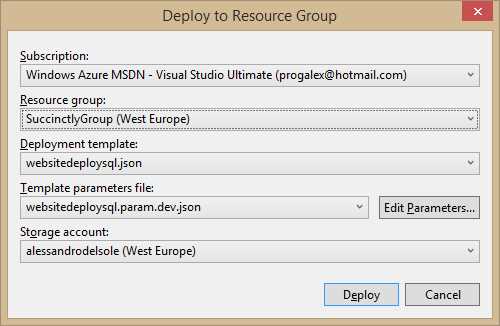
- The Deploy to Resource Group dialog.
To create a resource group, click the Create New… option in the combo box and in the Create Resource Group dialog specify a custom name and region. This must represent the nearest location to you (see Figure 79).

- Creating a new resource group.
Before deploying the application, you will need to edit parameters for the WebSiteDeploy.param.dev.json file. By clicking Edit Parameters, you will be able to edit parameters visually inside the Edit Parameters dialog, as shown in Figure 80.
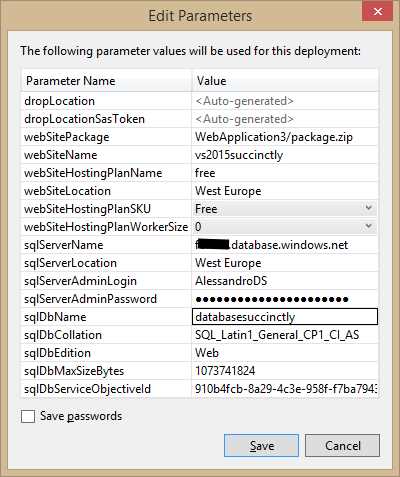
- Editing parameters for deployment.
The number of settings varies depending on what Azure Gallery template you select at the beginning. You will see many empty fields and all of them are mandatory; you will see a red glyph with a white exclamation mark that highlights mandatory parameters. Common mandatory parameters are summarized in Table 1.
Table 1—Common Mandatory Parameters for Deployment
Parameter | Description | Value |
webSiteName | The first part of the Web site URL. | For instance, if your site is called vs2015succinctly.azurewebsites.net, here you specify vs2015succinctly. |
webSiteHostingPlanName | Web hosting plans represent a set of features and capacity that you can share across websites; it supports the four Azure Websites pricing tiers (Free, Shared, Basic, and Standard). | A web hosting plan name. You are strongly encouraged to read the official page from Microsoft about creating Web Hosting Plans. |
webSiteLocation | The web site geographic location. | One of the supported Azure Regions. |
Additional parameters are required when you use the Web site + SQL template, as in the current example. SQL-related parameters are summarized in Table 2.
Table 2—SQL Mandatory Parameters
Parameter | Description | Value |
|---|---|---|
sqlServerName | The name of your database server, which can be retrieved in the Management Portal. | The server name is like yourserver.database.windows.net, where yourserver stands for your server’s name. |
sqlServerLocation | The server geographic location. This will be used if the server does not exist yet. | One of the supported Azure Regions. |
sqlServerAdminLogin | The database administrator’s user name. | See Description. |
sqlServerAdminPassword | The administrator’s password. | See Description. |
When you are ready, click Deploy. Visual Studio 2015 will publish the application to your Microsoft Azure subscription and create the appropriate resource group, including the database if it does not exist. The operation progress is displayed in the Output window as usual. You will then be able to run and manage the application.
Support for Multiple Microsoft Accounts
As you learned in Chapter 1, Visual Studio 2015 introduces support for multiple Microsoft Accounts. This is even more useful when talking about Microsoft Azure, because you can simultaneously sign into multiple subscriptions and leverage the Server Explorer window to manage your resources on the cloud. In Server Explorer, right-click the Azure node and then select Manage and filter Subscriptions. This will open the Manage Microsoft Azure Subscriptions dialog, which is represented in Figure 81.

- Managing Azure subscriptions.
Here you can select or unselect accounts that will be automatically signed in for Server Explorer; in the Subscriptions tab you can select or unselect subscriptions so that Server Explorer shows resources only for the selected ones.
Blob Storage Folders
Visual Studio 2013 and the Azure SDK 2.2 introduced the ability to interact with your Azure Storage Account, which includes blobs, tables, and queues, directly from within the IDE via the Server Explorer window and its Storage node. With regard to the Blob storage, these tools allow creating and managing containers, and uploading/downloading files to/from containers. Visual Studio 2015 and the Azure SDK 2.5.1 take it one step further by providing support for blob folders. These allow blobs to be grouped into logical units, which is very useful when you are using only one blob container. Blob folders are actually a prefix for the blob name; these prefixes include the / delimiter. For instance, say you have a storage account called vs2015succinctly, with a container called documents and a blob folder called personal, and here you have a Word file called mydocument.docx. The URL will look like this:
https://vs2015succinctly.blob.core.windows.net/documents/personal/mydocument.docx
This is very intuitive and recalls how you reach folders on a web site (which is actually what you do).
While you can navigate existing blob folders, you cannot create folders from Server Explorer; therefore you create a blob folder when uploading the first file to it. For a better understanding, follow these steps:
- Right-click the Blobs node in Server Explorer for one of your storage accounts (I’m using the local development storage for this example) and select Create Blob Container.
- In the Create Blob Container dialog, enter documents as the container name (see Figure 82).
- Double-click the newly created container so that Visual Studio opens the Container tool window.
- Click Upload and specify both the file name you want to upload and the folder name, e.g. personal. Figure 83 shows an example.
- When ready, click OK. At this point, Visual Studio shows the content of the personal blob folder and its content (see Figure 84). Here you can manage blobs the usual way.
- Click Open Parent Directory, which is located near the blob folder name. This will bring you to the upper level and show the list of blob folders in the current container.

- Creating a blob container.

- Uploading a file and creating a blob folder.

- Managing blobs in the blob folder.
It is very important to underline that deleting all blobs from a specific folder will also result in folder deletion. The reason is that a blob folder is just a logical grouping, not a physical location, so when you remove all blobs from a folder, this has no reason to exist anymore.
Adding Connected Services
Visual Studio 2015 and the Azure SDK 2.5.1 make it easier to connect to Azure-based services like Azure Mobile Services, Azure Storage, Office 365, and Salesforce. To understand the improvements, suppose you have an ASP.NET web application. In Solution Explorer, right-click the project name and select Add > Connected Service. The Add Connected Service dialog will show up, offering choices that you can see in Figure 85.
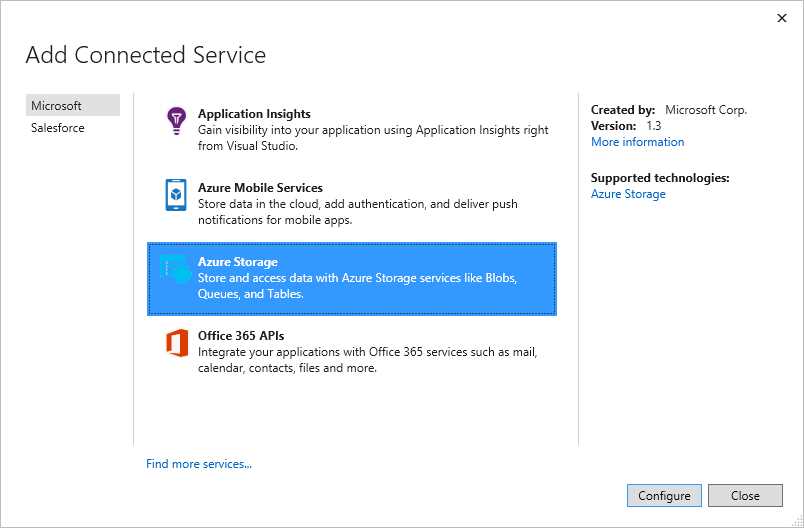
- Adding a Connected Service.
Say you want to connect to Azure Storage; select Azure Storage and click Configure. At this point you will be prompted to select one of your storage accounts in the Azure Storage dialog (see Figure 86), where you will also have an option to switch Microsoft accounts easily.
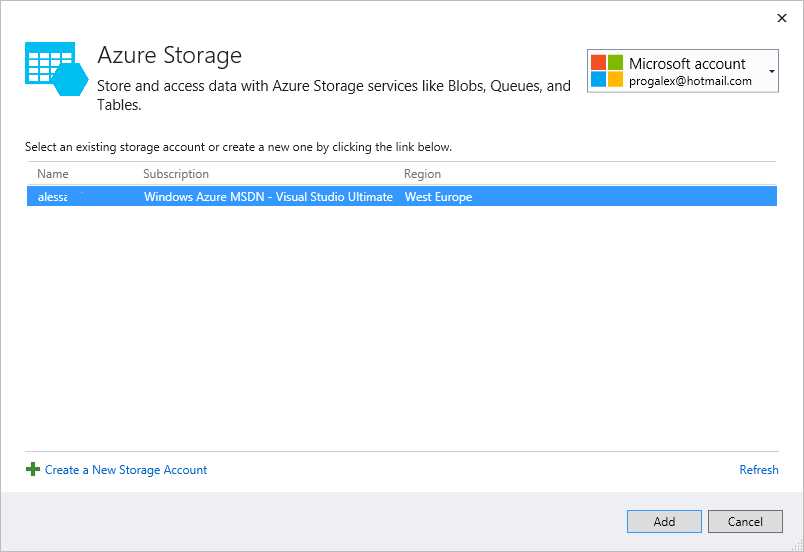
- Selecting a storage account.
When you click Add, Visual Studio will launch your default Web browser pointing to a “getting started” web page where you get guidance about the code that you need to interact with in the connected service of your choice. Figure 87 shows an example based on the current selection.

- Getting guidance about code you need in the current scenario.
Most importantly, Visual Studio 2015 automatically adds references to the necessary libraries invoking NuGet and the connection string in the Web.config file. This happens with any connected service you choose in the Add Connected Service dialog. Describing how each service works is impossible in this book, so this is left to your further studies. What it is important to underline here is how the new way of referencing services makes things faster and easier.
Code Analysis for Azure
The .NET Compiler Platform, formerly known as Project Roslyn, provides compilers with real-time code analysis and issue detection as you type. These capabilities were illustrated by examples in Chapter 3, with regard to Light Bulbs and Quick Actions. Microsoft has also created an additional rules set specifically for Azure, which analyzes issues in your code and suggests possible fixes. The code analysis for Azure is available as a NuGet package. That said, supposing you have an Azure project like a Web Role or a Worker Role, search for the Azure Code Analysis package as shown in Figure 88.
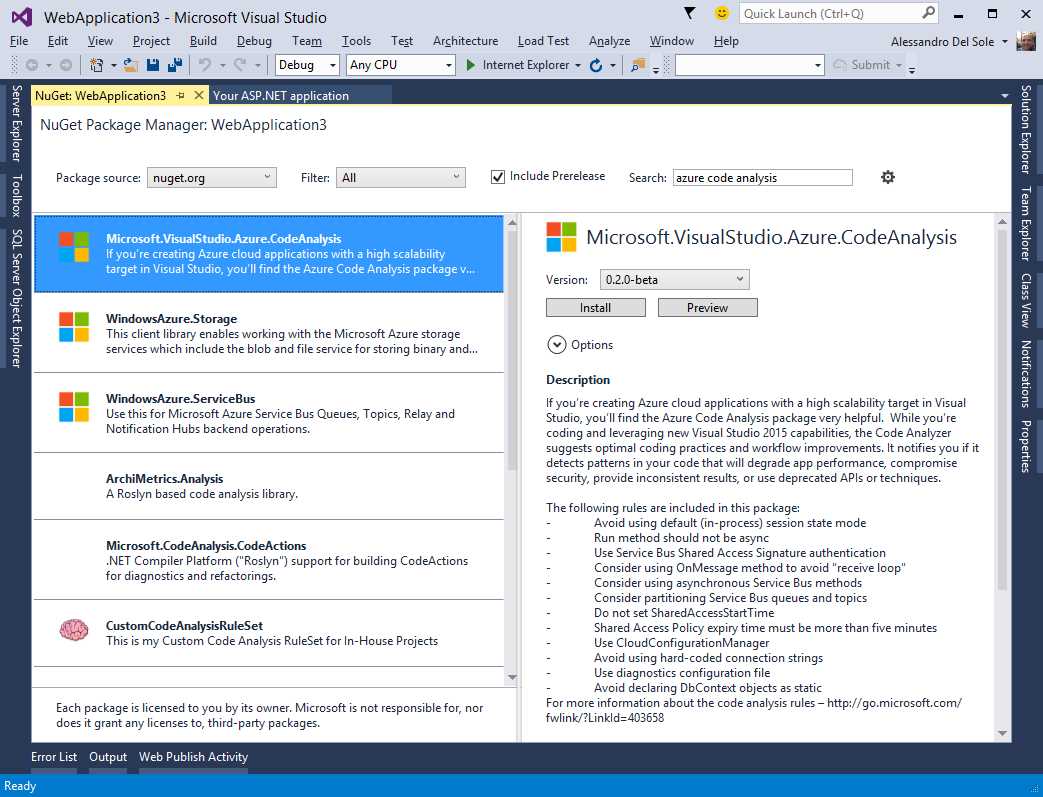
- Adding Azure Code Analysis to your projects.
When the package is installed, compilers are able to check for code compliance to the Azure rules and best practices in real time. For instance, Figure 89 shows an issue with the Run method in a Worker Role, which has been marked as async but is not compliant to the Azure rules; Figure 89 also shows the Light Bulb in action.
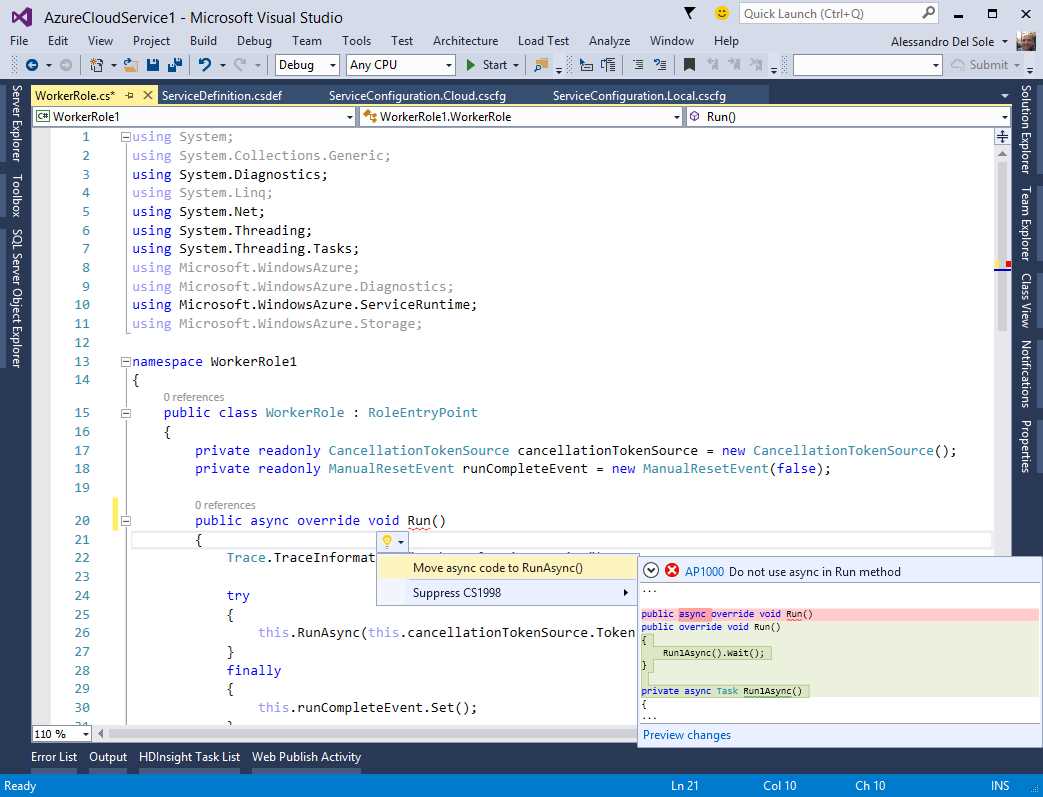
- Adding Azure Code Analysis to your projects.
The Azure Code Analysis is particularly useful when you build applications with a high-scalability target, because it suggests best practices and helps you write better and more efficient code.
HDInsight Support
The Azure SDK 2.5.1 and Visual Studio 2015 have support for HDInsight services for Big Data and for Hive to query datasets. Support is made of project templates (see Figure 90) including a Hive sample, which comes with some demo code, and a Server Explorer interaction with HDInsight items, exactly as you would do with any other subscription service.
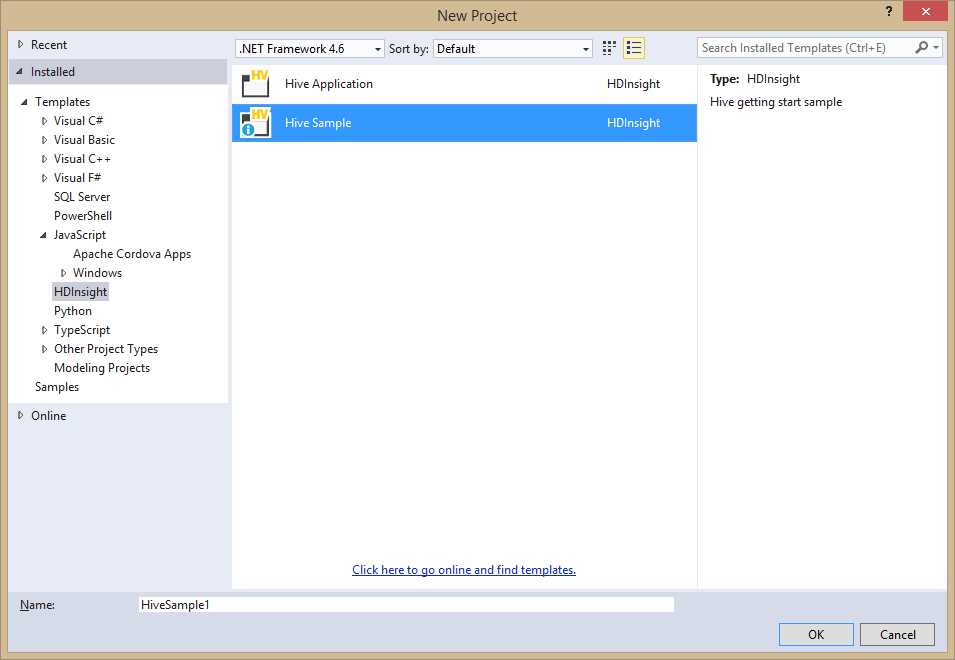
- Creating Hive projects with HDInsight support.
The Hive Sample template (see Figure 90) gives you an idea of how HDInsight works. If you double-click a template to create a sample project, you will see how Visual Studio generates two .hql files, each containing specific SQL queries against Azure Websites (WebLogAnalysis.hql) and devices’ sensors (SensorDataAnalysis.hql) respectively. The following listing reproduces the sample code for WebLogAnalysis.hql. Notice that the comments explain how each code snippet works and how the code is made of familiar syntax nodes based on SQL.
--Part 1: Introduction -- In this sample you will use an HDInsight query that analyzes website log files -- to get insight into how customers use the website. With this analysis, you can see -- the frequency of visits to the website in a day from external websites, and a -- summary of website errors that the users experience. -- In this tutorial, you'll learn how to use HDInsight to: -- *Connect to an Azure Storage Blob containing website log files. -- *Create Hive tables to query those logs. -- *Create Hive queries to analyze the data. --Part 2: Prerequisites -- The script here is only for your reference. You need to log in to -- https://yourclusteraddress.azurehdinsight.net/ in order to trigger the HDInsight -- service to load the sample data. -- For clusters provisioned before 10/15/2014, go to -- http://azure.microsoft.com/en-us/documentation/services/hdinsight/ for more details -- since those clusters do not have the sample data installed. --Part 3: Website Log Data Loaded into Windows Azure Storage Blob -- The data stored in Windows Azure Storage Blob can be accessed by expanding a -- HDInsight cluster and double-clicking the default container of your default storage -- account. The data for this sample can be found under the -- /HdiSamples/WebsiteLogSampleData/SampleLog path in your default container. --Part 4: Creating Hive table to Query Website Log Data -- The following Hive statement creates an external table that allows Hive to query -- data stored in Azure Blob Storage. External tables preserve the data in the original -- file format, while allowing Hive to perform queries against the data within the file. -- The Hive statement below creates a new table, named weblogs, by describing the -- fields within the files, the delimiter between fields, and the location of the file -- in Azure Blob Storage. In the Creating Hive Queries to Analyze Data section of this -- tutorial, you will perform queries on the data stored in this table. -- You could also create a table by right-clicking on a database and selecting -- "Create Table". We will provide you with a UI to help you to create this table. DROP TABLE IF EXISTS weblogs; -- Create table weblogs on space-delimited website log data. -- In this sample we will use the default container. You could also use -- 'wasb://[container]@[storage account].blob.core.windows.net/Path/To/Data/' to access -- the data in other containers. CREATE EXTERNAL TABLE IF NOT EXISTS weblogs(s_date date, s_time string, s_sitename string, cs_method string, cs_uristem string, cs_uriquery string, s_port int, cs_username string, c_ip string, cs_useragent string, cs_cookie string, cs_referer string, cs_host string, sc_status int, sc_substatus int, sc_win32status int, sc_bytes int, cs_bytes int, s_timetaken int ) ROW FORMAT DELIMITED FIELDS TERMINATED BY ' ' STORED AS TEXTFILE LOCATION '/HdiSamples/WebsiteLogSampleData/SampleLog/' TBLPROPERTIES ('skip.header.line.count'='2'); -- The following HIVE queries create two new tables based on the queries run on the -- weblogs table. The new tables are called clienterrors and refersperday. -- The query for clienterrors extracts data from the weblogs table for HTTP status -- codes between 400 and 500, and groups them by the users facing those errors and the -- type of error codes. The range of status code between 400 and 500, represented by -- sc_status column in the weblogs table, corresponds to the errors clients get while -- accessing the website. The extracted data is then sorted on the number of -- occurrences of each error code and written to the clienterrors table. -- The query for refersperday extracts data from the weblogs table for all external -- websites referencing this website. The external website information is extracted -- from the cs_referer column of the weblogs table. To make sure the referring links did -- not encounter an error, the table only shows data for pages that returned an HTTP -- status code between 200 and 300. The extracted data is then written to the -- refersperday table. DROP TABLE IF EXISTS ClientErrors; -- Create table ClientErrors for storing errors users experienced and their frequencies. CREATE EXTERNAL TABLE ClientErrors(sc_status int, cs_referer string, cs_page string, cnt int) ROW FORMAT DELIMITED FIELDS TERMINATED BY ','; -- Populate table ClientErrors with data from table weblogs. INSERT OVERWRITE TABLE ClientErrors SELECT sc_status, cs_referer, concat(cs_uristem,'?', regexp_replace(cs_uriquery,'X-ARR-LOG-ID=[0-9a-f]{8}-[0-9a-f]{4}-[0-9a-f]{4}-[0-9a-f]{4}-[0-9a-f]{12}','')) cs_page, count(distinct c_ip) as cnt FROM weblogs WHERE sc_status >=400 and sc_status < 500 GROUP BY sc_status, cs_referer, concat(cs_uristem,'?', regexp_replace(cs_uriquery,'X-ARR-LOG-ID=[0-9a-f]{8}-[0-9a-f]{4}-[0-9a-f]{4}-[0-9a-f]{4}-[0-9a-f]{12}','')) ORDER BY cnt; DROP TABLE IF EXISTS RefersPerDay; -- Create table RefersPerDay for storing references from external websites. CREATE EXTERNAL TABLE IF NOT EXISTS RefersPerDay(year int, month int, day int, cs_referer string, cnt int) ROW FORMAT DELIMITED FIELDS TERMINATED BY ','; -- Populate table RefersPerDay with data from the weblogs table. INSERT OVERWRITE TABLE RefersPerDay SELECT year(s_date), month(s_date), day(s_date), cs_referer, count(distinct c_ip) as cnt FROM weblogs WHERE sc_status >=200 and sc_status <300 GROUP BY s_date, cs_referer ORDER BY cnt desc; --Part 6: Executing Queries and Viewing the Results -- Select Submit/Submit(Advanced) in the HDInsight toolbar to execute the queries. You -- can also use Alt+Shift+S for a quick submission. After submitting the job, you can -- view details by right-clicking on the cluster and selecting "View Hive Jobs". -- You can also expand the Hive databases and right-click on the tables you just created, select "View Top 100 Rows" and sample the table you just created. |
Of course, you will need to replace sample web site names with yours, and to adjust the code based on your services and needs, but it is a nice example to understand the purpose of HDInsight.
Introducing WebJobs
Azure WebJobs provides the ability to run programs, such as .exe and .cmd files, on Azure web sites. You may have many reasons to run a program, such as executing background tasks, CPU-Intensive work, image processing when uploading blobs, RSS aggregation, and others. To make WebJobs programming easier, Microsoft also released a WebJobs SDK, which provides a simplified framework that minimizes your effort and reduces the amount of code you need to write. The Azure SDK 2.5.1 for Visual Studio 2015 provides support to the IDE in several ways. First, you have project templates. The Cloud node of the New Project dialog contains a project template called Azure WebJob, as shown in Figure 91.
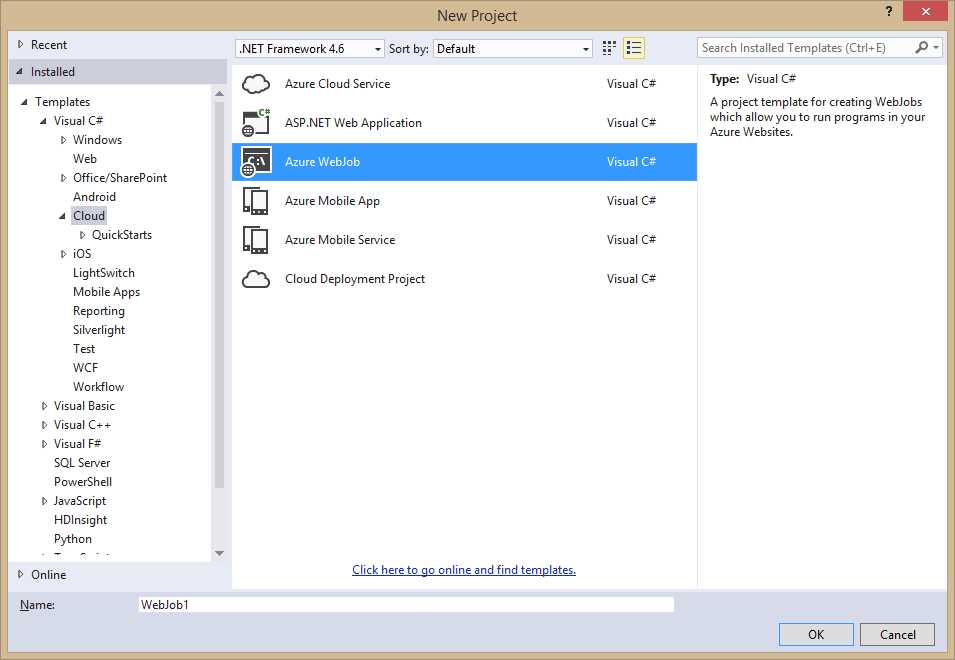
- Azure WebJob project template.
However, this is the most basic project template and provides no code. Instead, you can use the Azure Quick Starts to get started with the SDK examples; Figure 92 shows WebJobs Quick Starts.
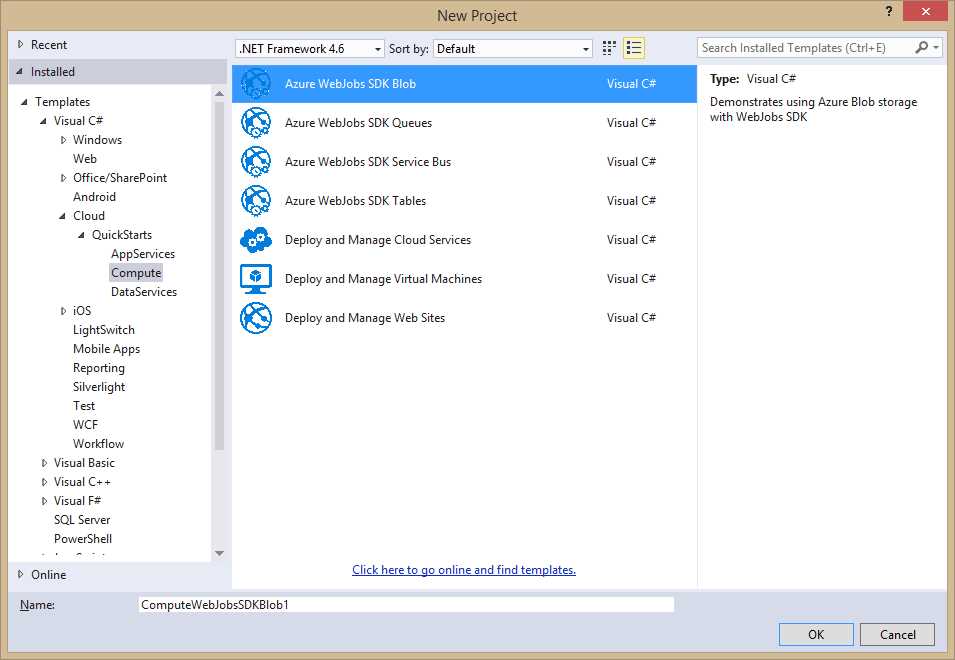
- Azure WebJobs Quick Starts from the SDK.
For instance, the Azure WebJobs SDK Blob template demonstrates how to use the Azure Blob storage with WebJobs. More specifically, this example demonstrates how to read/write objects in a queue and how to write information into a text file. As you can see from Figure 92, similar examples are available for other Azure services. In order to publish WebJobs to an Azure Website, you right-click the project name in Solution Explorer and select Publish as Azure WebJob. At this point the Add Azure WebJob dialog appears (see Figure 93) and allows specifying information such as the name, run mode (Run Continuously, Run on a Schedule, Run on Demand), plus starting and end time in case your WebJob represents a recurring operation.
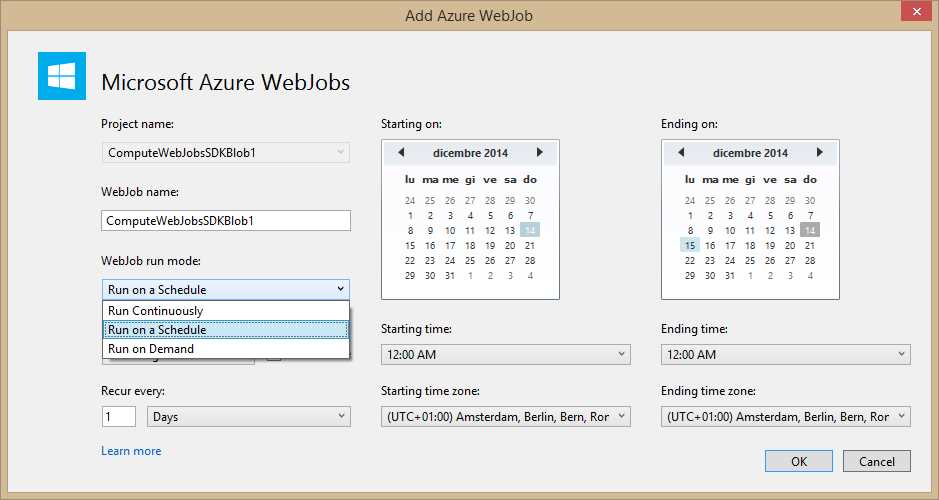
- Azure WebJobs Quick Starts from the SDK.
When the WebJob is published to Azure, Server Explorer will allow the following:
- Show a WebJobs node under the related web site name.
- Attach the debugger for remote debugging to the specified WebJob.
- Start and stop WebJobs.
All of these interactions have been made possible due to the WebJobs SDK, which not only simplifies the amount of code you write, but also makes it easier to work with WebJobs via visual tooling.
Chapter Summary
This chapter explained some key features in Visual Studio 2015 for web and cloud development. In the first part, you learned about new project templates that enable developers to target the ASP.NET 5.0 Core runtime. You then learned how templates are organized into a new project system, with new project files, new JSON files for configuration, and an easier package management that allows this kind of applications running cross-platform and using only the needed packages via NuGet. In the second part of the chapter, you became familiar with new tooling for Microsoft Azure, such as Quick Starts project templates and support for multiple Microsoft Accounts to easily connect to cloud resources from Server Explorer. You learned how Visual Studio 2015 allows managing Blob folders and how it simplifies the way you add connected services to your projects. You learned about the Code Analysis for Azure package, which provides real-time code analysis and appropriate suggestions to possible code issues. Finally, you learned how to interact with HDInsight services for Big Data and how to run background programs on your web sites via WebJobs.
- 1800+ high-performance UI components.
- Includes popular controls such as Grid, Chart, Scheduler, and more.
- 24x5 unlimited support by developers.