
Visual Studio 2015 Succinctly®

CHAPTER 7
Managing NuGet Packages
NuGet is the package manager for Microsoft Visual Studio. With NuGet, you can easily search for libraries that your application might need. The IDE tooling for NuGet automatically downloads packages to your solution, adds references, and resolves all the required dependencies. NuGet is also a huge repository of libraries that you can consume, but you can also publish your own libraries to NuGet that other developers can use in their projects. NuGet has been around for a few years, starting as a stand-alone project and then becoming a fundamental part of Visual Studio 2012. For Microsoft, NuGet is so important that many libraries are available only via NuGet, such as the Entity Framework or the ASP.NET 5 composable stack. More precisely, in .NET Core 5 all required libraries come from NuGet and the IDE no longer adds references to any library from the .NET Framework. Visual Studio 2015 enhances support for NuGet, making it an even better tool.
A New NuGet
Visual Studio 2015 offers a revisited NuGet experience. Now the NuGet tools appear inside a dockable tool window with a non-modal and non-blocking approach. To understand the new NuGet, suppose you have a WPF project and that you want to install the Entity Framework libraries. In Visual Studio 2015, you access NuGet tools by selecting Tools > NuGet Package Manager > Manage NuGet Packages for Solution or by right-clicking the project name in Solution Explorer and selecting Manage NuGet Packages. The NuGet window appears as represented in Figure 61.

- The new NuGet window.
As you can see, you no longer have a modal dialog; instead, you are free to switch between tool windows and code editor windows. The left side of the window shows the list of available packages, based on the Package source, Filter, and Include Prerelease boxes. The Package source box allows selecting the online repository through which to search for packages. The default value is nuget.org, while other available options are Microsoft and .NET and preview.nuget.org; the later option specifically searches for preview releases. The Filter box filters the list of packages in case you want to see All packages (default value), Installed packages, and packages with an Update available. You can easily search packages by keyword via the Search text box. On the right side of the window, you get detailed information about the selected package (see Figure 61). You get information like the package description, author, license, and downloads number, but also you have an option of choosing among multiple versions. If your package has dependencies on other libraries, then these are also listed at the bottom of the window. It is also interesting how you can specify what action to take in case of file conflict (Prompt, Ignore all, Overwrite all). When ready, simply click Install. Accept any license agreement required by the package owner and wait for a few seconds in order to get the packages installed. If the installation succeeds, Visual Studio shows a green check box near the package name, as shown in Figure 62.

- Package installation succeeded.
Tip: Except for the license agreement acceptance, which is a modal dialog, the NuGet window never blocks the UI, so you can switch to other windows, including the code editor, while installing packages.
You will be able to see the downloaded packages in the References node for your project in Solution Explorer. A nice addition to NuGet support in Visual Studio 2015 is the option to see a dependency graph for packages. Select Tools > NuGet Package Manager > Package Visualizer to get a visual representation for installed packages and their dependencies. Figure 63 shows an example in which you have a main project with two packages installed and one package has dependencies on the other one.
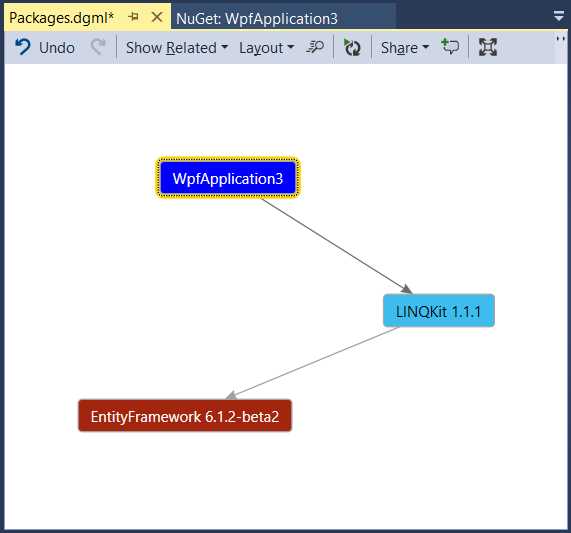
- Package Visualizer.
The dependency graph is based on the Code Map tooling, which was introduced into the IDE in Visual Studio 2012 and enhanced in Visual Studio 2013. It inherits all of its features, such as exporting the graph to image, grouping items, choosing different colors, adding comments, and so on.
Setting NuGet Preferences
The new NuGet window has as shortcut near the Search box (see Figure 61) to invoke the Options dialog for NuGet. Of course, you can still use Tools > NuGet Package Manager > Package Manager Settings to open NuGet settings. Without a doubt, the most interesting option is that you can specify additional package sources, which also means that you can create your NuGet-based repository. Figure 64 shows the Package Sources options.

- Package Sources options.
While you cannot edit the Machine-wide package sources contents, which typically points to packages of the .NET Framework, you can definitely add custom sources by clicking the green + symbol. The Name and Source text boxes will be enabled, accepting a friendly name for your repository and the URL. It is important to mention that you can also specify a local folder on your machine, not just an online repository.
Note: In case you are interested in creating custom NuGet packages and repositories, the NuGet foundation has specific documentation.
Chapter Summary
In this chapter, you saw how NuGet tooling has been revisited in order to be non-blocking when managing packages in your solution. You also saw how to create dependency graphs for your packages and how to specify additional settings. It is important to remember that NuGet tools are actually offered by a Visual Studio extension, and Microsoft provides updates for this extension very often.
- 1800+ high-performance UI components.
- Includes popular controls such as Grid, Chart, Scheduler, and more.
- 24x5 unlimited support by developers.