
Visual Studio 2015 Succinctly®

CHAPTER 3
Code Editor Improvements
Continuing to the same goal of Visual Studio 2013, Microsoft has made additional, important improvements to a fundamental area of the IDE: the code editor. This chapter describes new features in the so-called code-focused IDE experience, which brings productivity to the maximum and really helps for writing high-quality, fast, and efficient code.
Note: Except where explicitly stated, all the new features described in this chapter apply to both C# and Visual Basic.
Touch Gestures
The code editor has been enhanced to support common gestures on touch screens. Touch already worked in previous versions but the IDE was not optimized; touch support was only available previously because of hardware capabilities. In Visual Studio 2015, you can:
- Double-tap a word or an identifier to select it.
- Press and hold on screen to open the context menu.
- Tap the margin of the code editor to select the corresponding line of code.
- Tap and hold anywhere on the code editor’s surface to scroll up and down.
- “Pinch and zoom” to zoom in and out with two fingers.
You will find these features very useful if you use Visual Studio 2015 on touch-enabled devices such as tablets or laptops.
Colorized Tooltips
The code editor automatically creates collapsible regions for many language constructs, such as (but not limited to) class definitions, structure definitions, and method bodies. Starting from Visual Studio 2013, when a region is collapsed, you can get a preview of the full code by passing the mouse pointer over the collapsed construct. Visual Studio 2015 provides an enhanced experience providing colorized tooltips and the full object or member declaration, as shown in Figure 19.

- Colorized Tooltips.
This is much better if compared to Visual Studio 2013, where you do not have the object/member declaration and the tooltip’s color is only black.
Light Bulbs and Quick Actions
As you might know, in Visual Studio 2015 and .NET Framework 4.6, the managed compilers have been completely rewritten, released as an open source project, and brought to the development experience by the .NET Compiler Platform (formerly known as Project Roslyn).
Note: Talking about the .NET Compiler Platform is out of the scope of this book. You can get specific information and learn how to create custom code analyzers at Roslyn.
Among the other benefits, compilers expose APIs, have even better integration with the code editor and the rest of the IDE, and they provide full, real-time, static code analysis to find issues and provide suggestions as you type. Improvements center primarily on redundant code, finding and fixing errors as you type, and refactoring code.
When Visual Studio 2015 detects redundant code, errors, or code that should be refactored, it shows the Light Bulb. The Light Bulb is a container of actions, called Quick Actions, which you can take to solve a particular problem. Figure 20 shows an example of the Light Bulb and the available actions when you invoke a method that has not been declared in your code.
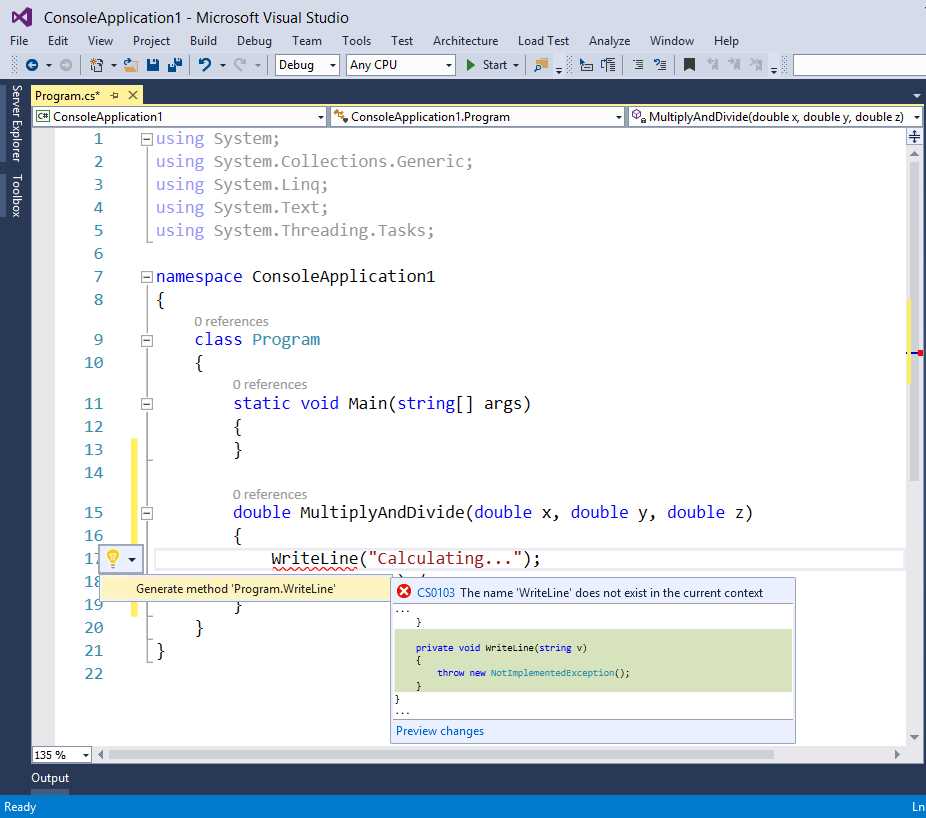
- The Light Bulb provides quick actions to suggest fixes for errors or to refactor your code.
Usually the Light Bulb appears automatically when you place the cursor on a piece of code that needs some fixes or when you hover over error squiggles; however, you can manually enable the Light Bulb by pressing CTRL + <Period>. You got just a quick introduction about the Light Bulb and Quick Actions, but in the next paragraphs you will learn more about this powerful new feature.
Finding and Fixing Redundant Code
Live static code analysis is able to detect redundant code such as unused using directives (Imports for Visual Basic) or unneeded object invocations. Redundant code is grayed out so that you can easily see it in your code. Figure 21 shows an example of redundant code, made of unused using directives and of the this object invocation.
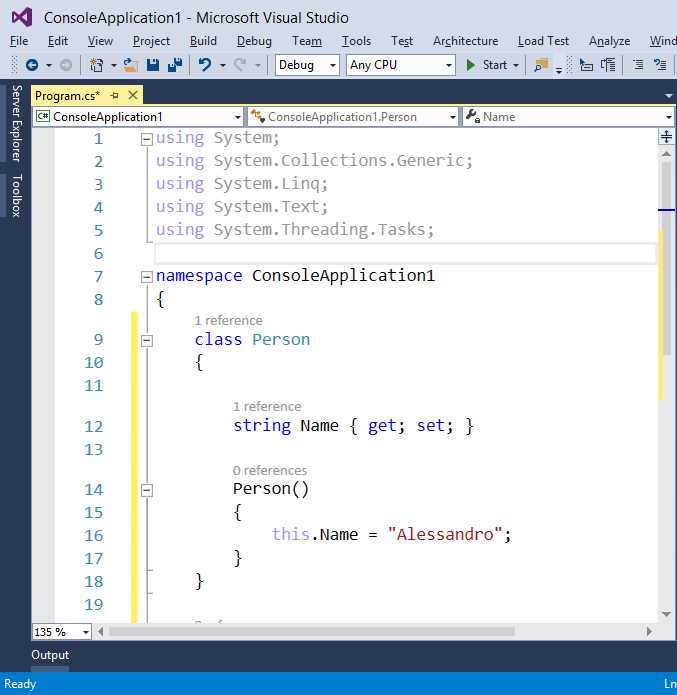
- Detecting redundant code.
If you click one of the using directives, the Light Bulb appears. You can expand it and see how Visual Studio suggests a quick action for removing unnecessary directives by highlighting in red the code that will be removed (see Figure 22).
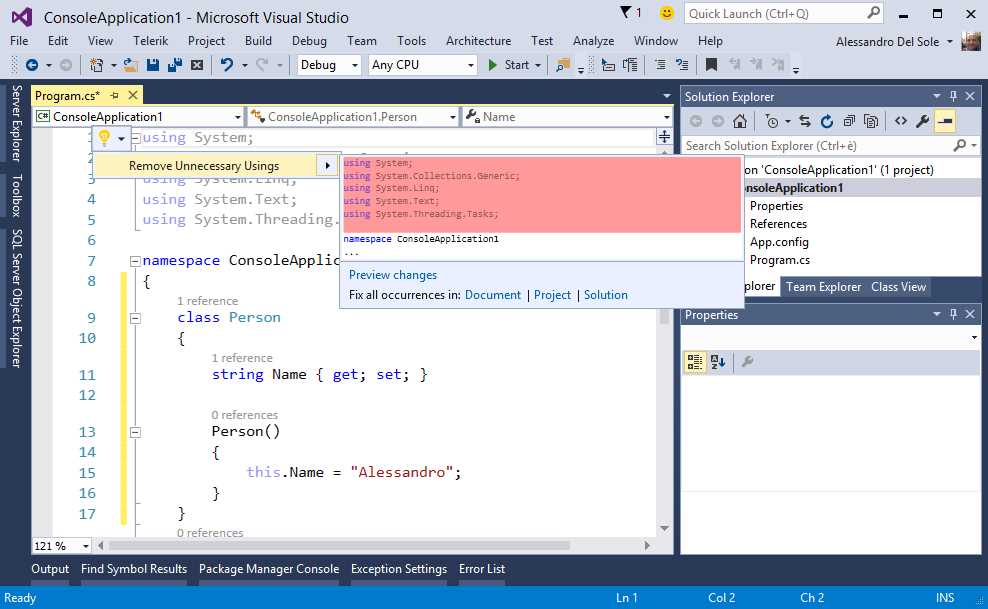
- The Light Bulb suggests removing unnecessary code.
You can also apply these changes to the current project or to the entire solution, not just the current code file. As you can also see, you have the option of previewing changes. This is explained in more detail in the next paragraph. For now, click the Remove Unnecessary Using suggestions and see how the IDE removes the redundant using directives. You can also repeat the same steps on the this object.
Tip: The option for removing unnecessary using is also available by right-clicking in the code editor, navigating to Organize Usings, and selecting Remove Unnecessary Usings. In Visual Basic, the same option is available under Organize Imports > Remove Unnecessary Imports.
Fixing Errors
Live static code analysis and Light Bulbs make it easier to detect and fix errors as you type. For example, consider the class definition shown in Figure 23.
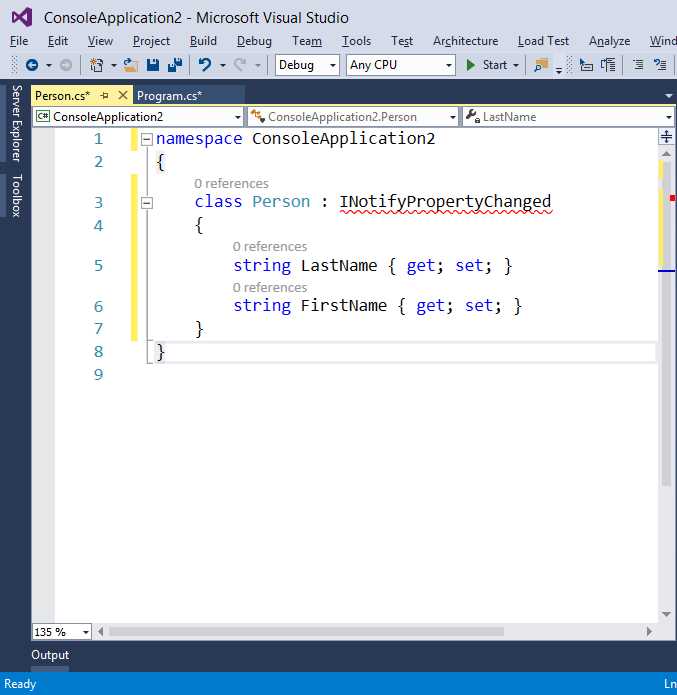
- A sample class with errors.
The code has several errors, in that it is missing a using System.ComponentModel directive and the class does not actually implement the INotifyPropertyChanged interface, as highlighted by the error squiggle.
Tip: In Visual Studio 2015, you no longer need to place the cursor outside a line of code to get error squiggles. In fact, the new live static code analysis will show them immediately.
You can use the Light Bulb to fix errors. In this case, the Light Bulb first suggests quick actions to resolve the INotifyPropertyChanged interface, as shown in Figure 24.
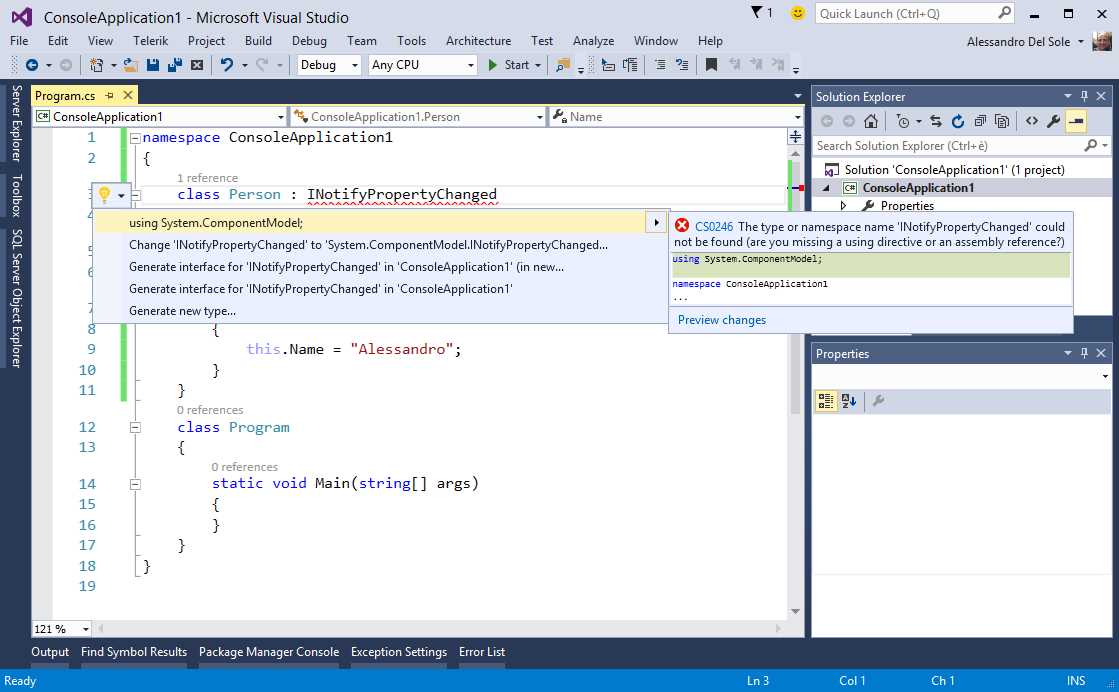
- Quick Actions for a missing namespace.
A tooltip provides a detailed description about the error message and shows a preview of changes in the code when you hover over one of the suggested quick actions. A good option at this point is adding a using directive; select the first solution to do it. At this point, the compiler detects that the class is not implementing the interface yet, so the Light Bulb provides specific quick actions to fix this error, as demonstrated in Figure 25.
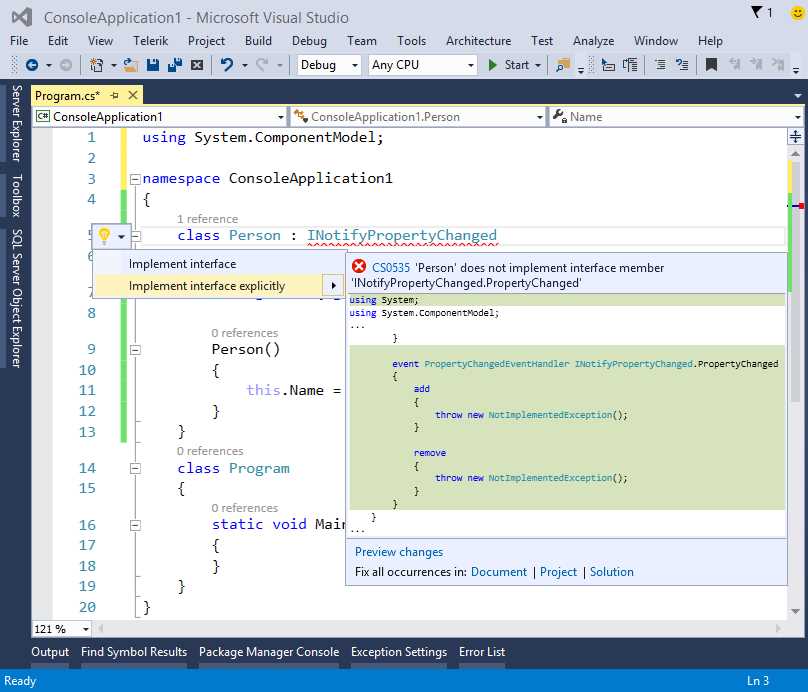
- Quick Actions for a not implemented interface.
Suppose you want to implement the interface implicitly; select the first solution (Implement interface) and in the preview click the Preview changes hyperlink. At this point, the Preview Changes dialog appears, showing one or more code files where the change is going to be applied and a full preview of the code with changes. These changes are highlighted so that you can immediately have a look, as demonstrated in Figure 26.
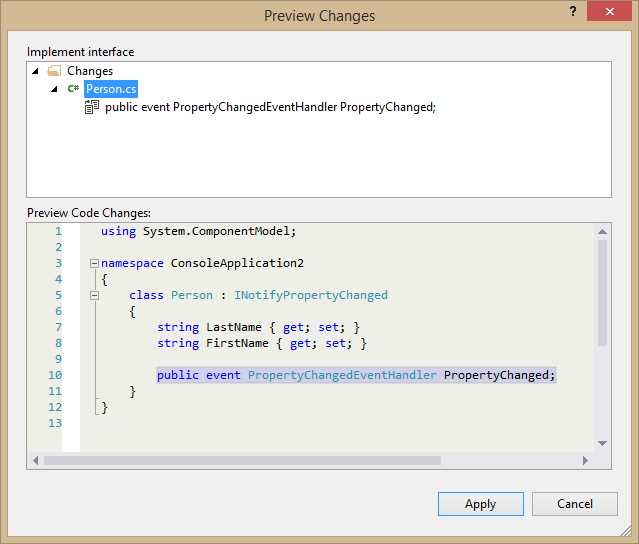
- Previewing changes before making edits.
If you are fine with the changes, simply click Apply or, if you want to choose a different quick action, click Cancel. Compilers are intelligent enough to suggest additional solutions based on the object you are going to use. For instance, if you want an object to implement the IDisposable interface, the Light Bulb will show additional quick actions specific to the Dispose pattern, as represented in Figure 27.
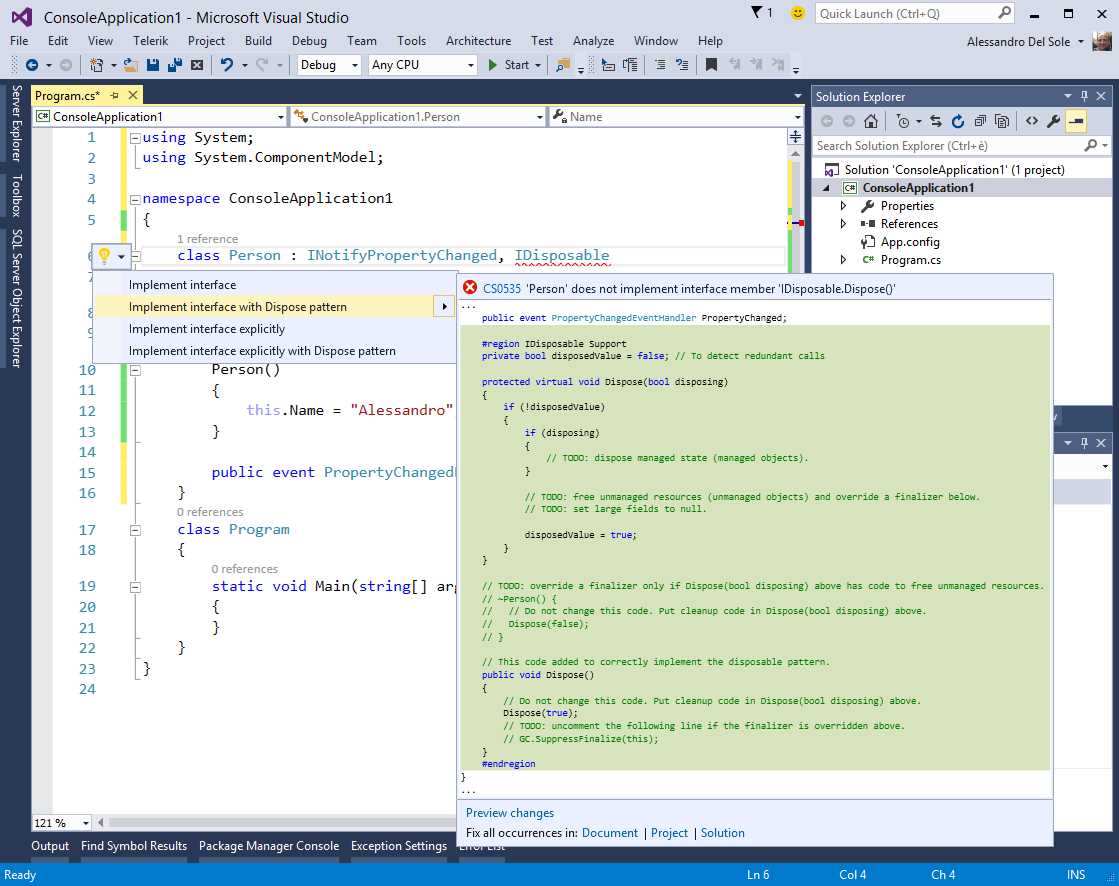
- Quick Actions suggesting different ways to implement a pattern.
Light Bulbs and Quick Actions are very powerful, not only because they help you fix errors quickly, but also because they usually provide the most appropriate solutions for the current context.
Applying Refactorings
Refactoring is a technique for rewriting pieces of code in a more efficient and cleaner way, while keeping the existing code behavior and results. During the years, Visual Studio has been offering built-in support to certain refactoring techniques for C#, while Visual Basic developers had to use third-party IDE extensions. In Visual Studio 2015, refactoring has been dramatically enhanced in several ways. Refactoring techniques are now part of the Light Bulb’s quick actions; in addition, new features have been added, and finally Visual Basic has support for refactoring. You’ll learn more about this in the next few paragraphs.
Extract Method
Consider the following code, which simply calculates the area of a circle, given the radius.
static void Main(string[] args) { double radius = 4; double circleArea = radius * radius * Math.PI; Console.WriteLine(circleArea); Console.ReadLine(); } |
The math operation happens inside a method, but it would be useful to separate the logic and make that code reusable. If you select the first two lines of the method body and enable the Light Bulb by pressing CTRL+<Period>, you will see an option called Extract Method, as shown in Figure 28.
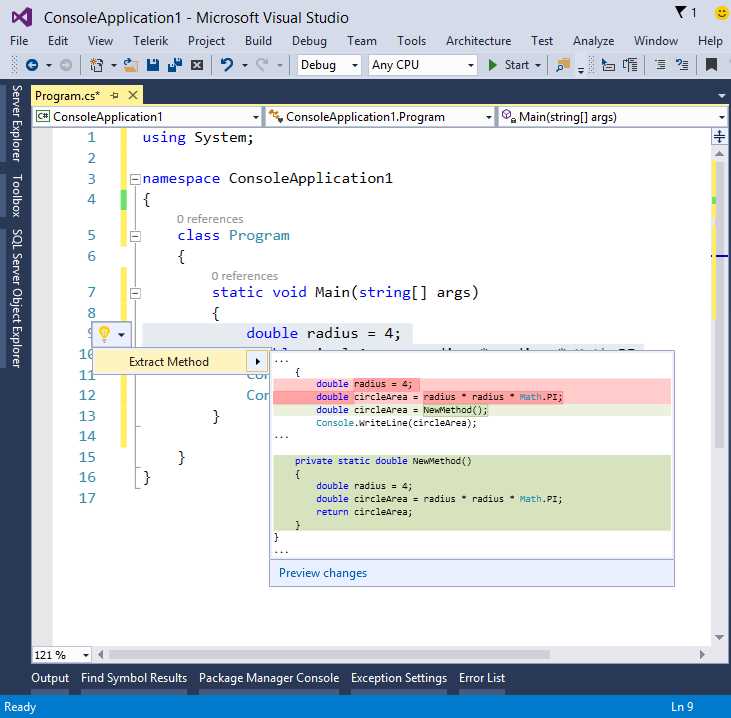
- Quick Actions suggesting to extract a new method.
As usual, you will get an inline preview of changes and you can click the Preview Changes hyperlink for a more detailed view. If you click Extract Method, Visual Studio will change your code to the following:
static void Main(string[] args) { double circleArea = NewMethod(); Console.WriteLine(circleArea); Console.ReadLine(); } private static double NewMethod() { double radius = 4; double circleArea = radius * radius * Math.PI; return circleArea; } |
Not only the code is organized better, but also the new method is reusable. Of course, the best option would be making the new method accept an argument and use this instead of hard-coding the radius variable value. When the new method is generated, you can replace the green-highlighted default name; this is accomplished via a new feature called Inline Rename, which deserves some more detailed information.
Tip: In C#, Extract Method refactoring is still available in the context menu under Refactorings.
Inline Rename
One of the most common tasks while writing code is renaming identifiers, such as method or variable names. In the past, you could simply right-click the identifier, select Rename, and rename the identifier inside a modal dialog. In C#, you can also do this by pressing Ctrl + R to rename the variable or method the cursor is on. This feature has been completely redesigned in Visual Studio 2015: when you right-click an identifier and select Rename, you can rename directly inside the code editor and the changes are reflected to all the other occurrences of the identifier. With this approach, you never lose focus on your code. In addition, you can automatically rename occurrences inside comments and in string literals. Continuing the previous example based on the Extract Method refactoring, Figure 29 shows how Visual Studio 2015 allows you to rename a newly generated method.
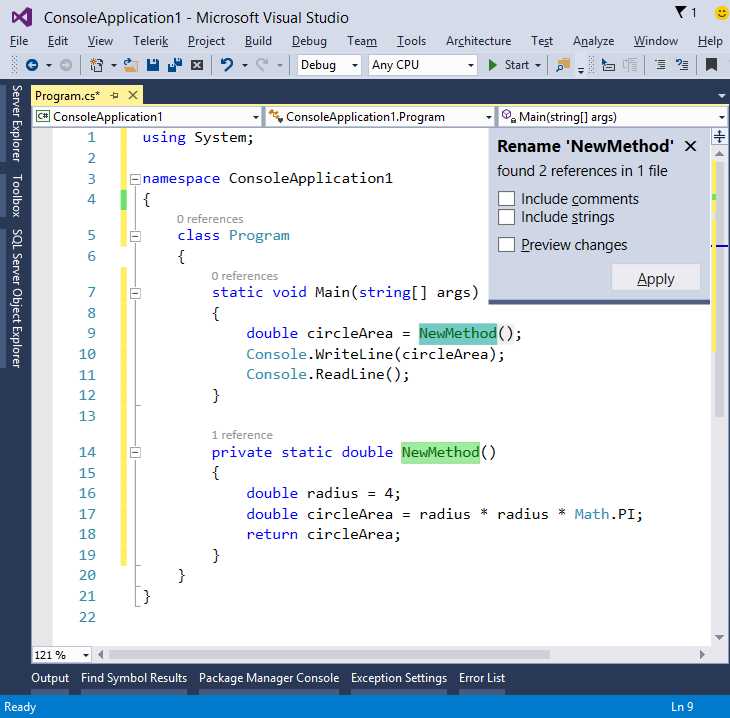
- Renaming an object with the new Inline Rename.
A non-modal popup at the upper-right corner shows how many occurrences of the identifier the IDE found and the total number of code files containing the identifier. To rename an object, simply type the new name over one of the highlighted occurrences. Changes will be immediately reflected to all other occurrences. If you are satisfied with changes, click Apply, otherwise just close the popup or press ESC. Notice that you can still preview changes as you did with when fixing errors (see the Fixing Errors section earlier in this chapter). The good news is that you can automatically rename occurrences inside comments and string literals. Figure 30 shows the same code extended with a comment and a string literal within a Console.WriteLine statement.
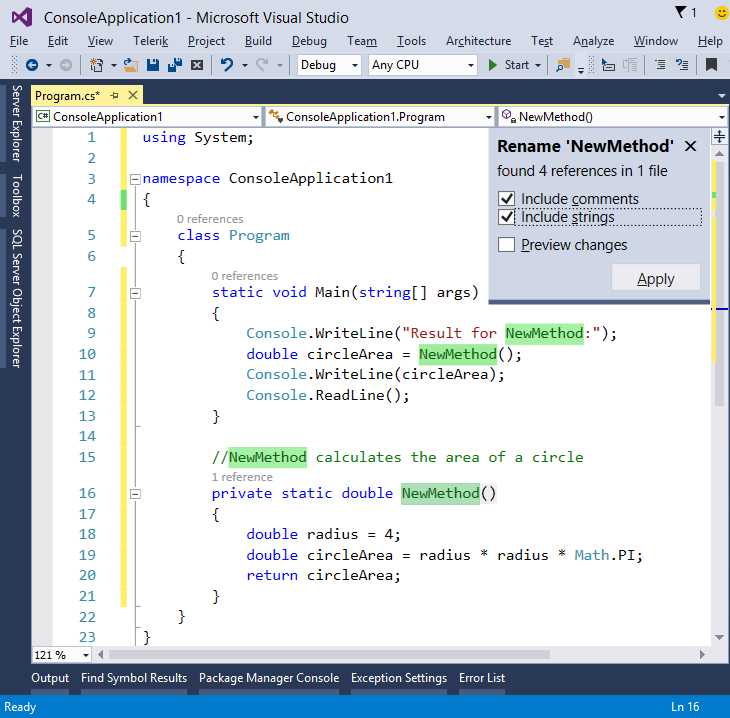
- Inline Rename can replace occurrences inside comments and string literals.
If you select both the Include comments and Include strings option in the Rename box, you will see how occurrences of the identifier in comments and string literals are automatically selected. If you type a new name and click Apply, all the occurrences will be replaced, as demonstrated in Figure 31 which shows how the NewMethod identifier has been renamed into CalculateCircleArea.
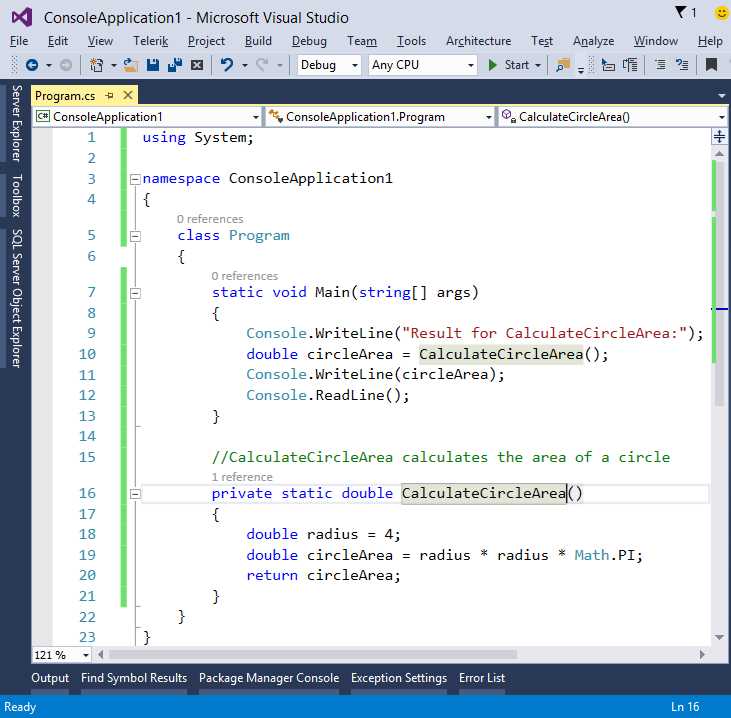
- All occurrences of an identifier renamed with Inline Rename.
Inline Rename is another helpful feature that will help you save a lot of time when refactoring your code.
Introduce Constant and Introduce Local Constant
The Introduce Constant and Introduce Local Constant refactoring techniques allow replacing hard-coded values with constants; these can be at the class level or within method bodies. For example, consider the following code.
class Program { static void Main(string[] args) { double circleArea = CalculateCircleArea(4.2); } private static double CalculateCircleArea(double radius) { double circleArea = radius * radius * Math.PI; return circleArea; } } |
This is very simple code: the CalculateCircleArea method returns to the caller the area of a circle, given the radius, which is passed as an argument. The Main method invokes CalculateCircleArea passing a value. If you now select 4.2 and enable the Light Bulb, you will see four options:
- Introduce constant for ‘4.2’,
- Introduce constant for all occurrences of ‘4.2’ (see Figure 32)
- Introduce local constant for ‘4.2’
- Introduce local constant for all occurrences of ‘4.2’ (see Figure 33)
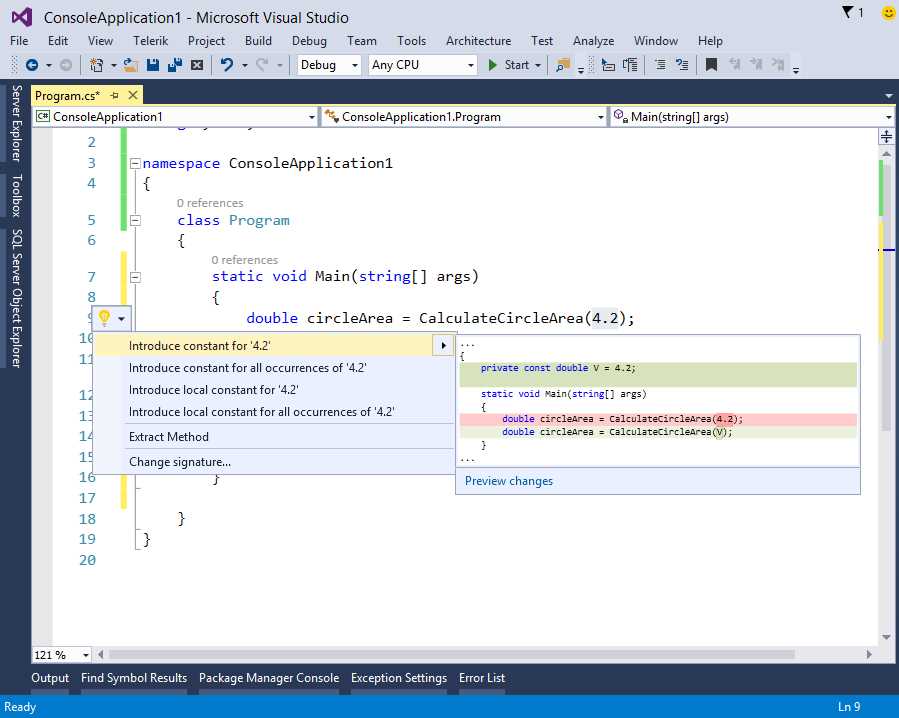
- Introducing a constant at the class level.
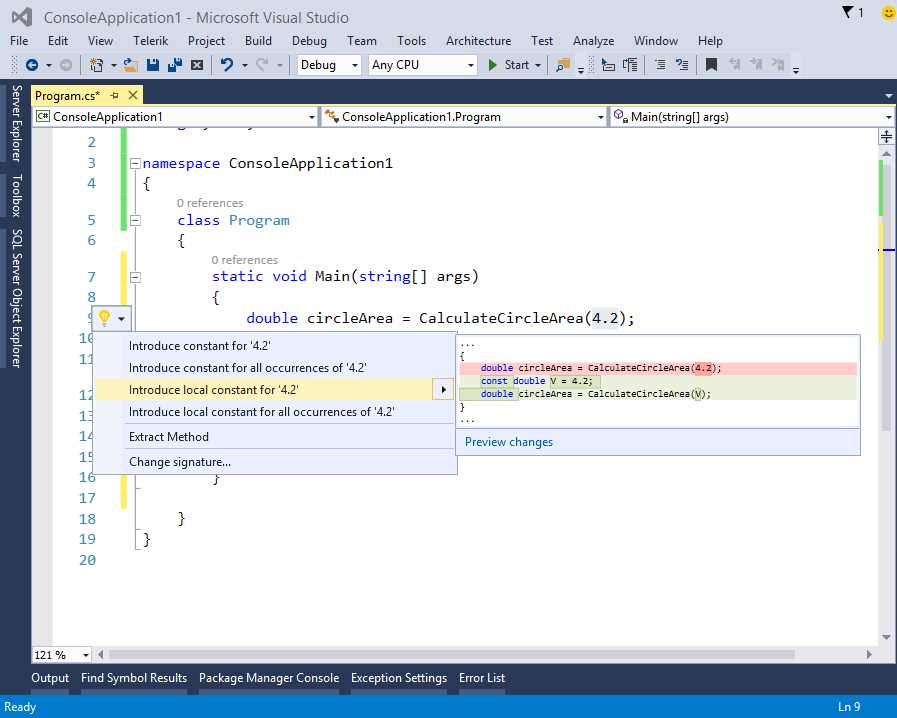
- Introducing a local constant into the method body.
The first two options will introduce a constant declaration at the class level, assigning 4.2 as the value; in particular, the second option will do the same for all occurrences (if any other) of 4.2 in the code. The other option will instead introduce a local constant into the method body, for the current occurrence or for all occurrences respectively. Whatever option you choose, Visual Studio will apply the change and will enable Inline Rename to give you an opportunity of choosing a different identifier, as represented in Figure 34, which shows both the applied constant and the Inline Rename in action.

- Applying and renaming a constant.
Inline Temporary Variable
Inline Temporary Variable is a new refactoring technique that allows simplifying your code by removing unnecessary variable declarations. To understand how it works, consider the CalculateCircleArea method described in the previous paragraph. If you select the circleArea variable in the method body and then enable the Light Bulb, Visual Studio will show a simplified solution, as represented in Figure 35.
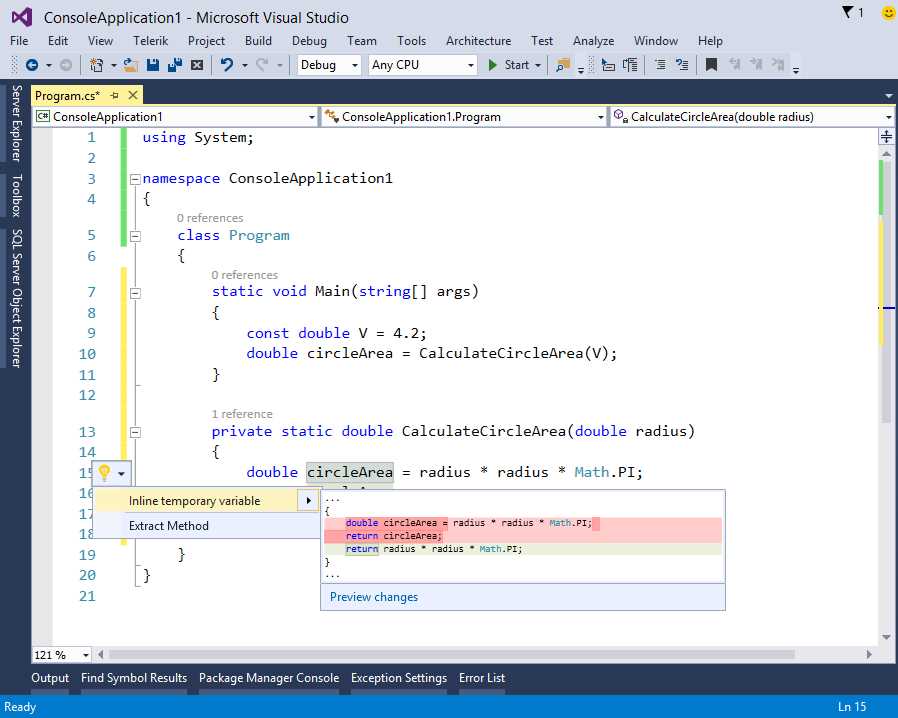
- Inline Temporary Variable.
In the preview, Visual Studio highlights in red the current code and then shows the new result below. Applying this quick action results in the following code.
private static double CalculateCircleArea(double radius) { return radius * radius * Math.PI; } |
This code is certainly simpler and more readable.
Introduce Local
Introduce Local is a new refactoring technique that simplifies complex expressions by introducing local variables. As an example, consider the following code.
private static double CalculateCircleArea(object radius) { double circleArea = Convert.ToDouble(radius) * Convert.ToDouble(radius) * Math.PI; return circleArea; } |
This new version of the CalculateCircleArea method takes an argument of type object, and then performs the same conversion twice. With Introduce Local, you can definitely improve this code. Select Convert.ToDouble(radius) and then enable the Light Bulb. You will get two Quick Actions: the first allows introducing a local variable for the selected code, whereas the second one allows introducing a local variable for all other occurrences of the selected code (see Figure 36).
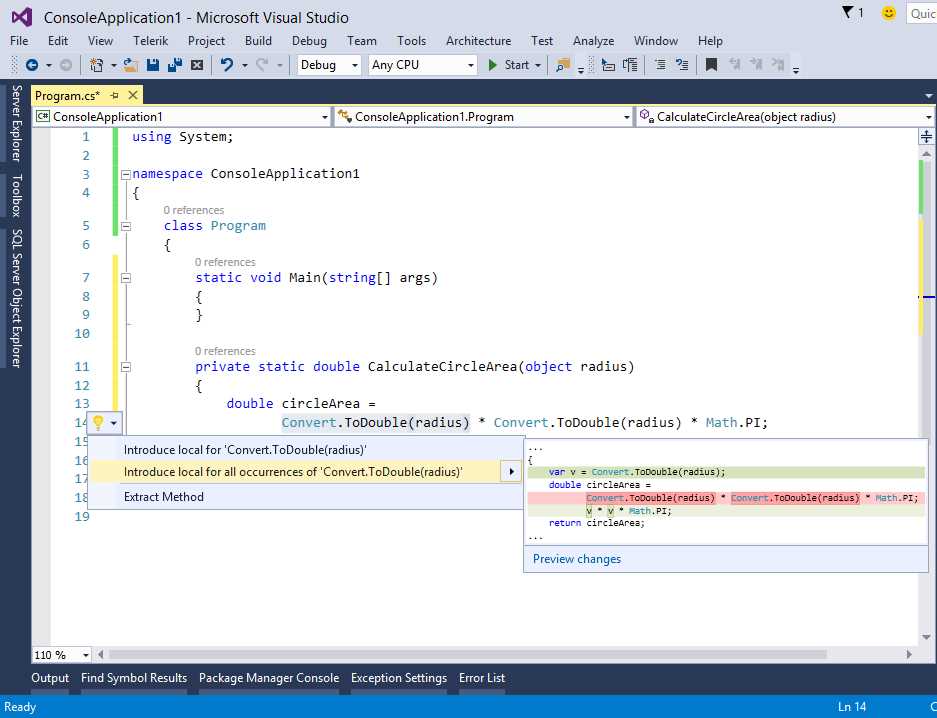
- Introducing a local variable to simplify the code.
When you apply your changes, Inline Rename still appears so that you can choose a different identifier for the local variable. Applying the second quick action will result in the following code.
private static double CalculateCircleArea(object radius) { var v = Convert.ToDouble(radius); double circleArea = v * v * Math.PI; return circleArea; } |
As you can see, the code is now much simpler and more readable. You typically use Introduce Local to separate complex expressions that are nested into other expressions.
Visual Basic Support
For the first time in the history of Visual Studio, refactoring support has been added to Visual Basic. This means that all the refactoring techniques described in this chapter are available to VB, including quick actions for fixing errors and redundant code. As examples, Figure 37 shows how you can extract a method and Figure 38 shows how you can introduce an inline temporary variable.
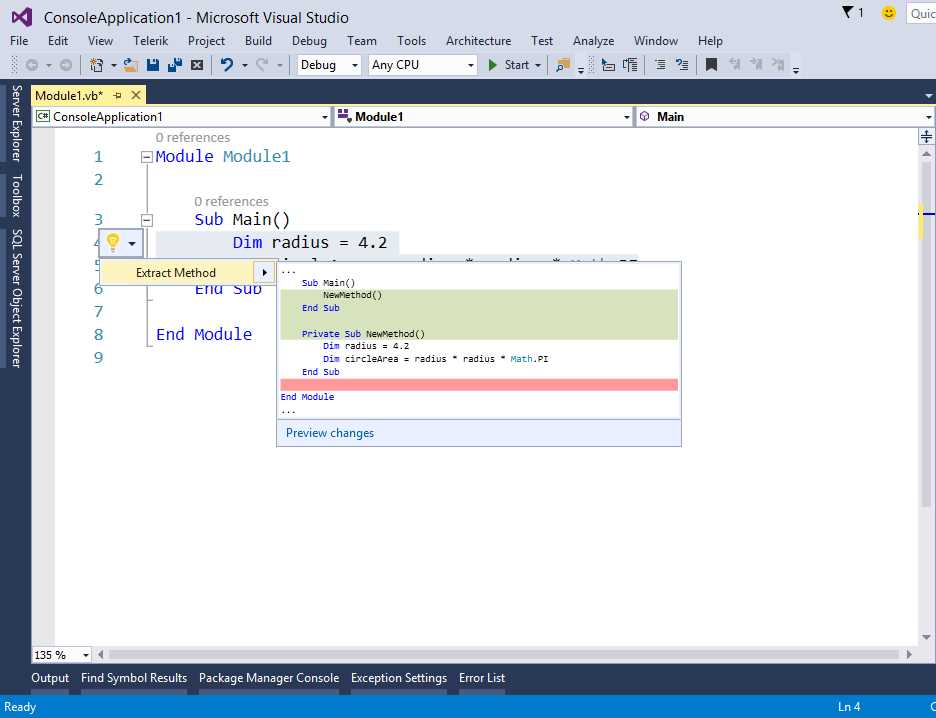
- Visual Basic support for refactoring: extracting a method.
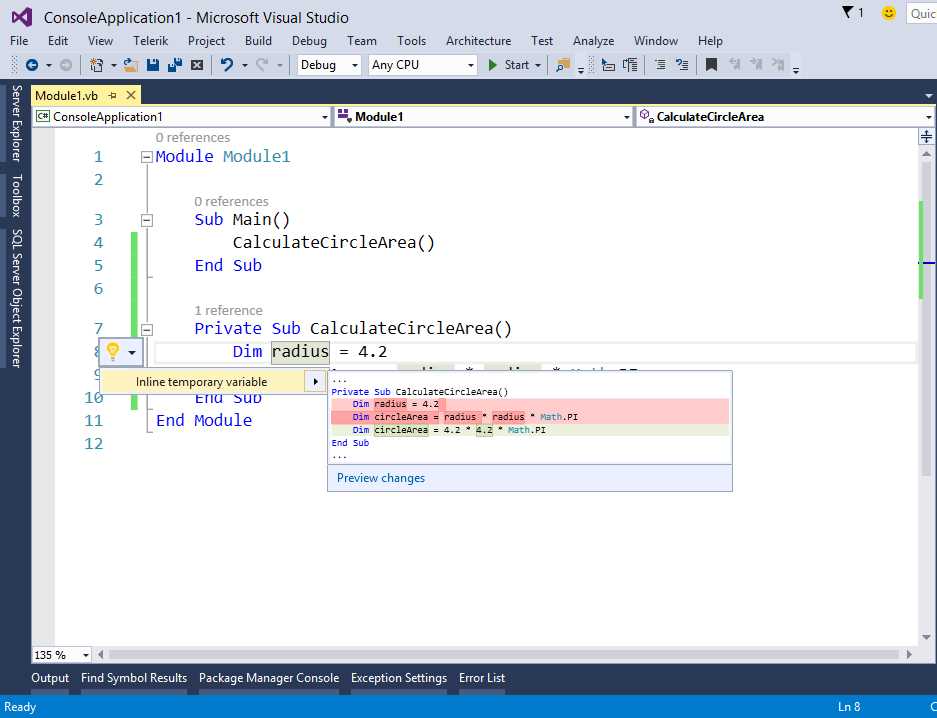
- Visual Basic support for refactoring: introducing an inline temporary variable.
Chapter Summary
This chapter introduced some new key features in the code editor. You met colorized tooltips, which show cool previews of collapsed code regions. You learned how you can successfully interact with the code editor on touch screen devices. Most importantly, you learned about the Light Bulbs and Quick Actions, which will help you fix errors as you type and write better code with new and enhanced refactoring options, now available for Visual Basic too.
- 1800+ high-performance UI components.
- Includes popular controls such as Grid, Chart, Scheduler, and more.
- 24x5 unlimited support by developers.