
Visual Studio 2013 Succinctly®

CHAPTER 5
Visual Studio 2013 for the web and Windows Azure
Programming for the web is the core business for many companies and developers. Creating websites means making an application available to potential customers worldwide through the Internet or providing internal portals or departmental applications through a local Intranet. Because of the importance of the web in a programmer’s life, cloud computing platforms are becoming more and more important every day. With Windows Azure, Microsoft has released one of the most powerful and complete cloud infrastructures ever. With a platform like Windows Azure you no longer need an in-house data-center, removing the need of purchasing physical servers and paying for their maintenance; with Windows Azure, you only pay for services you actually use. This chapter does not explain what ASP.NET and Windows Azure are, nor does it explain how to create applications for both platforms; that’s the goal of other resources. Instead, here we focus on how the new tooling available in Visual Studio 2013 makes programming for the web and the cloud an even more amazing experience with a deeper integration with the IDE.
Note: The .NET Framework 4.5.1 introduces some new features to ASP.NET. If you want to learn about what’s new, you can visit the appropriate page in the MSDN Library. Here you learn about new features in the IDE for ASP.NET, not about the runtime.
What’s new in the IDE for ASP.NET
Visual Studio 2013 introduces new tools and updates the existing environment for web development with ASP.NET. This chapter focuses on the most important features that you must know, as they will change the way you create web applications.
One ASP.NET: A new, unified experience
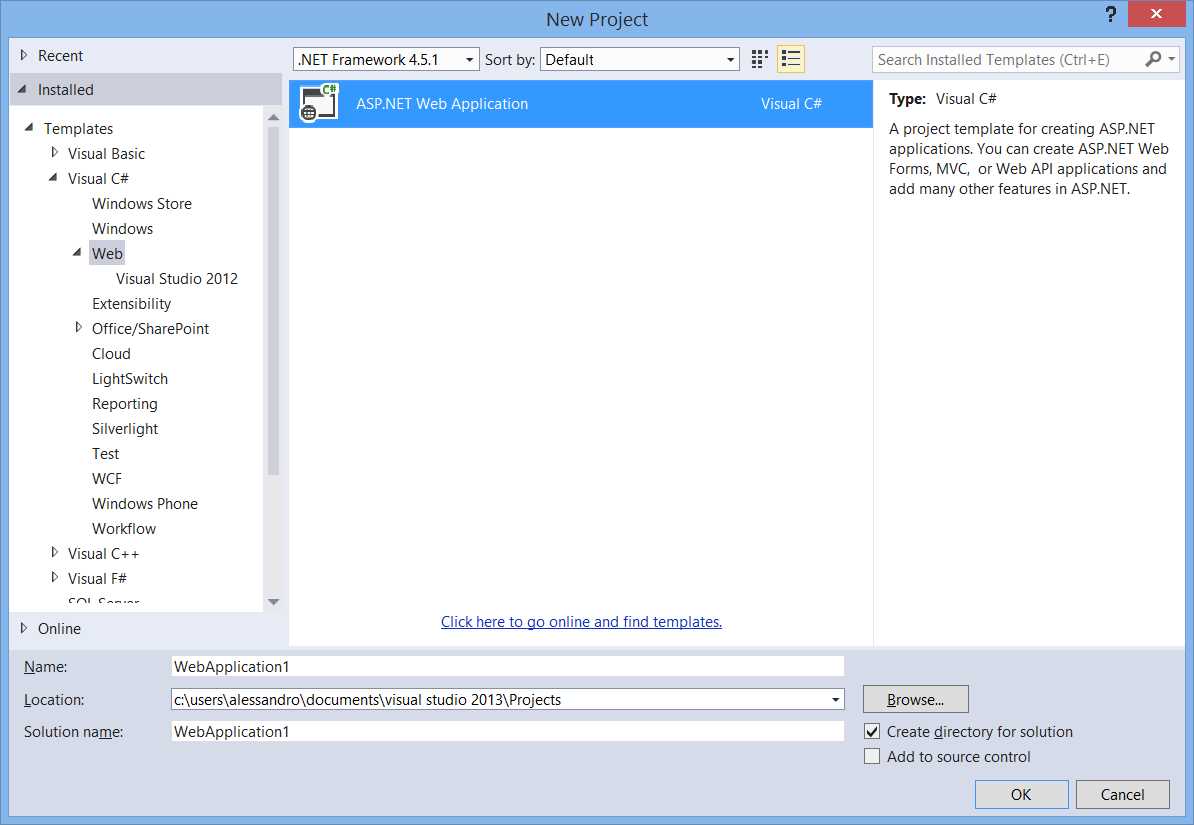
In the past, Microsoft released several technologies for creating web applications, like Web Forms, ASP.NET Dynamic Data, and MVC. Similarly, a number of frameworks and libraries were released, such as jQuery, jQuery Mobile, Web API, and Windows Identity Foundation. You could choose among several kinds of project templates in order to build web applications and add references to your desired frameworks later. Visual Studio 2013 dramatically simplifies this process by introducing the so-called One ASP.NET, which provides a unified development experience and makes it easy to use any of the available platforms, as well as making libraries interchangeable. But what does One ASP.NET mean in practice? To understand what it is, open Visual Studio 2013 and select File, New Project. Select the Web templates folder. As you can see from Figure 29, now there is only one project template.
- One ASP.NET also means simplifying a project’s creation.
Unlike in the past, where you had to choose among a number of several project templates, now you have only one template. Don’t be scared of this; in the next steps you will learn the reasons behind this feature and how to take advantage of it. For backward compatibility, you can still create web applications using templates inherited from Visual Studio 2012. You can simply expand the Web template folder and select the Visual Studio 2012 subfolder (which is visible in Figure 29). You will see the classic list of available project templates based on Web Forms, MVC, and Ajax. Let’s focus on One ASP.NET and double-click the single project template. At this point Visual Studio 2013 will show a new dialog, represented in Figure 30.

- Selecting the Presentation Framework, Authentication, References
It’s becoming clearer why the new approach is called One ASP.NET. In one place, you can:
- Select the presentation framework, such as Web Forms or MVC.
- Select a ready-to-use application stub, such as the Single Page Application or the Facebook application templates.
- Choose the authentication model: anonymous, Individual (ASP.NET), Windows (for Windows domains), Organizational (based on Active Directory, Office 365, and Windows Azure Active Directory).
- Add unit tests.
- Add folders and references to libraries that are specific to other frameworks; for instance, in a Web Forms application you can use MVC libraries and vice versa.
This new way of creating web applications gives you an opportunity to work with multiple kinds of libraries, taking full advantage of all the libraries from ASP.NET 4.5.1. Also, One ASP.NET simplifies the process by adding references for you. Experimenting with Web Forms, MVC, and other project templates is left to you as an exercise. Let’s now take a closer look at new features from the IDE.
Scaffolding for Web Forms
Scaffolding is all about data. Basically with scaffolding the IDE can generate view models and views based on a modeled data source (such as the ADO.NET Entity Framework); with scaffolding, Visual Studio generates for you pages that can read, insert, delete, or update data without you writing a single line of code. Technically speaking, Visual Studio generates a controller, which is a class containing the necessary code to perform C.R.U.D. (Create, Read, Update, Delete) operations against data, and pages to work with data (Views), one for each of the C.R.U.D. operations. Scaffolding is not a new concept in the ASP.NET development; it was first introduced with ASP.NET MVC. The good news is that Visual Studio 2013 brings scaffolding to Web Forms as well. This is possible because of the One ASP.NET experience; in fact, Visual Studio injects the appropriate MVC dependencies into a Web Form project and then does most of the work for you. If you already used this technique in MVC projects, you will be familiar with most of the concepts.
Note: With Visual Studio 2008 and .NET Framework 3.5 Service Pack 1, Microsoft introduced ASP.NET Dynamic Data, an innovative way of creating modern, data-centric applications for the web. Dynamic Data is still available in later versions. The concept of scaffolding was the base of ASP.NET Dynamic Data, but what we mean today by scaffolding is pretty different, and is based on new frameworks, libraries, and implements different code-behind. For this reason, be sure you have clear that in this chapter we refer to scaffolding by indicating the MVC (and now Web Forms) implementations.
To understand how scaffolding works, we will now create a sample ASP.NET application based on Web Forms, then we will add a reference to a database. Then we will use the new tooling in Visual Studio 2013 to generate data-bound pages without writing a single line of code. Before you continue, ensure you have downloaded and installed the following prerequisites:
- Microsoft SQL Server 2012 Express Edition, as the database engine required for data access. I recommend you download either the “With Tools” or the “With Advanced Services” editions that will also install SQL Server Management Studio Express for database management.
- The Adventure Works sample database from Microsoft. It can be downloaded for free from this page of the CodePlex website.
We assume that you already know how to install a database like Adventure Works to SQL Server, so let’s go ahead.
Create a sample project
First you will create a sample project. This is also the first time for you to see the One ASP.NET tooling in action. To create the project, follow these steps:
- Select File, New Project.
- Select the Web templates folder (see Figure 1).
- Select the one ASP.NET Web Application and call the new project ScaffoldingDemo.
- Click OK.
- In the New ASP.NET Project dialog (take Figure 30 as a reference), select Web Forms as the presentation framework, then select the MVC checkbox.
- For the sake of simplicity, change the authentication mode to anonymous. This is just for testing purposes; in a real world scenario you must select the appropriate authentication type according to your needs. To change the authentication, click Change Authentication, then in the Change Authentication dialog, select No Authentication (see Figure 31).
- Click OK to create the project.

- Changing the Authentication Type
Tip: For your curiosity or for real needs, while you are in the Change Authentication dialog, try to click on each option to see how you can implement different authentication types and how each type satisfies specific platform requirements.
Adding Data Connection and Entity Data Model
When the project is ready, in Solution Explorer right-click the project name, select Add New Item, and select the Data template folder. This is the point in which a data connection will be added, as demonstrated in Figure 32. Select the ADO.NET Entity Data Model item template; call the new model AdventureWorks.edmx and click Add.

- Adding a New Entity Data Model
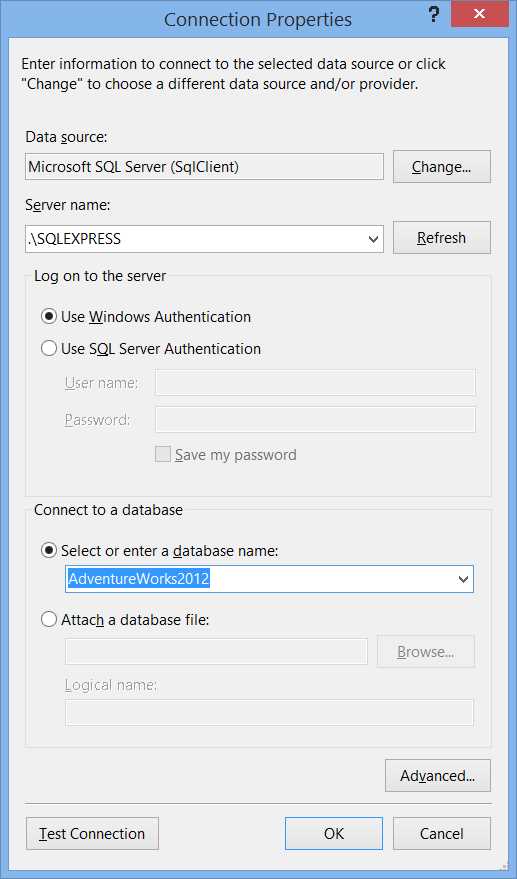
As you know, the Entity Data Model is based on the ADO.NET Entity Framework. In the Entity Data Model wizard, select the Generate From Database option first, then click Next. Click the New Connection button, then add a new connection that points to the AdventureWorks database. Figure 33 shows how the Connection Properties window will look like at this point; of course, you can have a different server name on your machine.
- Adding a New Entity Data Model
At this point the Entity Data Model Wizard will show summary information for the newly created connection (see Figure 6). You can definitely leave unchanged the identifier for the connection settings or provide a different one (at the bottom of Figure 34).

- Summary Information for the New Entity Data Model
When you click Next, Visual Studio will ask you to specify the version of the Entity Framework you want to use, between 5.0 and 6.0 (default option). Leave unchanged the selection on version 6.0 and click Next. At this point you will need to specify the tables or views you want to add to the model. Just select the Person table, as we want to demonstrate concepts easily without having a complex data structure. Figure 35 shows how to make such a selection.

- Selecting Database Objects
Click Finish. After a few seconds the Entity Data Model designer shows the .NET representation of the selected table (see Figure 36).
Tip: If you see a message that says “Running this template can potentially harm your computer,” ignore it. Visual Studio always analyzes code snippets that execute actions against local resources, such as a database, including auto-generated snippets, but of course executing such actions is safe at this point.
Before doing anything else, rebuild the project (CTRL + Shift + B) so that all references are updated.

- The Entity Data Model designer shows the table representation.
Depending on the database version you have installed, you might see additional entities in your designer. In fact, there are some differences between versions 2008 and 2012. You can ignore those additional entities and focus on entities you see in Figure 36. In the designer, right-click the Demographics property and select Delete from Model. The reason for this is that the Demographics property contains long XML markup that would make it difficult to provide readable figures for this e-book. Now that you have a connection to your data source, you need to present data and give users an opportunity of editing data. So, let’s dive into scaffolding.
Generate data-bound pages with scaffolding
The benefit of scaffolding is the ability to generate data-bound views without writing a single line of code. Visual Studio 2013 generates a controller for each entity set and one page per action, which means one page for listing a collection of items, one for adding an item, one for editing, and one for deleting. Since scaffolding generates views, in Solution Explorer right-click the Views folder, then select Add, New Scaffolded Item. The Add Scaffold dialog appears and allows specifying the item you need, as you can see in Figure 37.

- Selecting an Appropriate Controller for Scaffolding
As you can see, you can choose among different kinds of controllers. In this case you are working with the Entity Framework, so the appropriate controller is MVC 5 Controller with views, using Entity Framework. You can also choose an empty controller or a view. Also notice how you can take advantage of the Web API framework to create controllers that can be exposed to other consumers. When you click Add, Visual Studio shows the Add Controller dialog (see Figure 38).
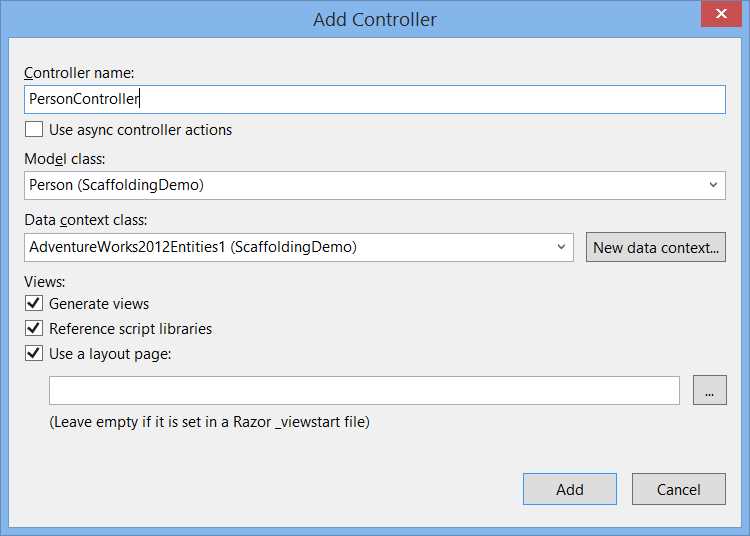
- Specifying Properties and Settings for the New Controller
Here you can specify a number of settings for the new controller. The following table describes these settings and indicates how to rename items.
Table 1: Members and settings for the Add Controller dialog
Item name | Description | Value |
|---|---|---|
Controller name | The name of the controller class that will be generated to interact with data | PersonController |
Model class | The entity class that will be managed by the controller | Person |
Data Context class | The context class generated by the Entity Framework to represent the database in a modeled way | AdventureWorks2012Entities |
Generate views | Select this checkbox to make Visual Studio generate views (pages) for you | True |
Reference script libraries | Select this checkbox to import scripting libraries | True |
Use a layout page | Select this checkbox if you want to use a custom page for the layout; no need for this example | False |
Click Add. In a few seconds, Visual Studio 2013 generates the PersonController class and a number of .cshtml files (under the Views\Person subfolder); each file is a page whose name is self-explanatory, such as Create.cshtml or Delete.cshtml. If you double-click the PersonController class in Solution Explorer, you will see the code that interacts with the data model. Figure 39 shows the result of scaffolding that is the controller and generated files in Solution Explorer.

- The Result of Scaffolding in Solution Explorer
The full code for the PersonController class follows.
Visual C#
public class PersonController : Controller { private AdventureWorks2012Entities1 db = new AdventureWorks2012Entities1(); // GET: /Person/ public ActionResult Index() { return View(db.People.ToList()); } // GET: /Person/Details/5 public ActionResult Details(int? id) { if (id == null) { return new HttpStatusCodeResult(HttpStatusCode.BadRequest); } Person person = db.People.Find(id); if (person == null) { return HttpNotFound(); } return View(person); } // GET: /Person/Create public ActionResult Create() { return View(); } // POST: /Person/Create // To protect from overposting attacks, please enable the specific properties you want to bind to, for // more details see http://go.microsoft.com/fwlink/?LinkId=317598. [HttpPost] [ValidateAntiForgeryToken] public ActionResult Create([Bind(Include="BusinessEntityID,PersonType,NameStyle,Title,FirstName,MiddleName,LastName,Suffix,EmailPromotion,AdditionalContactInfo,rowguid,ModifiedDate")] Person person) { if (ModelState.IsValid) { db.People.Add(person); db.SaveChanges(); return RedirectToAction("Index"); } return View(person); } // GET: /Person/Edit/5 public ActionResult Edit(int? id) { if (id == null) { return new HttpStatusCodeResult(HttpStatusCode.BadRequest); } Person person = db.People.Find(id); if (person == null) { return HttpNotFound(); } return View(person); } // POST: /Person/Edit/5 // To protect from overposting attacks, please enable the specific properties you want to bind to, for // more details see http://go.microsoft.com/fwlink/?LinkId=317598. [HttpPost] [ValidateAntiForgeryToken] public ActionResult Edit([Bind(Include="BusinessEntityID,PersonType,NameStyle,Title,FirstName,MiddleName,LastName,Suffix,EmailPromotion,AdditionalContactInfo,rowguid,ModifiedDate")] Person person) { if (ModelState.IsValid) { db.Entry(person).State = EntityState.Modified; db.SaveChanges(); return RedirectToAction("Index"); } return View(person); } // GET: /Person/Delete/5 public ActionResult Delete(int? id) { if (id == null) { return new HttpStatusCodeResult(HttpStatusCode.BadRequest); } Person person = db.People.Find(id); if (person == null) { return HttpNotFound(); } return View(person); } // POST: /Person/Delete/5 [HttpPost, ActionName("Delete")] [ValidateAntiForgeryToken] public ActionResult DeleteConfirmed(int id) { Person person = db.People.Find(id); db.People.Remove(person); db.SaveChanges(); return RedirectToAction("Index"); } protected override void Dispose(bool disposing) { if (disposing) { db.Dispose(); } base.Dispose(disposing); } } |
Visual Basic
Imports System Imports System.Collections.Generic Imports System.Data Imports System.Data.Entity Imports System.Linq Imports System.Net Imports System.Web Imports System.Web.Mvc Namespace ScaffoldingDemo Public Class PersonController Inherits System.Web.Mvc.Controller Private db As New AdventureWorks2012Entities ' GET: /Person/ Function Index() As ActionResult Return View(db.People.ToList()) End Function ' GET: /Person/Details/5 Function Details(ByVal id As Integer?) As ActionResult If IsNothing(id) Then Return New HttpStatusCodeResult(HttpStatusCode.BadRequest) End If Dim person As Person = db.People.Find(id) If IsNothing(person) Then Return HttpNotFound() End If Return View(person) End Function ' GET: /Person/Create Function Create() As ActionResult Return View() End Function ' POST: /Person/Create 'To protect from overposting attacks, please enable the specific properties you want to bind to, for 'more details see http://go.microsoft.com/fwlink/?LinkId=317598. <HttpPost()> <ValidateAntiForgeryToken()> Function Create(<Bind(Include := "BusinessEntityID,PersonType,NameStyle,Title,FirstName,MiddleName,LastName,Suffix,EmailPromotion,AdditionalContactInfo,rowguid,ModifiedDate")> ByVal person As Person) As ActionResult If ModelState.IsValid Then db.People.Add(person) db.SaveChanges() Return RedirectToAction("Index") End If Return View(person) End Function ' GET: /Person/Edit/5 Function Edit(ByVal id As Integer?) As ActionResult If IsNothing(id) Then Return New HttpStatusCodeResult(HttpStatusCode.BadRequest) End If Dim person As Person = db.People.Find(id) If IsNothing(person) Then Return HttpNotFound() End If Return View(person) End Function ' POST: /Person/Edit/5 'To protect from overposting attacks, please enable the specific properties you want to bind to, for 'more details see http://go.microsoft.com/fwlink/?LinkId=317598. <HttpPost()> <ValidateAntiForgeryToken()> Function Edit(<Bind(Include := "BusinessEntityID,PersonType,NameStyle,Title,FirstName,MiddleName,LastName,Suffix,EmailPromotion,AdditionalContactInfo,rowguid,ModifiedDate")> ByVal person As Person) As ActionResult If ModelState.IsValid Then db.Entry(person).State = EntityState.Modified db.SaveChanges() Return RedirectToAction("Index") End If Return View(person) End Function ' GET: /Person/Delete/5 Function Delete(ByVal id As Integer?) As ActionResult If IsNothing(id) Then Return New HttpStatusCodeResult(HttpStatusCode.BadRequest) End If Dim person As Person = db.People.Find(id) If IsNothing(person) Then Return HttpNotFound() End If Return View(person) End Function ' POST: /Person/Delete/5 <HttpPost()> <ActionName("Delete")> <ValidateAntiForgeryToken()> Function DeleteConfirmed(ByVal id As Integer) As ActionResult Dim person As Person = db.People.Find(id) db.People.Remove(person) db.SaveChanges() Return RedirectToAction("Index") End Function Protected Overrides Sub Dispose(ByVal disposing As Boolean) If (disposing) Then db.Dispose() End If MyBase.Dispose(disposing) End Sub End Class End Namespace |
Although lengthy, the code is not difficult; you have a number of methods responsible for C.R.U.D. operations, such as Create, Edit, Details, Delete, and Index. The latter returns the full list of records in the table mapped by the model class. Every method returns an object of type ActionResult, which is exposed by the MVC framework (remember you are using Web Forms here). It encapsulates the result of the aforementioned methods and is used to perform framework-level operations on behalf of the method. Of course, you can make additional edits to the controller class if you wish. In this particular example, it is a good idea to restrict the number of people returned by the Index method, in order to speed up the process. Imagine you want to retrieve only the first ten people in the table. You can edit the Index method as follows:
Visual C#
// GET: /Person/ public ActionResult Index() { return View(db.People.Take(10).ToList()); } |
Visual Basic
' GET: /Person/ Function Index() As ActionResult Return View(db.People.Take(10).ToList()) End Function |
You can use any LINQ operator to edit the query in a way that best fits your needs. In this case, the code uses Take to retrieve the first 10 records. It is worth mentioning that for each method in the code you will find some comments that explain how to invoke the related page in the browser. For instance, if you want to view the list of records in the table, you will use the /Person relative URL (see the code in the previous listing). You will get a demonstration shortly.
Test the application
Press F5 to start debugging the application. Your default web browser will open and show the default page of the application. In the address bar, type the /Person relative URL at the end (see the highlight in Figure 40). The application will show the first ten people in the table at this point, as you can see in Figure 40.
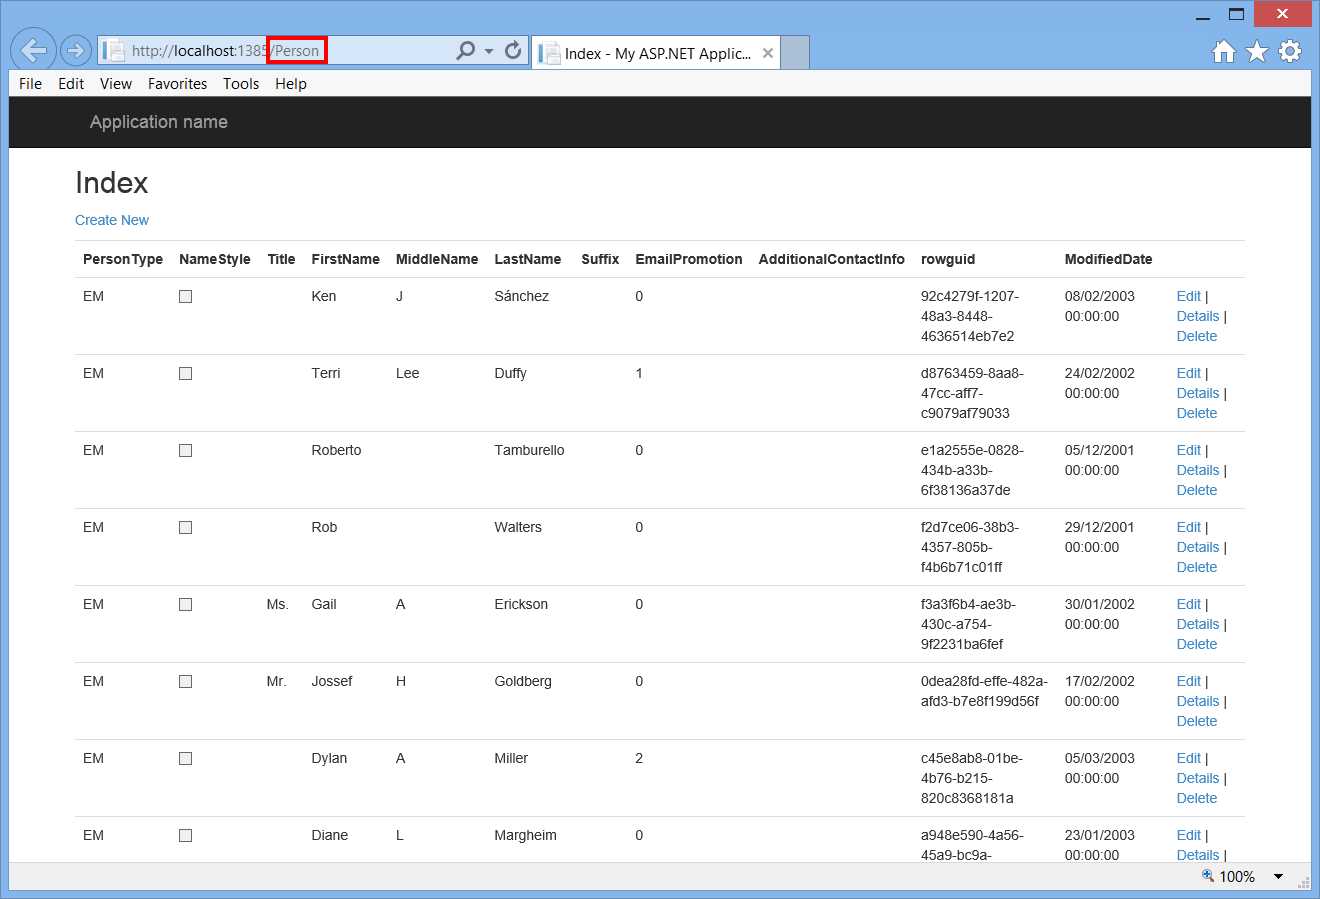
- The application shows a list of items.
Notice the shortcuts to pages for data operations. For example, you can click Edit to see and change details of an item. This is also useful to understand how the application invokes the appropriate methods in the controller. Take a look at Figure 41, which shows how to edit an existing item.
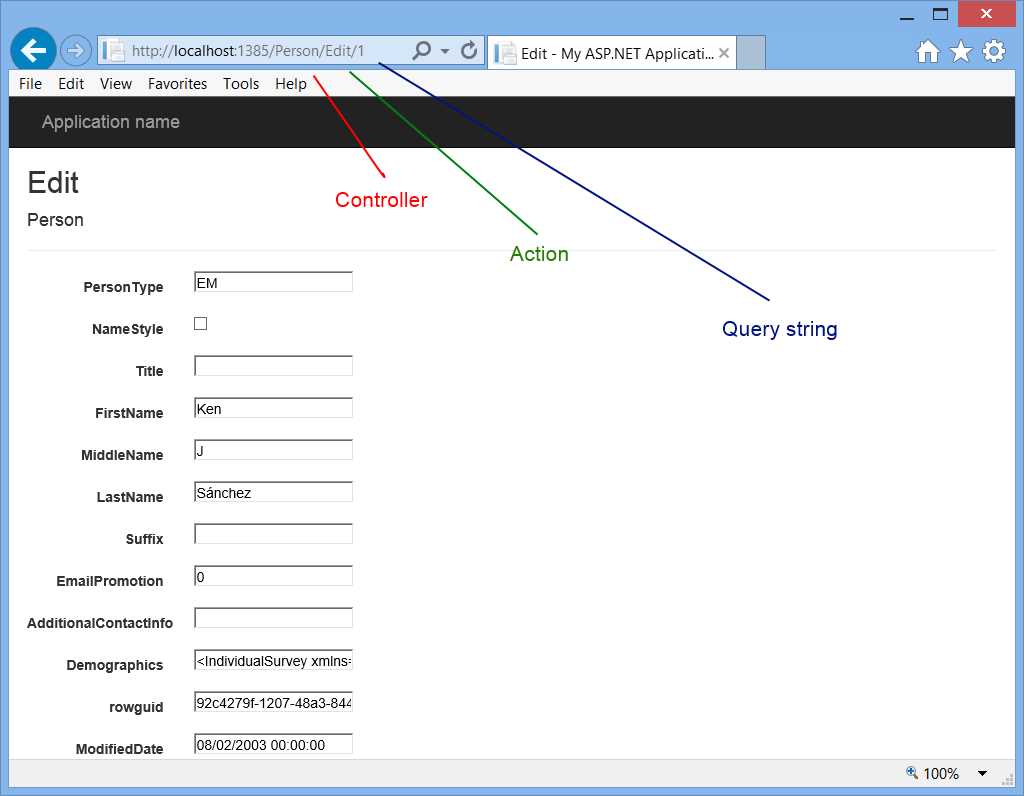
- Editing an Item and the Anatomy of the Address
Apart from seeing how easy it is to edit an item without writing any code, notice look at the address bar. The address is made of the following elements:
- The web address for the application
- The name of the controller (in this case Person)
- The name of the method in the controller (in this case Edit)
- The value for the query string that will be used by the invoked method to retrieve a specific item
You can go back to the previous page and select Create New to see how easy it is to add a new person to the database (see Figure 42).

- Adding a New Item
Figure 42 also highlights how both the controller name and the method name are used in the address. So you have seen how to take advantage of scaffolding in a Web Forms application due to the new One ASP.NET experience. Pages generated by Visual Studio can be edited to provide a different layout, but it is evident how with a minimal effort you can create powerful data-centric applications.
Browsers Link Dashboard
You already know that with Visual Studio you can test your web applications with different browsers. In Visual Studio 2013, if you have your application running in different browsers and you make changes in the IDE, such changes can be refreshed to every browser with a single click. This is possible because Visual Studio 2013 and the .NET Framework 4.5.1 use SignalR 2.0, the popular library that allows sending real-time notifications.
To understand how it works, first create a new ASP.NET project called BrowserLinkDemo. By following the lesson learned in the previous section, select the Web Forms template and the anonymous authentication. Of course, this feature works not only with Web Forms, but also with ASP.NET MVC.
Note: Do not delete the new project until you complete this chapter. It will be used again later when discussing the new tools for Windows Azure.
The next step is telling Visual Studio to use multiple browsers to run the application, so if you did not do this before, select the arrow near the Start button on the toolbar (see Figure 43), then Browse With.
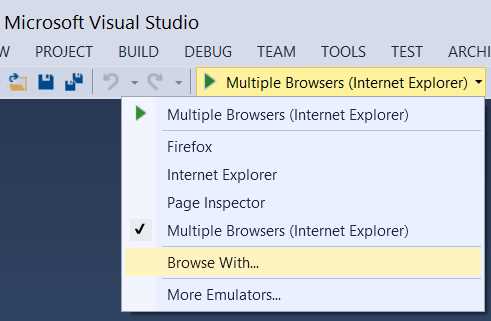
- Accessing the Command to Change the Default Browser(s) for Testing
In the Browse With dialog, select two or more web browsers. On my machine, I have Internet Explorer and FireFox installed, so my selection includes both (see Figure 44).

- Selecting Two or More Web Browsers for Testing
Press CTRL and click on each browser you want to use, then select Set as Default and close the dialog. Now, instead of debugging the usual way with F5, press CTRL + F5 to start without debugging. This way, the application will be launched in all of the browsers you selected. Figure 45 shows the application running inside Internet Explorer.

- The Sample Application Running
Now let’s make a very simple edit in Visual Studio. Open the Default.aspx page in the designer and replace the ASP.NET string with Visual Studio 2013 Succinctly. On the Standard toolbar, click the Refresh button, which you can see highlighted in Figure 46, or press CTRL+ALT+Enter.
![]()
- The Refresh Button for Linked Browsers
Now switch back to both browsers; you will see how they show the updated string. With this technique, you do not need to stop the application, make your edits, and restart debugging. By clicking the arrow near the Refresh button, you can access additional shortcuts, including the one to enable the Browser Link Dashboard tool window. With the Browser Link Dashboard you can see connections for each application in the solution and you can take specific action for each linked browser, such as refreshing only one instead. Figure 47 shows what the Browser Link Dashboard looks like against a solution containing both sample projects described in this chapter.
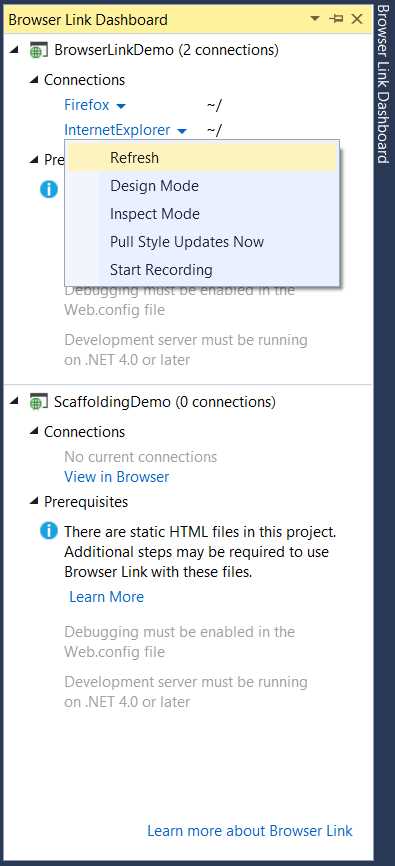
- The Browser Link Dashboard allows managing actions for single connections.
With Scaffolding and Browsers Link, you have seen two relevant features in Visual Studio 2013. But this new release has a great focus on the cloud. This is discussed in the next section.
What’s new in Windows Azure
Windows Azure is the popular cloud computing platform from Microsoft, first unveiled at the Professional Developer Conference (PDC) in 2008. Over the years, Windows Azure has dramatically evolved by introducing tons of services, and the cloud has become an important part of our daily lives. Many websites, mobile devices, and applications use Windows Azure’s services. If you’ve ever developed applications for Windows Azure before, you know that you had to do most things outside of Visual Studio, using the Windows Azure Developer Portal on the web or special client applications; in fact, Visual Studio lacked a good integration with the platform. As for other platforms, Visual Studio 2013 solves the problem and provides deep integration with Windows Azure making it easy to manage many services from within the IDE. This chapter provides guidance on how Visual Studio 2013 integrates with Azure and on how you can leverage this integration to build applications faster.
What you need before reading this section
Because we focus on the new tooling in Visual Studio 2013 for Windows Azure, we assume you already have at least a basic knowledge of the platform, including information about paid services and pricing. In fact, this chapter can neither summarize all services offered by Windows Azure nor it can explain programming for Azure, since this would require an entire book. If you need an overview of programming for Windows Azure before reading this chapter, refer to the official documentation available at http://www.windowsazure.com/en-us/documentation/ . In order to complete the steps described in this chapter, you must install the Windows Azure SDK 2.2 or later.
Note: This chapter describes Windows Azure from the developer’s perspective and will describe services that you can access only if you have a current subscription. But Windows Azure is a paid service. Fortunately, you can enable a 30-day trial at http://www.windowsazure.com/en-us/pricing/free-trial/. If you want to fully understand the rest of this chapter, you are encouraged to subscribe the trial
Server Explorer window
You’ve probably already used the Server Explorer tool window in Visual Studio many times, for different purposes such as managing connections to databases, or web servers. In Visual Studio 2013, Server Explorer offers a new node called Windows Azure, which allows connecting to your subscription and managing services from within the IDE. Figure 48 shows how the Windows Azure node looks.
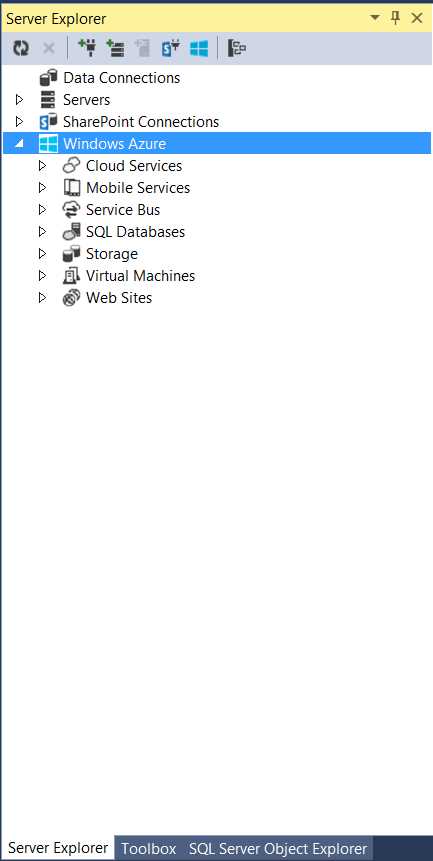
- The New Windows Azure Tooling in the Server Explorer Window
As you can see, you can manage most services without leaving Visual Studio. The first thing you need to do is associate a valid Windows Azure subscription to Visual Studio 2013. To do so, right-click Windows Azure and select Connect to Windows Azure. You will be asked to enter the Microsoft Account of your current subscription. If you have multiple subscriptions associated with your Microsoft Account, you will be able to manage subscriptions. Simply right-click again Windows Azure and select Manage Subscriptions. At this point, the Manage Windows Azure Subscriptions appears, as shown in Figure 49.

- Managing Windows Azure Subscriptions
You will need to import your subscription settings in Visual Studio 2013 at this point. Click Certificates, then Import. In the appearing Import Windows Azure Subscriptions dialog (see Figure 50), click the Download subscription file hyperlink.
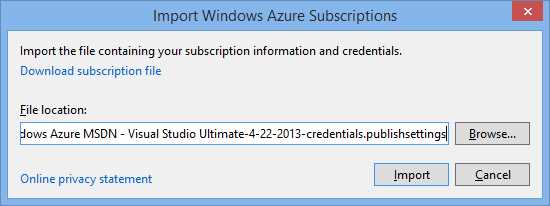
- Managing Windows Azure Subscriptions
At this point, a page in the Windows Azure’s website will be opened and a file with your subscription’s settings will be automatically available for downloading. Once you’ve downloaded the settings file, click Browse and in the dialog search for the downloaded settings file, select it, and finally click Import. By following these steps, your subscription will be added to the list of subscriptions in Visual Studio. If you have added multiple subscriptions, in the Manage Windows Azure Subscriptions dialog you will be able to select the subscription you want to work with. Click Close when you have made your selection. Let’s now see in more detail what you can do with Server Explorer.
Integration with mobile services
Mobile Services can be used as a backend for mobile applications. A very common use of Mobile Services is storing data inside tables. In Visual Studio 2013 you can now create a mobile service directly, add tables, and see logs for the service. To create a new service, right-click Mobile Services, and then select Create Service. In the Create Mobile Service dialog you will have to specify the new service’s details, as shown in Figure 51.

- Creating a New Mobile Service
You will need to specify the following information:
- The subscription where the service will be created. You can leave the selection unchanged if you want the service to be created in the current subscription.
- The service name. Visual Studio 2013 will check the availability of the service name as you type.
- The Region. Remember to select the region that is nearest to your location.
- A new or existing SQL Azure database to be associated with the new service (optional). If you did not create a SQL Azure database in the Management Portal before, you can use the Create a free SQL database option or the Create a billed SQL database. Of course, I strongly recommend to create a free SQL Azure database (up to 20 MB) rather than a billed one.
- User name and password for the SQL Azure server in order to access the database.
Note: I’m assuming you have already configured a SQL Azure server, since I’m talking about server user name and password required to access a database on the cloud. If you did not configure your SQL Azure server, you can get started by reading the official documentation.
When you’re finished, click Create. The new service will appear under the Mobile Services node of Server Explorer. You can also add tables to the service directly. Right-click the service’s name and select Create Table. In the Create Table dialog (see Figure 52) you can specify the table name and permission for each of the C.R.U.D. operations.
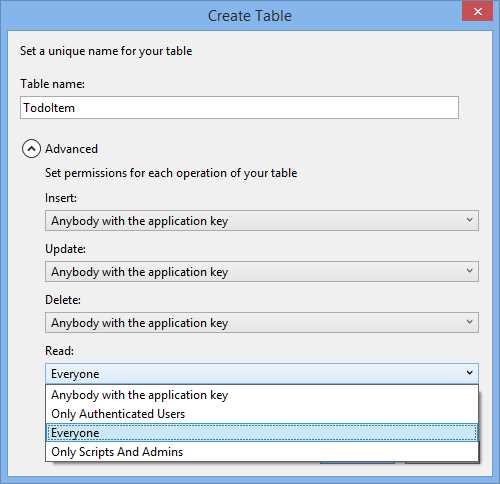
- Creating a New Mobile Service
Now create a new table called TodoItem. We will use this table in the next chapter when demonstrating Windows 8 support for mobile services. Notice how you have deep control over permissions; you can allow everyone, authenticated users, administrators, or users having the application key (managing the application key is only available in the management portal). Click Create when you’re ready. You will be able to see the new table as a node under the mobile service’s name. Also, if you expand the table name, you will see a number of JavaScript code files, which are responsible of performing operations against data, such as read, insert, update, and delete. Figure 53 shows how the Server Explorer window appears at this point.
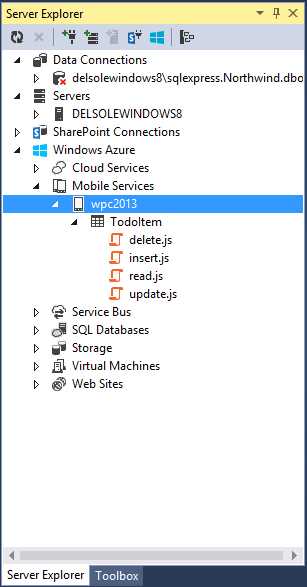
- Mobile service, table, and JavaScript files as they appear in Server Explorer.
With only a few steps, you have created a mobile service that can be used as a backend in your mobile applications. You can use mobile services in the following applications:
- Windows Store apps for Windows 8.x
- Windows Phone apps
- ASP.NET web applications
You will need to right-click the project name in Solution Explorer and select Add Connected Service. This is discussed further in Chapter 7.
Integration with Azure websites and cloud services
In Windows Azure, you publish your web applications through websites or cloud services. A website is a simplified, pre-configured environment for easy deployment. A cloud service, instead, is a highly customizable environment that requires you to make some configurations before deployment, and where you can take a lot of actions over the system. You can find the full description of both environments in this page of the Windows Azure documentation (I recommend that you read it). Whatever your choice is, Visual Studio 2013 supports publishing applications to both web sites and cloud services.
Note: You can connect to Virtual Machines from Server Explorer, but you can only publish to websites and cloud services directly.
For instance, imagine you want to deploy the sample application created earlier in this chapter to demonstrate the Browser Link feature. In Server Explorer, right-click the Web Sites node and then select Add New Site. A new dialog called Create site on Windows Azure appears. Here you will have to specify details for the new website, as shown in Figure 54.

- Creating a New Website
The following information is required:
- The site name, an identifier that will be used to construct the website’s URL. Visual Studio will check for the availability of the name as you type.
- The location: Microsoft has several data centers across the world, so ensure you select the location nearest to you.
- Database server, database username, and database password. These are optional fields; you only need to supply them if your application will use an SQL Azure database.
Tip: The sample application does not use any database. For the sake of completeness, Figure 54 shows how to fill database-related fields.
Once you have entered all the required information, click Create. Once the website has been created, double-click its name in Server Explorer so that Visual Studio shows a configuration window (see Figure 55).
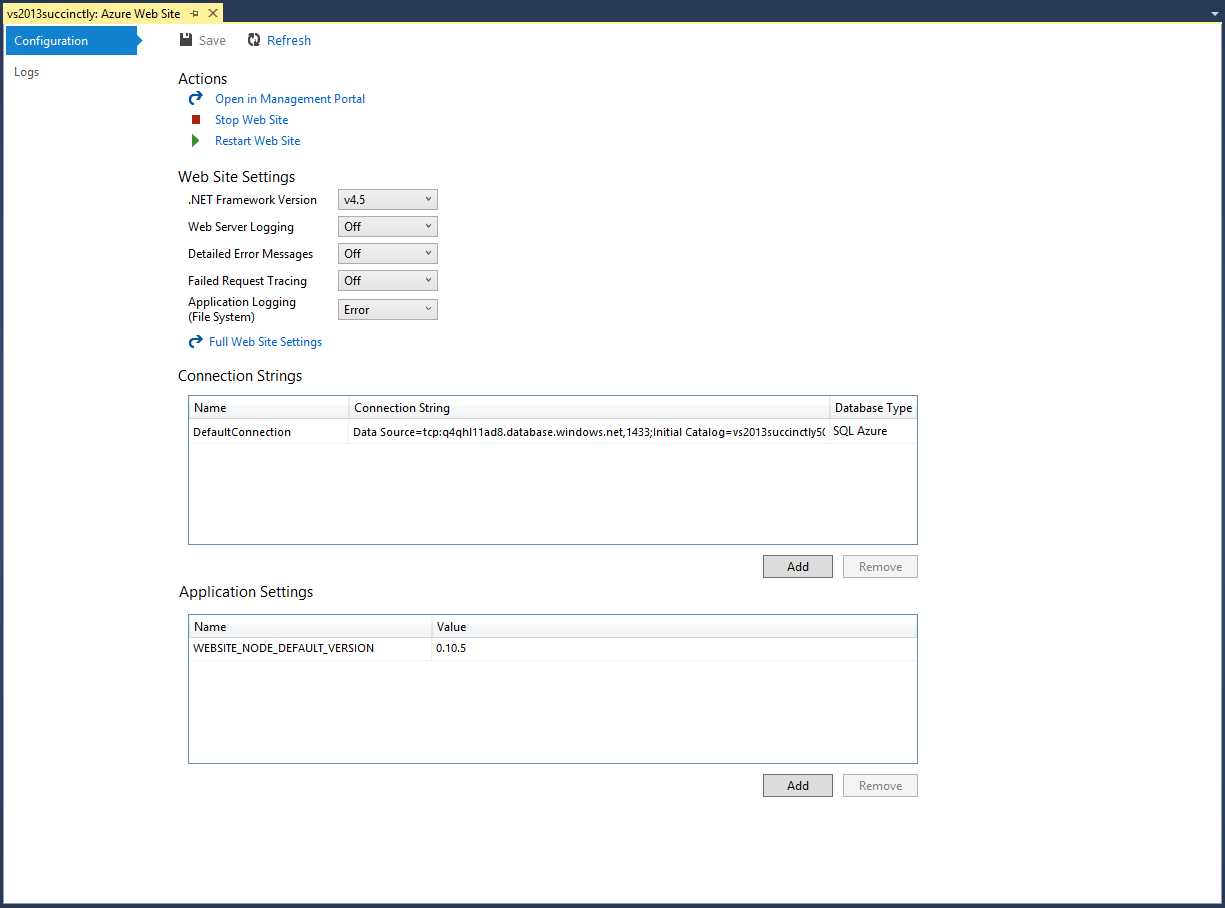
- Configuration Window for the New Website
The window is divided into four main areas:
- Actions: here you find shortcuts to common tasks such as opening the site in the Azure’s management portal, stopping or restarting the site.
- Web Site Settings: here you can fine-tune the configuration for your website, including error management and tracing.
- Connection Strings: here you can manage connection strings that your application uses to connect to data sources.
- Application Settings: this allows listing and adding environment variables for your websites. You should never change or remove settings added by Visual Studio.
Now you want to publish the BrowserLinkDemo sample application to the newly created website. First, right-click the project name in Solution Explorer, then select Convert, Convert to Windows Azure Cloud Service Project. This action will add a new project with a Windows Azure role to the solution. By default, the new project’s name has the same name of the original project plus the .Azure suffix, in our example it is BrowserLinkDemo.Azure. Now, in Solution Explorer right-click the original project (BrowserLinkDemo) and then click Publish.
Tip: Use the Publish command if you want to deploy your application to a website. Because this is our current case, we are using this option. If you want to deploy to a Cloud Service instead, right-click the project name and select Publish to Windows Azure. A specific dialog will allow creating a new Cloud Service and easily deploy the application
The Publish Web dialog appears and has no preconfigured settings, so you need to click the Import button to specify the target website. Visual Studio shows the Import Publish Settings dialog at this point, which is visible in Figure 55.

- Selecting the Website for Publishing
Since the IDE is still connected to your Azure subscription, you can simply select the target website from the first combo box. You can also select a different subscription by clicking Sign In or by importing an existing publish profile file.
Tip: Visual Studio 2013 makes it easy to download and publish profiles from your Windows Azure subscription. Just right-click a website in Server Explorer and then click Download Publish Profile.
When you’re ready, click OK. The Profile form in the Publish Web dialog will be filled with information coming from the publish profile you just selected. Go ahead to the Connection form (see Figure 57).

- Connection Settings for the Application
Visual Studio 2013 automatically provides information for this form so you do not need to change any field. Notice the content of the Destination URL field, which contains the web address for your application once published. Click Next to access the Settings form (see Figure 58).

- Publish Settings for the Application
In this form of the Publish Web dialog you can change the configuration between Release (default) and Debug, or decide if you want to remove additional files at destination, precompile managed code during publishing, or exclude files from the App_Data folder. If you are also using a database, here you will be able to set a default connection string. When you click Next, you access the Preview form where you can optionally view the full list of files that will be published to the websites, by clicking Start Preview. The result of pressing this button is shown in Figure 59.

- The List of Files that Will Be Published to the Website
You can finally click Publish. The progress of publishing will be shown in the Output window and the speed may vary depending on your Internet connection. When the application has been published and is online, you will see a message in the Output window and you will be able to start the application by using the appropriate web address. Figure 60 shows the sample application running on the website created previously.

- The Sample Application Running on the Website
As you can see, with a very few steps you have been able to publish an ASP.NET application to Windows Azure, without the need of having an in-house server and hosting infrastructure.
Note: If you create websites for testing purposes like in the current scenario, remember to delete the site when finished, even if you have the spending limit enabled. Websites consume resources even if they are offline, so the only way to ensure they do not consume any unneeded resources to delete them.
Integration with Azure Storage
Note: For the rest of Azure services described in this chapter, we focus on the new tools in the IDE. If you need guidance on how to access resources in the Azure Storage from your applications, make sure you read the appropriate documentation.
The Windows Azure Storage is the place where you can store data and files for your cloud-based applications. For instance, if your application needs to show some pictures or allows downloading files, these will be first saved onto the Storage and then accessed via their web address (HTTP). The Windows Azure Storage provides the following services:
- Blob Storage: here you can upload unstructured binary data, such as files.
- Queue Storage: this is used to save and retrieve messages for workflows and communications.
- Table Storage: here you can store non-relational and unschematized data with support for queries.
The Blob Storage can also recognize VHD files and allows mounting these files as virtual hard disks on the cloud. Visual Studio 2013 finally provides integration with the Windows Azure Storage from within the IDE. This is a tremendous benefit and a significant step forward, because before Visual Studio 2013, the only way to upload to or manage information on the Storage was by using 3rd party client applications. Now you can definitely use Visual Studio to perform operations such as uploading files to the Blob Storage. Any Windows Azure subscription supports multiple storages. For each storage, you need to create a storage account. Since any transaction (download, upload, login) has a cost, Microsoft offers the Development Account, which consists of the Windows Azure Emulator and other components that allow simulating a production environment on your development machine. This way, you can freely test transactions locally, and move to the cloud only when you are ready to go to production. Remember to check the MSDN documentation for the storage programmability and for understanding how to access information on the storage from your applications.
Creating a storage account
In Server Explorer, expand the Storage node under Windows Azure. The local development storage will be shown by default. If it’s not already running, Visual Studio will start the Windows Azure Storage Emulator. The development storage works exactly like an online storage; however, it is a good idea to see how to work with an online account. Unfortunately, you cannot create new storage accounts from Visual Studio; instead, you can connect to existing accounts. So, open the Windows Azure Management Portal in your favorite web browser. Once logged in, click Storage in the dashboard on the left. Figure 61 shows how the management portal appears at this point, with no accounts available yet.

- The Windows Azure subscription has no storages at the moment.
Click CREATE A STORAGE ACCOUNT. The Management Portal will open a new page where you can easily create a new storage account by supplying the account name and the location. Figure 62 shows how the management portal appears at this point.
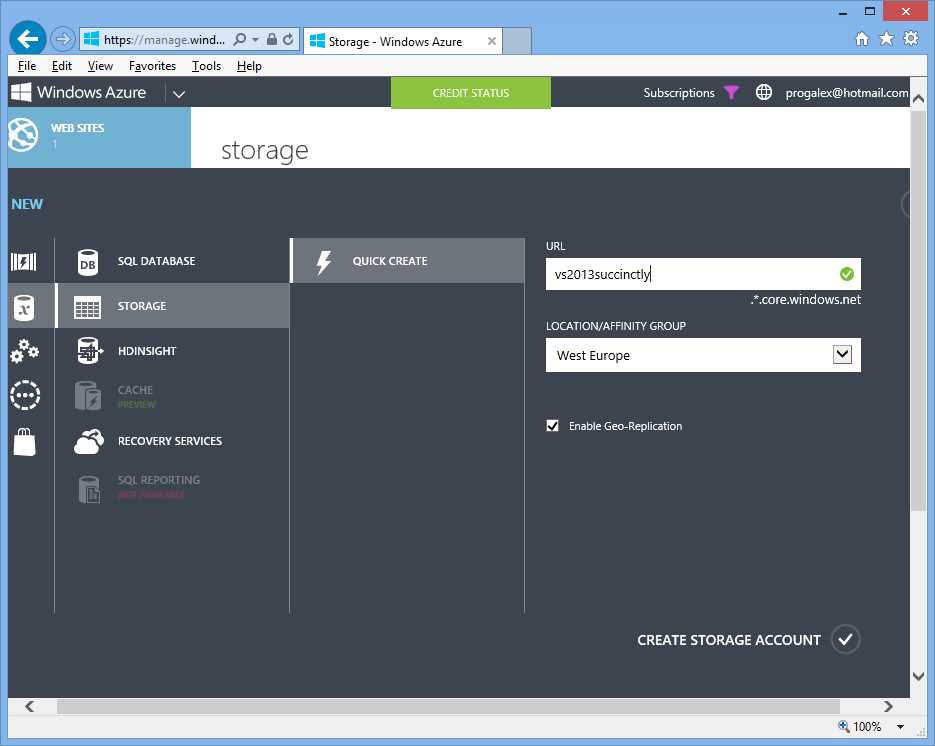
- Creating a New Storage Account
Always remember to select the nearest location to where you live. As you might know, the account name becomes the prefix of the URL for services exposed by the storage. Table 2 shows URLs for each service (where storagename is the name you entered when creating the storage account).
Table 2 – Members and settings for the Add Controller dialog
Storage | URL |
Blob Storage | http://storagename.blob.core.windows.net |
Table Storage | http://storagename.table.core.windows.net |
Queue Storage | http://storagename.queue.core.windows.net |
Addresses shown in Table 2 are very important, since they are the way you access each storage. Click CREATE STORAGE ACCOUNT. After about one minute, you will be able to see the storage account online in the Management Portal. Now close the management portal and go back to Visual Studio 2013. In Server Explorer, right-click the Storage node and then click Refresh. You will now see the newly created storage account (see Figure 63).

- The new Storage Account is visible inside Server Explorer.
Now you will see how to interact with the storage.
Managing the Blob Storage
Say you want to upload an image file to the Blob Storage. Blobs are organized within folders called containers, so you first need to create a container. Follow these steps:
- Click the Storage Account of your interest (in this case, vs2013succinctly) and expand it in order to make the Blobs node visible.
- Select Create Blob Container.
- In the Create Blob Container dialog (see Figure 64), specify the name of your new container all lower case. For example, enter pictures.
- The new container will be visible in Server Explorer. Right-click it and select View Blob Container. You will see a new window called Container whose purpose is showing and filtering the list of blobs in a container. It also allows uploading and/or deleting blobs (see Figure 65).
- Click the Upload Blob button (the one with the black arrow). In the file selection dialog, select an image file (possibly of type Jpeg, in order to save space and time due to the lower size of this format). Visual Studio will start uploading your file to the storage, showing the progress of the operation. As you can see from Figure 66, the window shows metadata information for the file and, most importantly, the URL to access it.

- Creating a New Blob Container
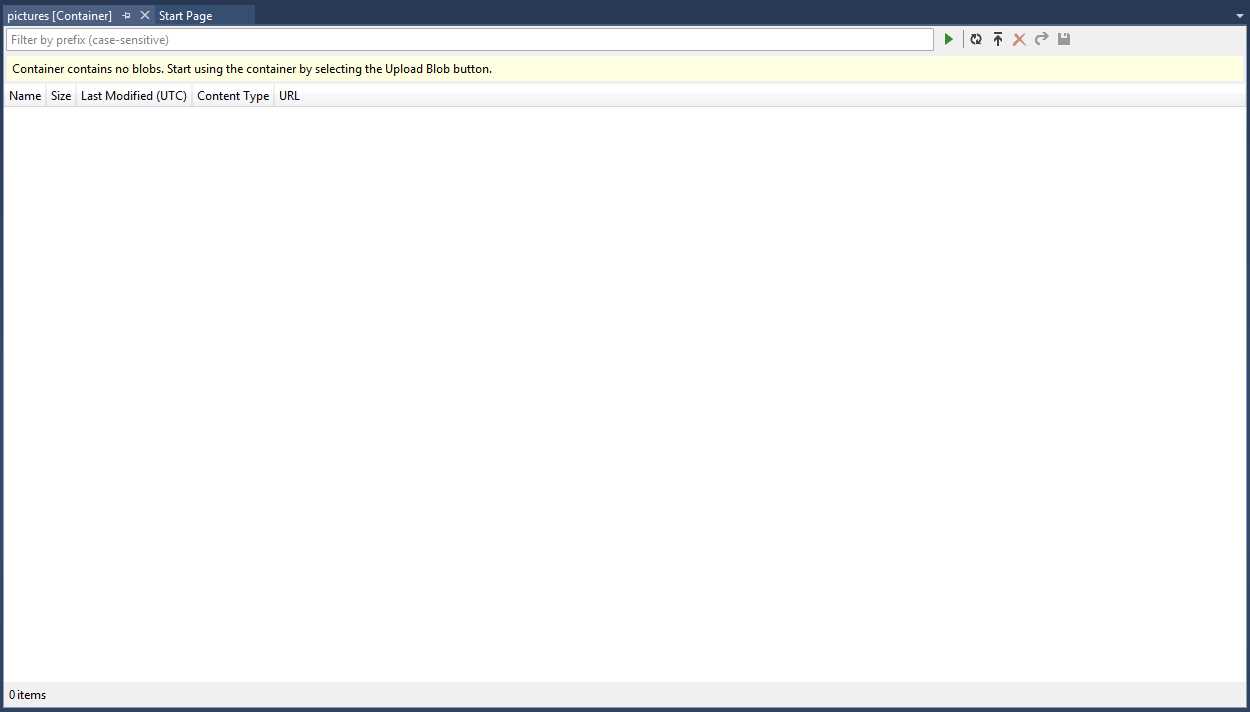
- The list of blobs for the current container is empty.

- The blob has been uploaded and you can see its metadata and URL.
If you right-click the blob, you will get a popup menu showing a list of interesting commands. You can download the blob to disk (Save As), open the blob (Open), delete the blob (Delete), view more detailed properties in the Properties window (Properties), and copy the blob’s URL to the clipboard (Copy URL). In order to access the blob in code, you will need to supply a connection string and credentials for your Windows Azure subscription. Writing code to accomplish this is beyond the scope of this chapter, so read this page in the Windows Azure documentation for this purpose. What you really need to understand is how you can upload the blob (and how you can manage blobs and containers) with the new tooling in Visual Studio 2013, without the need of 3rd party client applications.
Create and query tables
The Windows Azure storage supports creating tables to store nonrelational data. Right-click Tables in your storage account and select Create Table. In the Create Table dialog (see Figure 67), enter the name of your table, for example mydata.
![]()
- Creating a New Table
When the new table is created, double-click it: you will see a window similar to the one you saw for containers. The window’s toolbar (see Figure 68) has a button called Add Entity, represented by three drawers and a green addition symbol.
![]()
- The Table’s Designer Toolbar
Click Add Entity to enter new data. Figure 69 shows how you can enter data for the new entity.
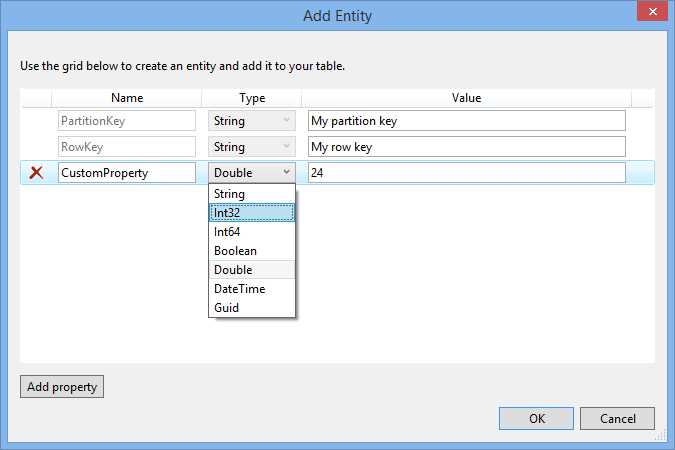
- Entering Data for the New Entity and Property Customization
Every entity has some predefined properties, such as PartitionKey and RowKey, both of type String, that can be assigned with your values. Also, you can add custom properties of different types (see Figure 69). Click OK when ready. The new entity will be now visible inside the window, as shown in Figure 70.
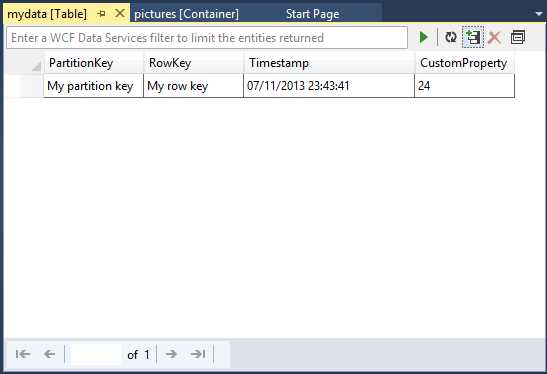
- Listing Tables in your Storage Account
The toolbar has another button called Query Builder (the one on the right represented by two overlaid squares as shown in Figure 68), which allows executing queries against tables. You can specify one or more filters against different properties, as shown in Figure 71.

- Defining Queries with the Query Builder
Notice that custom properties are not available in the Property Name dropdown. However, you can type queries and add filters by custom properties in the textbox inside the designer’s toolbar (see Figure 68). When you have defined all the required filters, click OK. You will see the query syntax in the text box; if you click Execute, the query will be executed and only entities matching the specified criteria will be shown.
Create message queues
Visual Studio 2013 supports creating queues in the storage. With queues, cloud-based applications can easily share messages. To create a queue, in Server Explorer expand Storage, then expand the storage account of your choice (you can use Development), then right-click Queues. In the Create Queue dialog, enter the name for the new queue, again lower case (see Figure 72).

- Creating a New Queue
When the new queue is visible in Server Explorer, double-click it to open the Queue window. Here is the place where you add and manage messages. To add one, click Add Message on the toolbar (the button with the icon of a letter and the green + symbol). In the appearing Add Message dialog, enter a text message and define when the message will expire (see Figure 73), and then click OK.

- Creating a New Message
The new message will be added to the queue and will be visible in the Queue window, as you can see in Figure 74.
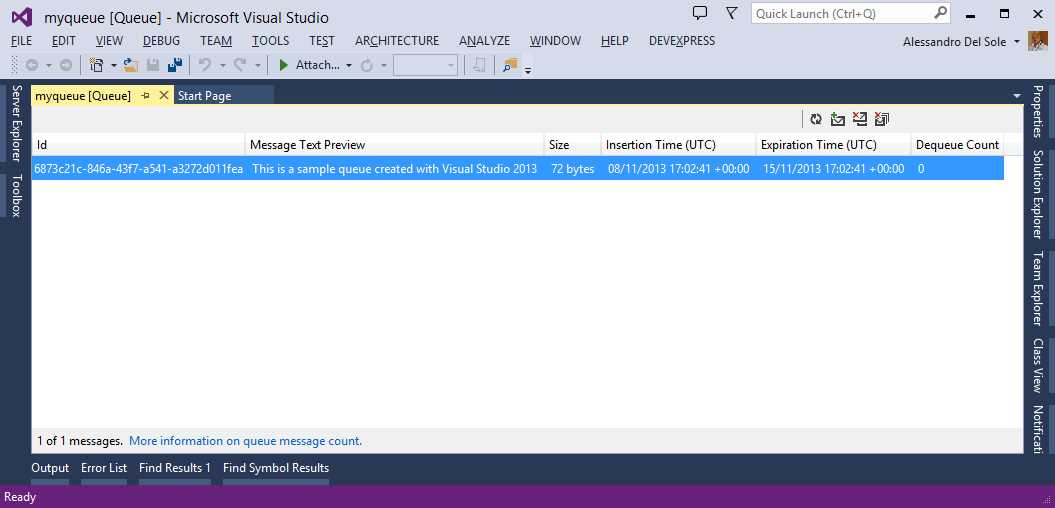
- Creating a New Queue
Interesting information is shown, such as the insertion time, expiration time, and ID. By using the appropriate buttons on the toolbar, you can also de-queue or remove messages. If you are not familiar with using queues in your applications, check out the Windows Azure documentation about programming with queues. As for other storage types, Visual Studio 2013 makes it very easy to create and manage queues avoiding the need of using 3rd party applications.
Chapter summary
With the idea of offering the most productive environment ever, Visual Studio 2013 introduces many new tools for web development, including building applications for Windows Azure. On the ASP.NET side, Visual Studio 2013 introduces the One ASP.NET experience, which provides a unified approach to web development making it easy to use libraries from different frameworks into one application. This includes the use of scaffolding (formerly available only for MVC applications) in Web Forms applications. With scaffolding you can easily build data-centric applications and take advantage of auto-generated code for data access and data-bound, ready-to-use pages. Also, Visual Studio 2013 makes it easier to test applications in different web browsers with the new Browser Link feature, which allows refreshing all browsers with one click. For Windows Azure, Visual Studio 2013 enhances the Server Explorer tool window, which now offers all you need to work with most services exposed by the platform from within the IDE.
- 1800+ high-performance UI components.
- Includes popular controls such as Grid, Chart, Scheduler, and more.
- 24x5 unlimited support by developers.