
Visual Studio Add-Ins Succinctly®

CHAPTER 7
Visual Studio Environment
In this chapter we will create an add-in module to provide some details about the Visual Studio installed version and the computer that the IDE is currently running on. Although the collected information will be displayed in a Windows form, you could also add logic to create a text file of the information, allowing a user to duplicate the Visual Studio environment on another computer if desired.
VS Info Wizard
Start your VS info add-in by using the wizard and the following settings:
- Visual C# (or your preferred language).
- Application Host: Only Visual Studio, because we wouldn’t use this in a macro.
- Name/Description: VS_Info and Info about Visual Studio and Dev Environment.
- Create UI Menu and load at start-up is not selected.
Verify the settings at the Summary screen, and if they look okay, generate the code.
VS Info Form
We need to create a form to hold our Visual Studio information, so we will need to add a Windows form to the project. In addition, we will be using the String Builder object to assemble our information, so add the following line to your connect.cs file:
using System.Text; |
Create a form similar to the following figure, but feel free to add your own artistic touches.
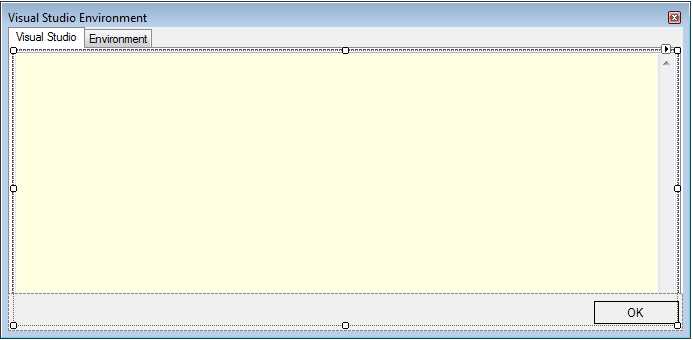
- Form for Visual Studio information
However, be sure the two text boxes have PUBLIC modifiers. I’ve named the Visual Studio text box VSINFO and the Environment text box ENVINFO. If you use different names, you’ll need to tweak the code in your Exec() method.
Name the form that you create VSInfoForm; I recommend using a monospace font so the generated text will line up nicely.
Exec() method
In our Exec() method, we are going to gather information and build lines of text to transfer to the form’s windows. We will start simply by grabbing some simple string properties from the _applicationObject variable, as seen in the following code:
|
if(commandName == "VS_Info.Connect.VS_Info") { VSInfoForm theForm = new VSInfoForm(); // Create the form. StringBuilder sb = new StringBuilder(); // Get information specifically about Visual Studio. sb.AppendLine("Visual Studio " + _applicationObject.Edition + " edition"); sb.AppendLine(" Version " + _applicationObject.Version.ToString()); sb.AppendLine(""); sb.AppendLine("Full EXE Name " + _applicationObject.FullName); sb.AppendLine(" Parameters " + _applicationObject.CommandLineArguments.ToString()); sb.AppendLine(""); sb.AppendLine("Registry Root " + _applicationObject.RegistryRoot.ToString()); sb.AppendLine(""); |
Getting options
Visual Studio has an options menu to allow you to tweak the settings and behavior of the IDE. It can be found in the Tools menu under Options.

- Visual Studio options
You can access any of the Visual Studio options by using the get_Properties method of the _applicationObject variable. The method takes two parameters, the category name and the page name. The example code that follows shows how to get a collection of the options from the Environment category, General page.
|
// Gives you access to various IDE options (see Tools | Options menu). Properties theSection = _applicationObject.get_Properties("Environment", "General"); |
This method will return a properties collection object with the options from the indicated section. We can then iterate through the properties collection to find the individual options.
Note: You need to know the exact names of the categories and pages; otherwise, you’ll encounter an error message.
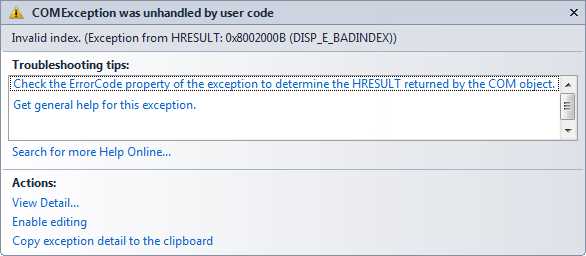
- Error result of mismatched option categories and pages
If you plan on using the options, you can go to the following registry key to get the actual category names: HKEY_LOCAL_MACHINE\SOFTWARE\Microsoft\VisualStudio\<ver>\AutomationProperties.
This registry location will show you the actual text fields to use with the get_Properties method.
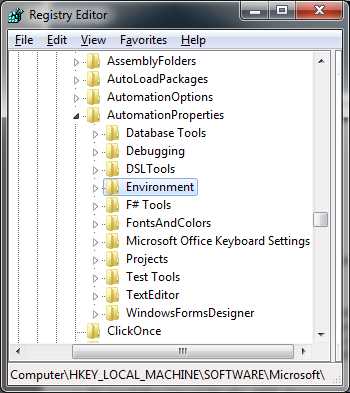
- Text fields to use with Get_properties method
For our code, we are going to get the list of folders that Visual Studio looks in when loading add-ins.
|
// Gives you access to various IDE options (see Tools | Options menu). Properties theSection = _applicationObject.get_Properties("Environment", "AddinMacrosSecurity"); foreach (Property theProp in theSection) { // Add-in locations are handled specially. if (theProp.Name == "AddinFileLocations") { object[] theArr = (object[])theProp.Value; for (int i = 0; i < theProp.Collection.Count;i++) { string s = (string)theArr[i]; sb.AppendLine(s); } } } |
To access the properties, we assign the results of get_Properties to a variable of type Properties. We then iterate through this collection, getting an individual property object for every entry within the category and page. The property contents will vary a bit, from simple name and value pairs to the slightly more complex code in the previous code sample to iterate the path list for add-ins.
Getting add-ins installed
Once we have gathered the settings and paths, we also want to report on the currently installed add-ins. The following code sample shows how to accomplish that:
|
sb.AppendLine(""); foreach (AddIn theItem in _applicationObject.AddIns) { sb.AppendLine(theItem.Name.ToString()+" (" + theItem.Description.ToString() + ") "); sb.AppendLine(" "+theItem.SatelliteDllPath.ToString()); sb.AppendLine(""); } // And put the results into the form’s edit box. theForm.VSINFO.Text = sb.ToString(); |
And the final step is to put the string we’ve just assembled into the form’s Edit box.
Environment information
We can take a similar approach to provide users some information about the development environment Visual Studio is running in.
|
sb.Clear(); // Get information about development machine. sb.AppendLine(" Machine Name: "+Environment.MachineName.ToString()); sb.AppendLine(" User: "+Environment.UserDomainName + "/" + Environment.UserName.ToString()); sb.AppendLine("Operating System: "+ OSVersionToFriendlyName(Environment.OSVersion.Version.Major, Environment.OSVersion.Version.Minor)); sb.AppendLine(" "+Environment.OSVersion.ToString() + " with " + Environment.ProcessorCount.ToString() + " processors"); if (Environment.OSVersion.Platform == PlatformID.Win32Windows || Environment.OSVersion.Platform == PlatformID.Win32Windows) { sb.AppendLine("You are using an older, unsupported OS, you should consider upgrading to a later version"); } if (System.Windows.Forms.SystemInformation.MonitorCount > 1) { sb.AppendLine("Multiple monitors setup"); } theForm.ENVINFO.Text = sb.ToString(); |
Getting an OS-friendly name
You can use the version information supplied in the environment class to convert the version into a friendlier name (such as Windows XP, Windows Vista, etc.) The OSVersionToFriendlyName() function handles that task.
|
public string OSVersionToFriendlyName(int MajorVer,int MinorVer) { string OsName = "Unknown"; switch (MajorVer) { case 1 : { OsName="Windows 1.0"; break; } case 2 : { OsName ="Windows 2.0"; break; } case 3: { switch (MinorVer) { case 10: { OsName = "Windows NT 3.1"; break; } case 11: { OsName = "Windows for Workgroups 3.11"; break; } case 5: { OsName = "Windows NT Workstation 3.5"; break; } case 51: { OsName = "Windows NT Workstation 3.51"; break; } } } break; case 4: { switch (MinorVer) { case 0: { OsName = "Windows 95"; break; } case 1: { OsName = "Windows 98"; break; } case 90: { OsName = "Windows Me"; break; } } } break; case 5: { switch (MinorVer) { case 0: { OsName = "Windows 2000 Professional"; break; } case 1: { OsName = "Windows XP"; break; } case 2: { OsName = "Windows XP Professional x64"; break; } } } break; case 6: { switch (MinorVer) { case 0: { OsName = "Windows Vista"; break; } case 1: { OsName = "Windows 7"; break; } } } break; default: break; } return OsName; } |
Displaying the form
Once the information has been gathered and transferred to the form, we now simply display the form.
|
theForm.ShowDialog(); handled = true; return; |
Final results
Once you build and run the add-in, your screen should look something like this:
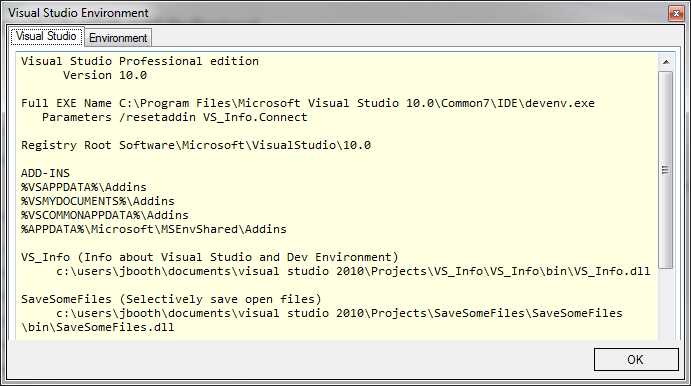
- Completed information form
You can adjust the code to include different button options, and even add a print button to print the contents of the Visual Studio setup to a printer or to a text file.
- 1800+ high-performance UI components.
- Includes popular controls such as Grid, Chart, Scheduler, and more.
- 24x5 unlimited support by developers.