
Visual Studio Add-Ins Succinctly®

CHAPTER 2
Add-in “Hello World”
Ever since the classic example in the book The C Programming Language, the Hello World program has been the starting point for new example programs. In this chapter, we will use the project wizard to create a Visual Studio add-in version of this classic example.
Create the project
To create a new add-in project, we will use the Add-in Wizard built into Visual Studio:
- Open Visual Studio and select New Project on the File menu.
- Choose Other Project Types from the Installed Templates list.
- Choose Extensibility.
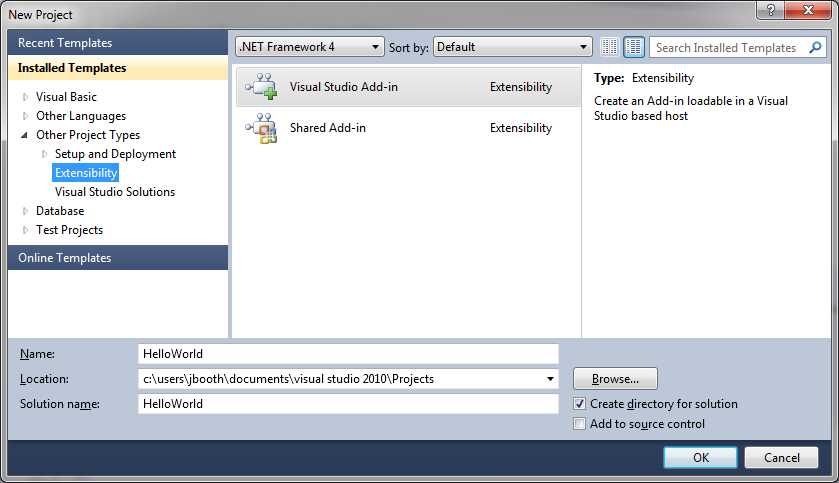
- Creating a new project
There are two types of add-ins you can create, one that can be loaded into Visual Studio (which is the focus of this book), as well as a shared add-in that can be used across different Microsoft products (such as Word, Excel, Outlook, etc.).
Note: All of the add-in modules we create in this book will start with the wizard screen, so you will use it quite a bit. It is definitely a time-saver compared to creating the implementation class code and XML files manually.
Select your language
After the wizard splash screen, you will be given the option to select the programming language you want the code to be generated in. The options are:
- Visual C#
- Visual Basic
- Visual C++ /CLR
- Visual C++/ATL
For the examples in this book, we will work in Visual C#, but you may use whichever language you are most comfortable programming in. This choice determines the language in which the add-in project will be generated, but does not impact running or using the add-in.
Application hosts
The application hosts selection screen lets you indicate which host applications can run your add-in. The options are:
- Visual Studio
- Visual Studio Macros
You can select either or both options. For the examples in this book, we only need to select Visual Studio. The add-in XML file will contain a <HostApplication> entry for each option selected. Most add-ins in this book will have a UI component, so you shouldn't need to select Visual Studio Macros.
Note: When using Visual Studio macros, interactive commands such as LaunchWizard, OpenFile, etc. are not available. Other commands, such as Quit, behave differently. For example, the Quit command closes the Macros IDE and returns to Visual Studio, rather than shutting down Visual Studio itself.
Name and Description
You can provide a name and description for your add-in. The name will be used as the menu label as well as the internal name for the command your code implements. The description is stored as tooltip text, which the IDE displays when the user selects the add-in from the Add-in Manager window.
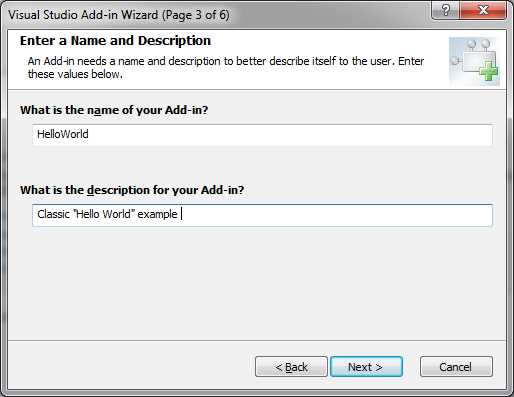
- Adding a name and description to the add-in
Note: The wizard will generate a unique, qualified command name consisting of <filename>.Connect.<commandName> when referencing your add-in module’s commands.
Add-in options
The add-in options screen helps control the generated code for your add-in. In our examples, we are going to hook our class into the Tools menu, so we select the first option to generate code on the Connection method to load our add-in.
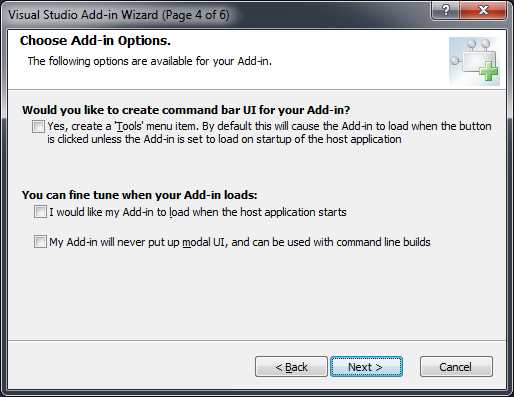
- Add-in options
For debugging purposes, do not select the Load Add-in check box when the host application starts. Ignoring this option will make debugging easier. When you are ready to deploy your application, it is an easy update to have your add-in load at start-up time.
Note: In some examples, we might connect to a different menu or toolbar, but it is still beneficial to let the wizard generate the default method, even if we tweak its code.
About Information
The About Information option lets you specify text to display in the Visual Studio About box. When you run the About Visual Studio menu option, the dialog box displays a list of all installed products, including add-ins. When a user navigates to your add-in, any information you provide will be displayed below the add-in list.
Summary
After you have filled in all of the information, a summary screen will be shown:
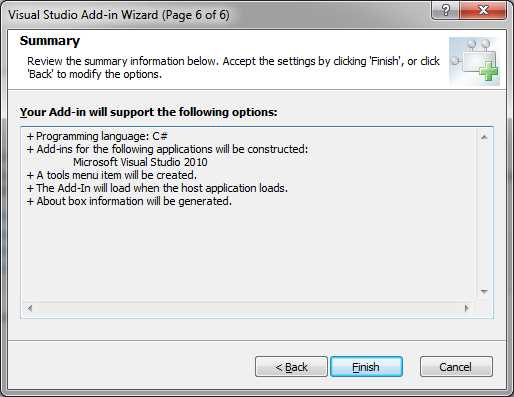
- Summary of add-in options
Double-check your selections, and if they all look okay, click Finish. The wizard will work for a bit, and then produce a source file that provides implementation methods for the IDTExtensibility2 and IDTCommandTarget interfaces. It will also generate the XML configuration files with your add-in load instructions.
Connection Code
The code generated by the OnConnection method will look like the following code sample (it may be different depending upon language and settings):
|
public void OnConnection(object application, ext_ConnectMode connectMode, object addInInst, ref Array custom) { _applicationObject = (DTE2)application; _addInInstance = (AddIn)addInInst; if(connectMode == ext_ConnectMode.ext_cm_UISetup) { object []contextGUIDS = new object[] { }; Commands2 commands = (Commands2)_applicationObject.Commands; string toolsMenuName = "Tools"; //Place the command on the tools menu. //Find the MenuBar command bar, CommandBars.CommandBar menuBarCommandBar = ((CommandBars.CommandBars)_applicationObject.CommandBars)["MenuBar"]; //Find the Tools command bar on the MenuBar command bar: CommandBarControl toolsControl = menuBarCommandBar.Controls[toolsMenuName]; CommandBarPopup toolsPopup = (CommandBarPopup)toolsControl; try { //Add a command to the Commands collection: Command command = commands.AddNamedCommand2(_addInInstance, "HelloWorld", "HelloWorld", "Executes the command for HelloWorld", true, 59, ref contextGUIDS, (int)vsCommandStatus.vsCommandStatusSupported+ (int)vsCommandStatus.vsCommandStatusEnabled, (int)vsCommandStyle.vsCommandStylePictAndText, vsCommandControlType.vsCommandControlTypeButton); //Add a control for the command to the tools menu: if((command != null) && (toolsPopup != null)) { command.AddControl(toolsPopup.CommandBar, 1); } } catch(System.ArgumentException) { // If here, the exception is probably because a command with that name // already exists. If so there is no need to re-create the command and we // can safely ignore the exception. } } } |
The code checks to see the connect mode, and only installs the add-in during the UI Setup call. This event is called during the splash screen display when Visual Studio starts. OnConnection will be called other times by Visual Studio, but there is no need to install the command into the menu structure more than once.
The code will search the IDE’s command menu structure to find the Tools menu, and then add your add-in to that menu. Most add-in modules are placed on the Tools menu, but you are free to put them anywhere you’d like.
Notice that the Application parameter is assigned to _applicationObject, a private variable in the class. This variable and the _addInInstance variable will allow your add-in code to interact with various Visual Studio elements.
Note: The private class variables (_applicationObject and _AddInInstance) are populated during the connection routine, so they can be referred to during your Exec() and Query Status() method calls.
Exec Code
The generated code includes an Exec() method, which is where you’ll add the code you want your add-in to execute. The Handled variable, passed by reference, should be set to true to inform Visual Studio that the particular command was processed by the add-in method.
|
public void Exec(string commandName, vsCommandExecOption executeOption, ref object varIn, ref object varOut, ref bool handled) { handled = false; if(executeOption == vsCommandExecOption.vsCommandExecOptionDoDefault) { if(commandName == "HelloWorld.Connect.HelloWorld") { MessageBox.Show("Hello World!", "Hello" ,MessageBoxButtons.OK); handled = true; return; } } } |
Note: You will need to add a reference to System.Windows.Forms to include the MessageBox code in your add-in.
Query Status code
This method returns a status code to Visual Studio when it requests the current status of your method.
|
public void QueryStatus(string commandName, vsCommandStatusTextWanted neededText, ref vsCommandStatus status, ref object commandText) { if(neededText == vsCommandStatusTextWanted.vsCommandStatusTextWantedNone) { if(commandName == "HelloWorld.Connect.HelloWorld") { status = (vsCommandStatus)vsCommandStatus.vsCommandStatusSupported |vsCommandStatus.vsCommandStatusEnabled; return; } } } |
Although the generated code provides the basic query result, you may need to adjust the code to return a Not Supported status if the add-in module should not be called during the debugging process of Visual Studio.
If your code does not update the status variable, the default behavior is to disable the menu or toolbar item.
Generated files
The wizard will generate the standard project files (Project and AssemblyInfo.cs), as well as the source code files containing your add-in code:
- Connect.cs: Generated source code of the add-in.
- <YourName>.AddIn: XML Configuration file for your add-in.
- <YourName> - For Testing.AddIn: XML configuration file to test your add-in.
- 1800+ high-performance UI components.
- Includes popular controls such as Grid, Chart, Scheduler, and more.
- 24x5 unlimited support by developers.