
Visual Studio for Mac Succinctly®

CHAPTER 6
Version Control with Git
Visual Studio 2019 for Mac supports team collaboration over source code by integrating with popular version control engines, such as Subversion and Git. Without a doubt, Git is the most used between the two, and for this reason I will use Git to demonstrate the collaboration capabilities of Visual Studio for Mac. Most of the features will also be available for Subversion.
Tip: Visual Studio 2019 for Mac has different command names for version control tools, to match the Git terminology, than version 2017. This chapter uses the new names and will not make comparisons with the previous edition.
Preparing a sample repository
Visual Studio for Mac can leverage all the most advanced Git features to work with source code, such as merging, branching, reviewing files, viewing differences and authors, and so on. To understand how it works, we first need to create a remote repository, and GitHub will be the service of choice.
Note: Without a doubt, GitHub is the most popular open-source platform that uses Git as the version control engine. This is why I’m showing an example based on GitHub rather than other services, but it’s worth mentioning that VS for Mac supports Git repositories on other platforms, like Azure DevOps and BitBucket.
Log into GitHub with your account. If you don’t have one, you can register for free. Click New Repository and enter IncrementalHelloWorld for the project name, as shown in Figure 67.

Figure 67: Creating a Git repository for a new project
When you’re ready, click Create repository. Once the repository has been created, you will get to a page where you will see the new repository’s URL, which has the following form:
https://github.com/YourAccount/IncrementalHelloWorld.git
YourAccount stands for the username you use on GitHub. Save this URL, since it will be used shortly. Now go back to Visual Studio for Mac and create a new .NET Core console project called IncrementalHelloWorld, but do not enable Git version control, since the project will be associated with the remote repository created previously. The reason for this is that, at the moment, Visual Studio for Mac has limited support to publishing local repositories if they do not already have a matching remote repository.
When the project is ready, select Version Control > Publish in Version Control. At this point, the Clone Repository dialog appears. Here you need to specify the details of the remote repository, including the version control engine, which is Git in this case. Enter the repository URL and your account name, as shown in Figure 68.

Figure 68: Entering a repository’s details
The port number varies according to the protocol used. For example, with https, the port is 443. When you click OK, Visual Studio for Mac will ask for your confirmation to publish the project remotely and will request your GitHub (or any other Git service of your choice) credentials. After a few seconds, the project will be available both locally and remotely.
Working with file changes
In the Program.cs file, remove the blank space between the using directive and the namespace keyword, then add the following line right after the Console.WriteLine statement.
Console.ReadLine();
With this line, you have introduced a change, and therefore, a difference between the local repository and the remote repository updated previously. At the bottom of the code editor, click the Changes tab. You will be able to compare the local files with the remote files. Lines of code highlighted in green represent new code, whereas lines of code underlined in red represent removed code. Figure 69 shows how the differences look.

Figure 69: Viewing file changes
With the Blame tab (see Figure 70), you can see the authors of a specific piece of code, together with the commit details. If the code has not been committed yet, the author still appears in the view near the code that is currently a work in progress.

Figure 70: Viewing code authors
With the History tab, you can see the details of the edits made to each file in a commit. Look at Figure 71. In the box at the left side, you will see the list of commits. When more commits are available, you can click a commit and see its details on the right side of the tab. Additionally, when you select a commit, the area at the bottom of the tab shows the list of files that were committed and the edits they went through.

Figure 71: Viewing commits history
The Merge tab is about merging branches and will be discussed later in this chapter. Now, suppose you want to commit the changes made previously. Select Version Control > Review and Commit. As you can see in Figure 72, you will see the list of files with changes. In this case, the Program.cs file has a red icon, which means it has been edited, and a red overlay icon is also visible in the Solution pad for this file. New solution files are recognizable by a green overlay icon, whereas removed files are recognizable by a blue overlay icon.

Figure 72: Reviewing file changes before commit
If you expand the file, you will see a preview of the code changes, including new and removed code. Do not forget to enter a comment, and then click Commit. At this point, you will see the Commit Files dialog (see Figure 73). Here you can select the option to automatically push changes to the remote repository, so select the Push changes to remote repository after commit check box and click Commit.

Figure 73: The Commit Files dialog
Note: If you get an error saying that the push operation could not be completed the first time you commit, it might be due to the fact that Visual Studio needs your Git credentials again. If this happens, select Version Control > Push Changes. Visual Studio will ask your Git credentials and will push any unsaved changes to the remote repository. Then commit again, and this time it should work.
Once the code has been committed, the repository is up to date with the latest version of the code. If you opted for automatic pushing changes, the remote repository is also up to date. If you did not select this option, you can select Version Control > Push. Remember to always push your changes when you want other developers to be able to work on the latest version of the source code.
Collaborating with other developers
Working with a version control service is not only important for keeping a history of the work on a project, but also because it simplifies the way a development team can collaborate on the same project. This section describes the available collaboration tools in Visual Studio for Mac that allow for Git integration.
Cloning repositories
When you want to work on a project that is associated to a version control service like Git, you need to get a copy of the source code, work on the code, and finally, you resubmit the code to the server. In Git terminology, getting a copy of the source code is known as cloning a repository.
In Visual Studio for Mac, you can clone a repository via Version Control > Clone Repository. When you do this, the Select Repository dialog appears (see Figure 74). Here you can specify the URL of the existing remote repository, your Git user account, and other properties like you did when pushing a local repository to its remote counterpart.

Figure 74: Cloning a repository
Click Clone to start cloning the repository to the folder specified in the Local path field. Obviously, you can select a different path. Once the repository has been cloned, you will be able to open the solution file as you would normally.
Branching and merging
Visual Studio for Mac has built-in support for creating and managing both local and remote branches. To work with branches, select Version Control > Manage Branches and Remotes. When the Git Repository Configuration dialog appears (see Figure 68), you will see a list of branches for the current project. In the sample project created previously, only the master branch is available. If you click New, you can create a new branch in the Branch Properties dialog, still visible in Figure 75.

Figure 75: Creating a branch
Enter the branch name, then click OK. For the current example, I’m creating a branch called development. Alternatively, you can track an existing remote branch by using the Track a branch check box and selecting a branch from the drop-down list. The new branch will be visible in the Git Repository Configuration dialog. At this point, you can click Switch to branch to set the selected branch as the active branch. When you’re ready, click Close. Now that you have a new branch, replace the code of the Main method with the following, in order to introduce file changes.
Code Listing 4
static void Main(string[] args) |
By following the lesson learned previously, review and commit your code. Figure 76 shows how file changes appear.
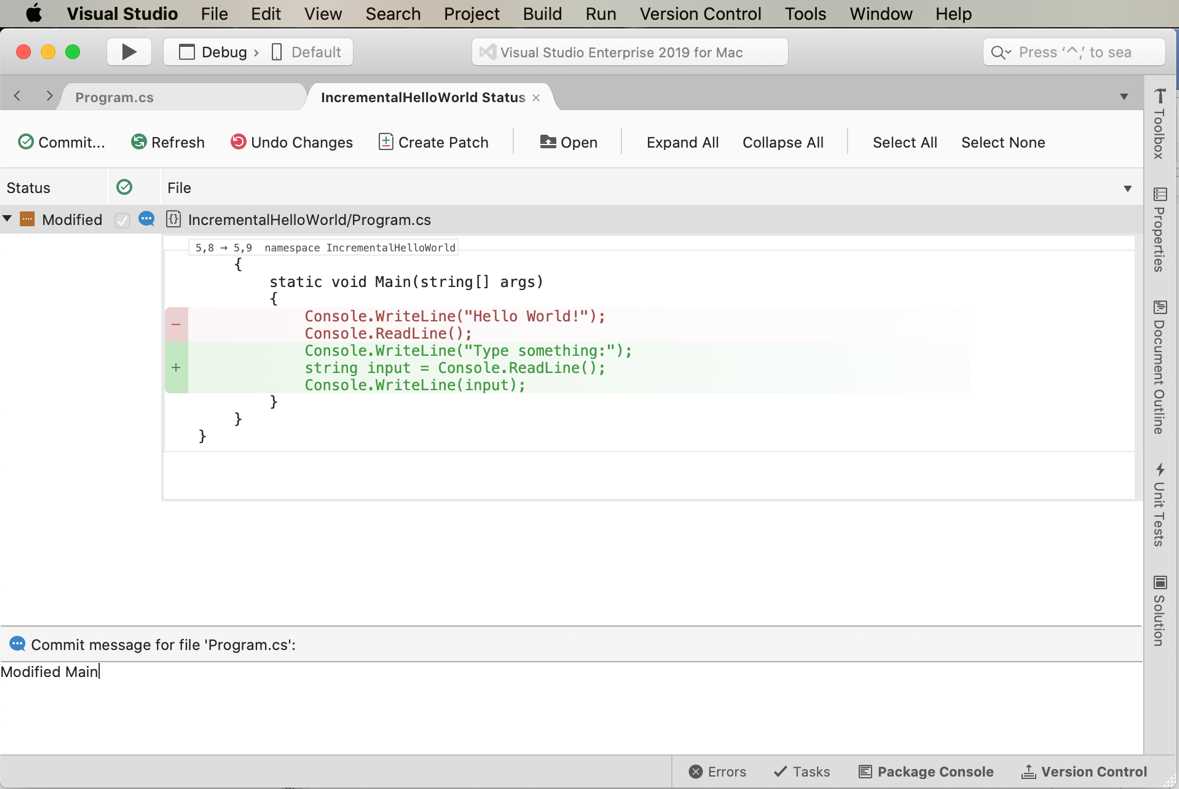
Figure 76: Reviewing changes on the new branch
Click Commit when you’re ready and make sure your changes are pushed to the remote repository. Now switch to the master branch. As a shortcut, you can right-click the solution name in the Solution pad and select Switch to Branch > master. Now select Version Control > Merge. When the dialog appears (see Figure 77), you can select the branch that will be merged into the current branch, development in this case. Let’s select development, then Merge.

Figure 77: Merging a branch
The source code will be updated accordingly. When you’re satisfied with your changes, select Version Control > Push so that the code will be updated in the remote branch, as well.
Resolving conflicts
When merging branches, some conflicts can occur. In this case, you will be able to use the Merge tab of the code editor, where you will see the local version on the left side, the remote version on the right side, and a preview of how the code will appear at the center of the window. You will be able to resolve conflicts by selecting the parts of the code you want to include in the merging process.
Synchronizing branches
If more people are working on the same branch, it is important to stay up to date with the latest edits on the code. With Version Control > Pull, the current branch will be synchronized with the remote branch.
Hints about stashes
Visual Studio for Mac also supports stashes. With stashes, Git allows for saving your edited files on a stack of unfinished changes that you can reapply at any time. This can be useful when you have not finished your work and you want to have a remote copy of your changes without affecting the repository with a commit. If you have experience with Team Foundation Server, now called Azure DevOps, this is similar to the Shelve operation. Stashes will not be discussed in this chapter, but Visual Studio for Mac provides the Stash, Pop stash, and Manage stashes commands in the Version Control menu that help you work with this feature.
Chapter summary
More often than not, you need to collaborate on a project with other developers. Visual Studio for Mac has integrated support for the Subversion and Git version control services, but for Git, the integration is even more powerful. Once your project is under version control, you can easily see file changes and commit your work, so that other developers can then work on the project by first cloning the repository, and then creating and merging branches. All the work can be done inside Visual Studio, which offers convenient integrated tabs in the code editor and specific dialogs. So far, you have seen a large number of productivity features, but Visual Studio 2019 for Mac offers even more. In fact, it can be customized to better suit your preferences, and it can be extended so that its power is increased with third-party tools.
- 1800+ high-performance UI components.
- Includes popular controls such as Grid, Chart, Scheduler, and more.
- 24x5 unlimited support by developers.