
Visual Studio for Mac Succinctly®

CHAPTER 2
Exploring the IDE
Visual Studio for Mac provides a very powerful integrated development environment (IDE) with a very versatile code editor and tons of productivity tools. This chapter provides guidance on how you can leverage the integrated tools and get the most out of the IDE in terms of productivity.
The Start window
At startup, Visual Studio for Mac shows the Start window. This contains a number of shortcuts and links that simplify common tasks. Figure 4 shows how it appears.

Figure 4: The Start page
You can open the Welcome page at any time by selecting Window > Show Start Window. The Start window is very simple and has been simplified a lot compared to VS for Mac 2017. On the left side of the window, you can see the list of recently used projects. If this is the first time you’ve opened Visual Studio, the Recent area will be empty. In Figure 4, you can see an example of a list of most recently used projects as it appears on my machine.
Simply click on a project name to open it. You can also filter the list by typing inside the search box. If you right-click a project name, you will also see an icon with the x symbol, which allows you to remove projects from the list. Notice that this action does not delete the project from disk; it just removes the project from the list of most recently used ones.
On the right side of the Start window, you will see two shortcuts: Open and New. These allow for opening existing projects and creating new projects, respectively. The process of creating new projects is more thoroughly described in the next section.
Creating projects
You create projects via the New Project button on the Start page or by selecting File > New Solution. Both actions open the New Project dialog, where you can see the full list of available project templates. Figure 5 shows an excerpt of the full list, which you can see by scrolling the list on the left side of the dialog.

Figure 5: Creating a new project
In the next subsection, you will read more details about the available project templates, and in Chapters 3 and 4, you will learn how to use a few templates for .NET Core and Xamarin. Remember that you can simply click a project template to see a description on the right side of the dialog. For example, in Figure 5 you can see a description of the Console Application project template. You will get a similar description when clicking on the other project templates.
Tip: You must scroll the list on the left in order to see all available project templates. Also, the New Project dialog presents a tab called Recently used, where you will see a list of the most recently used project templates.
Available project types
Visual Studio for Mac allows for building a variety of different applications, from web (ASP.NET) to mobile (Xamarin) to cloud (Azure). It also allows building apps for .NET. Table 1 summarizes the available project categories in Visual Studio for Mac.
Available project categories | |
|---|---|
Category | Description |
Contains Xamarin project templates that focus on code reuse to build cross-platform apps, games, and libraries. | |
iOS | Contains project templates based on Xamarin.iOS that allow you to build apps, games, and libraries for the iPhone and iPad. |
tvOS | Contains project templates based on Xamarin.TVOS that allow you to build apps, games, and libraries for the Apple tvOS. |
Android | Contains project templates based on Xamarin.Android that allow you to build apps, games, and libraries for Android devices, including wearable devices. |
Web and Console | Contains project templates that allow you to build cross-platform console and web applications based on .NET Core. Visual Studio 2019 for Mac adds support for new project types, such as Blazor, Razor, Angular, React.js, and gRPC services. |
Mac | Contains project templates based on Xamarin.Mac that allow you to build applications and games for macOS. |
Cloud | Contains project templates that allow for developing Azure Functions in C#. |
Other | Contains miscellaneous project templates; most relevant templates allow the building of console, ASP.NET web apps, and services that run on Mono and Cocoa desktop apps. |
Each category is made of one or more specialized project templates. All the project categories consist of three subcategories: App, Library, and Tests. The App subcategory includes project templates you use for app development; Library contains project templates you can use to author libraries, both universal libraries with the .NET Standard specification and platform-specific libraries; and Tests includes project templates you can use to write unit tests (.NET Core) and automated UI tests (Xamarin). As an exception, the Cloud category consists only of a subcategory called General.
Note: Project templates for game development with Unity will be available in the New Project dialog once you install the proper tools but will not be covered in this book. It is also worth mentioning that, after creating your first projects, the New Project dialog will display an additional tab called Recently used, where you will be able to quickly access the most recently used project templates.
Creating your first C# project
In order to discover the goodies of the Visual Studio 2019 for Mac IDE, you need to create at least a basic project. In the New Project dialog, select the Console Application template under .NET Core (see Figure 5), and click Next. If multiple versions of .NET Core are installed on your machine, you will have an option to select the version, in which case select the highest version available. On the next screen (see Figure 6), enter a name of your choice for the new sample app.

Figure 6: Entering a project name
The Location text box allows you to specify a folder for your new solution. By default, Visual Studio for Mac creates a Projects folder under the Home directory of your Mac. You can click Browse to select a different folder, or you can simply type a new folder name, and you can change the default folder in the IDE options. I recommend that you leave the check box selected next to Create a project directory within the solution directory. This option ensures that a root folder is created for the solution, and that a subfolder in the solution folder is created for the new project. This helps to keep the solution’s structure well organized, especially if you plan to add new or existing projects to the solution later.
The New Project dialog provides a visual representation of the solution’s folder structure on the right side, under Preview. You will see how this preview changes depending on whether the directory check box is selected or deselected. You also have an option to enable Git version control for the solution, but this will be discussed in more detail in Chapter 5.
When you’re ready, click Create. After a few seconds, your new project will be ready. If you’ve never made customizations to the IDE, by default, you will see the Solution pad on the left side of the workspace and the code editor on the right side. You might also see additional pads, such as Errors. If you do not see the code editor, expand the project view in the Solution pad and double-click the Program.cs file. At this point, your workspace should look like Figure 7.

Figure 7: A new C# console application project-ready
When you create a new project or open an existing solution, Visual Studio for Mac will automatically attempt to refresh any references to external libraries, such as NuGet packages. This might take a few seconds; you will see the progress of the restore operation in the upper status bar (where you can normally see the Visual Studio icon and product name). This is important to remember, because you might have projects that have dependencies, and you might see some error squiggles in the code editor until libraries restoration is completed.
The Solution pad (which you can see on the right in Figure 7) is a very important tool, and you will work with it all the time. It basically provides a hierarchical view of your solution and allows you to browse for files and folders. You can also right-click the solution name and then select Add > New Project or Add > Existing Project to add new or existing projects. You can also add individual files and folders (referred to as solution items) that will not be part of the build output, but that you might need for several purposes, such as documents or images you might want to include for your team.
For each project in the solution, the Solution pad shows not only files, but also dependencies your project has on specific SDKs (such as .NET Core in the current example) or on external libraries. Notice how the code editor provides syntax colorization for any of the supported languages, as you might expect.
Running projects
As a common behavior, Visual Studio for Mac provides commands to compile your code in the Build menu via the Build All, Rebuild All, Build, and Rebuild commands. When you compile your code, you also need to select a build configuration, and Visual Studio for Mac exposes the Debug and Release configurations, which are self-explanatory, especially if you have experience with Visual Studio for PC. You can select the configuration from the standard toolbar (see Figure 8).

Figure 8: The standard toolbar
Notice that additional configurations might be available, depending on platform-specific project templates, but these two are certainly available to all projects. You can run your solutions with the Start button in the toolbar and with two commands from the Run menu: Start Debugging and Start Without Debugging. In the first case, you first select the Debug configuration, and then you invoke the command. This will launch the application from within the IDE with an instance of the debugger attached and will enable the powerful debugging tools in Visual Studio that you will learn to leverage shortly. In the second case, you can select the Release configuration, and the application will start without an instance of the debugger, detached from the IDE. You can certainly leave the Debug configuration selected when running the application without debugging, but the generated debug symbols will be ignored.
Once you have selected the configuration, you can start the application. Apart from the two commands in the Run menu, the easiest way is by clicking the Start button, which you can see in Figure 8. When you start the application, Visual Studio first saves all recent changes, and then it performs a Build All operation if it detects some changes from the last build (or if you have never built the solution). It does not perform a Build All operation if you already called Build All or Rebuild All before starting the application. Figure 9 shows the sample console application running in the integrated terminal.

Figure 9: The sample app running in the terminal
In this case, the application has been started with the Debug configuration enabled, so an instance of the debugger is attached. All the steps you have seen so far apply to all the supported project types, and the only difference will be the application host, which can be a terminal window, web server, device simulator, or physical device, depending on the project type.
Tip: The integrated terminal is a new feature in Visual Studio 2019 for Mac that will be discussed shortly. If you wish to run programs inside an external instance of the Terminal, select Visual Studio > Preferences > Terminal and unselect the option called Enable integrated terminal.
Understanding pads
Pads are floating tool windows that are responsible for various tasks. Pads in Visual Studio for Mac can be compared to tool windows in Visual Studio on Windows, and to pads in Apple’s Xcode. Pads can be docked and arranged in the workspace according to your preferences so that you can customize the development environment in the best way for you.
In the previous sections, you worked with the Solution pad, which allows you to browse and manage projects and code files in a solution. In this section, you will learn about the other most important and common pads in Visual Studio for Mac. Some other specific pads will be discussed where appropriate.
As a general rule, pads can be enabled with View > Pads. When you open a pad, it is automatically docked and positioned in a specific place in the IDE, but you can rearrange it as you like, and you can also undock a pad and treat it as a stand-alone window.
You can also auto-hide pads to show them only when necessary and maximize the editor area by simply clicking their labels. In order to undock a pad, you click its title, move it by keeping the left mouse button pressed and dragging, and then release it when you see that its height is not constrained by other areas of the workspace. In the undocked state, a pad works like a stand-alone window; therefore, it has the classic three buttons to close, minimize, and maximize it. You can dock a floating pad by simply clicking the Dock button on its toolbar. Visual Studio will automatically dock the pad in the position it was docked previously. In the docked state, the Dock button changes into Auto-Hide, which you can click to completely hide the pad (except for its label, which you can click to open the pad). It will be automatically hidden again once you click outside of it.
In Figure 10, you can see a number of pads in a hidden state with only their labels visible, such as Toolbox, Properties, Document Outline, and Unit Tests. You can also completely close a pad by clicking the Close button on its toolbar, but then you will need to select View > Pads to open it again. In order to rearrange pads in the workspace, you click a pad’s title and move it to the desired position. An explanation of the available pads will be provided in the next paragraphs.
The Classes pad
The Classes pad provides a hierarchical view of all the types and their members defined within projects in a solution. Figure 10 provides an example based on a namespace that contains several classes, an interface, and an enumeration.

Figure 10: The Classes pad
As you can see, classes show all the types defined inside a namespace, and can be expanded to show the members they define. Namespaces are represented by gray icons and an open bracket. Value types are represented by a green icon and the first letter of the type (E for enumerations and S for structures). Reference types are represented by light blue icons and the first letter of the type (C for classes, I for interfaces, and D for delegates). Type members are represented by a violet icon for fields and properties, by a light blue icon for methods, and by a red icon for constants, plus the first letter of the member type (F for fields, P for properties, M for methods, and C for constants).
Icons also help with understanding a type or member’s visibility: if a type or member is public, the icon has no border; if it is private, the icon has a strong border; if it is protected, the icon has a thin border; if it is internal, the icon has thin borders only around its corners. Notice how, for static members, an overlay icon representing four black squares is added to the object icon. If you double-click a type or member in the Classes pad, the code editor will immediately move the cursor to that type or member, and it will also highlight all the occurrences of its name in the code file. The Classes pad is extremely useful as a visual representation of the hierarchy of objects in your solutions and is a perfect companion for the Solution pad.
The Errors pad
The Errors pad shows all the messages that Visual Studio for Mac generates during the development of an application. Messages can be errors, warnings, and messages. Errors include any problems or blocking errors the compiler encounters that prevent your code from being successfully compiled and, consequently, prevent your application from running. Warnings include messages about potential problems that actually do not prevent your code from being compiled successfully, but that should not be ignored. The compiler also reports warnings that help you keep your code clean, for example, with unused declared variables. Messages are just informational messages that have no impact on the build process. Figure 11 shows an example of the Errors pad displaying information about an error.

Figure 11: The Errors pad
For each error, warning, or message, the Errors pad shows the line number in the code file (Line column), the error description (Description column), the code file where the problem was detected (File column), the project name (Project column), and the path (Path column). Optionally, the Errors pad might show a category based on the .NET coding rules. Messages can be filtered to exclude errors, warnings, and messages by simply clicking the corresponding button or by typing key words in the search box. If you double-click a message, the code editor will move the cursor to the code file and line number where the problem was detected. Additionally, you can right-click a message and select Go to reference to find information about the error code on the internet.
The Errors pad is not the only way for Visual Studio to report errors and warnings. In fact, the code editor also plays a key role in this by underlining errors and warnings with the so-called squiggles, which are wavy lines that appear under code issues and that are red for errors and green for warnings.
The Properties pad
Because you often need to set properties for your .NET objects, layouts, and files, Visual Studio for Mac provides a convenient tool to set properties for files and objects, called the Properties pad. The appearance of the Properties pad is different according to the item you need to set properties for, but it generally appears as a two-column table in which the left column displays the property name and the right column shows or sets the property value. Figure 12 shows an example of the Properties pad for a C# code file.

Figure 12: The Properties pad
You will use the Properties pad often, so additional explanations will be provided where appropriate. The Properties pad is particularly useful when working with user interface elements in web or Xamarin projects, because it allows you to set object properties with a visual tool instead of setting all the properties manually in the code.
The Toolbox pad
The Toolbox pad makes it easy to add items to your code or to elements of the user interface. Instead of manually writing code snippets or writing the code that defines a piece of user interface at design time, you can drag items from the Toolbox pad onto the code editor or the designer surface. Figure 13 shows an example of the Toolbox as it is available over a XAML file in a Xamarin.Forms project, presenting a list of available layouts and controls.

Figure 13: The Toolbox pad
In the case of code files, the Toolbox pad would contain a list of code snippets that you can drag onto the code editor to insert a ready-to-use code block.
The Terminal pad
One of the new features in Visual Studio 2019 for Mac is the integrated terminal, which you enable via View > Pads > Terminal. The terminal is a fundamental tool for developers working on macOS, because it allows us to use the command line. With Visual Studio 2019 for Mac, you no longer need to open an external instance of the terminal. Figure 14 shows an example where you can see the execution of the du command, which lists all the subdirectories for the current folder.

Figure 14: The Terminal pad
Actually, the Terminal pad is not only a place where you can run commands, but also an integrated window where Visual Studio can run .NET Core console applications and display their output without opening an instance of the system terminal. You will see an example in Chapter 3, “Debugging Applications.” Using the integrated terminal is optional, which means it can be disabled by selecting Visual Studio > Preferences > Other > Terminal.
Working with the code editor
The code editor in Visual Studio 2019 for Mac is the place where you will spend the most time in your developer life; therefore, it deserves a thorough explanation. In this section, you will learn how to get the most out of the features that empower the code editor to boost your productivity, and you will see how most of the tools work directly in the active editor window, so that you will never lose the focus on your code.
As a general rule, Visual Studio will open a new editor window every time you double-click a code file in the Solution pad. Each code file lives in a separate editor window that is represented by a tab. There is no Visual Studio limit on the number of windows, pads, and tabs that can be displayed. By default, the code editor shows the full view of a code file, but you can split a single editor window into two columns with View > Editor Columns > Two Columns. This is useful when you need to work on different places in the same code file concurrently. Use View > Editor Columns > One Column to restore the original view.
Syntax colorization
As you would expect, Visual Studio for Mac’s code editor provides syntax colorization for all of the supported languages, such as C#, F#, XML, XAML, HTML, JavaScript, JSON, and Visual Basic. In all other cases, the code editor will treat files as plain text documents. In this new version of the IDE, syntax colorization has been changed to match the same colors used in Visual Studio 2019 on Windows.
The Edit menu
The Edit menu offers common commands for editing source text, such as Copy, Paste, Cut, Undo, Redo, and Select All. It also provides the Format submenu, which includes commands to fix spaces, such as Format Document, Indent, and Unindent. You can also quickly convert a line, string, or identifier to uppercase and lowercase with the same-named commands. With Join Lines, you can make a number of selected lines of code into a single line. With Toggle Line Comments, you can quickly comment or uncomment one or more lines. For each command, the Edit menu also shows the proper keyboard shortcuts. The most common are Command + C (Copy), Command + V (Paste), Command + X (Cut), and Command + Z (Undo).
Zooming the code editor
You can zoom the size of the view of the active editor by pressing Option and then moving the mouse wheel up (zoom out) or down (zoom in).
IntelliSense
IntelliSense has always been one of the biggest points of strength in Microsoft Visual Studio on Windows, and now this technology is also available in VS for Mac. IntelliSense is an advanced word-completion engine that provides suggestions based on context and offers help and tips on how to use a type or member. IntelliSense shows up when you start typing in the code editor and, in Visual Studio 2019 for Mac, it has been rebuilt upon the same engine that powers IntelliSense in Visual Studio 2019 on Windows, adding new important features. Figure 15 shows an example in which the developer starts writing a .NET type name.

Figure 15: IntelliSense’s keyword completion
IntelliSense automatically filters the list of available words for completion as you type. When you scroll the list and select an item, a tooltip appears and shows documentation about that item. You can press the spacebar or Tab to insert the selected word. Notice how items in the list have the same icons with the same colors you saw previously with the Classes pad.
It is worth mentioning that IntelliSense here is showing only what it thinks is suitable in the current context, so it does not show reserved words or other objects that should not be in a method body. If you insert a word and then press the dot, IntelliSense will show objects available for the inserted item.
New IntelliSense filtering features
When you scroll the list of members, you will see a tooltip with the member signature and the documentation. In the case of methods, if you press the left and right cursor keys, you will be able to scroll the list of method overloads. Additionally, when you insert methods, IntelliSense will show contextualized documentation for method parameters when you open the left parenthesis. A new IntelliSense feature in Visual Studio 2019 for Mac is type filtering. As you can see in Figure 16, at the bottom of the pop-up there are several icons, each representing a type or member. For example, if you click the Enum icon, then IntelliSense will filter the list by displaying only enumeration names (see Figure 17). Click the same icon again to return the full list.

Figure 16: IntelliSense filtering in action
Tip: Another demonstration of how IntelliSense provides contextualized suggestions is outside of namespace declarations: in this case, only a few reserved words are supported, and thus IntelliSense properly suggests only the words that the compiler accepts to be outside a namespace declaration, such as the using, unchecked, and namespace reserved words.
IntelliSense also makes it easier to insert ready-to-use code snippets via the so-called templates. When you encounter the (…) icon in the word completion list, you can press Tab to insert a code snippet for the given template. For instance, you can select the (…) interface item to insert an interface stub quickly. The code editor will then highlight all the auto-generated identifiers that you might want to rename or that need your attention.
Live static code analysis
The code editor leverages the .NET Compiler Platform (also known as project Roslyn) to detect code issues as you type and provide quick fixes and suggestions with all the supported languages. If you used Visual Studio 2017 for Mac in the past, you will notice huge changes in this new version, because both the code analysis engine and the IDE interface for issue detection and fixes have been updated in a lot of areas.
When code issues are detected, the code editor underlines the code that has issues with red squiggles for errors and green squiggles for warnings. The code editor also displays detailed messages when you hover over a code issue. Figure 17 shows an example based on a class that should implement the IDisposable interface, but that actually does not.

Figure 17: Live code issues detection
With most errors and warnings raised by the compiler, Visual Studio is also able to offer a proper fix. For example, if you hover over a code issue and click the light bulb icon (visible in Figure 17), or if you right-click a code issue and then select Quick Actions and Refactorings, the code editor will offer one or more possible code fixes for that context, with a live preview of how the code will look after the fix.
In the current example, the code editor offers four different alternatives to implement the IDisposable interface, with a live preview for each (see Figure 18). As an alternative, you can click the word that is underlined with a squiggle and wait for a little overlay line that appears over the word, which you can click to enable the quick fix actions.

Figure 18: The code editor suggests quick fixes for the current context
You can select one of the suggested fixes and the code editor will implement the code based on your selection. Listing and describing all the available code fixes for all the errors and warnings the compiler can detect is not possible here, but just keep in mind that fixes are available for the most common development contexts.
Sometimes, you might see a screwdriver icon instead of a light bulb. When you see the screwdriver, Visual Studio has suggestions for improvements that you are totally free to ignore because your code is already accurate. When you instead see the light bulb, Visual Studio has suggestions that you should really follow to improve your code, which might have some problems that could not be immediately evident, but that the compiler was able to analyze as potentially wrong.
Live analysis and code fixes dramatically improve your coding experience, as they provide a convenient way to fix code issues within the active editor window, helping you keep your focus on the code.
Tip: You can see the list of available analysis rules and quick-fix actions in the Visual Studio preferences. To accomplish this, select Visual Studio > Preferences > Text Editor > Source Analysis > C#. The dialog will be divided into two tabs: one containing the list of code issues, and one containing the list of actions. You can also disable and enable both via the corresponding check boxes.
Code refactoring
Refactoring is the process of rewriting a piece of code in a better way, without changing its original behavior. By leveraging the C# compiler’s APIs, the code editor in Visual Studio 2019 for Mac offers a large number of built-in code refactorings. As a general rule, you can select a piece of code, right-click, and then select either Refactor or Quick Actions and Refactorings to see if a code refactoring is available.
Additionally, Visual Studio automatically detects the availability of a code refactoring for a specific code block, so it underlines a keyword or block with an overlay icon that you can recognize by three small dots, which you can click to discover potential refactorings. Keep these options in mind, because only the most common refactorings will be discussed here. You can select a single identifier or type name, a line of code, or even a code block, as refactorings are available at different levels.
Common built-in refactorings include the following:
Removing redundant code: Names of unused variables or namespaces are colored in gray instead of black, or keywords referring to redundant code are colored in light blue. When you see redundant code, you can hover over it with the mouse, and the code editor will show a descriptive tooltip of the full message. Then you can right-click the redundant code, select Quick Fix, and choose the proper fix.
Extracting code blocks: You can create a method from a set of lines of code inside another method. To accomplish this, select the code block you want to extract, right-click, and select Quick Fix > Extract Method. Once the method has been created, you will be provided with an option to enter a new method name. Another useful refactoring allows extracting of an interface from a class. To accomplish this, right-click a class name and select Quick Fix > Extract Interface.
Renaming identifiers: The code editor allows you to easily rename identifiers directly inline, without modal dialogs. For example, you can right-click a variable name, then select Refactor > Rename. At this point, the identifier will be highlighted. Just type the new name, and you will see how all the occurrences of the identifier will be renamed as you type. Also, the code editor highlights the line numbers for lines where an occurrence of the identifier is being renamed.
Changing access modifiers: Access modifiers represent the visibility of types and members, and are represented by the public, private, internal, protected, and protected internal keywords. Most code blocks share refactorings that allow you to quickly change the access modifier, such as To public and To private.
Changing method definitions: The C# compiler provides some interesting code refactorings for methods and method parameters. Table 2 provides a quick summary.
Table 2
Method refactoring | ||
|---|---|---|
Name | Scope | Description |
Change signature | Method | Allows you to change the signature of a method quickly. |
To… | Method | Allows you to change the access modifier of a method quickly. |
Create Overload Without parameter | Method | Offers to create a method overload without parameters, if one does not already exist. |
Add null check for parameter | Parameter | Introduces a code snippet that checks whether a parameter value is null (only with reference types). |
Add contract requiring parameter must not be null | Parameter | Introduces a code snippet based on the Code Contracts library that ensures the parameter value is not null. |
Moving types to files: Sometimes it is common to define a type inside a code file where other types are already defined. Though this is fine for the compiler, it’s not very good from the point of view of code organization. If you look at Figure 19, you can see how it is easy to move a type into a specific file by clicking the screwdriver icon that appears near the type definition.

Figure 19: Moving types into separate files
Of course, this works not only with classes but also with namespaces, interfaces, structures, and enumerations.
Don’t forget to right-click an object in the code editor and then select either Quick Fix or Refactor to see what other code refactorings are available.
Navigating your code
Visual Studio for Mac offers a number of features that allow you to browse your source code quickly and easily move among files, types, and members. This section explains these features and how to increase your productivity in the editing experience.
Navigating between files
Instead of moving to a different file using the Solution pad, you can press Control + Tab. Visual Studio will show a pop-up containing the list of files that can be opened with an editor window. You can simply keep Control pressed and go on pressing Tab to select a different file. Just release both keys when you have made your choice. As an alternative, you can open the Window menu and select the file you want to open in the editor or select Window > Next Document and Window > Previous Document to quickly move through the sequence of open files.
The scrollbar
The editor’s scrollbar does not just allow you to move quickly inside a source code file; it is an advanced tool that gives you a visual, immediate representation of any relevant information in the code. For a better understanding, consider Figure 20, where you can see a C# code file that contains two intentional errors (the missing semicolon at line 10 and a missing closing bracket at line 38), and warnings on the i variable inside the Main method, which is never used and is considered redundant.

Figure 20: The scrollbar flags code issues
As you can see, the scrollbar shows a number of small horizontal lines that make it easier for you to understand where errors, warnings, comments, and the cursor are. Generally speaking, you can hover over a symbol and see a tooltip that describes the related message, and then you can click the horizontal line and the code editor will move the cursor to the line that is affected by the information. More specifically, errors are represented with a red line, whereas warnings are represented with a green line. If the code contains any errors or warnings, the scrollbar will show a small, colored circle at the top. This circle will be yellow if the code contains only warnings, or red if it contains at least one error. You can hover over the circle to see a detailed message, and you can click it to go to the next error or warning quickly.
Block delimiter selection
With complex, long, and nested code snippets, it might be difficult to understand the enclosing blocks. When you click the opening or closing tag for a given code block, VS for Mac automatically highlights both enclosing tags, such as brackets or parentheses.
Find References
Find References is a tool that allows you to see quickly how many times and where an object has been used across the entire solution. To use this tool, right-click the name of an object and select Find References. Figure 21 shows an example based on finding all the references for a property called LastName in a class called Person.

Figure 21: Finding references of types and members
The list of references appears in the Search Results pad. At the bottom of the pad, you see the number of results. The Project column shows the name of the project in which the reference was found. The File column contains both the name and the line of the code file in which the reference was found. The Text column is very useful, because it shows a preview of the code that contains the reference with syntax colorization. The Path column shows the folder path for the code file. You can double-click a reference to move to the related code in the editor, and Visual Studio will open a new editor window on the file if it is not the same as the active editor window. The reference will be automatically highlighted in the code.
Navigate
The Navigate tool works similarly to Find References, but it provides more advanced capabilities for specific scenarios. Navigate can be enabled by right-clicking an item in your code, and then selecting Navigate. The submenu offers the navigation commands summarized in Table 3, and whose results are shown in the Search Results pad as it was for Find References.
Table 3
Options for the Navigate tool | |
|---|---|
Name | Description |
Find References of All Overloads | Finds all references of all the overloads of a method that have been used in the solution. |
Base Symbols | Shows the list of base types and interfaces that the type on which you invoked Navigate inherits from or implements. If you invoked Navigate on a method, it shows the list of methods that the current one is overriding. |
Derived Symbols | Shows the list of types that inherit from the type on which you invoked Navigate. If you invoked Navigate on a method, it shows the list of methods that are overriding the current one. |
Extension Methods | Shows the list of extension methods used by the object on which you invoked Navigate. |
Member Overloads | Shows the list of overload definitions for the type member on which you invoked Navigate. |
Implementing Members | Shows the list of types or members that are implementing an abstract type or member or an interface or its members. |
For example, if you had a class Person that implements an IPerson interface, and then you wanted to see the list of all types that implement IPerson, you could right-click the Person type name, then select Navigate > Derived Symbols. This would produce the result shown in Figure 22.
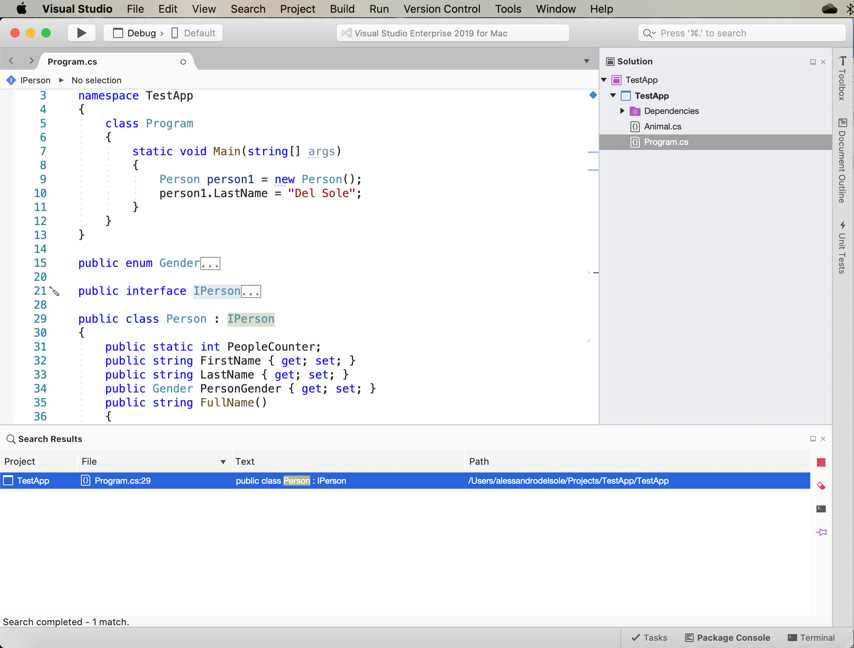
Figure 22: Finding the list of derived symbols
Browsing objects within a code file
Visual Studio 2019 for Mac provides a visual way to browse types and members quickly within a code file. Each code editor window has tabs that you can click to show the list of types defined in the active code file. When you select a type, then you will be able to see the list of its members. Figure 23 shows an example. If you click a member name, the code editor will move the cursor to that member’s definition.

Figure 23: Browsing types and members within a code file
Folding code blocks
Code blocks can be collapsed by clicking the – symbol near the border of the code editor, and they can be expanded by clicking +. Collapsing and expanding code blocks in Visual Studio is called folding. The View menu offers a Folding submenu with the following commands:
- Disable Folding: With this command, code blocks can no longer be folded. You can then select Enable Folding to re-enable this feature.
- Toggle Fold: With this command, you can collapse or expand an individual code block.
- Toggle All Folds: With this command, you can collapse or expand all the code blocks in your code file.
- Toggle Definition: This command is useful to fold all the code blocks that are nested inside a type or member definition.
Folding code blocks can be useful when you have long files and you need to focus only on a specific part of the code.
Generating types on the fly
As a developer, you will often realize that you need to create new types while coding. Visual Studio for Mac makes it easier to generate new types on the fly with a special kind of code refactoring. For example, suppose you declare a new variable of type Dog, but this type does not yet exist in your solution:
var dog = new Dog();
As you would expect, the editor underlines the type with a red squiggle and reports an error saying that it could not find the type. Now, if you right-click the type name and select Quick Fix, you will see a number of options that allow you to generate the new type, as shown in Figure 24.

Figure 24: Generating new types on the fly
The following options are available:
- Generate class in new file: Creates a new code file whose name is based on the type name and adds an empty class definition with the internal access modifier.
- Generate class: Generates a new class inside the active code file with the internal access modifier.
- Generate nested class: Generates a new class, nested in the current type, with the private access modifier.
- Generate new type: Shows a dialog that allows you to customize the type generation by specifying which type you want to create (class, interface, or enumeration), the access modifier, and the destination.
This quick fix is very useful and allows you to keep your focus on the code while writing.
Enabling multi-caret editing
You can enable multiple cursors by pressing one of the following combinations:
- ⌥⇧ (Alt + Shift) to invoke next caret matching. This action will add a caret to the next instance of the word where the first caret was placed.
- ⌥⇧; to invoke all carets matching. This action will add a caret to each instance of the word where the first caret was placed.
- ⌥⇧, to remove the last caret.
- ⌥⇧/ to move the last caret down.
To understand how this can be useful, think of a class that exposes a number of internal properties that you want to change to public in batch. You can enable the Invoke all carets matching action and select all the internal keywords only. Then you can start typing public, and the original text will be replaced on all the selected lines.
Navigating the IDE
Sometimes you need to invoke a tool or command in Visual Studio, but you do not remember the exact name, or you do not remember from which menu it can be invoked. In other situations, you might have a solution with thousands of files and you do not exactly remember the location of a file you need.
Visual Studio 2019 for Mac makes your life easier by providing a search box located at the upper-right corner of the IDE, where you can type the name, or just part of it, of the tool or file you need. Visual Studio will show a contextual list of matching results, as shown in Figure 25. If you come from Visual Studio on Windows, this is the counterpart of the Quick Launch tool.

Figure 25: Finding tools and commands with Navigate To
The list is filtered as you type and shows names of types, code files, and commands that match the search criterion. If you click Search Packages, Visual Studio will open the Add Package dialog and search for any NuGet packages that match your search criterion. You can also click the arrow near the magnifier icon in the search box to filter search results by file, type, and member.
Managing dependencies
Any application needs core runtime platforms or libraries to work—these are known as dependencies. For example, the .NET Core SDK is a dependency for any .NET Core application. The Mono runtime is instead a dependency for any Xamarin project. Visual Studio for Mac takes care of adding the proper references based on the type of project you create.
More often than not, your applications will need to use third-party libraries, or libraries you developed, that expose APIs and objects that the core libraries do not provide out of the box. When this happens, you are introducing additional dependencies. In VS 2019 for Mac, you have two main ways to add and consume dependencies in your applications: adding references to libraries on disk and downloading NuGet packages. This section walks through both scenarios.
Referencing libraries
If you need to consume a library that is on disk, either third party or developed by you, in the Solution pad you can add a reference to the library. The way you add a reference to a project changes a bit depending on the project type. In fact, in a .NET Core project, you right-click the Dependencies node in the Solution pad, then you select Add Reference; in Xamarin and .NET projects, you right-click the References node in the Solution pad, then you select Add Reference. Regardless of the project type, the Add Reference command opens up the Edit References dialog, where you will be able to select libraries with the help of four different tabs: All, Packages, Projects, and .Net Assembly. Figure 26 shows an example based on a Xamarin.iOS project.

Figure 26: The Edit References dialog
The Packages tab lists installed libraries that Visual Studio is able to detect as available for the current project. The Projects tab allows you to add a reference to other projects in the solution, which is very common when you have class library projects that expose custom objects or APIs. The .Net Assembly tab shows a list of .NET assemblies that are currently referenced by the project. For instance, you could simply double-click a library listed in the Packages tab to immediately add a reference. If the library you need is not listed but available on disk, you can click Browse, locate the library, and select it to add a reference. At this point, you will be able to consume the objects exposed by the library in your code.
This approach to adding dependencies has three important limitations:
- It requires you to have the library on your disk.
- It does not automatically resolve any additional dependencies that the library you are referencing might rely on, so this is something you must take care of manually.
- It makes it difficult to manage different versions of the library and its dependencies once new versions are available. For instance, if a new version of a library is available and also relies on an updated version of a dependency, you must take care of both manually. The same concept applies if you want to downgrade to an older version.
NuGet solves all these problems.
The NuGet package manager
NuGet is an integrated package manager that has been very popular among developers using Microsoft Visual Studio on Windows and Xamarin Studio since its introduction in 2010. Through a convenient, integrated user interface, the NuGet Package Manager allows you to download and reference a huge number of popular libraries, and it also automatically resolves any further dependencies that a library might need.
NuGet makes it extremely easy to manage different versions of a library and its dependencies. Libraries are bundled into the so-called NuGet packages, which are files with the .nupkg extension that contain the library itself, metadata that help developers identify a library, and information about dependencies that a library needs to be consumed properly.
NuGet packages are hosted on (and can be published to) an online, public repository available at NuGet.org. If you visit this website, you will be able to browse the gallery outside of Visual Studio and see what’s available. I recommend that you spend some time getting familiar with NuGet, because it is becoming the de facto standard for managing dependencies in both Visual Studio for Mac and Visual Studio on Windows. Visual Studio 2019 for Mac supports the latest version of the NuGet package manager, which is version 5.7.
As a general rule, in the Solution pad you right-click the project name and select Manage NuGet Packages. This will open the Manage NuGet Packages dialog that you can see in Figure 27.
Note: In the next steps, you will see an example that shows how to install NuGet packages to an individual project. However, Visual Studio 2019 for Mac also allows for managing NuGet packages at the solution level. This means that you can right-click the solution name and select Manage NuGet Packages, and the packages you select will be installed to all the projects in the solution.

Figure 27: The Add Packages dialog
The Manage NuGet Packages dialog shows the list of available packages from NuGet.org. For each package, you can see the description, author, publication date, number of downloads, and, very importantly, the license agreement and the additional dependencies the package requires. By default, only stable releases are displayed, but you can select the Show pre-release packages check box to show prerelease versions, also. In the Version drop-down box, you see the latest version available by default, but you can pick a different one.
When you select a NuGet package for installation, Visual Studio will show a dialog that contains a list of all the libraries that will be installed and a link to the license agreement for each. When you’re ready, click Accept to accept the license agreement for all the libraries. While Visual Studio downloads and installs the NuGet package with its dependencies, you will see the operation progress in the status bar. When it’s finished, you will see a new node called NuGet under Dependencies in the Solution pad. If you expand this node, you will see the library you just installed and the list of dependencies that the library relies on, if any. See Figure 28 for an example based on the Newtonsoft.Json package.

Figure 28: Browsing NuGet packages and their dependencies
When a NuGet package and its dependencies are installed, Visual Studio for Mac automatically adds a reference so that you can consume libraries in your code. If you want to install a different version of an already installed package, you have two options.
The first option is automatically updating NuGet packages to the latest stable release available, which you do by selecting Project > Update NuGet Packages.
The second option allows you to select a specific version of a NuGet package: simply right-click the NuGet node and select Manage NuGet Packages. Select the package you want to upgrade (or downgrade), select the version number in the Version drop-down box, and click Add Package.
Whenever Visual Studio for Mac performs any operations related to NuGet packages, it displays the output into the Package Console pad, which you enable with View > Pads > Package Console. Figure 29 shows an example.

Figure 29: The Package Console pad
The Package Console pad is particularly useful when installing NuGet packages fails because it provides detailed messages. A common reason for failure is selecting a NuGet package that is not compatible with the current project, or a dependency of the selected NuGet package that is not compatible with the current project.
For .NET Core, when NuGet packages are downloaded, they are stored inside a local cache for easy reuse. For other project types, such as Xamarin and full .NET, NuGet packages are downloaded into a project subfolder called Packages. In both cases, Visual Studio 2019 for Mac always knows which NuGet packages a solution needs. This is important because if a library is missing, Visual Studio can easily restore it.
For example, if a solution is under source control, it’s not uncommon that libraries are not sent to the server. So, when you download a solution from the Git source control repository of your choice for the first time, VS for Mac will check whether all the NuGet packages are available locally. If not, it will perform a restore operation.
Another example of when restoring NuGet packages is required is when you share a solution with other people, such as in the form of a .zip archive or on a website. Because your solution might rely on a large number of packages, you can exclude them from the archive to save a lot of space. This is typical with Xamarin or full .NET projects, where you can completely delete the content of the Packages subfolder. When other people open the solution on their machines, Visual Studio checks if the required libraries are available; if not, it performs a restore operation.
Usually, restoring NuGet packages occurs automatically when you open a solution, but you can restore packages manually by right-clicking the solution name in the Solution pad and selecting Restore NuGet Packages or by selecting Project > Restore NuGet Packages.
Running multiple instances
Visual Studio 2019 for Mac introduces the possibility of running multiple instances of the IDE, which was not possible with version 2017. In order to start a new instance of Visual Studio, right-click the program icon in the command bar and select New Instance. This is a very nice addition, since developers are used to working with multiple instances of their development environments very often.
Chapter summary
The integrated development environment in Visual Studio for Mac is very powerful and offers everything you need to develop high-quality applications with the most productive tools. With pads, you can easily enable specific tools based on the context. The code editor, where you spend most of your developer life, not only provides syntax colorization for all the supported languages, but also advanced word completion with IntelliSense and live static code analysis that detects code issues as you type and provides quick fixes and refactorings.
Many tools are available to help you quickly navigate among code files and between types and members. Finally, VS for Mac makes it easy to manage dependencies, especially with NuGet packages that help developers work with libraries that have one or more dependencies. After this overview of what the IDE offers, it is time to walk through the powerful debugging instrumentation.
- 1800+ high-performance UI components.
- Includes popular controls such as Grid, Chart, Scheduler, and more.
- 24x5 unlimited support by developers.