
Visual Studio for Mac Succinctly®

CHAPTER 5
Creating Xamarin Projects
Xamarin is the technology that allows developers to build native apps with C# for Android, iOS, macOS, Windows 10, and Tizen. In this chapter, you will get an overview of Xamarin development with Visual Studio 2019 for Mac, which offers a complete solution to build high-quality, cross-platform mobile apps by reusing your existing skills on the Microsoft stack.
Note: Microsoft recently announced .NET MAUI, a fully-featured, cross-platform framework that will allow you to build applications for desktop, web, and mobile devices with one .NET base class library. Xamarin.Forms should be included and evolved into .NET MAUI, but until stable releases can be used, this book takes into consideration Xamarin as a stand-alone technology because it is the current go-to for mobile development with C#.
Introducing Xamarin and Xamarin.Forms
With Xamarin, you can build native apps for multiple platforms using C# as the programming language. Xamarin provides libraries that wrap native APIs into .NET types and members, which allow for full access to all the iOS, Android, macOS, Windows 10, and Tizen capabilities.
Platforms like Xamarin.iOS, Xamarin.Mac, and Xamarin.Android allow you to write C# code to create native apps for iOS, macOS, and Android, respectively. In situations where you instead need to build apps whose user interface elements are common to all platforms, Xamarin.Forms is an interesting choice, in that it allows you to target multiple platforms from a single, shared C# codebase.
Note: Xamarin is a huge technology, and teaching how to build apps with Xamarin and Xamarin.Forms is not possible in this book. If you are interested in cross-platform mobile app development, you can download for free Xamarin.Forms for macOS Succinctly and Xamarin.Forms Succinctly (Windows version), books by the author of this book.
Available project types
Visual Studio 2019 for Mac ships with a large number of project templates for Xamarin development that are available in the New Project dialog. Figure 56 shows a few of them.
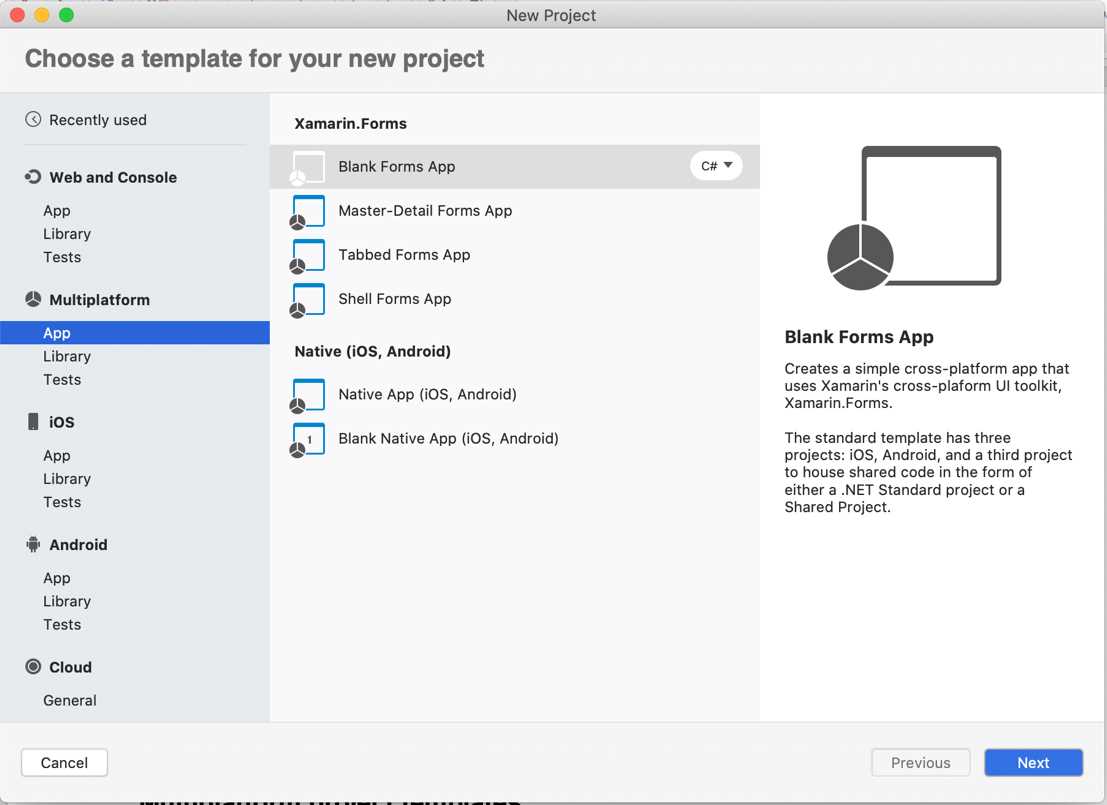
Figure 56: Some of the Xamarin project templates
Multiplatform project templates
Let’s start with the Multiplatform category, which offers project templates that aim to maximize code reuse. In this category, you find templates that allow sharing code by platform, such as Xamarin.Forms, or by project kind, such as Shared Projects and .NET Standard libraries.
The Multiplatform category is divided into three subcategories: App, Library, and Tests. Subcategories’ names are self-explanatory: App contains project templates that allow creating an app, Library contains project templates that allow producing reusable libraries, and Tests contains project templates that allow creating projects for UI test automation. You will find the same subcategories in the iOS and Android template categories, as well. Table 7 lists the project templates in the App category.
Table 7
Project templates in the Multiplatform category | ||
|---|---|---|
Target platform | Project type | Description |
Xamarin.Forms | Blank Forms App | Generates a solution that contains a blank Xamarin.Forms project. |
Xamarin.Forms | Master-Detail Forms App | Generates a Xamarin.Forms project that implements a side menu for navigation to child pages, including an optional ASP.NET Core back end and sample data. |
Xamarin.Forms | Tabbed Forms App | Generates a Xamarin.Forms project with a UI based on tabs, including an optional ASP.NET Core back end and sample data. |
Xamarin.Forms | Shell Forms App | Generates a Xamarin.Forms project using the Shell as the container for child pages, providing sample pages and sample data. |
Native (iOS, Android) | Native App (iOS, Android) | Generates a solution that contains a Xamarin.iOS project, a Xamarin.Android project, and a project to share code between the two Xamarin projects. This can be either a shared project or a .NET Standard library. Xamarin projects include an ASP.NET Web API back end based on .NET Core and sample data and views to simulate a To-do list app, including CRUD operations and authentication. The back-end project is optimized for distribution to Microsoft Azure. |
Native (iOS, Android) | Blank Native App (iOS, Android) | Generates a solution that contains blank Xamarin.iOS and Xamarin.Android projects, plus a project to share code between the two, which can be either a shared project or a .NET Standard library. |
The Library category contains project templates that allow creating reusable libraries or shared projects. Table 8 lists the available project templates in this category.
Table 8
Project templates in the Library category | ||
|---|---|---|
Target Platform | Project Type | Description |
General | Shared Project | Generates a solution that contains a so-called Shared Project, which allows sharing loose assortments of files between projects. |
General | Portable Library | Generates a legacy portable library that can be used on Windows, Mac, Windows Phone, Xamarin.iOS, and Xamarin.Android. |
General | Multiplatform Library | Generates a solution that contains a Portable Class Library and a corresponding NuGet package that can be compiled and distributed to the NuGet gallery. |
General | .NET Standard Library | Generates a solution that contains a C# library based on the .NET Standard specifications. At the time of writing, Visual Studio for Mac supports version 3.1 of .NET Standard. |
Xamarin.Forms | Class Library | Generates a solution containing a .NET Standard Library that can be consumed by Xamarin.Forms projects. |
Note: The .NET Standard specification provides a set of specifications for APIs that all the .NET development platforms, such as .NET Framework, .NET Core, and Mono, must implement. This allows for unifying .NET platforms and helps avoid future fragmentation. By creating a .NET Standard Library, you will be sure your code will run on any .NET platform without the need to select any targets. Microsoft has a blog post about .NET Standard and its goals and implementations that you can find here.
The last category is called Tests, and contains only one template, called UI Test App. This project template generates a solution with a project for automating tests against the user interface both locally and on Xamarin Test Cloud, the platform that provides a cloud-based environment with dozens of devices you can use to test the behavior of your apps.
iOS project templates
The iOS category contains project templates that allow you to generate Xamarin.iOS projects you can use to build native iOS apps with C#. Table 9 offers a summary description of each template.
Table 9
Project templates in the iOS category | ||
|---|---|---|
Target platform | Project type | Description |
General | Single View App | Generates a solution that contains a Xamarin.iOS project for a single-page app with a Storyboard object that contains a View, a View Controller, and a C# class for imperative code. |
General | Master-Detail App | Generates a solution that contains a Xamarin.iOS project based on a Master-Detail view and displays a list of sample items. It is optimized for different screen form factors, including a Navigation Controller for the iPhone and a Split View on the iPad. |
General | Tabbed App | Generates a solution that contains a Xamarin.iOS project based on multiple pages contained in tabs. It includes a Tab Bar Controller and a View Controller for each tab bar item. |
General | Page-Based App | Generates a solution containing a Xamarin.iOS project that shows how to implement navigation among multiple pages using a Page View Controller. |
General | WebView App | Generates a solution that contains a Xamarin.iOS project for displaying HTML content inside a WebView object, based on the Razor templating engine. |
Games | SpriteKit Game | Generates a solution containing a Xamarin.iOS project for creating 2D games based on the SpriteKit framework from Apple. |
Games | SceneKit Game | Generates a solution containing a Xamarin.iOS project for creating 3D games based on the SceneKit framework from Apple. |
Games | Metal Game | Generates a solution containing a Xamarin.iOS project for creating games based on Metal, a GPU-accelerated 3D framework from Apple. |
Games | OpenGL Game | Generates a solution containing a Xamarin.iOS project for creating 2D and 3D games based on the OpenGL framework APIs. |
The Library category offers two project templates: Class Library, which allows for generating C# class libraries that are tailored for Xamarin.iOS, and Bindings Library, a special project template that allows for generating C# class libraries that can consume third-party Objective-C libraries for iOS. This particular topic will not be covered in this book, but the Xamarin documentation has a specific page.
The Tests category offers two project templates, called UI Test App and Unit Test App. The first project template is similar to its corresponding template in the Multiplatform category but is tailored for Xamarin.iOS and allows for automating tests against the user interface, both locally and on Xamarin Test Cloud. The second template creates a test project for Xamarin.iOS apps and libraries in which you can write unit tests based on the Touch.Unit framework. About tvOS: Visual Studio for Mac offers project templates that generate Xamarin.iOS projects optimized for this kind of device. Supported project templates are Single View App, Tabbed App, SceneKit Game, SpriteKit Game, and Metal Game, and the description is the same as provided in Table 9.
Android project templates
The Android category is still divided into three subcategories: App, Library, and Test. In general, the Android category contains project templates that allow generating Xamarin.Android projects you can use to build native Android apps with C#. Table 10 offers a detailed description of each template.
Table 10
Project templates in the Android category | ||
|---|---|---|
Target Platform | Project Type | Description |
General | Android App | Generates a solution that contains a Xamarin.Android project with a single sample screen (Activity) with a button and a label. |
General | Wear App | Generates a solution containing a Xamarin.Android project that targets the Android Wear operating system. This project template works only with the API Level 20 or higher. |
General | Blank Android App | Generates a solution that contains a Xamarin.Android project with a single sample screen (Activity) and empty user interface. |
General | WebView App | Generates a solution containing a Xamarin.Android project for displaying HTML contents inside a WebView object, based on the Razor templating engine. |
Games | OpenGL Game | Generates a solution containing a Xamarin.Android project for creating 2D and 3D games based on the OpenGL framework APIs. |
Games | OpenGL ES 2.0 Game | Generates a solution containing a Xamarin.Android project for creating 2D and 3D games based on the OpenGL ES 2.0 APIs. ES stands for Embedded Systems. |
Games | OpenGL ES 3.0 Game | Generates a solution that contains a Xamarin.Android project for creating 2D and 3D games based on the OpenGL ES 3.0 APIs. This is the most recent version with new features and is backward compatible with 2.0. |
The Library category offers two project templates: Class Library, which allows for generating C# class libraries that are tailored for Xamarin.Android, and Bindings Library, a project template that allows for generating C# class libraries that can consume third-party Java libraries for Android. This particular topic will not be covered in this book, but the Xamarin documentation has a specific page.
The Tests category offers two project templates, called UI Test App and Unit Test App. Similar to the iOS templates, the first project template is similar to its corresponding template in the Multiplatform category. However, it is tailored for Xamarin.Android and allows for automating tests against the user interface, both locally and on Xamarin Test Cloud. The second template creates a test project for Xamarin.Android apps and libraries where you can write unit tests.
Project templates for macOS
The Mac category provides project templates that allow building applications, games, and libraries for the macOS operating system using Xamarin.Mac with C#. This category is divided into the App and Library subcategories, and Table 11 describes templates the App category in more detail.
Table 11
Project templates in the Mac category | ||
|---|---|---|
Target Platform | Project Type | Description |
General | Cocoa App | Generates a solution that contains a Xamarin.Mac project with a Storyboard for a stand-alone Mac application based on the Cocoa framework from Apple. |
Games | SpriteKit Game | Generates a solution containing a Xamarin.Mac project for creating 2D games based on the SpriteKit framework from Apple. |
Games | SceneKit Game | Generates a solution containing a Xamarin.Mac project for creating 3D games based on the SceneKit framework from Apple. |
Games | Metal Game | Generates a solution containing a Xamarin.Mac project for creating games based on Metal, a GPU-accelerated 3D framework from Apple. |
The Library category contains the Class Library and Bindings Library project templates. Their purpose is exactly the same as described for their counterparts in Xamarin.iOS, with an important clarification for the Class Library template: this one relies on the so-called Unified APIs, which means that code in this library can be shared between Xamarin.Mac and Xamarin.iOS on both 32-bit and 64-bit systems.
tvOS project templates
The tvOS category contains project templates that allow you to generate Xamarin.iOS projects you can use to build native apps with C# for devices running tvOS. Table 12 offers a summary description of each template.
Table 12
Project templates in the tvOS category | ||
|---|---|---|
Target platform | Project type | Description |
General | Tabbed App | Generates a solution that contains a Xamarin.iOS project based on multiple pages contained in tabs. It includes a Tab Bar Controller and a View Controller for each tab bar item. |
General | Single View App | Generates a solution that contains a Xamarin.iOS project for a single-page app with a Storyboard object that contains a View, a View Controller, and a C# class for imperative code. |
Games | SceneKit Game | Generates a solution containing a Xamarin project for creating 2D games based on the SceneKit framework from Apple. |
Games | SpriteKit Game | Generates a solution containing a Xamarin project for creating 3D games based on the SpriteKit framework from Apple. |
Games | Metal Game | Generates a solution containing a Xamarin project for creating games based on Metal, a GPU-accelerated 3D framework from Apple. |
Creating a Xamarin.Forms project
Xamarin.Forms allows you to create projects that target multiple platforms, such as iOS and Android, from a single, shared C# code base. Xamarin.Forms is essentially a library that wraps native controls into objects that you can use to code once, and then the runtime generates native apps that translate these objects into the appropriate platform-specific visual elements. You can create a variety of Xamarin projects in Visual Studio 2019 for Mac, but with Xamarin.Forms, you will get a better perception of cross-platform development made easy.
Select File > New Solution, and then in the New Project dialog, select the Blank Forms App project template (see Figure 56), then click Next. In the second screen, specify a name for your project in the App Name text box (see Figure 57) and make sure you fill in the Organization Identifier text box.

Figure 57: Entering the project information
The Organization Identifier is a very important field because both Android and iOS use it to uniquely identify your applications in Google Play and the App Store. By convention, the organization identifier has the form com.companyname.appname where com. is a fixed prefix, companyname represents your company’s name, and appname represents the name of your application. You don’t actually need to enter the app name in the Organization Identifier text box, since Visual Studio will automatically concatenate it to the organization identifier you just supplied.
In the Target Platforms group, you can select the platforms you want to target, such as Android and iOS. For now, leave both selected. In the final screen (see Figure 58), you will have an option to review the project information and the structure of the solution, and you will be able to add the solution to source control with Git and add a UI test project to the solution. Do not select these options—just click Create.
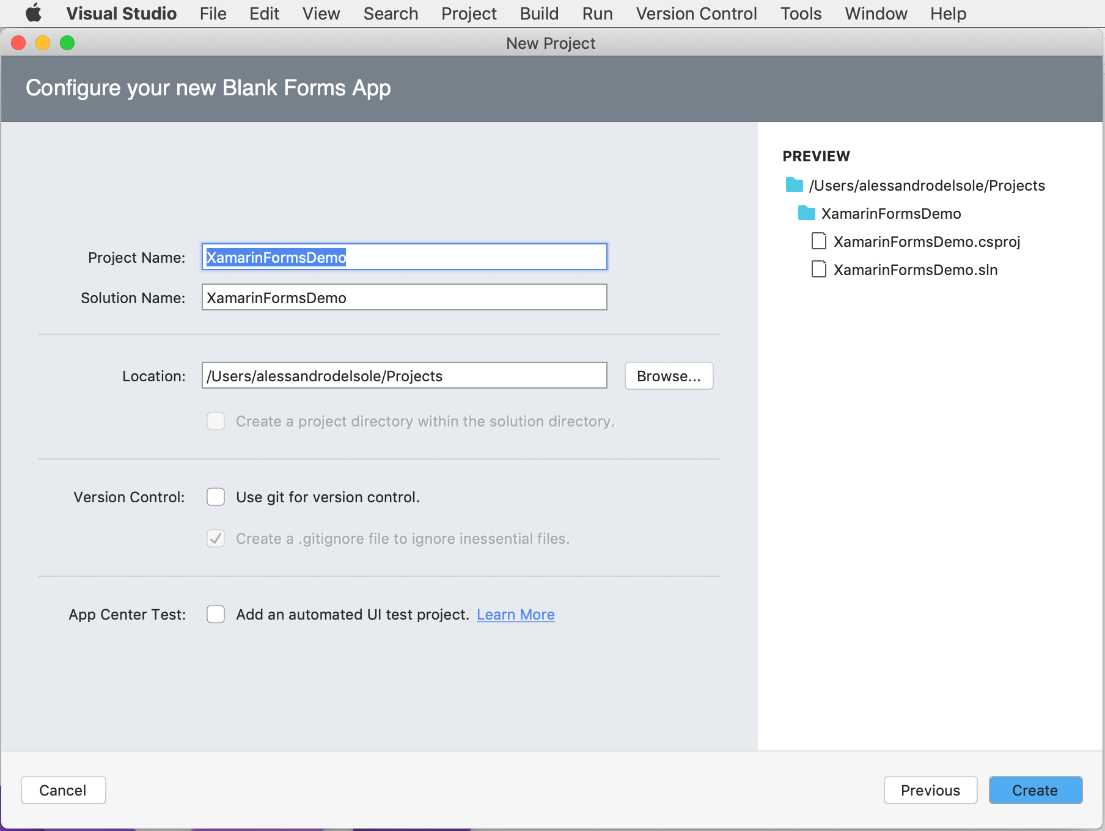
Figure 58: Project summary information
After a few seconds, the solution will be ready, and all its elements will be visible in the Solution pad, as demonstrated in Figure 59.

Figure 59: The Xamarin.Forms solution visible in the Solution pad
The solution contains three projects: the first project is a .NET Standard library that contains all the code that can be shared across platforms, such as visual elements that exist in both iOS and Android (labels, text boxes, buttons, and so on). The other two projects are native Xamarin.Android and Xamarin.iOS projects, which will contain any platform-specific code you need to write in order to access APIs that Xamarin.Forms cannot share among platforms.
In Xamarin.Forms and, more generally, with mobile app development, the user interface is presented with pages. When you create a Xamarin.Forms solution, a root page of type ContentPage is also provided in a file called MainPage.xaml. All the user interface in Xamarin.Forms is defined via the XAML (eXtensible Application Markup Language) language, which maps visual elements to XML nodes and their properties to XML attributes.
For each page defined in .xaml files, there is also a C# code-behind file, where you write the code that implements the logic and actions for the user interface. In the case of MainPage.xaml, the code-behind file is called MainPage.xaml.cs, and can be opened by expanding the MainPage.xaml item in the Solution pad.
You will add new XAML files depending on how many pages you need in the application via File > New File. For example, say you replace the default XAML code of the MainPage.xaml file (which is the root page of the app) with the following.
Code Listing 2
You will get a page with a root control container (StackLayout) that allows you to place multiple controls near one another, a text message (Label), a text box (Entry), and a Button control that exposes a Clicked event you can handle in C# code. The following simple example displays a message containing the text entered by the user.
Code Listing 3
async void Button1_Clicked(object sender, System.EventArgs e) |
It is worth mentioning that when you type the name of an event in the XAML code editor, Visual Studio will offer to generate a new C# event handler—simply press Tab to do so. When Visual Studio adds a new event handler stub, the body is empty, and you will need to add your own code, like in the previous example.
Writing XAML code to define the user interface is certainly intuitive, especially because the code editor provides a specialized version of the IntelliSense completion. However, it would be nice to have the option to preview the user interface while you code. Luckily enough, the XAML code editor in VS for Mac includes a feature called Preview, which you enable by clicking the Preview or Split tabs located at the bottom of the XAML editor.
Preview enables a full previewer window, while Split divides the window in two, showing the code on the left and the preview on the right. The previewer looks like the one shown in Figure 60, where it shows a preview of the result from the example XAML code, using the Split view.

Figure 60: Previewing the result of the XAML code
You can decide to get a preview based on a phone or tablet, and you can also decide to get a preview based on iOS or Android. Figure 60 shows the preview based on the Android renderer.
Tip: You will need to build the solution before you can use Preview for the first time. Also, if the renderer fails, it will show any error details so that you can fix your code and retry to see the preview.
Debugging and testing Xamarin projects is really straightforward in Visual Studio 2019 for Mac. In the standard toolbar, you can select the platform you want to target by choosing the Android or iOS project as the startup project. Then you can pick one from the list of available devices, which includes emulators and physical devices (if connected to the Mac). Once you have selected the target platform and device, you can press Start on the standard toolbar to start debugging. Figure 61 shows how the sample application looks in both the iOS and Android emulators.

Figure 61: The sample app running inside the emulators
You will be able to use all the debugging tools described in Chapter 3.
Tip: In order to test your apps on physical iOS devices, Visual Studio will need to invoke the Xcode SDK tools to generate certificates and provisioning profiles. More information about these topics is available in the official Xamarin.iOS documentation.
Running multiple projects
In Figure 61, you see both the Android and iOS versions of the app running at the same time. In the past, to accomplish this you needed to run one version and then the other one separately. In Visual Studio 2019 for Mac, a new way of running multiple projects has been introduced to simplify the process. To accomplish this, follow these steps:
- In the Solution pad, right-click the solution name and select Set Startup Projects.
- When the Solution Options dialog appears, select both the Android and iOS projects under Run Configuration: Multiple Projects.
- Click OK and start the app.
This is very useful not only to see how the app runs on two OSes at the same time, but also to use debugging tools on different platforms concurrently.
Hints about Hot Reload
Xamarin.Forms Hot Reload is a new feature that Microsoft added to Visual Studio 2019 on both Windows and Mac. It allows you to change your XAML code at debugging time, and have the changes immediately reflected on the user interface of your app. This is a tremendous benefit, because before, if you needed to change only a property value in your XAML, you had to stop debugging, change the code, recompile, and run the app again. You can enable Hot Reload by selecting Visual Studio > Preferences > Tools for Xamarin > Hot Reload.
There are known issues and limitations on the usage of Hot Reload, which also needs some specific project configurations. Because this is not related to Visual Studio for Mac, rather to the Xamarin.Forms technology, you can read further details in the official documentation.
Xamarin project options
Options for Xamarin projects can be deeply customized. For example, in the Xamarin.Forms solution created previously, in the Solution pad, right-click the name of the .NET Standard library project, then select Options. Only the Build tab will be discussed, in this section, as the other tabs have the same options and purposes you already saw for .NET Core projects. In the Build tab (see Figure 62), you can change the version of .NET Standard that the project supports.

Figure 62: Build options for the .NET Standard project in Xamarin.Forms
Now close the dialog, right-click the Android project name in the Solution pad, and select Options. You will find several tabs that are related to Android development, such as Android Build, Android Application, and Android Package Signing. Within the first tab, you will find options to control the compilation process, and with the Android Package Signing, you will find options to sign the .apk generated package, which you require before publishing apps to Google Play. The options provided in these tabs will not be covered in detail here; additional comments are provided about the Android Application tab, which you can see in Figure 63.

Figure 63: The Android Application options
Here you can specify an application-friendly name in the Application name box, as it will appear to your customers. You can also provide an icon and specify version numbers. The most important options are related to the version of the tools used for compilation and the Required permissions group. In the Minimum Android version combo box, you can specify the minimum Android version required to run your app. In the Target Android version combo box, you can specify the version of the Android SDK used to build the app.
At the bottom, you will see a list of permissions that you must select if your app needs to access specific system functionalities. For example, you will need to select the Internet permission if your app needs to access the internet. Remember that if you don’t specify the permissions the app needs, runtime exceptions will occur.
Close the dialog, right-click the iOS project name in the Solution pad, and then select Options. In the iOS project options, there are the following tabs specific to iOS development:
- iOS Build, which contains options for controlling the build process.
- iOS Debug, which contains options for configuring the debugger port and Wi-Fi debugging.
- iOS On-Demand Resources, which contain options for splitting the main app bundle into multiple chunks to reduce the app size.
- iOS Bundle Signing, which is extremely important because it allows you to select the certificate that will be used for signing the app package (such as a development certificate or a distribution certificate) via the Signing Identity box, and it allows you to select the provisioning profile based on the task you need to do (development or distribution). Figure 64 shows what this tab looks like.
- iOS IPA Options, which allows you to customize properties of the generated .ipa (iOS App Store) app package.
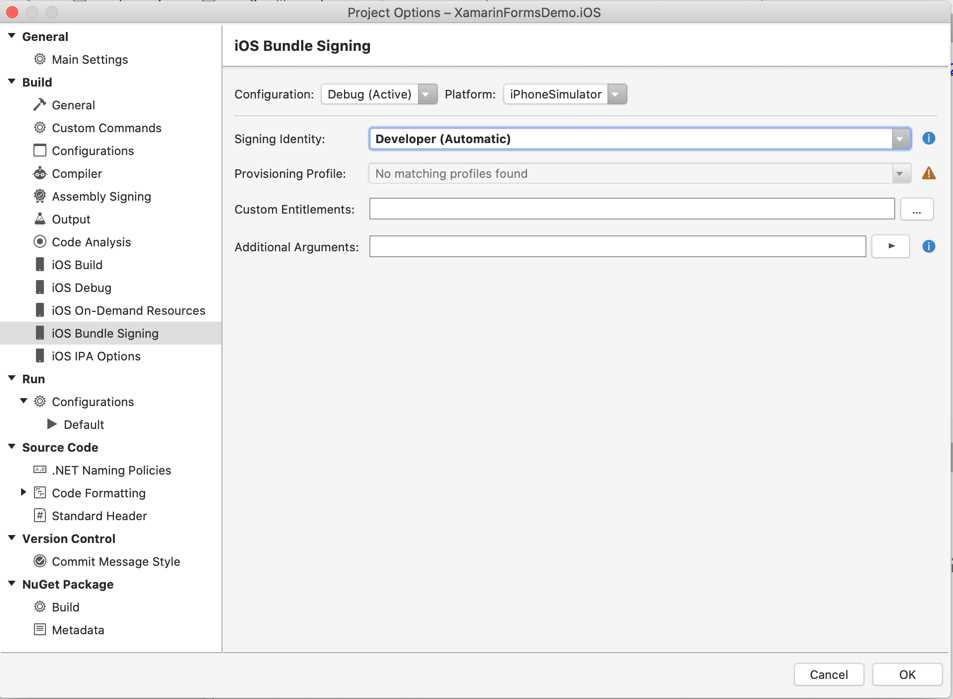
Figure 64: The iOS Bundle Signing options
Actually, for iOS projects, most of the app properties are set via the Info.plist (information property list) file, which you can see in the Solution pad, and for which Visual Studio 2019 for Mac provides a specific editor that appears once you double-click the file name, as shown in Figure 65.

Figure 65: The Info.plist editor
The Identity group contains options that identify the app, like the application-friendly name, the bundle identifier (generated when you created the project), the version number, and the build number. The Signing group allows you to select the provisioning profile, and Visual Studio for Mac allows you to select between Manual Provisioning and Automatic Provisioning. With the latter, if you sign in with your Apple ID, Visual Studio for Mac will be able to generate all the certificates and all the profiles required to run your app on a physical device. If you click the Bundle Signing Options button, you will be redirected to the iOS Bundle Signing tab of the Options dialog, which you saw in Figure 65.
In the Deployment group, you can specify options such as the minimum required version (Deployment Target), the device family (Universal, iPhone/iPod, or iPad), a startup screen (Main Interface), and the device orientation. You can optionally specify the status bar style, hide the status bar, and set the app to require full screen.
Hints about publishing apps
In order to publish apps you build with Visual Studio for Mac, you need paid developer accounts on the Google Play and the Apple Store. Then the IDE simplifies the whole process of publishing, assuming you performed all the preliminary steps required by both stores.
For Android, you will need to specify all the required properties in the app manifest, and then you can select the Release or Ad-hoc configurations and run the Build > Archive for Publishing command. This command generates an .apk package that you will need to sign with keys you got in the Google Developer Console. Figure 66 shows an example of how Visual Studio makes it easy to generate an archive for publishing.
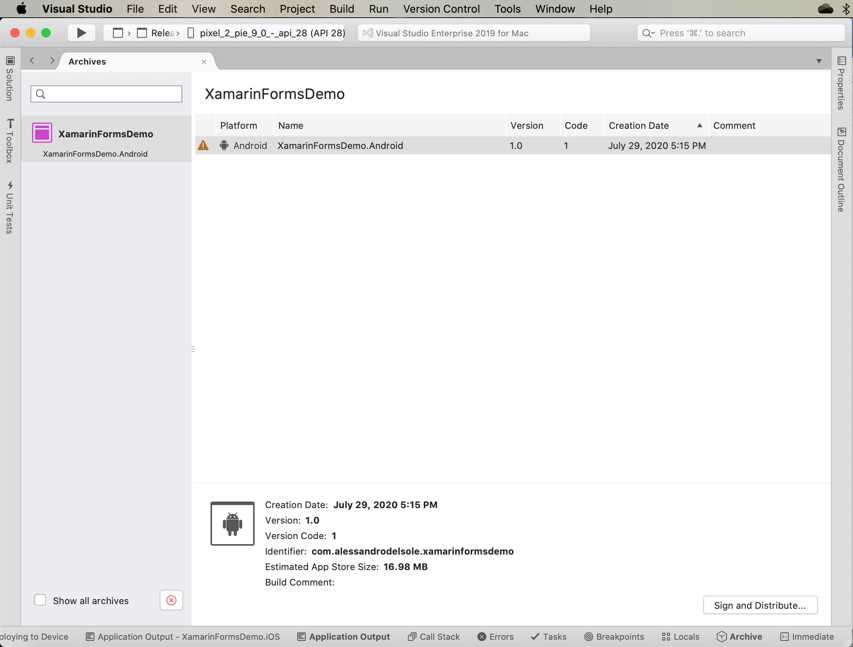
Figure 66: Archiving a package for publishing
You will then be able to upload the signed .apk package to Google Play via the Developer Console. For iOS, things are a bit more complex. You will need to generate and download distribution certificates in the Apple Developer portal and associate them to your app via the Signing Identity options of the Info.plist editor (see Figure 65). You will also need to associate the bundle identifier of your app to the developer account. The IDE has integrated tools that simplify the deployment process, but due to the complexity of the preliminary steps needed, I recommend that you read the official documentation.
Chapter summary
Mobile app development is crucial to Microsoft, and Visual Studio for Mac offers everything you need to develop, build, and publish apps with powerful, integrated tools. Xamarin is the technology of choice that allows developers with a Microsoft background to write apps in C#. This chapter provided an overview of Xamarin and Xamarin.Forms, as well as the available project templates, and demonstrated how you can work with emulators to test your apps with hints about app publishing.
Visual Studio 2019 for Mac also allows for integrated team collaboration with improved and updated tooling, and the next chapter is about version control with Git.
- 155+ high-performance Xamarin controls, including DataGrid, Charts, and ListView.
- Elegant XAML layouts for common scenarios.
- Layouts optimized for mobile and desktop.