
Visual Studio for Mac Succinctly®

CHAPTER 4
Creating .NET Core Apps
The .NET Core can be thought of as a subset of the .NET Framework that runs on Windows, macOS, and Linux. More specifically, .NET Core is a cross-platform, open-source, modular, and general-purpose development platform included in the .NET Foundation (dotnetfoundation.org) that Microsoft supports and maintains together with the .NET developer community.
The .NET Core also runs on devices, which may include mobile devices and IoT devices, so it is not limited to classic desktop and server environments. It is a modular framework in that it ships as NuGet packages, and the idea is that an app built on top of .NET Core will include only the libraries (modules) it actually needs, instead of relying on a full framework, as is the case with .NET Framework. This chapter explains what .NET Core consists of and shows how to create .NET Core apps with Visual Studio for Mac.
Note: In the pure spirit of the Succinctly series, this chapter cannot explain in full detail the MVC programming pattern and the ASP.NET Core APIs for web apps. The chapter instead focuses on the IDE tools to generate and maintain applications, simplifying the life cycle.
.NET Core architecture
.NET Core is made of several fundamental parts that work together to bring all the power, flexibility, and compatibility for this amazing technology. The following subsections provide a high-level overview of the parts that compose .NET Core.
The .NET Core runtime
The .NET Core runtime, known as CoreCLR, is a portable, cross-platform component that provides applications an execution environment. The CoreCLR includes a type system with base .NET data types, the Just-in-Time compiler (JIT), a garbage collector, and a base class library called mscorlib.
CLR stands for common language runtime, and it basically means that all .NET apps run on the same runtime platform, regardless of the programming language they have been written with. Different from the full .NET Framework, where applications need .NET to be installed on the target system to take advantage of the common language runtime, with .NET Core the CoreCLR is packaged together with the application and the required libraries. This avoids the need for a pre-installed runtime. The CoreCLR is an open-source project available on GitHub.
.NET Core libraries
While the .NET Core runtime includes the base class library, additional types are necessary for serious development. .NET Core provides a large number of libraries that ship as NuGet packages and expose types for file access, collections, XML, and so on. Providing the full list of .NET Core libraries is not necessary, since Visual Studio for Mac will automatically include the appropriate libraries when creating MVC and Web API projects.
.NET Core SDK: tools and languages
The .NET Core SDK is the set of tools you need to build applications for .NET Core. This includes the .NET command line interface (CLI) and the programming languages with compilers. The command line interface is covered in more detail in the next section, but first a few words about programming languages.
Currently, .NET Core allows you to write applications using C# and F#. The implication is that you can write C# and F# code not only on Windows, as you could do in the past, but now also on macOS and Linux. This is possible because Microsoft has been working hard to make these popular programming languages cross-platform.
Note: In .NET Core, you basically do everything via the command line interface, so it is very important. However, programs like Visual Studio for Mac invoke the appropriate commands behind the scenes on your behalf, so you do not need to interact with it directly. In this book, the .NET Core CLI is not discussed further, but you can have a look at the documentation for details about all the commands.
Supported .NET Core project types
Visual Studio for Mac supports .NET Core 3.1 and the project types summarized in Table 5, all available under the Web and Console category of the New Project dialog.
Table 5
Available .NET Core project types | |
|---|---|
Project Type | Description |
Console Application | Generates a solution that contains a C# project for a stand-alone, empty Console application. |
Worker Service | Generates a solution that helps implement long-running service apps based on ASP.NET Core. |
ASP.NET Core Empty | Generates a solution that contains an empty ASP.NET Core web project. |
ASP.NET Core API | Generates a solution that contains an ASP.NET Core project that scaffolds a RESTful service based on the Web API framework. |
ASP.NET Core Web Application | Generates a solution that contains an ASP.NET Core project that scaffolds a web application based on Razor pages. |
ASP.NET Core Web Application (MVC) | Generates a solution that contains an ASP.NET Core project that scaffolds a web application based on the MVC framework, with views and controllers. |
Razor Class Library | A project template that helps create a Razor library that targets .NET Standard. |
Blazor Server App | Generates a project that simplifies the creation of a Blazor app that runs server-side over ASP.NET Core. |
Blazor WebAssembly App | Generates a project that leverages WebAssembly, a new technology from Microsoft for creating front ends using C# instead of JavaScript. |
Angular | A project template to create an ASP.NET Core application using Angular. |
React.js | A project template to create an ASP.NET Core application using React.js. |
React.js and Redux | A project template to create an ASP.NET Core application using React.js and Redux. |
gRPC Service | A project template to create a gRPC service on top of ASP.NET Core. |
Note: In the New Project dialog, you will also see the Library and Tests project categories. These allow for creating reusable libraries and automated tests, but they won’t be covered in this chapter. You can read the description of the project templates in the New Project dialog.
Visual Studio 2019 for Mac supports many more development technologies, such as Angular, WebAssembly, and React.js. This makes this IDE even more versatile. You already saw an example of console applications previously, so in this chapter you will create a web MVC application that contains the basic infrastructure for a fully-functional website with pages.
Web applications with Visual Studio 2019 for Mac
For the first time with .NET Core, you can create web applications that span across platforms using C#. This is a tremendous benefit, because you are no longer limited to publishing your .NET web apps to Windows hosts (including Azure), and you can easily deploy web applications to Mac and Linux servers reusing your existing C# skills.
In this chapter, you will learn how to create an ASP.NET Core web application and how to publish it to Microsoft Azure as the host directly from Visual Studio for Mac. You will see how the IDE simplifies the whole application life cycle, from development to deployment. More specifically, you will see how the built-in project templates make it easy to create an application with pages and controllers, and how you can quickly deploy an application to Microsoft Azure.
Introducing ASP.NET Core
ASP.NET Core is an open-source and cross-platform framework for building modern, cloud-based connected applications such as web applications, IoT apps, and mobile back ends. ASP.NET Core provides an optimized development framework for applications that are deployed to the cloud or run on-premises, and that consist of modular components. The source code for ASP.NET Core is available on GitHub and Microsoft is accepting contributions from the developer community.
Like .NET Core, ASP.NET Core ships entirely as NuGet packages for improved modularity, and both applications and services can be hosted on Internet Information Services or self-hosted in your own process. As you will see later in this chapter, ASP.NET Core inherits from ASP.NET the so-called model binding, a runtime feature that can map parameters passed with HTTP requests to properties of .NET objects.
Put succinctly, ASP.NET Core will be your framework of choice if you want to build web apps and services that run cross-platform, are fully testable, and can be deployed easily regardless of whether the host is cloud-based or on-premises. In a layered architecture, ASP.NET Core is a layer upon the .NET Core architecture described previously, so it relies on the CoreCLR, the core libraries and NuGet packages, the C# compiler built upon Roslyn, and .NET Standard.
Introducing MVC
MVC stands for Model-View-Controller, which is the name of a programming pattern built on top of the following elements:
- Model: The business objects that represent the data an application needs to work with.
- Controller: An intermediate object that exposes and manages the model based on the business logic rules.
- View: The user interface of an application that invokes actions in a controller based on the user input and displays the result.
In ASP.NET and ASP.NET Core, the model is made of C# classes that represent your data. For example, a C# class that maps a table in a database is part of the model. Controllers are C# classes that implement business logic, such as queries or C.R.U.D. (create, read, update, delete) operations. The view is the full user interface made of HTML pages that invoke operations in controllers, like when the user clicks a button to load or insert data. For example, if you build an application for order management, an Order class might be the model that represents the Orders table in the database, an OrderController could expose methods that allow querying, adding, and updating orders, and then you might have an HTML page that displays the list of active orders and controls that allow adding or updating orders based on the user input.
Notice that models and controllers are not limited to working against databases: in fact, you can map anything you need with a business object, and you can even execute operations from controllers without having a model, for example, when you call a web service. Additionally, the ASP.NET Core MVC framework supports identity management and automatically provides plumbing code that configures an app startup.
Scaffolding an MVC application
In Visual Studio for Mac, click New Project in the Welcome page (or select File > New Solution). In the New Project dialog, select the Web Application (Model-View-Controller) project template, then click Next (see Figure 44).
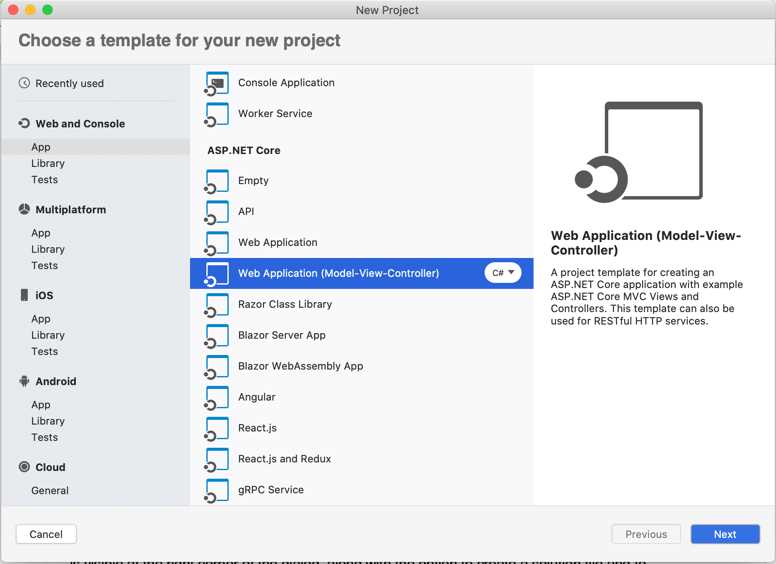
Figure 44: Selecting the MVC project template
In the next dialog, you can specify an authentication mechanism: No Authentication or Individual Authentication (in-app). This is a new feature in VS 2019. Select No Authentication and click Next. In the third and last dialog, enter a name for the sample project, as shown in Figure 45. As you can see, a preview of the structure of the solution is visible at the right corner of the dialog, along with the option to create a solution file and to associate the solution to the Git version control.
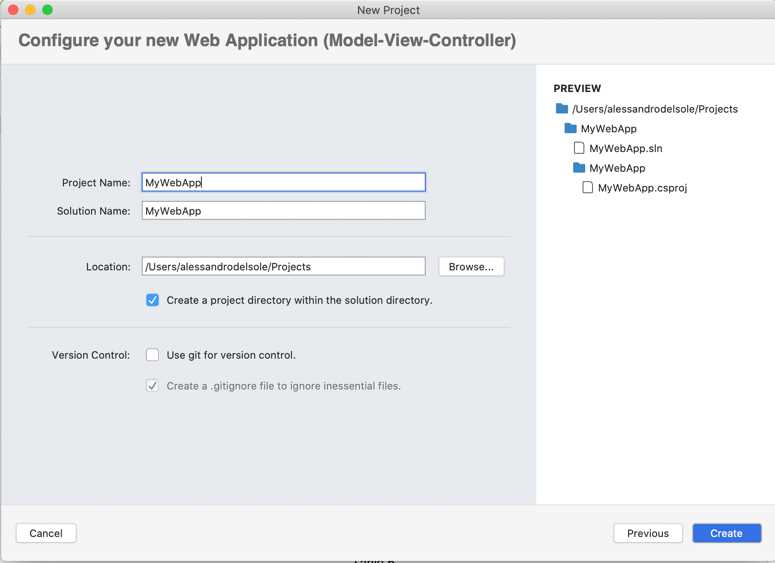
Figure 45: Specifying a project name
Click Create and, after a few seconds, the solution will be ready. An MVC solution has a particular structure whose elements are described in Table 6.
Table 6
Common elements in MVC solutions | ||
|---|---|---|
Name | Scope | Description |
Dependencies | Folder | Contains the NuGet packages and the SDK libraries required by the application. |
Controllers | Folder | Contains the C# controller classes that implement the application’s business logic. |
Models | Folder | Contains sample models and viewmodels for the project. |
Views | Folder | Contains .cshtml files and subfolders with other .cshtml files that define the user interface of the application. |
Properties | Folder | Contains configuration JSON files such as launchSettings.json |
Wwwroot | Folder | Contains all static files such as assets, fonts, cascading style sheets (CSS) files, JavaScript files, and HTML files. It also contains all the necessary jQuery files. |
appsettings.json | File | Allows defining application settings with the JSON notation. |
Program.cs | File | Defines the Main C# method that is the main application entry point and allows configuring the application host. |
Startup.cs | File | Defines MVC routing strategies and allows you to configure framework services and host settings. |
Under the Views > Home subfolder, you can find several .cshtml files that represent the views or pages of the user interface. The code editor in Visual Studio 2019 for Mac has improved support for these kinds of markup files and enables IntelliSense, as demonstrated in Figure 46. As you can see, IntelliSense for web files now supports filtering and an improved typing experience, the same one available for C# files. Not limited to .cshtml files, Visual Studio 2019 for Mac brings the same experience to other web files, such as JavaScript. Figure 47 shows an example of how IntelliSense looks in a JavaScript file inside a React.js project, where you can not only see the same improved IntelliSense, but also a description of a member when you hover over it.
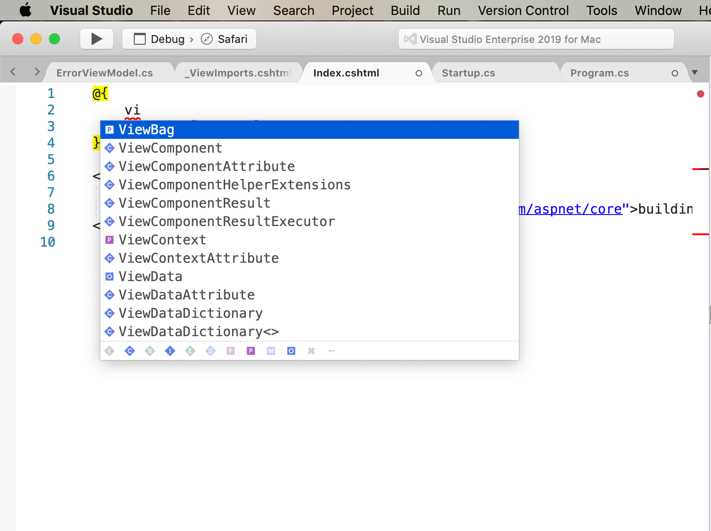
Figure 46: IntelliSense for .cshtml files

Figure 47: IntelliSense for React.js
Scaffolding pages and controllers
Visual Studio 2019 for Mac introduces support for scaffolding pages and controllers in a very similar way to what Visual Studio on Windows does. This tooling simplifies the generation of these kinds of items by creating the appropriate code files with basic user interfaces, for pages, and basic methods. You use the new scaffolding feature by right-clicking the project name in the Solution pad and then selecting Add > New Scaffolding. The Add New Scaffolding dialog appears, as shown in Figure 48.
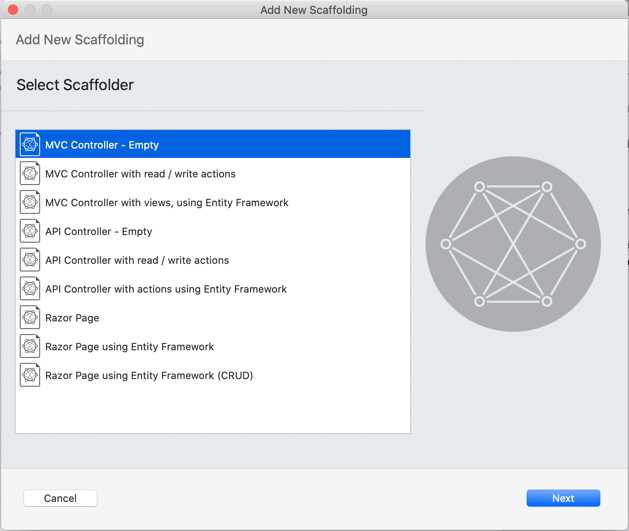
Figure 48: The Add New Scaffolding dialog
To understand how it works, select the API Controller with read / write actions option and click Next. In the next dialog, provide a name for the new controller, for example DataController, and then click Finish. At this point, Visual Studio will first install any required NuGet packages for the new controller, and then it will generate a C# file with methods such as Get, Post, Put, and Delete, which you will need to implement according to your needs. The new scaffolding feature is particularly useful with Razor pages, simplifying the whole generation process.
Configuring project options
Visual Studio for Mac provides you with deep control over project options and properties. You access the project options with Project, ProjectName Options (where ProjectName stands for your project name) or by right-clicking the project name in the Solution pad and selecting Options. The Project Options window appears at this point (see Figure 49).
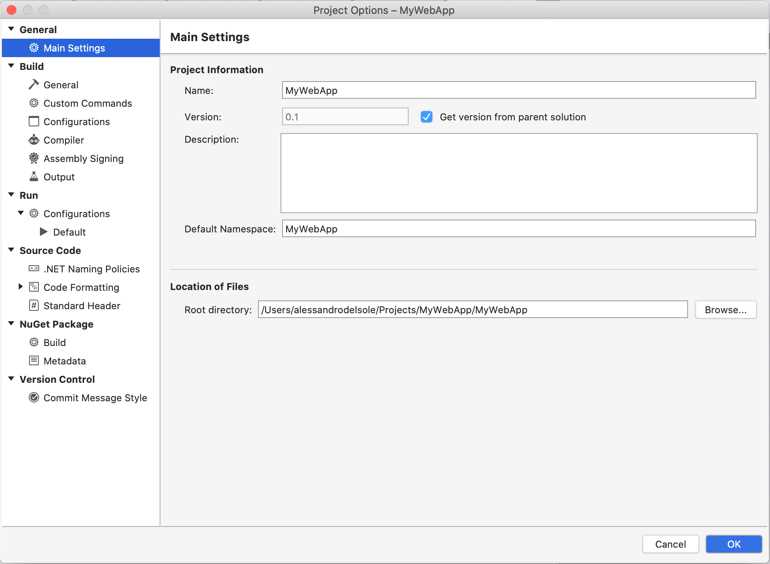
Figure 49: Configuring project options
In the General node, you find the Main Settings, which is the same for all the supported project types across VS for Mac. Here you can specify a different project name, a specific version number, an optional description, and the root C# namespace, and you can change the root directory where the project files are stored. By default, the project version is inherited from the solution version, but you can uncheck the Get version from parent solution check box and provide a new version.
The other settings are generated based on the information you supplied when you created the project, and unless you have specific requirements, I recommend you leave them unchanged. These settings are also available to Xamarin projects. In the Build node of the Project Options dialog (see Figure 50), the General tab allows you to change the target framework, which is the latest .NET Core runtime version by default.
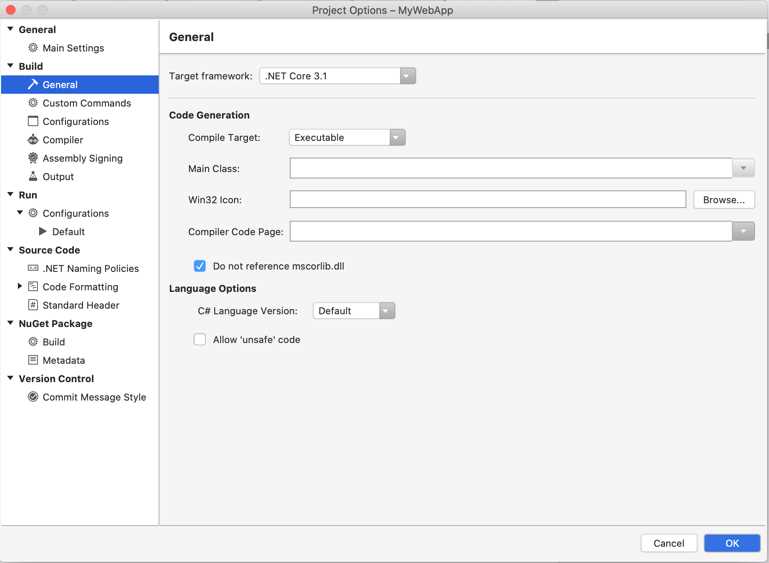
Figure 50: Configuring build options
In the Code Generation group, you can change the compile target (Executable, Library, Executable with GUI, or Module), the startup C# class in the Main Class box, the icon file in the Win32 Icon box, and the encoding code page for source files in the Compiler Code Page box. I recommend that you don’t change the default options, including the Do not reference mscorlib.dll check box value, because the default is already optimized for your project, and changing these options usually only makes sense for full .NET projects, not .NET Core projects.
Additionally, you can specify the C# version the compiler should use in the C# Language Version box. Visual Studio 2019 for Mac supports C# 8.0. The Default setting ensures the compiler uses the latest version of the language available. The Allow ‘unsafe’ code check box should be left unselected in a .NET Core project, as you will not typically invoke native code.
The Custom Commands tab allows you to specify any actions that should be executed before, during, or after a build or clean process. Actions are per configuration, so you can specify different actions for different configurations and, by default, the Configuration drop-down box shows the active build configuration, but you can choose a different one and provide any actions. You specify one or more actions with the Select Project Operation drop-down box. Supported actions are Before Build, Build, After Build, Before Clean, Clean, After Clean, and Custom Command. Figure 51 shows an example based on the After Build action.
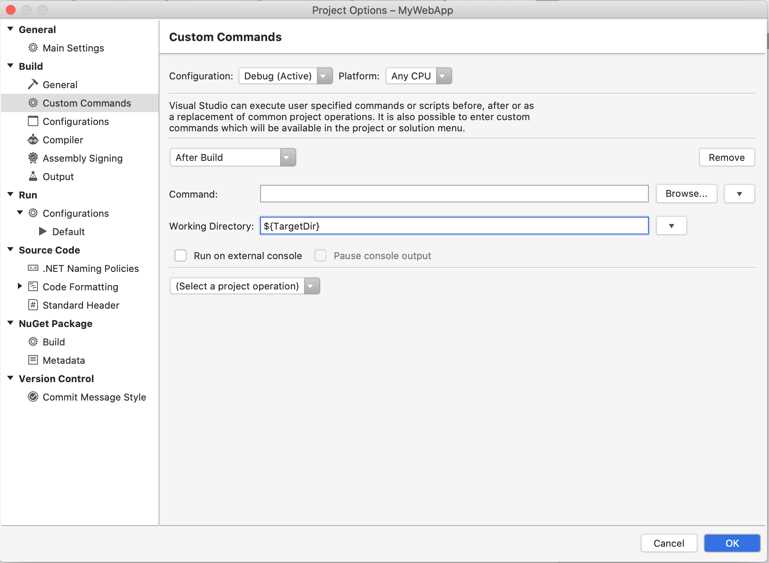
Figure 51: Configuring custom commands
You can specify the action that must be executed by supplying an application name in the Command text box (or you can click Browse instead of manually typing the name). Commands might need to receive parameters, for example, the solution or project name. Because VS for Mac identifies such parameters with special constants, you can select the appropriate constant by clicking the button with the arrow icon and selecting one of the self-explanatory values from the drop-down. The same applies to the Working Directory check box, where you can specify the directory in which the command should be executed.
In Figure 51, you can see the $(TargetDir) constant that represents the project output directory and is listed as Target Directory in the Constants drop-down box. The Configurations tab allows you to manage build configurations. By default, it shows the Debug and Release configurations. You can add, duplicate, remove, and rename configurations with the Add, Copy, Remove, and Rename buttons, respectively. The Compiler tab allows you to influence the compilation process, and Figure 52 shows how it appears.

Figure 52: Configuring compiler options
Compiler options are per configuration, and the default is the active build configuration, but you can select a different configuration in the Configuration drop-down box. In this way, changes you make in this tab will be applied when you build your solution using the specified configuration.
In the General Options, the Generate overflow checks check box forces the compiler to check for integer calculations overflow and to throw an OverflowException at compile time if it finds any. Enabling this option could be useful to make integer calculations faster and avoid storing results without any errors. The Enable optimizations check box forces the compiler to optimize the build output, so the resulting application, library, or package might be smaller, faster, and more efficient. However, because the optimization process requires rearranging the code in many ways, the debugging experience could be more difficult and less complete. For this reason, this check box is automatically enabled only for the Release configuration. The Generate xml documentation check box makes Visual Studio for Mac generate an XML documentation file for your objects. You can specify an output file name in the text box. Selecting this option only makes sense if you commented your source code with XML comments.
The Assembly Signing tab allows you to sign an assembly with a digital signature, also referred to as strong name. Supported files are .snk (“strong key”) and .pfx (“personal exchange format”) files. The .pfx format also allows for specifying a password, so it should be preferred. In order to specify a digital signature, enable the Sign this assembly check box, then click Browse to select your .snk or .pfx file from disk. In the Output tab, you can specify the assembly name and the directory for the build output if you want to change the default settings.
Running and debugging
If you press the Start button on the standard toolbar, the application will start for debugging and appears as seen in Figure 53.
Note: If you have never run a web app from Visual Studio, you might be warned that a required HTTP certificate was not found. Visual Studio will offer to prepare one for you, so you can accept and follow the instructions. This is a development certificate—it will not make any changes to your system.
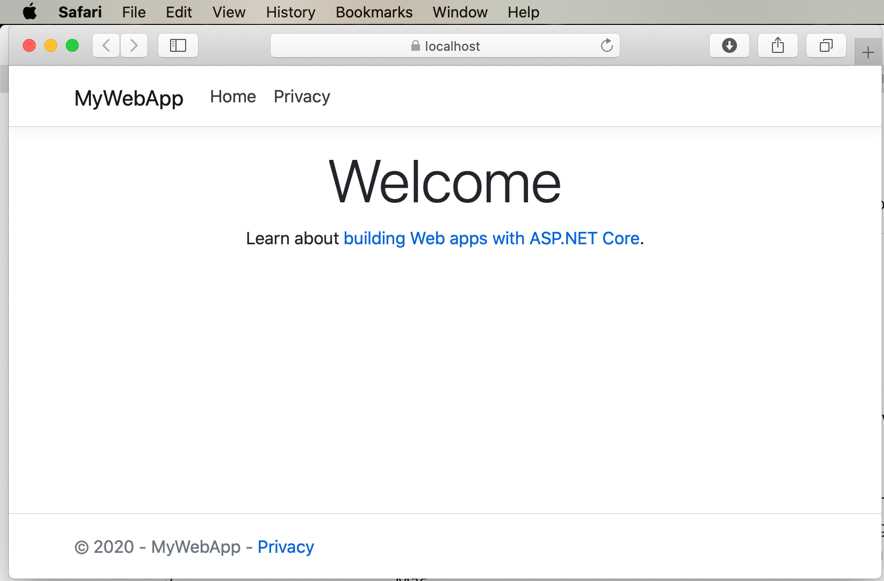
Figure 53: The MVC application running
Once the application is running, you will be able to use all the debugging tools discussed in Chapter 3. Debugging .NET Core applications relies on the .NET Debugger, an open-source and cross-platform debugger that Visual Studio for Mac attaches to a running .NET application. However, in the case of ASP.NET Core, this is not enough. In fact, a web application needs to be hosted on a web server in order to be started.
If you have developed ASP.NET applications with .NET on Windows in the past, you had Internet Information Services (IIS) and Internet Information Services Express as available choices to host the application. These are only available on Windows, so .NET Core ships with a special, open-source development web server called Kestrel. Kestrel’s behavior is very similar to IIS Express, with the important difference that it runs across platforms, which means macOS, Linux, and Windows.
With Kestrel, you can run, debug, and test your application as if it were on a real web server. As you would expect from a development server, the URL for the application always starts with http://localhost followed by the port number. You can simply click the address bar to see the current port number. If you wish to provide a different port number, you can right-click the project name in the Solution pad, then select Options and see the current value in the Default run configuration under Run > Configurations. The App URL field in the ASP.NET Core tab (see Figure 54) contains the current URL, and here you will be able to supply a different port number.

Figure 54: Changing the Kestrel’s default port
Publishing ASP.NET Core applications
Note: You need an active Azure subscription to complete the steps described in this section. You can request a free trial here.
ASP.NET Core web applications can be published to any host supporting .NET Core, such as Internet Information Services, but Visual Studio for Mac has integrated support for automating the deployment to Microsoft Azure. To accomplish this, you can select Build > Publish to Azure. In the Publish to Azure App Service dialog (see Figure 55), you will see the list of existing Azure app services, if there are any, and a link to create a new app service. Click Create a new App Service.
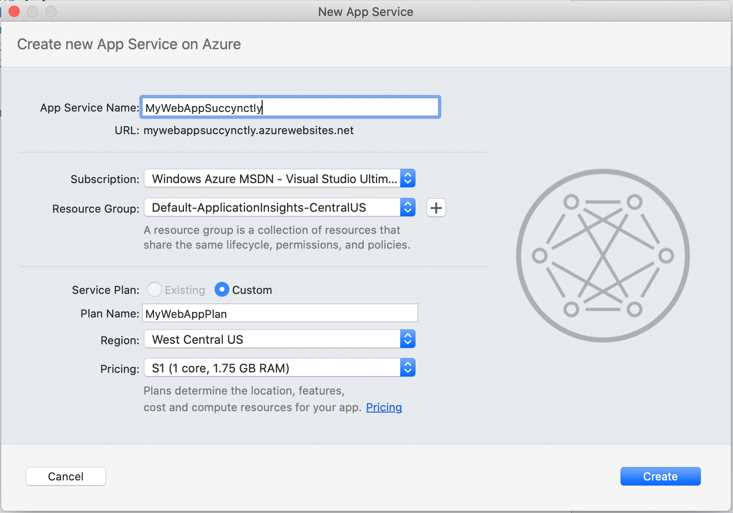
Figure 55: Creating a new Azure app service
At this point, you will need to specify the app service name, which will also become part of the web URL of the application. You will be able to select which Azure subscription (a billing mechanism) will host the application (in case you have more than one subscription), and a resource group, which can be thought of as an organization mechanism for related entities, such as an application and data storage for the app. As the name implies, a resource group in Azure contains multiple web resources, including applications.
If you want to use one of the existing resource groups, pick one from the list or click the + button to create a new resource group. I recommend that you select the closest region to where you live in the Region combo box, and the F1 – Free plan in the Pricing combo box. Paid plans provide more computing resources, but for demonstration purposes, the free plan is enough. When you click Create, Visual Studio will start publishing the web application to the specified Azure app service. After a few minutes, your application will be ready to run on the cloud at the URL defined in the New App Service dialog.
Testing with examples
As I mentioned at the beginning of this chapter, it is not possible to discuss all the ASP.NET Core features and all the development scenarios you could address with this platform in Visual Studio for Mac. For this reason, it’s a good idea to look at how you could work with an end-to-end example. More specifically, you can download the companion code for the ASP.NET Core official tutorials. The repository contains a lot of examples that span across development scenarios, including working with databases through the Entity Framework. I recommend that you take a look at these examples to better understand what you can do with ASP.NET Core.
Chapter summary
ASP.NET Core is the cross-platform, open-source, modular runtime for creating web applications that run on macOS, Linux, and Windows in C#. Visual Studio for Mac allows you to create ASP.NET Core web applications with convenient integrated tools that avoid using the command line interface. In the case of the MVC pattern, the IDE generates projects that implement model classes, controllers, and views. In this chapter, you have also discovered a new development web server called Kestrel that allows you to test and debug ASP.NET Core locally, together with the usual, powerful debugging instrumentation available in Visual Studio for Mac. In the end, you have seen how to publish an application to Microsoft Azure in only a few minutes with very few clicks, and how to be on the market in minutes.
- 80+ high-performance ASP.NET Core controls, including DataGrid, Charts, and Scheduler.
- Lightweight and responsive.
- Modular and touch-friendly.
- Built-in themes.