
Visual Studio Code Succinctly®

CHAPTER 3
Git Version Control and Task Automation
More often than not, writing software involves collaboration. For example, you might be part of a development team at work, or you might be involved in open source, community projects. Microsoft strongly supports both collaboration and open source, so Visual Studio Code perfectly integrates with Git. Also, in many cases you will need to launch external tools, which Visual Studio Code supports via Tasks. This chapter describes both topics.
Note: Because of the open source, cross-platform nature of Visual Studio Code, in this chapter I’ll be providing examples based on independent application development frameworks. For instance, there’s no Microsoft Visual Studio here, though you can certainly use anything you learn here with a Visual Studio solution opened with VS Code.
Version control with Git
Git is a very popular, open-source distributed version control engine that makes collaboration easier for small and large projects. Visual Studio Code works with any Git repository, such as GitHub or Visual Studio Team Services, and provides an integrated way to manage your code commits. Notice that this chapter is not a guide to Git, but rather an explanation of how Visual Studio Code works with it, so for further information visit the Git official page. Also, remember that Visual Studio Code requires the Git engine to be installed locally, so if you haven’t, download and install Git for your operating system. In order to demonstrate how Git version control works with Visual Studio Code, I will create a small Apache Cordova project. As you might know, Apache Cordova is a framework you can use to create cross-platform mobile applications based on JavaScript and HTML5. Of course, all of the steps and techniques described in this chapter apply to any project in any language Visual Studio Code supports. Make sure you have Node.js installed on your machine before going on.
Installing the Cordova command-line interface
In order to use the Apache Cordova tools, you first need to install the Cordova command-line interface (CLI). Of course, you can skip this step if you have installed the Apache Cordova tools for Visual Studio 2015. To accomplish the installation, and assuming you have Node.js installed, open a command prompt and type the following:
npm install -g Cordova
Installing the CLI won’t take very long.
Creating a sample project
Tip: There is an extension for VS Code called Cordova Tools which provides additional features such as specific debuggers and commands. This is not used in this example, but it is something you might want to download if working with Cordova is of primary importance for you.
Creating a Cordova project from the command line is very easy. This is the simple command you need to create a Cordova project:
> cordova create CodeSuccinctly
Where CodeSuccinctly is the name of your project. Notice that the tool will create a folder named CodeSuccinctly where it will place the project files. Remember this when it’s time to choose the project location. The new Cordova project at this point contains only an application skeleton with a few files, but that’s enough for our purposes. When ready, open the project with Visual Studio Code, which means opening the newly created folder. Figure 51 shows what Code looks like at this point.

Figure 51: The Cordova Project Opened with Code
Now you are ready to start working with Git.
Initializing a local Git repository
If you are familiar with Git, you know that version control works with both a local and a remote repository. The first thing you need to do is create a local repository for the current project. This is accomplished by opening the Git tool from the side bar, as shown in Figure 52.

Figure 52: Ready to Initialize a Local Git Repository
Click Initialize git repository. Visual Studio Code will initialize the local repository and show the list of files that the version control is tracking but has not yet committed (see Figure 53).

Figure 53: Files Ready for the First Commit
Notice how the Git icon shows the number of pending changes. This is an important indicator that you will always see any time you have pending, uncommitted changes. Write a commit description and then press Ctrl+Enter. At this point, files are committed to the local repository and the list of pending changes will be cleaned. Now there is a problem: You need a remote repository but the official documentation does not describe how to associate one to Code. Let’s look at how to accomplish this.
Creating a remote repository
Visual Studio Code can work with any Git repository. There are plenty of platforms that use Git as the version control engine, but probably the most popular platforms are GitHub and Microsoft Visual Studio Team Services. For the sake of platform-independence, I will show how to create a GitHub remote repository and associate this to a local project. Of course, I assume you have an existing GitHub account. If not, you can create a new account and a new repository for free. Figure 54 shows an example.

Figure 54: Creating a New Remote Repository
Once the repository is created, GitHub provides fundamental information you need to associate the remote repository with the local one. Figure 55 shows the remote address for the Git version control engine and the commands you have to type to perform the association.

Figure 55: Getting the Necessary Information to Associate the Remote Repository to the Local One
The next step is to open the command prompt and navigate to the folder that contains your Cordova project. Next, write the following two lines:
> git remote add origin https://github.com/YourAccount/YourRepository.git
> git push -u origin master
Where YourAccount and YourRepository represent your GitHub user name and the repository name respectively. The first line tells Git that the remote origin for the current folder (which contains the local repository) is the specified URL. The second line pushes the content of the local repository into the branch called master. Depending on your Internet connection, it will take up to a couple minutes to complete the upload operation. Now you really have everything you need and you can start discovering the Git integration that Visual Studio Code offers.
Managing file changes
Git monitors the code in your local repositories and detects any changes. The Git icon shows the number of files with pending changes. In Figure 56 you can see an example based on two edited files.
Tip: The number over the icon is actually updated only when you save your files locally.

Figure 56: Getting the List of Files with Pending Changes
By clicking a file in the list, you can see the differences between the new and the old file versions, as shown in Figure 57. This tool is called Diff.
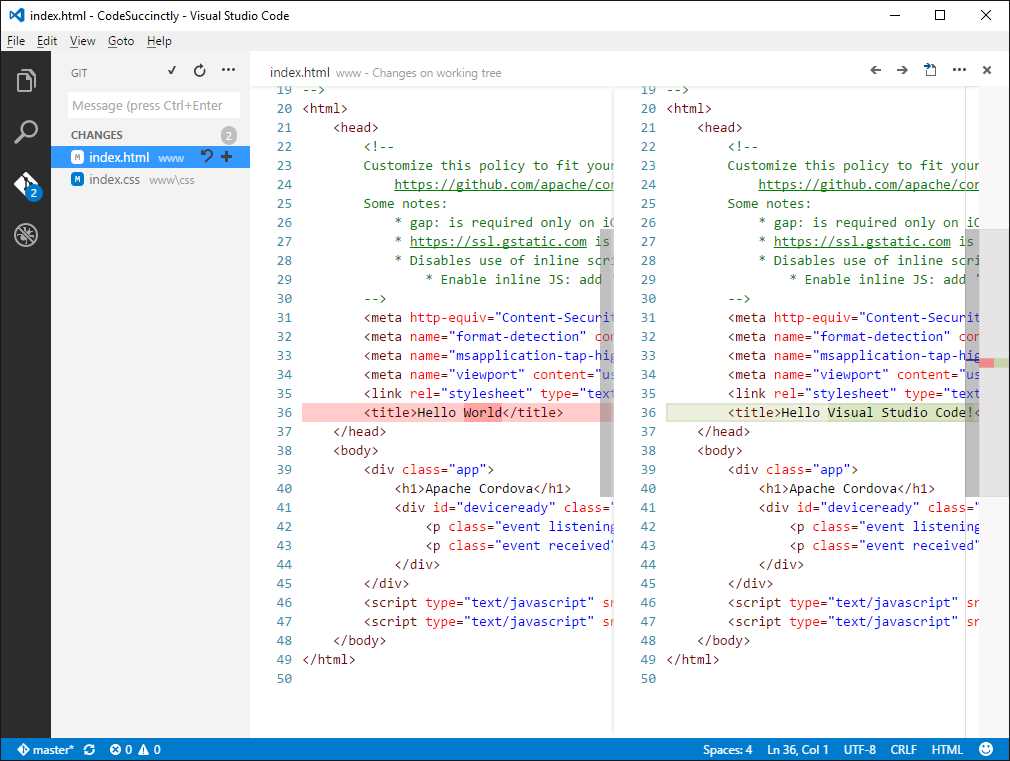
Figure 57: The Diff tool allows you to compare changes between versions.
On the left side you have the old version, while the new one is on the right. This is a very important tool when working with any version control engine. You can also promote files for staging, which means marking them as ready for the next commit. This is actually not mandatory, as you can commit directly, but it is useful to have a visual representation of your changes. You can stage a file by clicking the + symbol near its name. Visual Studio Code organizes staged files into a logical container, as you can see in Figure 58. Similarly, you can unstage files by clicking the – symbol.

Figure 58: Staged changes are grouped separately.
Managing commits
When you are ready, you can click the … button and access additional actions, such as Commit, Sync, Pull, and Pull (Rebase). Figure 59 shows how you can commit all files, and also shows how files marked for deletion are represented with a red icon.

Figure 59: Accessing Git Commands
When ready, click Commit All. Remember that this action commits files to the local repository. You then have to Sync in order to synchronize changes with the remote repository. You also have an option to undo the last commit and revert to the previous version with the Undo Last Commit command. Pull and Pull (Rebase) allow you to merge a branch into another branch. Pull actually is non-destructive and merges the history of the two branches, while Pull (Rebase) rewrites the project history by creating new commits for each commit in the original branch.
Git commands
The Command Palette has support for specific Git commands which you can type as if you were in a command shell. Figure 60 shows the list of available Git commands.
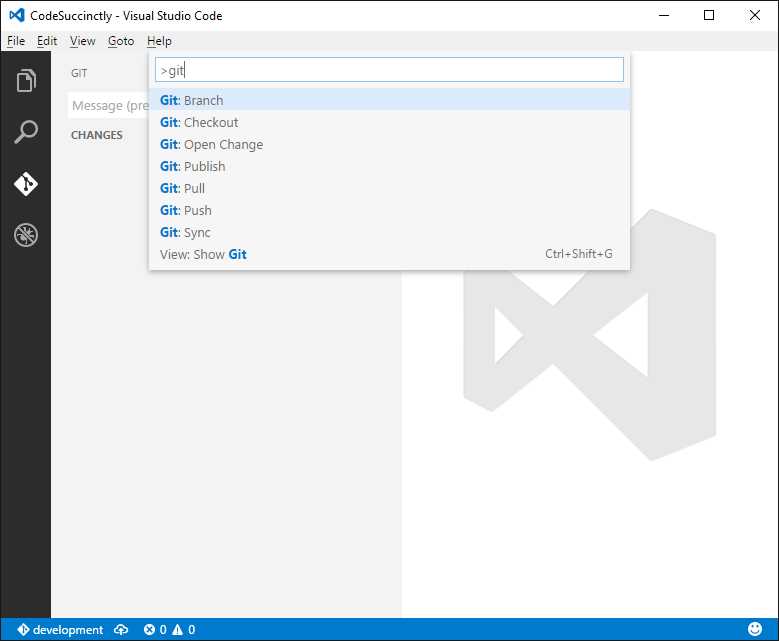
Figure 60: Supported Git Commands in the Command Palette
For instance, you can use Git Sync to synchronize the local and remote repository, or you can use Git Push to send pending changes to the remote repository. A common scenario in which you use Git commands is with branches.
Working with branches
I’ll use an example to explain what a branch is. Say you have a project that, at a certain point in its life cycle, goes to production. Now you need to continue the development of your project, but you do not want to do it over the code you have written so far. You can create two histories by using a branch. When you create a repository, you also get a default branch called master. Continuing with the example, the master branch could contain the code that has gone to production and now you can create a new branch, one called development, based on master but different from it. In the Command Palette, you can type Git branch and then you will be asked to specify a new branch name. This will create a new branch locally, based on master. As you can see in Figure 61, the status bar shows the new branch as the active branch. When you are ready, you can publish the new branch to the remote repository with the Publish Branch button, represented by the cloud icon.
![]()
Figure 61: The New Branch and the Publish Branch Button
With this tool, you do not need to create and manage a branch in your Git repository provider.
Automating tasks
I have mentioned several times that Visual Studio Code is more than just a code editor; it is an end-to-end development environment. After reading the book this far, I expect you have a better understanding of what I mean. But there is more. Any respectable development environment needs to run external tasks, such as programs, compilers, or general purpose tools. Of course, this is the case with Code too. Visual Studio Code allows running external programs Tasks. When you run a Task, Visual Studio Code will display the Output window where the output of external programs is redirected to. This window will be covered shortly.
Note: What you will see in this section is a practical implementation of tasks. Of course, Visual Studio Code supports many, many types of tasks and more complex operations. That said, be sure to check out the official documentation about specific and complex task configurations.
Understanding the tasks.json file
When you want to run an external program, you need to configure a new task. A task is a set of instructions and properties represented with the JSON notation. An important thing to keep in mind is that tasks are only available for projects and folders, so you cannot run a task against a single code file. In order to configure a task, you first need to open a project or folder, and then you open the Command Palette and type Configure Task Runner. Visual Studio Code adds a subfolder called .vscode and generates a new file called tasks.json, which contains one or more tasks that will be executed against the project or folder. The auto-generated task.json contains a pre-configured task (see Code Listing 1) and a number of additional tasks enclosed within comments, for specific scenarios.
Code Listing 1
// A task runner that calls the TypeScript compiler (tsc) and // compiles a HelloWorld.ts program. { "version": "0.1.0", // The command is tsc. Assumes that tsc has been installed using npm install -g typescript. "command": "tsc", // The command is a shell script. "isShellCommand": true, // Show the output window only if unrecognized errors occur. "showOutput": "silent", // args is the HelloWorld program to compile. "args": ["HelloWorld.ts"], // Use the standard tsc problem matcher to find compile problems // in the output. "problemMatcher": "$tsc" } |
The preconfigured default task starts the TypeScript compiler against a file called HelloWorld.ts. I’m going to show you how to implement your custom tasks shortly, but before that you need to understand what a task is made of. In its most basic form, a task is made of the following JSON elements:
- version. This represents the VS Code minimum version and should be left unchanged.
- command. This is the external program you want to run. Remember that you will need to include the full path for the program if an environment PATH variable has not been configured for it.
- isShellCommand. This represents whether a command is a shell script or not (you will leave this true in most cases).
- showOutput. This specifies when the Output window must show the output captured from the external program. Supported values are always, never, and silent. They will show the output window always, never, or only when unrecognized errors are detected.
- args: One or more arguments to be passed to the command. Typical arguments are file names and command-line switches.
Optionally, you can specify a problem matcher, which is a way to make Visual Studio Code understand and process styles of errors and warnings produced by external programs. For instance, the $tsc problem matcher (TypeScript) assumes that file names in the output are relative to the opened folder; the $mscompile (C# and Visual Basic) and the $lessCompile (Less) problem matcher assumes that file names are represented as an absolute path. Code supports many problem matchers out of the box, but you can define your own matchers for programs that are not supported directly. Also, you can configure multiple tasks and you will see an example based on Batch files later in this chapter. Discovering custom problem matchers is left to you as an exercise (look at the Visual Studio Code docs). Here, you will learn how to configure practical tasks such as running a Python program, executing a Batch file, and compiling a Visual Studio solution with MSBuild.
Tip: Tasks you define will not be executed until you save task.json, so do not forget this. Also, remember to close the task.json editor if your task runs against a different, active code file (or at least switch the view to the code file).
Predefined common variables
Visual Studio Code supports a number of predefined variables that you use instead of regular strings and are useful for representing file and folder names when passing these to a command. The following is a list of supported variables (which you can also see in the comments at the beginning of task.json):
- ${workSpaceRoot}. The root folder.
- ${file}. The active code file.
- ${fileBaseName}. The active code file’s base name.
- ${fileDirname}. The name of the directory that contains the active code file.
- ${fileExtname}: The file extension of the active code file.
- ${cwd}: The current working directory of the spawned process.
- ${env.VARIABLENAME}: References the specified environment variable, such as {$env.PATH}.
Using variables is very common when you run a task that works at the project or folder level or against file names that you either cannot predict or that you do not want to hardcode. You will see a couple examples in the next sections.
Sample 1: Running a Python program
Note: This section assumes you have already installed Python. If not, you can download it from the official website.
Python is a very popular programming language, and Visual Studio Code supports Python syntax out of the box. However, if you want to run a Python program you should launch the interpreter separately. Fortunately, you can configure a task and run Python from within Code. Because tasks run against projects and folders, the first thing you have to do is set up a folder on disk where you place your Python code files. The next thing to do is open this folder with Visual Studio Code. Figure 62 shows a sample folder called PythonPrograms, which contains a code file called StringAssignmentsSample.py, opened in Visual Studio Code.

Figure 62: A Python Program Opened in Visual Studio Code
Press Ctrl+Shift+P or the F1 key to open the Command Palette. Next, type Configure Task Runner or select the auto-fill suggestion item that appears while typing, as shown in Figure 63.

Figure 63: Invoking the Task Configuration Tool
At this point Visual Studio Code generates a new task.json file for the current folder. Either clear the content of the file or comment the pre-configured TypeScript task and write the new task shown in Code Listing 2.
Code Listing 2
// A task runner that calls the Python interpreter and // runs the current program. { "version": "0.1.0", // The command is Python.exe. "command": "C:\\Python34\\Python.exe", // The command is a shell script. "isShellCommand": true, // Always show the output window. "showOutput": "always", // args is the program to compile. "args": ["${file}"] } |
Code Listing 2 is very simple: It specifies the full path for the Python interpreter, because on my machine it is not registered with the PATH environment variable. Next, it specifies to always show the interpreter’s output in the Output window, and the argument, which is a variable that represents the currently opened file that we want to run. Save task.json, close it, and then press Ctrl+Shift+B or type Run Build Task in the Command Palette. At this point, Visual Studio Code launches Python.exe against the active file and shows the result in the Output window, as shown in Figure 64.

Figure 64: The Output window shows results from the external program.
As you can see, this is a very useful and powerful feature because it runs an external program and brings its output directly into the development environment.
Tip: The Output window is not interactive. For instance, if your program expects user input, the Output window is not able to capture it. Keep this in mind when you configure your tasks.
Sample 2: Executing Batch programs
With Batch files (.bat), you can execute one or more DOS commands supported by the operating system. Suppose you have a Batch file called CreateDir.bat, whose purpose is to create a folder on disk and redirect the output of the DIR command into a text file, which will be created in the newly created folder. Code Listing 3 shows the code for this.
Code Listing 3
@ECHO OFF SET FOLDERNAME=C:\TEMP\TESTFOLDER SET FILENAME=%FOLDERNAME%\TEXTFILE.TXT MKDIR %FOLDERNAME% ECHO %FOLDERNAME% CREATED REM REDIRECT OUTPUT TO A TEXT FILE ECHO This is a text file created programmatically>>%FILENAME% REM REDIRECT DIR LIST TO A TEXT FILE DIR >>%FILENAME% ECHO %FILENAME% CREATED |
Now assume this file is stored in a folder that we open in Visual Studio Code. The goal is to run this Batch program from within Code itself. To do this, you again run the Configure Task Runner command, and edit tasks.json as shown Code Listing 4.
Code Listing 4
{ "version": "0.1.0", "command": "${workspaceRoot}/CreateDir.bat", "isShellCommand": true, "showOutput": "always", "args": [ ] } |
In this case, your command is the Batch file whose execution is handled by the operating system that will treat it like an executable program. There are no arguments here because the Batch file does not expect any. Notice how the ${workspaceRoot} variable is specified to tell Code that the file is in the root folder. If you save tasks.json and press Ctrl+Shift+B, Visual Studio Code will launch the Batch file and show the result in the Output window, as shown in Figure 65.

Figure 65: The Output window shows the result of executing a Batch file.
Sample 3: Compiling MSBuild solutions
Note: This example only works on Microsoft Windows.
If you are used to working with Microsoft Visual Studio, one of the things you would definitely want in Visual Studio Code is the ability to compile your solutions and projects. Though this should not become a requirement, it would definitely be nice to have, and actually you can get it in a few steps. In fact, you can configure a task to run MSBuild.exe, the build engine used by Visual Studio. In the next example, you will see how to compile an MSBuild solution made of two Visual Basic projects, but of course all the steps apply to any .sln file and any supported languages. To enable MSBuild execution, you configure a task with the JSON code shown in Code Listing 5.
Code Listing 5
// A task runner that calls the MSBuild engine and // compiles a .sln solution. { "version": "0.1.0", // The command is msbuild. "command": "msbuild", // The command is a shell script. "isShellCommand": true, // Always show the output window for detailed information. "showOutput": "always", // args is the solution name. "args": ["WPCDemo.Sln"], // Use the standard problem matcher to find compile problems // in the output. "problemMatcher": "$msCompile" } |
It is worth noting that the command is msbuild and that the task is using the standard $msCompile problem matcher to find compile problems that are specific to Visual Basic and C#. Running this task by pressing Ctrl+Shift+B causes VS Code to run MSBuild.exe over the specified solution file, producing the sample output shown in Figure 66.

Figure 66: The Output window shows the result of compiling an MSBuild solution.
If you want to use the powerful editing features of Visual Studio Code and you want to be able to compile your solutions, this option is definitely a nice addition.
Understanding and configuring multiple tasks
So far you have seen how to configure one task. In practice, you might need to configure multiple tasks for a project or folder. Out of the box, Visual Studio Code supports two tasks with conventional names: build task (Ctrl+Shift+B) and test task (Ctrl+Shift+T). If you configure just one task, as you did in the previous examples, it is automatically considered a build task. If you want to differentiate build and test tasks, you need to specify this in tasks.json. Code Listing 6 shows an example based on the MSBuild task configured previously.
Code Listing 6
{ "version": "0.1.0", "command": "msbuild", "isShellCommand": true, "showOutput": "always", "args": ["WPCDemo.sln"], "tasks": [ { "taskName": "build", "isBuildCommand": true, "showOutput": "always" }, { "taskName": "test", "showOutput": "never" } ] } |
The following is a list of key points about configuring multiple tasks:
- A JSON array called tasks is used to specify multiple tasks.
- Each task is represented by the taskName property.
- Because you no longer have a default task, the isBuildCommand property set as true indicates which of the tasks the build task is associated with Ctrl+Shift+B.
Code Listing 6 defines two tasks for the build and test tasks supported by Visual Studio Code. The build task is available by pressing Ctrl+Shift+B, and the test task is available by pressing Ctrl+Shift+T. Both are also available through the Command Palette, as you can see in Figure 67.

Figure 67: Invoking the build and test tasks from the Command Palette.
Not limited to this, you can also specify additional tasks with custom names. Code Listing 7 shows how to define a new task called onError, which is displayed in the Output window only when compile errors are detected. Finally, Figure 68 shows how you can invoke the custom task from the Command Palette.
Code Listing 7
{ "version": "0.1.0", "command": "msbuild", "isShellCommand": true, "showOutput": "always", "args": ["WPCDemo.sln"], "tasks": [ { "taskName": "build", "isBuildCommand": true, "showOutput": "always" }, { "taskName": "test", "showOutput": "never" }, { "taskName": "onError", "showOutput": "silent" }, ] } |

Figure 68: Invoking Custom Tasks from the Command Palette
By defining multiple tasks, you can run external programs over your project and folders targeting different configurations.
Chapter Summary
Visual Studio Code provides integrated support for source code version control based on the Git engine, offering tools that make it easy to commit and manage your changes, including branches. Code also allows you to define build, test, and custom tasks, enabling you to run external programs such as compilers over your projects and folders. These are key features that make Visual Studio Code different from a simple source code notepad. Now you have in your hands all the powerful features you need to start writing great applications with Code, which is the topic of the next chapter.
- 1800+ high-performance UI components.
- Includes popular controls such as Grid, Chart, Scheduler, and more.
- 24x5 unlimited support by developers.