
Visual Studio Code Succinctly®

CHAPTER 5
Customizing and Extending Visual Studio Code
Being the great environment it is, Visual Studio Code can also be customized and extended in many ways. In fact, you can customize its appearance, the code editor, and keyboard shortcuts to make your editing experience extremely personalized. Also, you can download and install a number of extensions such as new languages with syntax colorization, debuggers, themes, linters, and code snippets. You can even create and share your own extensions and let other developers know how cool you are. This chapter explains how to customize and extend Visual Studio Code, including extensibility examples.
Note: In this chapter you learn how to customize and extend Visual Studio Code, and also the basics of creating and publishing your own extensions. However, explaining the core concepts of the extensibility model and describing every extensibility scenario is not possible here. For this reason, refer to the Overview document if you are interested in additional extensibility scenarios and the Approach to Extensibility document about the extensibility model.
Introducing the Visual Studio Code Marketplace
Visual Studio Code allows extending the environment with custom extensions. The developer community shares extensions to the Visual Studio Code Marketplace, also referred to as the Extension Gallery. To download extensions and customizations, open the Command Palette and type the following command:
> ext install
When you type this command, the list of extensions in the Gallery will be shown, and you will be able to see the extension types and filter the list as you type. This is the where you download new languages, code snippets, color themes, debuggers, complete extension bundles, and more. You can also browse the list of installed extensions by typing ext. From this list, you can also uninstall extensions with just a click. This is all you need to know for now about the Extension Gallery and related commands. I will go into more detail as I explain how to customize and extend Visual Studio Code.
Understanding customizations and extensions
Visual Studio Code can be personalized via customizations and extensions. The difference between them is that extensions add functionalities to a tool, change the behavior of existing functionalities, or provide new instrumentation. Supplying IntelliSense for a language that does not have it by default, adding commands to the status bar, and custom debuggers are examples of extensions. On the other hand, customizations are related to environment settings and do not add functionalities to a tool. Table 2 describes VS Code’s extensibility points and summarizes customizations and extensions in VS Code.
Table 2: Visual Studio Code Extensibility
Feature | Description | Type |
|---|---|---|
Color themes | Style the environment layout with different colors. | Customization |
User and workspace settings | Specify your preferences about the editing experience. | Customization |
Key bindings | Redefine key shortcuts in a way you feel more comfortable with. | Customization |
Language grammar and syntax colorizers | Add support for additional languages with syntax colorizers and bring VS Code’s evolved editing experience to your favorite languages. | Customization |
Code snippets | Add TextMate and Sublime Text snippets and write repetitive code faster. | Customization |
Debuggers | Add new debuggers for specific languages and platforms. | Extension |
Language servers | Implement your validation logic for files opened in VS Code. | Extension |
Activation | Load an extension when a specific file type is detected or when a command is selected in the Command Palette. | Extension |
Editor | Work against the code editor’s content, including text manipulation and selection. | Extension |
Workspace | Enhance the status bar, working file list, and other tools. | Extension |
Eventing | Interact with Code’s life-cycle events such as open and close. | Extension |
Evolved editing | Improve language support with IntelliSense, Peek, Go To Definition, and all the advanced, supported editing capabilities. | Extension |
Except for color themes, key bindings, and user settings that you can customize via VS Code’s specific options, customizations and extensions share the way they can be created. In fact, you typically create both (or at least you get started creating them) with Yeoman, the command-line generator you already met in Chapter 4. For this reason, after showing you how to install existing extensions, in this chapter I will describe how to create custom basic language support plus code snippets using Yeoman. I will also put you in the right direction to get started with extensions, but I will not cover the process of producing other types of extensions, which is something more complex and out of the scope of a book in the Succinctly series. What you really need to do before reading this chapter is install the Yeoman generator for VS Code, which can be done by typing the following in the command prompt:
> npm install –g yo code
Customizing Visual Studio Code
This section walks through supported customizations previously summarized in Table 2.
Choosing a theme
Visual Studio Code ships with a number of color themes you can pick to give the environment a different look and feel. You select a color theme by clicking File > Preferences > Color Theme. The list of available color themes will be shown in the Command Palette, as you can see in Figure 86.
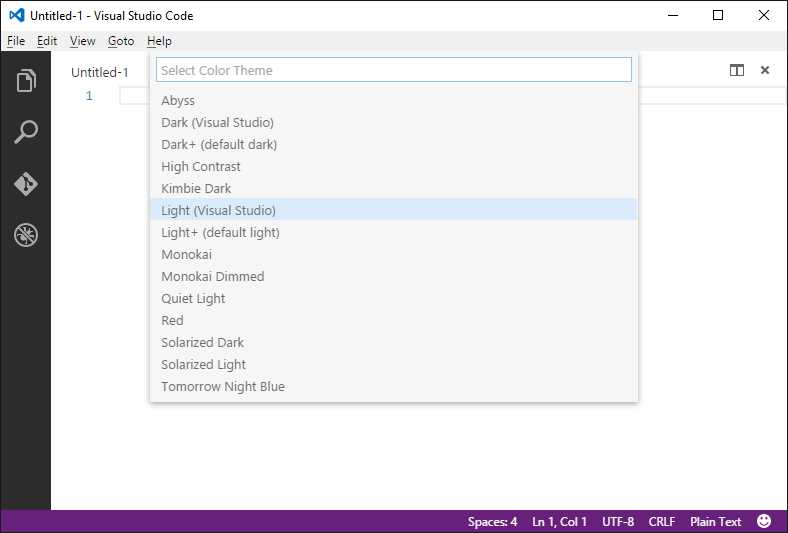
Figure 86: Selecting a Color Theme
Once you select a different color theme, it will be applied immediately. Also, you can get a preview of the theme as you scroll through the list with the keyboard. For instance, Figure 87 shows the Dark (Visual Studio) theme, which is a very popular choice that is similar to the Dark + default theme.
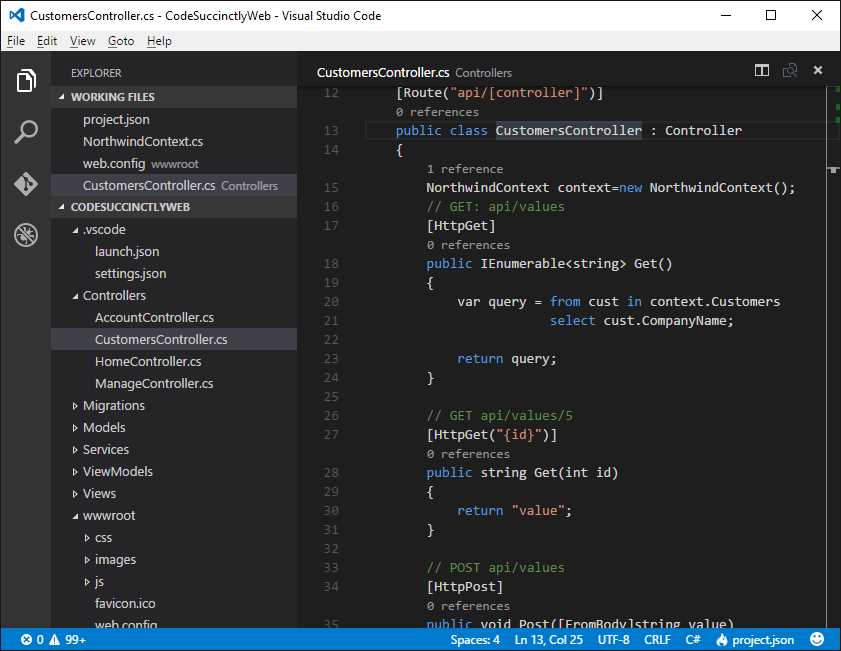
Figure 87: The Dark Theme
Trying the other available color themes is left to your curiosity.
Installing themes from the Extension Gallery
You can download and install additional themes produced by the developer community from the Extension Gallery. To do this, open the Command Palette by pressing F1 and type install extension, then type theme to filter the list. At this point, you will see a list of available themes from the Gallery, as shown in Figure 88.
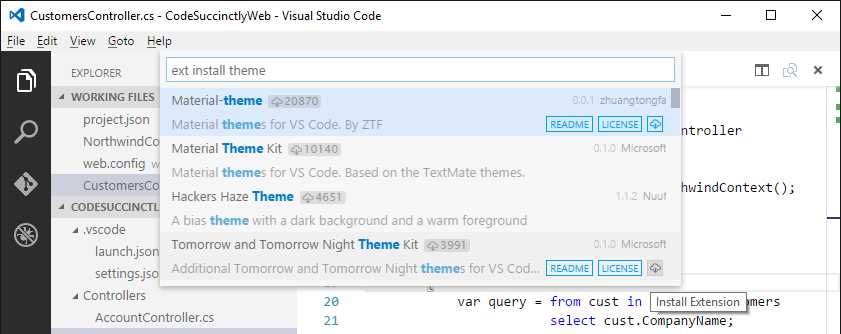
Figure 88: Selecting Themes from the Extension Gallery
If supplied by the theme producer, you can get information about a theme via the Readme and License files. Finally, click the Install Extension button, the last on the right, to install the selected theme. Notice that a VS Code restart will be required, and then you will be able to apply the new theme. You can also create custom themes using the Yeoman command-line tool that I will describe shortly.
Customizing the environment settings
In most applications, including other IDEs, you set environment settings and preferences via specific tools or windows. In Visual Studio Code, settings are instead specified writing JSON markup. There are two types of settings: user settings and workspace settings. User settings apply globally to the development environment, whereas workspace settings only apply to the current project or folder. Also, you can customize keyboard shortcuts in JSON format as well.
Customizing user settings
User settings globally apply to VS Code’s development environment. Customizing user settings is accomplished by selecting File > Preferences > User Settings. This action splits the code editor into two views. In the left view, you can see the default JSON settings file; in the right view, you can see a new, empty JSON file called settings.json where you can override the default settings.
Tip: The settings.json file’s location depends on your operating system and is visible at the top of the code editor.
Default settings relate to the code editor, file management, HTTP proxies, Git engine, linters, Markdown preview, and installed extensions’ behavior (if any). The default settings view provides detailed comments for each available setting expressed with JSON format so that you can easily understand what setting a particular line applies to. For more details about available settings, visit the official documentation. You can easily provide custom settings by overriding one or more default settings, writing inside settings.json. Figure 89 shows an example where you can see how to change the default editor font, how to remove line numbers, and how to disable file auto-save. Also, you can see how IntelliSense will help you choose among available settings. It is worth mentioning that using IntelliSense to pick a setting will also add a default value that you will want to replace with a custom one.
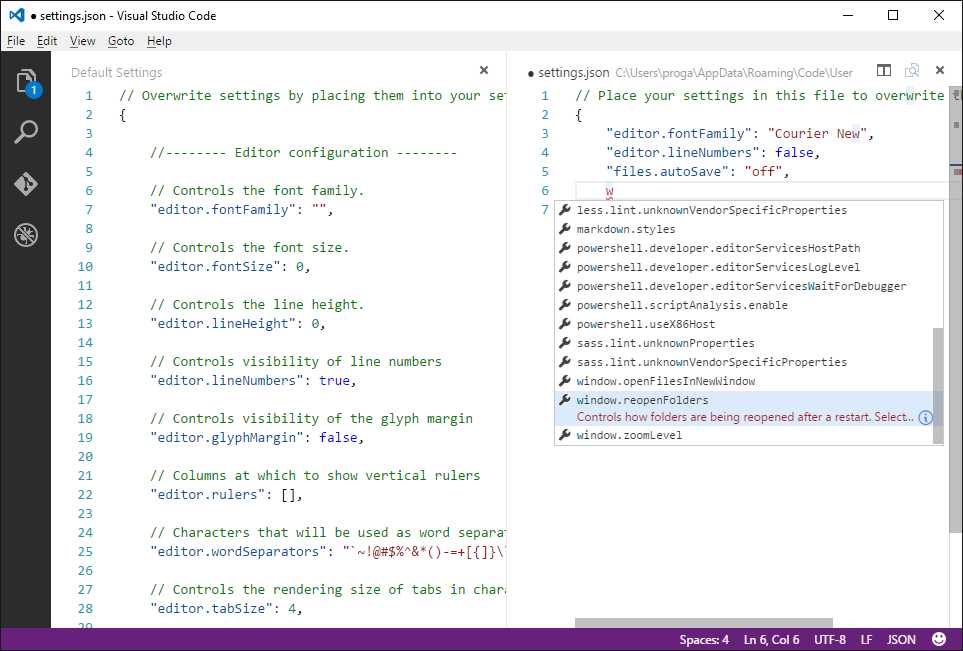
Figure 89: Supplying Custom User Settings
IntelliSense also shows hints about settings with a convenient tooltip under the selected setting. You can also expand the tooltip by clicking the information icon. When done, do not forget to save settings.json otherwise your changes will be lost.
Customizing workspace settings
Differently from user settings which globally apply to VS Code’s environment, workspace settings only apply to the current folder. In order to customize workspace settings, you first need to open an existing folder. Next, select File > Preferences > Workspace settings. What you see and what you can do at this point are exactly the same as the user settings: You have a settings.json file where you can specify your preferences. The difference is that settings.json is saved in the .vscode subfolder, restricting the settings availability to the current folder only.
Customizing key bindings
In VS Code terminology, key bindings represent shortcuts you use to invoke commands and actions from the keyboard instead of using the mouse. Visual Studio Code includes a huge number of keyboard shortcuts (summarized in the official documentation) that you can override with custom values. Key bindings are represented with JSON markup and each is made of two elements: key, which stores one or more keys to be associated to an action, and command, which represents the action to invoke. In some cases, VS Code might offer the same shortcuts for different scenarios. This is the typical case of the Esc key, which targets a number of actions depending on what you are working with, such as the code editor or a tool window. In order to identify the proper action, key binding settings support the when element, which specifies the proper action based on the context. Customizing key bindings is very easy: All you need to do is select File > Preferences > Keyboard Shortcuts, and edit the keybindings.json file that Code generates for you. The code editor gets split into two views. In the left view you can see the full list of default key bindings, and in the right view you can override default shortcuts with custom ones. Remember that Visual Studio Code has different default key bindings and allows for customizing them depending on what operating systems it is running on.
Tip: Key bindings are only available globally, so you cannot supply custom keyboard shortcuts for a specific folder as you can with workspace settings. Also, keyboard shortcut defaults target the US keyboard layout. Luckily, Visual Studio Code highlights shortcuts that have different key bindings for your current keyboard layout, suggesting the keys you should use.
A cool feature in VS Code allows you to quickly add a custom key binding by pressing Ctrl+K twice. When you do this, a pop-up appears and asks you to specify the key binding, as shown in Figure 90.
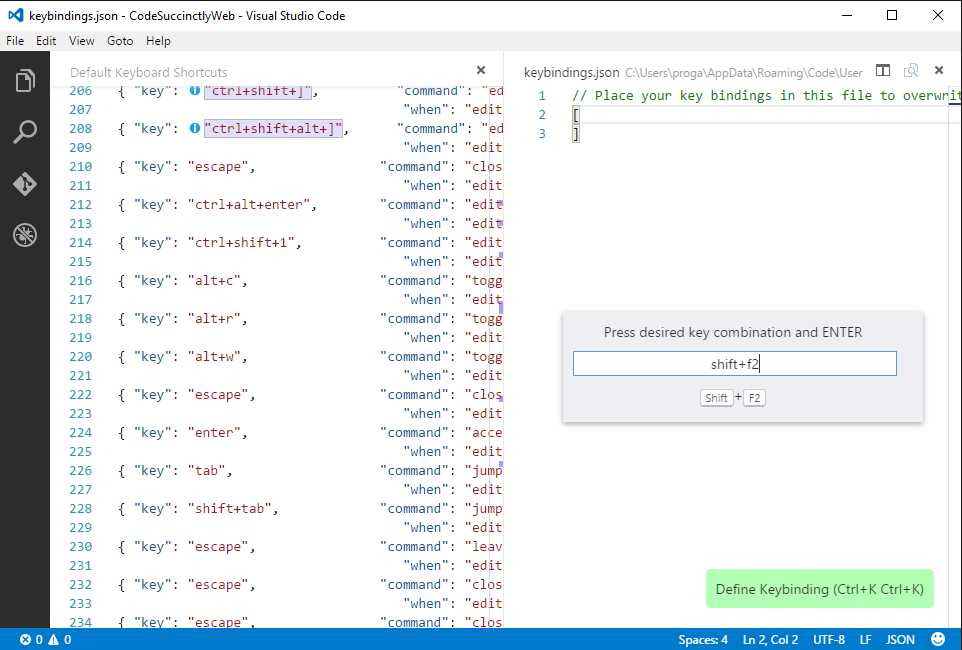
Figure 90: Entering a New Key Binding
Simply press the keys you want to bind to a new shortcut, and then press Enter. At this point, Visual Studio Code generates the proper JSON markup (see Figure 91), leaving you to specify the target command and optionally a when element to specify the action context.
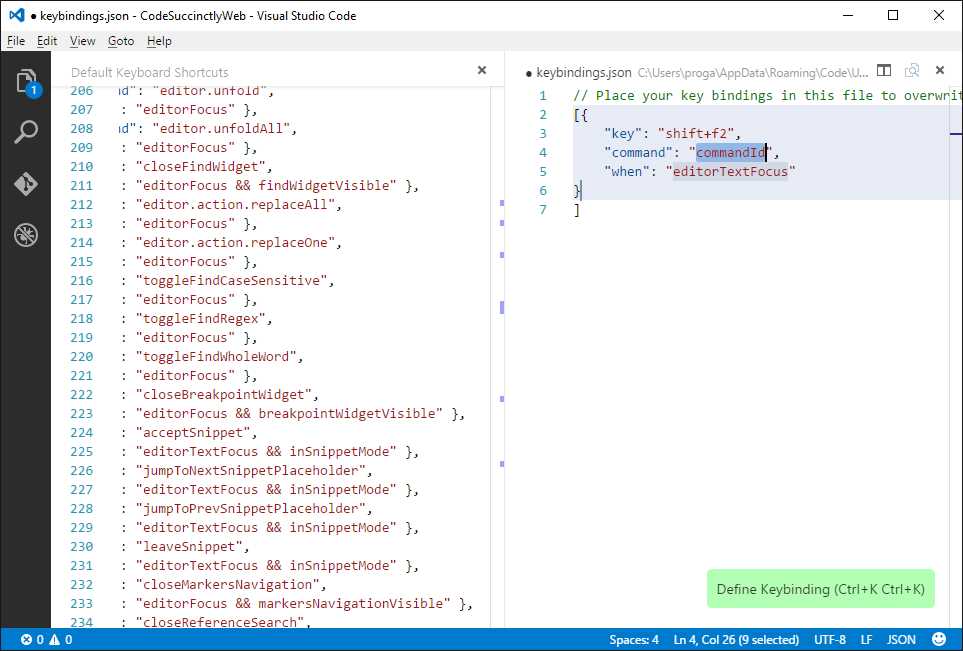
Figure 91: Specifying the New Key Binding’s Settings
When you are done with your custom key bindings, do not forget to save keybindings.json.
Languages, syntax colorizers, and code snippets
Visual Studio Code can be customized with additional languages, syntax colorizers, and code snippets. You can get additional languages and snippets from the Extension Gallery. More often than not, you will also find bundles containing the language support and related code snippets, and possibly additional goodies such as tasks and debuggers. Installing new languages and code snippets is very easy. In the Command Palette, type ext install and you will be able to pick from the extension list the desired language and snippets, or bundles. For instance, Figure 92 shows a bundle called OmniPascal, which supports the Delphi programming language and includes code snippets, IntelliSense support, and Go To Definition support.

Figure 92: Choosing New Languages, Code Snippets, or Bundles
When you select an item, VS Code starts to install it. When finished, you will be prompted to restart the application. At this point, you will be able to use the new language and snippets as shown in Figure 93, which shows an example based on Delphi and the newly installed OmniPascal extension.
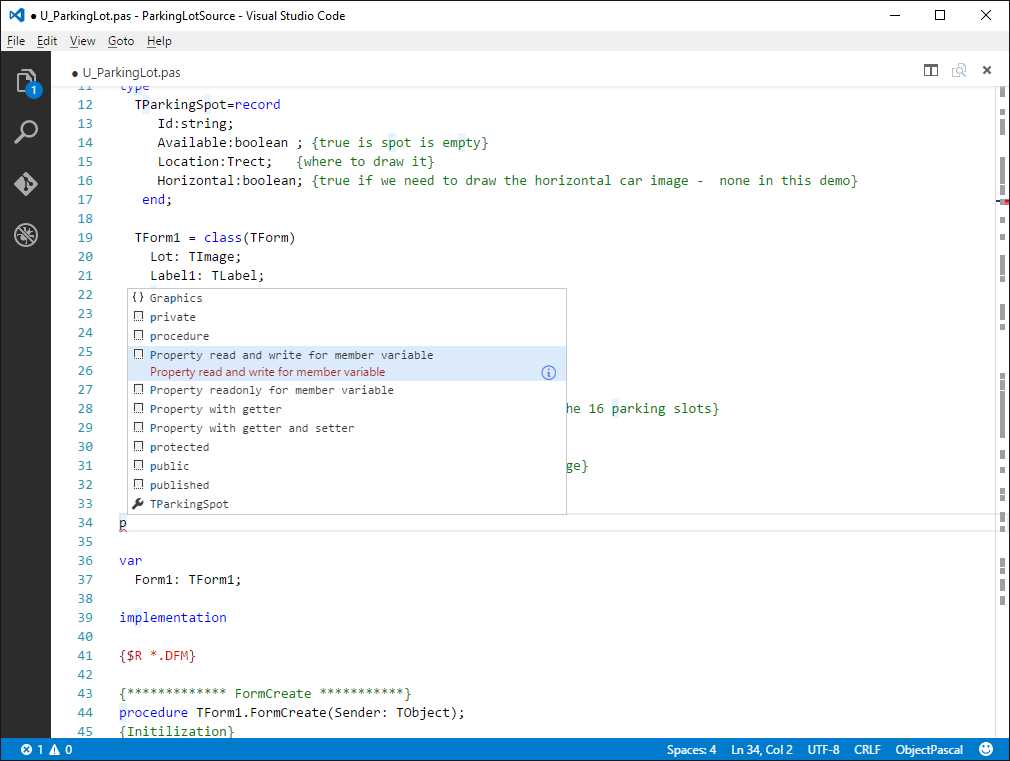
Figure 93: Writing Delphi Code with Syntax Colorization, Snippets, and IntelliSense Support
There is already rich support for important languages in the Extension Gallery, such as Python, Cobol, Fortran, and even PowerShell scripts. Among the others, you might want to check out the Cordova Tools for Visual Studio Code, which introduces a new debugger, commands, and IntelliSense for Cordova projects; the Python extension, which extends Python language support with IntelliSense, code snippets, a debugger, and enables features such as Go to Definition, Find all References, and Go to Symbol; and Visual Studio Team Services, which provides integration between VS Code and Visual Studio Team Services, introducing support for team projects, work items, and code management. These are really great examples of VS Code extensibility.
Create your first extension: Language with grammar, colorization, and snippets
As you know, Visual Studio Code supports a huge number of languages out of the box, plus you can install additional languages from the Visual Studio Code Marketplace. Not limited to this, you can add new languages to Visual Studio Code in a few steps. What you will do in the next example is add language support for the Ada programming language, including code snippets. Of course, all the steps described in this section apply to any other language.
Defining the language syntax
Visual Studio Code supports language syntaxes based on the TextMate .tmLanguage format. You can certainly define your own syntax, but the quickest way is starting with an existing one if the license agreement permits using the file. The first place you might want to search for an existing .tmLanguage syntax is GitHub. For instance, a well-done implementation of the Ada language syntax is available at https://raw.githubusercontent.com/mulander/ada.tmbundle/master/Syntaxes/Ada.tmLanguage.
Tip: Visual Studio Code needs the raw text of a language syntax definition. In the case of GitHub as the source, you need to open the .tmLanguage file in the raw view, which is accomplished by clicking the Raw button in the file view.
Once you have the syntax, you are ready to generate the language support for VS Code.
Generating new language support
Launch a command prompt and type yo code. This will launch the Yeoman Visual Studio Code Extension generator, which asks you what kind of extension you want to generate (see Figure 94).
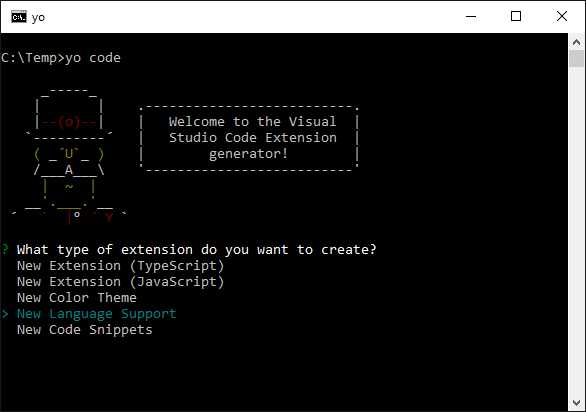
Figure 94: Yo Code’s First Screen
As you can see, with this tool you can create extensions, color themes, new languages, and code snippets. Select New Language Support and press Enter. Next the tool will ask for several pieces of information in sequence. So, provide the following information (see Figure 95 for reference):
- Enter the URL or path for the .tmLanguage syntax file, in this case https://raw.githubusercontent.com/mulander/ada.tmbundle/master/Syntaxes/Ada.tmLanguage.
- Enter ADA as the name of the extension.
- Accept the ada automatic suggestion as the extension identifier.
- Provide an extension description. In this case I’m entering ADA language and code snippets.
- Enter your publisher name. If you plan to publish extensions to the online Visual Studio Marketplace, keep note of the publisher name you are entering as you will need to register online (this will be described shortly).
- Accept ada as the languageId option. Notice that this must always be lowercase.
- Accept Ada as the detected name, which is what you will see when you select a language in the code editor’s selector.
- Accept the proposed file extensions that VS Code will associate to the current language—.adb and .ads in this case. Of course you can add or edit file extensions.
Your new language will be created in a few seconds. Figure 95 shows the full steps and the summary at the end of the operation.
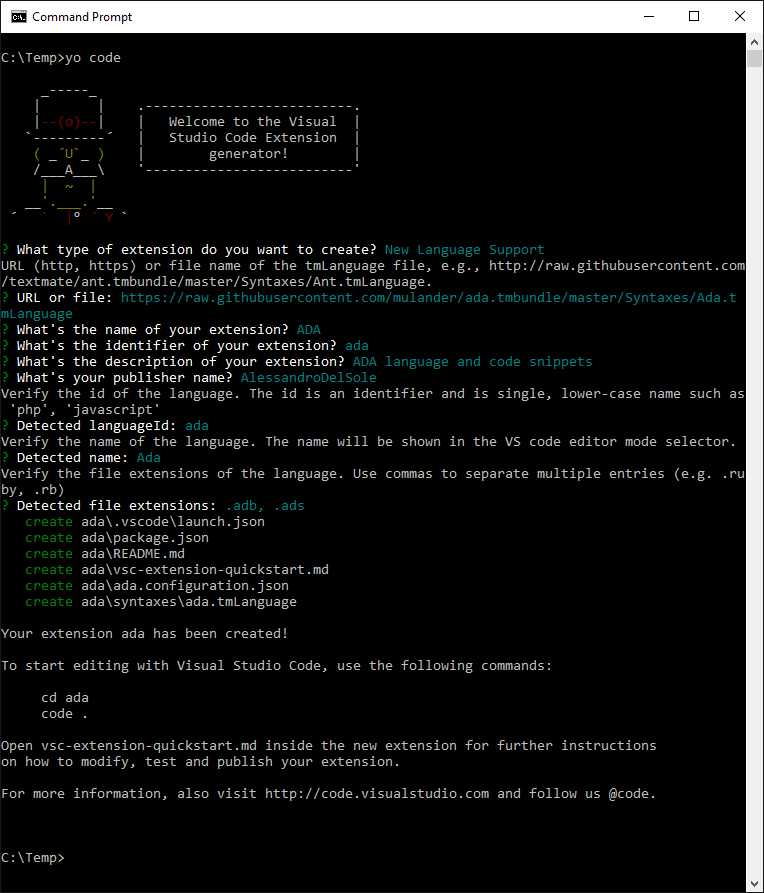
Figure 95: Generating the New Language with Yeoman
The new language will be created in a subfolder of the folder where you invoked the command prompt, which in my example is C:\Temp\Ada. Now, open the newly-created Ada folder with Visual Studio Code. As you can see in Figure 96, the Explorer shows the list of files that the new extension is made of. Among them, a README.md file is available and you should edit this file into a more personalized document. Figure 96 shows an example.
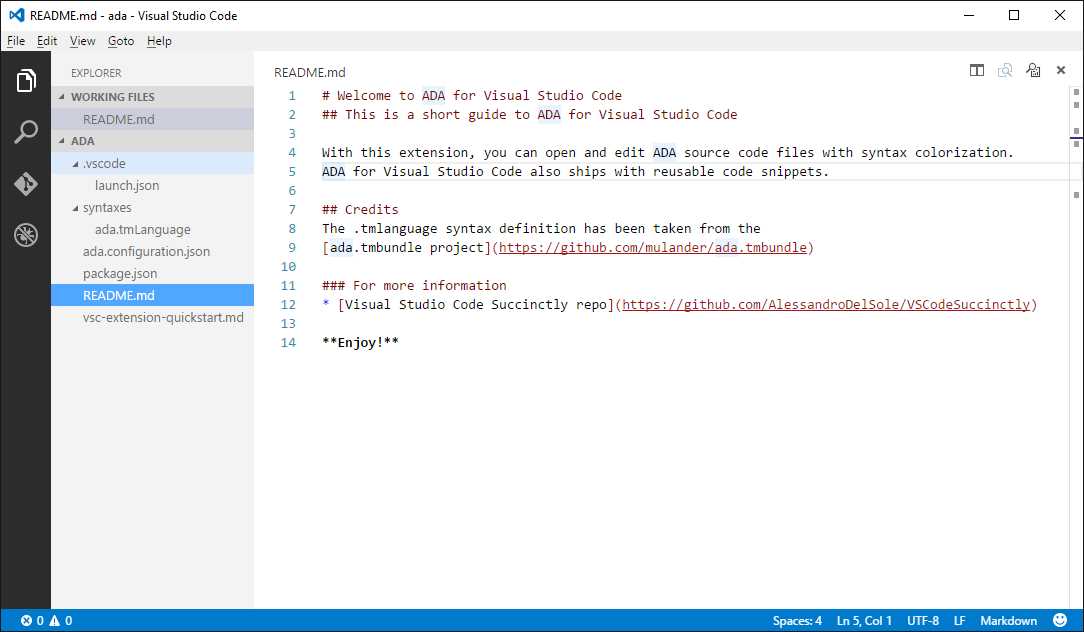
Figure 96: Editing README.md
Tip: When you use a .tmLanguage syntax file produced by other developers, though the license agreement typically allows using it with no restrictions, it is a good idea to give credit to the original work, as I’m doing in Figure 96.
Now open the package.json file, whose content is shown in Code Listing 10. Generally speaking, extensions and customizations have a manifest file called package.json that contains all the necessary information for Visual Studio Code to install and run the extension properly. As you can see, properties are self-explanatory and are the JSON counterpart of the information you entered when using Yeoman. It is worth mentioning the importance of categories, which are used to categorize an extension in the Visual Studio Marketplace. You can combine multiple categories, as you will see with snippets shortly. The contributes field stores the list of features the extension brings into Visual Studio Code--in this case, the language and its grammar. This is also the place to provide additional contributes, as you will do with code snippets in a moment.
Code Listing 10
{ "name": "ada", "displayName": "ADA", "description": "ADA language and code snippets", "version": "0.0.1", "publisher": "AlessandroDelSole", "engines": { "vscode": "^0.10.10" }, "categories": [ "Languages" ], "contributes": { "languages": [{ "id": "ada", "aliases": ["Ada", "ada"], "extensions": [".adb",".ads"], "configuration": "./ada.configuration.json" }], "grammars": [{ "language": "ada", "scopeName": "source.ada", "path": "./syntaxes/ada.tmLanguage" }] } } |
Testing the extension
Now close VS Code and copy the Ada subfolder into %USERPROFILE%\.vscode\extensions (where USERPROFILE is the path for your user profile on disk, such as C:\Users\YourName). On Mac and Linux, this folder is located at %HOME/.vscode/extensions. This is the folder where VS Code’s extensions are installed. If you now open Visual Studio Code, write some Ada code and select Ada as the current file language, you will see the proper syntax colorization, as shown in Figure 97.
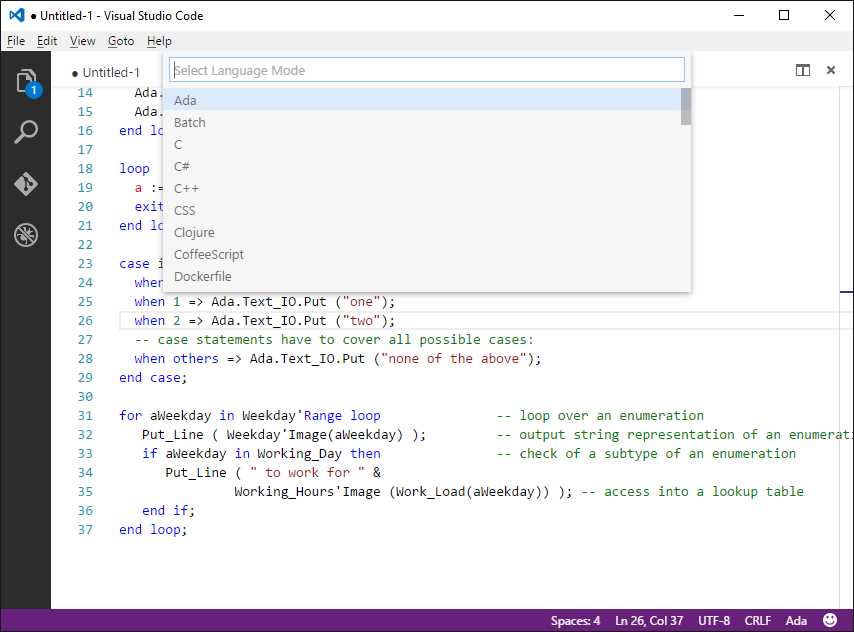
Figure 97: The custom language is properly recognized.
Also notice that VS Code will suggest the proper file extension when you first save a new file. Now you have a new language, but it would be a good idea to bundle some code snippets and make some customizations to the extension manifest.
Creating and packaging reusable code snippets
Visual Studio Code supports JSON as the format for code snippets. If you do not already have any written with JSON, you can generate code snippets using Yeoman starting from TextMate or Sublime Text code snippets. For instance, consider the following Ada code snippet that performs a simple for..loop iteration and prints the value of the i variable:
for i in 1 .. 10 loop
Ada.Text_IO.Put (i);
end loop;
With either TextMate or Sublime Text, create a new snippet containing the previous code. Figure 98 shows how the code snippet looks in Sublime Text.
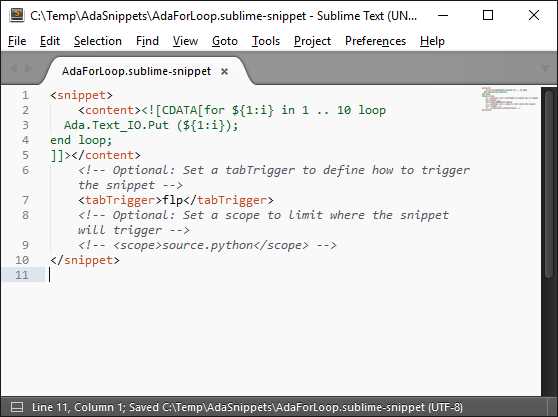
Figure 98: Preparing a Code Snippet with Sublime Text
TextMate and Sublime Text snippets are XML files. Basically you must enclose the code inside the CDATA section of the content node. Notice how you can use placeholders between brackets to define default values for a field. In this case the {1:i} placeholder means that the code editor will highlight the i variable so that the user understands it can be replaced with a different identifier. The number 1 will match any occurrence of the specified variable, but you could use 2, 3, and so on to suggest other default value replacements. You should also provide a keyboard shortcut that allows activating the code snippet in VS Code by pressing Tab, which is accomplished by providing the shortcut in the tabTrigger node. Let’s leave off the scope node, which is not necessary at this point. Save the file as AdaForLoop. Now consider the following Ada code, which performs a simple loop..end loop loop:
loop
a := a + 1;
exit when a = 10;
end loop;
Figure 99 shows this snippet in Sublime Text.
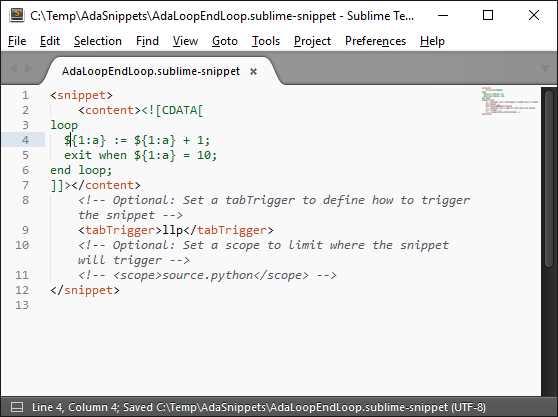
Figure 99: Preparing a Second Code Snippet with Sublime Text
Save the snippet as AdaLoopEndLoop. Now open a command prompt in the directory where you saved the code snippet files and type yo code. When the Yeoman tool starts, select New Code Snippets as the extension generation option. By using Figure 100 as a reference, provide in sequence:
- The folder that contains TextMate or Sublime snippets. You can type . if you already opened a command prompt in the folder that contains the desired snippets.
- The name of the extension, e.g., Ada Code Snippets.
- The extension identifier. You can accept the auto-generated identifier.
- An extension description.
- Your publisher name, as you did with the language support generation.
- The language id that your snippets are for. In this case, the language id is ada. In the case that you are packaging code snippets for other languages, you will need to supply the id for those languages (e.g., Markdown, Python).

Figure 100: Generating a Code Snippet Extension
As for a new language, Yeoman generates a new folder containing the extension manifest (package.json), a README.md file that you are encouraged to edit before you distribute your extension, and a subfolder called snippets, which contains a file called snippets.json. This one contains all the code snippets you provided, converted to JSON format. You can certainly open the new folder with Visual Studio Code and investigate the extension structure, not just edit the README.md file. As it is, the code snippet extension is ready for distribution, so it is really easy to package and distribute code snippets for existing languages. However, the goal now is to distribute both the Ada language support and the JSON code snippets. First, copy the snippets subfolder into the folder that contains the Ada language extension (see the steps listed just before creating code snippets). Just to make sure you copy this folder into the proper place, it is at the same level of the syntaxes and .vscode folders. Second, you need to make an edit to the package.json file that was created for the Ada language support. More specifically, because you can combine multiple contributes in one extension, you will add a snippets property as shown in Code Listing 11. This snippets property can be simply copied and pasted from the package.json that was created for the code snippet extension.
Code Listing 11
{ "name": "ada", "displayName": "ADA", "description": "ADA language and code snippets", "version": "0.0.1", "publisher": "AlessandroDelSole", "engines": { "vscode": "^0.10.10" }, "categories": [ "Languages", "Snippets" ], "contributes": { "languages": [{ "id": "ada", "aliases": ["Ada", "ada"], "extensions": [".adb",".ads"], "configuration": "./ada.configuration.json" }], "grammars": [{ "language": "ada", "scopeName": "source.ada", "path": "./syntaxes/ada.tmLanguage" }], "snippets": [{ "language": "ada", "path": "./snippets/snippets.json" }] } } |
Notice how the categories property has been extended to included snippets as well. This will make the extension discoverable when users search for both languages and snippets. Save your edits, and run Visual Studio Code again. You already saw how the language support works, so now type the snippet shortcuts flp and then press Tab, or llp and then press Tab. Figure 101 shows how the loop..end loop code snippet has been inserted, highlighting placeholders for replacements.
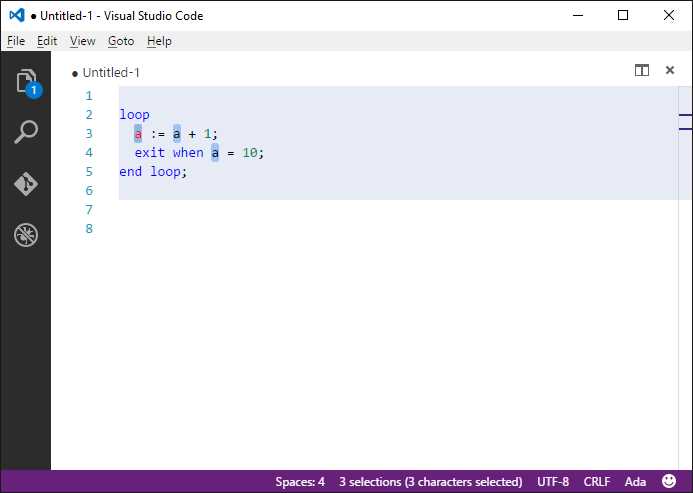
Figure 101: Support for Ada Code Snippets
So with relatively little effort you have been able to plug a new language with code snippets into Visual Studio Code. At this point, you are ready to share the result of your work with the rest of the world.
Become a registered publisher
Extending and customizing Visual Studio Code for your own usage is certainly helpful, but the real fun begins when you share your work with other developers. You can easily publish your extensions to the Visual Studio Code Marketplace so that other developers will be able to download them from within Code and will also be able to view summary information in the Marketplace portal. Before you start, you need to register as a publisher. The registration process passes through the Microsoft Visual Studio Team Services. Formerly known as Visual Studio Online, VS Team Services provides free services for up to five users on your team, such as version control, work management, build and test automation, and much more. The first thing you need to do is signing up for your free account. Once registered, you need a Personal access token which grants you permissions to publish your extensions to the Marketplace. To accomplish this, follow these steps:
- Click your name in the upper-right corner of the main page, and then click My Profile.
- Once you have accessed your profile administration, click the Security tab on the left side of the page (see Figure 102).
- Click Personal access tokens, and then click Add.
- Enter a name for your personal access token. As you can see in Figure 102, I am using vsce, which recalls the name of the tool you use to publish to the Marketplace and which you will use shortly, but you can use any name you like.
- In the Expires in field, enter 1 year.
- In the Accounts field, select All accessible accounts to grant permission to any account associated to the current subscription.
- In the Authorized Scopes group, select All scopes.
- Click Save at the bottom of the page (not visible in Figure 102).
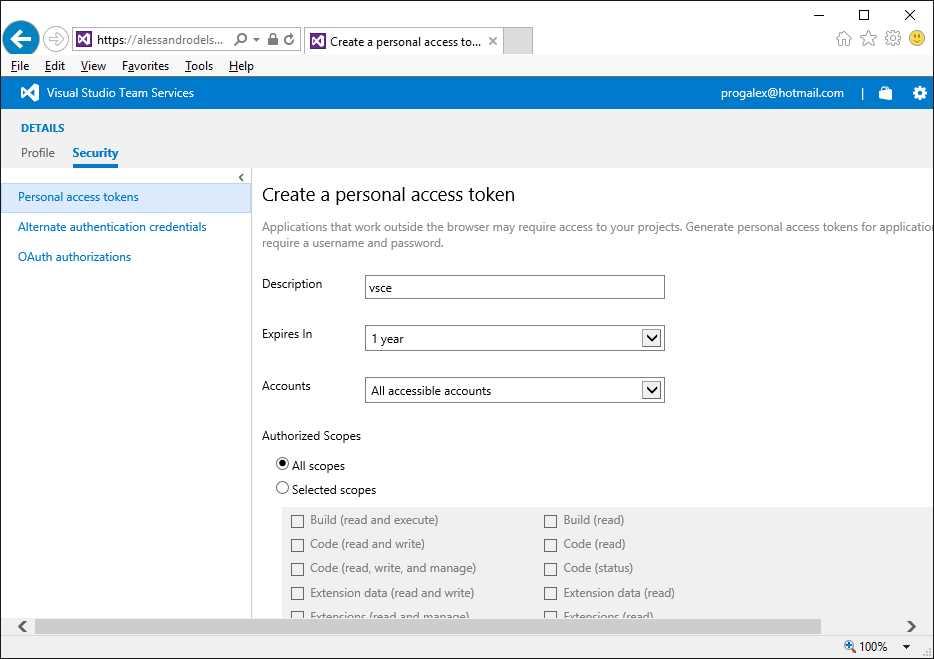
Figure 102: Creating a Personal Access Token
Note: Because the personal access token will not be stored anywhere, it is essential that you follow the portal’s suggestion of saving it in a secure place, as you will need it to publish extensions online.
Customizing the extension manifest
The extension manifest, that is the package.json file, can be customized further to offer useful information to end users. The official documentation provides full details about the manifest customization, but here I will show common customizations. For instance, you can add an icon property to specify a 128 × 128 image that will be used to promote your extension in the gallery, specify a license property that indicates a license agreement for your extension, specify a homepage property that points to the home page of your extension on the web, specify a bugs property where you can specify a URL and email address that users might use to file bugs. Code Listing 12 shows an example of manifest customization including an icon, a license, a home page, and a bug submission page.
Code Listing 12
{ "name": "ada", "displayName": "ADA", "description": "ADA language and code snippets", "version": "0.0.1", "publisher": "AlessandroDelSole", "icon": "images/MyIcon.jpg", "license": "SEE LICENSE IN LICENSE.md", "homepage": "https://github.com/AlessandroDelSole/VSCodeSuccinctly/blob/AdaLanguage/README.md", "bugs": { "url": "https://github.com/AlessandroDelSole/VSCodeSuccinctly/issues", "email": "[email protected]" }, "engines": { "vscode": "^0.10.10" }, "categories": [ "Languages" ], "contributes": { "languages": [ { "id": "ada", "aliases": [ "Ada", "ada" ], "extensions": [ ".adb", ".ads" ], "configuration": "./ada.configuration.json" } ], "grammars": [ { "language": "ada", "scopeName": "source.ada", "path": "./syntaxes/ada.tmLanguage" } ], "snippets": [ { "language": "ada", "path": "./snippets/snippets.json" } ] } } |
A couple of notes about the extension manifest:
- To provide an icon, create a subfolder inside the extension’s folder and place a 128 × 128 image there.
- The license property value must always be SEE LICENSE IN LICENSE.md, so you need to add a LICENSE.md file in the root folder of your extension.
Do not forget to check out additional possibilities in the official documentation. Now you really have all you need to publish your work online.
Publishing and sharing to the Visual Studio Code Marketplace
In order to publish extensions to the Visual Studio Code Marketplace, you need a command-line tool called vsce. You can get it by typing the following in the command line:
> npm install –g vsce
Next, open a command prompt in the root folder of the extension you want to publish, in this case the Ada language extension. The first time you publish an extension, you first need to create a publisher identity associating vsce with your personal access token, which is accomplished with the following command:
> vsce create-publisher publisherName
Where publisherName is the unique identifier you want to use. When you press Enter, you will be prompted to enter a friendly, human readable name, and the personal access token you received previously. You will need to perform this step just once. The next step is simply typing vsce publish to publish your extension to the Visual Studio Code Marketplace. If everything succeeds, the extension will be available online in a few seconds. Figure 103 shows what the Ada extension looks like in the Marketplace portal.
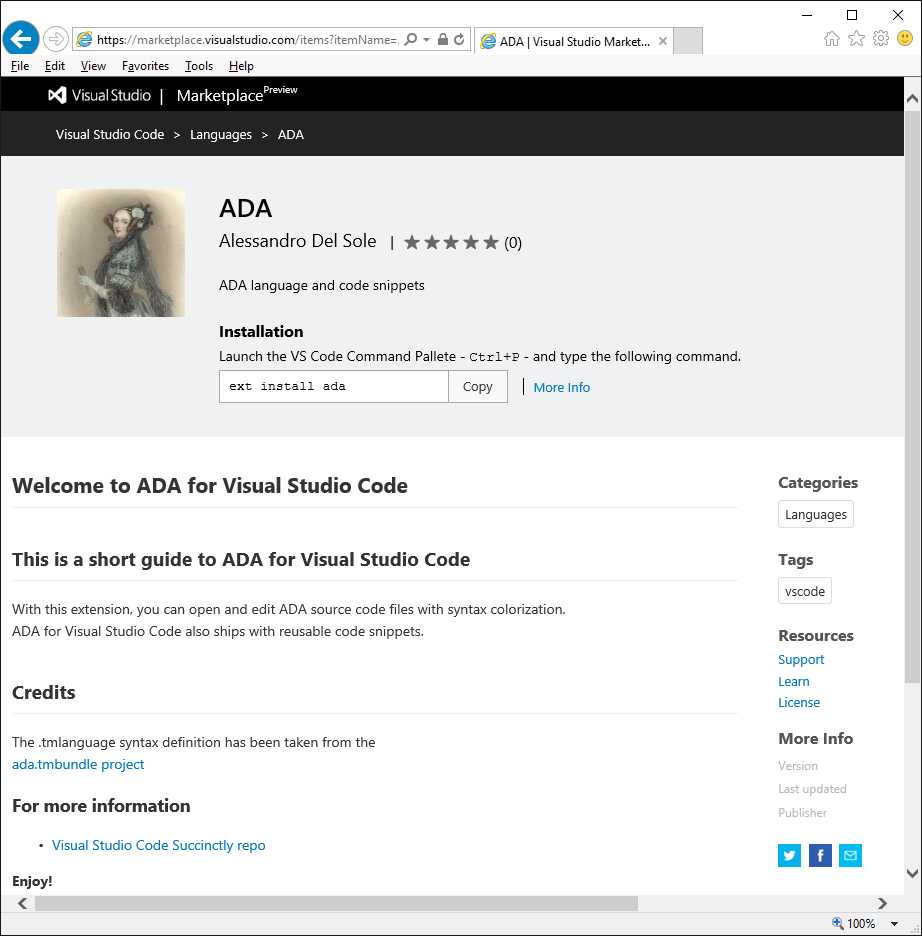
Figure 103: The published extension appears in the VS Code Marketplace.
Figure 104 shows instead how the extension appears in the Command Palette, where you can see how users can look at the license agreement and open the Readme file.
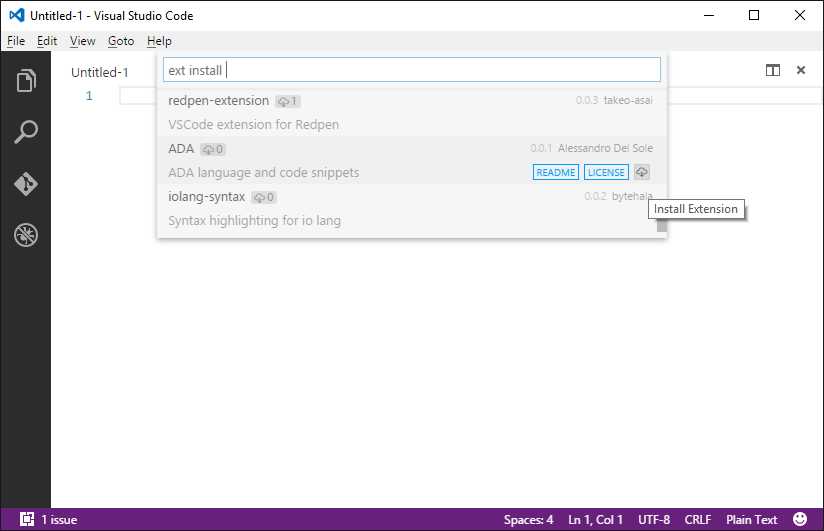
Figure 104: The extension appears in the Command Palette.
There is so much more in the Visual Studio Code extensibility, but in this chapter you have seen a number of steps, information, and resources that are common to any customization and extension you want to build.
Chapter Summary
Visual Studio Code can be customized and extended in many ways. You can customize VS Code’s settings, such as the color theme, user and workspace settings, and key bindings. You can also download and install extensions from the Visual Studio Code Marketplace, and manage installed extensions, using the Command Palette. Not limited to this, you can write your own customizations and extensions using the Yeoman generator for Visual Studio Code, which enables you to get started with extensibility quickly, such as generating new language support, code snippets, color themes, and other kinds of extensions. Advanced extensibility has not been discussed in this chapter, but you can definitely have a look at the documentation.
7 |
- 1800+ high-performance UI components.
- Includes popular controls such as Grid, Chart, Scheduler, and more.
- 24x5 unlimited support by developers.