
Visual Studio 2019 Succinctly®

CHAPTER 6
What’s new for mobile development
Mobile development with C# is one of the areas where Microsoft has made more investments in recent years, starting with the acquisition of Xamarin and continuing with many updates and improvements to the technology. Xamarin is now a consolidated development platform and the technology of choice for thousands of developers.
Visual Studio 2019 continues the path of its predecessor, adding new tools to make the development experience more productive, including support for the next generation of mobile development tools. Additionally, the size of the Xamarin workload in the Visual Studio Installer has been dramatically reduced so that setup is faster and less space on disk is required. This chapter describes what’s new for mobile development with Xamarin in Visual Studio 2019, from the IDE point of view.
Note: Microsoft has made huge investments in improving Xamarin performance. This includes not only the development tools, but also the build processes and simulators. Specific performance improvements will not be covered in this chapter, but you will immediately notice how much faster the process is, from project creation to debugging and deployment.
Creating mobile projects with Xamarin
In Chapter 2, you saw the new user interfaces for creating projects. When it comes to mobile apps with Xamarin, you can filter the list of project templates by project type and select Mobile. Figure 62 shows how the list of Xamarin projects appears at this point.

Figure 62: Getting the list of Xamarin project templates
The list of templates, which you will need to scroll down to see in its entirety, includes both Xamarin.Forms and Xamarin native project templates. Xamarin.Forms deserves a few more words, since Microsoft is hugely investing in this platform.
Platform support and code-sharing strategies
If you select the Mobile App (Xamarin.Forms) project template (see Figure 57) and click Next, you will be asked to specify the target folder on disk, and then you will be asked to select a specific template, as you can see in Figure 63.
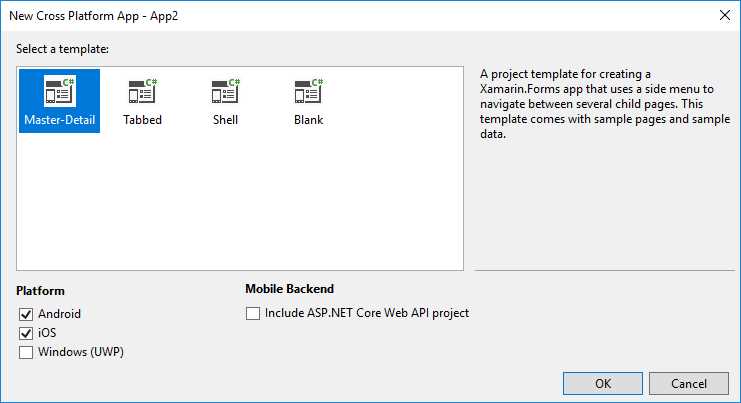
Figure 63: Xamarin.Forms project templates
Table 2 describes Xamarin.Forms templates in more detail.
Table 2: Xamarin.Forms project templates
Xamarin.Forms project templates | |
|---|---|
Master-Detail | Create a mobile app with a side menu with built-in navigation to several child pages. Sample pages and sample data are included. |
Tabbed | Create a mobile app that uses tabs to navigate among several child pages. Sample pages and sample data are included. |
Shell | Create a mobile app that uses the new Xamarin.Forms Shell to hold child pages. |
Blank | Create an empty Xamarin.Forms project. |
Except for the Blank template, the other templates also include an option to generate an ASP.NET Core Web API project that will serve as the mobile back end. It is important to note that Visual Studio 2019 generates new Xamarin.Forms projects based only on the .NET Standard code-sharing strategy, so you will no longer choose between .NET Standard and shared projects, as you did with Visual Studio 2017. This is a very important change that will make your mobile projects easier to maintain in the future.
Note: When you create a Xamarin.Forms project, Visual Studio 2019 will automatically use the latest stable release of the library. At this writing, the latest stable release for Xamarin.Forms is 4.0.0.48.2894.
Shell template for Xamarin.Forms
The Shell is a new feature in Xamarin.Forms 4.0 that reduces the complexity of a project by providing the fundamentals that most mobile applications require. The Shell includes a common navigation experience, a URI-based navigation scheme, and an integrated search handler. Apps built upon the Shell can easily include flyout menus and tabs. Writing code using the Shell is not in the scope of this e-book, so you can read all the details in the official documentation. Here, it’s important to note that Visual Studio 2019 introduces a specific project template for Xamarin.Forms called Shell, shown in Figure 64.
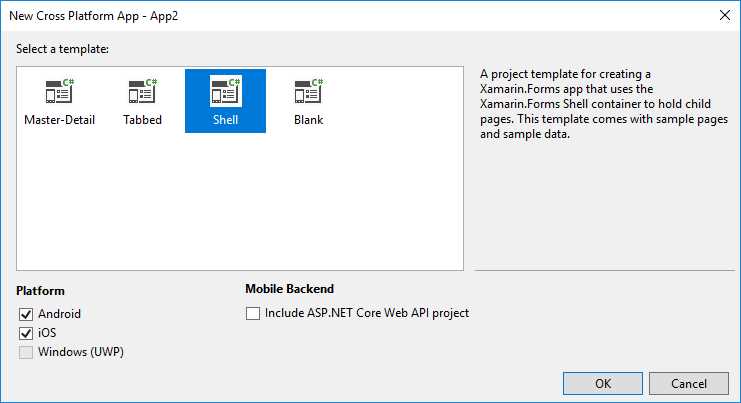
Figure 64: The Shell project template
This template generates a project based on the Model-View-ViewModel (MVVM) architecture, with data objects, pages, and view models. The core of the generated code is in the AppShell.xaml file, whose content is included in Code Listing 1 for your convenience (comments in the original code have not been included).
Code Listing 1
<?xml version="1.0" encoding="UTF-8"?> <Shell xmlns="http://xamarin.com/schemas/2014/forms" xmlns:x="http://schemas.microsoft.com/winfx/2009/xaml" xmlns:local="clr-namespace:App1.Views" RouteHost="companyname.com" RouteScheme="app" Route="App1" FlyoutBehavior="Disabled" Title="App1" x:Class="App1.AppShell"> <Shell.Resources> <ResourceDictionary> <Color x:Key="NavigationPrimary">#2196F3</Color> <Style x:Key="BaseStyle" TargetType="Element"> <Setter Property="Shell.ShellBackgroundColor" Value="{StaticResource NavigationPrimary}" /> <Setter Property="Shell.ShellForegroundColor" Value="White" /> <Setter Property="Shell.ShellTitleColor" Value="White" /> <Setter Property="Shell.ShellDisabledColor" Value="#B4FFFFFF" /> <Setter Property="Shell.ShellUnselectedColor" Value="#95FFFFFF" /> <Setter Property="Shell.ShellTabBarBackgroundColor" Value="{StaticResource NavigationPrimary}" /> <Setter Property="Shell.ShellTabBarForegroundColor" Value="White"/> <Setter Property="Shell.ShellTabBarUnselectedColor" Value="#95FFFFFF"/> <Setter Property="Shell.ShellTabBarTitleColor" Value="White"/> </Style> <Style TargetType="ShellItem" BasedOn="{StaticResource BaseStyle}" /> </ResourceDictionary> </Shell.Resources> <!-- Your Pages --> <ShellItem> <ShellSection Title="Browse" Icon="tab_feed.png"> <ShellContent ContentTemplate="{DataTemplate local:ItemsPage}" /> </ShellSection> <ShellSection Title="About" Icon="tab_about.png"> <ShellContent ContentTemplate="{DataTemplate local:AboutPage}" /> </ShellSection> </ShellItem> </Shell> |
This XAML file contains the basic structure for an app built upon the Shell and demonstrates how easy it is to use this feature. You will work on your content pages as you are already used to doing, but the Shell will simplify the project structure by doing most of the work.
Xamarin.Forms improvements
Visual Studio 2019 introduces some improvements to the existing development tools for Xamarin.Forms and, since version 16.1, it has supported Xamarin.Forms 4.0. More specifically, you can now select a device factor when previewing the result of your XAML, and you can now edit property values via the Properties window. The next paragraphs describe these additions in detail.
Tip: Remember that the XAML code editor can also benefit from IntelliCode.
Xamarin.Forms Previewer updates
Visual Studio 2017 introduced the Xamarin.Forms Previewer, an integrated tool that allows you to see the result of your XAML code without deploying the app to a device, for both iOS and Android form factors. Visual Studio 2019 brings two interesting updates to the Previewer:
- You no longer need to build the project to see the preview. Simply enable the Previewer to see your changes.
- You now have the option to display the preview based on different devices.
Tip: You can show the Xamarin.Forms Previewer by clicking the Design icon at the upper-right corner of the XAML code editor. Additionally, you can control the appearance of both the Previewer and the XAML code editor via Tools > Options > Xamarin > Xamarin.Forms Previewer.
To demonstrate these two interesting updates, simply create a new Xamarin.Forms project. The next figures are based on the Shell template. Double-click a XAML page in Solution Explorer, and when the code editor is displayed, click the Design icon at the top-right corner. You will immediately notice that the Xamarin.Forms previewer will be able to render the preview without prebuilding the project. You will also see a combo box that shows a list of devices. Figure 65 shows how this appears for Android, and Figure 66 shows how this appears for iOS.
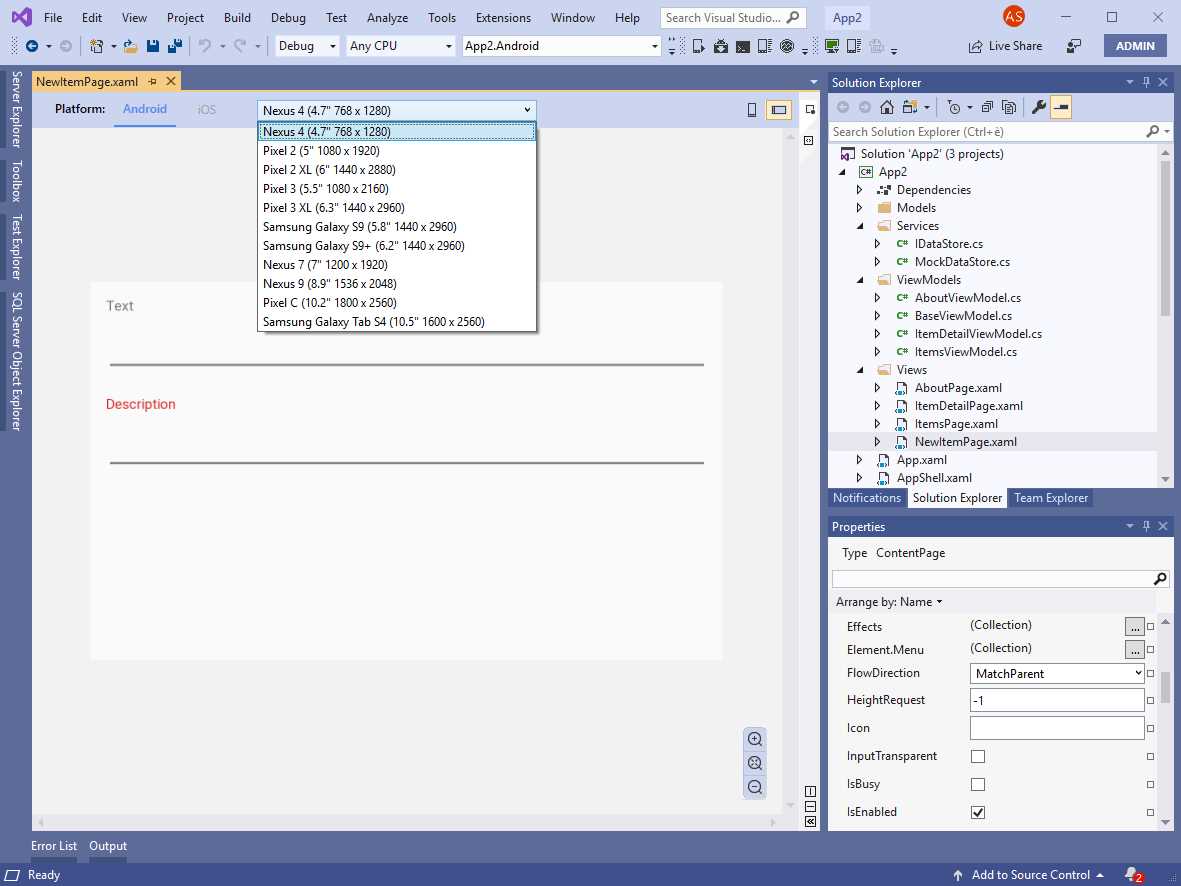
Figure 65: Selecting a device factor on Android
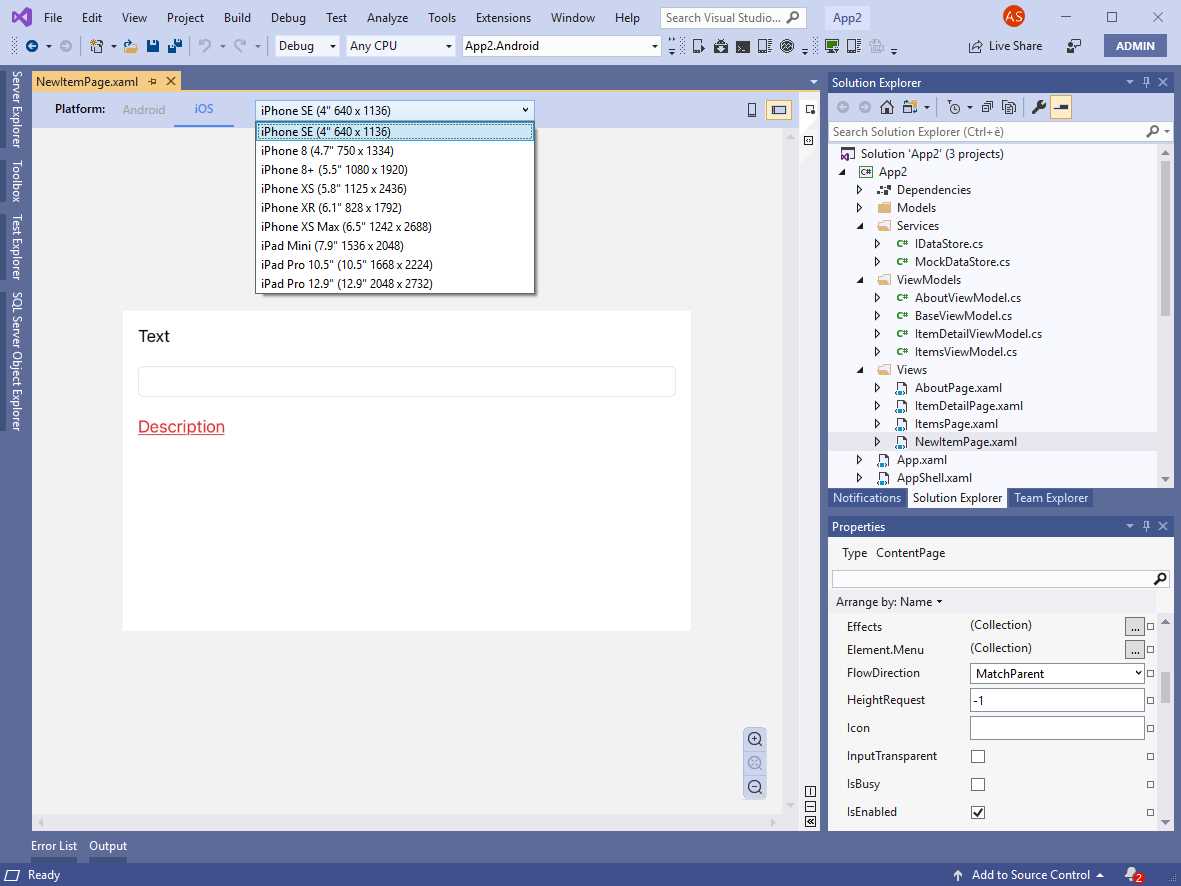
Figure 66: Selecting a device factor on iOS
These are very nice additions because they will help you understand how your code is rendered on both platforms at design time without the need to rebuild and re-deploy the app every time.
Note: You might still need to rebuild the project before you see your changes on the Previewer. This might happen if you have custom renderers or third-party controls. The IDE will tell you when the project needs to be rebuilt.
Managing objects with the Properties window
In Xamarin.Forms, you can now quickly edit object properties via the Properties tool window. This has always been possible with other development technologies, and now it is for Xamarin.Forms, too. All you have to do is click inside an object declaration in the XAML code editor, and the Properties tool window will allow you to view current object properties and assign their values, as shown in Figure 67, which provides an example based on the Label control.
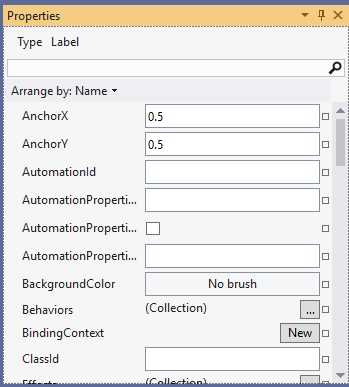
Figure 67: Editing object properties via the Properties window
For some specific types, the Properties window provides specialized editors. For example, you can edit properties of type Color with a convenient color picker, as shown in Figure 68.

Figure 68: Editing object properties via the Properties window
Currently, you can only enable editing properties in the Properties window by selecting objects in the XAML code editor. Clicking objects in the Xamarin.Forms Previewer does not enable selection, and therefore, the Properties window is not activated.
Xamarin.Android improvements
Specific investments have been made in the Xamarin.Android development experience. Here is a summary of what’s new:
- There is a simplified way to create emulator images via the new Create Android Emulator button directly in the Run drop-down.
- Visual Studio can now determine the best emulator image based on your system configuration (for example, if the Intel HAXM acceleration drivers are installed).
- Fast Deployment, a mode used to package assemblies for debugging, is now even faster.
- When working with the designer on .axml (Android XML) files, you can now drag views from the toolbox onto the code editor and generate the related code.
- The XML editor for the user interface files now displays an integrated preview for attributes that contain color values (or references to color values), as you can see in Figure 69. Additionally, you can hover over the attribute and a tooltip will display the color information.
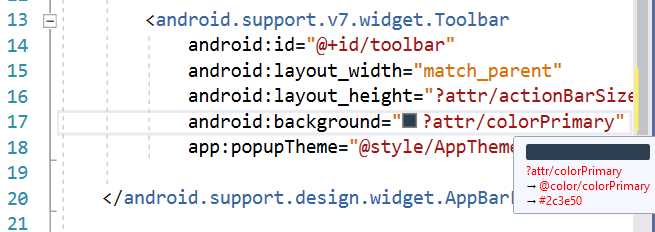
Figure 69: Color preview in the XML editor for Android
Note: There are no significant updates for Xamarin.iOS in Visual Studio 2019 at the moment. Xamarin.iOS updates depend on Apple SDKs updates, so make sure to check the release notes of future VS releases to see if new features are available.
Chapter summary
Mobile app development is crucial to Microsoft, and Visual Studio 2019 makes several steps forward to support C# developers who use Xamarin for their business. The new version of the IDE has new and updated, yet simplified, project templates. It brings improvements to the Xamarin.Forms experience with support for multiple form factors in the Previewer, and with the option to edit property values in the Properties window.
For Xamarin.Android, several improvements are also available for the designer, emulators, and the overall experience. Mobile is certainly important, but so is web: in the next chapter, you’ll see what’s new for web and cloud development in VS 2019.
- 1800+ high-performance UI components.
- Includes popular controls such as Grid, Chart, Scheduler, and more.
- 24x5 unlimited support by developers.