
Visual Studio 2019 Succinctly®

CHAPTER 2
Layout and Project Management
When you run Visual Studio 2019 for the first time, you will immediately notice some differences with Visual Studio 2017. Additionally, many tools have been moved to different places, some changes have been done to the IDE layout, and the way you create new projects has completely changed. This chapter describes what’s new in the IDE layout and project management tools, so that you will quickly become more familiar with VS 2019.
The IDE startup
Microsoft is always committed to improving its products’ performance, and Visual Studio 2019 is no exception. When you launch VS 2019, you will see that startup is much faster than with Visual Studio 2017. You will also notice a new splash screen and a new product icon. You will no longer see the start page like in the previous versions, as it has been discontinued in favor of a new dialog called the start window.
Introducing the start window
When Visual Studio 2019 launches, the first visual element you see is the new start window. Figure 7 shows an example.
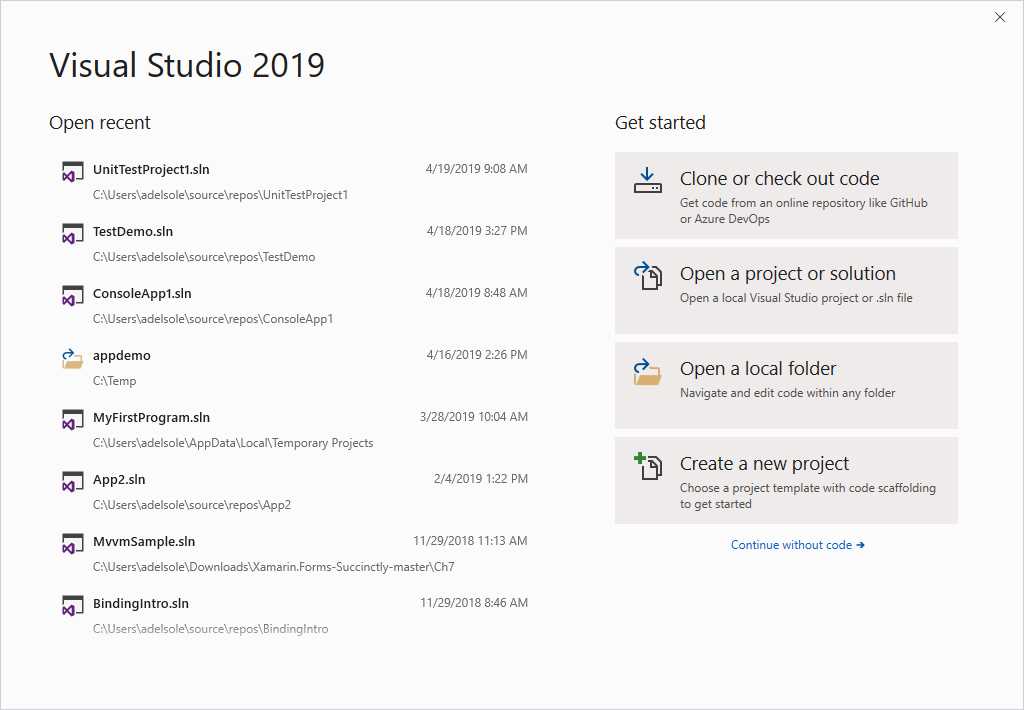
Figure 7: The start window
The start window replaces the start page you were used to seeing in the previous versions of Visual Studio. Here you can see the list of recently used projects on the left. You can remove items from the list by right-clicking them and selecting Remove From List. On the right, you get shortcuts to common actions:
- Clone or check out code: This shortcut allows you to quickly connect to a Git repository on Azure DevOps or GitHub, so that you can easily clone the repository or simply check out the code. I’ll discuss this feature in more detail in the next section.
- Open a project or solution: This shortcut allows you to open an existing solution or project by using a simple, common dialog.
- Open a local folder: This shortcut allows you to open an existing folder. Microsoft introduced this feature in Visual Studio 2017.
- Create a new project: This shortcut will launch the user interface for creating a new project. This feature has been completely redesigned in Visual Studio 2019 and will be discussed thoroughly in the next section.
You are not obliged to select one of these actions: you can click the Continue without code hyperlink to simply open the Visual Studio IDE without working on code. Connecting to a Git repository and creating a new project require more detailed explanations, so the next section walks through both features.
Tip: You can customize the behavior of Visual Studio at startup by selecting Tools > Options > Environment > Startup. Possible options include displaying the start window, the most recent solution, or the empty environment.
Working with projects and solutions
The start window simplifies working with projects and solutions by providing useful shortcuts. You can quickly open an existing solution via the Open a project or solution shortcut, and you can also open a folder via the Open a local folder shortcut. If you instead do not wish to open a project or solution at startup, you can simply click the Continue without code hyperlink in order to open the IDE with no code. You will then be able to open a solution later, via the usual commands in the File menu. In the next two paragraphs, I will cover two features that present a new user interface and experience in Visual Studio 2019: creating new projects and cloning existing code repositories.
Creating new projects
Visual Studio 2019 provides a completely new user interface for creating new projects. In the start window, click Create a new project. The same-named dialog appears at this point (see Figure 8).

Figure 8: The Create a new project dialog
On the left side of the dialog, you will see a list of recently used project templates. You can select a template from the list, scroll the list for additional templates, or you can search for a specific template by typing in the search box. You can also quickly filter the list by language, platform, and project type, as well as combine multiple filters. For example, Figure 9 shows the list of templates filtered by language (Visual Basic), platform (Windows) and project type (Library).

Figure 9: Filtering the list of project templates
The dialog shows the filters currently applied, if any, and provides the Clear filter shortcut, which restores the original view. When you have selected the project template of your choice, click Next. The “Configure your new project” dialog appears (see Figure 10) and allows for entering a project name, and for specifying the target folder. Note that, unlike its predecessors, in VS 2019 the dialog asks if you want to place the solution and project in the same directory, rather than asking you if you want to create a separate directory for the solution.

Figure 10: Configuring project name and folder
When you’re ready, click Create. Visual Studio 2019 will generate a new solution and project the usual way, and you will quickly get to the code editor and to all the other well-known tools.
Cloning existing code repositories
Though you can still connect to an online code repository via the Manage Connections button of the Team Explorer window, you can quickly connect to an Azure DevOps or GitHub repository at startup by clicking the Clone or checkout code shortcut in the start window. When you click this shortcut, the same-named dialog appears (see Figure 11).

Figure 11: Configuring the connection to a Git repository
The first option you have is to provide the address of a Git repository in the Repository location box. The repository can be hosted on any Git provider. You can then specify a local path to which the repository will be cloned and click Clone. For repositories hosted on Azure DevOps or GitHub, you can quickly browse the list of projects by clicking either link. In the case of Azure DevOps, you will be prompted with the list of servers and of team projects that your current Microsoft Account has access to, as demonstrated in Figure 12.
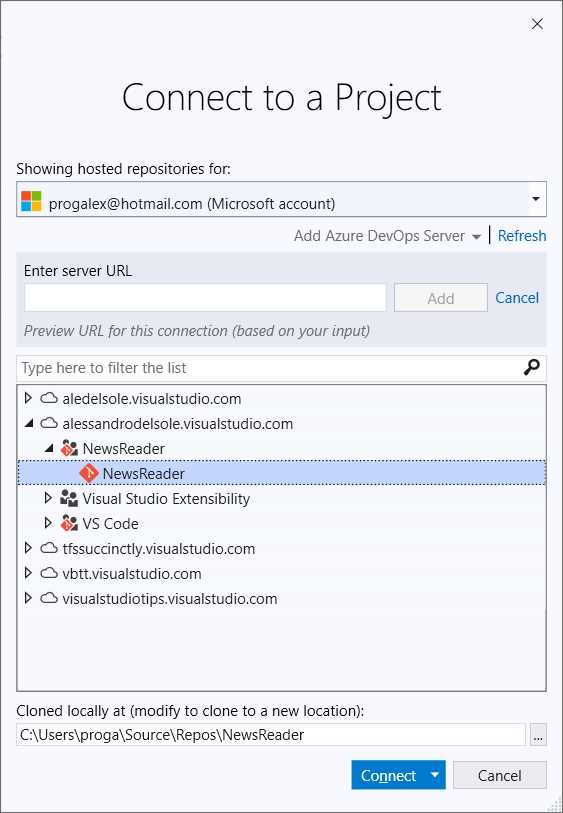
Figure 12: Connecting to a Git repository hosted on Azure DevOps
If a specific server is not listed, you can click the Add Azure DevOps Server hyperlink and enter the server address manually. You can then simply expand a server name, list all the team projects, and select the one you want to clone. When you’re ready, make sure the local target path is appropriate for you, and then click Connect (or double-click the project name).
Tip: To browse other servers, you can click the Microsoft Account combo box and provide a different email address.
At this point Visual Studio 2019 starts cloning the repository to the local machine. When finished, it will open up the Team Explorer window, showing a success message and the address of the repository (see Figure 13).

Figure 13: The completion message after cloning a repository
Visual Studio 2019 automatically opens the repository as a folder. If the repository contains a solution, you can open Solution Explorer and double-click the solution file of your interest and move from the folder view to the solution view. Cloning a repository hosted on GitHub works similarly. In fact, if you select GitHub in the “Clone or checkout code” dialog, you will be first asked to enter your GitHub credentials, and then you will be able to browse all your repositories, as shown in Figure 14.

Figure 14: Browsing GitHub repositories
Simply select the repository of your interest, check out the local target path, and then click Clone. Visual Studio will display the Team Explorer window like you have seen for Azure DevOps, with the same default behavior of opening the code as a folder.
Filtering solutions
With solutions containing many projects, you can now reduce the time required for opening the solution by loading only a subset of projects. To accomplish this, in the Open Project/Solution dialog, make sure you select the Do not load projects check box (see Figure 15).
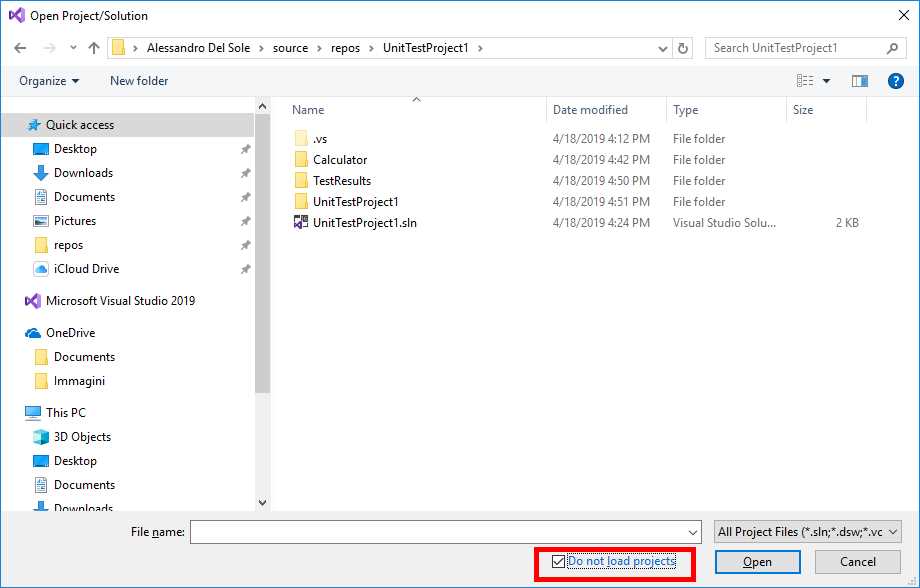
Figure 15: Opening a solution without loading projects
At this point, the solution will be visible in Solution Explorer with all the projects in the unloaded state (see Figure 16).

Figure 16: Loading only the desired projects
Now, right-click the projects you want to load and select Reload Project for each one. Visual Studio will remember your selection and, the next time you open the solution, it will load only the projects that you have selected. If your filter should be shared with other developers, for example via source control, you can create a solution filter file. To accomplish this, right-click the solution name in Solution Explorer and then select Save As Solution Filter. This will create a .slnf file that is part of the solution, and which can be committed to your code repository.
Project visibility and dependencies
You can hide unloaded projects from the Solution Explorer view by right-clicking the solution name and selecting Hide Unloaded Projects. To restore the view, right-click again and select Show Unloaded Projects. Loaded projects might have dependencies on unloaded projects and their dependencies, so Visual Studio offers an option called Load Project Dependencies, which allows for loading dependencies that are necessary to compile and run the loaded projects. This option is available when you right-click a loaded project in Solution Explorer.
Graphical enhancements
Visual Studio 2019 introduces a couple of graphical improvements: an updated Blue theme and enhanced multi-monitor support. This section covers both.
The Blue theme
In Visual Studio 2019, the popular Blue theme has been revised for the first time since Visual Studio 2012. In the new version, the Blue theme has sharper overall contrast, which helps improve legibility and accessibility. It also makes it easier to distinguish between different versions of Visual Studio running on the same machine. The brightness of the base color has been reduced, and a set of complementary and analogous accent colors has been added. Actually, Visual Studio 2019 offers the Blue theme and the Blue (Extra Contrast) theme. Both have lighter colors than their counterpart in the previous versions of Visual Studio, and the Blue theme offers lighter colors for the code editor, as you can see in Figure 17.
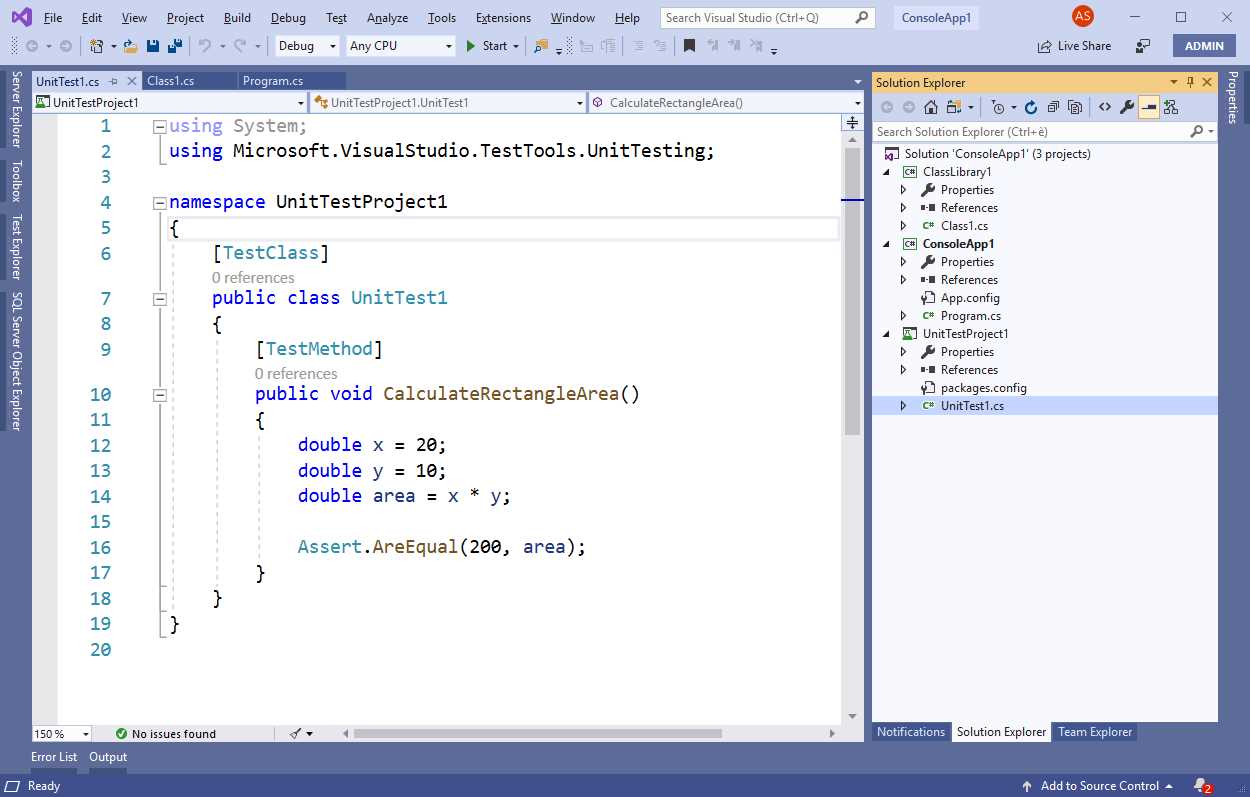
Figure 17: The updated Blue theme
The Blue (Extra Contrast) theme basically includes the same colors, but with much higher contrast, as you can see in the code editor in Figure 18.
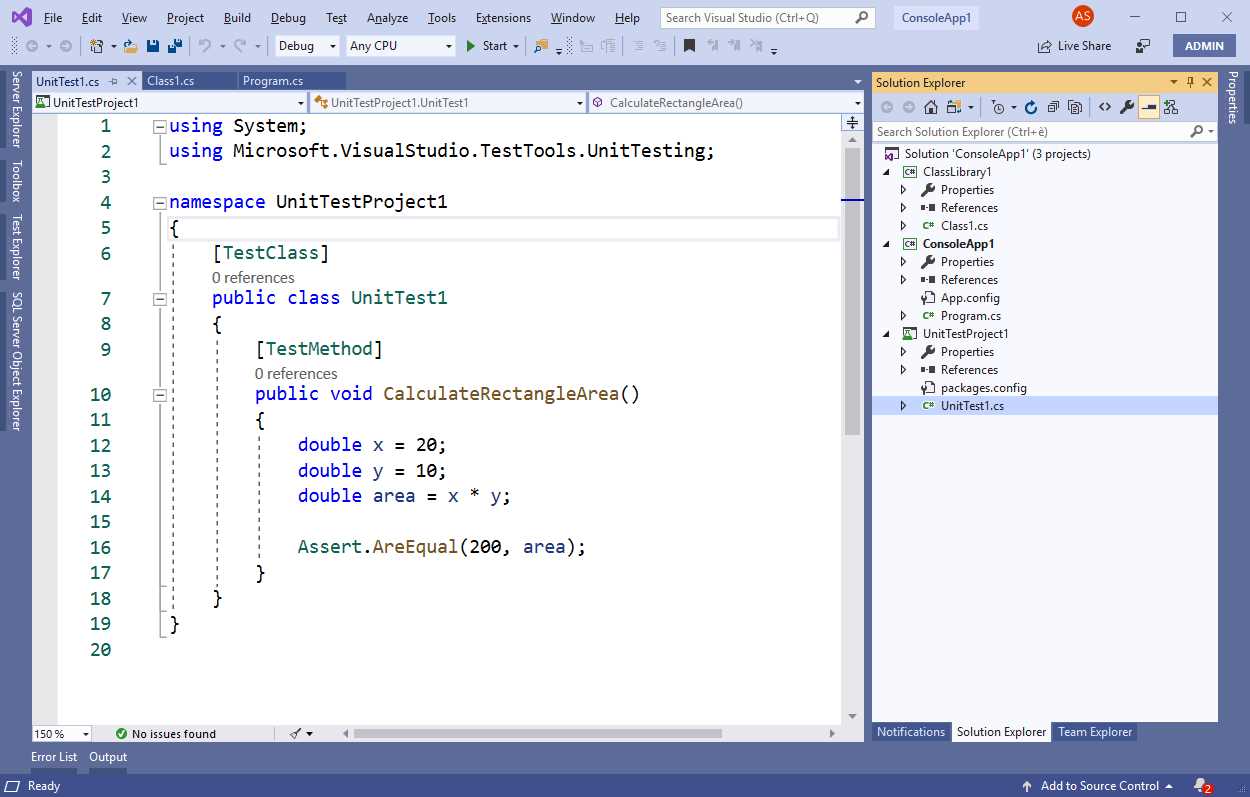
Figure 18: The Blue (Extra Contrast) theme
Like in the previous versions, you change the theme via Tools > Options > Environment > General > Color Theme. The Dark and Light themes are obviously still available.
Improved multi-monitor support
In the past, if you worked with Visual Studio across multiple monitors with different scale factors, you might have noticed that the code could be rendered incorrectly and, in some cases, it could also look blurry. This happened because previous versions of Visual Studio were set to render as a system scaled application.
Visual Studio 2019 introduces support for the per-monitor DPI awareness (PMA). PMA means that the IDE, and more importantly, the code you work on, appear crisp in any monitor display scale factor and DPI configuration, including across multiple monitors. PMA is not enabled by default. You must select Tools > Options > Environment > General, and then select the Optimize rendering for screens with different pixel densities check box (see Figure 19).

Figure 19: Enabling PMA
Note: This feature requires Windows 10 version 1803 and the .NET Framework 4.8. If your system doesn’t meet these requirements, it will be disabled in the Options window.
According to Microsoft, these are the areas where PMA brings noticeable improvements:
- Core Shell
- Menus and context menus
- Most code editors
- Solution Explorer
- Team Explorer
- Toolbox
- Breakpoints
- Watch
- Locals
- Autos
- Call stack
Since most developers work with multiple monitors, this is a very important feature that will also decrease the fatigue of your eyes after many hours of coding.
Layout and tool changes
In Visual Studio 2019, some tools have been repositioned in the IDE, and others have a slightly different layout. This section describes the most relevant changes in the development environment, so that you will not feel confused.
Search box and solution name
In Visual Studio 2019, the search tool known as Quick Launch has been renamed Visual Studio Search and moved next to the Help menu, as you can see in Figure 20, where you can also see an example of a search.
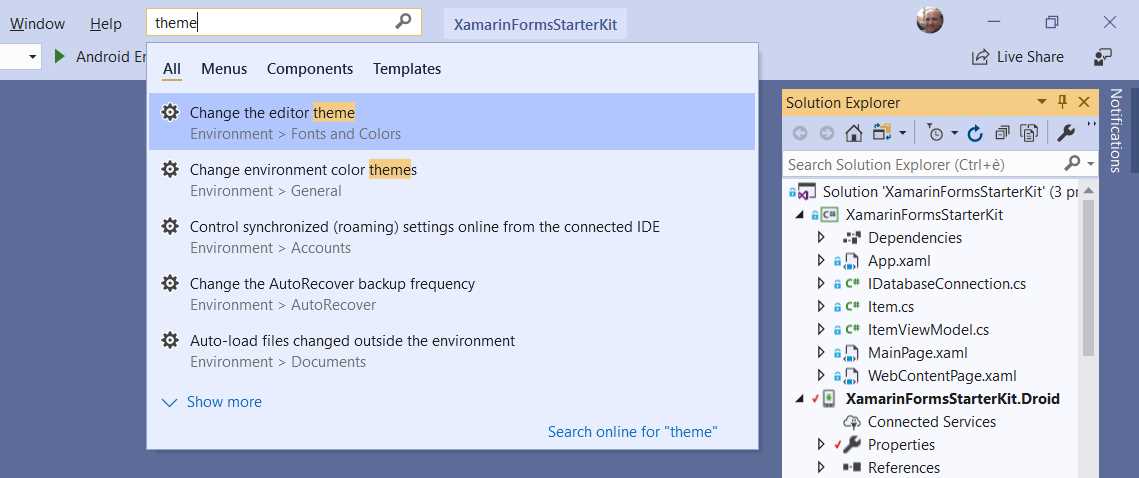
Figure 20: Searching across Visual Studio
The new search tool has been improved with filters by all items, menus, components, and templates. The solution name has also been moved next to the search box (see Figure 20), and the background color for the name is lighter so that it can be recognized more easily. Additionally, when you click the search box, the last three most-recently used actions will be displayed.
The Notifications hub
The Notifications hub is still offered as a tool window. However, the bell icon is now slightly different than in Visual Studio 2017 and shows the number of notifications available. Figure 21 shows both the bell icon at the bottom right of Visual Studio 2019, and a sample list of notifications.

Figure 21: The Notifications hub
Depending on the notification, you will see either the View details or the More details hyperlinks, which you can click to discover more about a specific notification. In the case of Visual Studio updates, by clicking the notification you will be redirected to the Visual Studio Installer, which will show an Update button (see Figure 22).

Figure 22: Updating Visual Studio 2019
In case of extension updates, the process is the same as in Visual Studio 2017, so updates are actually scheduled to be installed once you close Visual Studio.
Reporting feedback
The Feedback menu is now placed below the closing icon. You can use it to report a problem, and Visual Studio 2019 will show the built-in feedback tool. It automatically connects to your Microsoft account and will display any previous feedback you submitted. Figure 23 shows an example based on my activity.
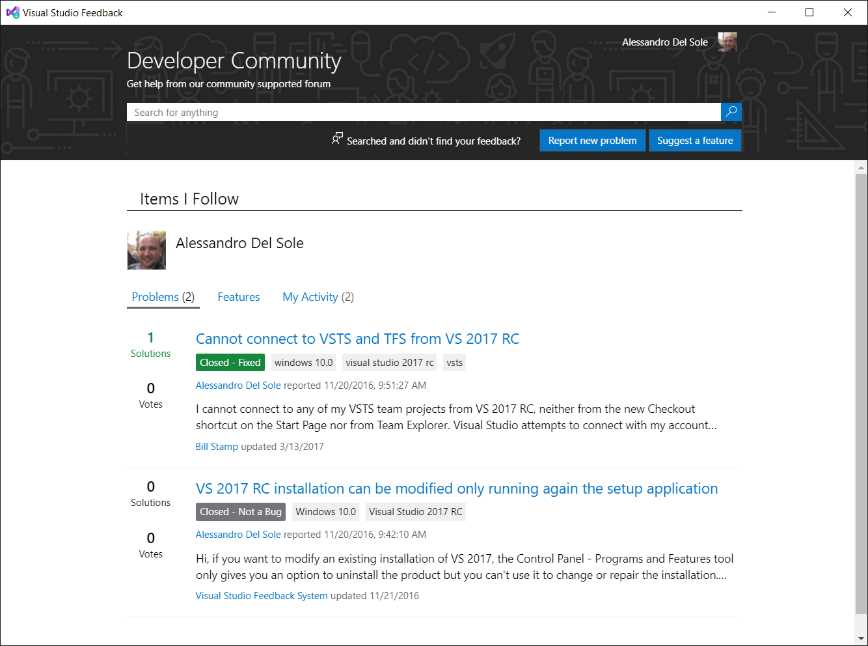
Figure 23: Latest developer activities from the feedback tool
If you click Report new problem, you will be able to fill in a form (see Figure 24) to send your feedback.
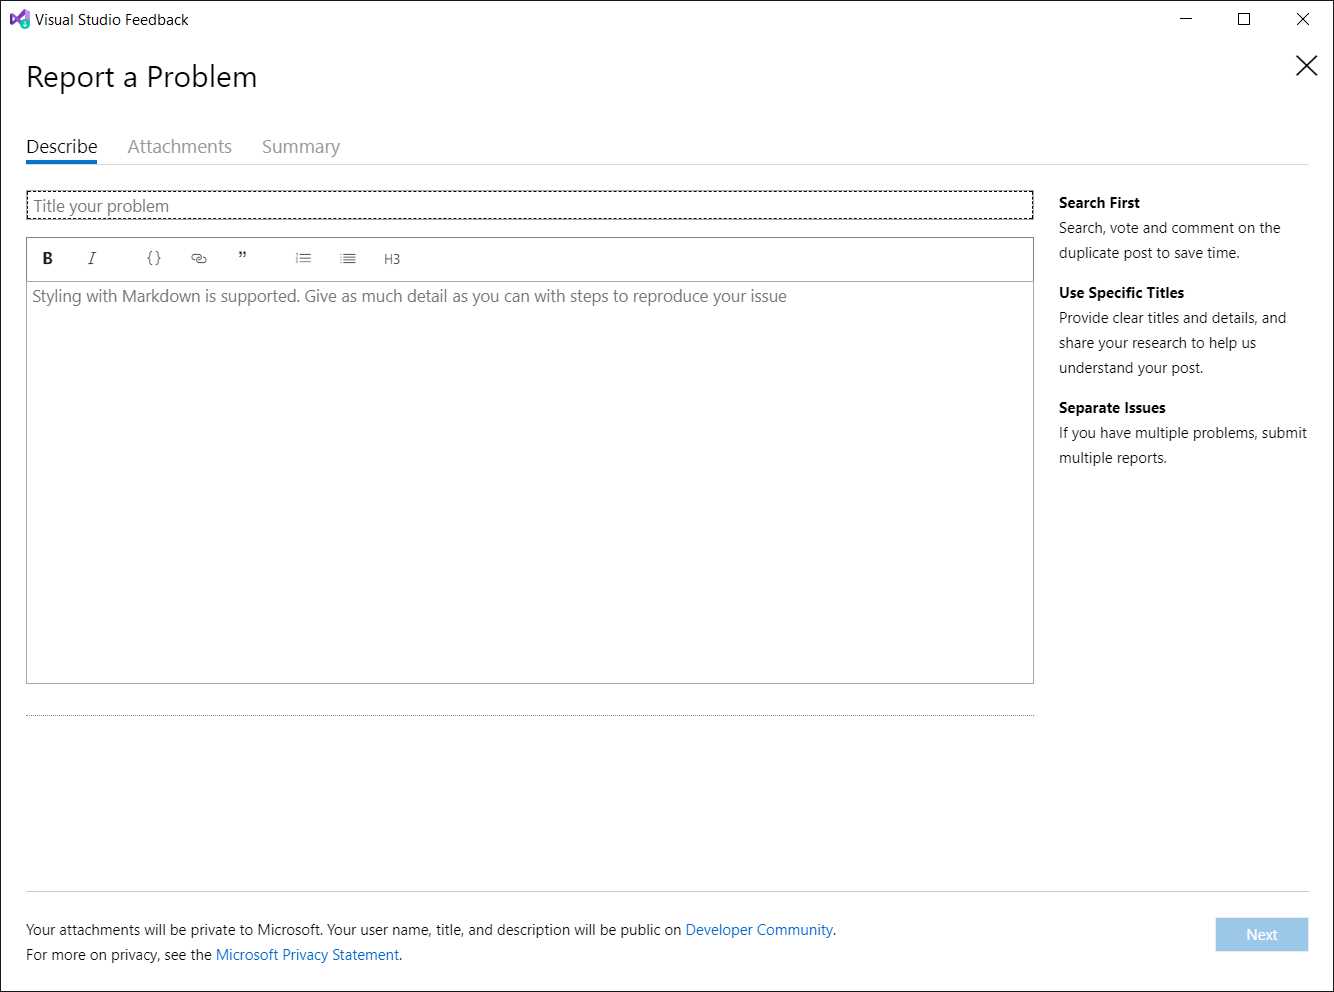
Figure 24: The form offered to report a problem
You will get a similar form to send a suggestion if you click Suggest a feature from the screen seen in Figure 23. However, if you click the Suggest a feature item under the feedback menu, you will be redirected to the Developer Community website, rather than to a built-in form.
The Extensions menu
Visual Studio 2019 introduced a new menu called Extensions. This menu contains the Manage Extensions menu item, previously available under the Tools menu. It also contains submenus that contain shortcuts to items installed by third-party providers. In Figure 25, you can see the Extensions menu and a submenu pointing to installed extensions by Syncfusion.

Figure 25: The Extensions menu
Chapter summary
Visual Studio 2019 introduces new ways to work with projects and solutions after startup. With the start window, you have shortcuts to common tasks, such as creating new projects and cloning Git repositories from Azure DevOps and GitHub. There are also graphical enhancements, such as high-contrast and low-contrast Blue themes, as well as improved multi-monitor support with PMA. Finally, some tools have been repositioned on the screen, such as the search box, the solution name, and the feedback tool. In the next chapter, you will discover productivity improvements for the code editor.
- 1800+ high-performance UI components.
- Includes popular controls such as Grid, Chart, Scheduler, and more.
- 24x5 unlimited support by developers.