
Visual Studio 2019 Succinctly®

CHAPTER 4
Collaboration
Team collaboration is another key area for developers using Visual Studio. For this reason, Microsoft has invested in adding tools that will simplify your teamwork, from source control to integrated live code-sharing. This chapter describes what’s new for team collaboration in Visual Studio 2019, starting with updates to Git support, and then walking through online code sharing.
Git tooling updates
Visual Studio 2019 introduces two important improvements to the integrated tools for Git, the popular source-control engine: stashing changes and supporting pull requests. Both are described in the next paragraphs.
Support for stashing changes
Git allows for temporarily storing changes to your source code so that you can work on a different task before committing such changes to the repository. This operation is referred to as stashing changes.
Tip: The stash feature has basically the same goal as the Shelve operation in Team Foundation Server.
Visual Studio 2019 introduces integrated support for stashing in the Team Explorer window. For example, suppose you have some uncommitted changes in your source code. In Team Explorer, you will see a new command called Stash (see Figure 42).
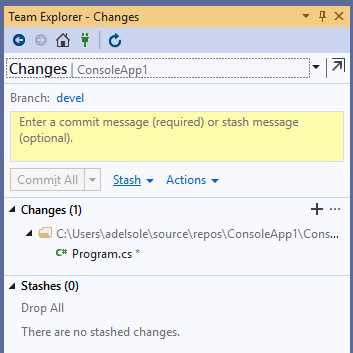
Figure 42: Support for stashing changes in Team Explorer
You can quickly click Stash > Stash All to temporarily store your changes, which will appear as a unique set in the Stashes group at the bottom of Team Explorer (see Figure 43).
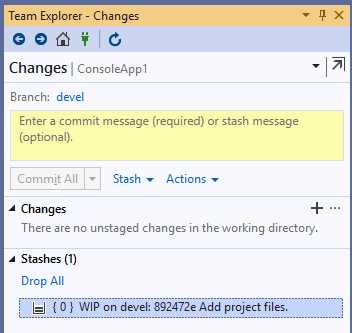
Figure 43: A stash has been created for your changes
If you want your stashed changes to be back in your code, you can right-click the stash and select one of the following from the submenu:
- Apply: This will bring your changes back to the source code and will not remove the stash, so that it can be saved for later reuse.
- Pop: This will bring your changes back to the source code and will also remove the stash.
You can also delete a stash by selecting Drop from the contextual menu. Stashing is a very useful feature because it allows for working on different tasks without the need of committing incomplete source code every time.
Support for pull requests
With pull requests, you can let other developers know about changes to the source code you have pushed to a Git repository, and you can ask for a code review. Visual Studio 2019 is the first edition of the IDE that supports pull requests via an official Microsoft extension, called Pull Requests for Visual Studio, that you can download with the Manage Extensions tool, as shown in Figure 44. This extension also allows for code comparisons between specific branches, and not just between the current code and the latest commit.
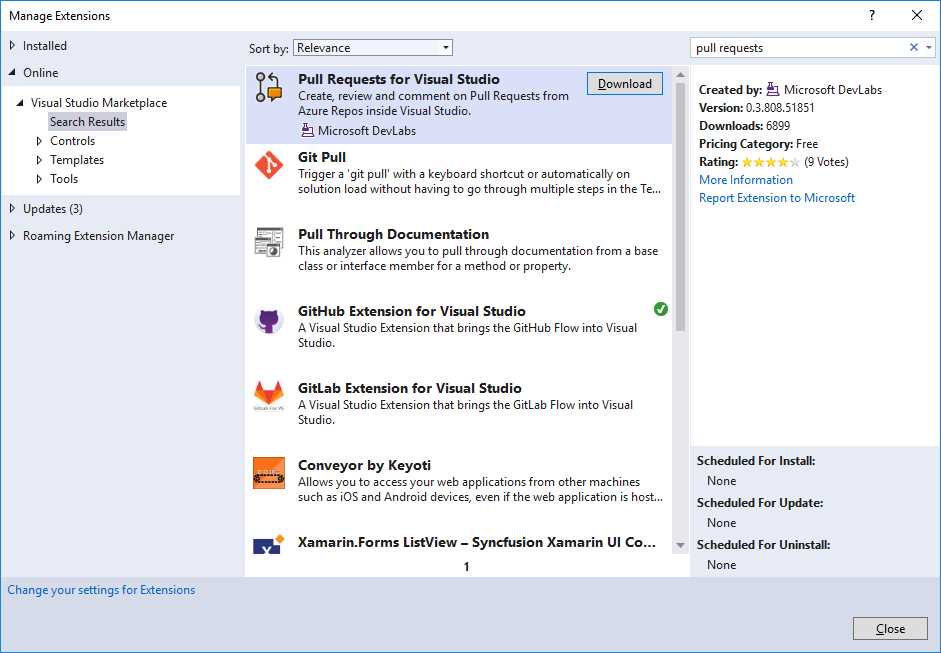
Figure 44: Downloading the Pull Requests for Visual Studio extension
Currently, Pull Requests for Visual Studio only supports Git repositories hosted on Azure DevOps. For a better understanding of how this extension works, create a new C# project (any template is fine) and then follow these steps:
- Add the project to a Git repository via the Add to Source Control command at the bottom-right corner of Visual Studio.
- Create a new branch called devel.
- Make any changes to the code, even simply a comment.
- Click the Comparisons button on the toolbar (highlighted in red in Figure 45).
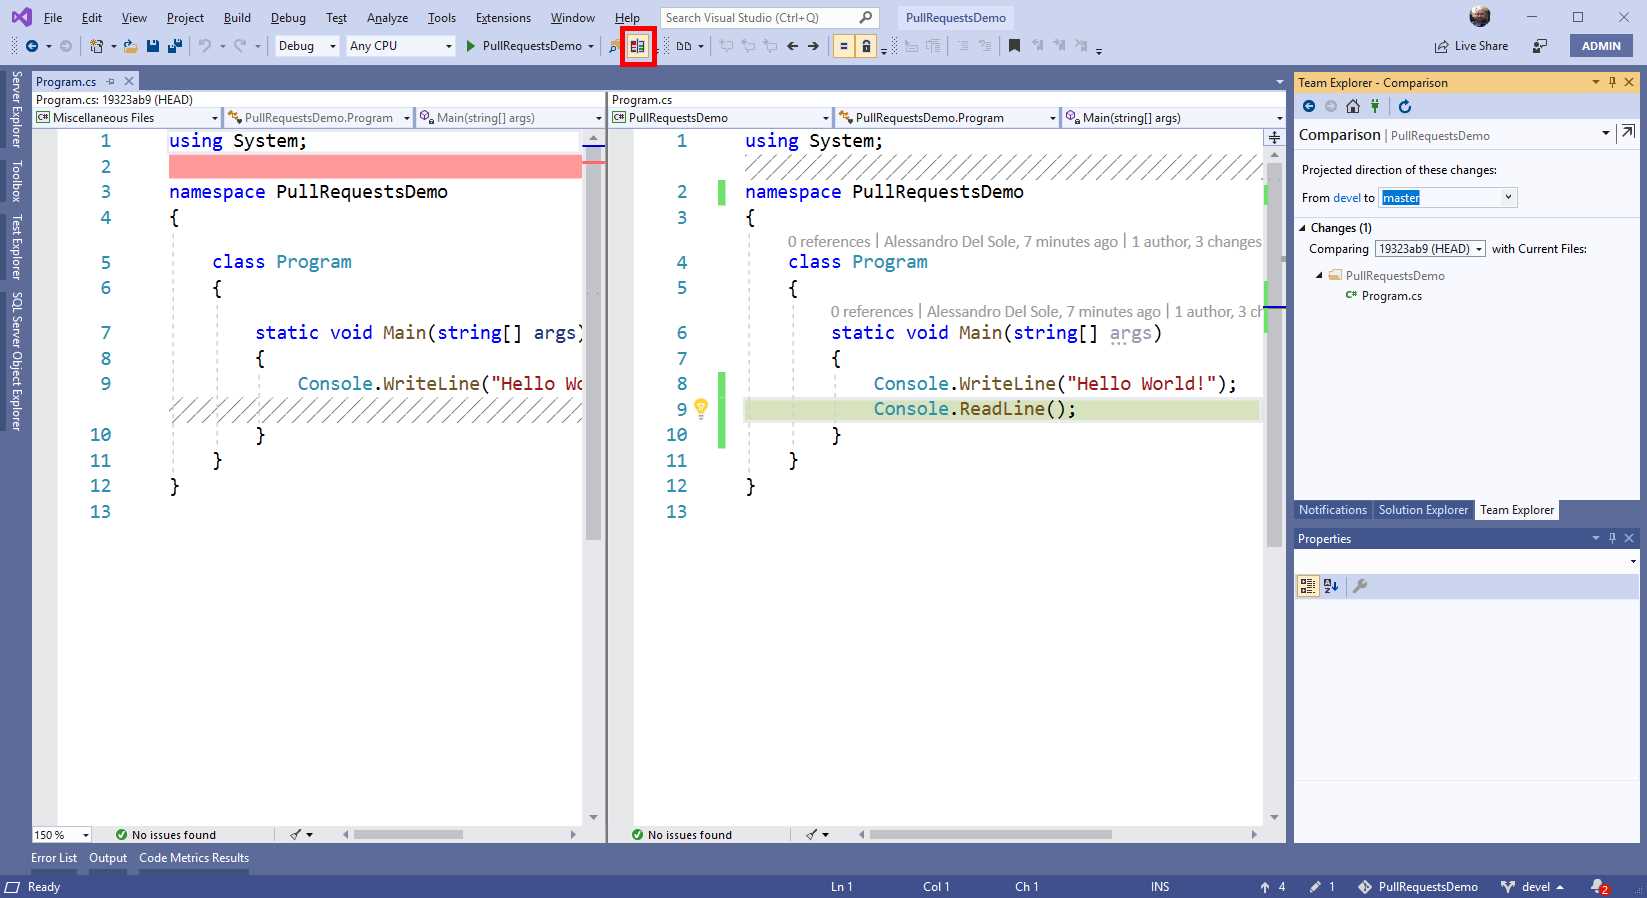
Figure 45: The Comparisons view
Team Explorer allows you to select the branch to which the current branch should be compared, and then the code editor can display the differences between files. Green highlights show new lines of code, and red highlights represent code that has been removed.
This view is similar to what you get when you use the Compare with Unmodified source control command, but the difference is that here you can decide which branches to compare, whereas the Compare with Unmodified command compares the current code with the code in the latest commit. This view is interactive, meaning that you can also work inside the current branch’s code directly.
To create a pull request instead, commit your code both locally and remotely. To accomplish this, you need an Azure DevOps subscription. Free subscriptions are available for teams with up to five members. Assuming you already have your subscription, push your changes to a remote repository created on Azure DevOps. Then, click the branch name at the bottom-right corner of the IDE and select New Pull Request. Team Explorer will now show the New Pull Request user interface (see Figure 46).
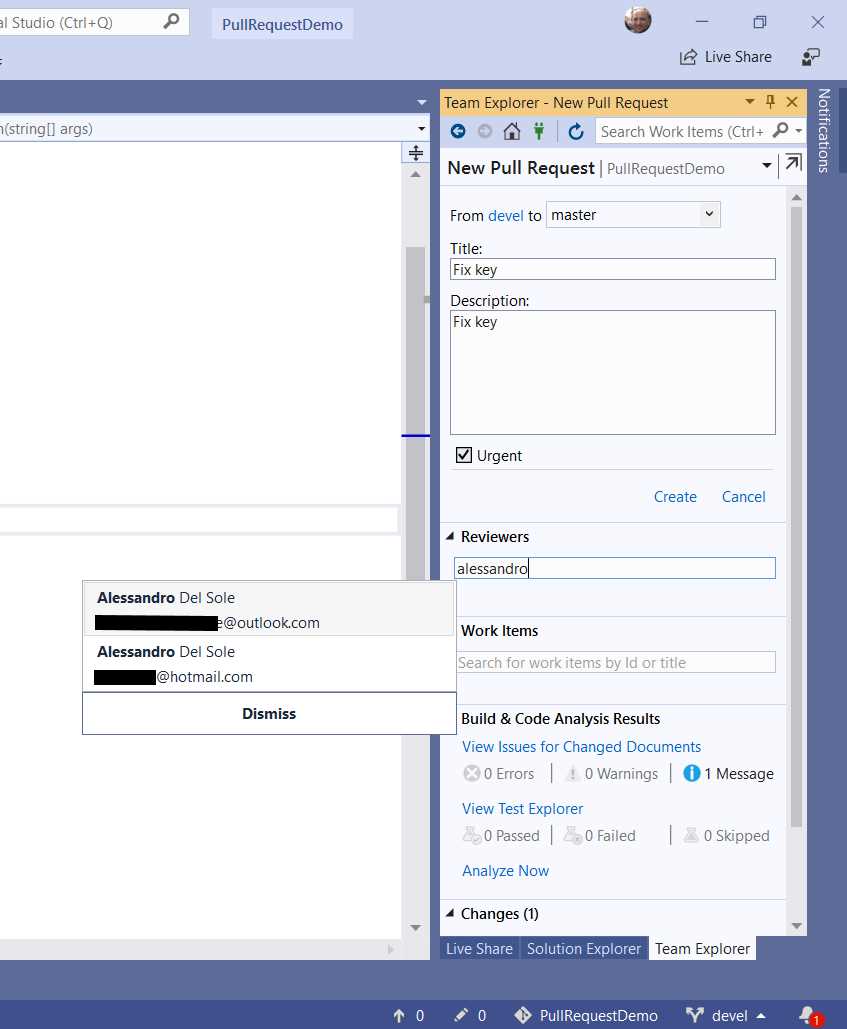
Figure 46: The New Pull Request user interface
From top to bottom, you can:
- Specify the pull request’s target branch.
- Provide a title and detailed description for the pull request.
- Mark the pull request as urgent. This will highlight the pull request with an [Urgent] tag in the project management page on Azure DevOps.
- Select one or more code reviewers from your team (optional). In Figure 46, you can see how team member names appear as you type. This implies that you (or your project administrator) previously assigned members to the team project on Azure DevOps.
- Link the pull request to one or more work items (optional).
- View code issues and unit test results (if any).
When you’re ready, click the Create hyperlink. After a few seconds, you will see the pull request in the Requested By Me group of Team Explorer (see Figure 47).

Figure 47: The new pull request has been created
Tip: Assignees of the pull request will be notified via an automatic email. This is the default behavior, and you can disable automatic emails in the Azure DevOps portal.
The new pull request will be also visible in the Azure DevOps portal. Once you enter, you just need to open the team project, and the pull request will be visible in the project summary. You will also be able to see the code that has been changed in the Files tab, as shown in Figure 48.
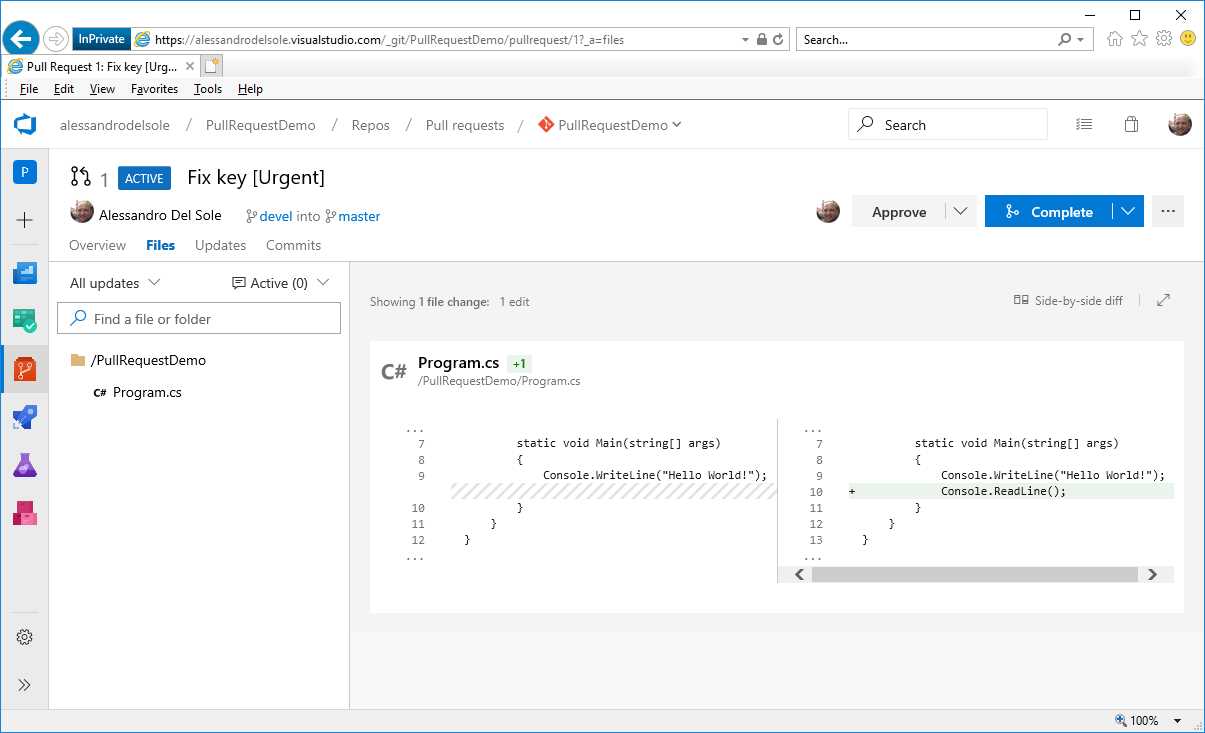
Figure 48: The pull request details in the Azure DevOps portal
Pull requests can certainly be approved, rejected, or commented within the portal, but we want to see how this works inside Visual Studio with the Pull Requests extension. Now, suppose you are the assignee of the pull request for code review. When you open Visual Studio, Team Explorer will display the pull request as assigned to you, also showing the name of the person who requested your code review. Figure 49 demonstrates this.
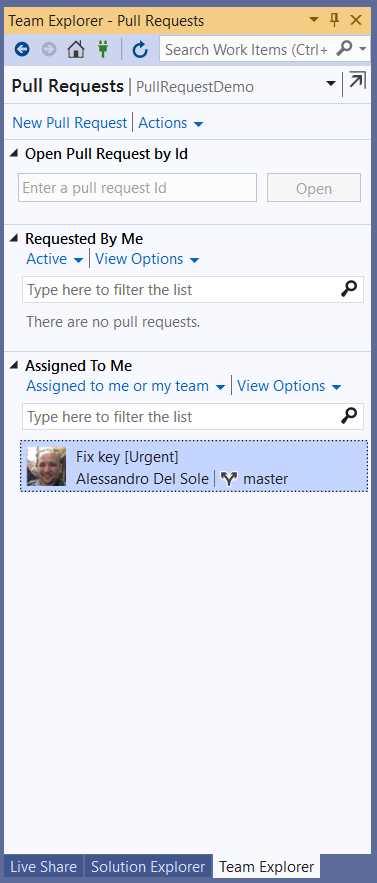
Figure 49: The pull request assignee sees the pull request and who requested it
You can open the details view with a simple double-click on the pull request. From the details view (see Figure 50), you will be able to see the description and discussion comments (these typically happen on Azure DevOps).
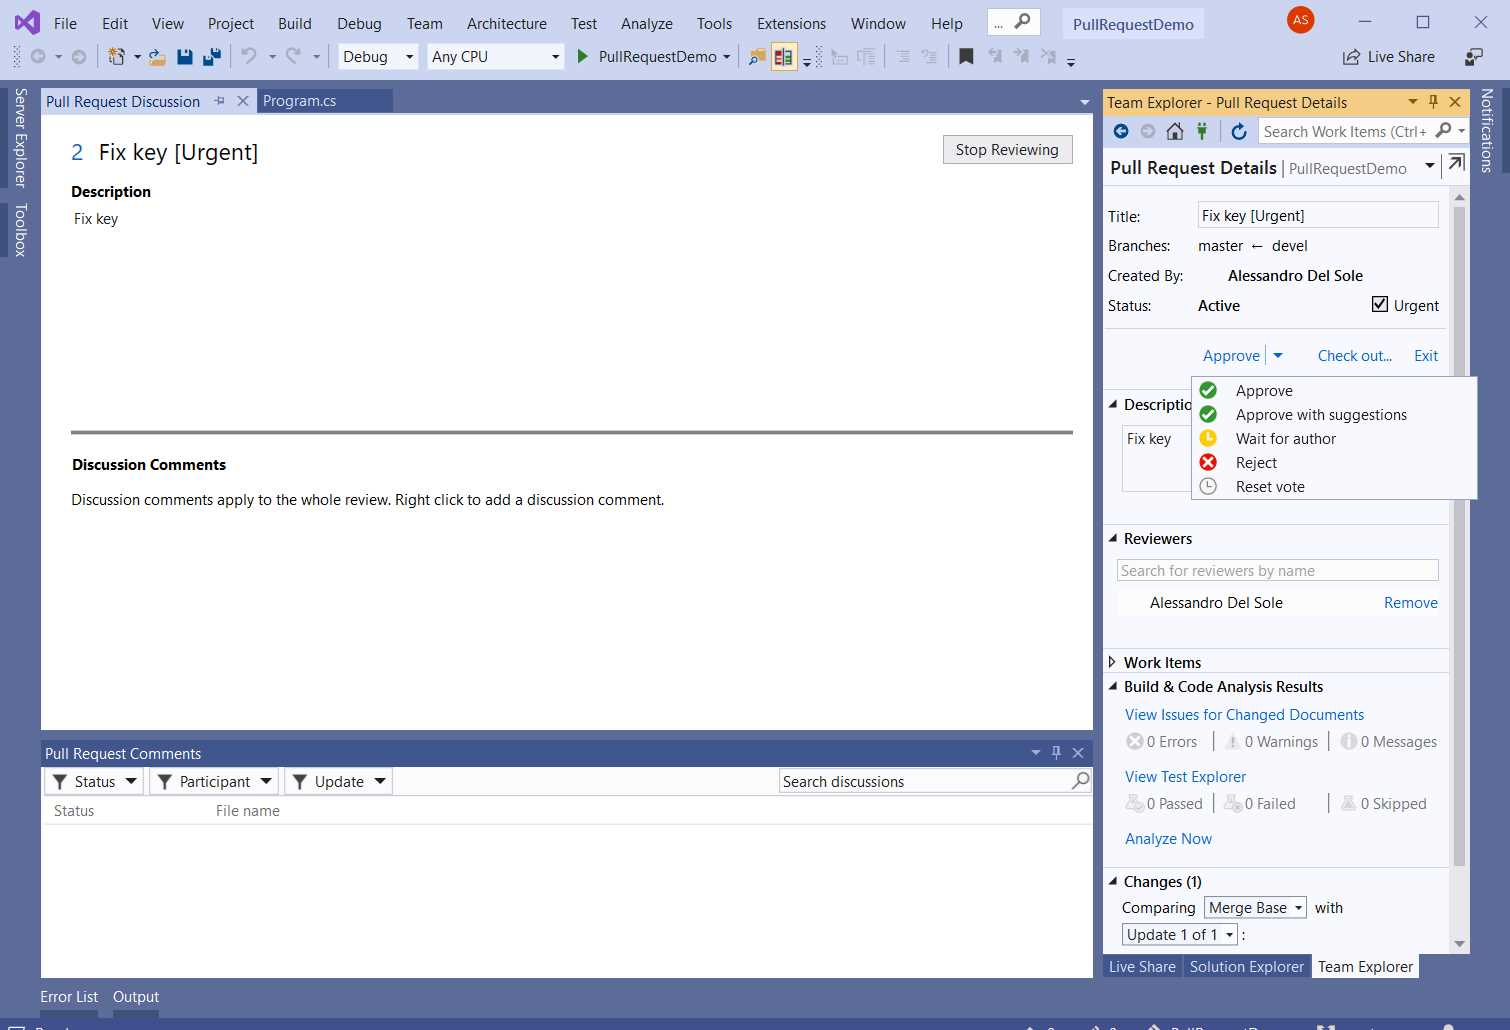
Figure 50: The pull request details
If you click Check out in Team Explorer, you will be able to download the source code changes for your review. With the Approve menu, you will be able to decide what to do with the pull request after your review, such as approving or rejecting it. The team member who has requested the code review will be notified of the decision you make as a code reviewer, and that decision will be applied to the team project on Azure DevOps.
Note: As an extension, Pull Requests for Visual Studio is constantly updated. For this reason, it might have additional features when this e-book is released.
Collaboration sessions with VS Live Share
Visual Studio 2019 makes it easier to collaborate on source code across distributed and remote teams. This is possible with a new tool called Visual Studio Live Share. This tool is actually an IDE extension that is automatically installed for you at setup time, and it is also available for Visual Studio Code, which means you can work in a collaboration session via different development environments.
The workflow is very simple: you start a collaboration session, and then you send a connection link to attendees you want to invite. A maximum of five participants is currently allowed. You can start a collaboration session by clicking the Live Share button, located at the upper-right corner of the IDE, at the left side of the feedback button. Look at Figure 15 as a reference. Starting a collaboration session takes a few seconds. When started, Visual Studio shows an informational page with the session details and automatically copies the invitation link to the clipboard (see Figure 51).
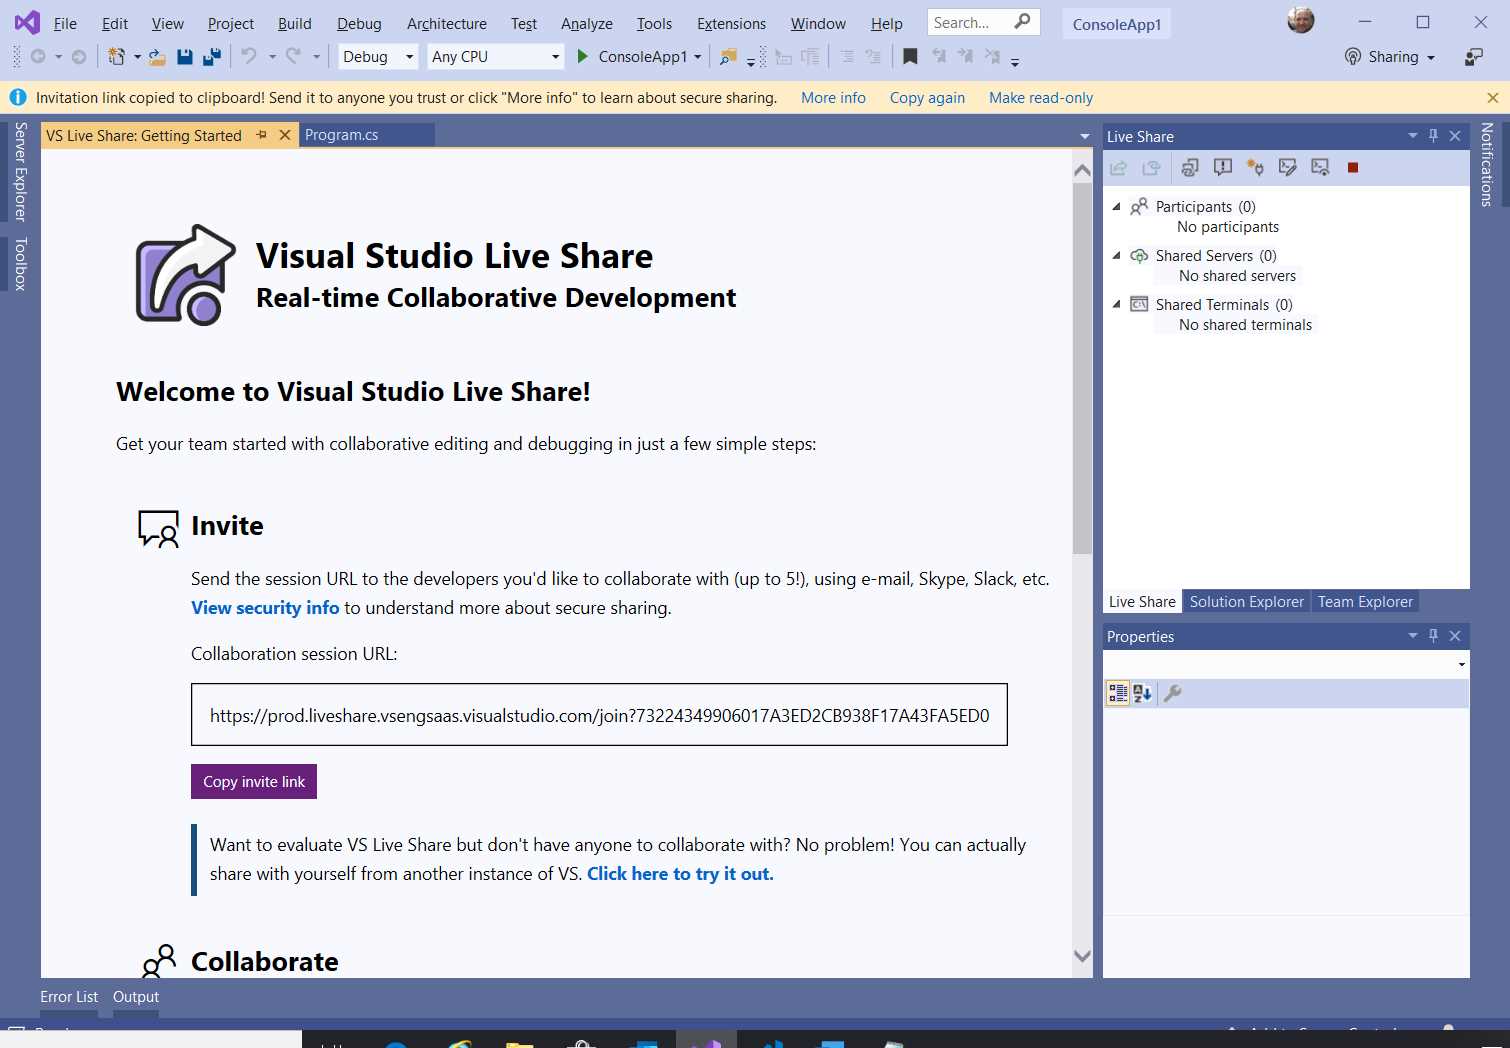
Figure 51: Live Share’s informational page
Tip: The informational page will be visible only the first time you create a collaboration session. Should you want to make it visible again, you will need to click the More Info hyperlink in the bar at the top.
A new docking window called Live Share is also displayed. In Figure 46, it is visible next to Solution Explorer. This window includes some shortcuts that will be discussed in moments. Notice that Live Share does not include integrated chat or call capabilities, so you will need to use a program such as Skype or Skype for Business if you need to talk by voice with the other developers. Extensions for Visual Studio Code exist to add chat and audio capability to Live Share, but not for VS 2019 at the moment.
Note: You might encounter some issues when running Live Share behind a proxy. If the connection doesn’t work, check out the Connectivity documentation page for potential solutions, or contact your network administrator.
Collaboration starts when other people join the Live Share session. You can send the invitation link using your channel of choice, such as email, Skype, or Slack. Participants can:
- Select File > Join Live Share session and paste the link in the connection dialog.
- Open the invitation link in their default browser. The system will recognize this as a link that should be opened in Visual Studio 2019 and will ask the user permission for doing this.
Participants will then be automatically entered into the collaboration session, and they will see the Live Share tool window in their instance of Visual Studio 2019. The presenter will see the list of participants in the Live Share tool window (see Figure 52). Attendees can move among source code files via your shared Solution Explorer, and they can directly work on the code, making their edits from their machines. Figure 52 shows how the attendee’s email address is displayed in the code editor to highlight that another person is working on a specific code block.
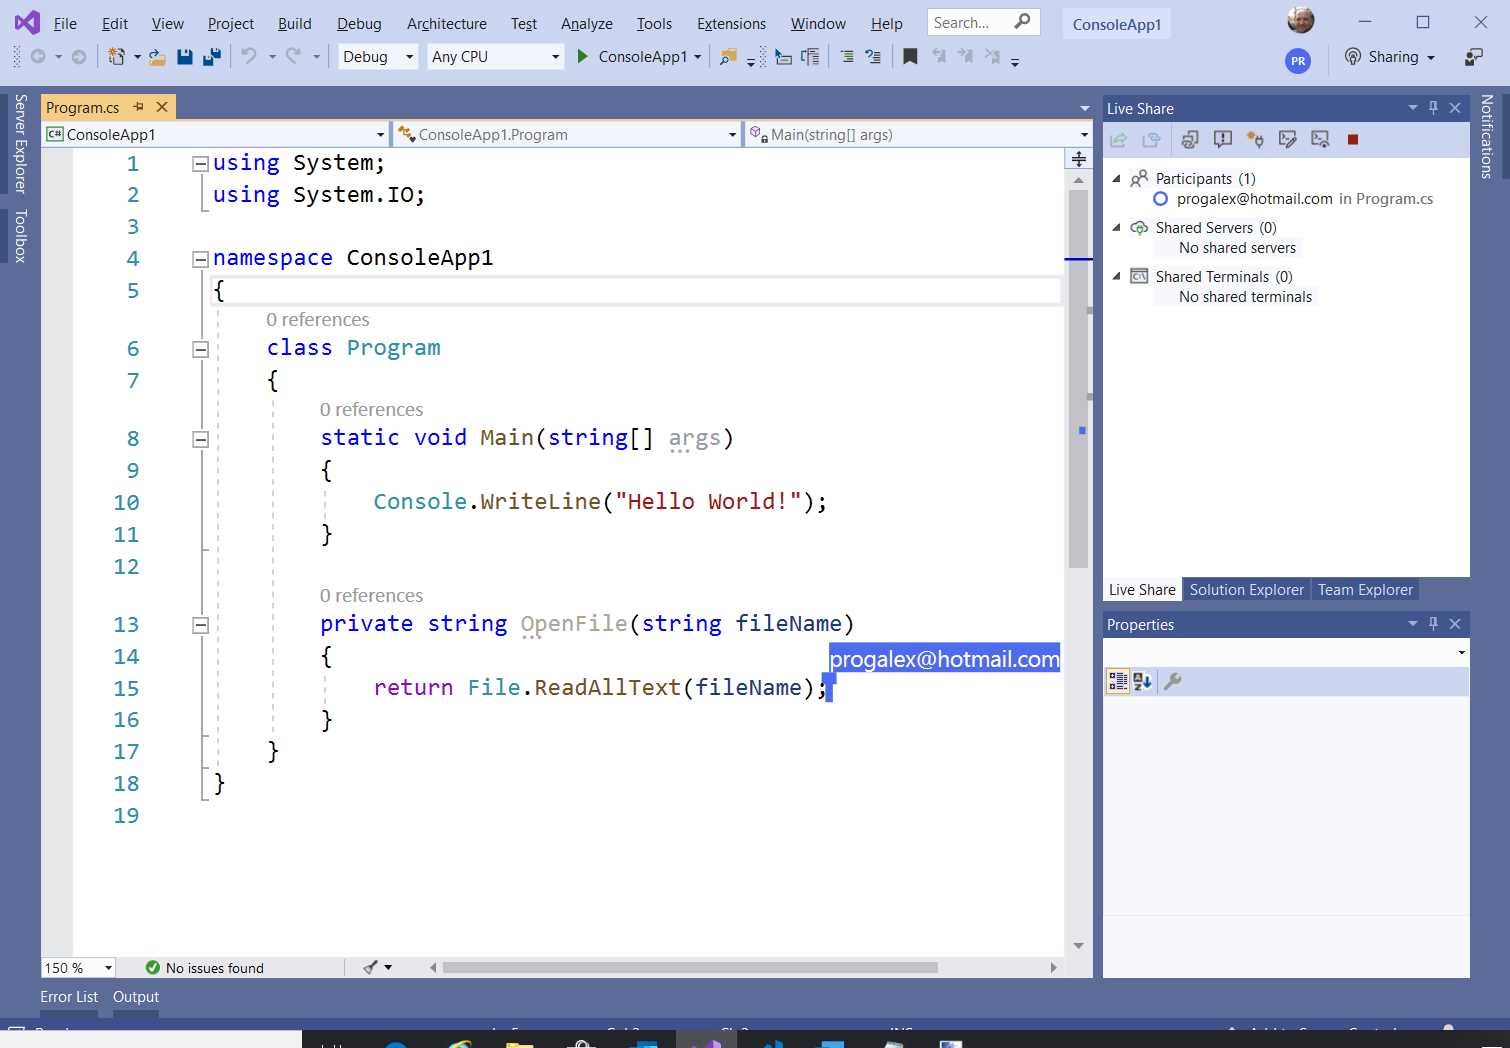
Figure 52: Collaborating on the source code and viewing the list of participants
Live Share is particularly useful for pair programming, a well-known approach in the Agile methodology, especially with remote teams. You are not limited to sharing source code: you can also share a terminal window and access to a web server. This can be done via the appropriate buttons on the Live Share window’s toolbar. For example, Figure 53 shows an instance of a shared terminal. Notice how the title bar highlights this as a shared instance.
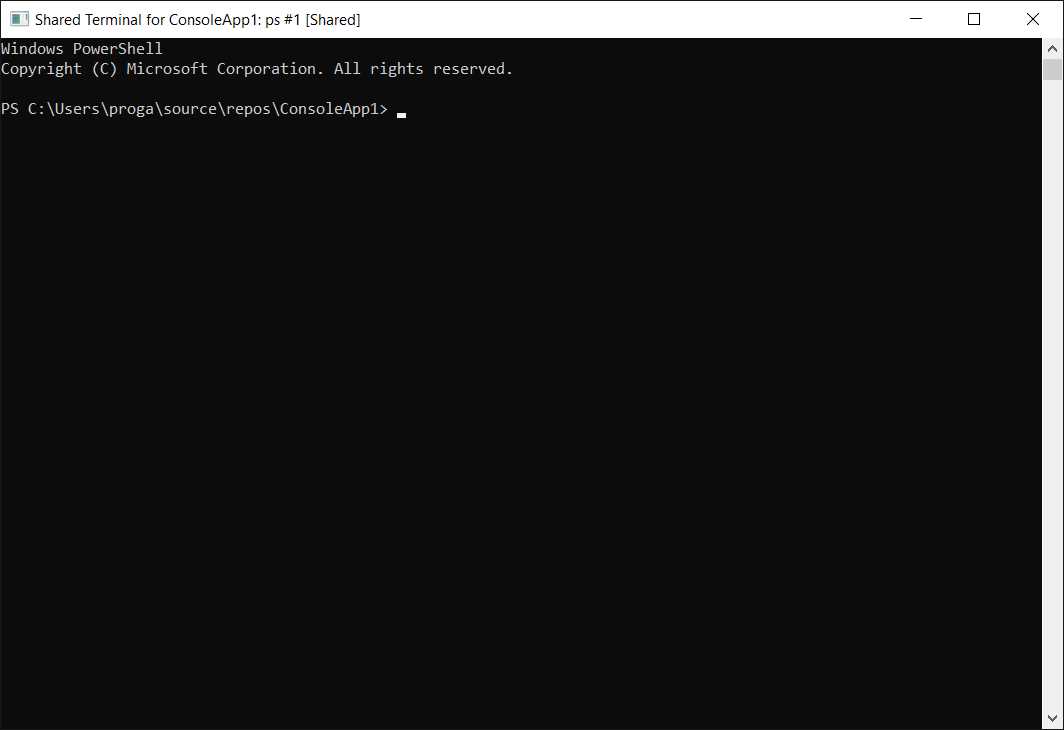
Figure 53: A shared instance of the terminal
A shared instance means that a participant can work directly on the terminal window. If you want to avoid this, you can share a read-only terminal instance. Similarly, you can share access to a local server. Figure 54 shows how you can configure sharing by clicking Add and then specifying the port number.
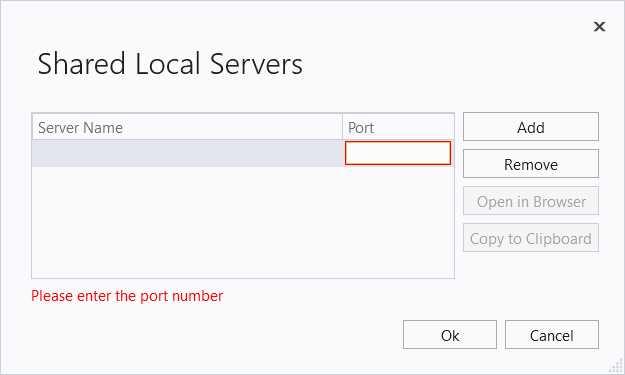
Figure 54: Sharing a local server
Once the port number has been specified, the local server will be shared, and participants will be able to access it via the full link that you can quickly generate by clicking Copy to Clipboard.
Tip: It’s important to remember that sharing terminals and local servers can be very dangerous. Make sure participants know what they are doing, and set up the proper limitations, as described in the next subsection.
Both shared terminals and servers will be listed in the Live Share tool window for easy reference, in both the presenter and the participant views. The Stop button in the Live Share’s toolbar can be used by the presenter to end the collaboration session, and by the participant to leave the session.
Live Share configuration
VS Live Share can be configured in many ways, and the most important configuration options are about limiting direct control on your machine when working in a collaboration session. You can access Live Share options via Tools > Options > Live Share. Figure 55 shows the full list of options.
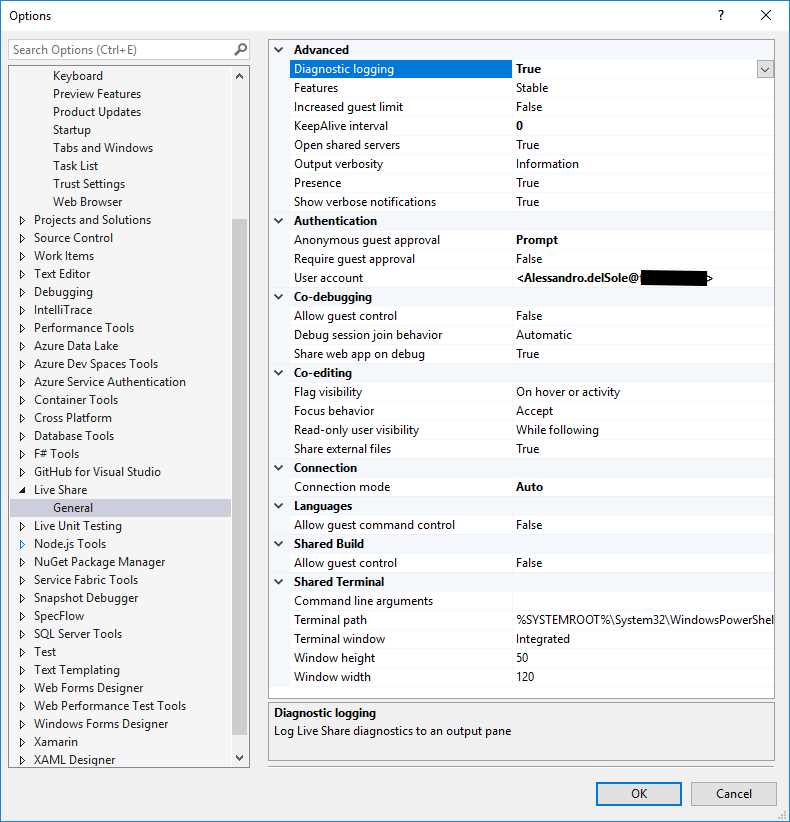
Figure 55: Configuring VS Live Share
These options are self-explanatory, so I will not discuss each in detail. It is worth mentioning that, by default, guests cannot control many Visual Studio features. For instance, “Allow guest control” is False for Co-debugging, and “Anonymous guest approval” requires your permission. The description of each option is available at the bottom of the Options dialog when you click one. I recommend you use the default options, because they have a good balance between team collaboration and access limitations.
Chapter summary
Collaboration is the key to success for modern development teams, and Visual Studio 2019 introduces important new collaboration features. In terms of source control, the IDE now supports stashing changes on Git repositories, and it can also be enabled to support pull requests via the Pull Requests extension, which will allow you to manage pull requests on Git repositories hosted on Azure DevOps.
In terms of real-time collaboration, VS Live Share enables pair programming directly from within the IDE, and developers can join a collaboration session with a simple click. Another key area is crucial in terms of developer productivity: the debugging experience.
The next chapter focuses on what’s new in the debugger, completing the overview about the new productivity features.
- 1800+ high-performance UI components.
- Includes popular controls such as Grid, Chart, Scheduler, and more.
- 24x5 unlimited support by developers.