
Visual Studio 2019 Succinctly®

CHAPTER 3
Code Editor Productivity
With every major release, Microsoft introduces new productivity features to the code editor in Visual Studio, because it is the place where you spend most of your development time. VS 2019 improves the way you write high-quality code with lots of productivity enhancements. This chapter is all about the code editor, including new features and updated tools.
Document Health Indicator and Code Cleanup
Visual Studio 2019 includes a new feature called Document Health Indicator with the code editor. As the name suggests, the Document Health Indicator detects code issues in a single document, showing icons and issue descriptions. In the VS terminology, a document is an individual code file opened in the IDE. For example, Figure 26 shows the Document Health Indicator with a document that has no code issues.
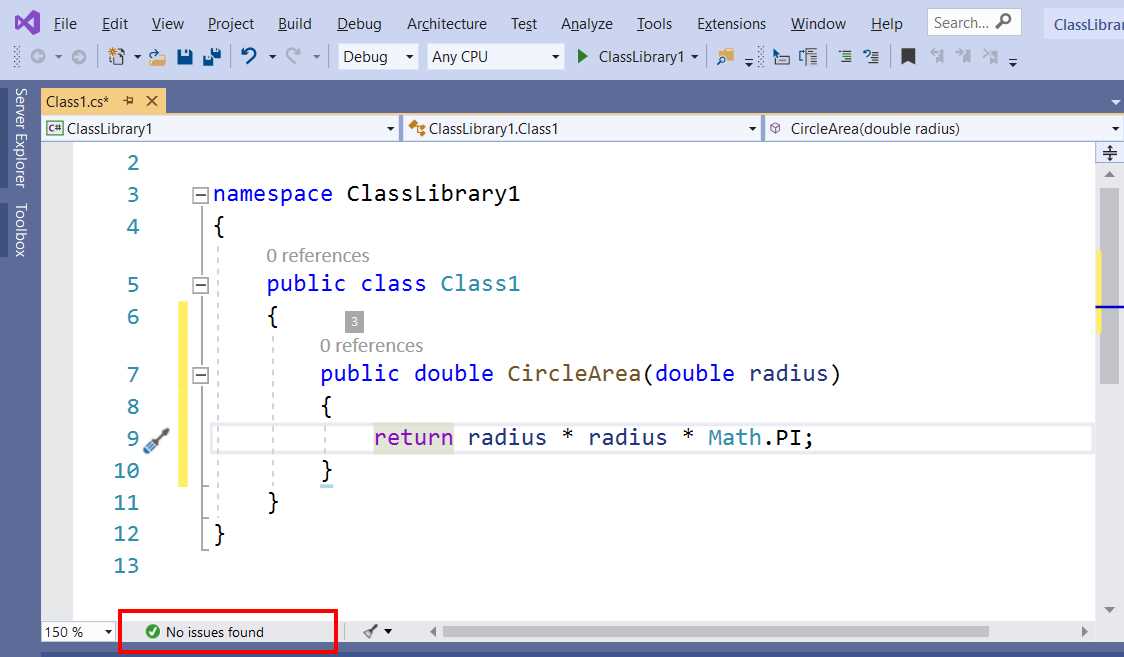
Figure 26: The Document Health Indicator
If the code file contains errors, the Document Health Indicator shows the number of errors and warnings represented by appropriate icons. You can click on the error or warning icon to quickly open the Error List window, and you can quickly navigate among code issues by using the two arrows near the indicator. Figure 27 shows an example of code file that contains intentional errors and shows how the Document Health Indicator appears at this point.
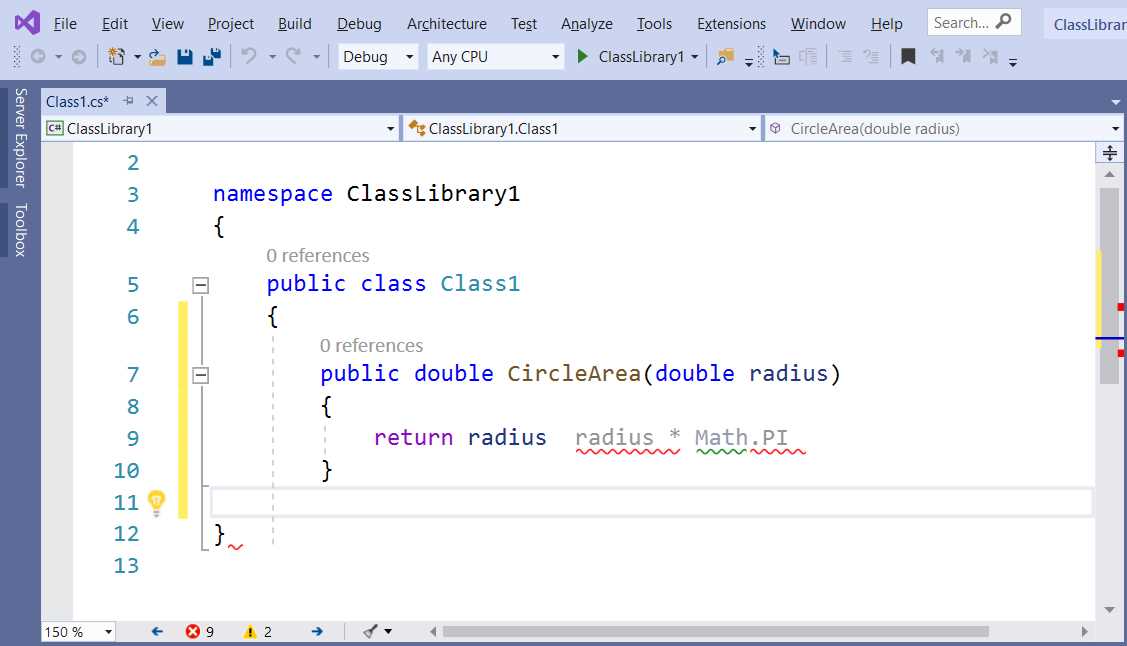
Figure 27: The Document Health Indicator shows the number of errors and warnings
The Document Health Indicator is very useful, especially if you don’t keep the Error List window open, and gives you an updated report of the number of code issues in your document.
Note: The Document Health Indicator is available not only for C# and Visual Basic, but also for other languages, including C++ and Python.
Another very useful addition to the code editor is Code Cleanup. Code Cleanup is a customizable tool that automates the maintenance of your code by applying more rules. In the code editor, it is represented by the sweep/broom icon on the right side of the Document Health Indicator (see Figures 26 and 27). You can click the Code Cleanup icon to run the tool with the built-in rules, but you might want to customize it first.
Note: Code Cleanup is only available in C# and Visual Basic.
If you click the arrow at the right side of the icon, you will see the following commands:
- Run Code Cleanup (Profile 1)
- Run Code Cleanup (Profile 2)
- Configure Code Cleanup
Code Cleanup ships with two profiles, each customizable with different rules. By default, clicking the Code Cleanup icon runs Profile 1. You instead customize each profile by clicking Configure Code Cleanup. The same-named dialog that appears is shown in Figure 28.
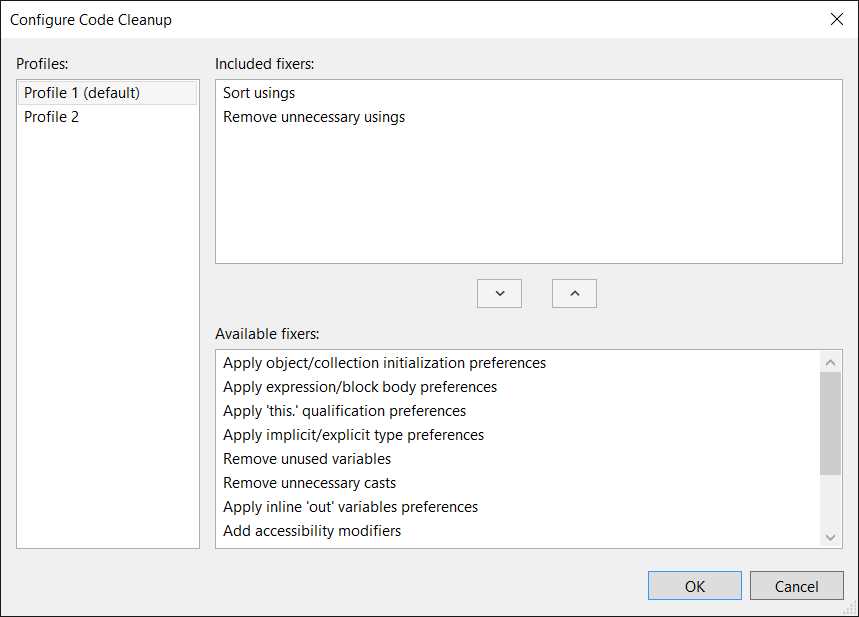
Figure 28: Configuring Code Cleanup
Each profile includes many fixers. A fixer is a code-refactoring action, such as Sort usings and Remove unnecessary usings. These are the fixers included by default. You can include more fixers, selecting them from the Available fixers list and then clicking the up-arrow button. For example, you could select the Remove unused variables fixer. You can remove a fixer from the Included fixers list by clicking the down-arrow button. When you have customized your profiles, click OK.
Now let’s consider the code shown in Figure 29, which intentionally includes unnecessary using directives and an unused integer variable.

Figure 29: Code with issues ready for Code Cleanup
Clicking the Code Cleanup icon will result in the removal of both the unnecessary using directive and the unused integer variable. Note that some of the Code Cleanup fixers are strictly related to the code style preferences that you can set up in the language options. Code Style is a feature that was introduced in Visual Studio 2017, and you can access these preferences via Tools > Options > Text Editor > C# (or Visual Basic) > Code Style. Figure 30 shows how the Code Style options look.
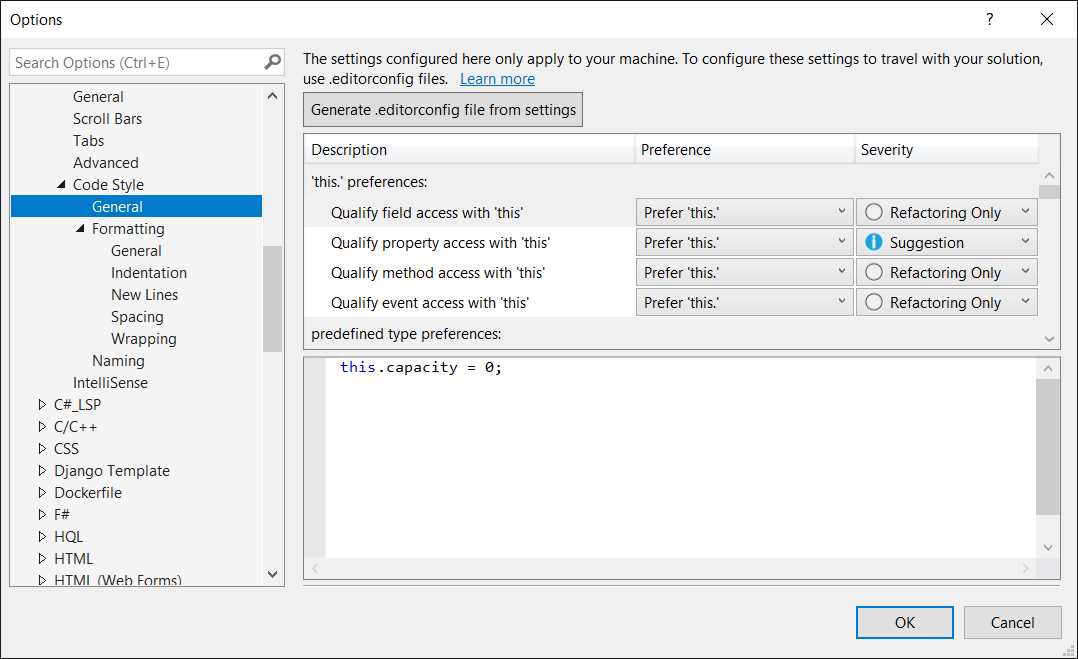
Figure 30: Code Style options for C#
All the Code Cleanup fixers whose names contain the word preferences are applied based on the Code Style preferences. For example, with the fixer called Apply ‘this.’, qualification preferences will be applied during Code Cleanup only if your code style preferences for the usage of the this keyword have a severity of at least Warning, and if your code contains qualifications of fields, properties, methods, or events that match the specified preference. Configuring Code Style might take some time, but the combination of this feature with Code Cleanup gives you a powerful set of tools that helps you write code based on your team’s requirements, and that makes maintenance much easier and faster.
Clipboard Ring
You can quickly view the history of items copied into the clipboard by simply pressing CTRL + Shift + V in the code editor. This feature is not new, but has been redesigned in Visual Studio 2019. Figure 31 shows an example.

Figure 31: Clipboard Ring in action
If you hover over an item, a tooltip will show its content. If you click an item, its content will be pasted into the code editor.
Classification colors
In Visual Studio 2019, colors in the code editor are now based on the so-called Roslyn classification colors. These color schemes are already part of Visual Studio Code, and they have been brought to VS 2019 as well. Now there are basically more colors in your code.
If you look at Figure 27, you can see how, in the Blue theme, a method name is represented in a tone of brown, and how the return statement is represented in violet. Obviously, color schemes differ in the various themes, but colors can be still customized via Tools > Options > Environment > Fonts and Colors. In the list of colors, scroll to the items whose names start with User Members. These specific items represent the Roslyn classification colors that you can customize according to your preferences.
Quick actions and refactorings for C# and Visual Basic
Introduced with Visual Studio 2015 and dramatically improved with Visual Studio 2017, quick actions and refactorings based on the .NET Compiler Platform (Roslyn) for C# and Visual Basic make additional steps forward in VS 2019. They introduce new code fixes that will help you keep your code in good health. This section describes the most important new quick actions that will boost your productivity while coding.
Tip: For additional quick actions and refactoring, you can read the “Visual Studio 2019 .NET Productivity” blog post.
Converting foreach loops to LINQ or lambda expressions
A new refactoring quickly allows you to convert a foreach loop into a LINQ or lambda expression. For example, consider the following code snippet, which includes a foreach loop over an object of type IEnumerable<int>.
private IEnumerable<int> IterateCollection(IEnumerable<int> collection)
{
foreach (int number in collection)
{
if (number > 10)
yield return number;
}
yield break;
}
The new quick action offers to refactor the code as a LINQ expression, as demonstrated in Figure 32.
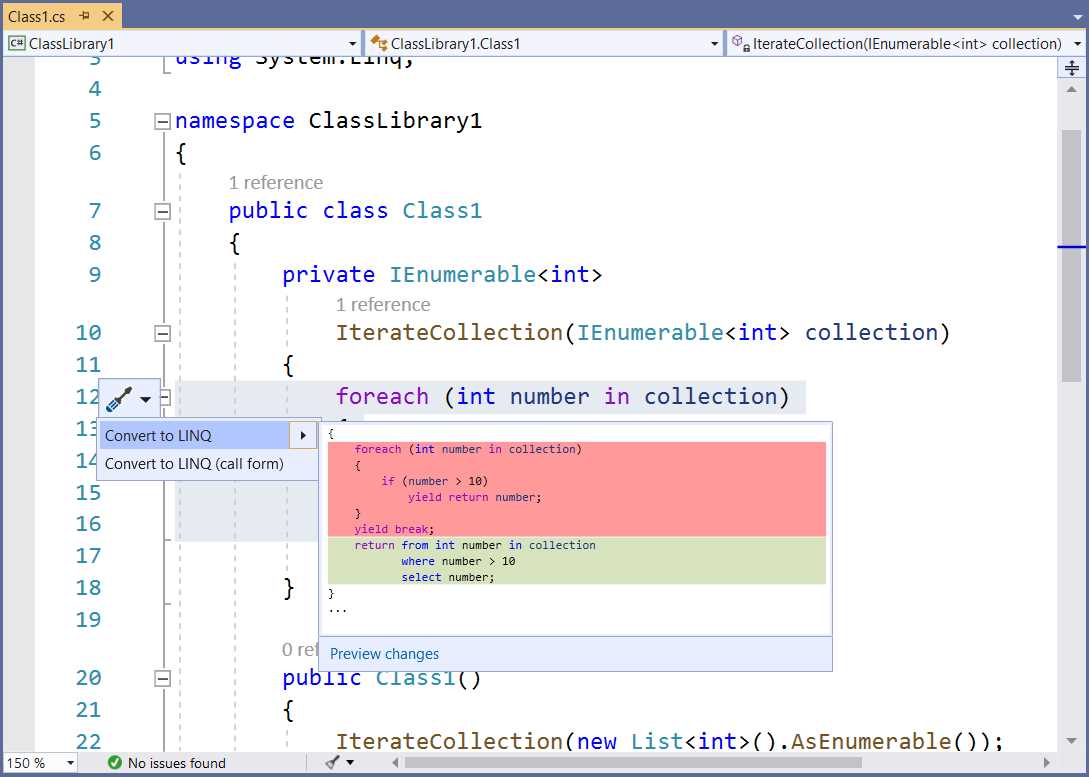
Figure 32: Refactoring a foreach loop into a LINQ expression
It’s also possible to refactor the same code as a lambda expression based on extension methods, as shown in Figure 33.
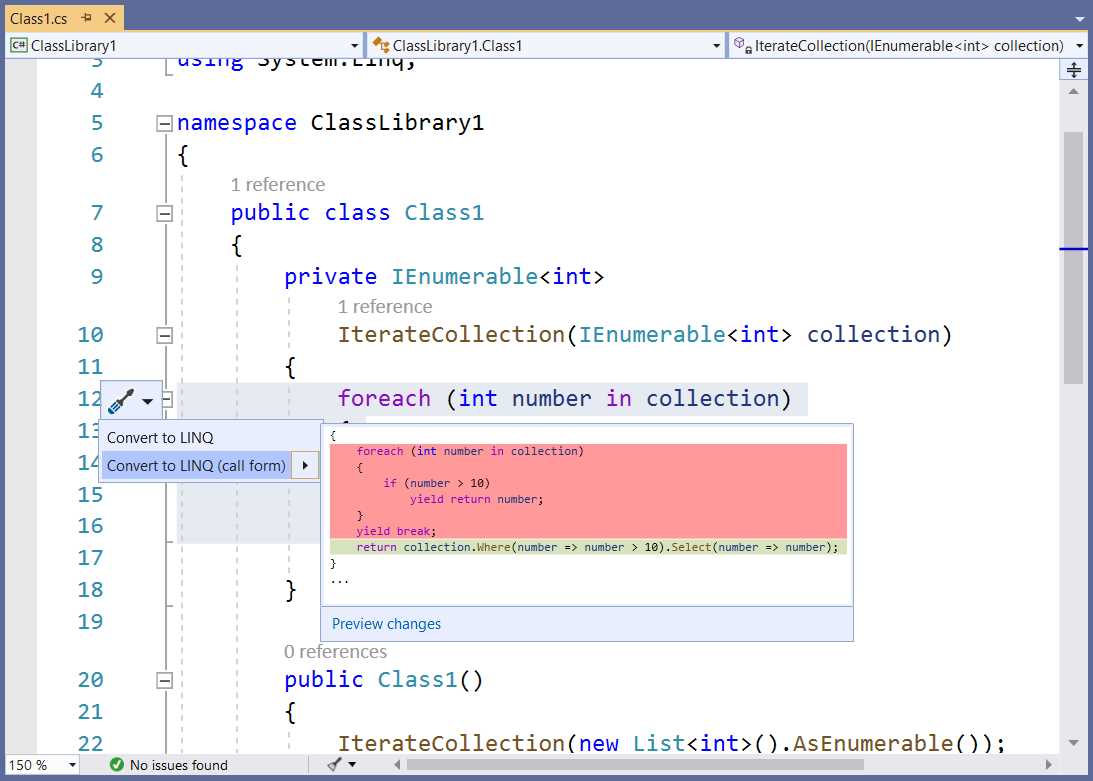
Figure 33: Refactoring a foreach loop into a lambda expression
This is a very nice feature, and definitely my favorite one among the new quick actions.
Promoting class members to interfaces and base types
It is now possible to quickly promote a class member to an interface, if not done previously. For example, consider Figure 34, where an interface called IUtils and a class called Utils are defined. Utils implements IUtils and defines a method that isn’t actually declared in the interface.
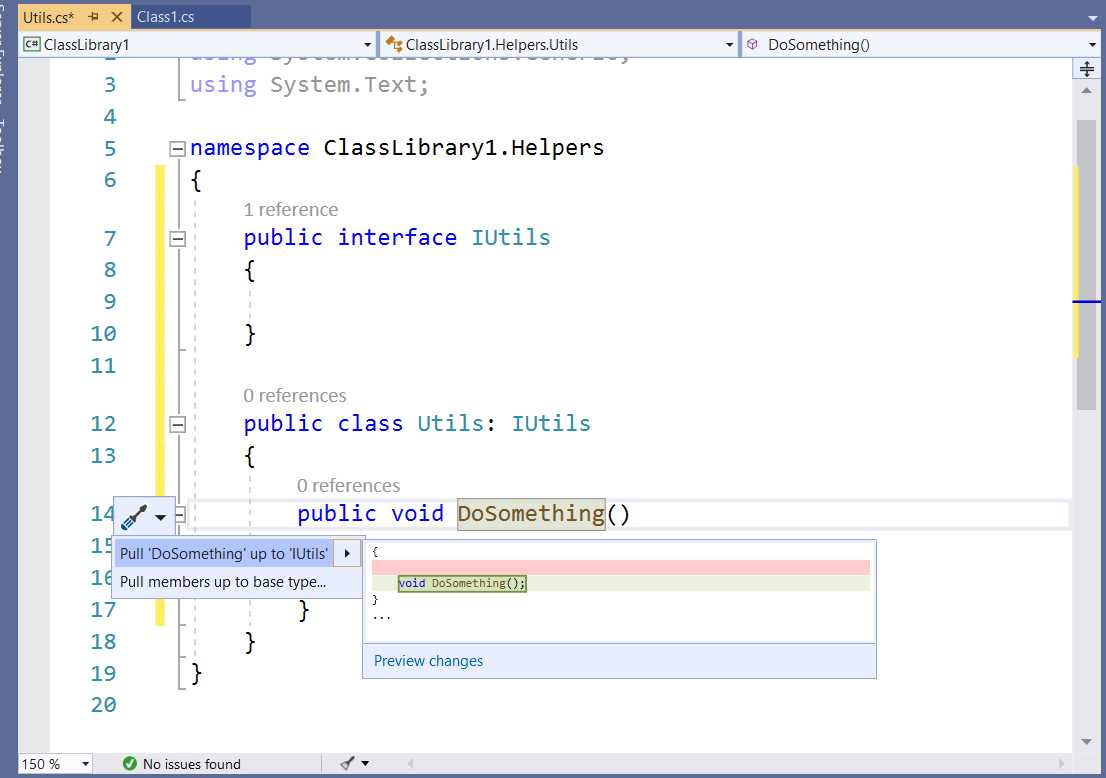
Figure 34: Promoting class members to interfaces
If you enable quick actions over the method, you will get an option to pull the method definition to the implemented interface. In the current example, after applying this fix, the IUtils interface will look like the following.
public interface IUtils
{
void DoSomething();
}
This tool not only works with interfaces, but also with base classes from which your classes inherit. You will still see the option to pull the member definition to a specific class, but you will be also able to use the option called Pull members up to base type (see Figure 34). Suppose the Utils class is instead inheriting from a base type called BaseUtils. If you select this option, a new dialog called Pull Members Up appears, as shown in Figure 35.
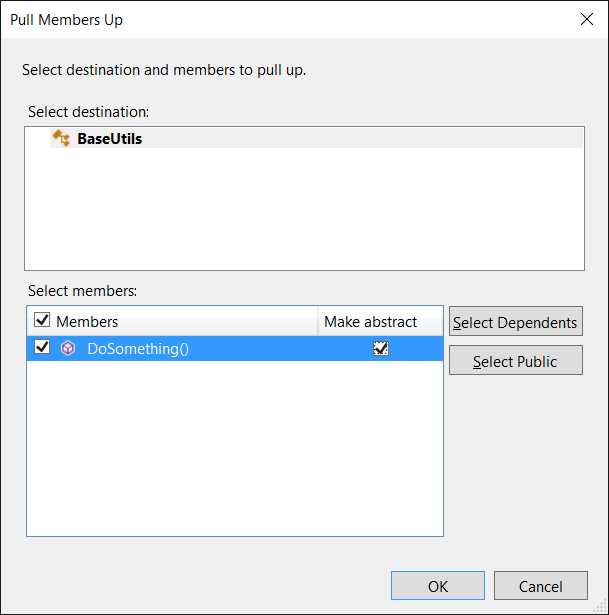
Figure 35: The Pull Members Up dialog
Here you can select the destination type. If your class is concurrently inheriting from a bass class and implementing one or more interfaces, you will see the list of types that can receive the member definition. Second, you can select one or more members to be pulled up. You also have the option to mark the member as abstract and to select only public members and dependent members. Simply click OK to apply the fix.
Synchronizing namespace and folder names
It is a common practice to move code files in a project from the root folder to a subfolder or from one subfolder to another. In C#, creating a subfolder also means adding a child namespace to the parent one, so if you move code files between folders, there will be a namespace mismatch between the code file and the new target folder.
Visual Studio 2019 includes a new code fix that will help synchronizing the namespace with the name of the folder that contains the code file. An example will make it easier to understand this. Consider Figure 36: you can see how the active code file’s namespace is ClassLibrary1, but the file is under the Helpers folder.
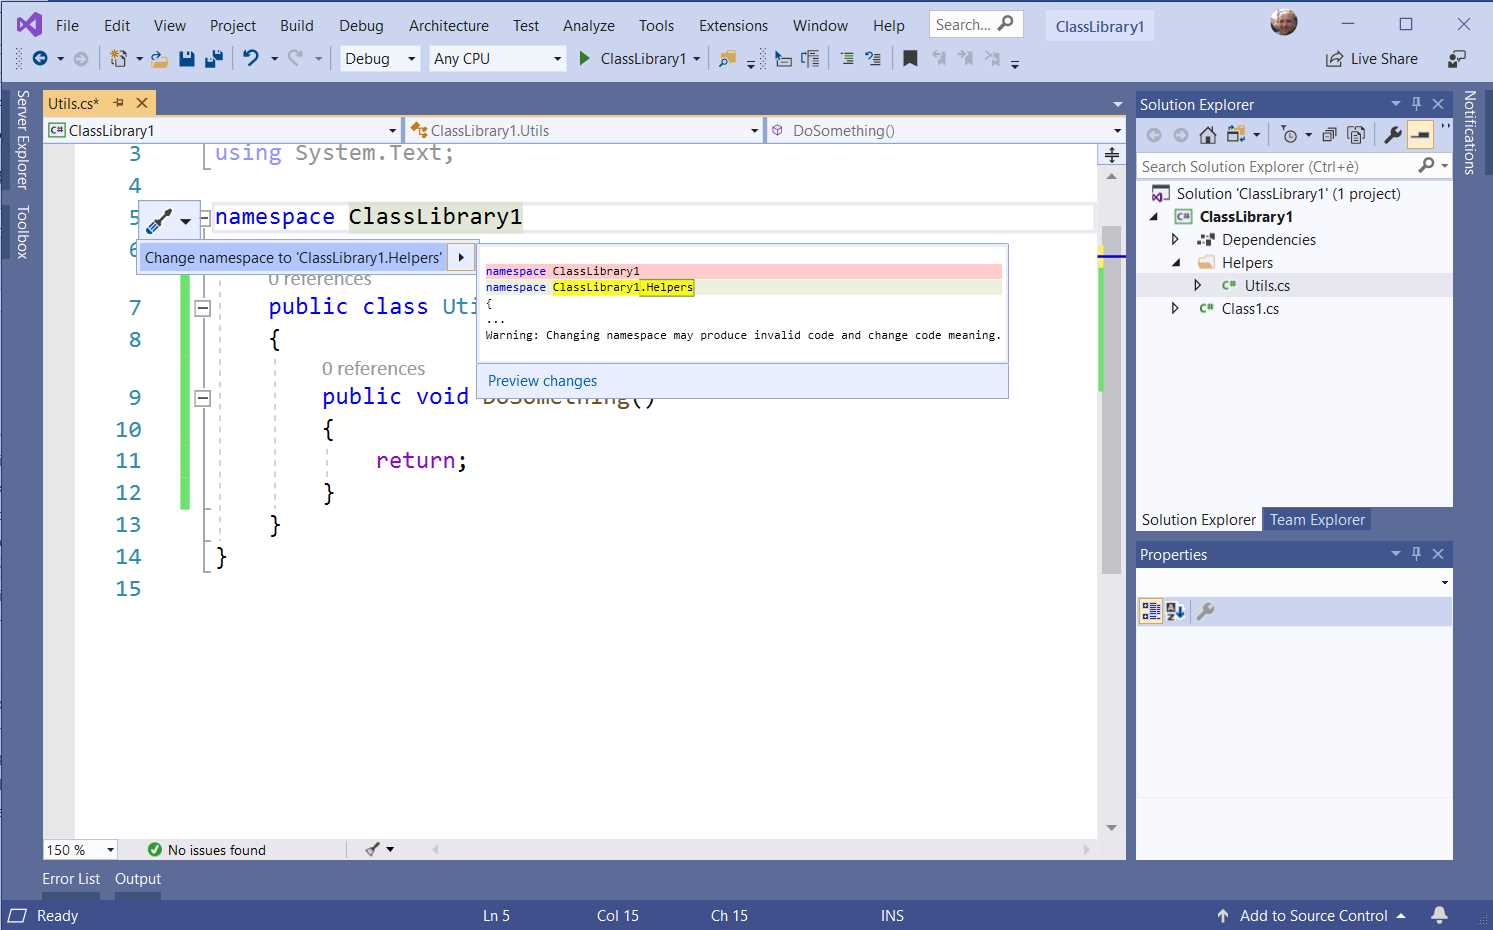
Figure 36: Synchronizing namespace and folder names
The Change namespace quick fix will synchronize the namespace with the folder name, changing into ClassLibrary1.Helpers. The quick fix will also add the proper using directive to all code files that have a reference to the types defined in the renamed namespace, so that your code will continue to work as expected. This quick fix should not be underestimated—it really helps keep the code in a consistent state.
Converting anonymous types to tuples
A new refactoring makes it easy to convert an anonymous type into a tuple object. Figure 37 shows an example.
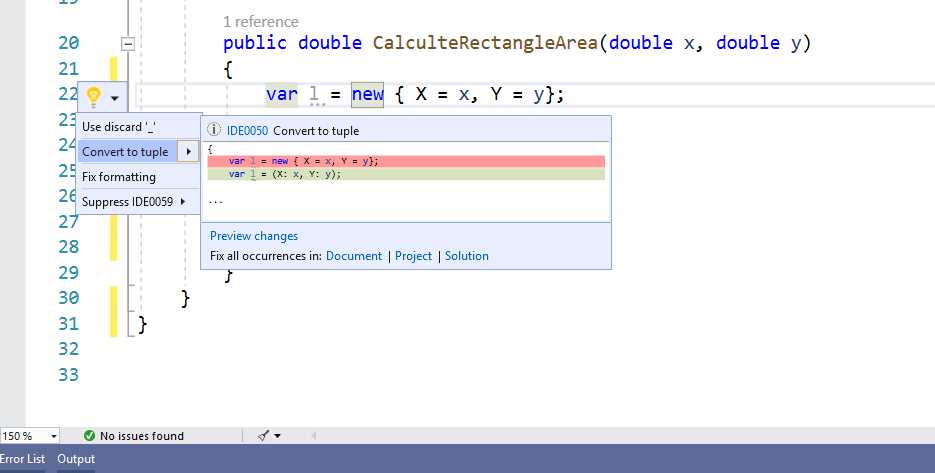
Figure 37: Converting anonymous types into tuples
Simply select the Convert to tuple suggestion to see a preview of how the anonymous type will be refactored.
Tip: Tuple types were introduced in C# 7.0. You can read the official documentation for more information.
IntelliCode: AI-powered word completion
IntelliCode is an extension to IntelliSense, the well-known and powerful code completion tool available in the code editor. IntelliCode provides context-aware code completion based on artificial intelligence and is available for both Visual Studio and Visual Studio Code. Currently, IntelliCode is available for C#, XAML, TypeScript, JavaScript, and Java, with more enhanced support for C# and XAML.
With IntelliCode, you will see code completion recommendations at the top of the IntelliSense list, marked with a star. Such recommendations are based on thousands of open-source projects on GitHub, each rated with over 100 stars. When combined with the context of your code, the completion list is tailored to promote common practices, and is able to suggest the most likely and most relevant API calls. IntelliCode can also recommend the most suitable argument signature on method definitions. To enable IntelliCode, the first step is installing the IntelliCode extension.
Tip: Installing the IntelliCode extension is not necessary if you have installed any workloads that include C#, XAML, or C++. In this case, IntelliCode is automatically installed.
This can be accomplished by selecting Extensions > Manage Extensions and searching for IntelliCode, as shown in Figure 38.
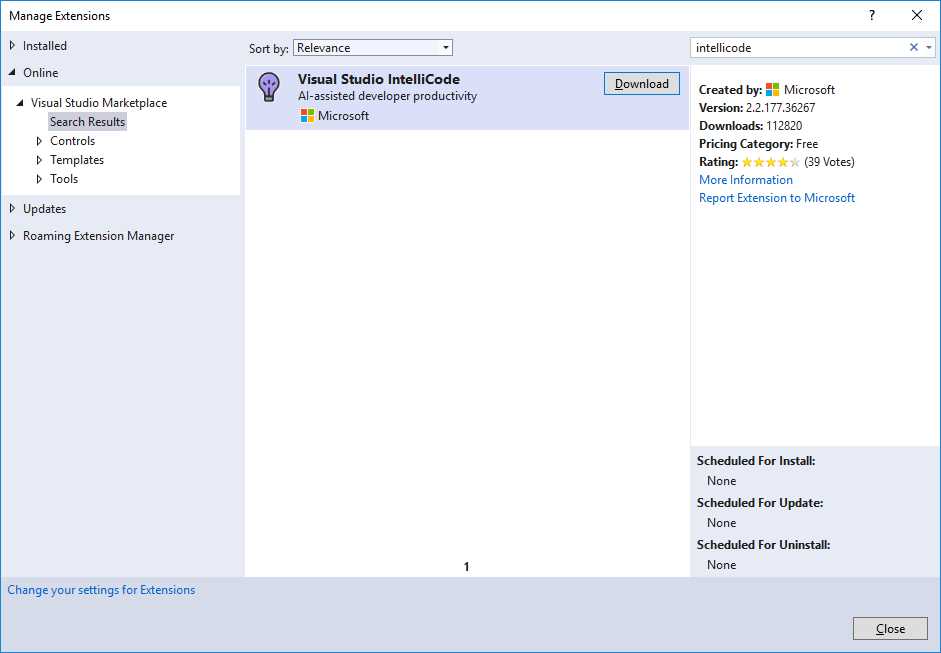
Figure 38: Installing the IntelliCode extension
Click Download, and when it’s finished, click Close and close Visual Studio so that the extension gets installed. Restart Visual Studio and open a new or existing C# project. When you type code, IntelliSense will show IntelliCode recommendations at the top of the list, as demonstrated in Figure 39. You can recognize recommendations by a black star icon.
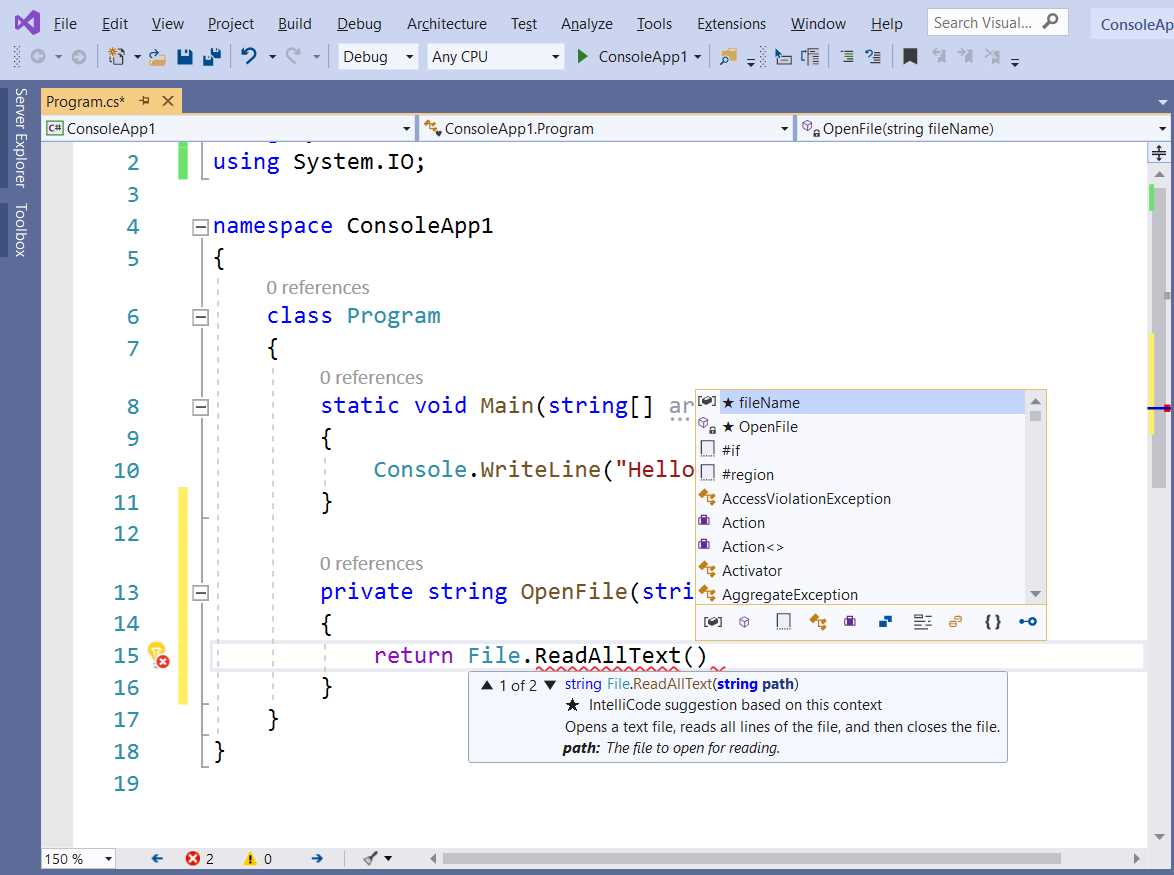
Figure 39: IntelliSense shows IntelliCode recommendations
Tip: If you do not see IntelliCode suggestions, there might be one or more extensions that interact with IntelliSense and override the expected behavior. If this happens, try to disable extensions that might affect IntelliSense and retry.
Because IntelliCode is based on artificial intelligence for searching and suggesting the most likely patterns related to the context of your code, the more it learns from your coding patterns, the more it will provide appropriate suggestions. You can help IntelliCode learn from your coding patterns by selecting View > Other Windows > IntelliCode Model Management. This will open the Visual Studio IntelliCode page, which you can see in Figure 40.
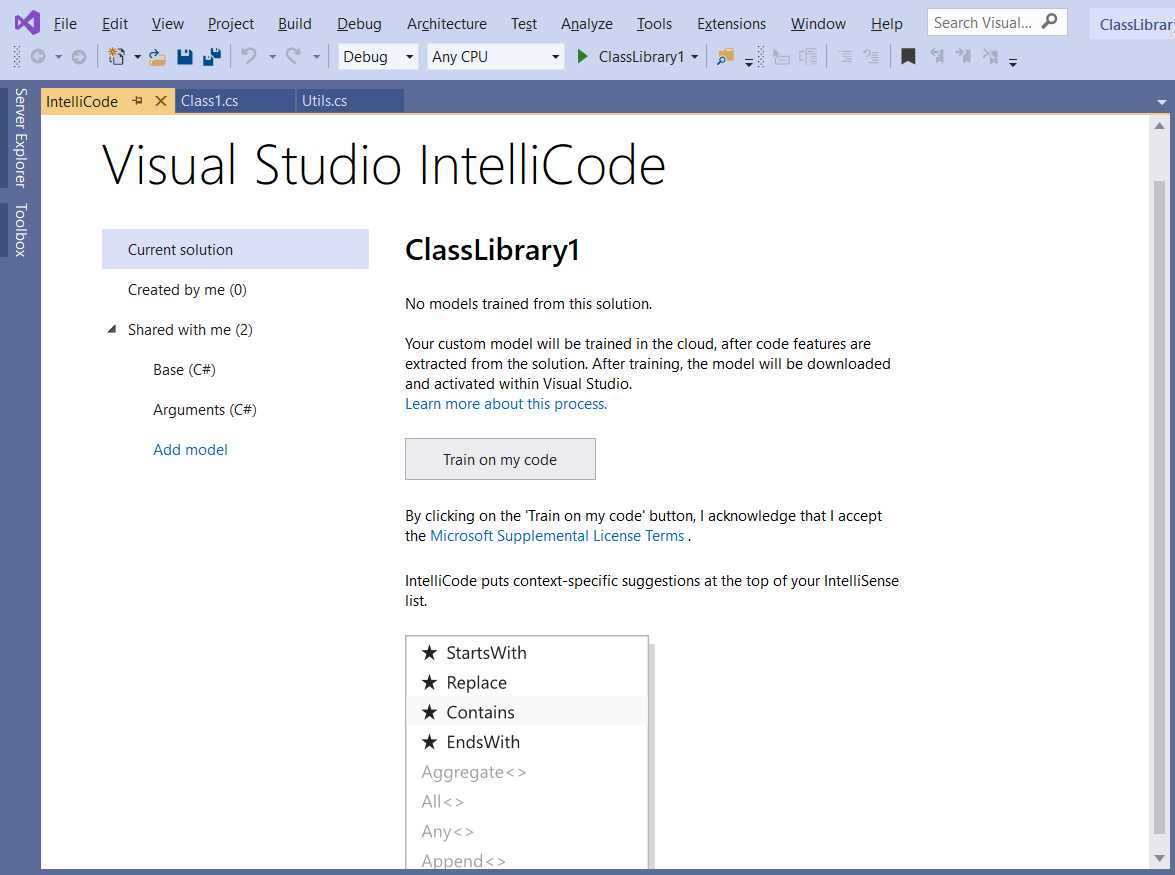
Figure 40: The Visual Studio IntelliCode management page
On this page, you can manage the so-called IntelliCode models. A model is a set of coding patterns and rules that can be either of general purpose or based on the context of your code. By default, IntelliCode includes two general purpose models (under the Shared with me node). The Created by me node contains models generated based on your code. In this case, there are no models yet.
If you click Train on my code, IntelliCode will start analyzing your solution, sending a lot of information to an online Microsoft analysis service based on artificial intelligence. This is collected into a new model, which will be available under the Created by me node, as you can see in Figure 41.
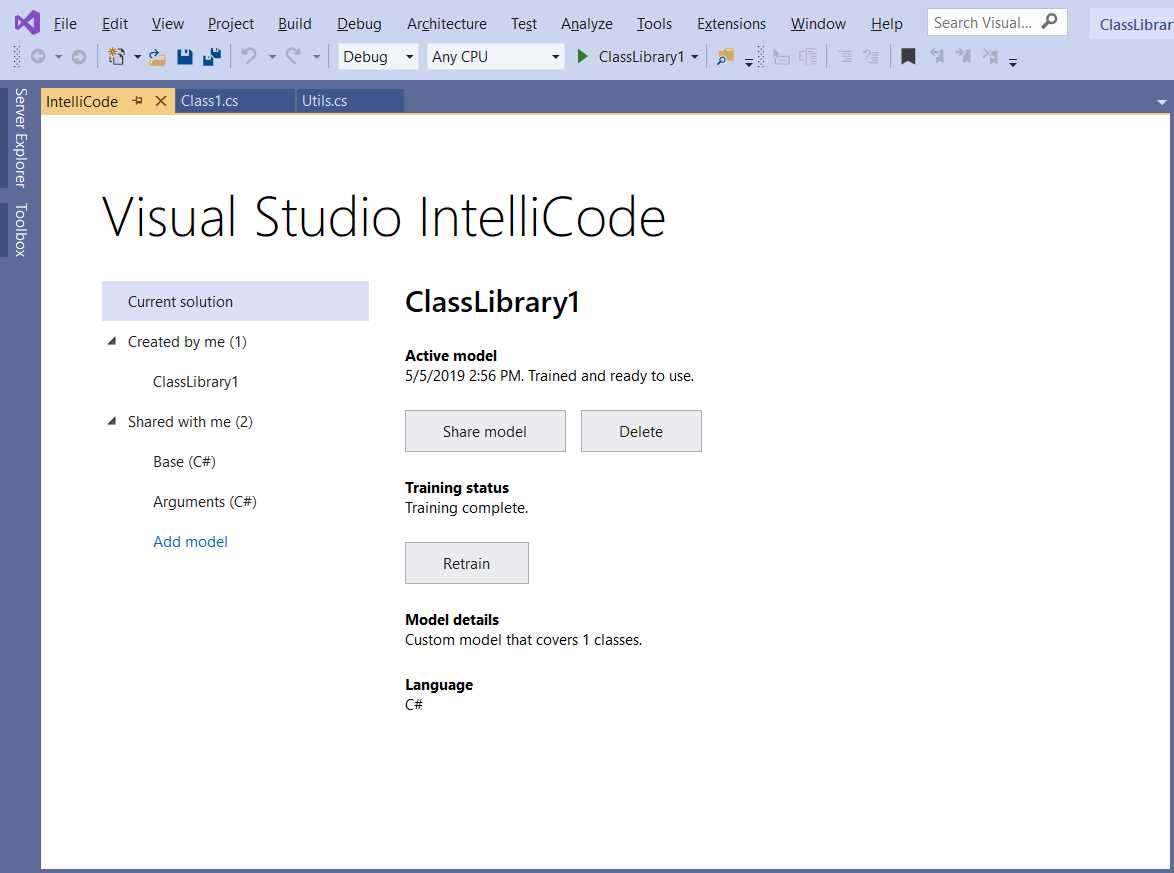
Figure 41: Code analysis completion
Now that a new model has been generated, IntelliCode will be able to provide much better suggestions based on your code context. A model can be also shared, deleted, or regenerated using the appropriate buttons in the IntelliCode management page. You can now go back to your code and work as you would normally do. IntelliCode will now be able to provide much better suggestions.
Chapter summary
Visual Studio 2019 provides many improvements to the code-editing experience. The Document Health Indicator provides a quick view of the code issues in each document, and the Code Cleanup tool allows for one-click code maintenance based on customizable rules.
The Clipboard Ring makes it easy to navigate among items in your clipboard, and Roslyn classification colors improve the readability of your code with better color schemes. New quick actions and refactorings have been added to the Roslyn code analysis engine, and you can now quickly refactor foreach loops into LINQ and lambda expressions. You can easily promote classes’ members into base types and interfaces, and you can quickly synchronize namespace with folder names.
Microsoft is also investing in AI-assisted coding and is working on IntelliCode to provide suggestions based on the most appropriate patterns. In the next chapter, you will read about the improvements that Microsoft has brought to Visual Studio related to team collaboration.
- 1800+ high-performance UI components.
- Includes popular controls such as Grid, Chart, Scheduler, and more.
- 24x5 unlimited support by developers.