
Using .NET Core, Docker, and Kubernetes Succinctly®

CHAPTER 5
Production Time
Azure Kubernetes Service
Installing, managing, and updating a Kubernetes cluster can be very difficult if you don’t have experience with the administration of a Linux server. The best solution is probably to entrust these tasks to some provider, and the good news is that you can choose from many solutions. The main cloud providers provide a Kubernetes solution as a service, and Microsoft’s Azure Kubernetes Service (AKS) is one of them.
The Kubernetes cluster management is free in Azure, you will pay only for the nodes (virtual machines) and the public, reserved, and balanced IP that you need. If you don’t have an Azure account, you can register for a free account here and receive a $200 credit for the first 30 days, and 25 free services forever. A credit card will be required only to check your identity.
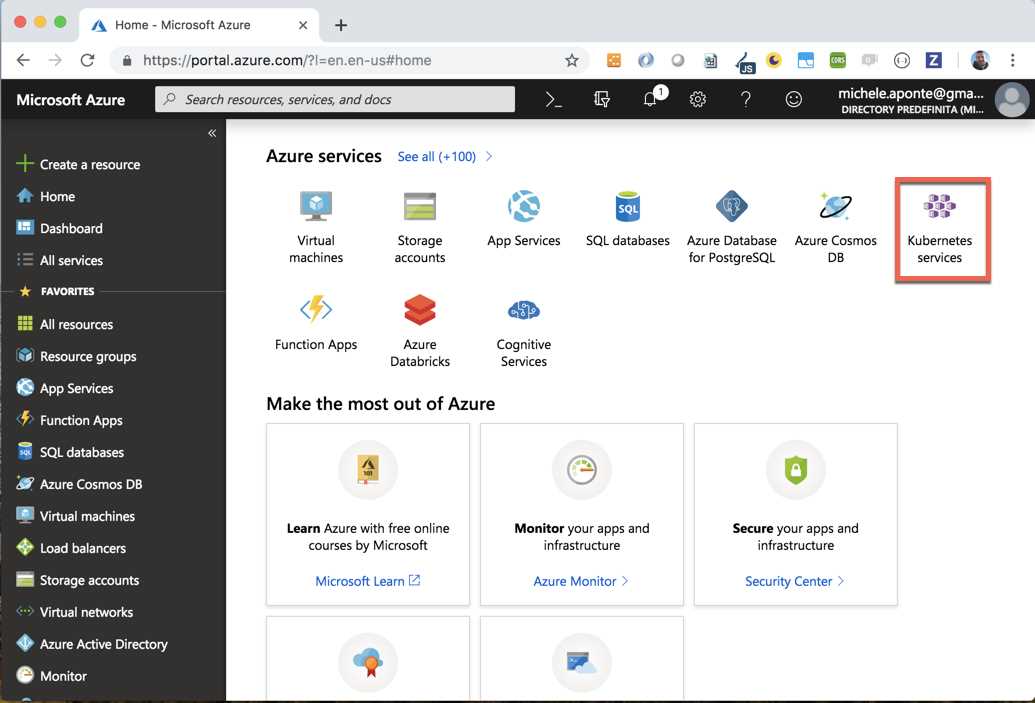
Figure 54: Azure Portal after the registration of a free account
In Figure 54 you can see the Azure Portal after the free registration. You can create a new Kubernetes service by selecting the service from the list, searching for it in the search box, or clicking Create a resource.
The creation wizard requires the main information for the cluster, starting with the subscription (you can have more than one subscription in Azure) and the resource group, a logical container to group Azure services. It’s a good idea to have a specific resource group for our cluster and the services connected to it to simplify the management and the monitoring of tasks. As shown in Figure 55, select the link Create New to create a new resource group with the name Kubernetes_Cluster.
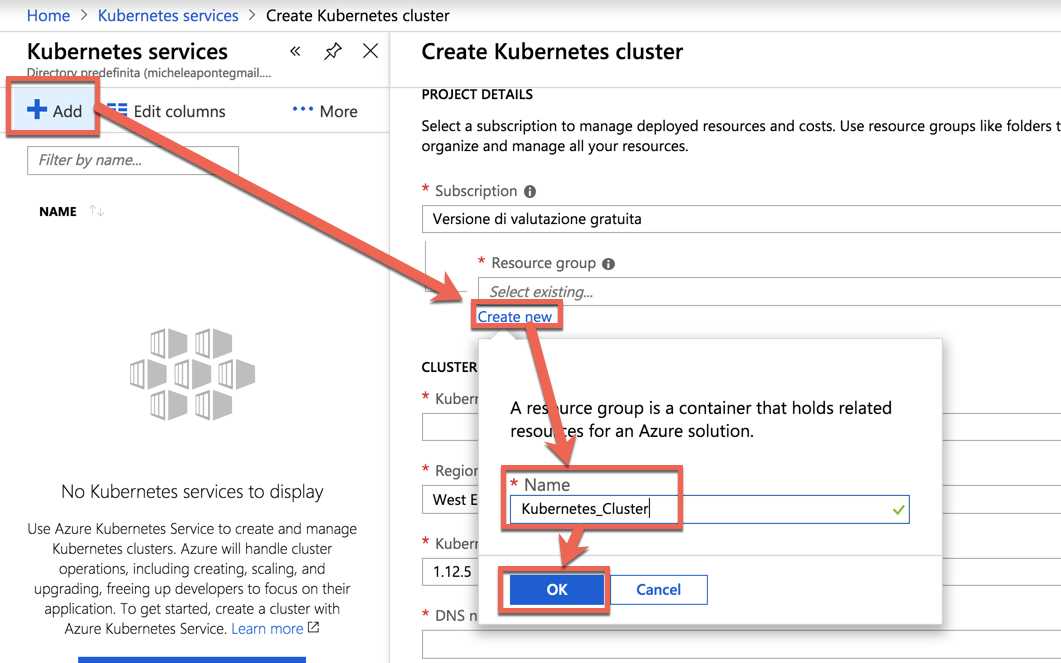
Figure 55: Azure Kubernetes Service wizard
Choose a name for your cluster that is unique in your resource group, and a DNS name prefix that is unique in Azure, because you will use it to connect to your cluster. We can use myappk8s for both our values. You can choose the Azure region where the cluster will be created; choose a region near your user to improve the network performance. If you have any requirement on different versions of Kubernetes, you can select it in the selection box. If you don’t have any constraints, choose the latest version.
The last information to insert in the first step of the cluster creation wizard is the nodes information. This choice influences the billing, so we can start with the cheaper size of virtual machine for the nodes. Click the Change size link (Figure 56) to change the size of the virtual machines for your nodes to B2s.
The next steps are:
- Authentication: Manage the resources attached to the cluster.
- Networking: Customize the networking options for the cluster.
- Monitoring: Enable metrics and monitoring options for the cluster nodes.
- Tags: Categorize resource with custom name/value pairs.
- Review + create: Review and analyze your choices before the cluster creation.
If you don’t have any particular constraints, you can leave the default values for these steps and click Review + create.
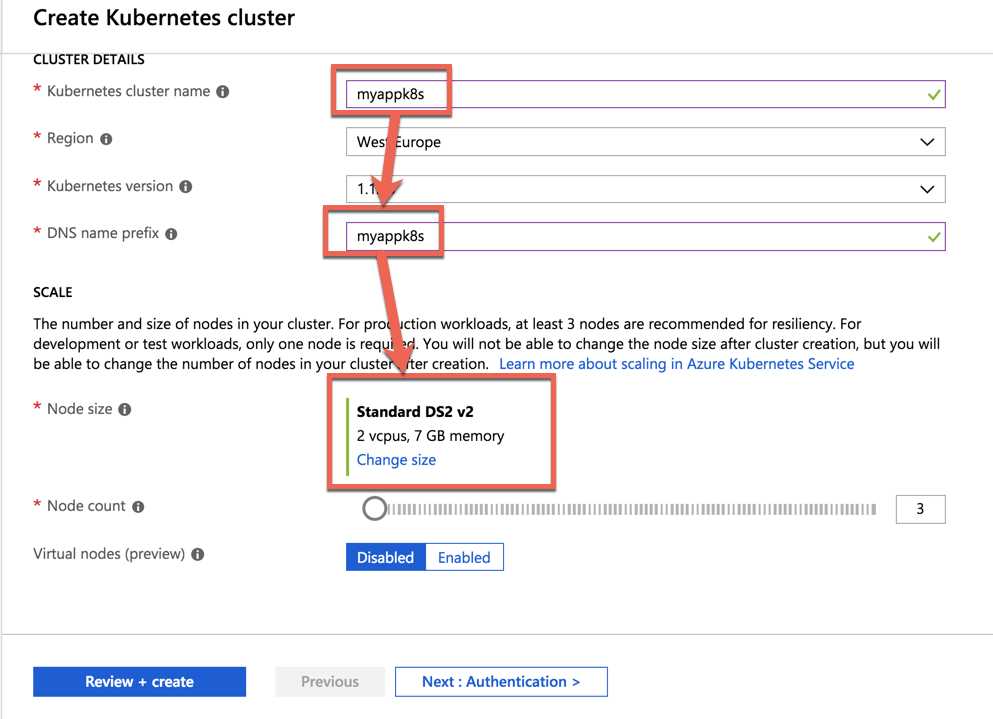
Figure 56: First step of AKS creation wizard
The cluster creation requires several minutes. Many Azure objects will be configured and connected to enable the service. If all operations end without errors, a notification alerts you on the operation success.
It’s time to connect our kubectl to the Azure Kubernetes Service. To do this, we need to install the Azure Command Line Interface (Azure CLI) by Homebrew (if you are on MacOS) or download and execute the Windows installation package (if you are on Windows).
Code Listing 120: Command to install Azure CLI on Mac with Homebrew
brew install azure-cli |
After the installation of the CLI, you can execute commands with az from the terminal. The first command to execute is login, as follows.
Code Listing 121: Command to login Azure CLI to Azure subscription
az login |
The command opens the browser to permit you to use the Azure account credentials to complete the operation, and return to the terminal with the operation result.
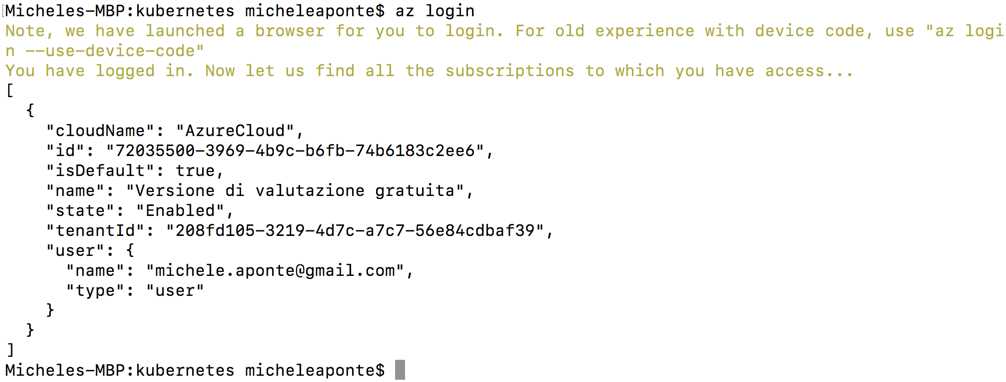
Figure 57: The result of the Azure CLI login command
Now that you are connected with the Azure subscription, you can use the aks get-credentials command to update the Kubernetes current context.
Code Listing 122: Command to merge AKS credential with the current Kubernetes context
az aks get-credentials --resource-group Kubernetes_Cluster --name myappk8s |
You can see the result in Figure 58.

Figure 58: The aks get-credential command result
After the command execution, the kubectl tool is connected to the AKS cluster. You can return to your local environment by using the Docker tool, as shown in Figure 59.
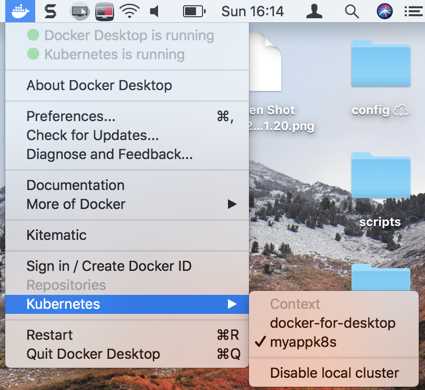
Figure 59: Docker tool to change the target Kubernetes cluster
If you try to execute the kubectl get nodes command, the result is similar to Figure 60, which shows the two nodes of the Azure Kubernetes Service cluster.

Figure 60: The Azure Kubernetes Service Nodes from the terminal command
It’s time to deploy our application on Azure! You just need to execute the same command used for local deployment: kubectl create -f deployment.yml. After a few seconds, you can execute the kubectl get pods, with the following result.

Figure 61: The front-end pod deployed on Azure Kubernetes Service
To expose the application, we need a service. We can use a LoadBalancer service type. Create a copy of service.yml, rename it service-aks.yml, and modify the script as follows.
Code Listing 123: LoadBalancer service to expose front-end application from Azure
apiVersion: v1 kind: Service metadata: name: myapp-svc spec: selector: app: myapp type: LoadBalancer ports: - port: 80 |
Execute the script with the kubectl create -f service-aks.yml command and execute the kubectl get service myapp-svc --watch command. The --watch option permits us to monitor the command results until the public IP is assigned from Azure.

Figure 62: Command to create service on Azure and waiting for public IP assignment
As you can see in Figure 62, after 52 seconds Azure assigns an external IP to the service, which we can use to navigate to the application.
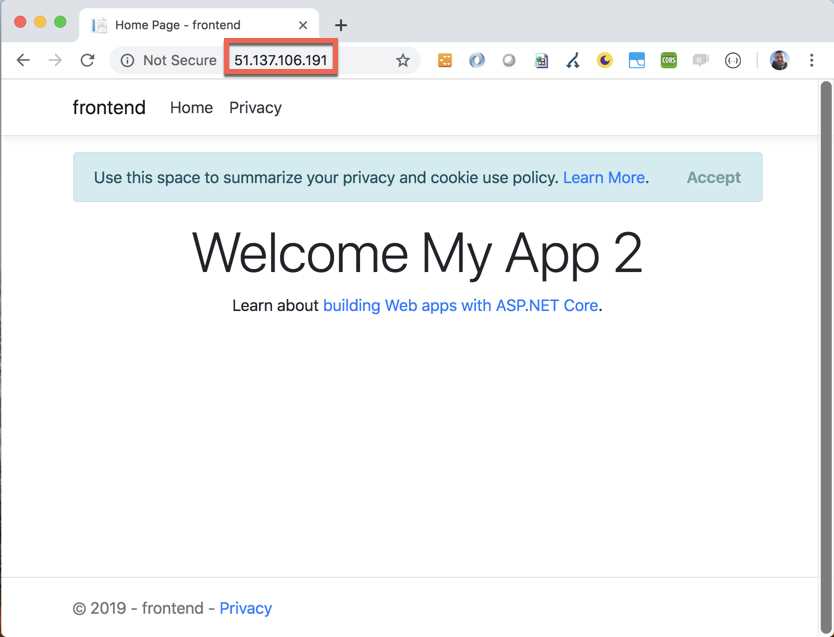
Figure 63: The front-end application exposed from Azure
Now, the database needs a volume to store the physical file with the data. In Azure, you have specific services to store data. Azure disks is one of them, and to use it with Kubernetes, we need to create a StorageClass. Let’s create a storageclass-aks.yml and insert the following script.
Code Listing 124: Script to create a StorageClass for Azure disks
kind: StorageClass apiVersion: storage.k8s.io/v1beta1 metadata: name: azure-disk provisioner: kubernetes.io/azure-disk parameters: storageaccounttype: Standard_LRS kind: Managed |
After the execution of this script (with the kubectl create -f storageclass-aks.yml command), you can use the name azure-disk to create a persistent volume claim for your volumes. In this case, we do not need to create a persistent volume, because Azure Disks supports the dynamic provisioning. Create a file named volume-claim-aks.yml with the following script.
Code Listing 125: Script to create a PersistentVolumeClaim for Azure Disk
apiVersion: v1 kind: PersistentVolumeClaim metadata: name: azure-volume-claim spec: storageClassName: azure-disk accessModes: - ReadWriteOnce resources: requests: storage: 8Gi |
Remember to create a secret for the database password (kubectl create secret generic mssql --from-literal=SA_PASSWORD="Password_123") and modify the database deployment as follows.
Code Listing 126: Database deployment script changes to set the Azure volume claim
spec: containers: - name: myapp-database image: mcr.microsoft.com/mssql/server ports: - containerPort: 1433 env: - name: "ACCEPT_EULA" value: "Y" - name: "SA_PASSWORD" valueFrom: secretKeyRef: name: mssql key: SA_PASSWORD - name: "MSSQL_PID" value: "Express" volumeMounts: - name: mssqldb mountPath: /var/opt/mssql volumes: - name: mssqldb persistentVolumeClaim: claimName: azure-volume-claim |
We are ready to create the deployment (kubectl create -f db-deployment-aks.yml) and wait for the pod creation. In the meantime, we can create a LoadBalancer service to access the database and initialize it with the SQL script created with the front end. Create a new file named db-service.yml with the following script.
Code Listing 127: Script to create a LoadBalancer service for the database
apiVersion: v1 kind: Service metadata: name: myapp-db-svc spec: selector: app: myapp-db ports: - protocol: TCP port: 1433 targetPort: 1433 type: LoadBalancer |
After the execution of this script (kubectl create -f db-service.yml), the system allocates an external IP that we can use with our preferred database management tool. You can use sqlcmd to execute the script, but if you want a free management tool that’s also available on MacOS, you can download and install Azure Data Studio.
In my case, Azure provides me with the IP 23.97.160.75, which I can use as server for the connection. As you can see in Figure 65, Azure Data Studio is very similar to Visual Studio Code, so you should be familiar with it.
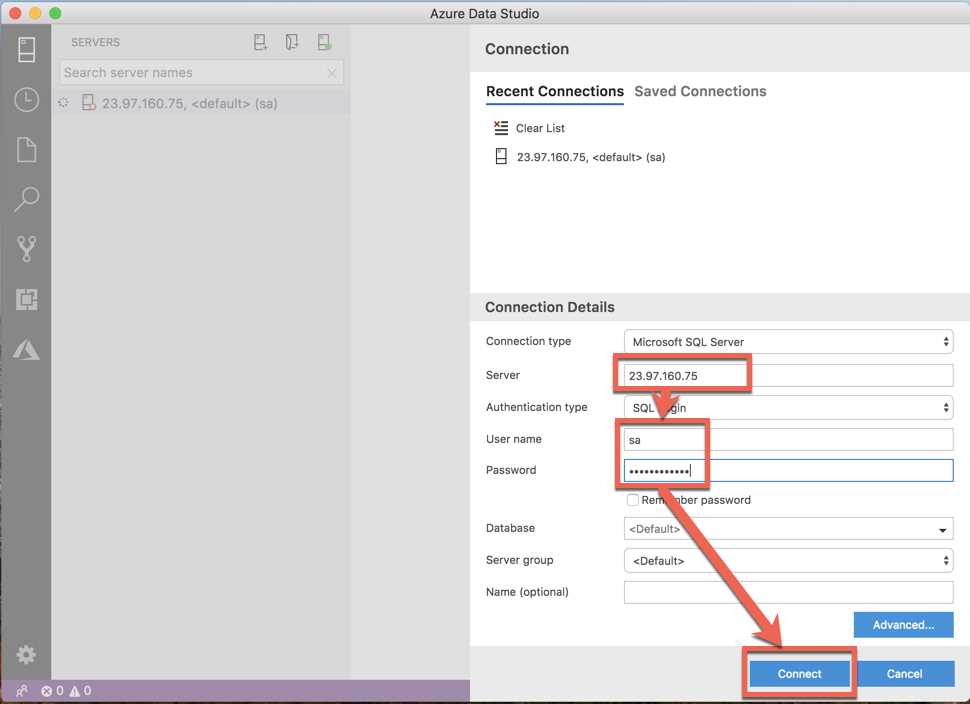
Figure 64: Azure Data Studio connection form
Create a new query to execute the following script.
Code Listing 128: SQL command to create the myapp database
CREATE DATABASE myapp |
We can now open the file script.sql and execute it on the myapp database to create the schema and fill the tables with the initial data. You can see the Azure Data Studio dashboard with the connection info and the myapp database created in Figure 65.
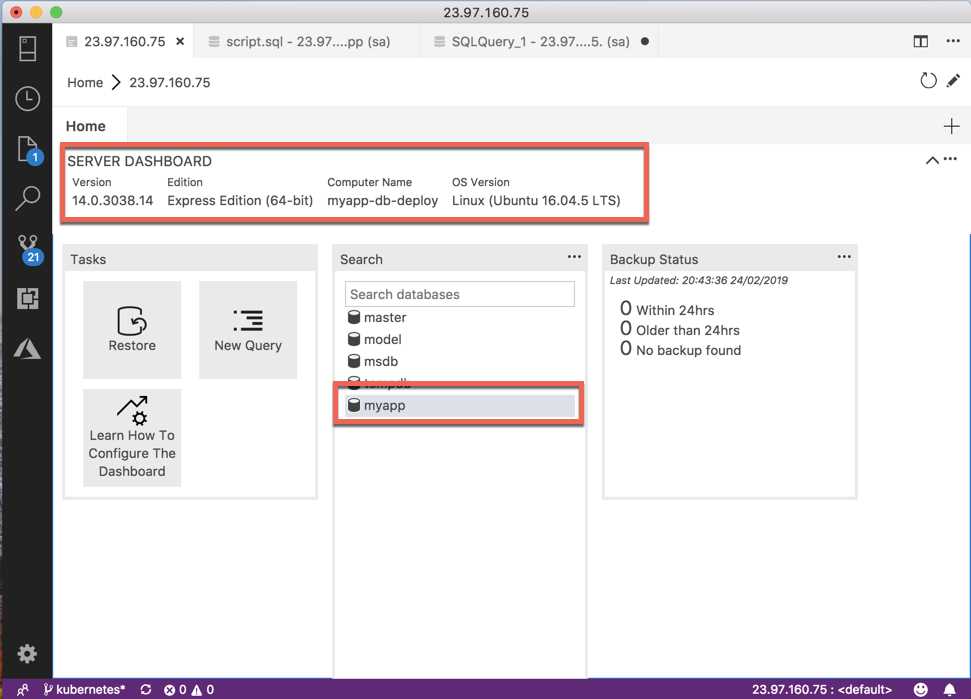
Figure 65: Azure Data Studio dashboard with the connection info and the created database
After the database creation and configuration, you can delete the LoadBalancer service and create a ClusterIP service, accessible only from within the cluster. You can recreate the LoadBalancer service when you need to access to the database for management purposes. If the service is named myapp-db-svc, the internal DNS name will be myapp-db-svc.default.svc.cluster.local. You can use it to change the connection string in your deployment.yml.
Code Listing 129: Front-end deployment connection string
env: - name: SQLSERVER_CONNECTIONSTRING value: "Server=myapp-db-svc.default.svc.cluster.local;Database=myapp;User=sa;Password=Password_123;MultipleActiveResultSets=true;" |
Apply the change with the kubectl apply -f deployment.yaml --record command and navigate to the customer page to see the result of your work: the application is running from the Azure Kubernetes Service cluster!
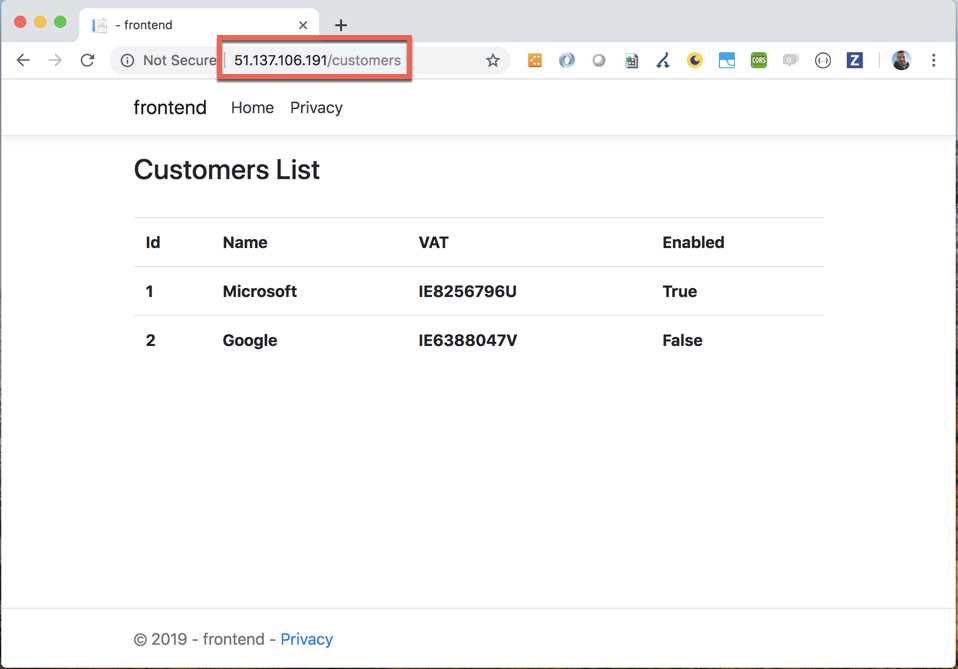
Figure 66: The customer page of the application running from Azure Kubernetes Service
Monitoring a Kubernetes cluster
You can also use the Kubernetes Dashboard with the Azure cluster, but this tool is not the best for managing a cluster in production. Azure provides three default monitoring tools:
- Insight: Provides many metrics and details on the cluster.
- Metrics: Creates new graphics on available metrics in a graphical environment. It helps to select the parameters and export the results in Excel.
- Logs: A query builder to analyze the cluster logs.
If you are on Azure, these tools are very useful both for a first look and an in-depth analysis of the cluster state. The creation of a new chart in the Metrics section is in preview, but you can try it—it has a very simple user experience.
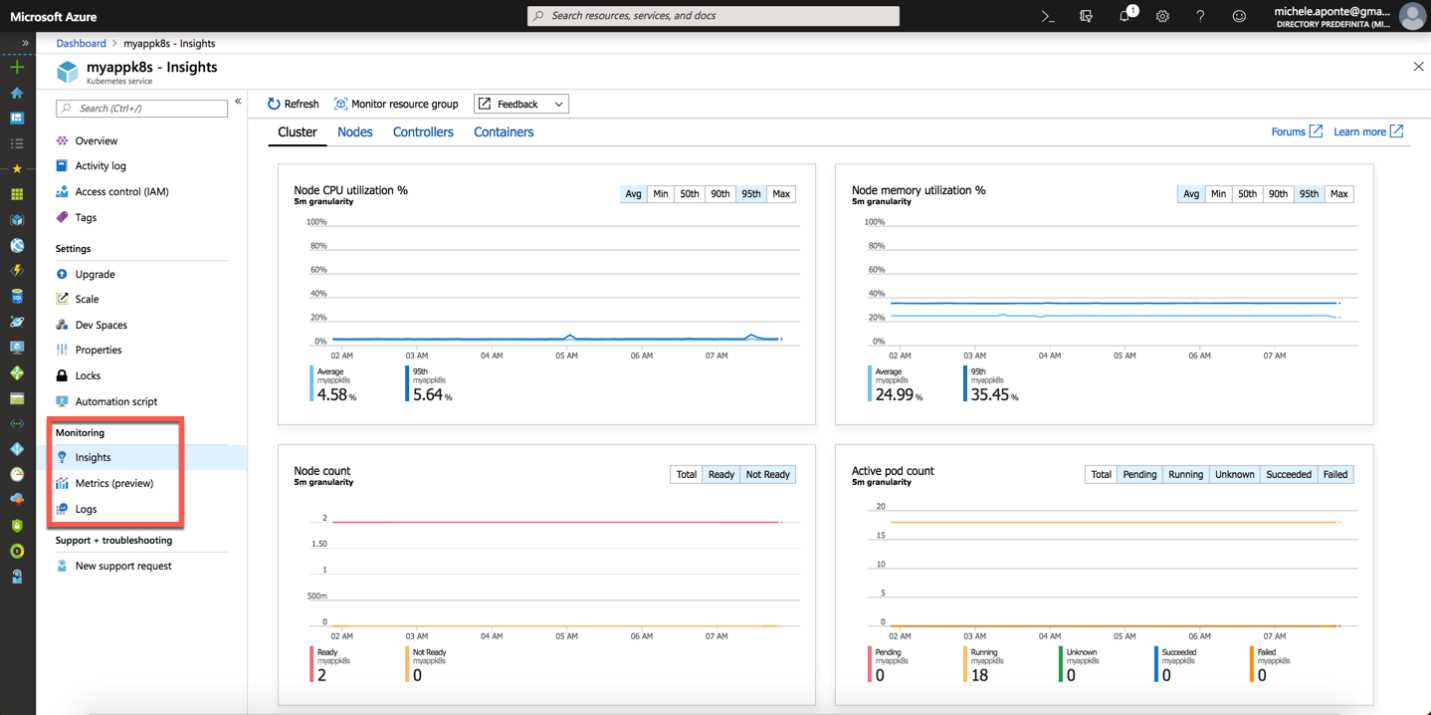
Figure 67: Azure Kubernetes Service monitoring tools
Azure provides tools for monitoring all services and you can access them from the main menu by selecting the Monitoring choice. The most well-known service for monitoring in Azure is Application Insights, which you can integrate into your code to provide any information that will be collected and analyzed for you by a machine learning system.
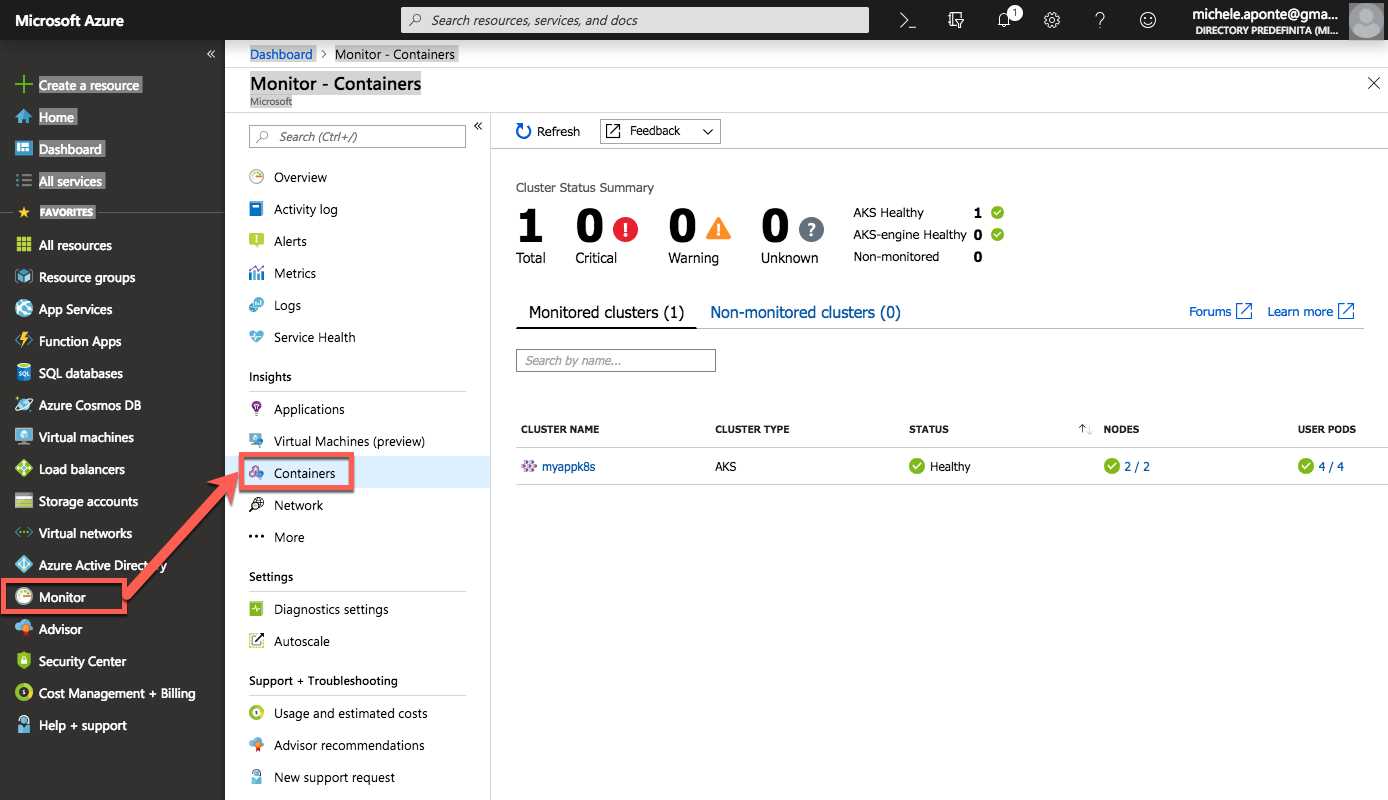
Figure 68: Monitor containers from Azure portal
If you have more than one cluster, you can see the monitoring values of your containers in a single page that shows you an overall view of the status of the container (Figure 68). A very cool feature of Azure’s monitoring tools is the possibility to create an alert based on particular situations. From the Alert section, you can create your rule with a simple wizard (Figure 69).
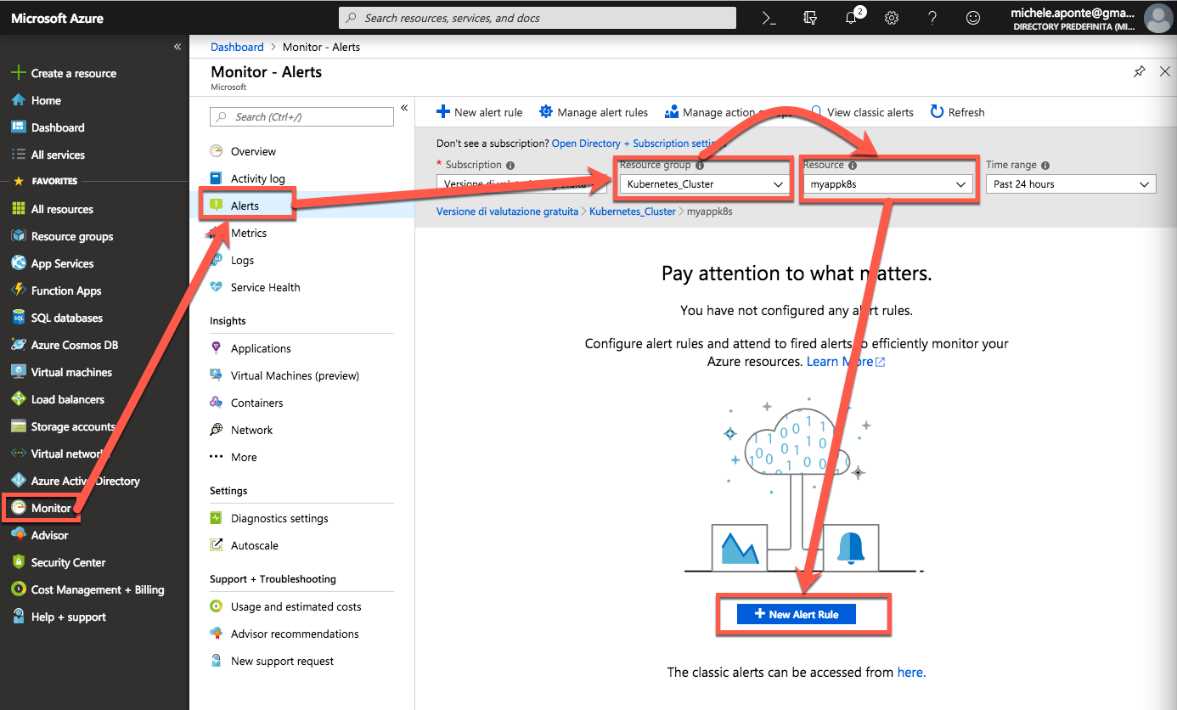
Figure 69: Monitoring alert from Azure portal
You can choose the resource to monitor, the condition that generates the alert, the action group to act when the condition is true (like send an email or text message), a name, and a description of the alert. You can choose the conditions from many options, and aggregate information by configurable period and frequency.

Figure 70: Azure monitoring Alert wizard
If you are not on the Azure platform, there are a lot of advanced tools available (both free and paid) that can help you to have the same control of the cluster monitoring. The most well-known is Prometheus, which you can use with AKS if you have hybrid monitoring requirements. It is open source, and you can find rich documentation about its configuration.
What next?
Kubernetes is the de facto standard for container orchestration. You can use it everywhere, and it is receiving a lot of improvements thanks to the contribution of the main cloud providers that supply it as a service.
In this book, we have seen Docker containers and Kubernetes from the developer point of view, but to manage a production environment, there are a lot of tools and objects to explore from a system administrator point of view.
I hope that this book has helped you begin your journey with Docker and Kubernetes, because these tools are the present and the future of software development. I suggest that you study more in depth and put what you learn into practice—it’s the only way to work with these tools and have fun while doing it!
Happy coding!
- 80+ high-performance ASP.NET Core controls, including DataGrid, Charts, and Scheduler.
- Lightweight and responsive.
- Modular and touch-friendly.
- Built-in themes.