
Using .NET Core, Docker, and Kubernetes Succinctly®

CHAPTER 3
Deploy Your Application on Kubernetes
The journey to Kubernetes begins
There are several reasons to choose Kubernetes as a container orchestrator, but you can appreciate its power and simplicity only when you start to work with it. Naturally, you need to understand its basic components and how they work together.
Kubernetes, often shorted to k8s (for the eight characters between the k and the s in the alphabet), was created by Google in a private project named Borg and donated to the open-source community in 2014. It is written in Go/Golang, and its name is a Greek word that means helmsman, the person who steers a ship.
Kubernetes is designed to manage and scale your containers based on your configuration. To do this, it offers a cluster architecture to simplify the communication among available resources. Today, it’s the de facto standard, adopted and supported by the major cloud providers because it is platform-agnostic and well-documented.

Figure 27: Kubernetes cluster components
As with any cluster, Kubernetes is composed of one or more master nodes, called masters, and one or more slave nodes, called nodes. You can have more masters for high-availability requirements. So if one master dies or is unavailable, the other master can guarantee that the system continues to work.
In the master, no user containers can be executed—only the services needed to control the nodes can be executed, ensuring that the system as a whole respects the configuration.
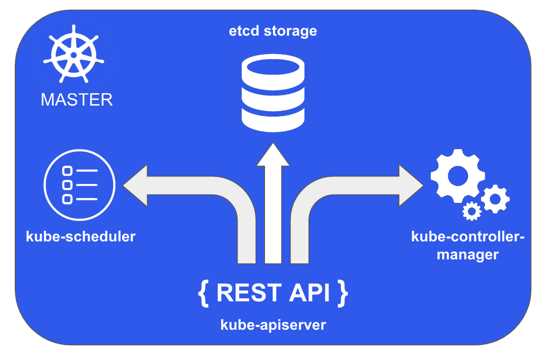
Figure 28: Kubernetes master
The master exposes a REST API server that consumes JSON data via manifest files to allow the Kubernetes configuration. This component is named kube-apiserver. The cluster configuration and state are saved on a distributed, consistent, and watchable persistent storage, accessible only through the REST API. The storage uses etcd, an open-source key/value store designed for small amounts of data that can be kept in memory. This store is the heart of Kubernetes, so you should back it up.
The master node also contains some controller services to control specific items like the nodes, namespaces, and endpoints. This component is named kube-controller-manager, and its primary goal is to watch for changes in the system and react to maintain the configured state. The last master component is named kube-scheduler, and it has the task of assigning work to the nodes and watching the API server for the creation of new pods. A pod is the minimum working unit in Kubernetes and contains one or more containers. We will examine them in depth shortly.
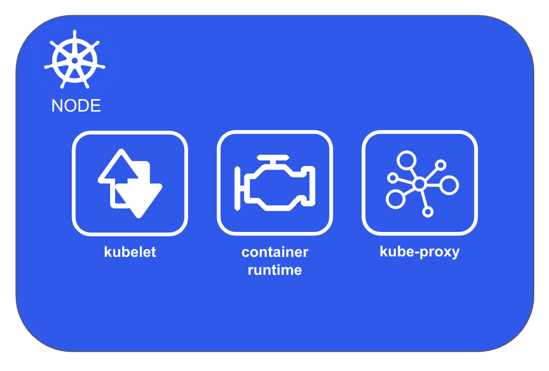
Figure 29: Kubernetes node
A Kubernetes node, previously called a “minion,” is the worker machine where the containers are executed. A node contains an agent named kubelet that communicates with the master to run operations on the node and reports back the node status. This agent registers the machine as a Kubernetes node, and after the registration, the node becomes a resource of the cluster. So, the node does not decide which activities should be done, because only the master knows the state of the whole system and can make that decision. The agent exposes an endpoint on the 10255 port, where it is possible to query the node for the configuration, status, and pods.
A node also contains the container engine to perform operations like pull images and start and stop the containers. The container engine is pluggable, so you can use any container engine you want. Usually, the container engine is Docker, but you can change it for any container specification implementation. For example, you can use rkt, the Kubernetes pod-native container runtime.
The Kubernetes node networking is managed from kube-proxy, the node component that allows IP addressed to the pod and balances the traffic across all pods in a service.
Before going deep into how Kubernetes works, let's create an environment in which we can experiment with its components. We have some choices, depending on which operating system you use, how much memory and CPU you have, and how lazy you are.
We can distinguish two main possibilities: the creation of a local environment or the configuration of a Kubernetes cluster in one of the available cloud providers.
Microsoft with Azure, Google with Google Cloud Platform, and Amazon with AWS provide services to create a Kubernetes cluster as a managed service, so you need only to configure your needs and pay for it. A production environment is the best choice, but first, you could explore the Kubernetes features in a local environment.
For the creation of a local environment, you have three options:
- Install a Kubernetes cluster locally using virtual machines.
- Install Minikube.
- Enable Kubernetes in Docker Desktop.
The first option requires experience with Linux administration and much patience, because creating a Kubernetes cluster (with only one master and one node) can be a very frustrating experience.
Minikube was born to solve this kind of problem. It is a tool that installs and runs a single-node cluster inside a virtual machine, designed for development purposes. You can find the instructions for the installation on the official documentation.
As you probably predicted, we will opt for the third option, which is perfect if, like me, you are lazy and you already have the Docker tools installed on your machine. From the Docker tray icon, choose the Settings menu item, select the Kubernetes tab in the Settings dialog, select the Enable Kubernetes check box, and click Apply.
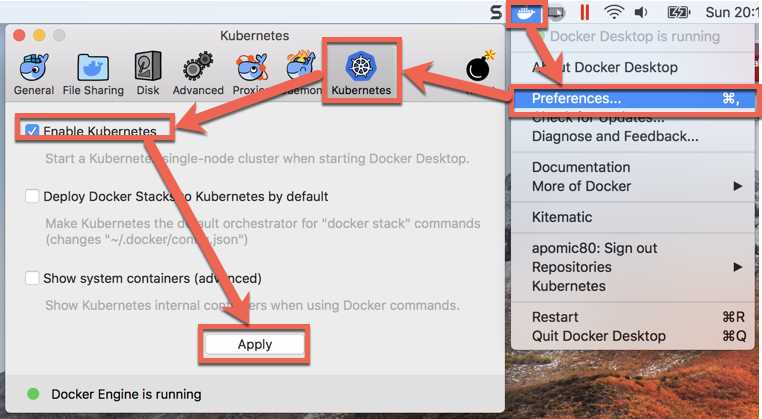
Figure 30: Enabling Kubernetes in Docker for Desktop
The installation requires several minutes, depending on your connection and the power of your machine. The good news is that all the operations are automatic, so you only need to wait for the success message.
When the installation ends, you can test that it works from the terminal by executing the following command.
Code Listing 70: Command to show information about the Kubernetes cluster
kubectl cluster-info |
The kubectl is a command line tool installed with Kubernetes that allows us to interact with a cluster. If the command executes correctly, you can see the cluster information.

Figure 31: Kubernetes information command output
When you interact with Kubernetes, you can adopt an imperative or declarative approach. With the imperative approach, you impose a command on the Kubernetes cluster that will execute it and return a result. With the declarative approach, you can describe your desired state for the cluster and let Kubernetes do all the necessary work to achieve the status indicated.
To understand the difference between the two approaches and gain the necessary knowledge to publish our application in the local cluster, we need to introduce and analyze some Kubernetes concepts. Let the games begin!
Deploy your images in Kubernetes
Suppose we want to deploy our frontend in Kubernetes. To do this, we need to create a Kubernetes resource known as the pod. A pod is the minimum deployable unit in the cluster, so in Kubernetes, we talk about pods instead of containers.
A pod can contain one or more container—usually only one, but if you have more containers that are strongly dependent, you can deploy them together in the same pod. They will scale together and share the same IP address. You can create a pod from the command line using the kubectl run command, specifying a name for it, the image to use, and the port where the container responds.
Code Listing 71: Command to create a Kubernetes pod
kubectl run frontend --image=apomic80/myapp:frontend-v1 --port 80 --restart=Never |
The parameter restart indicates that if the pod fails or dies, it will never be recreated. If you run the command kubectl get pods, you can see the created pods and their status.

Figure 32: Kubernetes pod creation output
To analyze the created pod in depth, you can use the command kubectl describe pod frontend, which shows you all the available information about the pod and the containers contained within it.
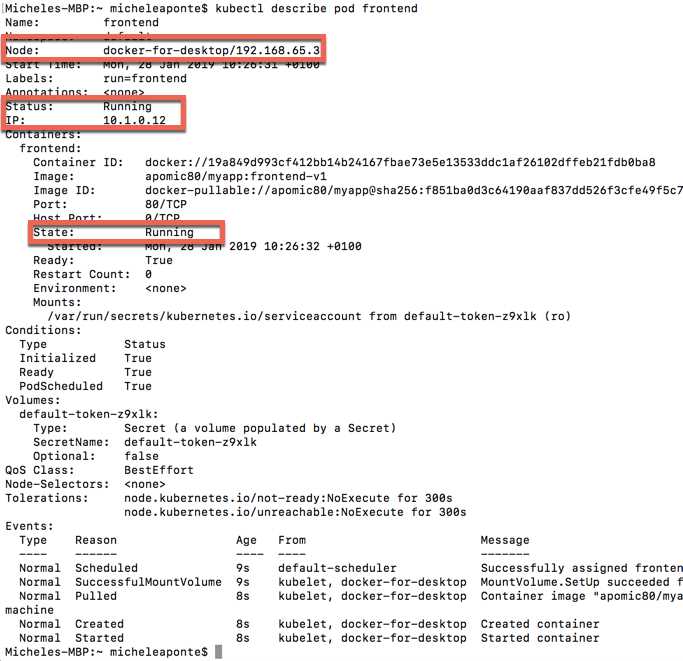
Figure 33: Kubernetes pod description output
In the image, you can see a status label for the pod and a status label for the container. You already know the possible container states, but the pod has different values. It follows a life cycle that starts with the creation command, which brings its status to the Pending value, during which the containers in it are loaded. If there are errors creating the containers, the pod will assume the Failed state; otherwise, it will assume the state Running. Running means that all containers are created and at least one is starting, restarting, or running. When all the containers in the pod are terminated successfully and will not be restarted, the pod will assume the Succeeded status.
To delete the pod, you can execute the following command.
Code Listing 72: Command to delete a Kubernetes pod
kubectl delete pod frontend |
It is essential to understand that all the operations are not instantaneous—they are sent to the master, which validates them and sends the right requests to the nodes interested by the operation. So, if you execute the command kubectl get pods, just after the delete command, you will probably see the pod in the list in the Terminating status.
We have created a pod directly from the command line, but the best way to do so is to use a YAML configuration file that will be sent to the cluster. As for the kubectl tool, the YAML also requires a lot of practice to memorize the syntax. Let's create a pod.yml file with the following script to create the frontend pod.
Code Listing 73: YAML description to create a Kubernetes pod
apiVersion: v1 kind: pod metadata: name: frontend-pod labels: app: myapp zone: prod version: v1 spec: containers: - name: myapp-frontend image: apomic80/myapp:frontend-v1 ports: - containerPort: 80 |
The first line indicates the version of the syntax used from the script, which is needed by the cluster to correctly understand the configuration. The second row defines the kind of item that we want to create, a Pod. After these initial rows, the script describes the item metadata. Here there are three blocks: name, which indicates the pod name; labels, which adds some custom labels to the pod in the <key>:<value> format; and spec, the item specification, which in the case of the pod is the definition of the containers in it. To create this pod, you can execute the following command.
Code Listing 74: Command to create a Kubernetes pod from a configuration file
kubectl create -f pod.yml |
Instead of using kubectl tools to monitor the Kubernetes cluster, we can use a simple web user interface that graphically shows the cluster state. It is not enabled by default; it’s basically a web portal deployed as a pod, so we have to create it from a YAML configuration file.
Code Listing 75: Command to create all the Kubernetes components to run the Dashboard
kubectl create -f https://raw.githubusercontent.com/kubernetes/dashboard/master/aio/deploy/recommended/kubernetes-dashboard.yaml |
To access the application locally, we need to enable the Kubernetes proxy with the following command that starts a proxy server.
Code Listing 76: Command to start Kubernetes proxy server
kubectl proxy |
Now you can open the Kubernetes Dashboard from here.
The first time you open the Dashboard, you need to authenticate with a token. Your token is kept in a special content, named secret, designed to be safe, so we need to locate it using the following command.
Code Listing 77: Command to show all Kubernetes secrets
kubectl -n kube-system get secret |
This command shows all the secrets of the cluster. We need to retrieve the name of the secret that has a name starting with deployment-controller-token.
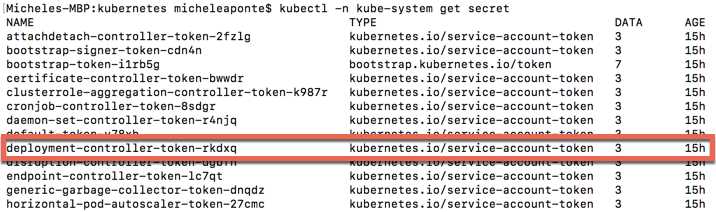
Figure 34: Kubernetes secrets list output
The name for ours is deployment-controller-token-rkdxq, so we can request the token using the following command.
Code Listing 79: Command to show the specified secret details
kubectl -n kube-system describe secret deployment-controller-token-rkdxq |
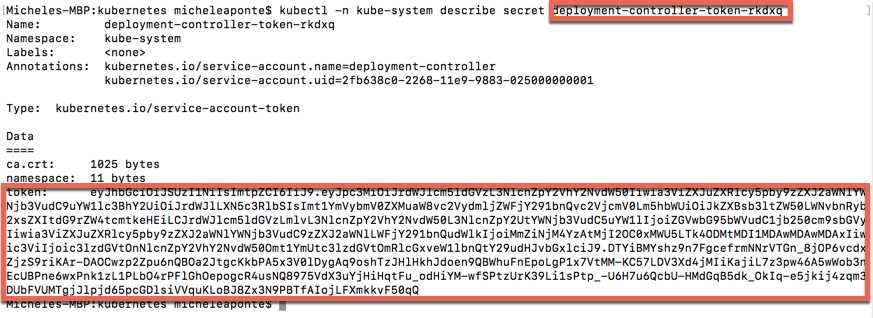
Figure 35: Kubernetes secrets detail output
Copy the token and paste it in the login window. Finally, we can see the Kubernetes Dashboard.
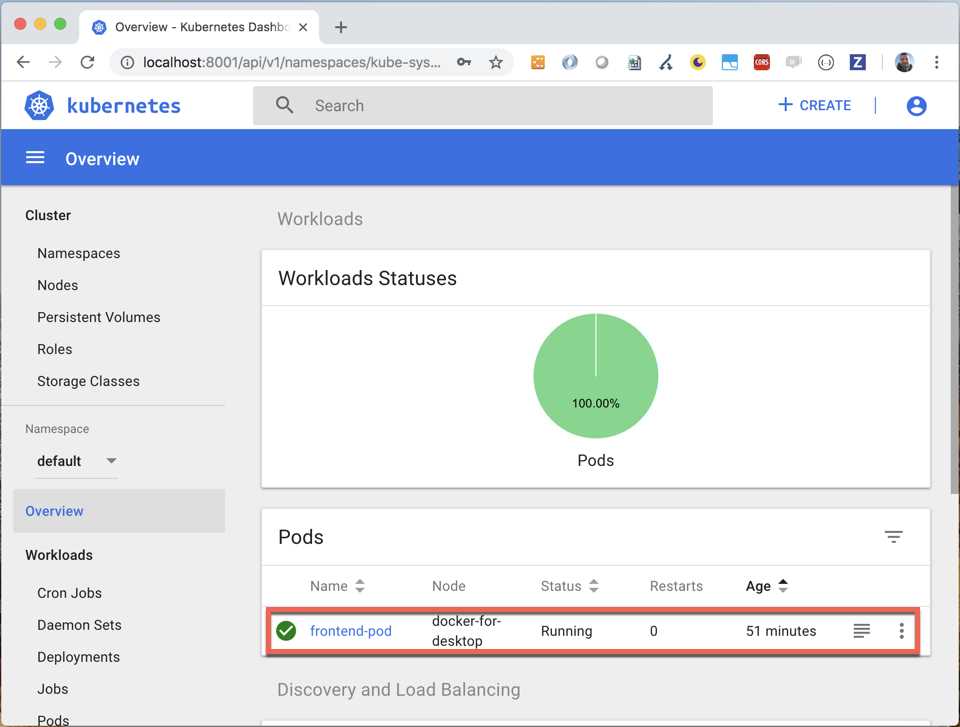
Figure 36: Kubernetes Dashboard
As you can see, there is only one instance of the pod, but Kubernetes is designed to scale, so we can use another item kind to declare that we want, for example, always five instances of the pod. To achieve this behavior, we need to use a ReplicationController, which is a master controller that replicates the specified pods, balances them on all the nodes, and reacts if some pod dies to restore the desired state.
Let's create a file named rc.yml and write the following script.
Code Listing 78: Kubernetes ReplicationController configuration script
apiVersion: v1 kind: ReplicationController metadata: name: myapp-rc spec: replicas: 5 selector: app: myapp template: metadata: labels: app: myapp zone: prod version: v1 spec: containers: - name: myapp-frontend image: apomic80/myapp:frontend-v1 ports: - containerPort: 80 |
As you can see, the script version is the same as the previous one, but the kind value is now ReplicationController. In the metadata block, we specify the name of the replication controllers that will be created, and in the specification block, we indicate the number of replicas for the pod. We also need to specify a selector label to indicate which pod will be replicated, and a template with the information about the pod. The pod definition is the same as the previous script, so if you don’t remove the previous pod, the replication controller will create only four pods.
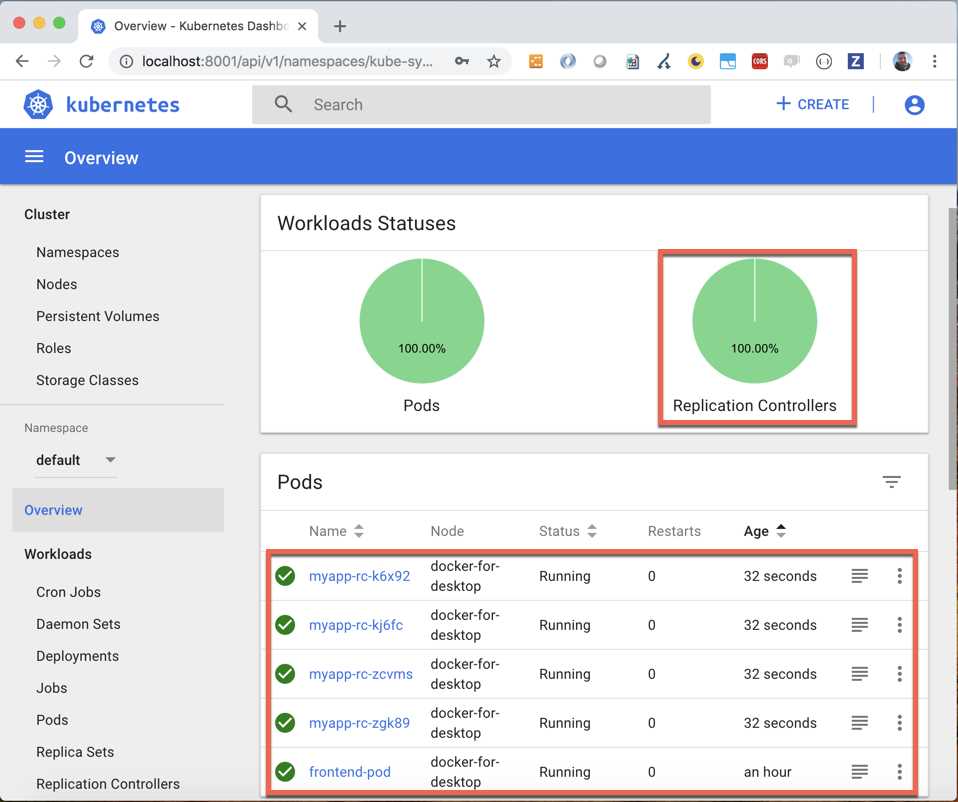
Figure 37: Kubernetes replication controller in Dashboard
Try to delete the frontend pod (kubectl delete pod frontend-pod) and observe how the replication controller will add a new pod to maintain the desired state of five replicas.
Expose your application with Kubernetes
Now that we’ve deployed our application, we want to access it. If you execute the kubectl describe command for the created pods (kubectl describe <pod-name>, see Figure 33), you can see that each of them is running on a specific IP, internal to the node. You can also see the Node IP (192.168.65.3), but you can’t use it directly because the forwarding rule to send the requests from the node IP to the pod IP is missing. We need to expose the pod, and Kubernetes provides the services to do that.
A service has the task of exposing pods to a client or other pods, with an IP (or a DNS) and a port. We can expose a specified pod or a group of pods (our replicas). If we can expose the pods that compose the created replication controller (myapp-rc) to the client, we can run the kubectl expose command from the terminal as follows.
Code Listing 79: Command to expose the replication controller
kubectl expose rc myapp-rc --name=myapp-rc-service --type=NodePort |
The --name option sets a name for the service. The --type option sets the service type, and can be one of the following four values:
- ClusterIP: The default value that exposes the pods internal to the cluster.
- NodePort: Exposes the pods as a static port on each node that contains the pods.
- LoadBalancer: Exposes the pods externally using a load balancer of a cloud provider.
- ExternalName: Available from version 1.7 of kube-dns to expose the pods through the contents of the externalName field.
We used the NodePort type to make the service available on a port, which we can retrieve with the described command (kubectl describe service myapp-rc-service).
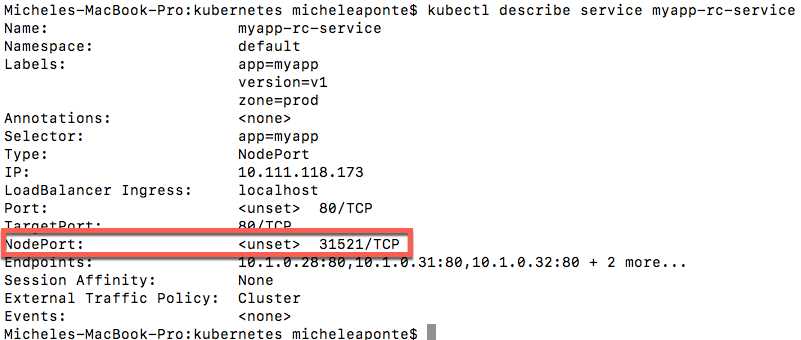
Figure 38: Output of the created service description
Now we can reach our application at the address http://localhost:31521 because we have a local cluster.
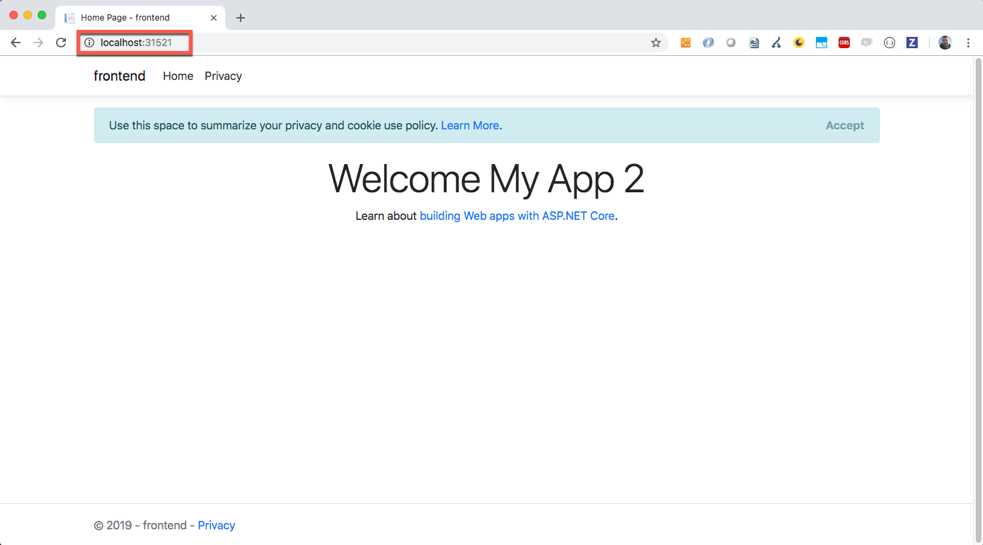
Figure 39: The application exposed from the Kubernetes cluster
The NodePort type automatically creates a ClusterIP service used by the NodePort service to route the requests to the pods.
We can create a service in a declarative way using a YAML file. We create a file named service.yml with the following script.
Code Listing 80: Service YAML description
apiVersion: v1 kind: Service metadata: name: myapp-svc spec: selector: app: myapp type: NodePort ports: - port: 80 nodePort: 30001 |
The property kind now is Service, and we set its name in the metadata block as usual. The spec block sets three things: the selector, to indicate which pods will be exposed; the service type, NodePort in this case; and the ports mapping, in this case, the HTTP port 80 and NodePort 30001 of the cluster. Now you can delete the previous service (kubectl delete service myapp-rc-service) and create the service using the following command from the terminal.
Code Listing 81: Command to create service from a YAML script
kubectl create -f service.yml |
Now the application is available at the address http://localhost:30001.
Let's focus for a moment on the selector. What is the app: myapp value? The answer is interesting: it is one of the labels of the pods. Labels in Kubernetes are not only a way to add some information to elements, but are also used to connect them. In this case, we are connecting the service with the pods, and we tell the system to select all pods that have the label myapp for the service. As you can see in Code Listing 81, the pods have three labels: app, with the value myapp; zone, with the value prod; and version, with the value v1. To select the pods, you can also use all the labels in the selector, opening a cool scenario.
Imagine deploying others pods, individually or with a replication controller, using the same labels, except for the version, for which you use the value v2. This is a typical scenario of new version deployment. If we have a new image with the version v2 of our application, the replication controller will be as follows.
Code Listing 82: The v2 replication controller YAML script
apiVersion: v1 kind: ReplicationController metadata: name: myapp-rc2 spec: replicas: 5 selector: app: myapp zone: prod version: v2 template: metadata: labels: app: myapp zone: prod version: v2 spec: containers: - name: myapp-frontend image: apomic80/myapp:frontend-v2 ports: - containerPort: 80 |
In this case, you can change the value of the label version in the service to make the new pods available to the client with the second version of the application!
With the same mechanism, you can roll back to the v1 version or use the zone label to pass from a test stage to the production stage. The useful aspect is that the labels are entirely customizable and you can create an unlimited number of them, so you can invent any mechanism you need.
Deploy your application with the deployments
In the real world, the deployment and maintenance of an application can be more complicated than the scenario we have seen with the service and the replication controllers. The labels are a powerful tool for managing Kubernetes elements, but we need a more powerful mechanism that permits us to manage updates and rollbacks in more detail.
For example, say we need to update our application with a rolling update strategy that releases new pods more gradually, one pod at a time. We need to roll back the application to a specific version of the deploy history. We can obtain these behaviors and others in Kubernetes using the deployment.
Do you remember the deployment of our first pod? You can see it in Code Listing 73. We added the --restart option with the Never value to create a simple pod, because without the --restart option, the system would have created a deployment. Try to execute the following command.
Code Listing 83: Command to create a simple deployment
kubectl run frontend --image=apomic80/myapp:frontend-v1 --port 80 |
In Figure 40 you can see the output of the command, which shows the creation of a deployment named frontend and the creation of a pod with a name assigned from the system.
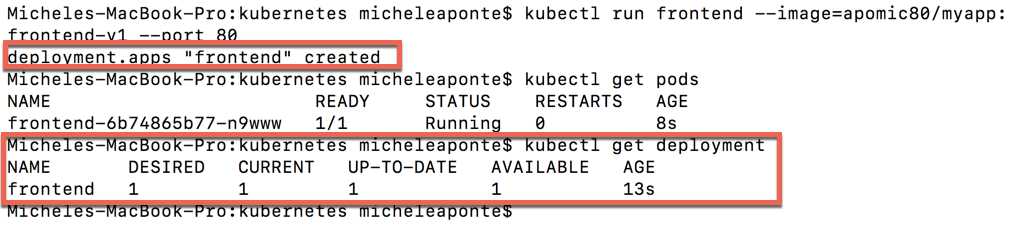
Figure 40: Simple deployment creation output
You can see the deployment created with the kubectl get deployment frontend command. The output, again in Figure 40, shows the primary information about the deployment: the name, the desired replica of the pod, the current pods, the up-to-date pods, and the available pods.
These values suggest the power of a deployment: it manages the desired state of the application for us and reacts if something happens to alter this state.
A deployment has a large number of parameters, so the best way to create it is a YAML file with the description of our desired state. Let's create a file named deployment.yml with the following script:
Code Listing 84: Deployment YAML script
apiVersion: apps/v1 kind: Deployment metadata: name: myapp-deployment spec: replicas: 3 selector: matchLabels: app: myapp template: metadata: labels: app: myapp zone: prod version: v1 spec: containers: - name: myapp-frontend image: apomic80/myapp:frontend-v1 ports: - containerPort: 80 |
In this simple deployment, the structure is similar to the replication controller, but the selector is more explicit about the label mechanism to match the pods. After the deletion of the previous deploy with the kubectl delete deployment frontend command (just to prevent confusion), you can execute the script with the following command:
Code Listing 85: Command to create a deployment from the script
kubectl create -f deployment.yml |
The system will create the deployment named myapp-deployment, which you can analyze using the kubectl describe deployment myapp-deployment command.
In Figure 41, you can see all the information about the deployment; the most interesting points are highlighted in red blocks. The first block shows the replicas and the update strategy, which by default uses the value RollingUpdate. You can also view the update strategy parameters that are specific for each strategy type. The second block introduces another Kubernetes element: ReplicaSet.
A ReplicaSet is a tool to manage the pod replicas and update strategies, and it is more flexible than the replication controller. It provides set-based labels selection support instead of the equality-based labels support of the ReplicationController. With equality-based labels support, you can match labels only with an "is equal" or "is not equal" assertion. With a set-based labels selection, you can express more powerful assertions, like in, not in, or exists.
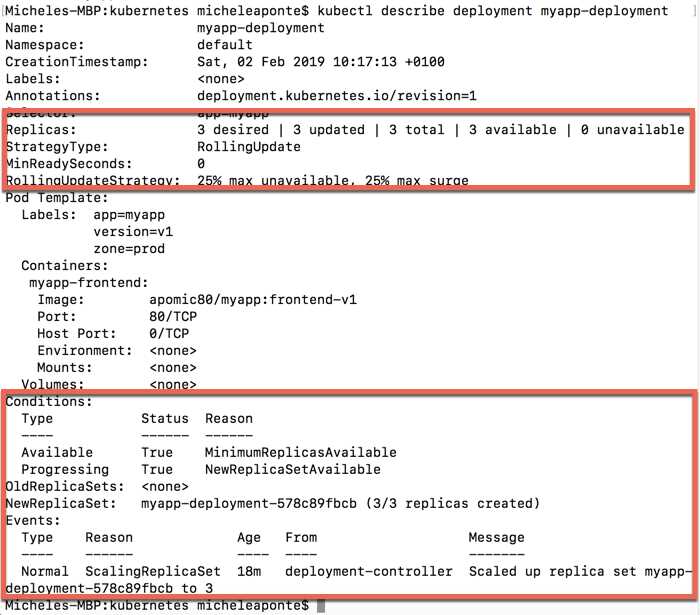
Figure 41: Output of the deployment describe command
For example, with a replication controller, you can match a group of pods that has a label zone with the value prod or test, but not both of them. With a ReplicaSet, you can match all the pods with the prod label in prod and test, using the matchExpressions property of the selector.
Code Listing 86: ReplicaSet selector with matchExpressions value
selector: matchLabels: app: myapp matchExpressions: - {key: zone, operator: In, values: [prod, test]} |
A deployment automatically creates a ReplicaSet to manage the replicas and the update strategies configured.
Let's focus on the update strategies. Kubernetes offers two possible values that we can use to set the desired behavior to update our application:
- Recreate: Removes the previous version and loads the new.
- RollingUpdate: The default value; moves to a new version gradually based on configured parameters.
The value Recreate is useful in the development stage because it destroys the old version of the pods and creates the new one, interrupting the service. In a production scenario, interrupting the service is not acceptable, so the RollingUpdate value, with its parameters, can help us to update the application by degree.
With the RollingUpdate value, you can use the following parameters:
- maxUnavailable: The number of pods that can be unavailable during the update.
- maxSurge: The number of pods that can exceed the replicas requested.
- minReadySeconds: The number of seconds to wait before the next pod’s creation.
The parameters maxSurge and maxUnavailable can be a number or a percentage; the minReadySecond can be only a number. When the update starts, Kubernetes creates a second ReplicaSet, where it deploys the new pods and removes the old one from the original ReplicaSet, following the parameter values. See, for example, the following script.
Code Listing 89: RollingUpdate parameters
spec: replicas: 10 selector: matchLabels: app: myapp strategy: type: RollingUpdate minReadySeconds: 5 rollingUpdate: maxSurge: 1 maxUnavailable: 1 |
In this sample, Kubernetes will create a new ReplicaSet and deploy one pod at a time, waiting five seconds for each pod. During the update, only one pod can be unavailable, and the maximum number of pods is 11: ten for the replica value, and one for the maxSurge value. You can not specify the minReadySecond parameter, but if your container in the pod is not fast, you can make your application unavailable for a while.
If we modify Code Listing 87 (our deployment.yml file) with these values, we can apply the change using the following command.
Code Listing 87: Deployment apply command
kubectl apply -f deployment.yml --record |
The --record parameter permits us to track all the changes to the deployment, which we will use to analyze the history and rollback to a previous version of the application. The operation requires some time to complete, but you can see the progress with the following command.
Code Listing 88: Deployment rollout status command
kubectl rollout status deployment myapp-deployment |
You can see the result of this command in Figure 42.
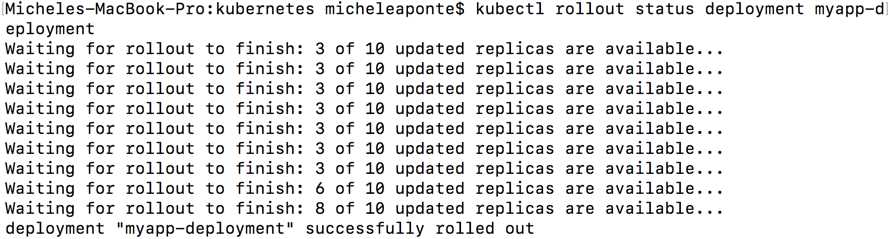
Figure 42: Deployment rollout status output
If you used the --record parameter in the apply command, you can see the history of your deployment with the following command.
Code Listing 89: Deployment rollout history command
kubectl rollout history deployment myapp-deployment |
Try to change one of the labels and re-execute the command in Code Listing 91; this way, we will have two rows in the history. The output of the history command shows the revisions and the cause of the change.

Figure 43: Deployment history output
If we want to return to a specific revision, for example, revision 1, we can use the following command.
Code Listing 90: Deployment undo command
kubectl rollout undo deployment myapp-deployment --to-revision=1 |
- 80+ high-performance ASP.NET Core controls, including DataGrid, Charts, and Scheduler.
- Lightweight and responsive.
- Modular and touch-friendly.
- Built-in themes.