
Using .NET Core, Docker, and Kubernetes Succinctly®

CHAPTER 4
Deploy the Database
Create a deployment for SQL Server
Now that we have learned how to deploy a container in Kubernetes, we are ready to move the database used for our front end. To do this, you have to create a specific deployment script in a separate file or in the same file of the front-end deployment. You can choose the best solution for you based on your requirements. In the case of SQL Server, a specific script is probably the best way for most scenarios, because you deploy a standard image provided by Microsoft instead of your custom image.
We have to separate the deployment of our database in the development or testing stages and the deployment in the production stage because the update strategy could be different. For example, in the development stage, we use sample data that can be lost without problems. I can recreate both the pods and the data for each update. But in the production environment, I could recreate the pods, but I cannot lose data. We can use volumes to solve the same problems we deal with when using Docker and containers. In the next paragraph, we will see that Kubernetes provides a similar tool, but now we focus on a preliminary version of the script to deploy the database and see how we can enable connections from the front end using Kubernetes Services.
Let’s create a db-deployment.yml file and insert the following script.
Code Listing 91: Database deployment script
apiVersion: apps/v1 kind: Deployment metadata: name: myapp-db-deployment spec: replicas: 1 selector: matchLabels: app: myapp-db minReadySeconds: 5 strategy: type: Recreate template: metadata: labels: app: myapp-db spec: containers: - name: myapp-database image: mcr.microsoft.com/mssql/server ports: - containerPort: 1433 env: - name: "ACCEPT_EULA" value: "Y" - name: "SA_PASSWORD" value: "Password_123" - name: "MSSQL_PID" value: "Express" |
It is very similar to the frontend script, but we use the env block to specify the environment variables that configure the SQL Server instance. This time the password is visible, but in the next paragraph, we will see a more secure mode of managing this value.
Now we need a service to expose the database, but for security reasons, we can expose it only inside the cluster. We don’t use a NodePort Service, but a ClusterIP Service, and we set the correct labels to select the database pod.
Code Listing 92: Service script to expose the database
apiVersion: v1 kind: Service metadata: name: myapp-db-service spec: selector: app: myapp-db ports: - protocol: TCP port: 1433 targetPort: 1433 type: ClusterIP |
You can put the YAML script in the same file of the deployment because they are related, but you can also put it in another file if you want.
Now we are ready to create the new deployment using the kubectl create command.
Code Listing 93: Command to create the database deployment
kubectl create -f db-deployment.yml |
We need to change the frontend deployment to configure the connection string in the environment variable created for the image.
Code Listing 94: Frontend deployment script update to add environment variables
spec: containers: - name: myapp-frontend image: apomic80/myapp:frontend-v1 ports: - containerPort: 80 env: - name: ASPNETCORE_ENVIRONMENT value: DEVELOPMENT - name: SQLSERVER_CONNECTIONSTRING value: "Server=localhost:30002;Database=myapp;User=sa;Password=Password_123;MultipleActiveResultSets=true;" |
We can now apply the changes using the kubectl apply command.
Code Listing 95: Frontend deployment configured with environment variables
kubectl apply -f deployment.yml |
If we navigate to the Customers page of our front end, we can see the result shown in Figure 44.
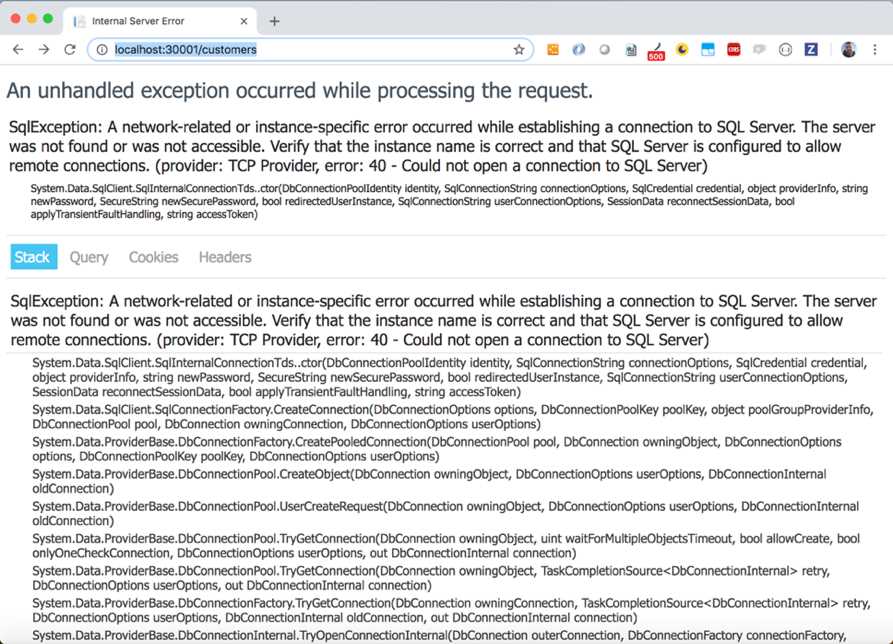
Figure 44: Customers page database error
We received an error because our database does not exist and we decided not to provide the database creation with the frontend image. In this scenario, the reasoning of this choice is clear: we have more than one replica and the script would have been executed by each of them.
This is a good opportunity to see another command of the kubectl tool that permits us to execute commands in a container guest of a pod. The command is kubectl exec and we can use it to connect us to the database container in the deployed pod (retrieve the pod name with the kubectl get pod command), as follows.
Code Listing 99: Command to connect to the bash of the container in the database pod
kubectl exec -it myapp-db-deployment-789b766d79-kxvcq -- /bin/bash |
If you have more than one container in the target pod, you also need to specify the target container with the option --container. From the internal bash of the container, we can use the sqlcmd tool to create the database as follows.
Code Listing 96: Database creation command
/opt/mssql-tools/bin/sqlcmd -S localhost -U SA -P 'Password_123' -Q 'CREATE DATABASE [myapp]' |
From another terminal window, we can copy the SQL script file created in Code Listing 65 to the container with the kubectl cp command, which is the equivalent of the docker cp command, as follows.
Code Listing 97: Command to copy the SQL script file to the container in the database pod
kubectl cp script.sql myapp-db-deployment-789b766d79-kxvcq:script.sql |
Now we can update the database and launch the SQL script copied in the container, with the following command.
Code Listing 98: Command to execute a SQL script in the database container
/opt/mssql-tools/bin/sqlcmd -S localhost -U SA -P 'Password_123' -d myapp -i script.sql |
Returning to the browser and refreshing the page, we can see the correct result (Figure 45).
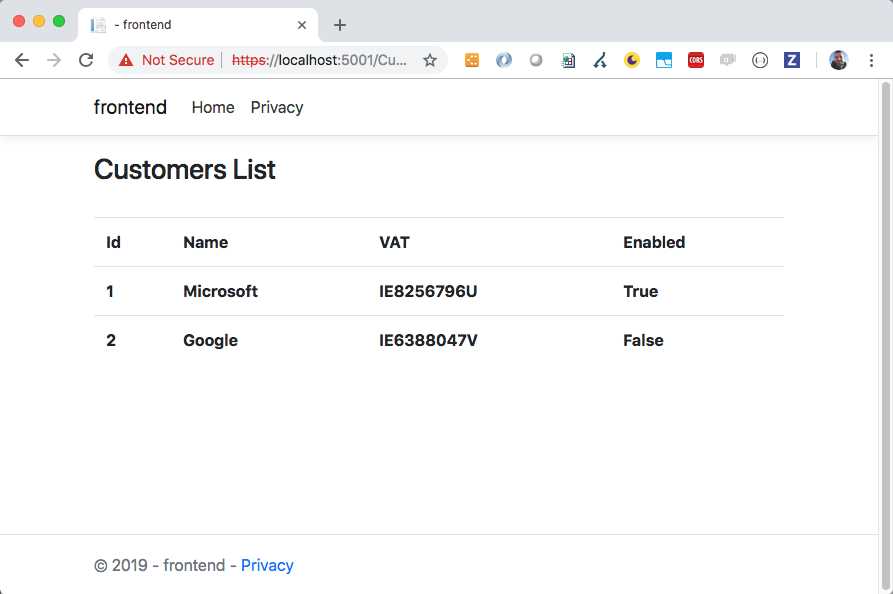
Figure 45: The customer page shown correctly from Kubernetes
If we try to delete and recreate the database, manually or with the kubectl apply command, we will lose our data. The images update (Microsoft releases an update of its images periodically to solve security problems and provide a new version of the products) is only one of the reasons to recreate the database, so we need to save the data in another place—and back it up! We also need to store the sensitive data in a secure way, like a connection string that contains a password, to ensure that only authorized users have access to it. Let’s see how we can do that.
Kubernetes volumes and secrets
We have already seen how Docker can help us share data with containers using volumes. Kubernetes provides a similar mechanism with the same name, but we are talking about something that also needs to be managed in the production environment, so it is essential to provide more advanced storage solutions.
As you can imagine, the volumes are strictly related to the environment’s configuration, so we can choose the available volumes’ type depending on the infrastructure environment. The main cloud providers, for example, supply different types of volume for Kubernetes, like awsElasticBlockStore in AWS or AzureDisk and AzureFile in Azure.
Some kinds of volumes can be provisioned dynamically, while others cannot. This means that if dynamic provisioning is not supported in your case and you cannot create storage volumes on demand, then a cluster administrator has to create a volume for you. To abstract the concept of storage from its usage, Kubernetes provides the concept of persistent volumes. The name immediately communicates the idea of something that withstands the test of time. We can create two types of resources in Kubernetes to implement this concept:
- PersistentVolume: A resource created by a cluster administrator with specific characteristics and a lifecycle independent from your applications.
- PersistentVolumeClaim: A storage request by the user based on their needs, like specific access modes or sizes.
In this way, the user doesn’t need to know the available persistent volumes in the cluster, but can simply say what is needed, and the cluster will provide the correct storage option.
Let’s create our first PersistentVolume. We create a file named volume.yml and insert the following script.
Code Listing 99: HostPath PersistentVolume creation script
apiVersion: v1 kind: PersistentVolume metadata: name: local-volume labels: type: local spec: storageClassName: hostpath capacity: storage: 10Gi accessModes: - ReadWriteOnce hostPath: path: /mnt/data |
With this script, we will create a PersistentVolume named local-volume with a label named type and the value local. Kubernetes will create a volume in the /mnt/data path of the cluster node, in read and write mode by a single Node, and with a size of 10 gigabytes.
The storage class is used to indicate the service level or other characteristics like the backup policies, and its purpose is to enable a user to claim the storage based on need. The hostpath value is a way to indicate that we want to use storage based on a cluster node path. This is a typical testing and development configuration; you don’t use it in a production environment.
We can create the volume with the usual kubectl create command (for us, kubectl create -f volume.yml) and list the available volumes with the following commands.
Code Listing 100: Commands to list the persistent volumes
kubectl get persistentvolumes kubectl get persistentvolume kubectl get pv |
You can see the results of the command in Figure 46.
![]()
Figure 46: Persistent volumes list
As you can see, the volume has the status Available and no claims, so we can claim it with a new script placed in a file named volume-claim.yml.
Code Listing 101: PersistentVolumeClaim script
apiVersion: v1 kind: PersistentVolumeClaim metadata: name: local-volume-claim spec: storageClassName: hostpath accessModes: - ReadWriteOnce resources: requests: storage: 3Gi |
With the creation of the resource (using the kubectl create -f volume-claim.yml command), we request three gigabytes of storage in read and write mode with the class hostpath. You can see the persistent volume claims with the following command.
Code Listing 102: Commands to list persistent volume claims
kubectl get persistentvolumeclaims kubectl get persistentvolumeclaim kubectl get pvc |
By executing the kubectl get pv command again, we can also see the claim of the volume and its state changed to Bound.

Figure 47: Persistent volume claim request info result
When the status of the claim is Bound, you can use it in your pods. In particular, we want to use this storage to save the SQL Server database, located in the /var/opt/mssql container path. To do this, return to the db-deployment.yml file and change the spec section of the script as follows.
Code Listing 103: Volume mounts in SqlServer deployment
spec: containers: - name: myapp-database image: mcr.microsoft.com/mssql/server ports: - containerPort: 1433 env: - name: "ACCEPT_EULA" value: "Y" - name: "SA_PASSWORD" value: "Password_1234" - name: "MSSQL_PID" value: "Express" volumeMounts: - name: mssqldb mountPath: /var/opt/mssql volumes: - name: mssqldb persistentVolumeClaim: claimName: local-volume-claim |
As you can see, the container configuration is changed. In the new section, volumeMounts, we indicate that the path /var/opt/mssql will be mounted on a volume named mssqldb. The second change is about the section volumes, where we use a persistent volume claim to map a persistent volume with the container. In this case, we use the local-volume-claim, previously created, in a logical volume named mssqldb. Thanks to the equality of the volume mount and the volume name, we obtain the expected result: the container database will be created in the volume instead of in the container.
With the same mechanism, we can also map the database backup folder, or a folder for the images uploaded by users using the front end, solving the problem of storing data without the fear of losing data. In the next chapter, with the administration of a Kubernetes cluster on Azure, we will see some advanced features of volumes that we cannot analyze now because of the limitations of the local environment.
Another problem that we can solve now is the storage of sensitive data in a Kubernetes cluster, like the password to access our database. To do this, Kubernetes provides a tool known as a secret, which we already glimpsed when we talked about the token to access the Kubernetes Dashboard.
A secret is a container for a small amount of sensitive data, which our pods can access in a secure way with a file placed at runtime in a volume or using an environment variable. Kubernetes shares this information with the pod, but it doesn’t worry about the content of the data, so it doesn’t provide strong encryption. Secrets are key/value pairs where both key and value are strings, so we can encrypt the value in any way we want. Typically, a secret uses a Base64 encoding, because the result string does not contain reserved characters and we can store small files and images in a string in this way.
To create a secret for our database password, we can use the following command.
Code Listing 104: Command to create a secret from a literal
kubectl create secret generic mssql --from-literal=SA_PASSWORD="Password_123" |
Now we only need to change the SA_PASSWORD environment variable as follows.
Code Listing 105: Passing secret in an environment variable
env: - name: "ACCEPT_EULA" value: "Y" - name: "SA_PASSWORD" valueFrom: secretKeyRef: name: mssql key: SA_PASSWORD |
We can use the same command for the connection string in the frontend or change the code to use the same Secret when composing the connection string.
If you can store the password using the Base64 encoding, you can retrieve the corresponding value of the Password_123 string with the following command.
Code Listing 106: Command to encode a string in Base64
echo -n Password_123 | base64 |
The result is UGFzc3dvcmRfMTIz, which you can use in the command of Code Listing 109. You can also create a secret with a YAML file.
Code Listing 107: YAML script to create a secret
apiVersion: v1 kind: Secret metadata: name: mssql type: Opaque data: SA_PASSWORD: UGFzc3dvcmRfMTIz |
To get the created secrets, you can use the command kubectl get secrets, which shows the following output.

Figure 48: Secrets list from terminal
As you can see in Figure 48, the value of the secrets is not shown for security reasons. To show the value of the mssql secret, you can use the following command.
Code Listing 108: Command to show a secret value
kubectl get secret mssql -o yaml |
You can see the result of the command in the Figure 49.
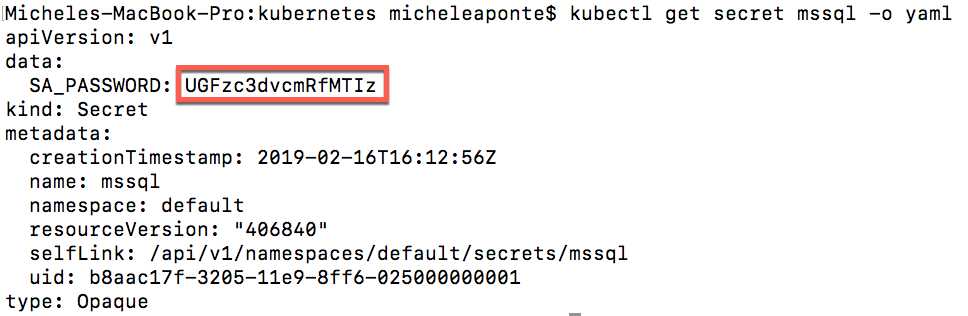
Figure 49: Output of the command to show secret value
To decode the value, you can use the following command.
Code Listing 109: Command to decode a Base64 string
echo UGFzc3dvcmRfMTIz | base64 --decode |
If you want to access a secret from a volume mounted with the pod, you need to specify a volume from a secret, as follows.
Code Listing 110: Script to mount volume from secret
volumeMounts: - name: mssqldb mountPath: /var/opt/mssql - name: secret-volume mountPath: /etc/secretVolume volumes: - name: mssqldb persistentVolumeClaim: claimName: local-volume-claim - name: secret-volume secret: secretName: mssql |
In Code Listing 115, we mounted the secret mssql in the container path /etc/secretVolume, so if you go into the container, you can see the folder secretVolume in the etc system folder, where the system created the SA_PASSWORD file that contains the password Password_123 (Figure 50).

Figure 50: The secret mounted as volume in the container
This mechanism is particularly interesting when you place files in secrets using the option --from-file with the create secret command, as follows.
Code Listing 111: Command to create a secret from a file
kubectl create secret generic mssql --from-file=./<filename> |
Namespaces and resource quotas
When you install a new Kubernetes cluster, the system creates a default namespace to include all items under a logical name. If you try to create two items with the same name, the system responds with an error. You won't have this problem if you work on small projects or with a small team, but you can create custom namespaces to separate your projects and limit the resources available for each of them.
You can obtain the available namespaces in your cluster with the following command.
Code Listing 112: Command to obtain the available namespaces
kubectl get namespaces |
You can see the result of this command in Figure 51.
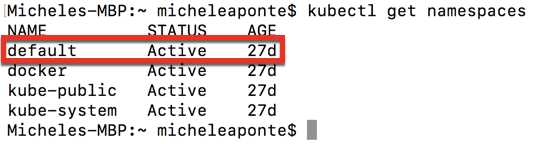
Figure 51: Available namespaces in Kubernetes
As you can see, there are also some system namespaces, used by Kubernetes to manage system objects. If you want to create a new namespace for the myapp application, you can use the following command.
Code Listing 113: Command to create a new namespace
kubectl create namespace myapp |
From this moment, if you want to create Kubernetes objects like pods or deployments, you need to add the --namespace=myapp in all kubectl create commands. If you are lazy like me, you can change the current context for your commands with the following command.
Code Listing 114: Command to set current namespace
kubectl config set-context $(kubectl config current-context) –namespace=myapp |
This command sets your current context namespace property to the value myapp; the $(kubectl config current-context) instruction gets the cluster name (docker-for-desktop in our case). You can see the result of your configuration with the command kubectl config view, which shows you the current configuration.
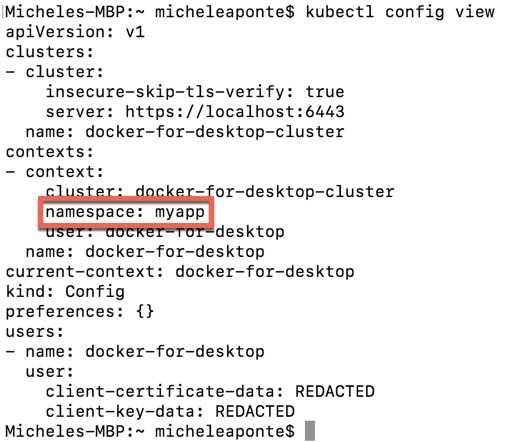
Figure 52: Current configuration context
A namespace is like a virtual cluster over a physical Kubernetes one, but the best practice is to use multiple namespaces only if you need them. This practice is important because multiple namespaces can complicate the management of your environment. A good reason to use multiple namespaces is to limit resource quota for the cluster objects like CPU memory. You can easily create a ResourceQuota with a simple file named resourcequota.yml and insert this script.
Code Listing 115: Sample resource quota script
apiVersion: v1 kind: ResourceQuota metadata: name: myapp-quota spec: hard: limits.cpu: 1 limits.memory: 2Gi |
You can create the resource quota with the following command.
Code Listing 116: Command to create a resource quota
kubectl create -f resourcequota.yml |
As you can see, the option --namespace is not specified, so this command is applied to the namespace of the current context (myapp in our case). From this moment on, all the pods in the namespace can use only one CPU and a maximum of two gigabytes of memory.
The namespaces also influence the internal networking of the cluster. Kubernetes provides an internal DNS that is automatically configured to help us translate internal IP addresses into logical names. When you create a service, the system allocates an IP address, but a DNS name is also created, composed of the service name with the namespace and the constant svc.cluster.local.
Code Listing 117: DNS name rule
<myservicename>.<mynamespace>.svc.cluster.local |
If you create a service in the namespace myapp and name it frontend, the DNS name will be frontend.myapp.svc.cluster.local. Very simple and effective.
Horizontal Pod Autoscaler
Another very cool feature of Kubernetes is the auto scale. You can scale the number of pod instances in your deployment based on system metrics like the CPU percentage usage. This is a typical horizontal scaling technique and it is very useful if the traffic to your application is not constant over time.
If you want to scale the pod instances of the deployment named myapp-deployment from 1 to 5 when the use of the CPU is over 50 percent, you can use the following command.
Code Listing 118: Command to enable auto scale of a deployment
kubectl autoscale deployment myapp-deployment --cpu-percent=50 --min=1 --max=5 |
This command configures the Horizontal Pod Autoscaler (HPA), which you can monitor with the following command.
Code Listing 119: Command to show Horizontal Pod Autoscaler settings
kubectl get hpa |
The HPA is a controller that checks the resources defined in a configuration (in our case, the CPU percentage) in a control loop. By default, the loop runs every 15 seconds, but you can control it with the --horizontal-pod-autoscaler-sync-period setting.
When the resource metrics match the HPA definition, the controller reacts to implement the desired state, creating or deleting pods. There are various metrics that you can use, and from the 1.6 version, Kubernetes permits the definition of multiple and custom metrics.
Unfortunately, the metrics are not present in the local cluster, as you can see from the kubectl describe hpa command.

Figure 53: Command to describe the HPA status
You can try this feature with minikube, adding a specific plugin to enable metrics, or by using a cluster in the cloud like Azure Kubernetes Services.
- 80+ high-performance ASP.NET Core controls, including DataGrid, Charts, and Scheduler.
- Lightweight and responsive.
- Modular and touch-friendly.
- Built-in themes.