
Using .NET Core, Docker, and Kubernetes Succinctly®

CHAPTER 1
ASP.NET and Docker Together
How it all began
With the .NET Core framework, Microsoft has enabled all .NET developers to cross-platform develop, to the amazement of some, and the joy of others. The first question is: why? Today it’s clear that the focus of the leading software company of the world has changed: the future of software is the cloud, and the priority is to provide a cloud platform to everyone.
Thanks to Azure, Microsoft is today one of the three leading cloud-services providers, with a complete platform that allows developers to do everything they need, using any language or technology stack. One of the most interesting collateral effects of this change, especially in web development, is the break with the Windows ecosystem, like Microsoft’s Internet Information Services (IIS), the application server that’s provided for free with all the versions of Windows Server.
We have gone from hosting our ASP.NET application on Windows with IIS to the infinite number of possibilities offered by the open-source market. Consequently, terms like container and Docker, unknown to Microsoft programmers until now, have recently become essential in technical discussions about the development, distribution, and management of our applications. Moreover, the idea that an integrated development environment (IDE) such as Visual Studio can hide the complexity of using these technologies is disappearing, which is powering the CLI (Command Line Interface) and requiring us to be familiar with the command line.
However, why should I change my working method? Why should I choose containers for my applications? What value do containers add to my work? Sorry for the spoiler, but to have a microservices architecture is not the answer: if you have a microservices architecture, you probably need container technology to make it sustainable. This doesn’t mean you can't take advantage of containers if you are not Netflix or Amazon.
Containers can solve some of programmers’ everyday problems, such as configuring the development environment or recreating a production problem. Often, containers can help you overcome the fear of not being production-ready, because they can make it simple to restore a specific version of your application in case of problems. The automation of the release of your updates to the various stages of your development pipeline is much easier with containers, and all the tasks that you can automate give you more time to spend on business problems instead of technical problems.
As with most useful things, containers also have negative sides. By their nature, they tend to grow in number with the applications, and the communication among them can become hard to manage. In the passage from development to production, it could be crucial to consider, for example, how many instances of a single container can be running based on the state of the system, or where I store my data.
Nevertheless, when summarizing these questions, we can reconduct all the main difficulties to a problem of management, where configuration simplicity is the key for the right choice. If I could set up in a simple way the condition I want the system to be in, and if I could easily configure where to store my passwords safely, or where to save my data, I would probably solve my main problems.
If my system is a collection of containers, the main challenge is managing their lifecycles and the communication among them. Technically, I need an orchestrator, and in my opinion, the best choice today is Kubernetes. Let's see why.
Execute .NET Core application with Docker
As I’ve already said, a container is a good solution for both the development and release of an application. Until now, you probably developed and tested your ASP.NET applications on your machine. When you finished, or it was time to release your work, perhaps you published your application from Visual Studio to an FTP storage, a local folder copied next to the server, or a remote publishing endpoint on-premise or in a cloud. How many times have you found that it doesn’t all work the first time? And that similar problems also occurred in later releases?
A possible solution is the development of an environment similar to the production, but this option requires the installation of all dependencies on your machine. Many times, it can be more productive to create a virtual machine because in many cases even the production environment is a collection of virtual machines. The main problem with a virtual machine is that it requires the installation of the operating system to work, consuming more CPU and memory than working on your host machine. Often, you would need more than one virtual machine, but other CPU and memory consumption would make your development and testing experience very stressful.
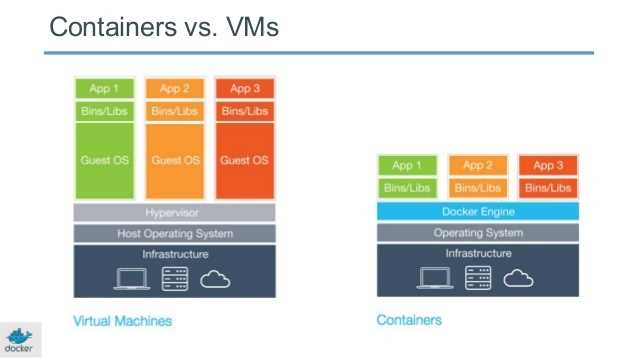
Figure 1: Virtual Machines vs. Containers, Source: Docker
A container is a solution to all these problems because, contrary to a virtual machine, you don't need to replicate the operating system—you can share the host operating system with your container, so you only have to add the files to run the applications.
It all starts with the creation of an image that contains your code and the libraries needed to run your application. Remember that an image is always read-only, and it can be executed to become a container. You can think of an image as a C# class that, when instantiated, becomes an object in memory with the properties defined in the class, but with its own values. In the same way, you can see a container like an instance of an image, where the properties are the files used to create the image itself.
To start working with containers, we need to choose a container technology, and Docker is surely the most famous and commonly used. The first step is to download the Docker tools for your operating system and install them. You can download the community edition for free here, and it is perfect for development purposes. The download requires free registration to Docker Hub, the largest registry of free images available in the open-source community. We will use it in our examples.
The setup program installs all you need to work with Docker: the Docker Engine, a client-server application that interacts with our installation. The Docker Engine is composed of a daemon process called Docker daemon, through which we can communicate by a REST API or a Command Line Interface (CLI). Docker Engine also contains other components that we will discover step by step when we need them.
To be sure that everything will work fine after the installation, we can run the following command in the terminal window.
Code Listing 1: Command to show executing Docker version
docker --version |
The terminal should respond with the installed version of Docker, like in the following image.
![]()
Figure 2: Output of the docker --version command
If you have an error instead, something went wrong. Thanks to this first command, we can analyze the communication process between our Docker CLI and the Docker daemon. But the first question is: where is the Docker daemon executed? Containers were born on Linux, so if we use a MacOS or Windows to run Docker commands, we need a virtual machine with a Linux-based operating system to execute the Docker daemon and the containers.
If you are using a Mac, the Docker tools set up for us an Alpine Linux distribution on top of an Xhyve virtual machine. Xhyve is a lightweight hypervisor built on top of OS X’s Hypervisor framework that runs virtual machines in user spaces. If you are using Windows instead, you have two options: use Linux Container from a Hyper-V virtual machine or, with Windows 10 or Windows Server 2016, use Windows containers.
It's true that containers were born on Linux, but as a consequence of the interest in this technology, Microsoft decided to create native Windows support for containers on its latest operating systems. This choice opens exciting scenarios, but it is essential to understand that containers share the operating system of the host. For this reason, we can only run Windows-compatible applications on Windows containers, and only Linux-compatible applications can run in a Linux container. Therefore, in Windows 10 or Windows Server 2016, you can choose (during or after installation) to use a Linux or a Windows container. In the first case, you will display in Hyper-V Manager a virtual machine named MobyLinuxVM, an Alpine Linux distribution configured with Hyper-V integration tools.
In the examples offered, you can use either Windows or Linux containers because .NET Core is cross-platform, and usually products like Redis, Mongo, and Elasticsearch are available for both operating systems. Even SQL Server 2017 is available for Linux and Windows, so feel free to use your favorite one.
It's time to run our first .NET Core container. First, you need to download an image from Docker Hub with a .NET Core example application. Microsoft released an image for this scope: microsoft/dotnet-samples. You can see all the images downloaded on your Docker machine with either of the following commands.
Code Listing 2: Commands to list docker images
docker image ls docker images |
For each image, you can display the repository name, a tag that usually specifies the repository version, the image ID, the creation date, and the size. To download the latest version of the microsoft/dotnet-samples image, you can execute the following command.
Code Listing 3: Command to pull .NET samples image
docker pull microsoft/dotnet-samples |
If you want a specific version of the image, for example, the version that contains only the ASP.NET Core sample, you can use the following command.
Code Listing 4: Command to pull ASP.NET Core sample image
docker pull microsoft/dotnet-samples:aspnetapp |
If you list the images, you can now see the downloaded images.
![]()
Figure 3: Downloaded images
To create and run a container from the downloaded image, we can execute the command docker run followed by the image identifier (you can also use the first digits of the ID).
Code Listing 5: Command to run the .NET Core sample container
docker run 9c22 |
If it all works fine, you see the message Hello from .NET Core! in the terminal. What has happened? A Docker container has been created from the image with the ID 9c22 and it has been run. A container can be in one of the following states:
- created: It’s been created, but not yet started.
- restarting: It’s in the process of being restarted.
- running: It is executing.
- paused: Its execution is suspended.
- exited: It’s been run and has completed its job.
- dead: The daemon tried and failed to stop.
To show all containers in a running state, you can execute the following command.
Code Listing 6: Command to list running containers
docker ps |
As you can see, the container was just created; it is not displayed. This happens because the container is not in a running state, as you can verify by executing the command to show the containers in all statuses.
Code Listing 7: Command to list all containers
docker ps -a |
The status of our container is exited. Why? If you display the code used to create the container, you can see that we are talking about a simple console application that terminates its execution at the end of the main method. So, at the end of process execution, the container was terminated. This behavior may seem weird if you usually use virtual machines, because a virtual machine remains in an execution state if your program has been executed. Obviously, the operating system running in the virtual machine doesn't stop its execution. But a container is not a virtual machine—it doesn't contain the operating system, just your code, and if your code has completed its job, the container terminates.
Try now to execute the image d203 (the ASP.NET application).
Code Listing 8: Command to run the ASP.NET Core sample container
docker run d203 |
This container starts an ASP.NET Core application, so the requested listener remains in waiting for the HTTP request.

Figure 4: Output of the ASP.NET Core sample container execution
If you now list all the running containers (docker ps) from another terminal window, you can see the container that’s just launched.
![]()
Figure 5: Output of the docker ps command after ASP.NET Core container runs
Press Ctrl+C on your keyboard: the process ends, and the container ends with it. Open the browser and navigate to http://localhost. You would expect to see the ASP.NET Core application response, but you will receive a connection refused error. This error occurs because the ASP.NET Core listener waits for requests on port 80 in the container, but, by default, your container doesn't redirect the external request to its local host. You have to specify this redirection when starting the container, using the -p options. For example, we can redirect a request from the external port 8080 to the internal port 80 with the execution of the following command.
Code Listing 9: Command to map port when running a Docker container
docker run -p 8080:80 d203 |
If you open the browser and navigate to http://localhost:8080, you can see the default template of an ASP.NET MVC Core application.
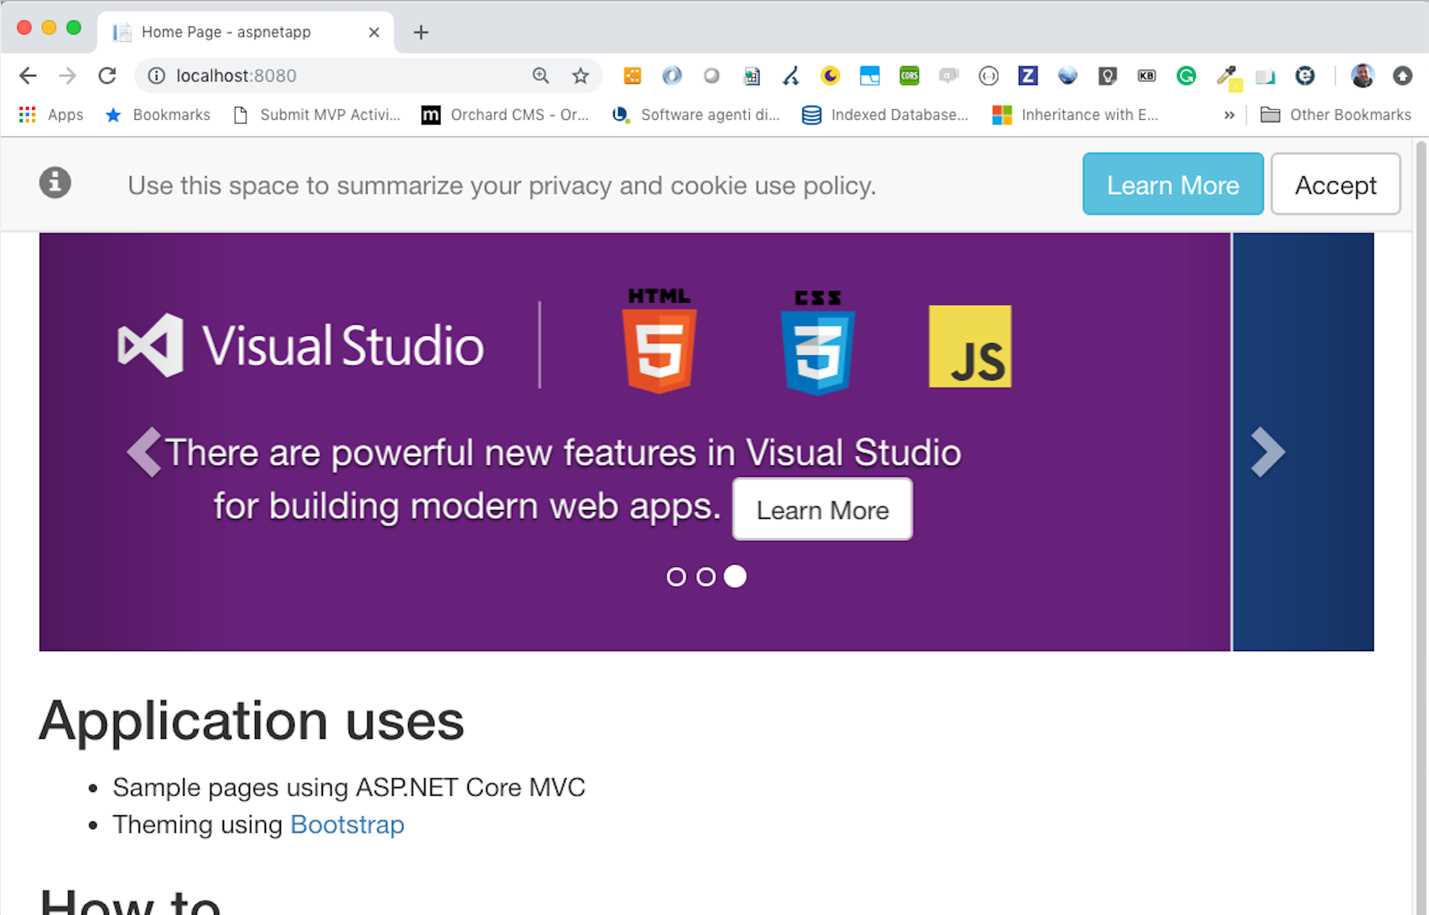
Figure 6: The sample ASP.NET Core application run from a Docker container
By default, the command docker run creates and executes a new container every time. So, if you have already created the container with a previous run, you can use the following command to start the container.
Code Listing 10: Command to start a Docker container
docker start <container-id> |
You can retrieve the container ID from the container list (docker ps -a). As an alternative, when you run a container, you can also specify a name that is assigned by default randomly (in the previous example, the name condescending_clackwell is assigned). To create a container with a name, you can use the options --name.
Code Listing 11: Command to name a container when it is running
docker run -p 8080:80 --name mvcapp d203 |
You can then stop and start the container using the mvcapp name instead of the container ID.
Code Listing 12: Commands to stop and start a container by its name
docker stop mvcapp docker start mvcapp |
The name must be unique; otherwise, the Docker daemon will respond with an error. If you want to create a container without running it, you can use the command docker create instead of docker run.
Code Listing 13: Command to create a container without running it
docker create -p 8080:80 --name mvcapp2 d203 |
To remove the container, you can use the docker rm command with the container name or ID.
Code Listing 14: Command to remove a container by its name
docker rm mvcapp2 |
Another very useful option for the run command, when working with a container that doesn't terminate, is -d.
Code Listing 15: Command to run a container in detached mode
docker run -d -p 8080:80 --name mvcapp2 d203 |
With this option, the container is created and is running in the background, printing in the terminal window the ID of the created container so that you can run other commands in the same window. The command docker start runs the container in background mode by default. If you want the interactive mode, you can use docker start -i mvcapp.
- 80+ high-performance ASP.NET Core controls, including DataGrid, Charts, and Scheduler.
- Lightweight and responsive.
- Modular and touch-friendly.
- Built-in themes.