
Uno Platform Succinctly®

CHAPTER 4
Reconstructing an App
Overview
It is now time to reconstruct an application. We will explore the thought process of repurposing an existing application as a potential document tracker single-page application.
This application could help us track the expiration dates of essential documents, such as credit cards, IDs, driver licenses, and passports.
Although it uses some unique features, such as a single XAML component rather than multiple controls and newer library dependencies, this application's code is inspired by the ideas and original code from this repository.
The XAML layout, code organization, solution structure, and views from this repository and this excellent article from the Uno blog were the inspiration for taking that example application and deconstructing, reconstructing, and repurposing it.
So, please check them out once you have read this book, as they are a great way to learn and complement what we will go through.
In general, I invite you to visit GitHub and look at different Uno Platform project repositories, check their code, see what you can learn from them and what you can improve.
Furthermore, the Uno code gallery has practical examples which are great to explore once you have some basic platform knowledge.
Why reconstructing?
I've written many books across different platforms and frameworks using a comprehensive set of technologies, some very different from one another.
However, all those books had one thing in common: a couple of underlying technologies, not more than two or there. Uno is different—it has many aspects, and it targets many other frameworks and platforms.
I've realized that sometimes the best way to learn a comprehensive, new technology—such as Uno—is not constantly building a new application from scratch throughout that writing process.
Uno includes many aspects to learn (such as XAML, MVVM, and targeting different platforms) that are impossible to cover in depth within one short book.
In my opinion, the best way to get acquainted with the basics of Uno is by deconstructing something that exists, rebuilding it, and making some modifications.
So, rather than having a puzzle with a million pieces to fit without the finished picture, we will do the opposite.
We'll take the finished puzzle, look at the entire picture, and then explore each of its constituent parts as if we are building it from scratch—but we’ll know where we are heading.
By taking something that exists, pulling it apart, and figuring out how to put it back together—and making some changes in the process—we will cover essential aspects in much more depth than an article.
So, the approach presented here is to stand on the shoulders of giants and explain how the puzzle comes together.
This way, we can cover enough aspects of the platform to understand how it works without being an expert on any underlying technologies. I hope you like the approach and find it fun—because I Ioved it.
Decluttering
When creating a single-page application using the existing AppUno solution, it's best to declutter it and leave only the projects we need.
Tip: If you would like to save time instead of manually decluttering the solution, download the complete decluttered solution template from this GitHub repository.
Using Solution Explorer within Visual Studio 2019, remove all the projects within the solution and leave only AppUno.Wasm and AppUno.Shared. The solution should look as follows.
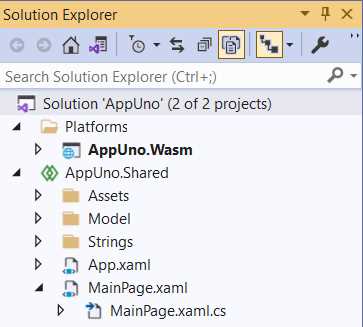
Figure 4-a: The Decluttered VS Solution
Navigate to the folder on your machine where the solution resides. Select and delete the project folders that are no longer needed.
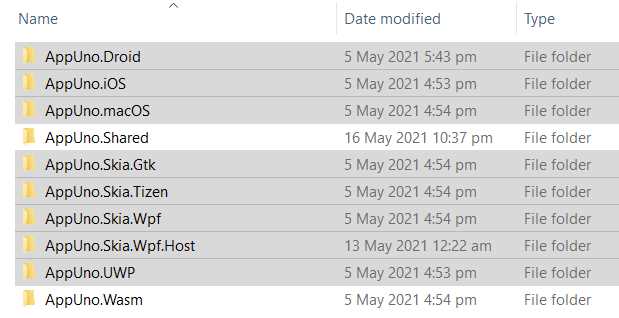
Figure 4-b: Project Folders to Remove
Now our solution is decluttered, and in principle, we are ready to reconstruct the single-page document tracker application.
You might have to restore the NuGet packages for each of the remaining projects, which can sometimes get tricky. Therefore, if you find yourself running into problems resolving dependencies that are no longer part of the solution, don't waste any precious time.
Make sure to fetch the decluttered AppUno solution GitHub repository I have already prepared—download and use it instead. If you do use it, click the Download ZIP option.
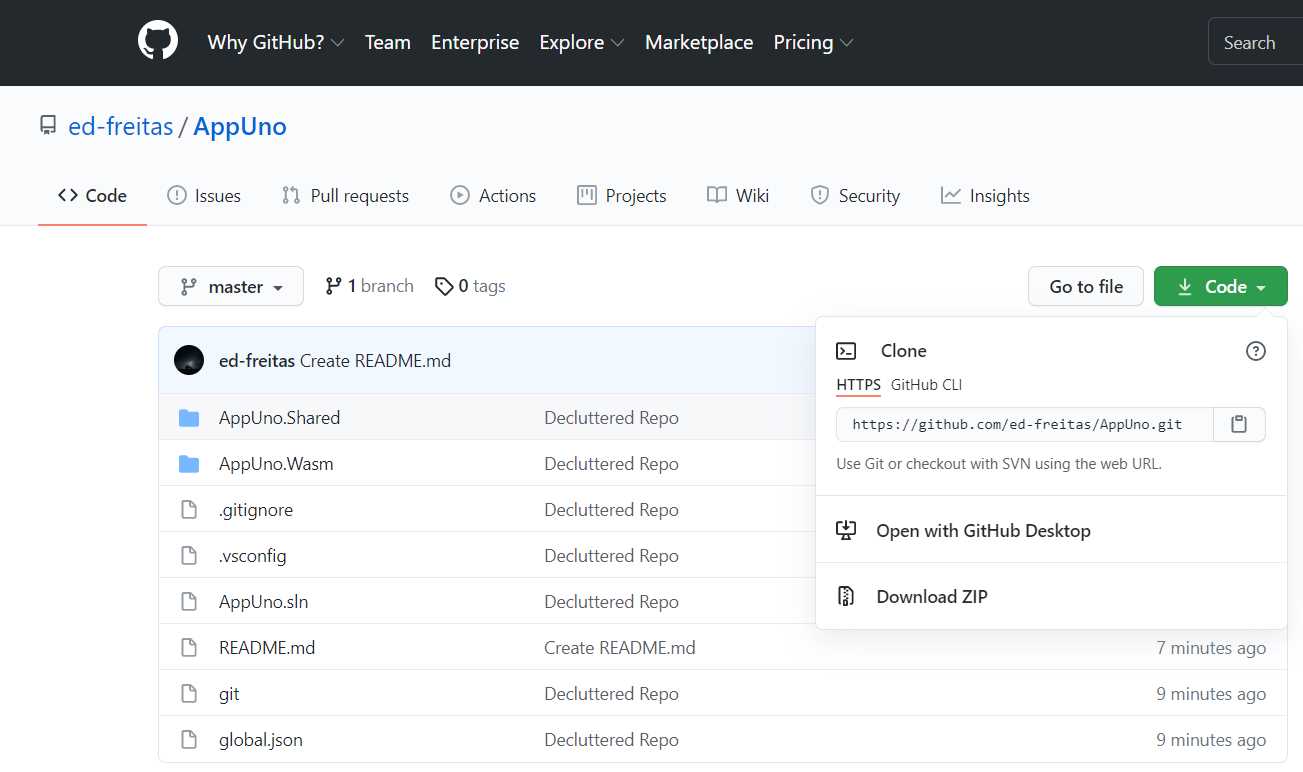
Figure 4-c: The Decluttered AppUno GitHub Repo
Data model
We will begin with the model and define the fields we want to track, such as id, title, and expiration date.
Within the Solution Explorer, select the AppUno.Shared project, right-click, click Add > New Folder, and name the folder Model.
Drag and drop the Model.cs file into the newly created folder. By doing this, we are keeping our code more structured and organized.
Open the Model.cs file, and let's update the existing model code we previously created—we can do this by removing the current Model.cs code and replacing it with the following.
Listing 4-a: Updated Model.cs File (soon to be renamed Doc.cs)
using System; using System.Globalization; using Windows.Foundation.Metadata; namespace AppUno.Model { [CreateFromString( MethodName = "AppUno.Model.ModelConverter.CreateDocFromString")] public class Doc : Observable { private int id; private string title = "Test"; private string expiration = DateTime.Now.ToString("dd-MMM-yyyy", DateTimeFormatInfo.InvariantInfo); public int Id { get => id; set { id = value; NotifyPropertyChanged(); } } public string Title { get => title; set { title = value; NotifyPropertyChanged(); } } public string Expiration { get => expiration; set { expiration = value; NotifyPropertyChanged(); } } } } |
Something to notice is that the model's namespace has been renamed from AppUno to AppUno.Model. Also, the class has been renamed from Model to Doc.
To keep consistency, let's rename the Model.cs file to Doc.cs, which we can do by right-clicking the file name in Solution Explorer. It's a good practice to have the model's class and the file that hosts it named the same.
The model structure remains the same, except that class is now called Doc, and it contains the variables id, title, and expiration, and the properties Id, Title, and Expiration.
The model now inherits from the Observable class (yet to be created), which inherits from the INotifyPropertyChanged interface.
Each of the properties of the model invokes the PropertyChanged event, but now through the NotifyPropertyChanged method.
Another difference is that the title and expiration variables have default values assigned. Those values are visible when a new document is added to the list using the application.
There is also a reference to the CreateDocFromString method (yet to be created), which adds a new document using a string instead of instantiating the Doc (model) class.
Observable
The Observable class is just a wrapper that inherits from the INotifyPropertyChanged interface and will handle raising the PropertyChanged event, so the code of the Doc class is easier to read and understand.
So, using Solution Explorer, right-click the Model folder, and select Add > New Item. The following window will appear.

Figure 4-d: Add New Item – Observable.cs File
Once the file has been created, replace the default code with the following code.
Listing 4-b: Updated Observable.cs File
using System.ComponentModel; using System.Runtime.CompilerServices; namespace AppUno.Model { public class Observable : INotifyPropertyChanged { public event PropertyChangedEventHandler PropertyChanged; protected virtual void NotifyPropertyChanged( [CallerMemberName] string propertyName = null) { PropertyChanged?.Invoke(this, new PropertyChangedEventArgs(propertyName)); } } } |
As we can see, the Observable class simply inherits from the INotifyPropertyChanged interface, and it declares the PropertyChanged event, which is what the model previously had.
The Observable class implements the NotifyPropertyChanged method, which is marked as virtual, allowing classes that inherit from Observable to override the method with a different implementation.
The Doc (model) and Observable classes belong to the same namespace (AppUno.Model); this doesn't require either of them to reference the other with a using statement.
If the method is not overridden in the descending class, then the inherited method implementation is used.
The implementation of the NotifyPropertyChanged method is straightforward. All it does is call the Invoke method of PropertyChanged, passing the name of the property being modified as a parameter of PropertyChangedEventArgs.
This logic is invoked within the setter of every model's property (as seen in the old Model class, Model.cs).
By implementing this logic instead within the Observable class, we can decouple and refactor this code.
Model converter
The ModelConverter class is used for creating a Doc instance using a string. We won't use it, but it is good to have it if you would like to make your application more dynamic in the future.
Using Solution Explorer, right-click the Model folder, and then click Add > New Item. The following window will appear.

Figure 4-e: Add New Item – ModelConverter.cs
Name the file ModelConverter.cs and click Add. Once the file has been created, replace the default code with the following.
Listing 4-c: Updated ModelConveter.cs File
using System; namespace AppUno.Model { public static class ModelConverter { public static Doc CreateDocFromString(string str) { var values = str.Split(','); return new Doc { Id = Convert.ToInt32(values[0]), Title = values[1], Expiration = values[2] }; } } } |
As we can see, the code is straightforward. The ModelConverter class is part of the same namespace as the Doc (model) and Observable classes—AppUno.Model—this makes it easy for this class to be referenced.
The CreateDocFromString method simply takes a string (str) as a parameter and splits its content, where each part (value[]) is assigned to its corresponding property within a Doc instance.
View model
During your developer career, it's very likely that you have heard of or come across the MVC pattern.
When developing Uno applications, we use a similar pattern to MVC called MVVM, where the view model plays an essential role. The view model acts as a glue between the data layer or model and the UI by using methods that can perform operations on the model.
Within the Solution Explorer, right-click the Model folder under the AppUno.Shared project and select Add > New Item. The following window will appear.
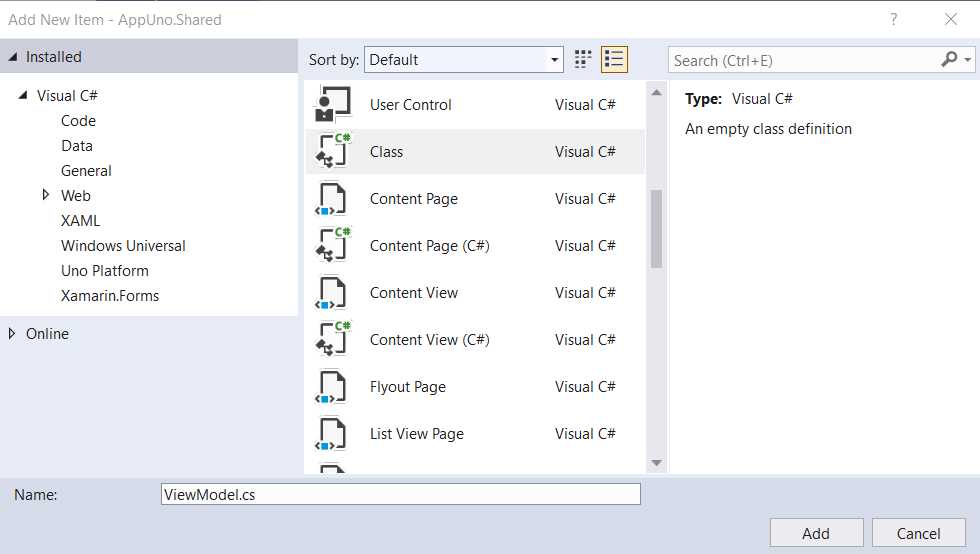
Figure 4-f: Add New Item – ViewModel.cs
Once the file has been created, it will appear under the Model folder of the AppUno.Shared project. Replace the existing code with the following.
Listing 4-d: Updated ViewModel.cs File
using System; using System.Collections.ObjectModel; using System.Globalization; namespace AppUno.Model { public class ViewModel : Observable { private Doc _selectedDoc; public bool IsDocSelected => SelectedDoc != null; public ObservableCollection<Doc> Docs { get; } public ViewModel() { string now = DateTime.Now. ToString("dd-MMM-yyyy", DateTimeFormatInfo.InvariantInfo); Docs = new ObservableCollection<Doc>{ new Doc { Id=1, Title="ID Card", Expiration=now }, new Doc { Id=2, Title="Passport", Expiration=now }, new Doc { Id=3, Title="License", Expiration=now }, }; } public Doc SelectedDoc { get { return _selectedDoc; } set { if (_selectedDoc != value) { _selectedDoc = value; NotifyPropertyChanged(); NotifyPropertyChanged(nameof(IsDocSelected)); } } } public void AddDoc() { int id = new Random().Next(); var doc = new Doc { Id = id }; Docs.Add(doc); SelectedDoc = doc; } public void DeleteDoc() { var doc = SelectedDoc; if (doc != null) { Docs.Remove(doc); SelectedDoc = null; } } } } |
Let's go over what we have done here. The first thing to notice is that the ViewModel class also inherits from the Observable class, and both are part of the AppUno.Model namespace.
Within the ViewModel class, we find three variables. The first is the _selectedDoc object that indicates which is the currently selected document.
Next, we have the IsDocSelected variable, which indicates whether a particular document is selected.
Then, we find the Docs object, an ObservableCollection list of Doc instances. This list will contain all the documents that our application will display.
After that, we find the ViewModel constructor. We initialize the now object within the constructor, representing the current date and time, using the dd-MMM-yyyy format.
Following that, within the ViewModel constructor, we add three documents (each a Doc instance) to the ObservableCollection, using the following code:
Docs = new ObservableCollection<Doc>{
new Doc { Id=1, Title="ID Card", Expiration=now },
new Doc { Id=2, Title="Passport", Expiration=now },
new Doc { Id=3, Title="License", Expiration=now }
};
Next, we find the SelectedDoc method, which returns the currently selected document within the application (_selectedDoc). This method also sets the value of the _selectedDoc object when the user selects another document, which triggers NotifyPropertyChanged, used for data binding.
The AddDoc method, as its name implies, is used by the application when a new document is added.
Each document (doc) has a unique identifier, an id, assigned a random integer (int) value. The new document is added to the ObservableCollection (Docs), and the document added is set as the selected one (SelectedDoc).
The DeleteDoc method, as its name implies, retrieves the value of the selected document (SelectedDoc). If the document's value is different from null, then the document is removed from the list.
As you can see, the ViewModel logic focuses on handling (adding, removing, and selecting) the documents within the list of documents—ObservableCollection.
App.xaml
Now that we have all the files in the Model folder ready, let's move our attention to the user interface. We'll begin with the App.xaml file.
Open the existing App.xaml file in the AppUno.Shared project and replace the current code with the following.
Listing 4-e: Updated App.xaml File
<Application x:Class="AppUno.App" xmlns="http://schemas.microsoft.com/winfx/2006/xaml/presentation" xmlns:x="http://schemas.microsoft.com/winfx/2006/xaml" xmlns:local="using:AppUno"> </Application> |
If you downloaded the decluttered AppUno solution template from GitHub, you probably noticed that the existing App.xaml code is identical to the preceding listing.
App.xaml.cs
Next, let's look at the App.xaml.cs (code-behind) file from the AppUno.Shared project. Replace the existing code with the following.
Listing 4-f: Updated App.xaml.cs File
using Microsoft.Extensions.Logging; using System; using Windows.ApplicationModel; using Windows.ApplicationModel.Activation; using Windows.UI.Xaml; using Windows.UI.Xaml.Controls; using Windows.UI.Xaml.Navigation; namespace AppUno { /// <summary> /// Provides application- /// specific behavior to supplement /// the default Application class. /// </summary> public sealed partial class App : Application { /// <summary> /// Initializes the singleton application object. /// This is the first line of authored code /// executed, and as such is the logical equivalent of /// main() or WinMain(). /// </summary> public App() { ConfigureFilters( global::Uno.Extensions.LogExtensionPoint.AmbientLoggerFactory); this.InitializeComponent(); this.Suspending += OnSuspending; } /// <summary> /// Invoked when the application is launched /// normally by the end user. Other entry points /// will be used such as when the application is launched /// to open a specific file. /// </summary> /// <param name="e">Details about the launch /// request and process.</param> protected override void OnLaunched(LaunchActivatedEventArgs e) { var window = Windows.UI.Xaml.Window.Current; Frame rootFrame = window.Content as Frame; // Do not repeat app initialization // when the window already has content, // just ensure that the window is active if (rootFrame == null) { // Create a Frame to act as the navigation // context and navigate to the first page rootFrame = new Frame(); rootFrame.NavigationFailed += OnNavigationFailed; if (e.PreviousExecutionState == ApplicationExecutionState.Terminated) { //TODO: Load state from previously //suspended application } // Place the frame in the current Window window.Content = rootFrame; } if (e.PrelaunchActivated == false) { if (rootFrame.Content == null) { // When the navigation stack isn't // restored, navigate to the first page, // configuring the new page by passing // required information as a navigation // parameter rootFrame.Navigate(typeof(MainPage), e.Arguments); } // Ensure the current window is active window.Activate(); } } /// <summary> /// Invoked when navigation to a certain page fails /// </summary> /// <param name="sender">The Frame that failed navigation</param> /// <param name="e">Details about the navigation failure</param> void OnNavigationFailed(object sender, NavigationFailedEventArgs e) { throw new Exception( $"Failed to load {e.SourcePageType.FullName}: {e.Exception}"); } /// <summary> /// Invoked when application execution is being /// suspended. Application state is saved /// without knowing whether the application will be /// terminated or resumed with the contents /// of memory still intact. /// </summary> /// <param name="sender">The source of the suspend request.</param> /// <param name="e">Details about the suspend request.</param> private void OnSuspending(object sender, SuspendingEventArgs e) { var deferral = e.SuspendingOperation.GetDeferral(); //TODO: Save application state and stop any background activity deferral.Complete(); } /// <summary> /// Configures global logging /// </summary> /// <param name="factory"></param> static void ConfigureFilters(ILoggerFactory factory) { } } } |
Let's briefly go over this code—even though we can see many explanatory comments that should provide you with a good understanding.
The App class inherits from the Application class. The constructor method initializes the logger (what the ConfigureFilters method does), the components, and the OnSuspending event.
The App class overrides the OnLaunched method, which gets triggered when the application starts.
All it does is retrieve the window content where the application will run, then creates a Frame instance containing the rest of the controls that the application will use, and ensures it is active.
Then, we find the OnNavigationFailed method, which is invoked when navigation to a particular page fails.
After that, we find the OnSuspending method invoked when the application execution is being suspended.
As you can see, it looks like a lot of code, but since most of it consists of comments, it's actually not much at all.
MainPage.xaml
There's just one piece of this puzzle remaining, and that's the application's UI, which we need to write using XAML.
Let’s open the MainPage.xaml file within the AppUno.Shared project and replace the existing code with the following.
Listing 4-g: Updated MainPage.xaml File
<Page x:Class="AppUno.MainPage" xmlns="http://schemas.microsoft.com/winfx/2006/xaml/presentation" xmlns:x="http://schemas.microsoft.com/winfx/2006/xaml" xmlns:model="using:AppUno.Model" xmlns:d="http://schemas.microsoft.com/expression/blend/2008" xmlns:mc= "http://schemas.openxmlformats.org/markup-compatibility/2006" mc:Ignorable="d" Background="{ThemeResource ApplicationPageBackgroundThemeBrush}" d:DesignWidth="600" d:DesignHeight="400"> <Grid> <Grid.ColumnDefinitions> <ColumnDefinition Width="Auto"/> <ColumnDefinition/> <ColumnDefinition Width="Auto"/> </Grid.ColumnDefinitions> <Grid.RowDefinitions> <RowDefinition Height="Auto"/> <RowDefinition/> </Grid.RowDefinitions> <StackPanel Grid.ColumnSpan="2" Background="#4d74d2" Orientation="Horizontal"> <TextBlock Text="Doc Tracker" FontSize="30" FontWeight="ExtraBold" Foreground="White" VerticalAlignment="Bottom" Margin="20"/> <Button Margin="10" Click="{x:Bind ViewModel.AddDoc}"> <StackPanel Orientation="Horizontal"> <SymbolIcon Symbol="Add"/> <TextBlock Text="Add" Margin="5 0 0 0"/> </StackPanel> </Button> <Button Margin="10" Click="{x:Bind ViewModel.DeleteDoc}" IsEnabled="{x:Bind ViewModel.IsDocSelected,Mode=OneWay}"> <StackPanel Orientation="Horizontal"> <SymbolIcon Symbol="Delete"/> <TextBlock Text="Delete" Margin="5 0 0 0"/> </StackPanel> </Button> </StackPanel> <Grid Grid.Row="1" x:Name="docListGrid" Background="#e5ebf8"> <Grid.RowDefinitions> <RowDefinition Height="Auto"/> <RowDefinition/> </Grid.RowDefinitions> <ListView Grid.Row="1" ItemsSource="{x:Bind ViewModel.Docs,Mode=OneWay}" SelectedItem="{x:Bind ViewModel.SelectedDoc,Mode=TwoWay}"> <ListView.ItemTemplate> <DataTemplate x:DataType="model:Doc"> <StackPanel Orientation="Horizontal"> <TextBlock Text="{x:Bind Title,Mode=OneWay}" FontWeight="Bold"/> <TextBlock Text="{x:Bind Expiration,Mode=OneWay}" Margin="5 0 0 0"/> </StackPanel> </DataTemplate> </ListView.ItemTemplate> </ListView> </Grid>
<StackPanel Grid.Row="1" Grid.Column="1" Visibility="{x:Bind ViewModel.IsDocSelected,Mode=OneWay}"> <TextBox Header="Id" Margin="10" Text="{x:Bind ViewModel.SelectedDoc.Id,Mode=TwoWay, UpdateSourceTrigger=PropertyChanged}"/> <TextBox Header="Title" Margin="10" Text="{x:Bind ViewModel.SelectedDoc.Title,Mode=TwoWay, UpdateSourceTrigger=PropertyChanged}"/> <TextBox Header="Expiration" Margin="10" Text="{x:Bind ViewModel.SelectedDoc.Expiration,Mode=TwoWay, UpdateSourceTrigger=PropertyChanged}" /> </StackPanel> </Grid> </Page> |
There's quite a bit of XAML markup here. To understand this better, let's look at the following diagrams to have a visual representation that establishes the relationship between the markup and the finished UI.

Figure 4-g: Relationship Between the XAML Markup and Finished UI (Part 1)
We can understand the relationship by looking at the XAML and UI and matching the exact colors.
The red part corresponds to the StackPanel component that contains the application's title and each of the buttons.
The light-yellow corresponds to the application's title (TextBlock), the black area corresponds to the Add Button component, and the dark-yellow corresponds to the Delete Button component.
The green area corresponds to the left-hand side panel (Grid) that contains the list of documents (ListView) to track. The blue area corresponds to the TextBlock that indicates the document's name, whereas the purple area (a TextBlock) corresponds to the date the document expires.
From the relationship described in the preceding diagram, we can see that all the UI parts except the white area (right-hand side of the application's screen) have been matched to the XAML markup. The reason is that this part of the code wouldn't fit in the preceding screenshot—so, let's look at that last bit.

Figure 4-h: Relationship Between the XAML Markup and Finished UI (Part 2)
The preceding diagram shows that the purple area corresponds to the StackPanel that contains all the fields.
Then, we have the green area that corresponds to the Id field (TextBlock). We can also see the dark-yellow section that corresponds to the Title field (TextBlock).
Finally, the red area corresponds to the Expiration field (TextBlock). Now that we know how the markup relates to the finished UI, let’s look at the bindings.
MainPage bindings
Having the UI ready is just one part of the story—the application works due to the bindings between the components and the model.
The first binding we have is for the Add button, which binds to the AddDoc method of the ViewModel. When the button is clicked, the AddDoc method is triggered; this is a OneWay binding operation as it is just used for executing the event.
The second binding we find is for the Delete button, which binds to the DeleteDoc method of the ViewModel. When the button is clicked, the DeleteDoc method is triggered; this is also a OneWay binding operation as it is just used for executing the event.
Something interesting to notice is that by default the Delete button is disabled, and only becomes enabled when one of the items from the ListView component is selected. This is because the button has a property called IsSelected, which binds to IsDocSelected of the ViewModel.
Here’s an example of how the application looks when the Delete button is disabled by default. In this case, none of the items of the ListView component are selected.
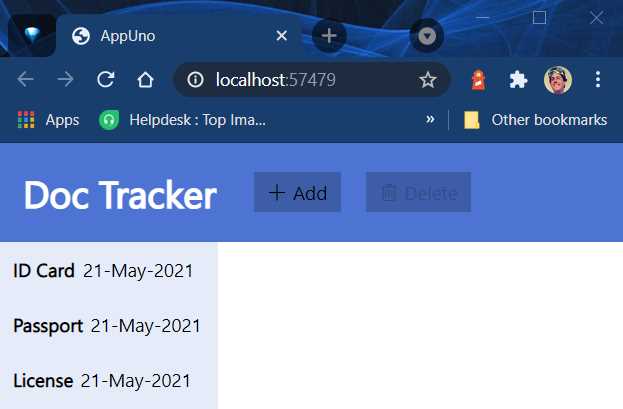
Figure 4-i: The App Running (Delete Button Disabled)
This behavior makes sense because to delete an item, you need to have an element selected. After an item has been selected, the application looks as follows.
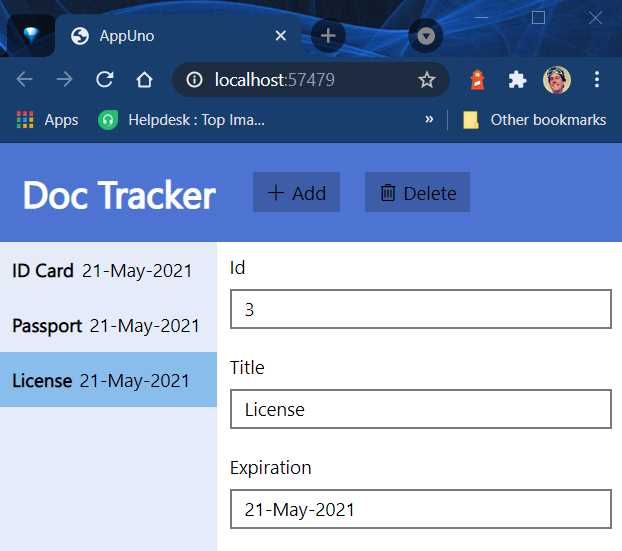
Figure 4-j: The App Running (The Delete Button Enabled)
As expected, when one item has been selected, the Delete button is enabled—that’s the magic of data binding.
Next, we have the ListView component, which has two bindings that are indispensable. The first data binding provides a way for the ListView to load its various child elements—this is a OneWay binding (ViewModel.Docs). Its sole purpose is to retrieve data items from the model.
The second binding (ViewModel.SelectedDoc) of the ListView component is responsible for selecting an item. This is a TwoWay binding, which not only selects an object, but also updates the model’s corresponding value.
Within the ListView component, we have a TextBlock component that displays the Title property, and another TextBlock component that displays the item's Expiration property.
Each of these fields uses OneWay binding because the binding is only used to retrieve (read) these values.
Finally, we have the three TextBox components that contain the values of each of the items of the ListView; these are contained within a StackPanel.
These three components use TwoWay binding, meaning that the values can be read and written to the model.
The first TextBox component (Id) binds to the property with the same name through ViewModel.SelectedDoc—which leads to the currently selected item from the ListView.
The second TextBox component (Title) binds to the property with the same name, also through ViewModel.SelectedDoc—which also leads to the currently selected item from the ListView.
Finally, the third TextBox component (Expiration) binds to the property with the same name, also through ViewModel.SelectedDoc—which also leads to the currently selected item from the ListView.
As you might have noticed, these TextBox components all have their UpdateSourceTrigger attribute set to the PropertyChanged method—which executes when the value of the TextBox changes.
MainPage.xaml.cs
Now that we have explored the XAML markup and bindings used in the MainPage.xaml file, let’s have a quick look at the code-behind file. As you’ll see, it’s straightforward.
Listing 4-h: MainPage.xaml.cs File
using Windows.UI.Xaml.Controls; using AppUno.Model; namespace AppUno { public sealed partial class MainPage : Page { public ViewModel ViewModel { get; } public MainPage() { this.InitializeComponent(); ViewModel = new ViewModel(); } } } |
All we have is a class called MainPage, which inherits from Page. This class contains a ViewModel property.
The constructor method creates an instance of the ViewModel class, and this ViewModel instance makes the binding work.
Project references
The final part is to look at the references required for the solution to run—specifically, the references of the AppUno.Wasm project.
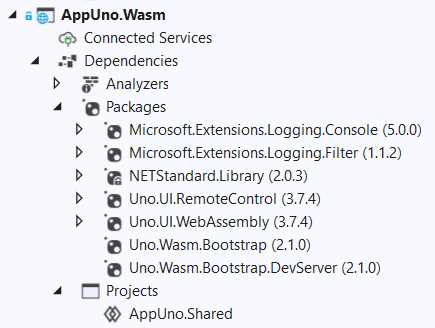
Figure 4-k: The AppUno.Wasm Project References
You’ll find the Manage NuGet Packages option by right-clicking Packages. This displays the window shown in Figure 4-l.
The main packages used by the project are Uno.UI.RemoteControl, Uno.UI.WebAssembly, Uno.Wasm.Bootstrap, Uno.Wasm.Bootstrap.DevServer, and NETStandard.Library.
If you don’t have all these packages installed within your project, click the Browse tab as seen in the screenshot that follows, and enter the library's name in the Search box.
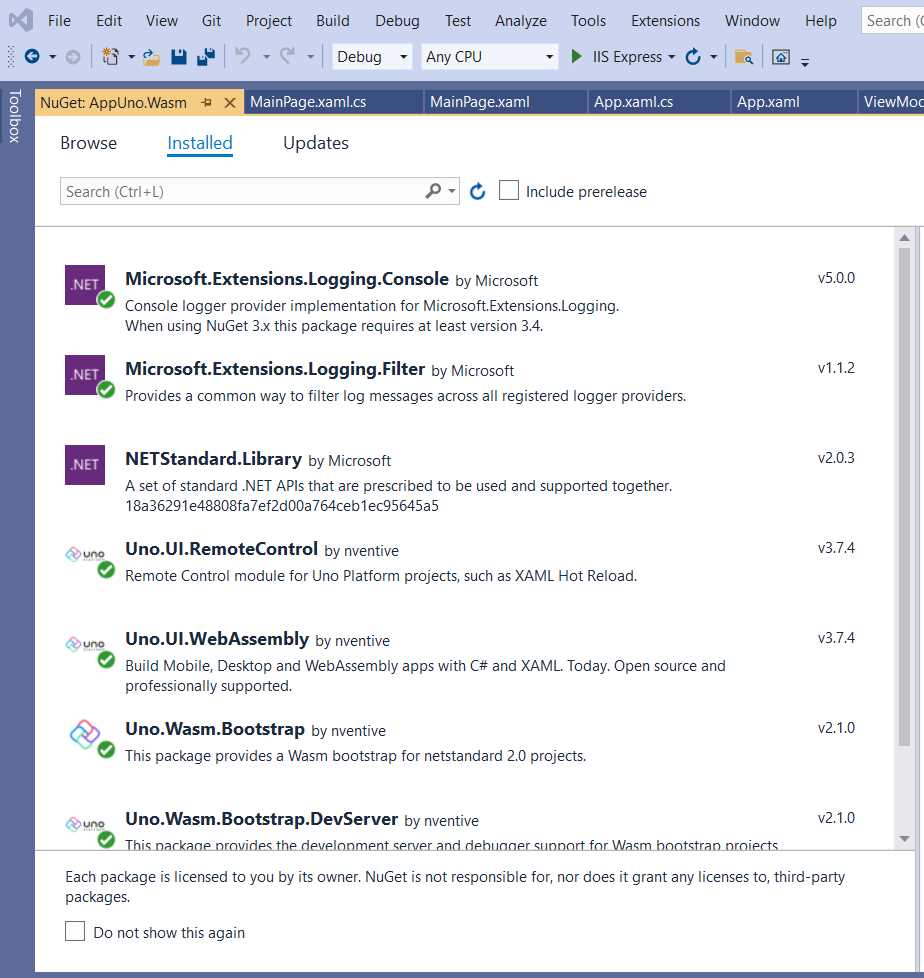
Figure 4-l: The NuGet Packages Window
Once you have these packages installed, you should be ready to run your application. Let’s go ahead and build the project.
Go to the Solution Explorer, right-click the solution, and click Build Solution. Hopefully, you should not see any compilation or building errors.
Tip: At this stage, if you run into compilation or building errors, you can download the finished repository.
If you execute the application, you should see a screen similar to the following one. First, you’ll see the application loading.
Figure 4-m: The Finished App Loading
Then, after the application loads, you’ll see the application running.
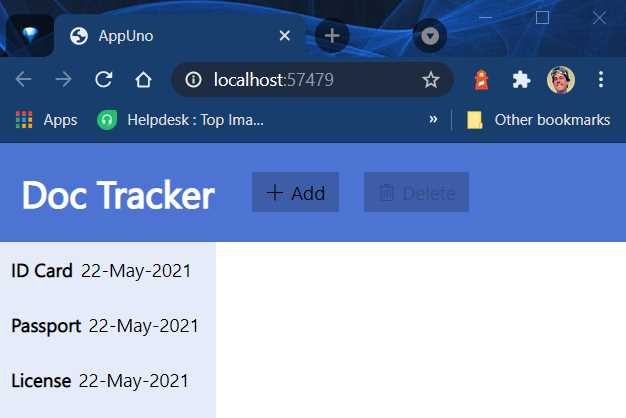
Figure 4-n: The Finished App Running
Excellent—you’ve done a great job! We have managed to reconstruct an Uno application, learn about its composition and parts, and made some adjustments along the way.
By default, when the application loads, the loading splash screen that Uno uses is white. However, we can see the loading screen's color is blue in the previous screenshots. You might have noticed this if you didn’t download and use the decluttered repository.
The reason is that I specifically changed the color of the loading splash screen from white to blue. I was able to do this by editing the AppManifest.js file found under the WasmScripts folder of the AppUno.Wasm project.

Figure 4-o: The AppManifest.js File
If you open this file, you should see the following content. The attribute used to change the loading screen color is splashScreenColor.
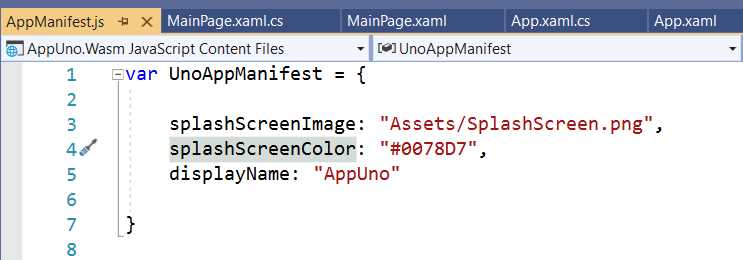
Figure 4-p: The splashScreenColor Attribute
You can change the value of this attribute to set your custom loading color. You can use any hexadecimal color code value.
Summary
We’ve reached the end of the chapter—and also this book. The Uno Platform is an excellent framework for creating cross-platform applications. It adds a layer of abstraction that allows code written with XAML and C# to target multiple platforms rather seamlessly.
It’s essential to have some good knowledge of XAML and C# before jumping into Uno. If you have worked with HTML, it should be relatively easy to pick up XAML and get acquainted with it.
On the other hand, if you don’t have a solid foundation for creating user interfaces using a markup language, it’s best to get some grounding with XAML before diving into Uno.
If you come from a WPF or UWP development background, you will be used to XAML, and you’ll feel right at home with Uno.
One of the critical aspects of working with Uno is writing as much shared code as possible. Using shared code is the key to targeting multiple platforms without reimplementing the same or similar application functionalities across different platforms.
Cross-platform development using the same code base has been the holy grail of software development for a long time, and during this time, many platforms have come and gone. Many others have promised instant cross-platform glory.
Uno seems to be onto something, and from the platforms I have tried, tested, and used, it has the broadest range of cross-platform compatibility I’ve come across so far—spanning between desktop, mobile, web, and other platforms.
Whether the cross-platform promise will be finally fulfilled with Uno and become ubiquitous is yet to be seen. Still, one thing is sure: they have done a fantastic job, and are on a great path to be one of those platforms that hopefully will remain in developers' lives for years to come.
I hope you have enjoyed this book, and that it has given you some foundations and insight on this technology. I invite you to continue to explore it. Until next time—take care, and do great things!
- 1800+ high-performance UI components.
- Includes popular controls such as Grid, Chart, Scheduler, and more.
- 24x5 unlimited support by developers.