
Unity Game Development Succinctly®

CHAPTER 1
Getting Started
Introduction
Indie game development is a huge business, unique in that developers are capable of making money on par with that of the big-name professional game companies such as Blizzard (World of Warcraft, Diablo) or Bioware (Mass Effect, Dragon Age). Granted, it’s the rare indie developer who reaches such heights, but someone reading this could go on to develop the next Minecraft or Angry Birds. Not so long ago, being an indie game developer meant posting your game on a couple of Internet sites and hoping for the best. But with the mobile explosion, the opening of Steam’s Greenlight service, and tools that make it possible to get on consoles, indies are capable of standing toe-to-toe with AAA devs and even outshining them with original and risky games that publishers won’t touch.
Among the tools indies can choose to use for their game development, Unity has become one of the top choices. Aside from a free version that offers everything most developers will need to create a game, constant feature additions, two dozen supported platforms, an Asset Store in which developers can buy and sell content, a huge community of fellow developers to learn from and obtain support from, and outstanding docs, tutorials, and videos from the Unity team to help you out, Unity is helping millions of developers (4.5 million registered developers as of 2015) realize their dreams of creating their own games. According to statistics from 2015, more than 600 million gamers have played games developed using Unity. It holds 45% of the game engine market and 47% of game developers are using it.
During the course of this e-book, we’ll cover the major features of Unity and use those to create a small 2-D game. We’ll go over every step, from downloading and installing Unity to expanding the finished game with features that would make it something resembling games that are selling now on PCs and consoles. I will assume you have some basic knowledge of C#, the most popular language used for coding in Unity games. Some knowledge about the basics of game programming will be useful, but even someone completely new to game development should be able to get up and running quickly. The game we’ll be creating is reminiscent of the old game Robotron 2084 (or Smash TV). For those not old enough to remember versions of that great game, here’s the setup—the character is stuck in an arena, destroying constantly spawning ghosts. Why ghosts? Who knows—maybe I just finished watching Ghostbusters? But Figure 1 offers a screenshot of the finished game.
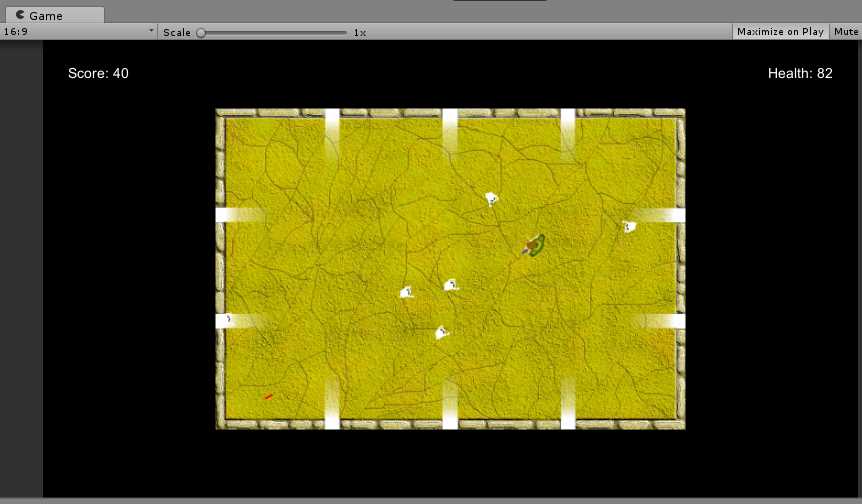
Figure 1: Completed Game Screenshot
What is Unity?
Unity was first released on June 8, 2005. In the 11+ years since then, it has advanced to its current stable version of 5.4.2 (as of the end of October, 2016). At the time of this writing, a beta of version 5.4 is available for those who like to live on the cutting edge.
Unity is a cross-platform game engine. Cross-platform means that it either runs on or allows what is created with it to run on multiple hardware/OS combinations. In the case of Unity, both are true. Currently, Unity can be installed on OS X and Windows operating systems. Ubuntu support (a version of the Linux OS) was released in beta in August, 2015.
A game engine is software that allows for the creation of video games. At a minimum, this means that the software allows the developer to write code to draw 2-D/3-D graphics on the screen, obtain and process input from players that use mouse, keyboard, gamepad, or other hardware, and play sounds and music through the hardware’s speakers. A wide variety of other features may be possible through the engine—physics and collision detection, networking, AI, video, etc. Unity supports all of these and more. We’ll only use a couple of these features, but we will address implementing others in order to make the game we create attractive to gamers.
Unity, like other game engines, features an Integrated Development Environment (IDE) in which the developer creates the game. There are two parts of Unity’s IDE—the main Unity editor and the code editor. We’ll look at the Unity IDE and interface shortly.
MonoDevelop was the usual editor until a plug-in was developed that allowed Visual Studio to write and debug Unity game scripts. Originally, a port of another open source IDE for use on Linux, the version packaged with Unity, was specifically customized for developing Unity games.

Figure 2: Monodevelop IDE
Setting up
First, you should head over to the Unity website and download the latest version. As of the time of this writing, the latest version is 5.4.0f3. The main download site will have all the different versions currently available, but you’ll want the free Personal version. Next, you should create a Unity account. You can find the page to create one at https://id.unity.com/account/new.
When you’ve set up your Unity account, run the installer you downloaded. After a couple of Next buttons, you’ll come to the Choose Components dialog, as shown in Figure 3.
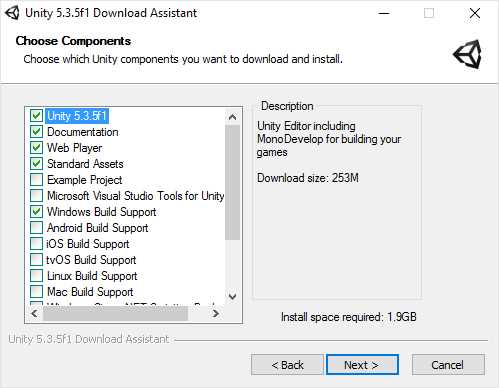
Figure 3: Unity Installer Dialog
You’ll find a couple of important options to select in this dialog.
Unity uses MonoDevelop by default, but if you use Visual Studio as your IDE, you’ll want to check the Microsoft Visual Studio Tools for Unity that will allow you to use it as your default editor for Unity. If you don’t have Visual Studio, you can download the Community Edition.
The Example Project could be a good starting point as you learn your way around Unity.
By default, only the Windows Build Support option is checked. If you plan on supporting other platforms, you’ll want to check those. Be aware that there could be costs or other requirements in order to be able to deploy your games to a specific platform.
After installing Unity, launch it and you’ll see the New Project dialog, as shown in Figure 4.
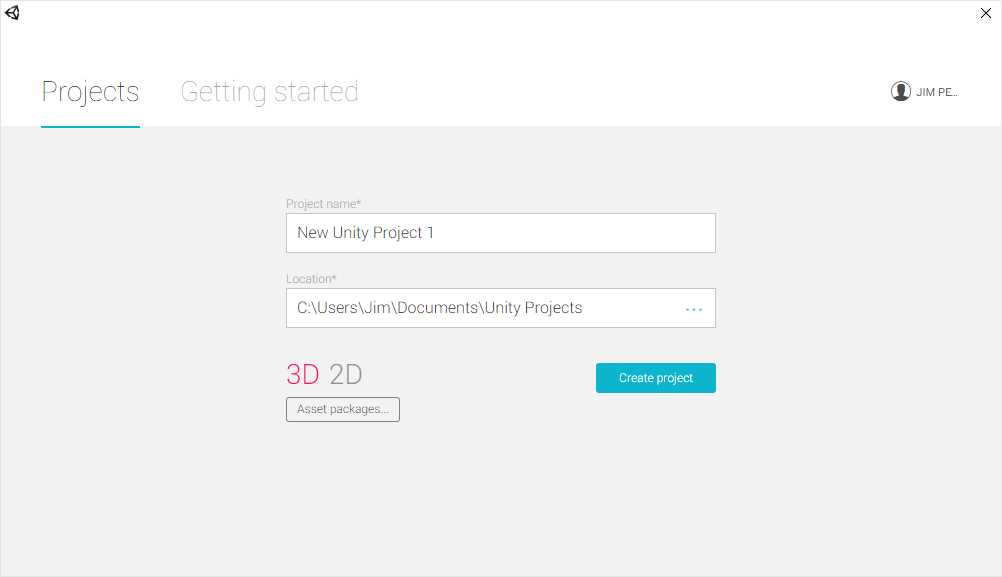
Figure 4: New Project Dialog
The default for new projects is 3-D. Make sure you click 2-D before you create your project—the game we’ll be creating is 2-D, and it is better to start with the correct setting rather than convert later. You can also select the asset packages that get added to the project when it’s created. You can easily add packages later if you forget. One package you’ll probably want to add is the Visual Studio 2015 Tools.
After selecting the packages you want to include, give the project a suitable name (I called the game we’ll be creating Ghost Arena), select the location (although I use the default to keep all my projects in one location), and click Create project. When Unity finishes, you’ll see something like Figure 5.

Figure 5: Default Unity IDE
Unity interface
Unity is ready to go. Looking at the figure above, you might find Unity’s interface a little intimidating. Let’s take some time and go over the main features of the interface.
The menu gives us access to most of Unity’s functionality. The File menu allows you to:
- Create, open, and save scenes (see the Scene section for more information)
- Create, open, and save projects
- Display the Build Settings dialog
- Build and run your project
- Exit the application
All very standard, of course.
The first three sections of the Edit menu are similar to most other applications in that they offer Undo and Redo functionality—cut, copy, paste, and delete. The Duplicate menu item creates a copy of whichever object is currently selected in the Hierarchy. Of the remaining items, you’ll probably deal with the following a lot:
- Play, Pause, and Step—although you can use the menu items or their shortcuts, you will probably use the toolbar buttons instead.
- Project Settings—the submenus under this menu allow you to set a lot of defined values for the following areas:
- Audio—allows you to specify the defaults for settings such as global volume, speaker mode (stereo, quad, surround, etc.), and audio disabled by default.
- Editor
- Input—allows you to specify the defaults for keys and buttons for in-game actions such as firing, jumping, and movement, along with the sensitivity and deadzone for controls.
- Network—allows you to specify the level of debug message that gets sent to the console and sets the default number of times per second that data is sent across the network.
- Physics (2-D and 3-D)
- Player—allows you to specify default resolution and platform-specific settings, icons, and game and company name.
- Quality—allows you to specify the default settings for each platform along with a number of rendering settings for higher or lower quality.
- Graphics—allows you to specify defaults for a number of shader settings.
- Script Execution Order
- Tags and Layers—allows you to specify your tags for identifying objects by code and rendering layers.
- Time—allows you to specify the default value for fixed timestep, max allowed time for physics calculations and code events, and the time scale (used for effects such as bullet-time).
Note: Definition— Deadzone is a small, set radius around the center of your controller axis where user input is ignored.
The Assets menu is pretty straightforward. It allows you to add assets (something larger than a GameObject) to the current scene. You can create a new asset, which could be anything from code to a new scene to a physics material. In later sections, we’ll dig into some of the specific assets we’ll use in our game. You can also import packages, which are assets put together to make something larger. These could be levels for your game; weapons consisting of a model, textures, and attached code; or they could be complete base games to which you add your own features. The Assets menu is also where you can open the project in your coding IDE.
The GameObject menu allows you to add objects such as sprites, user-interface elements, lights, and 3-D objects such as cubes and cylinders. You can also adjust objects already in the scene within the Hierarchy or in the view of the scene (useful if you have a lot of objects and need to focus your view on one).
The Component menu allows you to add components to GameObjects or the scene. Components are the functional pieces of GameObjects. You’ll find items such as physics colliders, audio filters, obstacles for navigation meshes, and network management pieces.
The Window menu allows you to change the layout of the Unity IDE using several preset layouts. You can also set and delete your own custom layouts. This menu also gives you access to the Asset Store inside the Unity IDE rather than using a separate browser window. You can also display pieces of the IDE—for example, the Hierarchy, Project, Console, or Inspector (if you hide them).
The Help menu has standard menu items but also includes items such as a link to download beta versions of the application and manage your license keys.
Hierarchy window
The Hierarchy will show you the objects in the current scene. You can make them children of other objects by moving objects around within the Hierarchy. You can also select multiple objects in order to quickly edit common properties, duplicate them, or make prefabs out of them. Right-clicking an object displays a context-sensitive menu for that object.
Note: Definition— A prefab is a template or blueprint that allows you to create new instances of it. Changes to the prefab are reflected in all instances.
Inspector window
Selecting an object in the Hierarchy window will display its properties in the Inspector Window, as shown in Figure 6.
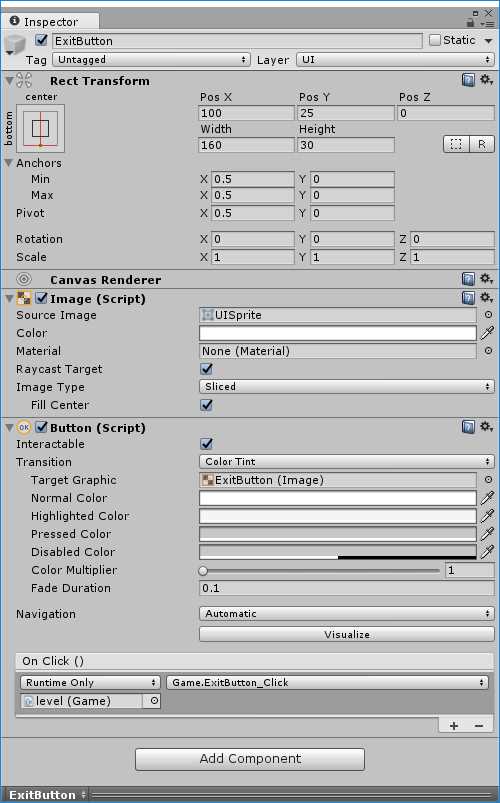
Figure 6: Inspector Window
The Inspector window lets you quickly change properties and see their effects in either the Scene window or Game window, depending on the property, without having to actually run the game. As you can see in Figure 6, even properties in scripts attached to the object can be set.
Each set of properties can be hidden by clicking the arrow at the top left of each section, allowing you to see exactly what you need to see. Clicking the gear at the top right displays a menu that allows you to reset the properties for that section, remove the component, move it up or down in the list in the window, or copy and paste it. Clicking the book will display the Help section of the documentation for the item in that section.
Project window
The Project window shows all the assets that have been added to the project. The assets within the project can be organized into folders, which means you can have a folder for all of your scripts, scenes, audio files, sprites, etc. For large games, this type of organizing is vital in order for you to quickly find the assets you need.
The left side of the Project window shows the hierarchy of the assets. The root of the Hierarchy will always be an Assets folder. Clicking on a folder will display all the assets in that folder in the right side of the window. Clicking on an asset in the right side will show the properties of that asset in the Inspector window and an asset-specific section of the Inspector window at the bottom will allow actions such as playing an audio file and seeing a sprite with info conveying width/height, type of graphic file, size of the file, etc.
Scene and Game windows
You design the parts of your game in the Scene window. You do this by dragging assets into it from the Hierarchy or adding new assets through menu items. The Game window shows you how the current scene will look when the game is actually being played.
You can control how you navigate around the scene using the toolbar buttons. From left to right, they work this way:
- Hand Tool—when this is selected, clicking and dragging in the scene will move the Camera object. Holding the Alt key while left-clicking or right-clicking will move the camera around the current pivot point or zoom in or out.
- Translate Tool—clicking on an object while this is selected will display controls that allow you to move the object around in the scene on the x, y, and z axes.
- Rotate Tool—clicking on an object while this is selected will display controls that allow you to rotate the object on the x, y, and z axes.
- Scale Tool—clicking on an object while this is selected will display controls that allow you to resize the object on all axes at once.
- Resize Tool—clicking on an object while this is selected will display controls that allow you to resize the object on an axis independent of the others.
There are also shortcut keys for moving around in the scene and moving objects around in the scene. Which shortcuts you use will depend on your normal keyboard and mouse style.
You will also probably find yourself making a lot of mistakes in moving things around in the scene as you get used to Unity’s interface. Undo will become your very close friend.
The Unity editor has more functionality than could possibly be discussed in a short e-book. The online documentation for Unity is very extensive—trying to read through the entire thing would be a Herculean task. As you come across something that you don’t know or need to figure out, reading the relevant portion, as well as hitting the Unity forums, is the best way to go. As you get used to Unity and game development, you’ll want to build bigger and more complex games. The documentation will become another friend, as will the rest of the material on Unity’s website.
Setting up the game
Unity games are typically structured so that different types of assets are organized into their own folder. For our game, we’ll only need six folders:
- Animations
- Audio
- Prefabs
- Scenes
- Scripts
- Sprites
Right-click the Assets folder in the Project window or the Assets folder window itself and select Create | Folder for each folder we’ll need. You should end up with the structure in Figure 7.
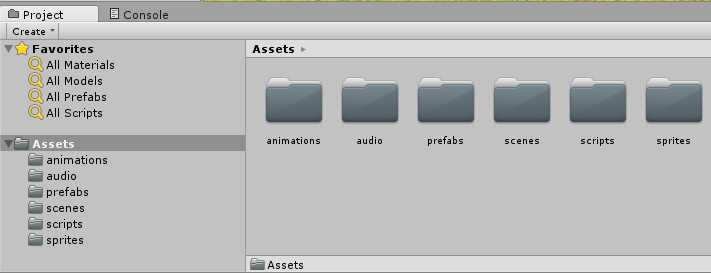
Figure 7: Project Folder Structure
At this point, you now have a blank slate to begin creating your game. We’ll first take a look at scenes and scene management.
- 1800+ high-performance UI components.
- Includes popular controls such as Grid, Chart, Scheduler, and more.
- 24x5 unlimited support by developers.