
Ubuntu Server Succinctly®

CHAPTER 4
Managing Files and Directories
Managing the file system is probably the most fundamental skill a user needs in order to get an idea of what is around and how to manage it when logged in. At this point, all the tasks to control the operating system have been made from the command line. So, this chapter attempts to get the user up to speed with the basics.
File and directory names in Ubuntu Server
Like in any other operating system, every file or directory stored in the disk must be identified with a name. In Ubuntu Server, the names for each file or directory should comply with the following rules, according to the best file-naming practices, in order to ensure cross-platform operations:
- All file or directory names are case sensitive. So, a file named Locations is different from a file with the name locations.
- Upper and lowercase letters, numbers, and the dot (.) and underscore (_) symbols can be used.
- Spaces can be used, but it’s better to avoid them.
- An extension can be used to identify similar files. This extension is placed after the file name, preceded by a dot (.)
- The name for a file or directory can be a maximum of 255 bytes long.
- A filename must be unique inside its directory.
- The following characters should be avoided in file names: / < > | : & * ?
Exploration and navigation
This section shows the basic commands that allow the user to know where exactly they are in the filesystem, and how to move around in it.
Finding where the user is
Once the user is logged in the server, he or she is typically dropped into the user’s home directory since this is the location where the user has full dominion. If the user’s home directory doesn’t exist, the user is dropped into the root (/) directory.
To find out where the home directory is in relationship with the rest of the filesystem, the following command must be issued.
Code Listing 18
$ pwd |
Then, the operating system will return something like the following:
/home/ubuntu-user
The home directory is named after the user account, and is stored within the directory called /home. For the previous example, the name returned by the operating system indicates that the user logged in is named ubuntu-user.
Showing the contents of directories
To display a directory’s contents, type the ls command, as shown in the following sample.
Code Listing 19
$ ls /usr/share |
The operating system will return a list with the /usr/share directory contents, which can be files, other directories contained within it, or a combination of both. For the previous example, the contents may be displayed like the following.
Code Listing 20
adduser groff pam-configs applications grub perl apport grub-gfxpayload-lists perl5 apps hal pixmaps apt i18n pkgconfig aptitude icons polkit-1 apt-xapian-index info popularity-contest . . . |
The previous list shows only the names of files or directories. If further information about the directory contents is desired, you must use the –l flag.
Code Listing 21
$ ls /usr/share -l |
The list obtained displays plenty information, and may look like the following example.
Code Listing 22
total 440 drwxr-xr-x 2 root root 4096 Apr 17 2014 adduser drwxr-xr-x 2 root root 4096 Sep 24 19:11 applications drwxr-xr-x 6 root root 4096 Oct 9 18:16 apport drwxr-xr-x 3 root root 4096 Apr 17 2014 apps drwxr-xr-x 2 root root 4096 Oct 9 18:15 apt drwxr-xr-x 2 root root 4096 Apr 17 2014 aptitude drwxr-xr-x 4 root root 4096 Apr 17 2014 apt-xapian-index drwxr-xr-x 2 root root 4096 Apr 17 2014 awk . . . |
The first block describes the file type and permissions. Each subsequent column, separated by white space, describes the owner, group owner, item size (in bytes), last modification date and time, and the name of the item. For the previous example, the d at the beginning of the first block means “directory.” If a normal file were listed, this character could be a dash (-). The following list shows the file types available.
- d: Directory; a container which holds other files or directories.
- l: Symbolic link; a pointer that redirects to another file or directory.
- p: Named pipe; a special instance of a file that has no contents on the filesystem.
- s: Socket; a special file type which allows inter-process networking using the file system’s access control protection.
- b: Block device; the name to identify a storage device (e.g., /dev/sda for hard disk 0).
- c: Character device; a special file that provides unbuffered and direct access to a hardware device (e.g., /dev/input/tty for the terminal that is running).
File permissions in Ubuntu
The –l flag of the ls command displays a block of 10 characters at the beginning of each item returned. The first character indicates the file type, such as a directory (d) or a normal file (-). The other nine characters refer to the permissions for that file. These characters can be split into three blocks. Each block indicates which permissions are granted for the file “owner,” the “group,” and “other” users, in that order. An explanation for these kinds of users is presented in Table 4.
User Types in Ubuntu
User Type | Description |
|---|---|
owner | The username of the person who owns the file or directory. By default, the user who creates the file or directory will become its owner. |
group | The user group that owns the file or folder. All users who belong to the same group as the user who created the file or directory will have the same access permissions to that file or folder. |
other | A user who isn't the owner of the file or directory and doesn't belong to the same group the file or folder does. |
Regarding file permissions, there are three types:
Permission Types in Ubuntu
Permission type | Description |
|---|---|
r | The user can read a file or directory. |
w | The user can write, overwrite, append-to, or delete a file or directory. |
x | The user can “run” a file. For example, a script or program. |
If an item of the list displayed by the ls command shows a block like drwxr-xr-x, it means that this item is a directory (d) with read (r), write (w), and execution (x) permissions for the owner; the group in this case has read (r) and execution (x) permissions, and other users have read (r) and execution (x) permissions, too.
Wildcard characters
A wildcard character is used to add criteria for displaying the content of a directory. The following wildcard characters are used in Ubuntu:
- Asterisk (*): Used to represent 0 or more occurrences of any character, starting from the point at which asterisk appears. For example, if the user enters lop*, this means that all files or directories that have a name starting with lop will be considered, no matter which characters appear after lop.
- Question mark (?): Used to represent a single unknown character in the point where it appears. For example, if the user enters mem*.tx?, this means all files that have a name starting with mem, no matter which characters appear before the dot, and with an extension starting with tx, no matter which character appear after the x, will be considered.
- Brackets ([]): Used to specify a range. For example, if the user wants to list all JPG filenames beginning with an image and a number between 10 and 30, image[10-30].jpg should be entered after the ls command.
- Curly brackets ({}): Used to separate terms, when each term must be the name of something or a wildcard. For example, if the user enters {*.pdf,*.png} after the ls command, all files with pdf or png extensions will be listed.
Moving around the filesystem
To move around the filesystem, the user needs to change the current location (usually the home directory) to any other that exists in the system. This can be accomplished using the cd command. In the following example, the user moves to the /bin directory.
Code Listing 23
$ cd /bin |
The directory name provided in the previous example is known as an absolute path. In Ubuntu, every file and directory is under the top-most directory, which is called the “root” directory. This directory is referenced by a single, leading forward slash (/). An absolute path points to the location of a directory in relation to this top-most directory. This avoids ambiguous references when referring to a directory anywhere in the filesystem.
An alternative is the use of relative paths. These refer to a directory in relation to the current directory (the directory in which the user is located). The use of relative paths makes navigation easier, especially when the directories are close in hierarchy. In relative paths, any directory within the current directory can be referenced by name without a leading forward slash. Assuming the user is in the /usr/share directory and a “locale” directory exists within it, the following command changes the location to the locale directory.
Code Listing 24
$ cd locale |
Likewise, moving to multiple directory levels with relative paths is possible by providing the portion of the path that comes after the current directory. Again, assuming the user is in the /usr/share directory and a docs directory exists within a common directory, changing to that directory can be accomplished by typing the following command.
Code Listing 25
$ cd common/docs |
Moving to the previous directory in relation to its hierarchy is also possible. This directory is called the parent directory. The following command changes the current location to the parent directory.
Code Listing 26
$ cd .. |
The double dot indicator after the cd command refers to the parent directory. Another special indicator is a single dot, which refers to the current directory.
Finally, issuing the cd command without providing a directory name takes the user back to the home directory.
Code Listing 27
$ cd |
Viewing files
In contrast to some operating systems, Ubuntu and other Unix-like operating systems rely on plain text files for vast portions of the system. This section discusses different ways to view these files.
One way to view files is by using the less command. This command is known as a “pager,” because it allows the user to scroll through pages for a file. Unlike the previous commands discussed, which return to the command line immediately after execution, less is an application that will continue to run and occupy the screen until the user exits.
To open the /etc/services file, which is a configuration file with service information that the system knows about, the following command must be issued.
Code Listing 28
$ less /etc/services |
less will open the file, and the portion of the document that fits in the screen will be displayed.
Code Listing 29
# Network services, Internet style # # Note that it is presently the policy of IANA to assign a single well-known # port number for both TCP and UDP; hence, officially ports have two entries # even if the protocol doesn't support UDP operations. # # Updated from http://www.iana.org/assignments/port-numbers and other # sources like http://www.freebsd.org/cgi/cvsweb.cgi/src/etc/services . # New ports will be added on request if they have been officially assigned # by IANA and used in the real-world or are needed by a debian package. # If you need a huge list of used numbers please install the nmap package. tcpmux 1/tcp # TCP port service multiplexer echo 7/tcp . . . |
The following table shows the keys that allow you to navigate through the file.
less Navigation Keys
Key | Description |
|---|---|
Up Arrow and Down Arrow keys | Scroll the file one line up or down. |
Page Up | Scrolls the file one page backward. |
Page Down | Scrolls the file one page forward. |
/ | Allows text searching (e.g., /mail looks for “mail” in the file). |
n (lowercase) | Gets the next result for a text search previously entered with the / key. |
N (uppercase) | Gets the previous result for a text search previously entered with the / key. |
q | Exits the less program. |
File and directory manipulation
This section shows how to create and manipulate files and directories in the filesystem.
Creating files
The most basic method for creating a file is using the touch command. This command creates an empty file using the filename and location specified. The following commands create a file named sample01 in the home directory.
Code Listing 30
$ cd $ touch sample01 |
The cd command allows the user to move into the user’s home directory. Then, the touch command creates the file.
touch allows multiple files to be created at the same time. Absolute paths can be used as well. The following command creates two files, named sample02 and sample03, in the home directory, assuming the user logged in is called ubuntu-user.
Code Listing 31
$ touch /home/ubuntu-user/sample02 /home/ubuntu-user/sample03 |
Also, touch is used to change the timestamps (i.e. dates and times of the most recent access and modification) on existing files and directories. There are several options for doing this. For example, the -a option changes the access time only, and the -m option changes the modification time only. The following command changes both access and modification time, to the current time for the file sample03.
Code Listing 32
$ touch –am /home/ubuntu-user/sample03 |
Another option regarding timestamps is –r, which is used with a pair of filenames following it. This option tells touch that the timestamps for the second file must be used for the first one, instead of the current time.
Code Listing 33
$ touch –r /home/ubuntu-user/sample03 /home/ubuntu-user/sample02 |
In the previous sample, the timestamps of /home/ubuntu-user/sample03 are used for /home/Ubuntu-user/sample02.
Another nice option of touch is that, unlike the cp command (which is used to copy files and directories) and the mv command (which is used to move or rename files and directories), it doesn’t automatically overwrite existing files with the same name and location. Instead, it changes the last access times for such files to the current time.
Also, touch allows you to modify timestamps by going back or forward a specified number of seconds. The -B option is used for going back, and the -F option is used for going forward.
Code Listing 34
$ touch –r /home/ubuntu-user/sample03 –B 40 /home/ubuntu-user/sample02 |
The previous sample makes /home/ubuntu-user/sample02 40 seconds older than /home/ubuntu-user/sample03.
The -d option is used to add a specific last-access time. A string in the day, month, year, minute:second format must follow the option.
Code Listing 35
$ touch –d '3 Feb 2016 12:15' /home/ubuntu-user/sample03 |
The previous sample sets the last access time of /home/ubuntu-user/sample03 to February 3, 2016 at 12:15 P.M.
Partial date-time strings can be used. If the only date part is provided, the time part is automatically set to 0:00.
Code Listing 36
$ touch –d '3 Feb 2016' /home/ubuntu-user/sample03 |
Likewise, if the time part is provided with no date, it is automatically set to the current date.
Code Listing 37
$ touch –d '16:20' /home/ubuntu-user/sample03 |
Creating directories
In a similar way to the touch command, the mkdir command allows the creation of empty directories. As with the touch command, absolute or relative paths can be used. A directory named test is created within the home directory in the following sample.
Code Listing 38
$ cd $ mkdir test |
Again, cd moves the user to the home directory. Then, the mkdir command proceeds with the directory creation.
The following commands will cause an error:
Code Listing 39
$ cd $ mkdir test/docs/pdfs |
The operating system throws the following message:
Code Listing 40
$ mkdir: cannot create directory test/docs/pdfs: No such file or directory |
The previous message is displayed because the directory docs doesn’t exist at the time mkdir attempts to create the pdfs directory. To ensure that mkdir creates all directories necessary to build a given directory path, the –p flag must be used. Now, the commands look like the following.
Code Listing 41
$ cd $ mkdir -p test/docs/pdfs |
The –p flag tells mkdir that the docs directory must be created before the pdfs directory is created in case it doesn’t exist.
Moving and renaming files and directories
The command mv is used to move a file from one location to another. The following sample moves the file sample01, located in the home directory, to the test directory, also located in the home directory.
Code Listing 42
$ cd $ mv sample01 test |
The first part of the command indicates all the items the user wishes to move and the destination directory is indicated at the end.
In case the user wants to move the file sample01 back from the test directory, the special dot reference can be used to point to our current directory.
Code Listing 43
$ cd $ mv test/sample01 . |
The mv command is also used to rename files, which can seem unintuitive. In essence, moving and renaming are both just adjusting the location and name for an existing item.
So, to rename the test directory to tested, the following commands must be entered.
Code Listing 44
$ cd $ mv test tested |
In this case, the first part of the mv command indicates the item that will be renamed, and the new name is indicated at the end.
Note: It‘s important to realize that Ubuntu won’t prevent the user from certain destructive actions. If the user is renaming a file and chooses a name that already exists, the previous file will be overwritten by the file that is being moved. There is no way to recover the previous file if it’s accidentally overwritten.
Copying files and directories
To duplicate an existing item—that is, create a copy of it—the cp command is used. For instance, a copy of the sample01 file can be created in a new file called sample02.
Code Listing 45
$ cd $ cp sample01 sample02 |
Unlike with an mv operation, after which the sample01 file no longer exists, now the sample01 and sample02 files are available.
Note: As with the mv command, it’s possible to overwrite a file if the user isn’t careful about the target filename used for the operation. For instance, if sample02 already existed in the previous example, its content would be completely replaced by the content of sample01..
Copying directories requires using the –r flag. This flag stands for “recursive,” as it tells the cp command that it must copy the directory and all of its content. The flag is necessary even if the directory is empty.
The following sample duplicates the tested directory into a new directory called production, including its content.
Code Listing 46
$ cd $ cp -r tested production |
Unlike with files, in which an existing destination could result in an overwrite accident, if the target directory exists, the file or directory is copied into it.
Code Listing 47
$ cd $ cp sample01 production |
The previous sample creates a copy of sample01 and places it into the production directory.
Removing files and directories
File deletion can be done with the rm command. The name of the file to be deleted must be passed to the rm command. The following sample deletes the sample01 file located in the home directory.
Code Listing 48
$ cd $ rm sample01 |
Likewise, to remove empty directories, the rmdir command must be used. The following commands remove the tested directory located in the home directory.
Code Listing 49
$ cd $ rmdir tested |
The previous sample will succeed if the tested directory has nothing within it. Otherwise, the operating system will throw the following message.
Code Listing 50
Rmdir: failed to remove tested: Directory not empty |
To remove a non-empty directory, the command rm with the –r flag must be used. Again, the -r flag stands for “recursive.” So, all the directory’s content will be removed recursively, including the directory itself.
Code Listing 51
$ cd $ rm -r tested |
The previous commands remove the directory tested and everything that’s stored within it.
Note: Be extremely careful when using any destructive command. There’s no “Undo“ command or a Recycle Bin (as in Windows) for these actions, so it is possible to accidentally destroy important files permanently.
Editing files
So far we’ve discussed file and directory manipulation, but this manipulation has been made at the object level. Now, we’ll look at how to edit and add content to files.
A good starting point for file editing is the nano command. Like the less command previously explained, the nano command occupies the entire terminal until the user exits.
The nano editor can open existing files or create new ones. If the user wants to create a new file, the name of the file must be typed when the nano editor is called. The following commands allow you to edit the sample01 file located in the home directory.
Code Listing 52
$ cd $ nano sample01 |
Then, the nano interface will appear on the screen.
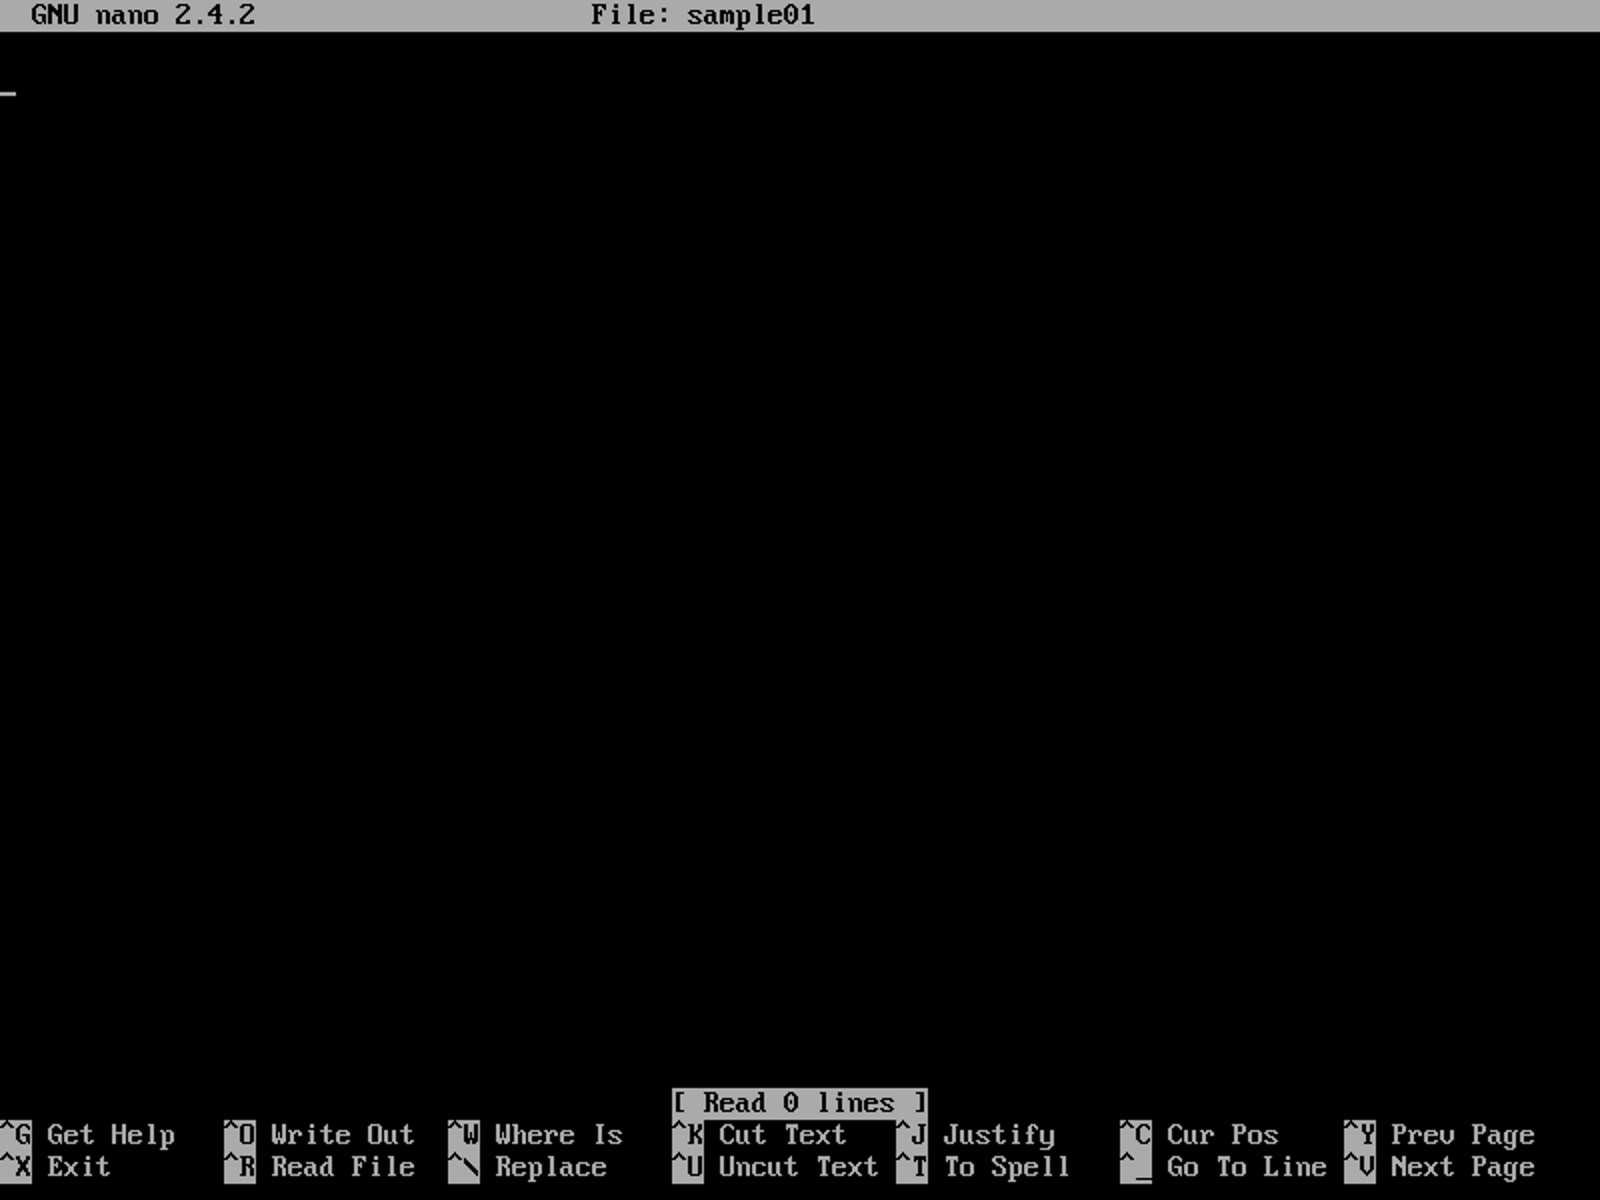
The nano Editor Interface
At the top of the screen, the name of the application and the name of the file are displayed. The content of the file (currently blank) is displayed at the middle, and a series of key combinations are displayed at the bottom of the screen. These combinations indicate some basic controls for the editor. The ^ character that appears in each combination means the Ctrl key.
Pressing Ctrl+G will display the help screen. Once the user finishes browsing the help screen, pressing Ctrl+X will bring the user back to the file for editing.
When the user is done editing the file, pressing Ctrl+O will save all the changes made to the file. Now, an entry appears at the bottom of the screen that allows the user to confirm the name for the file that will be saved.
![]()
Filename Confirmation Entry in nano Editor
To save the file, press Enter. Once the file is saved, the editor returns to its main screen to continue editing the file for further changes.
To quit the nano editor, the user can press Ctrl+X. If there are unsaved changes, the user will be asked about saving those changes.
![]()
Nano Editor Asking to Save Changes
The user can press Y to save the changes, N to discard them all and exit, or Ctrl+C to cancel the exit operation. If the user chooses to save the changes, the entry for the filename confirmation shown previously will appear. Again, to save the file, the user needs to press Enter. After the file is saved, the editor ends its execution.
Chapter summary
By now, the user has a basic understanding about Ubuntu Server filesystem navigation. This includes how to see the files and directories available with the ls command. The user should also know some basic file manipulation commands for viewing, copying, moving, or deleting files. Finally, some basic editing tasks were covered using the nano editor.
With these few skills, the user should be able to continue with the following chapters and learn how to get the most out of Ubuntu Server.
- 1800+ high-performance UI components.
- Includes popular controls such as Grid, Chart, Scheduler, and more.
- 24x5 unlimited support by developers.