
Twilio with C# Succinctly®

CHAPTER 2
Using Code Contracts
Note: The code samples in this book are available at bitbucket.org/syncfusiontech/c-code-contracts-succinctly.
A real-world example
There are a lot of examples illustrating the use of Code Contracts. A lot of them seem to use primitive non-real-world examples to explain the use of Code Contracts. While I understand the benefit of this, I feel that using a real-world example is preferable. So what would classify as a suitable example? Well, a couple of years ago I was working on a system that was being implemented to replace an existing ERP system. Both the old and new ERP systems used numerical serial numbers, but the integration we developed for the new ERP had to use only the new serial numbers.
The old ERP system was being retained for historical purposes, so the integration had to ensure that it only used the serial numbers that would be valid for the new ERP system. We decided to start all serial numbers above one hundred million. This meant that the first serial number created would be 100,000,001. Any serial number lower than this (while valid) should not be allowed into the new ERP system.
In Visual Studio 2015, start by adding the following using statement to your class.
using System.Diagnostics.Contracts; |
Code Listing 1: Required Using Statement
If you start writing the code for the Code Contracts without the using statement, Visual Studio 2015 will prompt you to add it via the new light bulb productivity feature, as shown in Figure 7.
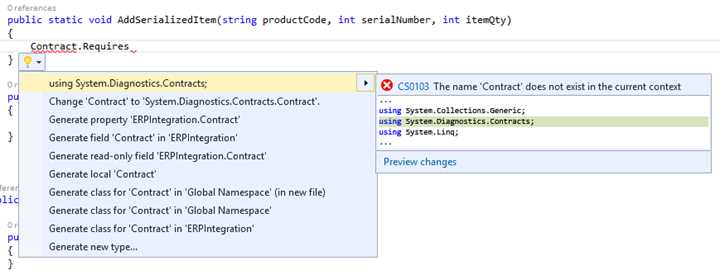
Figure 7: Visual Studio 2015 Light Bulb Feature
You will notice that Visual Studio 2015 suggests a few corrections. In Figure 7, you see that the using statement is the first suggestion, and is the fix we need to apply in this instance.
Visual Studio 2015 light bulbs
This productivity feature is new in Visual Studio 2015. Light bulbs appear automatically in the Visual Studio editor and provide error-fixing and refactoring suggestions to the developer on the current line of code being typed. Light bulbs can also manually be invoked by pressing Ctrl+Period on a line of code to see a list of potential fixes.
The Code Contract precondition
Consider the following code listing, which checks the value of the serial number being passed to the method. This method is used to add a serialized stock item to the inventory table of the new ERP system.
public static class ERPIntegration { public static void AddSerializedItem(string productCode, int serialNumber, int qty) { Contract.Requires<SerialNumberException> (serialNumber >= 100000001, "Invalid Serial number"); } } public class SerialNumberException : Exception { public SerialNumberException() { } public SerialNumberException(string message) : base(message) { } public SerialNumberException(string message, Exception inner) : base(message, inner) { } } |
Code Listing 2: Code Contract Precondition
The Contract.Requires statement denotes a precondition. Preconditions are the first statements in the method body. In the previous code listing, the precondition checks the value of the serial number passed to the method and determines if it is a valid serial number.
Now let us take a closer look at the actual Code Contract. The Code Contract is put together as follows: Contract.Requires<TException>(bool condition, string errorMessage) where TException : Exception. The Boolean condition is validated, and if it fails, the Code Contract will throw an exception with the message provided. Note that I have added a custom exception to the contract called SerialNumberException. It is derived from the Exception class, but you can add any applicable exception here to suit your requirements.
The format of the Code Contract in the preceding code listing is but one implementation. The following list illustrates the valid syntax for the Code Contract preconditions:
- Contract.Requires(bool condition)
- Contract.Requires(bool condition, string errorMessage)
- Contract.Requires<TException>(bool condition)
- Contract.Requires<TException>(bool condition, string errorMessage)
Personally, I prefer the combination of a specified exception class and the user-defined error message thrown if the condition expressed in the Code Contract fails. This provides the developer with a very powerful mechanism to ensure that the values passed to the method are valid. It also frees the developer from having to defensively code for every eventuality that might break the system. Knowing that the method under contract will always answer to the predetermined rules you specified gives you more peace of mind as a developer.
The Code Contract precondition in action
To illustrate the failure of the precondition defined in the Code Contract, I hard-coded an invalid serial number in the method call. Being a console application, the call to the method is wrapped in a try/catch statement that outputs the error to the console. Consider the following code listing.
static void Main(string[] args) { try { ERPIntegration.AddSerializedItem("BC32WL", 70012, 1); } catch (Exception ex) { Console.Write(ex.Message); Console.ReadLine(); } } |
Code Listing 3: The Code Contract Precondition in Action
When the console application is run, the exception is thrown and displayed in the console window. When using a Code Contract that has a custom exception, such as the one shown in Code Listing 2, you must set the Code Contracts Assembly Mode property to Standard Contract Requires.

Figure 8: Precondition Failed
This preceding example is a rather simple way to illustrate the power of Code Contracts. In a production system, however, one would obviously not have hard-coded values in the method call. The possibility that these values would come from a database or from user input is very high. As we all know, all input (user or data store) is something beyond our control, and we should treat it as such. Code Contracts mitigate the negative effects of bad data.
While the preceding example is functional, I want more from my Code Contract. I do not want to run my application and then realize that there are sections of code that cause my contracts to fail. Personally, I would like to see any failures at the moment I build my project. This project is small enough, so I can be a bit cavalier with the Code Contract properties as specified in the Project Properties window.
Fail build on warnings
Return to the Code Contracts property page, and if you haven’t already done so, enable Perform Static Contract Checking. Next, you need to clear the Check in background option. Then you will see that the Fail build on warnings option is enabled. Select this option.

Figure 9: Enable Fail Build on Warnings
Go ahead and build your project. Static Contract Checking kicks in immediately, and because your Code Contract does not pass, your build will fail, as shown in Figure 10. There is, however, a problem. Your Error List is empty even though your build failed. Because we only have a single Code Contract, we know where to look. This, however, isn’t feasible when we have several code contracts.
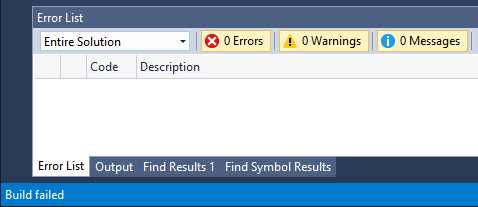
Figure 10: Visual Studio 2015 Build Failed
So what went wrong? To find the issue causing the build failure, head over to the Output window. If you don’t see the Output window, press Ctrl+W, O to bring it into view. You will then see the results of the build and the Code Contract that failed.
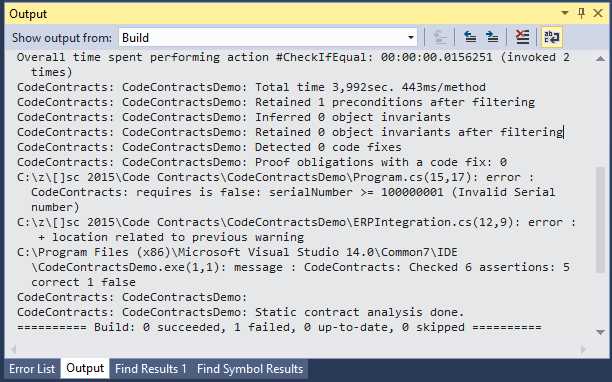
Figure 11: Visual Studio Output Window
With the current version 1.9.10714.2 of Code Contracts, the build errors not being output to the Error List has been identified as a bug in the release for Visual Studio 2015. This bug has been fixed and will be included in the next release of Code Contracts. For more information on this issue relating to Code Contracts for Visual Studio 2015, have a look at pull request 166 and issue 137 on GitHub. If you want to view all the open issues regarding Code Contracts, have a look at the Issues on the Code Contracts GitHub page.
Code Contracts is the result of a handful of dedicated individuals who continually work to improve the current version. It’s up to users like us to report issues we come across, and in doing so, build a healthy community of influencers and a more stable product. Lastly, since it’s open source, you can contribute to Code Contracts and be a part of this incredible Visual Studio extension.
The Code Contract postcondition
The Code Contract postcondition is the method under contract’s way of guaranteeing to the calling code that it will return a specific result if all the preconditions are met. Let us go back to the analogy of a bank and a loan for which a contract is drawn up. The bank ensures that the loan will have a fixed interest rate, but only if the repayments are made on time and for the amount due. The payments made by you can be equated to the preconditions of the Code Contract. The fact that the bank ensures a fixed interest rate can be equated to the postcondition.
It is therefore no surprise that the syntax of Code Contract postconditions use the Ensures method. Another interesting point to take note of is that while the postcondition validates the result of the method under contract, it must appear immediately after the preconditions in the method. Consider the following code sample:
public static Warehouse AddSerializedItem(string productCode, int serialNumber, int qty) { Contract.Requires<SerialNumberException> (serialNumber >= 100000001, "Invalid Serial number"); Contract.Ensures(Contract.Result<Warehouse>() != null); ProductCode = productCode; SerialNumber = serialNumber; Quantity = qty; return CreateItem(); } |
Code Listing 4: Contract Postcondition
As you can see from the previous code listing, I have expanded our method slightly. I have added the postcondition that tells the calling code that the return value of this method will be of type Warehouse and that it will not be null. The calling code therefore does not need to check if the object being returned to it is valid or not. The contract specifies that it will return a Warehouse object to it.
Contract.Ensures(Contract.Result<Warehouse>() != null); |
Code Listing 5: The Code Contract Ensures a Result
In the real-world example, this basically means that the created stock item will be issued to a specific warehouse based on a certain condition (the product code). The product code identifies the product as a fast mover, raw material, finished good, etc., and has to be issued to the correct warehouse upon creation. Our AddSerializedItem method under contract tells the calling code that it ensures the result of this warehouse issue will be stored in the Warehouse object. If anything goes wrong, the product code will be issued to a default warehouse. Users of the ERP system can inspect items stored in the default warehouse and manually issue the product codes to the correct warehouse at a later stage.
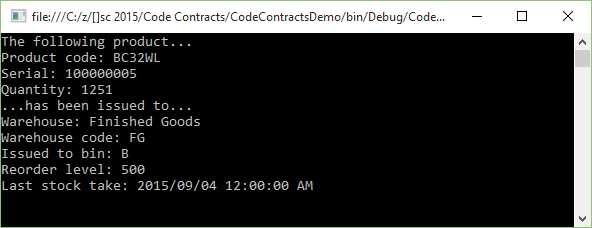
Figure 12: Code Contract Postcondition Result
I have included the CreateItem() method’s code in the following code listing. While this code sample is shown merely to explain a concept, the logic is sound. The switch statement will have a fixed set of cases it examines, as shown in Code Listing 5. It would not, however, have hard-coded values for the Warehouse object it returns. These would be read from a database or other object as the code interacts with the ERP to create the product code entry and issue it to a warehouse. What the code logic does ensure is that the method will always return a Warehouse object, and that object will always be a valid warehouse in the system.
private static Warehouse CreateItem() { // Add Stocked Item code goes here Warehouse IssuedToWarehouse = new Warehouse(); switch (ProductCode.Substring(0,1)) { case "A": IssuedToWarehouse.Code = "FM"; IssuedToWarehouse.Name = "Fast movers"; IssuedToWarehouse.Bin = "A"; IssuedToWarehouse.BinReorderLevel = 10000; IssuedToWarehouse.LastStockTake = Convert.ToDateTime("2015-09-01"); break; case "B": IssuedToWarehouse.Code = "FG"; IssuedToWarehouse.Name = "Finished Goods"; IssuedToWarehouse.Bin = "B"; IssuedToWarehouse.BinReorderLevel = 500; IssuedToWarehouse.LastStockTake = Convert.ToDateTime("2015-09-04"); break; case "C": IssuedToWarehouse.Code = "RM"; IssuedToWarehouse.Name = "Raw Materials"; IssuedToWarehouse.Bin = "AD"; IssuedToWarehouse.BinReorderLevel = 7500; IssuedToWarehouse.LastStockTake = Convert.ToDateTime("2015-09-02"); break; default: IssuedToWarehouse.Code = "GS"; IssuedToWarehouse.Name = "General Stock"; IssuedToWarehouse.Bin = "SS"; IssuedToWarehouse.BinReorderLevel = 5000; IssuedToWarehouse.LastStockTake = Convert.ToDateTime("2015-09-09"); break; } return IssuedToWarehouse; } |
Code Listing 6: Warehouse Issue Logic
You can see how postconditions can be used in Code Contracts to create highly robust code. Think of a developer working in a distributed team. Being able to work from anywhere in the world has many advantages and disadvantages (depending on your point of view). The absence of personal, one-to-one communication can be construed as a distinct disadvantage. Not being able to sit in a boardroom where developers can flesh out a problem together remains a challenge. Your brain can subconsciously infer feelings, meanings, and viewpoints based on the multitude of other signals (such as body language, eye movement, or breathing) that we tend to give out.
Communication is more than just the act of speaking. Therefore, as developers, we need to become sharper and heighten our effectiveness in other areas. A great place to start is at the code. With Code Contracts, we are able to defensively preempt certain conditions that may occur. Just because the specification doesn’t explicitly mention that a null condition would break the integration, that doesn’t mean we don’t need to defend against it.
The preceding example shows how developers can bullet-proof code against certain issues that logically could adversely affect the integration.
The Code Contract invariant
Code Contracts allow for the verification of a class’ internal state. It does this via the use of Code Contract invariants. As the name suggests, an invariant is something that can never change. It will always be as it is specified in the class under contract.
We now know that our AddSerializedItem method must be supplied with a valid serial number. Valid serial numbers fall within a specific range.
Contract.Requires<SerialNumberException> (serialNumber >= 100000001, "Invalid Serial number"); |
Code Listing 7: Contract Requires Condition
We also know that the method under contract guarantees the calling code that a non-null Warehouse object will be returned when the valid serial number precondition is met.
Contract.Ensures(Contract.Result<Warehouse>() != null); |
Code Listing 8: Contract Ensures Condition
Let us now assume that additional logic has to be added that needs to check the validity of the production date. This date can be in the future as well, so this needs to be supplied by an external data store, user entry, or lookup.
This is quite easy, and accomplished by adding a new private method to the class that has the [ContractInvariantMethod] attribute applied to it. If we had to add this check on the Warehouse class, we would need to add the following code to it.
[ContractInvariantMethod] private void Invariants() { Contract.Invariant(this.ProductionYear >= 0); Contract.Invariant(this.ProductionMonth >= 0); Contract.Invariant(this.ProductionMonth <= 12); Contract.Invariant(this.ProductionDay >= 0); Contract.Invariant(this.ProductionDay <= 30); } |
Code Listing 9: Contract Invariant Method
This tells the Code Contracts that the following properties for the production date have to fall within the following ranges. None of them can be zero, the number of months can’t be greater than 12, and the days can have a maximum value of 30 (assume we’re working with 30-day months).
Usually, you can call the contract invariant method anything you like, but many prefer to call it ObjectInvariant. Another point to note regarding the preceding code listing is that the method must have a void return type and be scoped as private or protected.
Code Contract invariant methods allow us to specify the state of a class that is not allowed to change. The code is short and easy to understand and implement.
Other Code Contract methods
Code Contracts also contain various other methods for use in your code. Let us have a look at these examples in the following sections.
Contract Assert and Assume
Some of you might be wondering what the difference is between Debug.Assert and Contract.Assert when used in your code. Debug.Assert is only executed when your code is compiled in Debug mode. The Contract.Assert method, however, is executed when you debug your code in Debug or Release mode.
The Assert method in Code Contracts can also easily be confused with the Contract.Requires method. As we saw in previous code listings, the Requires method is a precondition and must always be called at the start of a specific method. This is because Contract.Requires contains information regarding the method it resides in. Contract.Assert and Contract.Assume, on the other hand, are specific to a certain bit of code at some point in time within the method under contract.
So when do we use which method? With Assert, the static checker runs and will try to prove the assertion at that specific line of code. Assume will let the static checker simply assume that whatever the check is it needs to prove, is true. So why have both? Consider the next code listing.
public void CompleteBinPreparation(int quantityRequired) { QuantityRequired = quantityRequired; int available = BinQtyAvailable(); Contract.Assert(QuantityRequired <= available, "Quantity required exceeds available bin quantity"); }
public int BinQtyAvailable() { MaxBinQuantity = 75; CurrentBinQuantity = 50; int QtyAvailable = MaxBinQuantity - CurrentBinQuantity; return QtyAvailable; } |
Code Listing 10: Assert Static Check
The code in Code Listing 10 checks to see if the Bin containing the parts has enough space to contain the required quantity. With the Assert method, we are letting the static checker inspect the value of the QuantityRequired variable. If we had to pass through a value of 77 for QuantityRequired, we would see the static checker emit a warning and fail the build (remember, we turned on Fail build on warnings in the Code Contracts property page).
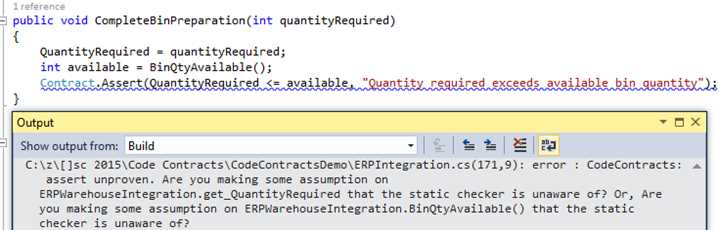
Figure 13: Assert Failed
If we had to modify the code in Code Listing 10 to contain an Assume, the output would be quite different indeed. Consider the code in the following listing.
public void CompleteBinPreparation(int quantityRequired) { QuantityRequired = quantityRequired; int available = BinQtyAvailable(); Contract.Assume(QuantityRequired <= available, "Quantity required exceeds available bin quantity"); }
public int BinQtyAvailable() { MaxBinQuantity = 75; CurrentBinQuantity = 50; int QtyAvailable = MaxBinQuantity - CurrentBinQuantity; return QtyAvailable; } |
Code Listing 11: Assume Static Check
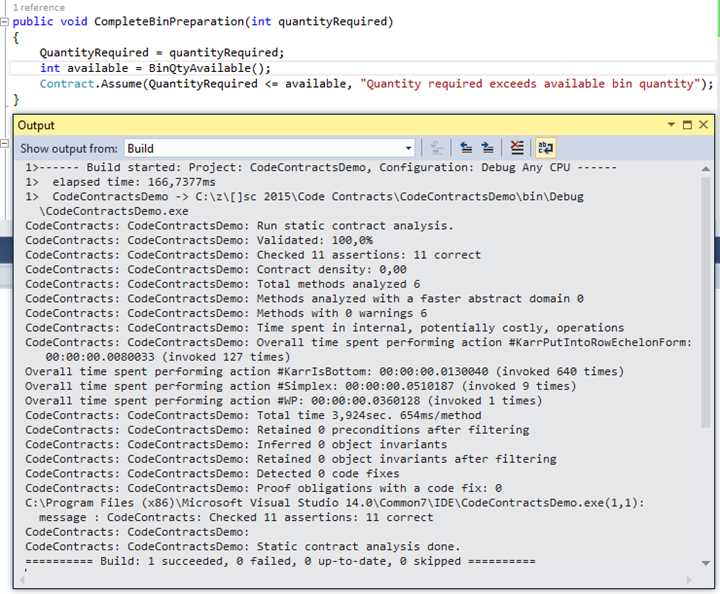
Figure 14: Assume Passed
When we use Contract.Assume, we are telling the static checker that it needs to assume that the condition under contract is true. Why would we want to do this? Well, the previous code in Code Listing 11 was calling a method we had control over. We could logically add a Contract.Ensures to the BinQtyAvailable method to guarantee that it will conform to the Code Contract. Consider for a minute, however, that we are calling a method in another external library. We do not have control over the code contained in that DLL and the developers didn’t implement Code Contracts. They do, however, guarantee that the value returned will always take the required quantity into account and return a bin with a sufficient quantity available. We can therefore tell the static checker to assume that this contract condition passes.
Note that the previous examples regarding Assert and Assume only apply to the static checker. Because we have Perform Runtime Contract Checking on and set to Full, the Contract.Assume will still fail during run-time if the condition being checked fails (the external library returns an invalid value for the available bin quantity).
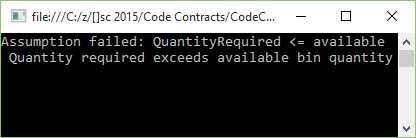
Figure 15: Assume Failed at Runtime
Assert and Assume make for a very powerful combination when dealing with external code and making sure that what you are expecting is returned and valid in the way you require.
Lastly, you can change the Warning Level in the Code Contracts property page. If you are expecting to see certain warnings in your Output window but are not, be sure to change the Warning Level to high.
Contract.ForAll
Before I continue to explain the Contract.ForAll logic, I have to point out that it currently fails to validate statically in Visual Studio 2015. Issue 177 has been logged on GitHub for this problem, and there is a workaround provided in the thread. To read more, go to github.com/Microsoft/CodeContracts/issues/177.
For now, I will need to disable static checking to illustrate the use of the Contract.ForAll method. To disable static checking, right-click your project in Visual Studio’s Solution Explorer and select Properties. The Code Contracts property page will open. Click on the Code Contracts tab.
This is the same page we accessed previously. Under the Static Checking group, clear the Perform Static Contract Checking option.

Figure 16: Disable Static Contract Checking
Once this is done, you should be able to have the Code Contract perform the required action and validate the condition you specified.
With that out of the way, let’s modify our CompleteBinPreparation method. The business rules require that before a bin can be processed, the quantity needs to be greater than 5. Let’s build this contract by requiring that the binQuantities array never be null. As explained previously, this is easily done by adding the Contract.Requires method.
Next, we need to add Contract.Assert to include the Contract.ForAll method. This will then use a lambda expression to check that all the quantities are greater than 5. The implementation is shown in the following code listing.
public void CompleteBinPreparation(int[] binQuantities) { Contract.Requires(binQuantities != null); Contract.Assert(Contract.ForAll(binQuantities, x => x > 5), "Some Bins contain invalid quantities"); // Process bin quantities BinCount = binQuantities.Length; } |
Code Listing 12: Contract.ForAll Example
If our method under contract passes the validation, it will simply return the bin count in the array. If, for example, the array contains invalid bin quantities, an exception will be displayed.
In our calling code, we will now add an array that contains a few invalid bin quantities. We can see that the quantities 4 and 3 are less than 5, and therefore invalid.
static void Main(string[] args) { try { int[] iBins = { 4, 3, 61, 51, 88, 55 }; ERPWarehouseIntegration oWhi = new ERPWarehouseIntegration(); oWhi.CompleteBinPreparation(iBins); Console.Write("Bin Count: " + oWhi.BinCount); Console.ReadLine(); } catch (Exception ex) { Console.Write(ex.Message); Console.ReadLine(); } } |
Code Listing 13: Calling Contract.ForAll Method
If we run the code, the console application will throw the exception and display the error message to the user.

Figure 17: Invalid Bin Quantities
Let us now modify our calling code to contain only valid bin quantities in the iBins array. You will see that I have changed the invalid bin quantities of 4 and 3 to 32 and 19, respectively.
If you run the application a second time, it will cause the Code Contract to pass validation and display the bin count in the console application.
static void Main(string[] args) { try { int[] iBins = { 32, 19, 61, 51, 88, 55 }; ERPWarehouseIntegration oWhi = new ERPWarehouseIntegration(); oWhi.CompleteBinPreparation(iBins); Console.Write("Bin Count: " + oWhi.BinCount); Console.ReadLine(); } catch (Exception ex) { Console.Write(ex.Message); Console.ReadLine(); } } |
Code Listing 14: Modified Calling Code
The console application now displays the count of valid bins, which means the Code Contract passed validation.

Figure 18: Valid Bin Quantities
As you can see, the Contract.ForAll method provides a fantastic way to check arrays of values for entries that could cause problems further down the path of execution if they contravene a business rule. The Contract.ForAll method can also be used with List collections, or any IEnumerable collection.
Contract.Exists
For a moment, let’s assume a bin number that needs to be processed goes into a batch of processed bins for 30 days. The system does not know when a bin enters a process phase, and therefore needs to check each bin number before it’s processed to ensure that it doesn’t already exist in the process queue. Code Contracts provide a nice solution here, too.
Create a method called ProcessBin and add the Contract.Requires method to check that the parameter passed to the method is not null. Then add the Contract.Assert method to include the Contract.Exists method. This checks to see if the processed queue ProcessedBins contains the bin we want to process. The following code listing illustrates this implementation.
public void ProcessBin(string bin) { Contract.Requires(bin != null); Contract.Assert(!Contract.Exists(ProcessedBins(), x => string.Compare(x, bin, true) == 0), "Bin " + bin + " already processed");
// Process bin and add to ProcessedBins collection } private List<string> ProcessedBins() { List<string> oBinsProcessed = new List<string>(); oBinsProcessed.Add("A12"); oBinsProcessed.Add("CD25"); oBinsProcessed.Add("ZX4R"); oBinsProcessed.Add("A11"); return oBinsProcessed; } |
Code Listing 15: Contract.Exists Implementation
In the calling code, we will just use a hard-coded value for the bin number to check. Call the method under contract and pass it a bin that is already in the process queue.
static void Main(string[] args) { try { string BinToProcess = "ZX4R"; ERPWarehouseIntegration oWhi = new ERPWarehouseIntegration(); oWhi.ProcessBin(BinToProcess); Console.Write("Bin " + BinToProcess + " processed"); Console.ReadLine(); } catch (Exception ex) { Console.Write(ex.Message); Console.ReadLine(); } } |
Code Listing 16: Calling Contract.Exists Method
The Code Contract validates if the bin exists in the process queue and displays the output to the user in the console application.
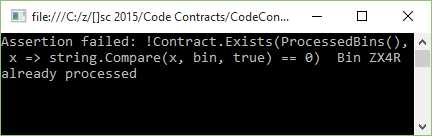
Figure 19: Bins Exist in Process Queue
Going back to our calling code, let us change the bin number to one that doesn’t exist in the process queue.
static void Main(string[] args) { try { string BinToProcess = "SSX4R"; ERPWarehouseIntegration oWhi = new ERPWarehouseIntegration(); oWhi.ProcessBin(BinToProcess); Console.Write("Bin " + BinToProcess + " processed"); Console.ReadLine(); } catch (Exception ex) { Console.Write(ex.Message); Console.ReadLine(); } } |
Code Listing 17: Modified Calling Code
If we run the application a second time, the bin will be processed and a confirmation message will be displayed to the user in the console application.

Figure 20: Bin Does Not Exist in Process Queue
Contract.Exists allows developers to easily verify the existence of an item based on certain business rules in the system you design.
Contract.OldValue<>
A couple of years ago, I worked on a project for a steel manufacturer. They had a very specific scrap process to follow when off-cuts were produced by cutting steel plates into specific sizes. Another project I worked on had a specific scrap workflow to process. Scrap is something many companies take very seriously, and they need to manage the process carefully.
For the next example of Code Contracts, I will use the scrap process to illustrate the use of the Contract.OldValue<> method. I have to mention, though, that the Contract.OldValue<> method can only be used in the conditional expression for the Ensures contract.
Let us assume that the steel manufacturer needs to minimize the amount of off-cuts produced by the cutting process. To do this, they use a calculation that takes the volume of steel to be cut, and calculate the amount of steel that can be used based on the cutting factor. A perfect cut means that if the volume of steel is 10 m3, then the resulting cut of steel will also be equal to 10 m3. All of the steel has therefore been consumed and resulted in zero off-cuts.
An imperfect cut would result in less than the original volume of steel, and this would mean that the user will need to change the cutting factor until they can ensure a near-perfect cut. Without going into more detailed specifics regarding thresholds and limits, let us assume that if anything other than a perfect cut is returned, the cutting process is not approved.
Consider the following code listing.
public void CutSteelNoScrap(int volumeSteel, int factor) { Contract.Ensures(volumeSteel != 0, "The volume of steel can't be zero"); Contract.Ensures(Contract.OldValue<int>(volumeSteel) == CutSteel(volumeSteel, factor) + volumeSteel, "The factor used will result in scrap. Please modify the cutting factor."); // Process steel to cut }
private int CutSteel(int volumeToCut, int factor) { return volumeToCut % factor; } |
Code Listing 18: Contract.OldValue<> Implementation
As you can see, I have simply used a modulus operator to simulate the existence of off-cuts based on the incorrect factor. The modulus operator simply returns the remainder of a division and is denoted by the % operator. Therefore, the following is true:
19 % 5 = 4
12 % 4 = 0
It’s crude, but it’s effective in illustrating the point I need to make. In the calling code, we call the CutSteelNoScrap method to perform the calculation and tell us if the factor used is incorrect and generates scrap.
static void Main(string[] args) { try { int steelVolume = 4; int cutFactor = 3; ERPWarehouseIntegration oWhi = new ERPWarehouseIntegration(); oWhi.CutSteelNoScrap(steelVolume, cutFactor); Console.Write("Steel fully consumed by cutting process"); Console.ReadLine(); } catch (Exception ex) { Console.Write(ex.Message); Console.ReadLine(); } } |
Code Listing 19: Calling Code
The Contract.OldValue method will inspect the value of the variable volumeSteel and see if the new value returned by the CutSteel method is zero. If it is zero, the sum of volumeSteel and CutSteel will equal zero. We therefore know that the factor resulted in no off-cuts.
If, however, the sum of volumeSteel and CutSteel is not equal to volumeSteel, then the factor resulted in off-cuts being generated by the cutting process. Running the console application with a steel volume value of 4 m3 and a factor of 3 results in off-cuts.
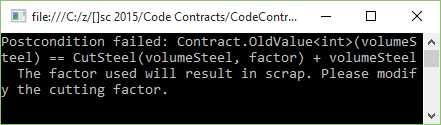
Figure 21: Contract.OldValue<> Fails
Go ahead and modify the previous code listing so that the factor is changed to a value that will not produce a remainder when used in the modulus calculation. Change it to a value of 2 and run the console application again.
static void Main(string[] args) { try { int steelVolume = 4; int cutFactor = 2; ERPWarehouseIntegration oWhi = new ERPWarehouseIntegration(); oWhi.CutSteelNoScrap(steelVolume, cutFactor); Console.Write("Steel fully consumed by cutting process"); Console.ReadLine(); } catch (Exception ex) { Console.Write(ex.Message); Console.ReadLine(); } } |
Code Listing 20: Modified Calling Code
The console application now returns a perfect cut for the given factor and steel volume.
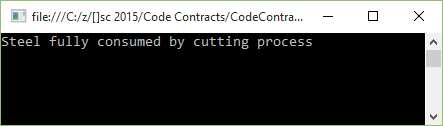
Figure 22: Contract.OldValue<> Passes
While the preceding code listing is an extremely simple way to illustrate the use of the Contract.OldValue<> method, it can be expanded to provide much more benefit in validating that methods conform to certain business rules.
Contract.Result<>
It is prudent to note that the Contract.Result<> method cannot be used in a method that has a void return type. To illustrate the use of this contract, we can reuse the previous code listings and modify them slightly.
public int ProductionVolumePerBin(int binVolume, int factor) { Contract.Ensures(Contract.Result<int>() == binVolume, "The factor used will result in scrap. Please modify the cutting factor."); int remainder = CutSteel(binVolume, factor); return binVolume - remainder; } private int CutSteel(int volumeToCut, int factor) { return volumeToCut % factor; } |
Code Listing 21: Contract.Result<>
We can see that the preceding code listing tells the calling method that the method under contract will result in the cut volume always equaling the bin volume. This means that all the steel has been cut perfectly and no off-cuts were made by using the specific factor.
The calling code also doesn’t differ much either.
static void Main(string[] args) { try { int binVolume = 4; int cutFactor = 2; ERPWarehouseIntegration oWhi = new ERPWarehouseIntegration(); oWhi.ProductionVolumePerBin(binVolume, cutFactor); Console.Write("Steel fully consumed by cutting process"); Console.ReadLine(); } catch (Exception ex) { Console.Write(ex.Message); Console.ReadLine(); } } |
Code Listing 22: Calling Code
If we ran the preceding code with the factor of 2 and the volume of 4, we would get a perfect cut.
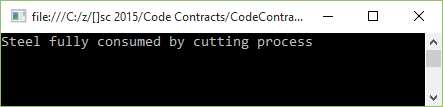
Figure 23: Contract Results in Perfect Cut
If, however, we had to modify the calling code again to a factor that would not satisfy the Contract.Result<> condition, the following would be output to the console application.
static void Main(string[] args) { try { int binVolume = 9; int cutFactor = 2; ERPWarehouseIntegration oWhi = new ERPWarehouseIntegration(); oWhi.ProductionVolumePerBin(binVolume, cutFactor); Console.Write("Steel fully consumed by cutting process"); Console.ReadLine(); } catch (Exception ex) { Console.Write(ex.Message); Console.ReadLine(); } } |
Code Listing 23: Modified Calling Code
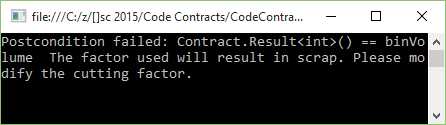
Figure 24: Contract.Result<> Failed
Code Contracts allow us to define exactly what needs to be validated in order for a specific method to pass the contract conditions. Being able to add several contract methods in a single method makes your code more robust and bug-free.
Contract.ValueAtReturn<>
Sometimes you might need to use out parameters in your methods. Code Contracts can easily be applied here, too. Let us use a slightly modified example of Contract.Result<> to illustrate this concept.
Keeping with the steel manufacturing code demo, assume that we need to ensure that all bins are filled to capacity given a specific volume of steel. Our out parameter is a bin over count. If this value is greater than zero, it means that the steel volume exceeds the maximum volume that the bins can hold. To achieve this logic, I will use the modulus operator again.
public void EnsureAllBinsFilled(out int binOverCount, int binVol, int steelVol) { Contract.Ensures(Contract.ValueAtReturn<int>(out binOverCount) == 0, "The steel volume exceeds the bin volume"); binOverCount = steelVol % binVol; } |
Code Listing 24: Contract.ValueAtReturn
Our method under contract needs to specify that the out parameter binOverCount never be greater than zero. To achieve this, we need to use the Contract.Ensures method along with the Contract.ValueAtReturn<> method.
In Code Listing 24, you will notice that the Contract.ValueAtReturn<> references the out parameter binOverCount and specifies that it must always equal zero.
To implement the method, refer to the following code sample.
static void Main(string[] args) { try { int steelVolume = 10; int binVolume = 3; int binWastedSpace = 0; // This must always equal zero ERPWarehouseIntegration oWhi = new ERPWarehouseIntegration(); oWhi.EnsureAllBinsFilled(out binWastedSpace, binVolume, steelVolume); Console.Write("All bins filled"); Console.ReadLine(); } catch (Exception ex) { Console.Write(ex.Message); Console.ReadLine(); } } |
Code Listing 25: Calling Code
The value of binWastedSpace will need to remain equal to zero for the method under contract to pass validation. If we ran this code, we would see that the values provided for steelVolume and binVolume cause the application to throw an exception.
The exception notifies the user that the steel volume exceeds the maximum volume of the bins provided for the operation.
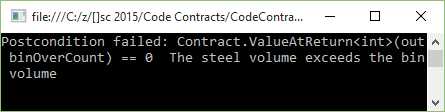
Figure 25: Contract.ValueAtReturn<> Failed
If we had to modify the calling code to provide valid values for the parameters steelVolume and binVolume, our application would pass validation.
static void Main(string[] args) { try { int steelVolume = 10; int binVolume = 2; int binWastedSpace = 0; // This must always equal zero ERPWarehouseIntegration oWhi = new ERPWarehouseIntegration(); oWhi.EnsureAllBinsFilled(out binWastedSpace, binVolume, steelVolume); Console.Write("All bins filled"); Console.ReadLine(); } catch (Exception ex) { Console.Write(ex.Message); Console.ReadLine(); } } |
Code Listing 26: Modified Calling Code
All I have done is change the value of the bin volume to 2. Running the application results in a successful validation of the bin logic.
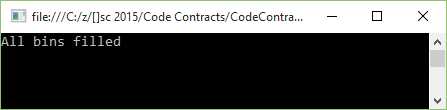
Figure 26: Contract.ValueAtReturn<> Succeeded
Without having to write extensive code logic to validate incoming and return values, we have provided a lot of validation code in the form of Code Contracts.
- 1800+ high-performance UI components.
- Includes popular controls such as Grid, Chart, Scheduler, and more.
- 24x5 unlimited support by developers.