
Twilio with C# Succinctly®

CHAPTER 3
Some Useful Tips
Using code snippets
You are likely already familiar with code snippets in Visual Studio; Code Contracts also provide this feature. When installing Code Contracts, the snippets are added. If you are using C#, you simply type the shortcut and press the Tab key twice.
In Visual Basic, the use of code snippets is slightly different. Type the shortcut and press the Tab key. There are subtle differences between the shortcut keys in C# and Visual Basic. The Contract.Requires shortcut, for example, is invoked in C# by typing cr, but in Visual Basic, it is invoked by typing creq.
C# Code Snippets
The following code listings illustrate the C# code snippet shortcuts. The shortcut used is the first line that is commented out followed by the code generated by the snippet.
//cr Contract.Requires(false); |
Code Listing 27: Contract.Requires Snippet
//ce Contract.Ensures(); |
Code Listing 28: Contract.Ensures Snippet
//ci Contract.Invariant(false); |
Code Listing 29: Contract.Invariant Snippet
//crr Contract.Result<int>() |
Code Listing 30: Contract.Result Snippet
//co Contract.OldValue(x) |
Code Listing 31: Contract.OldValue Snippet
//cim [ContractInvariantMethod] [System.Diagnostics.CodeAnalysis.SuppressMessage( "Microsoft.Performance", "CA1822:MarkMembersAsStatic", Justification = "Required for code contracts.")] private void ObjectInvariant() { Contract.Invariant(false); } |
Code Listing 32: ContractInvariantMethod Snippet
//crn Contract.Requires(arg != null); |
Code Listing 33: Contract.Requires Not Null Snippet
//cen Contract.Ensures(Contract.Result<string>() != null); |
Code Listing 34: Contract.Ensures Contract.Result Snippet
//crsn Contract.Requires(!String.IsNullOrEmpty(arg)); |
Code Listing 35: Contract.Requires String with Value Snippet
//cesn Contract.Ensures(!String.IsNullOrEmpty(Contract.Result<string>())); |
Code Listing 36: Contract.Ensures Contract.Result with String Value Snippet
//cca Contract.Assert(false); |
Code Listing 37: Contract.Assert Snippet
//cam Contract.Assume(false); |
Code Listing 38: Contract.Assume Snippet
//cre Contract.Requires<ArgumentException>(false); |
Code Listing 39: Contract.Requires with ArgumentException Snippet
//cren Contract.Requires<ArgumentNullException>(arg != null, "arg"); |
Code Listing 40: Contract Requires Argument Not Null Snippet
//cresn Contract.Requires<ArgumentException>(!String.IsNullOrEmpty(arg)); |
Code Listing 41: Contract.Requires String Parameter with Value
//cintf #region IFoo contract binding [ContractClass(typeof(IFooContract))] public partial interface IFoo { } [ContractClassFor(typeof(IFoo))] abstract class IFooContract : IFoo { } #endregion |
Code Listing 42: Interface Template and Associated Contract Class Snippet
Extending code snippets
This next section is not, strictly speaking, exclusive to Code Contracts, but I would be remiss if I didn’t mention the ability you have to extend your code snippets. I have always found that extending code snippets is a bit of a hassle. Luckily for developers, there are some really generous community members out there that create excellent extensions for Visual Studio. Snippet Designer is one such extension.
Before you can use it, you will need to install Snippet Designer from the Extensions and Updates under the Tools menu.

Figure 27: Visual Studio Extensions and Updates Menu Item
Once you have installed Snippet Designer, it will appear under your installed extensions.

Figure 28: Snippet Designer Extension
At its most basic, Snippet Designer gives you the ability to generate code snippets on the fly. Regarding Code Contracts, there are a set few that I always want to include within my methods. I want to be able to chain them together under a single code snippet, and for this, Snippet Designer is very well suited.
Highlight the Code Contracts you want to create a snippet of, open the context menu, and click Export as Snippet.

Figure 29: Export as Snippet
The Snippet Designer window is now displayed in a new tab within the Visual Studio 2015 IDE.

Figure 30: Snippet Designer Editor
Please note that the pink highlight is not a feature of Snippet Designer; it’s another great extension called Heat Margin. This, however, is beyond the scope of this book.
In the Snippet Designer window, you can see the code you highlighted in the editor window.
Select the section of code that you want replaced at the time of generation. Then, right-click and select Make Replacement from the context menu.

Figure 31: Make Replacement

Figure 32: Completed New Snippet
You will see that the parameter is replaced by a placeholder and the properties of that placeholder are defined in the Replacements grid. All that is left to do is give the shortcut a name (I called mine ccre for “Code Contract Requires Ensures”) and save your code snippet.
In the code editor of Visual Studio, type the ccre shortcut and press the Tab key twice. My code snippet is inserted for me with the parameter identified as a replacement highlighted so that I can edit it immediately.

Figure 33: Code Snippet Inserted
This is an extremely easy tool to use, and I have not even begun to explore the possibilities it provides developers. My focus here is simply to illustrate that code snippets can be extremely useful to developers and can be extended to suit your specific needs during development.
Code Contract documentation generation
One thing that I am sure most (if not all) developers dislike is creating documentation. It has become somewhat of the elephant in the room in many project meetings. Everybody knows that documentation is essential, and I am sure that there are a lot of developers out there that do create concise and rich documentation. This has obviously led to many tools and extensions that aim to make this process easier.
It therefore makes sense that Code Contracts can also integrate documentation of the included contracts. To enable the documentation generation, you need to open the Build tab of your project properties.

Figure 34: Enable XML Documentation File
Here, you need to select the XML documentation file option. If you don’t enable this option, the documentation XML file will not be created. Here you can also specify an output path and a name for the documentation file.
The next option you need to modify is in the Code Contracts tab. If you scroll to the bottom of the Code Contracts tab, you will see that the Contract Reference Assembly value is not specified. Change this to Build.
Lastly, you must ensure that the Emit contracts into XML doc file option is selected. This will make the Code Contract comments part of the generated documentation file.

Figure 35: Enable Code Contracts Documentation
You then need to ensure that you have added good comments to your code. It’s a habit you need to get into as soon as you create a new method or line of code where the logic isn’t obvious. On the flip side, having too many comments in your code is also not a good idea. So when should you comment, and when should you not? A good rule of thumb is to only comment code when the logic behind the code isn’t obvious.
In the following code listings, the logic is obvious in the first one (Code Listing 43), so commenting is not actually needed. In Code Listing 44, however, the use of the modulus operator should be explained in a comment because the reason for doing this isn’t obvious.
//Bad comment: Calculate the available quantity int QtyAvailable = MaxBinQuantity - CurrentBinQuantity; |
Code Listing 43: Unnecessary Code Comment
//Good comment: Use modulus to determine if the factor produces any scrap return volumeToCut % factor; |
Code Listing 44: Comment Clearly Explains Logic
A well-commented method might look as follows.
/// <summary> /// Calculate any remainder after the modulus operation between volume and factor /// </summary> /// <param name="volumeToCut"></param> /// <param name="factor"></param> /// <returns>Remainder after cutting</returns> private int CutSteel(int volumeToCut, int factor) { // Use modulus to determine if the factor produces any scrap return volumeToCut % factor; } |
Code Listing 45: Well-Commented Method
After adding relevant comments, you need to build your solution. You need to be aware of any warnings you might receive during your build when the documentation file is being generated. These will usually be related to missing XML comments in your source code. It’s a good idea to go ahead and fix these by adding clear and relevant code comments to your methods and properties.
After the build has completed, your XML document will be found in the path you specified when you configured your build settings. In this example, the XML document generated includes the Code Contract descriptions.
<?xml version="1.0"?> <doc> <assembly> <name>CodeContractsDemo</name> </assembly> <members> <member name="T:ERPWarehouseIntegration"> <summary> ERP Warehouse Integration class to manage the cutting of steel volume and available bin quantities </summary> </member> <member name="P:ERPWarehouseIntegration.MaxBinQuantity"> <summary> The maximum bin quantity for bins </summary> </member> <member name="P:ERPWarehouseIntegration.CurrentBinQuantity"> <summary> The current bin quantity available </summary> </member> <member name="M:ERPWarehouseIntegration.ProductionVolumePerBin(System.Int32,System.Int32)"> <summary> Calculate the production volume of steel per bin </summary> <param name="binVolume" /> <param name="factor" /> <returns>Bin Volume less Remainder</returns> <ensures description="The factor used will result in scrap. Please modify the cutting factor." csharp="result == binVolume" vb="result = binVolume">result == binVolume</ensures> </member> <member name="M:ERPWarehouseIntegration.CutSteel(System.Int32,System.Int32)"> <summary> Calculate any remainder after the modulus operation between volume and factor </summary> <param name="volumeToCut" /> <param name="factor" /> <returns>Remainder after cutting</returns> </member> <member name="M:ERPWarehouseIntegration.BinQtyAvailable"> <summary> Ensure that a non-negative value is returned for available bin quantity </summary> <returns>Available bin quantity</returns> <ensures csharp="result >= 0" vb="result >= 0">result >= 0</ensures> </member> <member name="M:ERPWarehouseIntegration.EnsureAllBinsFilled(System.Int32@,System.Int32,System.Int32)"> <summary> Ensure that all bins are filled and that the steel volume does not exceed the maximum bin volume </summary> <param name="binOverCount" /> <param name="binVol" /> <param name="steelVol" /> <ensures description="The steel volume exceeds the bin volume" csharp="binOverCount == 0" vb="binOverCount = 0">binOverCount == 0</ensures> </member> </members> </doc> |
Code Listing 46: Generated XML Document File
We have easily generated concise XML documentation for our code without any heavy lifting. If you comment your code regularly, your generated documentation will be up-to-date and a true reflection of the state of your code.
Creating user-friendly documents
The generated XML file is great, but it needs another step to create well-formatted, human-readable, HTML-type documentation. For this task I will use Sandcastle Help File Builder, which you can download from GitHub at github.com/EWSoftware/SHFB. During the guided installation, make a point of reading through each screen’s instructions and notes, as these contain important information you need to be aware of.
I would suggest reading more tutorials on using Sandcastle Help File Builder. The tool has so much to offer that one needs to really get under the hood of this excellent tool. For the purposes of this book, however, I will not go into any further detail other than showing you how to create a basic .chm help file.
Before you use Sandcastle Help File Builder, you have to ensure that your project has a namespace. Otherwise, you will see the following error displayed on the help file build.

Figure 36: Build Output Error
SHFB: Error BE0033: No APIs found to document. See error topic in help file for details. at SandcastleBuilder.Utils.BuildEngine.BuildProcess.Build() |
Code Listing 47: Sandcastle Help File Builder Error
I simply added a namespace to my class, as illustrated in Code Listing 48.
namespace CodeContractsDemoProject { /// <summary> /// ERP Warehouse Integration class to manage the cutting of steel volume and available bin quantities /// </summary> public class ERPWarehouseIntegration { |
Code Listing 48: Namespace Added to Class
Once you have done that, open Sandcastle Help File Builder if it’s not already open. In the Project Explorer, right-click the Documentation Sources node and add the .dll or .exe where your project built to (usually your bin folder). I opted to have my XML document output to my bin folder.

Figure 37: Project Bin Folder
Once I have selected the .exe file, the XML documentation file is also automatically picked up and added as a documentation source by Sandcastle Help File Builder. The added files will be displayed in the Project Explorer under the Documentation Sources node.

Figure 38: Documentation Sources and Summary
There are various other sections in the Project Properties tab that you can modify and set. One that’s important to remember to configure is the Summaries section. You need to ensure that you have added a namespace summary comment in the Summaries page of the Project Properties tab. Click the Edit Namespace Summaries button to open the Namespace Summaries window.

Figure 39: Namespace Summaries Window
Select the namespace you want to add a summary for and enter the summary description in the Edit the summary for the selected namespace text box. When you are done, click the Close button and save your project.
You are now ready to build your Sandcastle Help File Builder project, which will produce the help files as specified by you.
Types of help file formats supported:
- HTML Help 1 (chm)
- MS Help Viewer (mshc)
- Open XML (docx)
- Markdown (md)
- Website (HTML/ASP.NET)
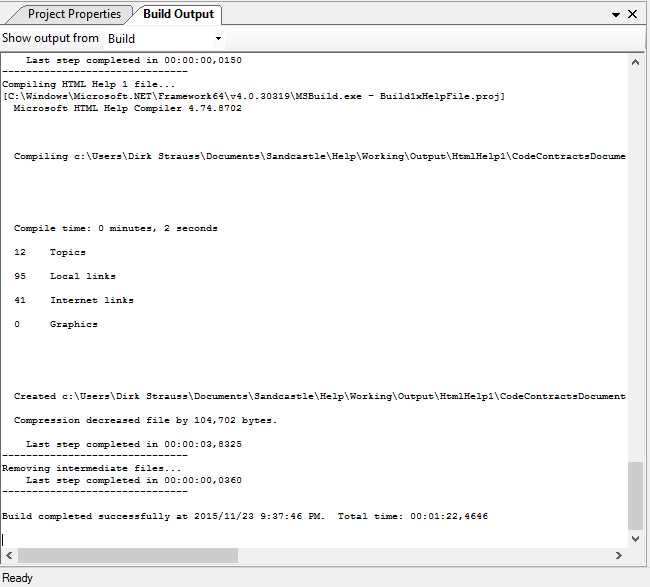
Figure 40: Sandcastle Help File Builder Successful Build
When the build has completed, navigate to the output directory for the generated help file. Mine defaulted to the path Documents\Sandcastle\Help.

Figure 41: Help File Output Path
Opening the generated help file, you will see that the compilation took the namespace summary added in the Summaries section earlier and added it as the summary text for the generated help file.

Figure 42: Generated Help File
Creating documentation from your code contract comments is really easy once you know how to do it. With superb tools such as Sandcastle Help File Builder and the tight integration Code Contracts offer with the output of comments into your generated XML file, developers have everything they need to create rich documentation for their projects.
Abstract classes and interfaces
Creating Code Contracts for abstract classes and interfaces needs to be approached slightly differently, as you might expect. This is because abstract classes and interfaces cannot contain method bodies. Many developers still wonder what the difference is between abstract classes and interfaces. One of the best explanations I have heard to distinguish when to use an abstract class and when to use an interface is the following.
Abstract Class
If you have many classes that can be grouped together and described by a single noun, you are most likely dealing with an abstract class. The abstract class is then named as this noun. Another very important thing to take into consideration is that these inherited classes share some sort of functionality, and that you would never create an instance of the noun (abstract class).
Think about the following example, where you have an abstract class of type Human. You will never instantiate just a Human, but rather a kind of Human, such as a Female or Male. Therefore, Male and Female both inherit from the abstract class Human. The abstract class will then implement a method void Sleep(), which all humans must do (shared functionality).
To implement Code Contracts on abstract classes, you need to create a separate ContractClass class and associate the contract class with the abstract class via the use of attributes.
using System.Diagnostics.Contracts; /// <summary> /// Human Abstract Class /// </summary> [ContractClass(typeof(HumanContract))] public abstract class Human { public abstract void Run(int distance); public abstract void Sleep(int hours); } /// <summary> /// Human Contract Class /// </summary> [ContractClassFor(typeof(Human))] public abstract class HumanContract : Human { public override void Sleep(int hours) { Contract.Requires(hours >= 8, "You need more than 8 hours of sleep each night."); } } |
Code Listing 49: Abstract Class and Contract Class
The abstract class Human uses the attribute [ContractClass(typeof(HumanContract))] and the contract class HumanContract uses the attribute [ContractClassFor(typeof(Human))].
The abstract class Human basically specifies that all humans will sleep and run. In the contract for the Sleep() method (defined in HumanContract), we are defining that all humans must sleep for a minimum of eight hours every night.
Let’s create a Male class that inherits from our Human abstract class.
public class Male : Human { public override void Run(int distance) { Console.Write("The distance run was " + distance); Console.ReadLine(); } public override void Sleep(int hours) { Console.Write("The hours slept were " + hours); Console.ReadLine(); } } |
Code Listing 50: Male Class Inheriting From Human
From the Male class we can see that it contains no Code Contracts at all. All it does is inherit from the Human abstract class.
namespace CodeContractsDemo { class Program { static void Main(string[] args) { try { Male oMan = new Male(); oMan.Sleep(5); } catch (Exception ex) { Console.Write(ex.Message); Console.ReadLine(); } } } } |
Code Listing 51: Instantiation of Male Class with Five Hours of Sleep
If we had to instantiate the Male class and call the Sleep method with five hours, our Code Contract would kick in and tell us that humans need eight hours of sleep each night.
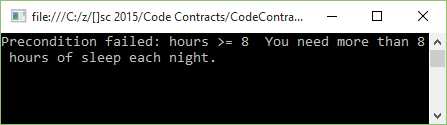
Figure 43: Male Class Sleep Method Contract Violated
Modifying our calling code to specify a nice Saturday morning snooze of nine hours, paints a different picture.
namespace CodeContractsDemo { class Program { static void Main(string[] args) { try { Male oMan = new Male(); oMan.Sleep(9); } catch (Exception ex) { Console.Write(ex.Message); Console.ReadLine(); } } } } |
Code Listing 52: Instantiation of Male Class with Nine Hours of Sleep
The Code Contract is validated and the Sleep() method passes validation.

Figure 44: Male Class Sleep Method Contract Passed
Code Contracts and abstract classes work together beautifully to create a truly stable and robust code base for a team of developers.
Interfaces
Let’s use the previous example of Male and Female classes. Fast forward 20 years from now, and we discover aliens on Mars. They are surprisingly similar to us, making them human, but they are neither male nor female. We now have a new type, Alien, which inherits from the abstract class Human.
Now think of interfaces as verbs. Which verb can be applied to my classes in general? All humans need to learn new things and can be taught, so now we can create an interface called ITeachable. We will implement the ITeachable interface on the Human abstract class, because all humans are teachable. The aliens, however, are slightly more advanced than Male or Female, and can rearrange their molecules into different structures, making aliens able to shape-shift. Therefore, we can create an interface called IShapeShiftable, which only applies to Alien.
Creating the interface is much like the abstract class. It also needs to contain a contract class, and the interface and contract class both need to point to each other via their attributes.
using System.Diagnostics.Contracts; [ContractClass(typeof(IShapeShiftableContract))] public interface IShapeShiftable { void Man(int shapeDuration); void Woman(int shapeDuration); void InanimateObject(int shapeDuration); } [ContractClassFor(typeof(IShapeShiftable))] abstract class IShapeShiftableContract : IShapeShiftable { void IShapeShiftable.InanimateObject(int shapeDuration) { Contract.Requires(shapeDuration <= 12); } void IShapeShiftable.Man(int shapeDuration) { Contract.Requires(shapeDuration <= 4); } void IShapeShiftable.Woman(int shapeDuration) { Contract.Requires(shapeDuration <= 4); } } |
Code Listing 53: Interface Implementing Code Contract Class
We can now create contracts for the interface via the contract class IShapeShiftableContract, exactly like we did earlier for abstract classes.
Abstract classes versus interface
To conclude the examples of abstract classes and interfaces, it all boils down to where you want your implementation. If you want to share implementation among all derived classes, you will be creating an abstract class. If you need your implementation specific to a single class or several classes, but not all classes, use an interface.
Code Contracts easily cater to both.
Method purity
A book on Code Contracts would not be complete without mentioning purity. When referring to Code Contracts, what exactly does method purity mean? Well, Code Contracts have an attribute called [Pure] that you can decorate methods with. This is basically an expression of the quality of the method, and that the method can’t change the state of any objects seen by callers. In other words, pure methods are only allowed to change objects created after the method has been entered.
Code Contracts require all methods called inside a contract to be pure. The reasons for this are simply:
- To avoid side effects in methods used in preconditions and postconditions.
- To make the task of the static checker easier because it can assume object states will be the same after the method is called.
- To improve design by specifically clarifying your intent that the method will not alter the state of objects after the method call has ended.
To illustrate the effect that a non-pure method has on the static checker, consider the following code listing.
public class DemoPurity { /// <summary> /// Property for cutting factor /// </summary> public int CutFactor { get; private set; }
/// <summary> /// Public Constructor /// </summary> /// <param name="cutFactor"></param> public DemoPurity(int cutFactor) { CutFactor = cutFactor; } /// <summary> /// Calculate the volume cut /// </summary> /// <param name="volumeSteel"></param> /// <param name="factorModifier"></param> /// <returns></returns> public int VolumeCut(int volumeSteel, int factorModifier) { Contract.Requires(CalculatedCutFactor(factorModifier) >= 0);
return volumeSteel / (CutFactor * factorModifier); } /// <summary> /// This is not a pure method /// </summary> /// <param name="factorModifier"></param> /// <returns></returns> public int CalculatedCutFactor(int factorModifier) { CutFactor = CutFactor * factorModifier; return CutFactor; } } |
Code Listing 54: Method Failing Purity
The property CutFactor is specified in the constructor for DemoPurity. The method VolumeCut includes a required contract on the CalculatedCutFactor method. As you can see, the CalculatedCutFactor method is definitely not pure because it modifies the CutFactor property. It is also sloppy code. The static checker will fail on the build because the method is not pure.
1>------ Rebuild All started: Project: CodeContractsDemo, Configuration: Debug Any CPU ------ 1>C:\z\[]sc 2015\Code Contracts\CodeContractsDemo\ERPIntegration.cs(197,9): warning CC1036: Detected call to method 'DemoPurity.CalculatedCutFactor(System.Int32)' without [Pure] in contracts of method 'DemoPurity.VolumeCut(System.Int32,System.Int32)'. CodeContracts: CodeContractsDemo: Run static contract analysis. C:\z\[]sc 2015\Code Contracts\CodeContractsDemo\ERPIntegration.cs(197,9): warning CC1036: CodeContracts: Detected call to method 'DemoPurity.CalculatedCutFactor(System.Int32)' without [Pure] in contracts of method 'DemoPurity.VolumeCut(System.Int32,System.Int32)'. 14.0\Common7\IDE\CodeContractsDemo.exe(1,1): message : CodeContracts: Checked 15 assertions: 13 correct (2 masked) CodeContracts: CodeContractsDemo: CodeContracts: CodeContractsDemo: Static contract analysis done. ========== Rebuild All: 0 succeeded, 1 failed, 0 skipped ========== |
Code Listing 55: Shortened Output Results
I have removed all the extra lines not relevant to this discussion on purity from the output text. You can see that the static checker is not happy with the CalculatedCutFactor not being pure. We can obviously go ahead and just add the [Pure] attribute to the CalculatedCutFactor method, but that would not be good programming practice. If we did this, it would result in a successful build because we have basically told the static checker that our method CalculatedCutFacor is pure. If we therefore modified our code, as shown in Code Listing 56, the static checker would assume that the method is pure.
public class DemoPurity { /// <summary> /// Property for cutting factor /// </summary> public int CutFactor { get; private set; }
/// <summary> /// Public Constructor /// </summary> /// <param name="cutFactor"></param> public DemoPurity(int cutFactor) { CutFactor = cutFactor; } /// <summary> /// Calculate the volume cut /// </summary> /// <param name="volumeSteel"></param> /// <param name="factorModifier"></param> /// <returns></returns> public int VolumeCut(int volumeSteel, int factorModifier) { Contract.Requires(CalculatedCutFactor(factorModifier) >= 0);
return volumeSteel / (CutFactor * factorModifier); } /// <summary> /// This is still not a pure method /// </summary> /// <param name="factorModifier"></param> /// <returns></returns> [Pure] public int CalculatedCutFactor(int factorModifier) { CutFactor = CutFactor * factorModifier; return CutFactor; } } |
Code Listing 56: Add Pure Attribute to Method
If we had to build our project, the resulting output would indicate a successful build.
1>------ Rebuild All started: Project: CodeContractsDemo, Configuration: Debug Any CPU ------ 1> elapsed time: 886,9984ms 1> elapsed time: 177,9426ms 1> elapsed time: 1120,0034ms CodeContracts: CodeContractsDemo: Run static contract analysis. 1> CodeContractsDemo -> C:\z\[]sc 2015\Code Contracts\CodeContractsDemo\bin\Debug\CodeContractsDemo.exe CodeContracts: CodeContractsDemo: Validated: 100,0% CodeContracts: CodeContractsDemo: Checked 15 assertions: 13 correct (2 masked) CodeContracts: CodeContractsDemo: Contract density: 0,98 CodeContracts: CodeContractsDemo: Total methods analyzed 6 CodeContracts: CodeContractsDemo: Methods analyzed with a faster abstract domain 0 CodeContracts: CodeContractsDemo: Methods with 0 warnings 5 CodeContracts: CodeContractsDemo: Time spent in internal, potentially costly, operations CodeContracts: CodeContractsDemo: Overall time spent performing action #KarrPutIntoRowEchelonForm: 00:00:00.0140007 (invoked 784 times) Overall time spent performing action #KarrIsBottom: 00:00:00.0120029 (invoked 1515 times) Overall time spent performing action #WP: 00:00:00.2000032 (invoked 5 times) Overall time spent performing action #CheckIfEqual: 00:00:00.0080005 (invoked 29 times) Overall time spent performing action #ArraysAssignInParallel: 00:00:00.1430061 (invoked 1 times) Overall time spent performing action #Simplex: 00:00:00.0810009 (invoked 19 times) CodeContracts: CodeContractsDemo: Total time 7,821sec. 1303ms/method CodeContracts: CodeContractsDemo: Generated 2 callee assume(s) CodeContracts: CodeContractsDemo: Retained 0 preconditions after filtering CodeContracts: CodeContractsDemo: Inferred 0 object invariants CodeContracts: CodeContractsDemo: Retained 0 object invariants after filtering CodeContracts: CodeContractsDemo: Discovered 3 postconditions to suggest CodeContracts: CodeContractsDemo: Retained 1 postconditions after filtering CodeContracts: CodeContractsDemo: Detected 1 code fixes CodeContracts: CodeContractsDemo: Proof obligations with a code fix: 3 C:\Program Files (x86)\Microsoft Visual Studio 14.0\Common7\IDE\CodeContractsDemo.exe(1,1): message : CodeContracts: Checked 15 assertions: 13 correct (2 masked) CodeContracts: CodeContractsDemo: CodeContracts: CodeContractsDemo: Static contract analysis done. ========== Rebuild All: 1 succeeded, 0 failed, 0 skipped ========== |
Code Listing 57: Successful Build
The problem here is that simply adding the [Pure] attribute to the CalculatedCutFactor method does not make it pure. This is the point I am trying to make with this section on method purity. We need to ensure that methods called inside a contract are pure because they are so by design, not because we have decorated them with the [Pure] attribute. Let’s have a look at our CalculatedCutFactor method again and modify it slightly so that we are not violating the rules specified for method purity.
public class DemoPurity { /// <summary> /// Property for cutting factor /// </summary> public int CutFactor { get; private set; }
/// <summary> /// Public Constructor /// </summary> /// <param name="cutFactor"></param> public DemoPurity(int cutFactor) { CutFactor = cutFactor; } /// <summary> /// Calculate the volume cut /// </summary> /// <param name="volumeSteel"></param> /// <param name="factorModifier"></param> /// <returns></returns> public int VolumeCut(int volumeSteel, int factorModifier) { Contract.Requires(CalculatedCutFactor(factorModifier) >= 0);
return volumeSteel / (CutFactor * factorModifier); } /// <summary> /// This is a pure method /// </summary> /// <param name="factorModifier"></param> /// <returns></returns> [Pure] public int CalculatedCutFactor(int factorModifier) { return CutFactor * factorModifier; } } |
Code Listing 58: Pure Method Marked as Pure
The CalculatedCutFactor method is now a pure method because it does not change the values of CutFactor or factorModifier. It can now suitably be decorated with the [Pure] attribute. Our Contract.Requires in the VolumeCut method can now use this pure method to check that the result of CalculatedCutFactor will not be zero, because this would result in a divide by zero exception on the return.
Method purity is a really good practice to follow, not only when using Code Contracts, but in every method you write.
Contract abbreviator methods
I am sure that those of you who use Code Contracts on a regular basis have run into the issue of repeating similar sets of Code Contracts across multiple methods. Code Contracts have a solution for this, and they are called abbreviator methods. The concept is really simple. You can see that the code in Code Listing 59 contains repeated sets of Code Contracts.
public class AbbreviatorDemo { /// <summary> /// The factor for the cutting volume /// </summary> public int Factor { get; private set; } /// <summary> /// The maximum volume a bin can contain /// </summary> public int MaxVolume { get; private set; } /// <summary> /// Fill the bin with the volume of steel /// </summary> /// <param name="steelVolume"></param> public void FillBin(int steelVolume) { Contract.Requires(steelVolume > 0); Contract.Ensures(steelVolume <= this.MaxVolume); } /// <summary> /// Empty the bin of all steel contained /// </summary> /// <param name="steelVolume"></param> /// <returns></returns> public bool PurgeBin(int steelVolume) { Contract.Requires(steelVolume > 0); Contract.Ensures(steelVolume <= this.MaxVolume); Contract.Ensures(Contract.Result<bool>() == true); // Purge bin and return successful result return true; } /// <summary> /// Perform a partial bin fill /// </summary> /// <param name="steelVolume"></param> /// <returns></returns> public bool FillBinPartially(int steelVolume) { Contract.Requires(steelVolume > 0); Contract.Ensures(steelVolume < this.MaxVolume); Contract.Ensures(Contract.Result<bool>() == true); return true; } } |
Code Listing 59: Repeated Contracts
We can now make use of Abbreviator methods to simplify the code and reference them in multiple methods. Using Abbreviator methods, the code can be refactored as follows.
public class AbbreviatorDemo { /// <summary> /// The factor for the cutting volume /// </summary> public int Factor { get; private set; } /// <summary> /// The maximum volume a bin can contain /// </summary> public int MaxVolume { get; private set; } /// <summary> /// Fill the bin with the volume of steel /// </summary> /// <param name="steelVolume"></param> public void FillBin(int steelVolume) { ValidSteelAndMaxVolume(steelVolume); } /// <summary> /// Empty the bin of all steel contained /// </summary> /// <param name="steelVolume"></param> /// <returns></returns> public bool PurgeBin(int steelVolume) { ValidSteelAndMaxVolume(steelVolume); EnsurePositiveResult(); // Purge bin and return successful result return true; } /// <summary> /// Perform a partial bin fill /// </summary> /// <param name="steelVolume"></param> /// <returns></returns> public bool FillBinPartially(int steelVolume) { ValidSteelAndMaxVolume(steelVolume); EnsurePositiveResult(); return true; } /// <summary> /// Abbreviator method for steel and max volume /// </summary> /// <param name="steelVolume"></param> [ContractAbbreviator] private void ValidSteelAndMaxVolume(int steelVolume) { Contract.Requires(steelVolume > 0); Contract.Ensures(steelVolume <= this.MaxVolume); } /// <summary> /// Abbreviator method for successful result /// </summary> [ContractAbbreviator] private void EnsurePositiveResult() { Contract.Ensures(Contract.Result<bool>() == true); } } |
Code Listing 60: Using Abbreviator Methods
I have added two new methods, ValidSteelAndMaxVolume and EnsurePositiveResult, and added the [ContractAbbreviator] attribute to them. This enables me to cut down on the repeated sets of Code Contracts in my methods. It makes for easier reading and clearer functionality when looking at the methods under contract. Another point to keep in mind is that Abbreviator methods can contain calls to other Abbreviator methods if needed.
- 1800+ high-performance UI components.
- Includes popular controls such as Grid, Chart, Scheduler, and more.
- 24x5 unlimited support by developers.