
Twilio with C# Succinctly®

CHAPTER 1
Getting Started
What are Code Contracts?
Many developers might have an idea what Code Contracts are, but they don’t have an understanding of the benefits they provide or how to implement them. I have to mention, though, that I’ve found the attitude toward Code Contracts and their use in development is somewhat divided. There is a group of staunch supporters on the one hand, and on the opposite end of that spectrum, there is a group of opponents. In the middle, however, is a broad group of developers who are unfamiliar with Code Contracts and their uses. It is here that I suspect many of you will find yourself. After working with Code Contracts for a while, I would expect that many of you will naturally migrate to one end of this love-hate spectrum.
Created by RiSE (Research in Software Engineering) at Microsoft, Code Contracts have been around for a number of years. As a matter of fact, the release notes on the RiSE website start at release 1.1.20215 on February 23, 2009. Code Contracts have gone through various revisions throughout the years, and have now found a new home on GitHub after being open-sourced by Microsoft.
Before we continue, let’s define what Code Contracts are exactly. The goal of Code Contracts is to provide a language-agnostic way to convey code assumptions in your .NET applications. Let us use the analogy of an actual contract between yourself and a third-party (for example, a bank). It is an agreement between the two of you to ensure both parties act in a specific manner. This is at the heart of Code Contracts. We are assuming certain logic within code, and we define contracts within that code in order to maintain those assumptions. These assumptions can take the form of preconditions, postconditions, and state invariants. If at any time those contractual conditions are broken, we will know about it. This is especially valuable when working in teams.
Download and installation
For the rest of this book, I will be referring to Visual Studio Enterprise 2015 (.NET Framework 4.6) and Code Contracts version 1.9.10714.2. Code Contracts will also work with Visual Studio 2015 Professional, but unfortunately, at the time of this writing, Code Contracts do not work with the free Visual Studio 2015 Community edition. Getting started with Code Contracts in Visual Studio is very easy. From the Tools menu in Visual Studio, click Extensions and Updates.

Figure 1: Extensions and Updates Menu Item
This will open the Extensions and Updates window (Figure 2), from which you can search the Visual Studio Gallery. Incidentally, you are also able to include Code Contracts in your project via NuGet (more on that later).
In the search box to the right of the screen, enter Code Contracts and be sure to have the Online section selected in the tree view to the left. When your search results are returned, Code Contracts should be one of the top results. From here it is easy to install Code Contracts. Simply click the Download button, which will download an .msi installer that you can run to install Code Contracts.

Figure 2: Extensions and Updates
NuGet
The NuGet package manager can also be used to download and include Code Contracts in your solution. You can use the NuGet Package Manager (Figure 3) to search for Code Contracts, or you can use the Package Manager Console from the Tools > NuGet Package Manager option to run the following command to install Code Contracts.
PM> Install-Package CodeContracts |
You will also find a portable version (for use with Windows Mobile applications) of the Code Contracts package on NuGet. It doesn’t really matter which method you use to install Code Contracts; it’s just a matter which method you prefer.
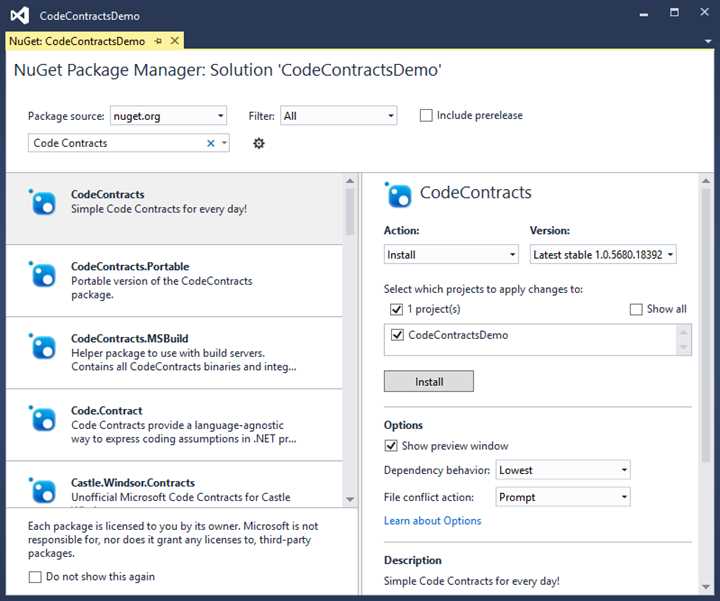
Figure 3: NuGet Package Manager
Visual Studio integration
You will need to restart Visual Studio for the Code Contracts item in the Properties page to become visible. The Code Contracts integration can be found by right-clicking on your project and selecting Properties from the context menu. You can also find the Code Contracts integration by selecting Project from the Visual Studio toolbar (be sure that you have selected your project in the Solution Explorer), and clicking the ProjectName Properties menu item (Figure 4).
I have called my Visual Studio project CodeContractsDemo, so the item in the Projects menu in Visual Studio will be called CodeContractsDemo Properties. The familiar Property page opens for your project, and at the bottom of the list on the left of the Property page you will see a new property pane called Code Contracts.
Clicking on this will display a smorgasbord of settings for you to select. Don’t let the number of settings intimidate you; we will go through these in the next section. Only know that many of the settings are defaulted, and you can leave them that way should you wish to.

Figure 4: Project Properties
Code Contracts property page
The Code Contracts properties will expose many options and settings to you initially. The properties under Code Contracts are separated into three groups: Runtime Checking, Static Checking, and Contract Reference Assembly.
Enable Code Contracts by selecting either Perform Runtime Contract Checking or Perform Static Contract Checking.
At minimum, you need to ensure that one of these options is selected in order to enable Code Contracts in your project. Without selecting either of these options, Code Contracts will not be enabled in your project, and you will not be able to benefit from the value they add to your system.
Runtime Contract Checking, as the name suggests, will work its magic during run-time. Static Contract Checking, however, is a different animal altogether. It lets Code Contracts analyze your code while you’re typing code or building your project. This is where Code Contracts become interesting and add the most value for me.
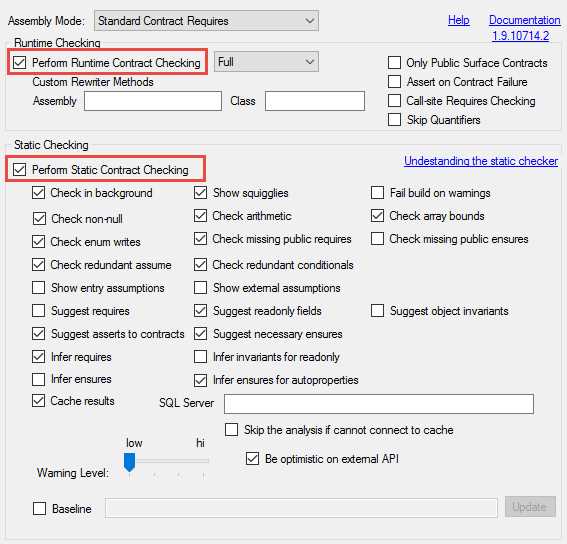
Figure 5: Code Contracts Property Page
Static checking
If you enable static checking, it is advisable to keep the Check in background option selected in the Properties page. This is because analysis can take some time to perform. Another advisable option is to select the parallel build option in Visual Studio. From the Tools menu in Visual Studio, select Options. In the tree-view on the left of the Options screen (Figure 6), expand the Projects and Solutions node. You will notice a node called Build and Run. Select that, and you will see the option to enable parallel builds.
Any value greater than 1 will enable the parallel builds option in Visual Studio. The default value on my machine is 8. Entering the value 1 in this text box will effectively switch off parallel builds in Visual Studio. By enabling parallel builds in Visual Studio, you enable Code Contracts to analyze several projects in parallel. According to RiSE, the Visual Studio extension is thread-safe. There are many other options available in the Code Contracts property page, but you can now start to use Code Contracts without having to configure these settings any further.
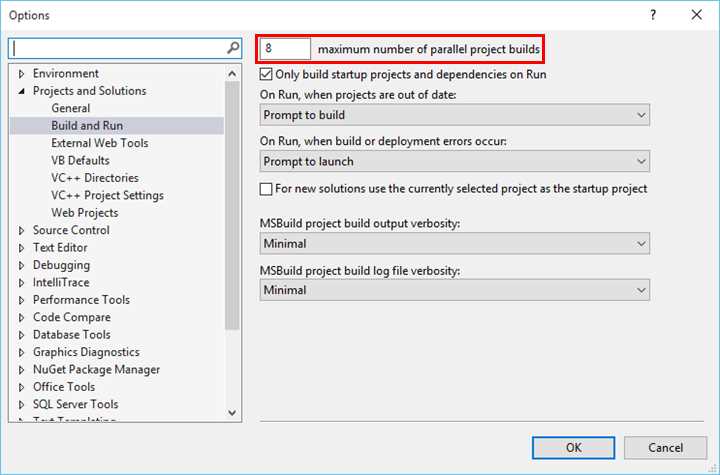
Figure 6: Visual Studio Parallel Builds Option
- 1800+ high-performance UI components.
- Includes popular controls such as Grid, Chart, Scheduler, and more.
- 24x5 unlimited support by developers.