
Svelte Succinctly®

CHAPTER 5
Main User Interface
Quick intro
In this chapter, we’ll get our hands dirty and create the application’s main user interface (the main page, log in, and register functionality). Let’s focus on the HTML markup and its related functionality.
Note: As a reminder, you can find the code repository of the finished application on Github.
The app.html file
The application’s entry point is the app.html file that resides within the project’s src folder. It’s the equivalent of an index.html file for a website (in other words, the application’s entry point).
Code Listing 5-a: The Finished app.html File
<!DOCTYPE html> <html lang="en"> <head> <meta charset="utf-8" /> <link rel="icon" href="%sveltekit.assets%/favicon.png" /> <!-- Font awesome --> <link rel="stylesheet" href="https://cdnjs.cloudflare.com/ajax/libs /font-awesome/4.7.0/css/font-awesome.min.css" integrity= "sha256-eZrrJcwDc/3uDhsdt61sL2oOBY362qM3lon1gyExkL0=" crossorigin="anonymous" /> <link href="https://fonts.googleapis.com/ css2?family=Roboto:wght@400; 500;700&display=swap" rel="stylesheet">
<!-- Halfmoon CSS --> <link href="%sveltekit.assets%/css/halfmoon.min.css" rel="stylesheet" /> <meta name="viewport" content="width=device-width, initial-scale=1" /> %sveltekit.head% </head> <body class="dark-mode with-custom-webkit-scrollbars with-custom-css-scrollbars" data-dm-shortcut-enabled="true"> <div>%sveltekit.body%</div> <script src="%sveltekit.assets%/js/halfmoon.min.js"></script> <script> var exports = {}; halfmoon.onDOMContentLoaded(); </script> </body> </html> |
Note: I split the two link tags highlighted in yellow in Code Listing 5-a into various readable lines so they could fit into the listing. However, each of those statements should be placed in one line.
Let’s explore what we have here. The first thing we find within the head section of the HTML markup is the meta tag that sets the encoding the application will use, in this case utf-8.
Then, we find a link tag indicating where the application's favicon can be found. As you might have noticed, a relative path is used, which is %sveltekit.assets%/.
The shorthand %sveltekit.assets% indicates the resource will be found under the project’s static folder.
Next, we can see two link tags highlighted in yellow that import Font Awesome. These should be placed in one line each.
Following that, we import the reference to the Halfmoon library, which I have downloaded and placed into the css subfolder within the project’s static folder (src/static/css).
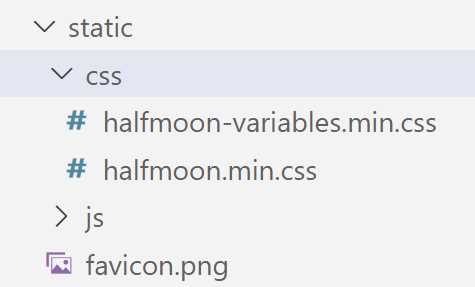
Figure 5-a: The Halfmoon Library CSS Files within the scr/static/css Project Folder (VS Code)
Note: Even though I’m using a Windows-based machine to build this Svelte application, since this is a web application, I will be using the forward-slash (/) convention when referring to folders and file paths, rather than the traditional backslash (\) pattern commonly used in Windows. Thus, I’m referring to the folder path as scr/static/css, rather than src\static\css.
Halfmoon is a lightweight library that offers a wide range of CSS classes that will be familiar to Bootstrap developers and allow us to create modern and beautiful layouts.
Note: I’m not affiliated with Halfmoon. I just stumbled upon it and was captivated by its simplicity, beautiful design, and robust features.
After that, we can see the meta tag that defines the markup’s viewport, determining where the web content will be displayed.
The following statement is %sveltekit.head%, which specifies the page’s title displayed in the browser title bar.
Within the body section of the HTML markup, we can see the dark-mode with-custom-webkit-scrollbars with-custom-css-scrollbars classes, which provide the default dark mode that the application uses.
Next, we can see the %sveltekit.body% placeholder enclosed within a div tag. All this does is inject the body of each page into that div, which represents the content for each page.
Following that, we find the script tag that imports the JavaScript part of the Halfmoon library. The script tag that follows initializes Halfmoon.
The JavaScript part of the Halfmoon library also needs to be downloaded from the Halfmoon website, and I’ve placed it into the project’s src/static/js folder.
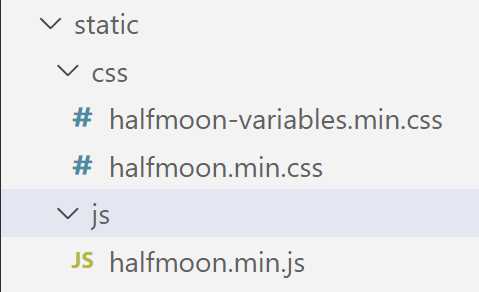
Figure 5-b: The Halfmoon JavaScript File within the scr/static/js Project Folder (VS Code)
As you have seen, it’s nothing complicated. Most of the markup was automatically generated when the Svelte project was scaffolded, and I just added the Font Awesome and Halfmoon tags and statements.
By exploring the app.html file, we also covered all the files found under the src/static folder and subfolders that our project includes.
The lib folder
By default, when a Svelte project is scaffolded using SvelteKit (as we’ve done), you won’t find a lib folder within your project structure.
Creating a lib subfolder under the project’s src folder is a non-official but widely adopted folder-naming convention used when creating a Svelte application.
A lib subfolder encourages the excellent practice of keeping any application-specific Svelte components separate from the application’s pages (located in the src/routes subfolder).
Now, within the VS Code EXPLORER, select the src folder and click the New Folder icon, as shown in the following figure.
![]()
Figure 5-c: The New Folder Icon (VS Code EXPLORER—For Creating a lib Subfolder within src)
Name the new folder lib and press Enter.
![]()
Figure 5-d: The New Folder Icon (VS Code EXPLORER—Naming the New Folder lib)
The lib folder will contain two files, a Svelte component called Books.svelte that’s shared among different pages of the application, and a utility JavaScript file (utils.js) that will be used across several project files.
We’ll get to those later. For now, we need to have this folder created, as this is not part of the default project structure.
The routes folder
A routes subfolder is added under the src folder when a SvelteKit project is created using the default process.
SvelteKit creates application routes based on the name of the folder structure and file names found under the routes folder.
Let’s look at the finished folder structure and files within the routes folder to understand how routing works with SvelteKit.

Figure 5-e: The routes Folder (Finished App—VS Code EXPLORER)
We can see various files within the root of the src/routes folder and two subfolders, api and favorites. Let’s first focus on the root folder.
index.svelte
The index.svelte file is the application’s main route, the app’s main page, which contains the list of books available to add as favorites. Visually, the application’s main page looks as follows.
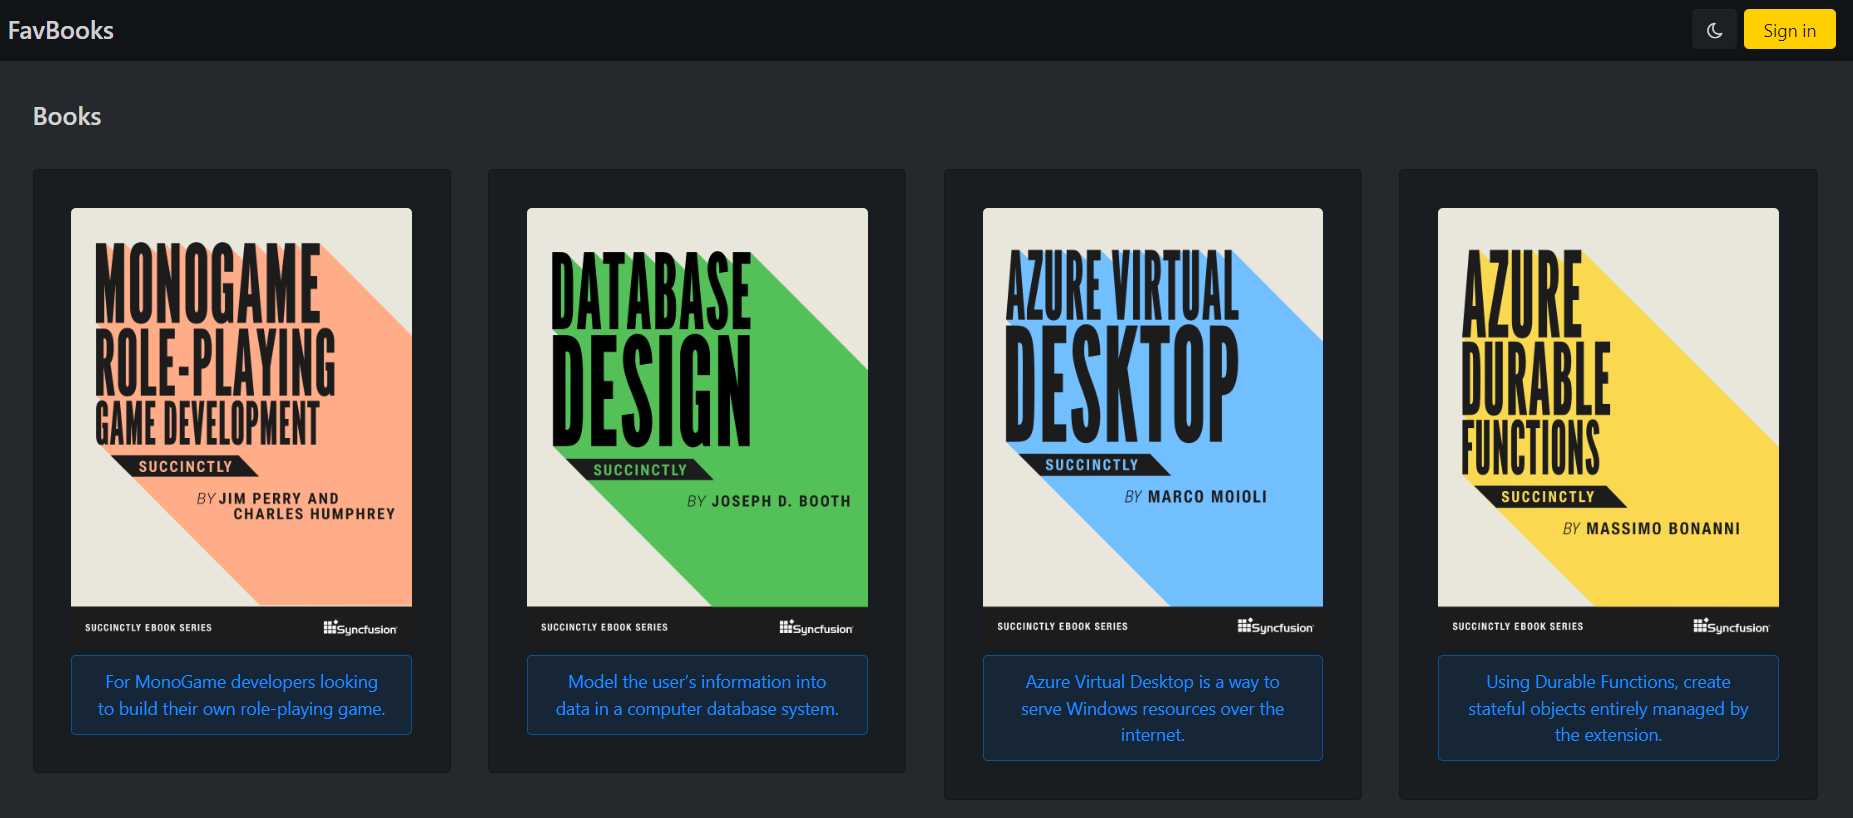
Figure 5-f: The App’s Main Page
Most of the HTML markup required to produce the main’s page visual appearance has been placed into the __layout.svelte file found under the root of the src/routes folder, and index.svelte is mainly limited to fetching the list of available books to display.
Here is the finished code for index.svelte found within the root of the src/routes folder.
Code Listing 5-b: The Finished index.svelte File (Root of the routes Folder)
<script context="module"> import Books from "$lib/Books.svelte" export const load = async({fetch}) => { const res = await fetch("/api") const books = await res.json() return { props: { books, }, } } </script> <script> import { addFav } from "../firebase.js";
import { goto } from "$app/navigation" export let books const fav = "" const btnAction = async (e) => { await addFav(e.detail) await goto("/favorites") } </script> <svelte:head> <title>FavBooks</title> </svelte:head> <Books {books} {fav} btnText="Add to favorites" on:btnAction={btnAction} /> |
The following diagram shows how the markup code relates to the finished user interface for the main page.
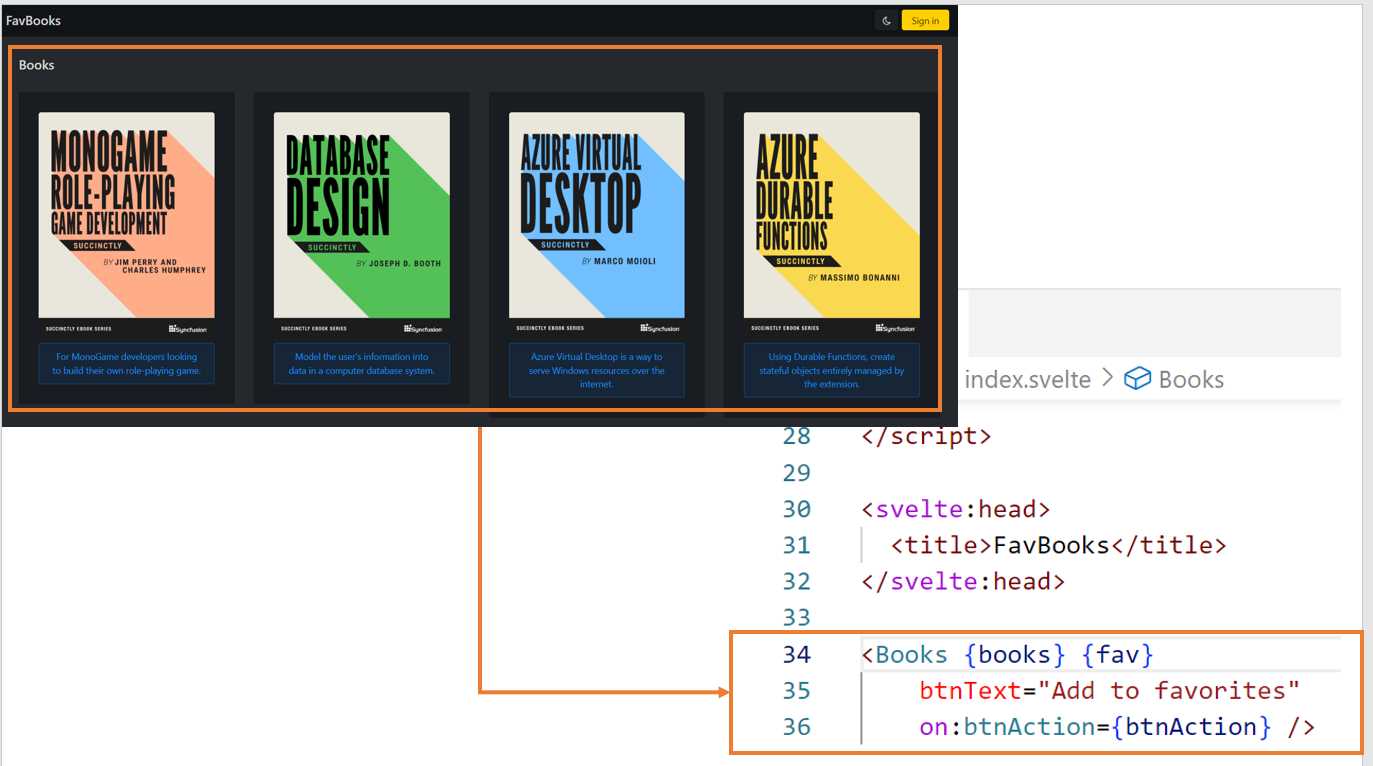
Figure 5-g: Main Page UI and Markup (index.svelte) Relationship (without Considering the Navigation Bar)
The preceding figure shows that most of the main page’s UI comes from the Books component.
So, to understand what is going on, let’s explore each part of the code. First, we have the <script context="module"> section.
In Svelte, a <script> code block includes code that runs when a component instance is initialized. For most components, that's all that’s required.
Nevertheless, on some occasions, you might need to run some code outside of an individual component instance. You can do this by using a <script context="module"> code block.
Within the <script context="module"> code block, the first thing we do is import the Books component from the Books.svelte file, which we’ll explore later. We do this with the following statement.
import Books from "$lib/Books.svelte"
Using the relative $lib/ file path, we indicate that Svelte can find the Books.svelte file within the lib subfolder of the project’s src folder.
The Books component displays a list of books, either obtained from the application’s API (the list of latest books, which is static) or the list of favorites from Firebase.
The functionality was refactored into a Books component to avoid recreating the same logic twice. We’ll have a look at how this component works later.
Next, we find the asynchronous (async) load function.
export const load = async({fetch}) => {
const res = await fetch("/api")
const books = await res.json()
return { props: { books, }, }
}
This function uses the browser’s fetch API (part of the browser context) to retrieve the static list of available books from the application’s /api endpoint. The list of books is returned as a JSON response.
Then, we find the <script> section, which executes when the component instance initializes. Within this section, we import the addFav function from the firebase.js file—a utility file that includes the logic that allows the application to interact with Firebase. We’ll explore this later.
import { addFav } from "../firebase.js";
The addFav function adds a book to the list of favorites. Next, we find the following import statement, which imports the goto method from Svelte’s navigation module (app/navigation).
import { goto } from "$app/navigation"
The goto method will redirect the user to the Favorites page once a book has been added to the favorites list.
Then, we declare but do not initialize the books variable that will store the list of the available books obtained from the application’s API.
Following that, we declare the constant fav, which will be used to indicate whether the list of available books will display the Add to favorites button for each book. If the value of fav is empty, then the Add to favorites buttons will not be shown.
Next, we find the btnAction function; this is the event that gets fired when clicking on the Add to favorites button.
const btnAction = async (e) => {
await addFav(e.detail)
await goto("/favorites")
}
The e parameter passed to the btnAction function contains specific event information. The detail property (e.detail) includes the information about the book to be added to the favorites list, which occurs when the addFav function is invoked.
After the book is added to the favorites list, the goto method is invoked, redirecting the user to the favorites page (/favorites).
Following the script part of index.svelte, we have the HTML markup. The <svelte:head> tag is Svelte’s way of adding or modifying the page header. In this case, the title of the page is changed as follows.
<svelte:head>
<title>FavBooks</title>
</svelte:head>
Finally, the body of the HTML file includes the Books component, which displays the list of available books. Here is what the Books component looks like for the finished application.

Figure 5-h: The Books Component
As you can see, the Books component is represented as a tag, which has four properties. The first property is the list of books to display, and the second property indicates whether the Add to favorites buttons (fav) will be shown or not.
<Books {books} {fav} btnText="Add to favorites" on:btnAction={btnAction} />
The third property is the caption of the Add to favorites or Remove button (btnText), and the fourth property is the event's name (btnAction), triggered when any Add to favorites or Remove buttons are clicked (btnAction).
Notice the syntax difference between books, fav, and btnText. The reason for this difference is that I’m using a Svelte shorthand.
When the name of the property and the name of the object assigned to the property are the same, then we can use this shorthand. So, instead of writing the following statement:
<Books books=books fav=fav btnText="Add to favorites" on:btnAction={btnAction} />
We can change books=books to {books} and fav=fav to {fav}, and we end up with a more concise statement.
Books {books} {fav} btnText="Add to favorites" on:btnAction={btnAction} />
__layout.svelte
You might have noticed that the index.svelte file found within the root of the routes folder has barely any HTML markup. There are two reasons for this.
The first reason is that a significant part of the HTML markup shown, such as the list of books, is encapsulated in the Books component.
The second reason for the minimal amount of HTML in the index.svelte file concerns the nice navigation bar on the main page. Well, that is included within the __layout.svelte file contained within the root of the src/routes folder.
Now, let me warn you: there’s more to the navigation bar than you expect. As you might have noticed from the figures in the previous chapter, the navigation bar knows if a user has signed in or not. The logic that regulates this behavior is part of the __layouts.svelte file.
The following diagram shows how the markup code relates to the finished user interface for the navigation bar of the main page, __layout.svelte.
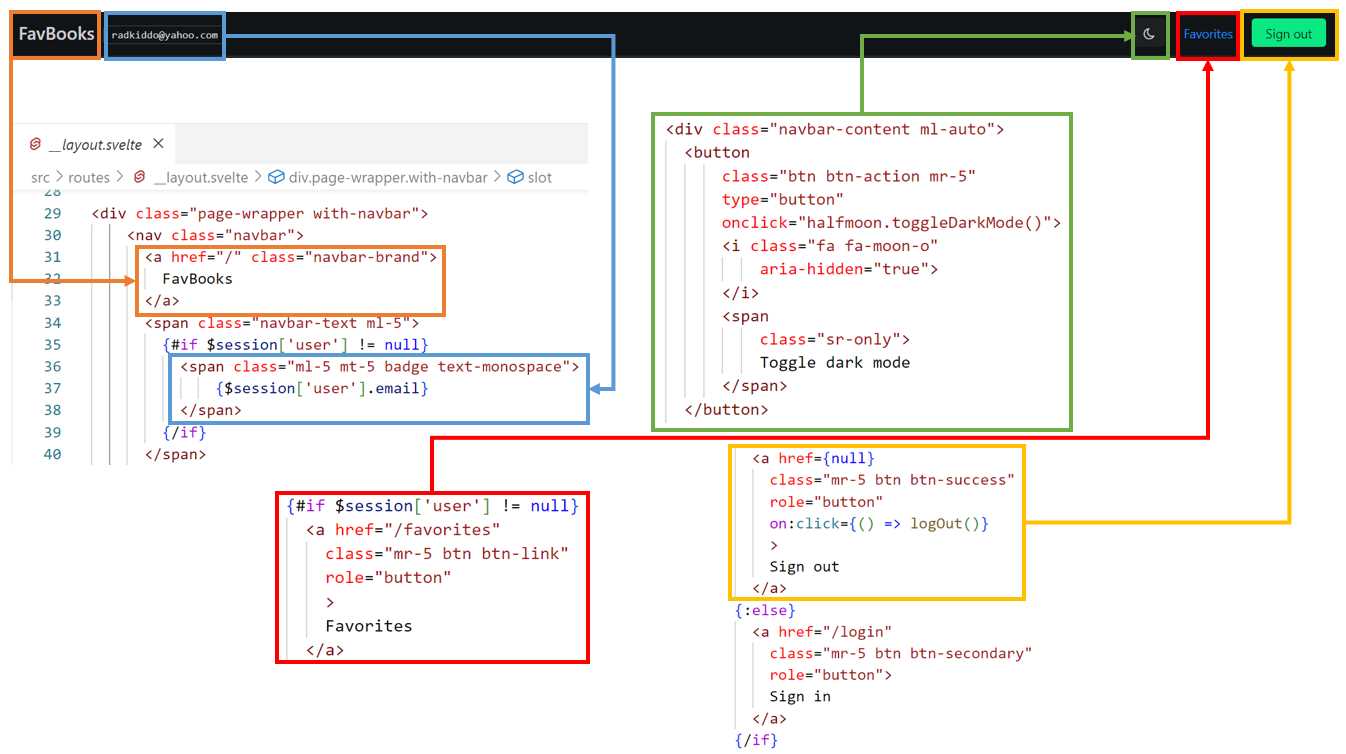
Figure 5-i: Main Page UI and Markup (__layout.svelte) Relationship (Just Considering the Navigation Bar)
As you can see, I’ve split the markup code of the __layout.svelte file into smaller chunks and colored each to match its corresponding UI element.
For example, the code highlighted in yellow corresponds to the Sign out button, and the code highlighted in blue corresponds to the signed-in user’s email address.
The code in green corresponds to the dark mode button, the code in orange to the app title (FavBooks), and the code in red to the favorites link.
Here is finished code of the __layout.svelte file contained within the root of the src/routes folder.
Code Listing 5-c: The finished __layout.svelte File (Root of the routes Folder)
<script> import { onAuthStateChanged, signOut } from "Firebase/auth" import { onMount } from "svelte" import { auth } from "../firebase.js" import { getStores } from "$app/stores" import { goto } from "$app/navigation" let { session } = getStores() onMount(() => { onAuthStateChanged( auth, (user) => { session.set({ user }) }, (error) => { session.set({ user: null }) console.log(error) } ); }); const logOut = async () => { await signOut(auth) await goto('/login') } </script> <div class="page-wrapper with-navbar"> <nav class="navbar"> <a href="/" class="navbar-brand"> FavBooks </a> <span class="navbar-text ml-5"> {#if $session['user'] != null} <span class="ml-5 mt-5 badge text-monospace"> {$session['user'].email} </span> {/if} </span>
<div class="navbar-content ml-auto"> <button class="btn btn-action mr-5" type="button" onclick="halfmoon.toggleDarkMode()"> <i class="fa fa-moon-o" aria-hidden="true"> </i> <span class="sr-only"> Toggle dark mode </span> </button> {#if $session['user'] != null} <a href="/favorites" class="mr-5 btn btn-link" role="button" > Favorites </a> <a href={null} class="mr-5 btn btn-success" role="button" on:click={() => logOut()} > Sign out </a> {:else} <a href="/login" class="mr-5 btn btn-secondary" role="button"> Sign in </a> {/if} </div> </nav> <slot /> </div> |
As you have seen, there’s much more code than in index.svelte. So, to properly understand this, let’s break it down into smaller bits. Let’s begin with the import statements.
import { onAuthStateChanged, signOut } from "Firebase/auth"
import { onMount } from "svelte"
import { auth } from "../firebase.js"
import { getStores } from "$app/stores"
import { goto } from "$app/navigation"
First, we begin by importing the onAuthStateChanged and signOut methods from the Firebase/auth module. We’ll need these to know whether a user has signed in and is active and to sign out the active user.
Then, we import the onMount component lifecycle event from the core Svelte module (svelte), which executes following the component's rendering to the DOM.
After that, we import the auth object from the firebase.js utility file, which we’ll explore later; this is used for retrieving the information about the authenticated user.
Next, we import the getStores method from the app/stores module responsible for state management in SvelteKit.
And finally, we import the goto method from the app/navigation module responsible for redirecting the navigation to another page.
Following the import statements, we retrieve session information for the signed-in user, which is done by invoking getStores.
let { session } = getStores()
Next, we have the onMount lifecycle event code, which subscribes to the onAuthStateChanged Firebase event that gets triggered when there’s a change to the state of the signed-in user.
onMount(() => {
onAuthStateChanged(
auth,
(user) => {
session.set({ user })
},
(error) => {
session.set({ user: null })
console.log(error)
}
);
});
The onAuthStateChanged event uses three parameters. The first is auth, which indicates the current authentication state of the app from Firebase.
The second is a function that sets the session state for the current user. The third is a function that sets the session state for the current user to null if an error occurs.
In other words, whenever there’s a change to a user’s authentication state in Firebase and no errors are produced, the currently signed-in user (if any) will be saved with the session state. All this happens on the onMount lifecycle event of __layout.svelte.
session.set({ user })
Next, we have the logOut function. All this function does is sign out the currently signed-in (authenticated) user. The sign-out process is done by invoking the signOut method and passing the authentication details (auth).
const logOut = async () => {
await signOut(auth)
await goto('/login')
}
Once the sign-out process has taken place, we redirect the user to the Sign in page (/login) by invoking the goto method.
Next, we have the HTML markup that makes up the navigation bar. Now, I’d like to clarify that I’m not going to focus on the CSS classes used to style the navigation bar, as this is all nicely documented on the Halfmoon website. Instead, I’d like to focus on specific Svelte functionality.
Here is the first piece of Svelte functionality included within the navigation bar markup.
<span class="navbar-text ml-5">
{#if $session['user'] != null}
<span class="ml-5 mt-5 badge text-monospace">
{$session['user'].email}
</span>
{/if}
</span>
What we have here is conditional rendering. We will only display the currently signed-in user’s email address $session['user'].email if (#if) a user has signed in ($session['user'] != null).
Because we are including Svelte logic within the actual markup, we must wrap this logic using curly braces {}.
Notice that the opening if tag (#if) has to be closed with a corresponding end if tag (/if). With this short example, we’ve just learned how to perform conditional rendering, which means that this markup will only be displayed when that specific condition is met.
The next exciting part I’d like to discuss is displaying the Sign in button or Sign out button—which is also done with conditional rendering, as follows.
{#if $session['user'] != null}
<a href="/favorites"
class="mr-5 btn btn-link"
role="button"
>
Favorites
</a>
<a href={null}
class="mr-5 btn btn-success"
role="button"
on:click={() => logOut()}
>
Sign out
</a>
{:else}
<a href="/login"
class="mr-5 btn btn-secondary"
role="button">
Sign in
</a>
{/if}
By examining the previous code, we can see that the Favorites link and the Sign out button only show when a user has signed in—in other words, if $session['user'] != null is true.
On the other hand, if a user is not signed in, then the Sign in button shows—in other words, if $session['user'] != null is false (so, when $session['user'] == null).
Notice that the Sign out button includes a click event that triggers the execution of the logOut function, which is done as follows.
on:click={() => logOut()}
Notice that the syntax is not written as on:click={logOut} because doing so only references the function and doesn’t invoke it.
The function's execution is done by creating an anonymous arrow function (() =>) that invokes the logOut function.
And finally, the slot tag is significant and can be easily missed. Svelte uses slots to indicate that a parent component can receive a child component, just like regular HTML elements have children.
In other words, the slot tag indicates where the child component will be placed within the parent component. To understand this better, let’s look at the following diagram.
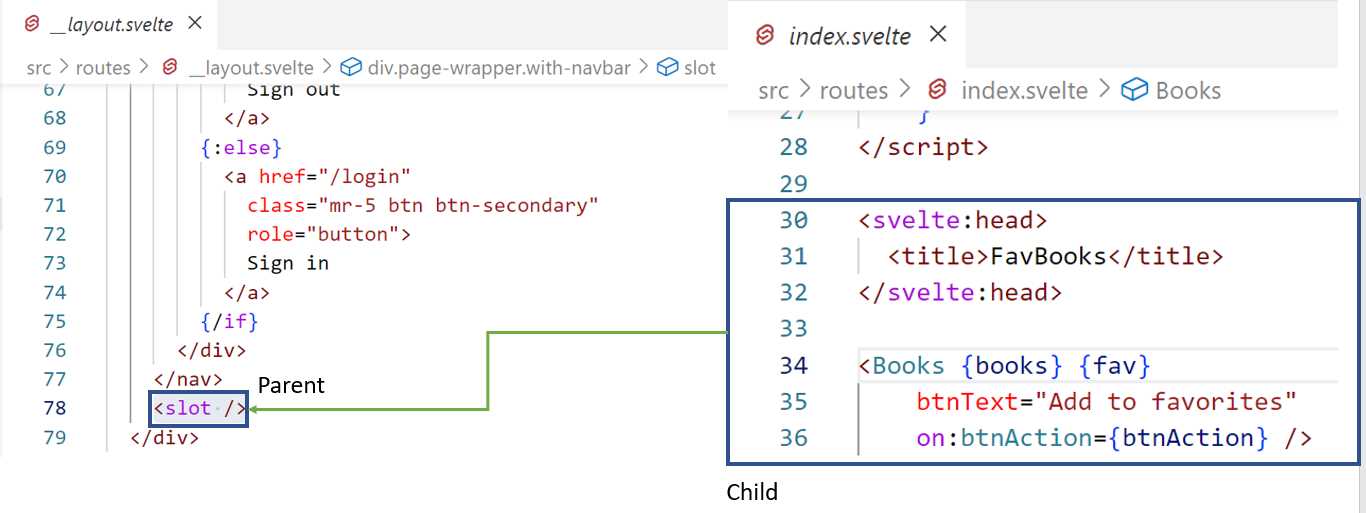
Figure 5-j: index.svelte Markup Injected into the __layout.svelte Slot (Code Approach)
In this figure, notice that the markup from index.svelte is placed by Svelte during compilation time into the slot available within __layout.svelte. So, __layout.svelte represents the parent component and index.svelte the child.
To understand this better, let’s look at the following image.
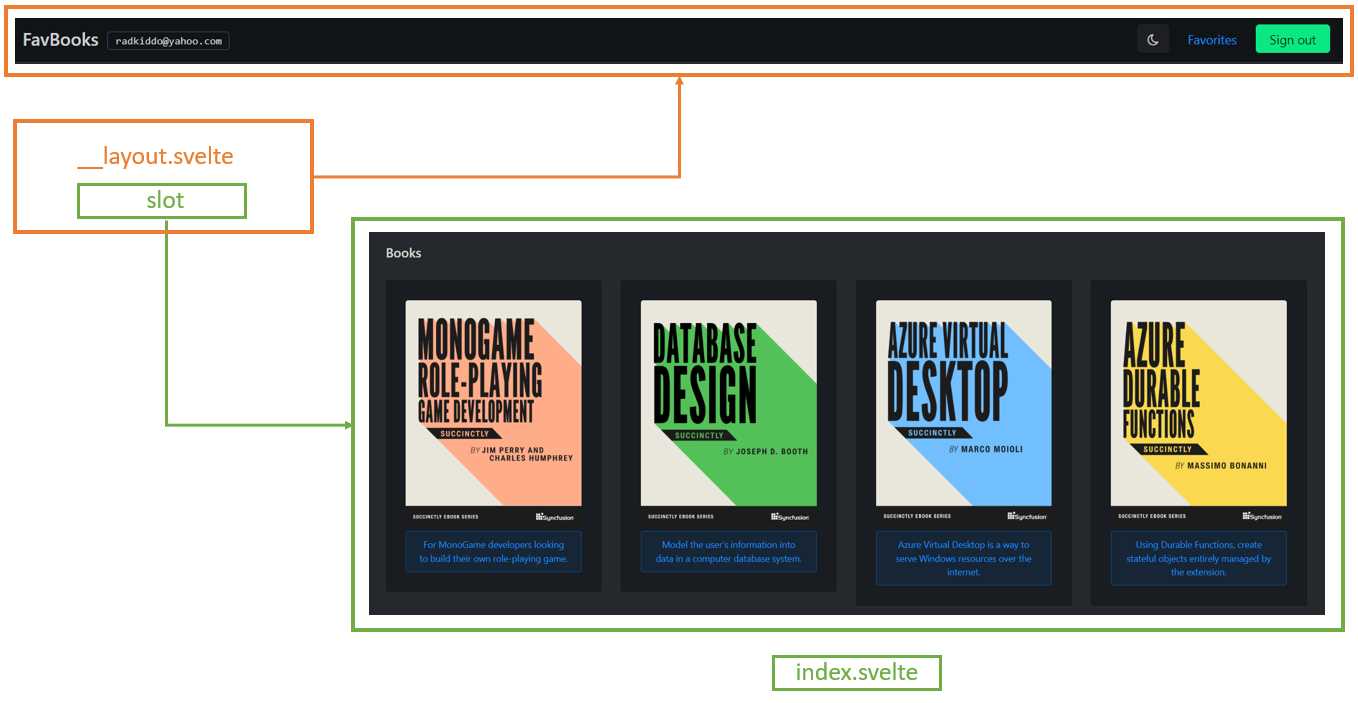
Figure 5-k: index.svelte Markup Injected into the __layout.svelte Slot (UI Approach)
This image shows that the Books component is placed into the slot tag within the __layout.svelte markup, which, as you have seen, includes the navigation bar markup.
Sign in page (login.svelte)
Now that we have looked at the main page, let’s explore the Sign in page. Before we look at the complete finished code, let’s see how the markup corresponds to the UI elements of this page.
In the following figure, I’ve highlighted how each UI part of the Sign in page corresponds to its markup counterpart within login.svelte.
For example, the part highlighted in purple corresponds to the navigation bar (__layout.svelte). The orange part corresponds to the Sign in form caption. The green part is only shown if an error occurs.
The red part corresponds to the User name field, the blue corresponds to the Password field, and the yellow part corresponds to the Submit button and the Don’t have an account link.
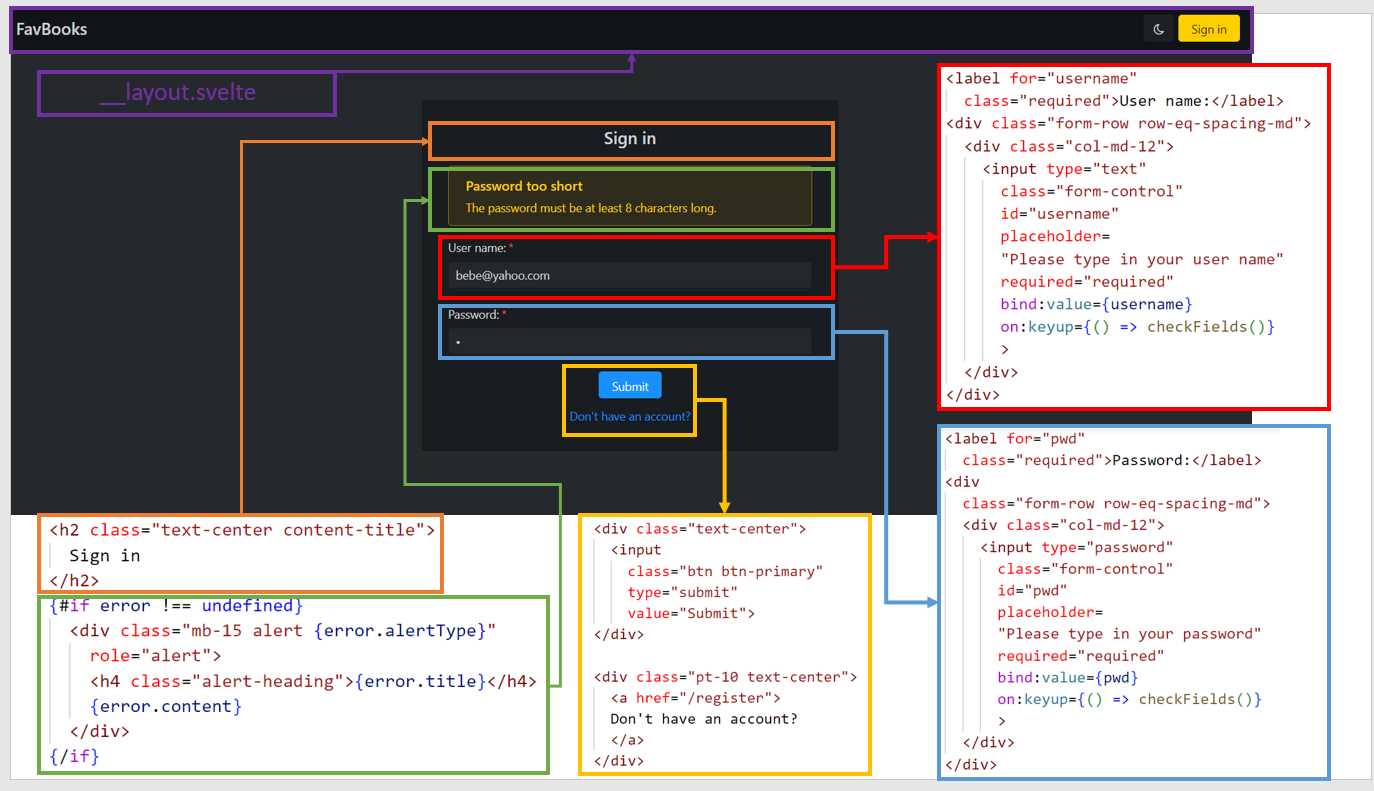
Figure 5-l: Sign in Page UI and Markup (login.svelte) Relationship
Here is the finished code for login.svelte.
Code Listing 5-d: The Finished login.svelte File (Root of the routes Folder)
<script context="module"> export const load = async ({ session }) => { let { user } = session if (user != null) { return { status: 302, redirect: "/favorites", } } return { status: 200, } } </script> <script> import { loginChecks, fbLoginChecks } from "$lib/utils.js" import { signInWithEmailAndPassword } from "Firebase/auth" import { auth, userDoc } from "../firebase.js" import { goto } from "$app/navigation" import { setDoc } from "Firebase/firestore/lite" export let error = undefined export let username = "" export let pwd = "" const checkFields = () => { if (username === "" && pwd === "") { error = undefined } } const signIn = async (email, pwd) => { if (email !== undefined && pwd !== undefined) {
error = loginChecks(email, pwd) if (error === undefined) { try { let user = await signInWithEmailAndPassword(auth, email, pwd) await setDoc( userDoc(auth.currentUser.uid), { username: user.user.displayName, email: user.user.email }) await goto("/favorites") } catch (e) { error = fbLoginChecks(e) } } } } </script> <svelte:head> <title>Sign in</title> </svelte:head> <div class="content-wrapper"> <div class="container-fluid"> <div class="content"> <div class="row"> <div class="col-sm"></div> <div class="card col-sm"> <h2 class="text-center content-title"> Sign in </h2> {#if error !== undefined} <div class="mb-15 alert {error.alertType}" role="alert"> <h4 class="alert-heading">{error.title}</h4> {error.content} </div> {/if} <form on:submit|preventDefault= {() => signIn(username, pwd)}> <div> <label for="username" class="required">User name:</label> <div class="form-row row-eq-spacing-md"> <div class="col-md-12"> <input type="text" class="form-control" id="username" placeholder= "Please type in your user name" required="required" bind:value={username} on:keyup={() => checkFields()} > </div> </div> </div> <div> <label for="pwd" class="required">Password:</label> <div class="form-row row-eq-spacing-md"> <div class="col-md-12"> <input type="password" class="form-control" id="pwd" placeholder= "Please type in your password" required="required" bind:value={pwd} on:keyup={() => checkFields()} > </div> </div> </div>
<div class="text-center"> <input class="btn btn-primary" type="submit" value="Submit"> </div> <div class="pt-10 text-center"> <a href="/register"> Don't have an account? </a> </div> </form> </div> <div class="col-sm"></div> </div> </div> </div> </div> |
As you can see, we have a part that runs outside of an individual component instance, which is done using the <script context="module"> code block.
This code block only includes the load function, which checks whether a user is signed in (user != null). If so, the user is redirected to the Favorites page (/favorites), and the Sign in page is not shown.
The reason for doing that (redirecting the user to the Favorites page when a user has already signed in) is that there is no need to execute another sign-in until the currently signed-in user signs out.
export const load = async ({ session }) => {
let { user } = session
if (user != null) {
return {
status: 302,
redirect: "/favorites",
}
}
return {
status: 200,
}
}
If a user has not signed in (user == null), then the Sign in page is shown so a user can sign in. The following diagram explains how this flow works.
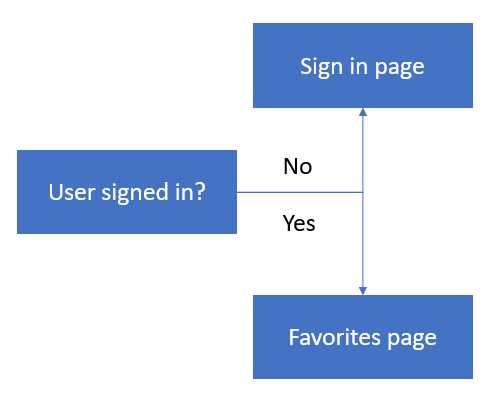
Figure 5-m: Login Flow
Next, we find the script section that executes within the individual component instance. Let’s start by looking at the import statements.
import { signInWithEmailAndPassword } from "Firebase/auth"
import { auth, userDoc } from "../firebase.js"
import { goto } from "$app/navigation"
import { setDoc } from "Firebase/firestore/lite"
First, we can see that from the Firebase authentication module (Firebase/auth), we import the signInWithEmailAndPassword method. As the method name implies, we’ll use it to authenticate any application user with Firebase.
Then, from the utility firebase.js file, we import the auth object and userDoc method. These are used to check if authentication has occurred and access the signed-in user.
Next, we import the goto method, which we use to redirect the user to the Favorites page if the user has signed in.
Then, we have the setDoc method, used for adding data to the Cloud Firestore database, which is why we import the Firebase Firestore Lite module (Firebase/firestore/lite).
Next, we declare the three variables for the Sign in page, error, username, and pwd. By adding the export keyword, we specify that these variables can be used outside of login.svelte.
export let error = undefined
export let username = ""
export let pwd = ""
Although we won’t be using these variables outside of login.svelte, it’s a good idea to export these variables if in the future we want to refactor login.svelte and register.svelte into a single component.
After that, we find the checkFields function, which checks that the username, pwd, and error variables have their initial values set as an empty string, or undefined in the case of the error variable.
const checkFields = () => {
if (username === "" &&
pwd === "") {
error = undefined
}
}
This function is used when the user deletes the content of either the username or pwd fields, and if a login error has occurred (and is still shown on the Sign in form), so that the error can be cleared (removed from the screen).
The checkFields function executes when the keyup event for the username or pwd field gets triggered. The keyup event occurs when the user presses and releases a key on either the username or pwd field.
Next, we find the signIn function. As its name implies, this function is responsible for authenticating the user against Firebase.
const signIn = async (email, pwd) => {
if (email !== undefined &&
pwd !== undefined) {
error = loginChecks(email, pwd)
if (error === undefined) {
try {
let user = await
signInWithEmailAndPassword(auth, email, pwd)
await setDoc(
userDoc(auth.currentUser.uid),
{ username: user.user.displayName,
email: user.user.email })
await goto("/favorites")
}
catch (e) {
error = fbLoginChecks(e)
}
}
}
}
As you can see, the function is asynchronous (async), and the user’s email (which represents the value of the username field) and pwd are passed as parameters.
The function first checks both the values of the email and pwd to ensure they are not undefined, which is performed by the if (email !== undefined && pwd !== undefined) condition.
Then, both email and pwd are checked to ensure that they are valid for login, which is done by the loginChecks function. As we’ll see later, this function verifies that the email variable's value is a valid email address, and the pwd field's value is good enough for a password (minimum length check).
If the loginChecks validation goes well and there are no errors (error === undefined), then we can authenticate the user to Firebase by calling the signInWithEmailAndPassword method.
If the authentication process succeeds, the currently active user can be set up by invoking the setDoc function, in which userDoc is passed as a first parameter, and an object containing the user information is passed as a second parameter.
setDoc(userDoc(auth.currentUser.uid), { username: user.user.displayName,
email: user.user.email })
Once that succeeds, the user is redirected to the Favorites page, which is done by executing the goto("/favorites") instruction. At this stage, the user is authenticated.
Suppose the authentication process fails at any given point (thus why it is wrapped around a try-catch statement). In that case, an error (e) is reported by Firebase, and the fbLoginChecks function then processes that error.
In that case, the fbLoginChecks converts the error to a user-friendly message displayed above the username field.
Moving on, we find the <svelte:head> section that sets the page’s title, and we can see the rest of the markup.
As for the remaining markup, I won’t go over the specifics of the Halfmoon CSS classes used (this is covered extensively within their excellent documentation), but instead focus solely on Svelte-specific instructions.
Notice the following conditional rendering, which is responsible for displaying an error in case there is one.
{#if error !== undefined}
<div class="mb-15 alert {error.alertType}"
role="alert">
<h4 class="alert-heading">{error.title}</h4>
{error.content}
</div>
{/if}
An error will display if the error variable's value is different than undefined. Depending on the type of error (error.alertType), a specific CSS class will be applied. The error.title and error.content are shown.
The following interesting Svelte logic relates to the form submission.
<form on:submit|preventDefault={() => signIn(username, pwd)}>
This binds the form to the submit event and prevents the default browser form behavior (preventDefault), which would be to submit the form and redirect the user to another page.
So, what happens instead is that a submit event occurs, and the signIn function is executed, passing the value of the submitted username and pwd fields.
Notice that the function is executed because it is called through an anonymous function: () => signIn(username, pwd). Otherwise, it wouldn't run and only be referenced.
Then, we have the input element used for entering the username variable, for which we can see the code as follows.
<input type="text"
class="form-control" id="username"
placeholder="Please type in your user name"
required="required"
bind:value={username}
on:keyup={() => checkFields()}
>
Notice that this input element (id="username") binds to the username variable. Whatever value is entered into the input element is automatically assigned to username.
Furthermore, the input element has a keyup event, which executes the checkFields function we covered before.
We can see the input element for entering the password (id="pwd"). Notice that the element binds to the pwd field; whatever value is entered into the input element is automatically assigned to pwd.
<input type="password"
class="form-control" id="pwd"
placeholder="Please type in your password"
required="required"
bind:value={pwd}
on:keyup={() => checkFields()}
>
This input element also has a keyup event, which executes the checkFields function we covered before.
Finally, we can see the Submit button. When you click this button, the submit event of the form is triggered.
<input class="btn btn-primary" type="submit" value="Submit">
That’s all there is to the Sign in page—as you have seen, it’s relatively straightforward.
Sign up page (register.svelte)
With the Sign in page covered, let’s now focus our attention on the Sign up page. The functionality is almost identical to the Sign in page. First, let’s look at how the UI relates to the markup.
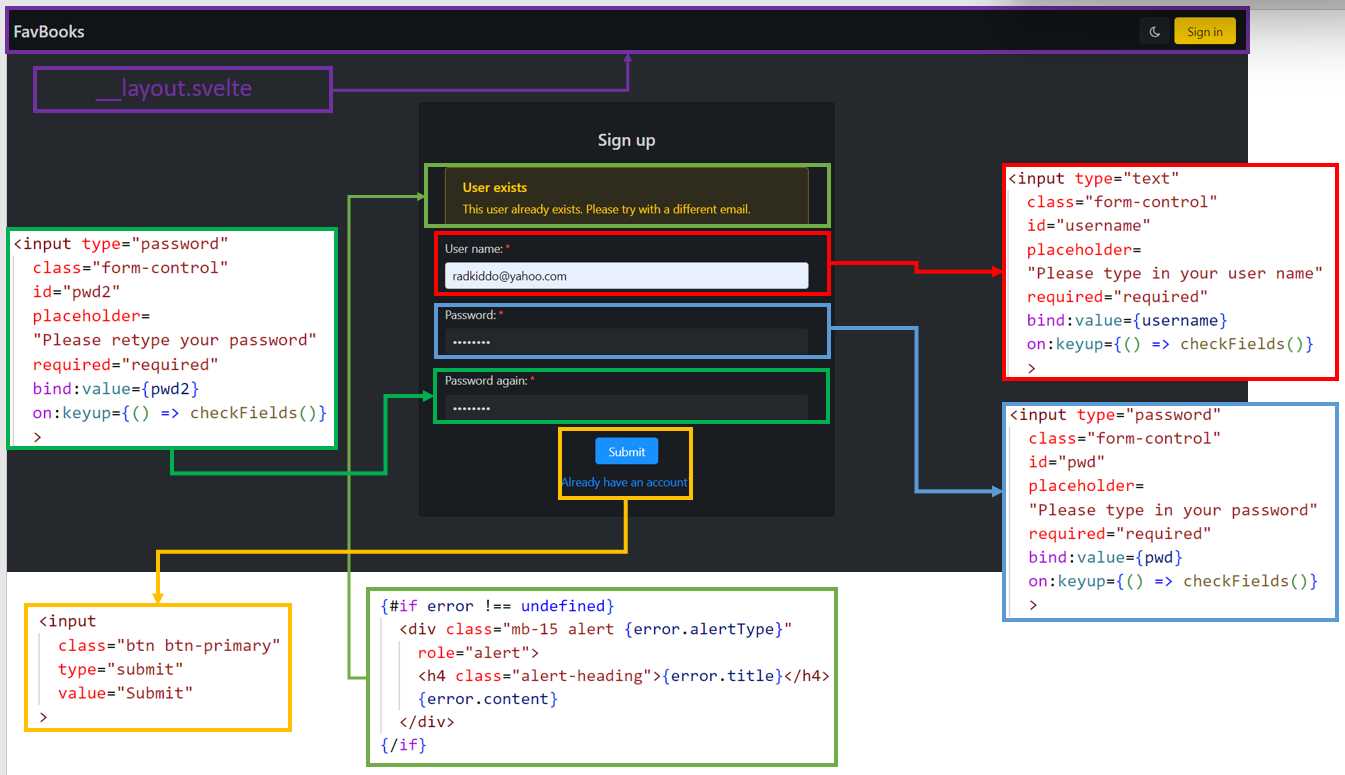
Figure 5-n: Sign up Page UI and Markup (register.svelte) Relationship
As you can see, the part highlighted in purple corresponds to the navigation bar (__layout.svelte).
The light green part is only shown if an error occurs. The red part corresponds to the User name field, the blue to the Password field, the bright green to the Password again field, and the yellow part corresponds to the Submit button and the Already have an account? link.
The only significant difference between Sign in and this page is that a different password-related field is used for repeating the password.
Now, let’s look at the finished code for the Sign up page.
Code Listing 5-e: The Finished register.svelte File (Root of the routes Folder)
<script context="module"> export const load = async ({ session }) =>{ let { user } = session if (user != null) { return { status: 302, redirect: "/favorites", } } return { status: 200, } } </script> <script> import { registerChecks, fbRegisterChecks } from "$lib/utils.js" import { createUserWithEmailAndPassword, updateProfile } from "Firebase/auth" import { goto } from "$app/navigation" import { auth, userDoc } from "../firebase.js" import { setDoc } from "Firebase/firestore/lite" export let error = undefined, username = "", pwd = "", pwd2 = "" const checkFields = () => { if (username === "" && pwd === "" && pwd2 === "") { error = undefined } } const signUp = async (email, pwd, pwd2) => { if (email !== undefined && pwd !== undefined && pwd2 !== undefined) { error = registerChecks(email, pwd, pwd2) if (error === undefined) { try { let user = await createUserWithEmailAndPassword( auth, email, pwd ); await updateProfile(user.user, { displayName: username }); await setDoc( userDoc(auth.currentUser.uid), { username: user.user.displayName, email: user.user.email }); await goto("/favorites") } catch (e) { error = fbRegisterChecks(e) } } } } </script> <svelte:head> <title>Sign up</title> </svelte:head> <div class="content-wrapper"> <div class="container-fluid"> <div class="content"> <div class="row"> <div class="col-sm"></div> <div class="card col-sm"> <h2 class="text-center content-title"> Sign up </h2> {#if error !== undefined} <div class="mb-15 alert {error.alertType}" role="alert"> <h4 class="alert-heading">{error.title}</h4> {error.content} </div> {/if} <form on:submit|preventDefault= {() => signUp(username, pwd, pwd2)}> <div> <label for="username" class="required">User name:</label> <div class="form-row row-eq-spacing-md"> <div class="col-md-12"> <input type="text" class="form-control" id="username" placeholder= "Please type in your user name" required="required" bind:value={username} on:keyup={() => checkFields()} > </div> </div> </div> <div> <label for="pwd" class="required">Password:</label> <div class="form-row row-eq-spacing-md"> <div class="col-md-12"> <input type="password" class="form-control" id="pwd" placeholder= "Please type in your password" required="required" bind:value={pwd} on:keyup={() => checkFields()} > </div> </div> </div> <div> <label for="pwd2" class="required">Password again:</label> <div class="form-row row-eq-spacing-md"> <div class="col-md-12"> <input type="password" class="form-control" id="pwd2" placeholder= "Please retype your password" required="required" bind:value={pwd2} on:keyup={() => checkFields()} > </div> </div> </div>
<div class="text-center"> <input class="btn btn-primary" type="submit" value="Submit" > </div> <div class="pt-10 text-center"> <a href="/login"> Already have an account? </a> </div> </form> </div> <div class="col-sm"></div> </div> </div> </div> </div> |
As you can see in the preceding code, just like with the Sign in page, we have a part that runs outside of an individual component instance, which is done using the <script context="module"> code block.
This code block only includes the load function, which checks whether a user is signed in (user != null). If so, the user is redirected to the Favorites page (/favorites), and the Sign up page is not shown.
The reason for doing that (redirecting the user to the Favorites page when a user has already signed up) is that there is no need to execute another sign up on the same browser session because the signed-up user will be signed in automatically.
export const load = async ({ session }) => {
let { user } = session
if (user != null) {
return {
status: 302,
redirect: "/favorites",
}
}
return {
status: 200,
}
}
Next, we find the script section that executes within the individual component instance. Let’s start by looking at the import statements.
import { registerChecks, fbRegisterChecks } from "$lib/utils.js"
import { createUserWithEmailAndPassword, updateProfile } from "Firebase/auth"
import { goto } from "$app/navigation"
import { auth, userDoc } from "../firebase.js"
import { setDoc } from "Firebase/firestore/lite"
First, from the utility file (util.js) found within the src/lib folder, we import the registerChecks and fbRegisterChecks functions used for validating the entered data.
Next, we can see that from the Firebase authentication module (Firebase/auth), we import the createUserWithEmailAndPassword method. As the method name implies, we’ll use it to register any application user with Firebase. Once the user is registered, the user profile is updated using the updateProfile method.
Then, we import the goto method, which we use to redirect the user to the Favorites page if the user has signed up (which automatically signs the user in).
Next, from the utility firebase.js file, we import the auth object and userDoc method. These are used to check if authentication has occurred and access the signed-in user details.
Then, we have the setDoc method, used for adding data to the Cloud Firestore, which is why we import the Firebase Firestore Lite module (Firebase/firestore/lite).
After that, just like we did for the Sign in page, we define the variables we will use for the sign-up process.
export let error = undefined, username = "", pwd = "", pwd2 = ""
In this case, the difference is that we have an additional variable (pwd2) that we did not need on the Sign in page.
Moving on, we find the checkFields function, which is almost identical to its counterpart within the Sign in page, except that the pwd2 field is included.
const checkFields = () => {
if (username === "" &&
pwd === "" && pwd2 === "") {
error = undefined
}
}
This function is used when the user deletes the content of the username, pwd, or pwd2 fields, and if a register error has occurred (and is still shown on the Sign up form), so that the error can be cleared (not shown anymore on the screen).
The last part of the user Sign up page logic is the user registration process, done with the signUp function.
const signUp = async (email, pwd, pwd2) => {
if (email !== undefined &&
pwd !== undefined &&
pwd2 !== undefined) {
error = registerChecks(email, pwd, pwd2)
if (error === undefined) {
try {
let user = await createUserWithEmailAndPassword(auth, email, pwd)
await updateProfile(user.user, { displayName: username })
await setDoc(userDoc(auth.currentUser.uid), {
username: user.user.displayName,
email: user.user.email
});
await goto("/favorites")
}
catch (e) {
error = fbRegisterChecks(e)
}
}
}
}
Paying close attention to the signUp function, we can see that the sequence of instructions is almost identical to the signIn process from the Sign in page.
The main differences are that for input validation, we are now using the registerChecks function; for error validation, the fbRegisterChecks function is used, and the user registration is done when the createUserWithEmailAndPassword function is invoked.
Once the user registration has taken place, the user profile is updated, which is done with the updateProfile function.
If the authentication process succeeds, the currently active user can be set up by invoking the setDoc function, in which userDoc is passed as a first parameter, and an object containing the user information is passed as a second parameter.
setDoc(userDoc(auth.currentUser.uid), { username: user.user.displayName,
email: user.user.email })
If the registration and subsequent automatic authentication are successful, the user is redirected to the Favorites page, which is done by executing the goto("/favorites") instruction. At this stage, the user is authenticated.
Suppose the authentication process fails at any given point (thus why it is wrapped around a try-catch statement). In that case, an error (e) is returned by Firebase, and the fbRegisterChecks function then processes that error.
Moving on, we find the <svelte:head> section that sets the page’s title, and we can see the rest of the markup.
As for the remaining markup, as I mentioned previously, I won’t go over the specifics of the Halfmoon CSS classes, but instead focus solely on Svelte-specific instructions.
Looking at the markup, we can see that the following code displays the error if its value is not undefined, which should look familiar to you.
{#if error !== undefined}
<div class="mb-15 alert {error.alertType}" role="alert">
<h4 class="alert-heading">{error.title}</h4>
{error.content}
</div>
{/if}
Depending on the type of error (error.alertType), a specific CSS class will be applied. The error.title and error.content are shown.
The next instruction relates to the form submission.
<form on:submit|preventDefault={() => signUp(username, pwd, pwd2)}>
This binds the form to the submit event and prevents the default browser form behavior (preventDefault), which would be to submit the form and redirect the user to another page.
What happens instead is that the submit event occurs and the signUp function runs, passing the value of the submitted username, pwd, and pwd2 fields.
Notice that the function is executed because it is called through an anonymous function: () => signUp(username, pwd, pwd2). Otherwise, it wouldn't run, and only be referenced.
Moving on, we have the input element for entering the username variable, for which we can see the code as follows.
<input type="text"
class="form-control" id="username"
placeholder="Please type in your user name"
required="required"
bind:value={username}
on:keyup={() => checkFields()}
>
Notice that this input element (id="username") binds to the username variable; whatever value is entered into the input element is automatically assigned to username.
Additionally, notice that the input element has a keyup event, which executes the checkFields function we covered before. It is specific for user registration, as it also evaluates the value of pwd2.
Next, we can see the input element for entering the password (id="pwd"). Notice that the element binds to the pwd field; whatever value is entered into the input element is automatically assigned to pwd. This is the same functionality we used for the Sign in page.
<input type="password"
class="form-control" id="pwd"
placeholder="Please type in your password"
required="required"
bind:value={pwd}
on:keyup={() => checkFields()}
>
The difference, though, is that for the Sign up page, we have another password field, which needs to match the value of the first password field (the values of pwd and pwd2 must be the same).
<input type="password" class="form-control" id="pwd2"
placeholder="Please retype your password"
required="required"
bind:value={pwd2}
on:keyup={() => checkFields()}
>
The main difference here is that this input element binds to the pwd2 field instead of pwd. This input element also has a keyup event, which executes the checkFields function we previously explored.
Finally, we can see the following markup for the Submit button. When you click on this button, the submit event of the form is triggered.
<input class="btn btn-primary" type="submit" value="Submit">
That’s all there is to the Sign up page—which, as you have seen, is also straightforward.
Recap
We have made substantial progress in creating and gluing our application's main user interface functionality. However, we are not entirely done.
We still have to put together the UI of the Favorites page and delve into the Books component, which is used by the app’s main page, and the Favorites page. That’s what the next chapter is all about.
- 1800+ high-performance UI components.
- Includes popular controls such as Grid, Chart, Scheduler, and more.
- 24x5 unlimited support by developers.