
SSIS Succinctly®

CHAPTER 6
Variables, Expressions, and Parameters
Introduction
Integration Services packages might be difficult to maintain if the rules specified in them change often. Imagine, for instance, a conditional split for a specific value coming from the source databases. In this case, you need to define a value as a condition inside your package but, if this value changes, you need to change it in the package and redeploy it.
Integration Services has powerful pieces in its architecture that will help you to resolve these problems without having to change your package execution, including variables, expressions, parameters, and some other well-known functions, operators, and literals. This chapter will focus on the first three as they are true mechanisms of adding abstraction and dynamics into your package runtime intelligence.
Understanding the components
Variables enable you to develop dynamic mechanisms inside your packages so that, according to a certain condition, they will reconfigure themselves and their execution logics will change—much like in any .NET language. In this way, you will be creating what are commonly called dynamic packages. You will able to create and use two types of variables: system variables and user variables. User variables are created by you. Variables can also vary in scope, with the default scope being the entire package. But they can also be set to be in the scope of a container, task, or an event handler inside the package. These variables can be used in many more scenarios such as iterating through a loop, concatenating multiple values together to create a file directory, or passing an array between objects. So let’s take a further look at all applicable scenarios in which variables can be used:
- Updating properties of package elements at run time, such as the number of concurrent executables that a Foreach Loop container allows.
- Including an in-memory lookup table such as running an Execute SQL Task that loads a variable with data values.
- Loading variables with data values and then using them to specify a search condition in a WHERE clause. For example, the script in a script task can update the value of a variable that is used by a Transact-SQL statement in an Execute SQL Task.
- Loading a variable with an integer and then using the value to control looping within a package control flow, such as using a variable in the evaluation expression of a For Loop container to control iteration.
- Populating parameter values for Transact-SQL statements at run time, such as running an Execute SQL Task and then using variables to dynamically set the parameters in a Transact-SQL statement.
- Building expressions that include variable values. For example, the Derived Column transformation can populate a column with the result obtained by multiplying a variable value by a column value.
Although variables are one of the key concepts of this dynamic mechanism, there are several other components that interact with variables to bring you the flexibility you need inside your package developments. Expressions, for instance, are used to evaluate a value in order to decide which path of execution the package should take. This value can be defined by a variable or by the combination of identifiers, literals, functions, and operators.
Another nice feature that SQL Server 2012 provides is parameters which, at first look, might look like variables because they are also used in expressions to condition a certain logic based in its store data (and even more, inside a package these parameters work just like a variable). However, there is a small detail that makes a huge difference: parameters are defined externally to the package and cannot be changed in development time, as opposed to variables which are used and defined internally. These parameters can be defined in two scopes: package-level in which they are available for a particular package, or project-level in which all packages of a project can be used.
If you need a simple way to decide whether you need a variable or a parameter, decide if you want to set the value of something from outside the package or if you want to create or store values only within a package. If the first case, use parameters; otherwise, use variables.
Creating New Variables
Creating variables is easy using the Variables window of the SSIS Designer. To create a new variable, click Add Variable. Give your new variable a name, data type, and value. This variable value can come from an expression as well; if you want to use an expression, leave the value blank.

- Creating a new variable
To call variables inside your packages, you can use the following syntax: @[User::VarName] for user variables and @[System::VarName] for system variables.
Creating New Expressions
Expressions are used along many components inside the Integration Services Designer. However, the window used to create them is the same in each. What we are going to do in this example is create a string with the following pattern: “Today is:” concatenated with a dynamic GETDATE() function. So let’s start by defining our variable name and data type as shown in the following figure.

- Created Variable
Now let’s create a new expression inside the Variable window by clicking the Expression button. The Expression Builder will open, and you can use it to write your expressions.

- Writing the Expression
Creating New Parameters
In older versions of SSIS, you could use configurations to update the values of package properties at run time; in SSIS 2012, these configurations are replaced by parameters which can be applied to a single package or at the project level. The slowly changing dimensions (SCD) modeling technique and the mechanism of extracting only changed records from source systems is called Change Data Capture (CDC).
Although I will briefly introduce each one of these topics, my main goal is to make sure you understand the importance of including these two topics inside your ETL projects—and of seeing how you can start using them right now.
Handling Slowly Changing Dimensions
Introduction
Slowly changing dimensions (SCD) are a special data warehouse modeling technique that allows you to manage how your ETL process will resolve updates and inserts into a dimension so that you can tell your packages what to do if an attribute value changes. SCDs were first introduced by Ralph Kimball in the form of three possible types which Kimball has recently reviewed. He has recently presented more types of SCDs. However, in this book, I will be explaining only the three original types (note that the SSIS SCD component doesn’t support SCD3):
- SCD1, in which an attribute value will be overwritten if the record has changed (used if historical data is not needed).
- SCD2, in which a new record will be created whenever an attribute value changes (used to keep all historical changes).
- SCD3, in which N columns are created in a dimension to keep N changes in it (only records the last N changes).
- Some authors refer to another type when no change is applied to an attribute (fixed attribute); the SCD type is known as 0. I will refer to this fourth type as “SCD0”.
For some time, the integration software available on the market didn’t support any kind of wizard or automation for developing SCD ETL packages; this meant that if you wanted to handle an SCD inside your packages, you had to create the entire data flow logic to handle it.
However, SSIS gives you the SCD component inside data flows so that you can use a wizard to create the flow for handling SCD. But there are two important things to note.
First, the SCD component doesn’t support SCD3 so, if you want to use it, you need to develop the flow yourself. Because SCD presents several performance issues, it’s better to always think twice about using it.
Second, if you want to use SCD2, you have to create two new columns in your dimension: the beginning date of the record life (SCD_DT_BEGIN, for example) and the end date of the record life. The latter represents the time in which a new record with different attribute values is identified in your ETL process (SCD_DT_END, for example).
If you aren’t familiar with using SCD dimensions, another important thing to note is that in the same dimension you can have SCD1 attributes, SCD2 attributes, and even SCD3 attributes. This is because when a change occurs in a specific attribute, you might not need to record it (SCD2) but you might want to update its value. These requirements will vary from business to business.
Demo: Using the Slowly Changing Dimension Component
Let’s start with an example that will demonstrate how easy it is to use the wizard inside SSIS 2012. I will show you all available options inside it by using all three SCD types in a single dimension. My scenario is based on a football referee operational system that will lead to a SCD dimension called DimReferee. Both are very simple dimensions with few attributes. The source table is shown in the following figure.

- SCD2 Source Table
The DimReferee dimension is structured as follows. As you can see, I have already added the start_date and end_date attributes which will be used to flag whether or not a SCD2 record is active. The SSIS SCD component allows you to use a Status column as well.
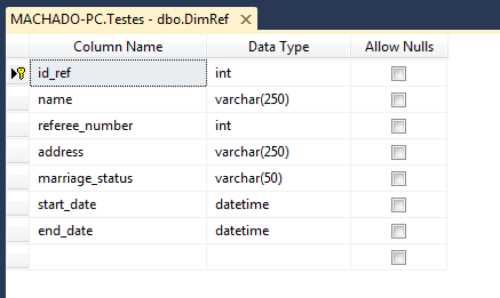
- SCD2 Destination Table
Now that both columns are created, let’s go to Integration Services. The first task is to add the SCD component to the data flow of your dimension. The following figure shows what it should look like. Our example package will be very simple: just a source component to read the referee data from the source, the flow generated with the SCD component, and a destination component to send our data to the dimension.
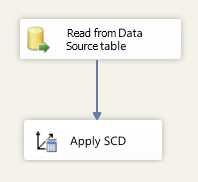
- Adding the SCD component to the data flow
There is an intermediate step that might or might not be needed depending on your attribute types in the source and destination tables, and that step is converting the data types. If you detect that your attribute types do not match, add a conversion component to your data flow to be executed before the SCD component. Your data flow should now look like the following figure.
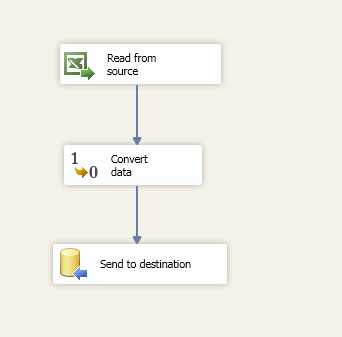
- SCD component data flow—Adding a conversion component
To start configuring the SCD component, double-click it to open a wizard that will help you configure your SCD. On the initial screen, click Next.

- SCD Wizard
This screen is very important. It is where you define the mappings between source and destination attributes and the business key, which will be used to look up the record in the source table. As you can also see, you need to define the connection manager for the dimension and the table you want to transform in an SCD dimension.
For our example, let’s map all attributes as in the following figure and choose the id_referee (primary key of the Referee table) as our business key. This business key is a key that works as a primary key for a record in our dimension and identifies a record in the operational systems. It is also commonly called a natural key. The start and end date will remain blank because they will be configured later.
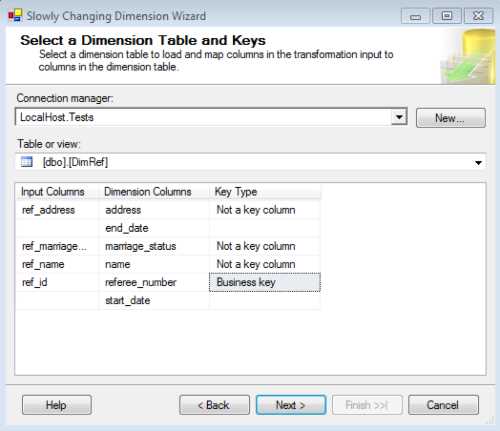
- Configuring Business Keys
Clicking Next will bring us to the most important screen in the SCD Wizard. It is in this screen that you define the type of SCD for each attribute mapped in the first screen. There are three available options:
- Fixed Attribute (SCD0)
- Changing Attribute (SCD1)
- Historical Attribute (SCD2)
As I have explained before, SCD3 is not supported in the SSIS component. In this example, I will use all of the types. After setting a referee’s name, I don’t plan to do anything else with it because I assume that the name won’t change, so I make it a fixed attribute (SCD0). However, when a referee’s marital status changes, I want to overwrite its value to the new one, so I set it as a changing attribute (SCD1). When the referee’s address changes, I want to save the old value, so it needs to be a historical attribute (SCD2).
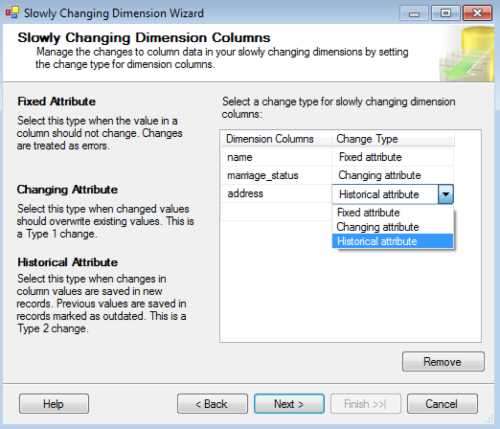
- Configuring the change type for SCD attributes
The next screen lets you choose what SSIS should do when a fixed attribute value changes, and if you want to update even the SCD2 historical records if a type SCD1 value changes. In the first case, you can tell SSIS to raise an error if a defined SCD0 attribute changes its value and the change is detected. In the second case, if an SCD attribute changes its value, you need to define whether you want to overwrite its value only in the most recent record or in all of them (historical ones).
The last case only makes sense if you have an SCD2 attribute in the dimension. In our example, let’s raise an error if the referee name changes, if we might have misunderstood the business, or if it might need to be adjusted. In the second check box, let’s leave it blank since we just want to update the active record only.
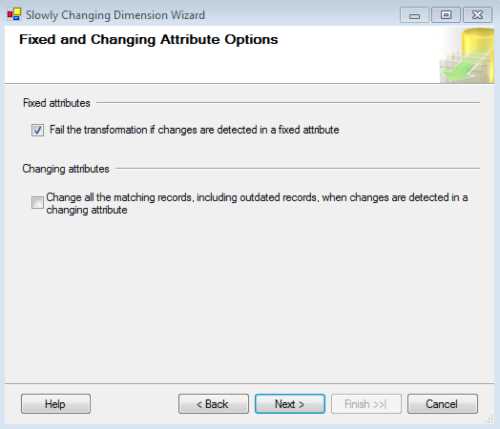
- Configuring the behavior
when changes are detected in non-changing attributes
The next screen is where you will define whether or not you will use a Status column to indicate the current (most recent/active/alive) record or, if you prefer, to use a time interval. I prefer to use dates as they allow me to know which period that record existed in. This time, let’s use our start_date and end_date attributes as a flag to the current record. We also need to indicate which type of variable we are going to use to populate the dates. To do so, we have three options:
- ContainerStartTime—The start time of the container which the package is in.
- CreationDate—Date of creation of the package.
- StartDate—The start date of execution of the package.
I prefer the last option as it is the closest to the SCD flow in the package, reflecting the most recent date. However, for this example, I used the CreationDate. After selecting the variable, click Next.

- Configuring
how to identify current and expired records
This screen is delicate. An interesting concept related to data warehouses using SSIS and SQL Server is the inferred member; this is a record from your dimension that is referenced by fact tables. However, the record is not yet loaded to the dimension. This means that a particular record can be referenced without existing.
This might occur if, for some reason, you need to load facts without having the dimension record data yet. So you create a blank/null record in a dimension that won’t have any data, just its primary key. The next screen allows you to tell SSIS what to do when the data for that inferred member arrives. You can either update the record or create a new one. If you activate the inferred member support, you have two options:
- All columns with a change type are null. This means that for every column in an inferred member record that is configured with an SCD type, SSIS will set its values to null.
- Use a Boolean column to indicate whether or not the current record is an inferred member. In this case, SSIS will use a column created by you to flag whether or not the current record is an inferred member.
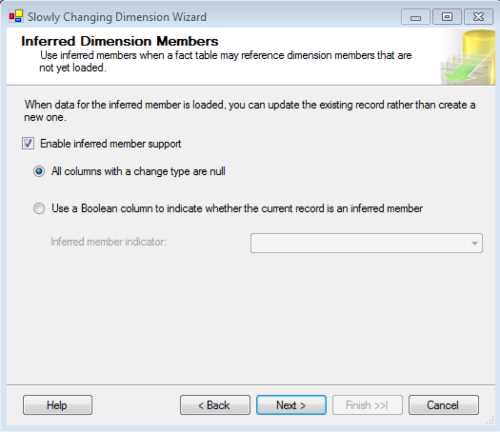
- Configuring Inferred Members
After configuring the inferred members, click Next, and you are done. SSIS will now automatically create the flow for you which, as you can see in the following figure, represents a lot of time saved with transformations and component configurations. However, if there are further transformations (such as data type conversions), you still need to do them. For instance, in our example we still need to convert some data types before running our package.
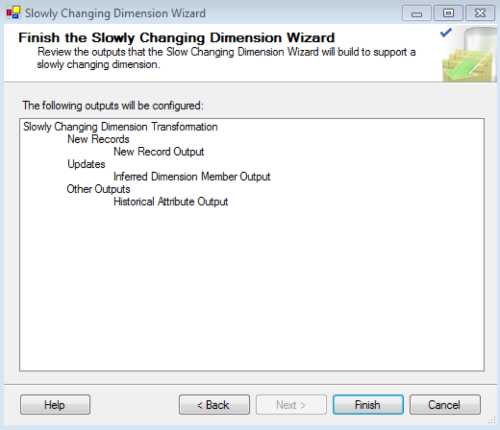
- Finishing the Configuration
Once you have added a conversion component to ensure data type consistency, your data flow should look like the following figure.
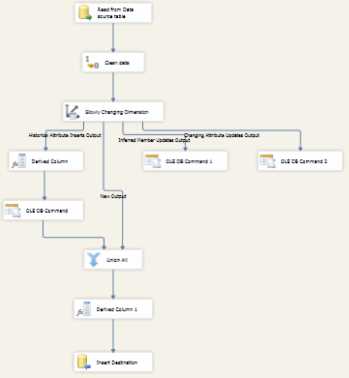
- Final data flow with SCD component
And it’s done! Your package for dimension DimReferee will now perform SCD evaluation and resolve it according to the rules specified in the SCD component. You can now run the package and test it yourself.
Change Data Capture
Introduction
Along with slowly changing dimensions (SCD), change data capture (CDC) is one of the most important mechanisms in handling changes. While SCDs define how you want to treat changes in your dimension attributes, CDC allows you to detect changes in the operational system since the last extraction process and retrieve only the changed data. By changed data, I mean updates, inserts, and also deletes from operational sources.
As you can imagine, the extraction of data from operational sources is very important in ETL operations using Integration Services or any other provider. This is because you do not want to process all the data again when you run your packages; you just want to process the records that have changed (inserts, updates, and deletes). If you schedule the execution of your ETL process every day at 2:00 in the morning for the processing of a four-year operational system database, you don´t want to process all the data from those four years. You just want to process the records that have changed since the previous night. In this way, your ETL process will be faster and much more efficient.
This mechanism was introduced in SQL Server 2008 and, since then, Microsoft has made many improvements to it. Proof of this are the new CDC components that SSIS 2012 includes. This is not the only option available; however, it probably is the most efficient. I will explain why.
Over time, database developers have created mechanisms to solve this problem. Some of those mechanisms are very smart; however, they bring with them particular problems. To understand these problems, let’s look at all options available to capture changed data in a specific time window. Here, I explain the most used alternatives:
- Audit Columns: This technique requires you to add datetime columns to each table you want to monitor for changes in the operational systems. By adding a start date and end date to the tables you change, you are able to change them every time the records change and then extract only the records for which the end date is null or higher than the last ETL round. This technique also requires you to create triggers in the source tables or external applications to update the audit column with the latest update changes in your data source table structure.
- PROBLEM: In some systems, the size and amount of tables, as well as DBAs with bad tempers, make this an impossible solution due to cost inefficiency.
- Triggers: This technique requires you to add triggers into each of the source tables you want to monitor. Every time an insert or delete occurs, the trigger will store the changed record business key into a log table. Your ETL process will then process only the records from the log table.
- PROBLEM: This will affect the performance of the operational systems, and you will also have to change all the triggers of the tables to monitor. Again, you will need to change the operational system.
Now comes the CDC technique, which solves the previously mentioned problems. Although you still need to enable CDC within each table you want to track changes, it does not affect the schema of the tables. So the impact over the operational systems’ database schemas is less when compared to audit columns or triggers.
Another interesting aspect of this technique is that it runs asynchronously. By this I mean that the job that reads from the SQL Server log to detect changes will only run when the system is idle, removing overhead from the process (when compared to triggers and audit columns which run synchronously).
The way the SQL Server CDC mechanism works together with Integration Services CDC components is also a huge benefit because you are able to extract the changed records into a package control flow and also know what kind of operation has occurred in that record. In this way, you can make separate developments over an inserted, updated, or deleted record.
Last but not least comes the usability of the CDC API. It is very easy to activate this mechanism as a SQL Server table and then handle it inside an SSIS package. The steps needed to do so will be shown in a brief demonstration so that you can start using it to optimize the extraction stage in your ETL projects.
The use of this CDC API requires you to do the following steps in order to start processing only changed records inside SSIS packages:
- Enable CDC in the database.
- This will create a new database schema (cdc) to record the information it needs to manage the mechanism.
- Enable the SQL Agent in the server of the CDC.
- This will enable the job that will analyze the logs and write the change to the CDC tables (these are the tables that record the changes, also called shadow tables). This new table has the same schema as the source plus some extra columns.
- Enable CDC in the tables we want to monitor for changes.
- This will create the instance table for the particular table you are monitoring. The SQL Agent job that is tracking the changes writes the changed records into these tables. Your ETL process will then read from these tables so that it only processes the changed records. There is an internal mechanism that cleans all the data inside it after three days by default, but you can change this limit. However, after processing the data, the ETL process should clean the table so that you won’t process them again.
- Process the changed data in SSIS and use the SSIS CDC component to make it easier.
- There are two main components:
- In the control flow, the CDC Control task is used to check the CDC state (if it is time to reprocess or if the data is updated). This task will create a new table in a database so that it can keep this information.
- In the data flow, the CDC Source queries the change tables and the CDC Splitter splits the records based on the SQL Server DML operation (Insert, Delete, or Update).
Processing the data involves the following algorithm in your SSIS package:
- Check the CDC state.
If it is time to reprocess:
- Query the data using the CDC Source.
- Send the data to the appropriate path (Insert, Delete, or Update).
- Process the data according to your needs in each path.
If the data is updated, don’t do anything.
And that’s it! By following these steps, you are able to create and maintain a CDC-based ETL solution. Now it’s time to show you how these steps are accomplished, which queries you should run in SQL Server, and what developments are required inside SSIS 2012.
Demo: Using CDC in an ETL Project
SCENARIO: We will be monitoring a table related to football games. Whenever a new record is inserted, deleted, or updated, we want to track that change and process it in our daily ETL process. The data will have our business intelligence data warehouse as the destination and, in this particular case, we will focus on updating our dimension (perspective of analysis in a business intelligence data warehouse architecture) related to referees.
Enable CDC on the Database
Let’s start by opening the SQL Server Management Tools to run some queries or, if you prefer, execute them using an Execute T-SQL task inside a package. Although I love Integration Services, the first option seems less geeky.
The first step is to run the following SQL query. In your case, you just need to change the database name. sp_cdc_enable_db is the store procedure used by SQL Server to enable CDC in the current database.
USE STG_FOOT_STAT; -- DATABASE_NAME GO --Enable CDC on the database EXEC sys.sp_cdc_enable_db; GO |
After running the previous command, SQL Server will create a special schema, cdc, which will be used to store all the objects it needs to manage the mechanism. In these objects, you will be able to find all your shadow tables. You are now able to check if the CDC is correctly enabled for that particular database. To do so, you can run the following SQL query which will retrieve the name and the value of the is_cdc_enabled attribute for your current database.
USE STG_FOOT_STAT; -- DATABASE_NAME GO --Check if CDC is enabled on the database SELECT name, is_cdc_enabled FROM sys.databases WHERE database_id = DB_ID(); |
Running the previous query will result in the following, in which the is_cdc_enabled attribute will be one of two possibilities:
- 0—Not enabled
- 1—Enabled
![]()
- Result of checking if CDC is enabled
Enable the SQL Agent in the Server of the CDC
The next important step is to check if the SQL Server Agent is running on the servers on which you want to use CDC. This is important because CDC uses a SQL job to crawl the change logs in order to write to the shadow tables.
This means that if the agent isn’t running, you won’t be able to capture changes automatically. An interesting thing about this job is that you can schedule the periodicity of its execution (daily, hourly, etc.). You have two options to activate the SQL Server Agent: either use the SQL Server Configuration Manager or use SQL Server Management Tools.
Let’s start with the first option. Open the SQL Server Configuration Manager and, in the explorer on the left, select SQL Server Services. When you do this, you will see all your servers’ services in the right pane which indicate whether or not they are running. Identify the SQL Server Agent of the server you want to activate, which in my case is the MSSQLSERVER instance. Right-click it and select Start if it isn’t running yet. If everything worked fine, you should then see that the agent is running.
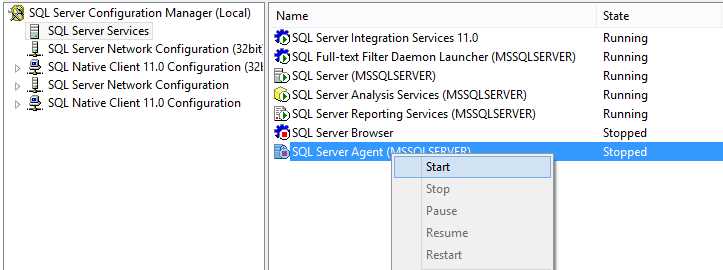
- Activating the SQL Agent in Configuration Manager
Another option is to use the SQL Server Management tools. It’s also very simple to use this option. Connect to the SQL Server instance in which you want to activate the Agent and then find the SQL Server Agent inside the Object Explorer. To start it, just right-click it and select Start. And that’s it! The small state indicator in the icon should now be green.
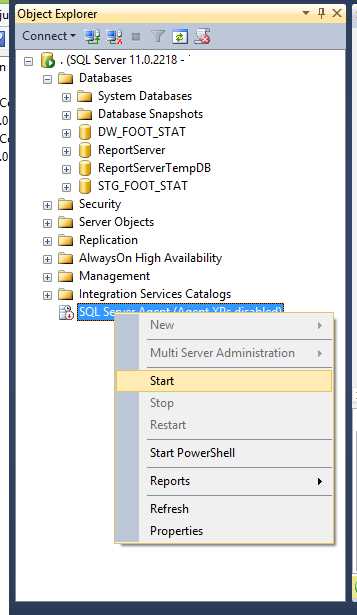
- Starting SQL Agent using SQL Server Management Tools
Enable CDC in the Tables We Want to Monitor for Changes
Now it’s time to show you how you can start monitoring the changes of a table. As I have already explained, this will create shadow tables in the cdc schema with all your source table columns, plus some special CDC ones.
The mechanism will then work in a very simple algorithm. When a record of each Data Manipulation Language (DML) operation applied to the table is written to the transaction log, the CDC process retrieves this information from the log and writes it to these shadow tables that are accessed by using a set of functions.
To enable it in a table, you need to run the stored procedure sys.sp_cdc_enable_table with some special parameters as shown in the following code example.
USE STG_FOOT_STAT; GO --Enable CDC on a specific table EXECUTE sys.sp_cdc_enable_table @source_schema = N'dbo' ,@source_name = N'STG_FOOT_STAT_TB' ,@role_name = N'cdc_Admin' ,@capture_instance = N'STG_FOOT_STAT_TB' ,@supports_net_changes = 0; |
As you can see in the stored procedure, I have used five parameters. However, there are some more that will help you align the CDC with your requirements. You need to understand all of them to execute it correctly. The definition for each one is as follows.
sys.sp_cdc_enable_table [ @source_schema = ] 'source_schema', [ @source_name = ] 'source_name' , [ @role_name = ] 'role_name' [,[ @capture_instance = ] 'capture_instance' ] [,[ @supports_net_changes = ] supports_net_changes ] [,[ @index_name = ] 'index_name' ] [,[ @captured_column_list = ] 'captured_column_list' ] [,[ @filegroup_name = ] 'filegroup_name' ] [,[ @allow_partition_switch = ] 'allow_partition_switch' ] |
The following table gives you a short definition of the parameters you can use in the sys.sp_cdc_enable_table stored procedure.
- Enable CDC in table parameters
Parameter | Definition |
|---|---|
@source_schema | Name of the schema in which the source table belongs. |
@source_name | Name of the source table in which to enable change data capture. |
@role_name | Name of the database role used to gate access to changed data. |
@capture_instance | Name of the capture instance used to name instance-specific changed data capture objects. If not specified, the name is derived from the source schema name plus the source table name in the format schemaname_sourcename.capture_instance. |
@supports_net_changes | The supports_net_changes option enables you to retrieve only the final image of a row, even if it was updated multiple times within the time window you specified. This parameter can only be activated if you have a primary key defined in the source table, otherwise you will receive the following error: Msg 22939, Level 16, State 1, Procedure sp_cdc_enable_table_internal, Line 194 The parameter @supports_net_changes is set to 1, but the source table does not have a primary key defined and no alternate unique index has been specified. |
@index_name | Name of a unique index to use to uniquely identify rows in the source table. |
@captured_column_list | Source table columns that are to be included in the change table. captured_column_list is nvarchar(max) and can be NULL. If NULL, all columns are included in the change table. |
@filegroup_name | Filegroup to be used for the change table created for the capture instance. |
@allow_partition_switch | Indicates whether the SWITCH PARTITION command of ALTER TABLE can be executed against a table that is enabled for change data capture. Its default is 1 |
If everything in your execution is correctly defined, you will see the following message in the output windows of SQL Server.

- Created the job for the STG_FOOT_STAT table
Now you can use several commands to evaluate whether or not CDC is correctly working for your table. The first option is to use the is_tracked_by_cdc attribute in the “tables” system table of SQL Server. To use it, run the following command which, as you can see, only shows you whether or not CDC is running.
--Check CDC is enabled on the table SELECT [name], is_tracked_by_cdc FROM sys.tables WHERE [object_id] = OBJECT_ID(N'dbo.STG_FOOT_STAT_TB'); |
This following figure shows the result of executing the previous command, which results in 0 if the table is not being tracked and 1 if it is. In this case, the table is being tracked as it was supposed to, after running the enable stored procedure.
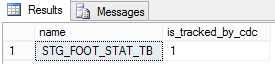
- CDC enabled for the table
Another option that will give you more information on the tracking is to use the built-in CDC stored procedure sp_cdc_help_change_data_capture. It will give you much more information including which columns are being tracked, the capture instances available (you can have two per table) and some others that you can explore. To run it, use the following code.
--Use the built-in CDC help procedure to get more information EXECUTE sys.sp_cdc_help_change_data_capture @source_schema = N'dbo', @source_name = N'STG_FOOT_STAT_TB'; GO |
And, as you can see, the result is much more interesting.
![]()
- CDC information about table tracking
With the source tables being tracked, you can now take advantage of the shadow tables directly from SQL Server because it allows you to query them and see the changes that have occurred. The CDC mechanism will create and name these shadow tables with a standard “Source table name” + “_CT”, like “myTable_CT”, for instance. This means that by knowing the source table name, you also know the shadow table name. To query it, you can use a simple SQL SELECT statement as in the following code example.
SELECT * FROM cdc.STG_FOOT_STAT_TB_CT |
Because you haven’t made any changes to the source table, the shadow table is empty as well. However, you can see the special columns in this shadow table.

- Querying the shadow table
The columns are very important for Integration Services because it will use them to know, for instance, what operations have been performed on a record. Let’s take a closer look at all of them. The __$start_lsn and __$seqval columns identify the original transaction and the order in which the operations occurred. The __$operation column shows the source operation that caused the change (1 = Delete, 2 = Insert, 3 = Update (before image), 4 = Update (after image), and 5 = Merge). The __$update_mask column contains a bit mask indicating which specific columns changed during an update.
Now, let’s perform a DML operation and then check this shadow table again. In this case, I will use Update.
USE STG_FOOT_STAT; GO UPDATE stg_foot_stat_tb SET HomeTeam = 'MANCHESTER UNITED' WHERE HomeTeam = 'Man United'; |
If you re-query the shadow table, you will see the changes tracked in it.

- Changes tracked in shadow table
Process the Changed Data in SSIS and Use the SSIS CDC Component to Make It Easier
Now that you understand CDC, let’s go back to Integration Services and make use of it. As previously mentioned, it’s one of the most important concepts to understand. Otherwise, if you don’t understand it, while processing the ETL of big data, your process will be very inefficient and, consequently, slow. Of course, this only makes sense when you have periodic ETL processes. If you only run a single execution, such as a data migration, CDC isn’t useful.
Process Initial Load
The first step is to add a new CDC Control task to your package data flow. This task will evaluate whether or not there are records to process and mark the initial load state in the CDC state variable. After that, we need to add our control flow logics and, in the end set, the initial load end state.

- Initial Load
We will now see how to configure the CDC Control tasks. The data flow that will process the data will be explained later in this chapter.
The first step is to configure the Mark initial load start task. So, let’s double-click it to open its configuration options.
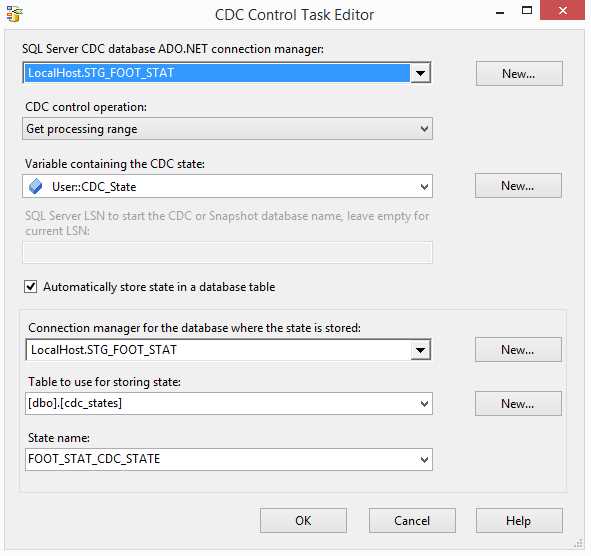
- Configuring the initial load start CDC Control task
In this window, you will need to make several configurations:
- SQL Server CDC database ADO.NET connection manager: Select an existing connection manager from the list or click New to create a new connection. The connection must be to a SQL Server database that is enabled for CDC and where the selected change table is located.
- CDC control operation: Select the operation to run for this task. All operations use the state variable that is stored in an SSIS package variable (which stores the state and passes it between the different components in the package).
- Variable containing the CDC state: Select the SSIS package variable that stores the state information for the task operation.
- Automatically store state in a database table: Select this check box for the CDC Control task to automatically handle loading and storing the CDC state in a state table contained in the specified database connection manager for the database in which the state is stored.
- Connection manager for the database where the state is stored: This connection is to a SQL Server database that contains the state table.
- Table to use for storing state: This is the SQL table that will store the CDC state. You won’t need to handle it since it’s an internal table used by the CDC mechanism.
- State name: Name of the state table to be used for storing the CDC state. You can create a new one using the New button.
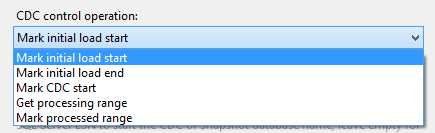
- Operation Types
As you can see in the previous figure, the CDC Control task has several options for control operations:
- Mark initial load start—This option records the first load starting point. This operation is used when executing an initial load from an active database without a snapshot. It is invoked at the beginning of an initial-load package to record the current log sequence number (LSN) in the source database before the initial-load package starts reading the source tables. This requires a connection to the source database.
- Mark initial load end—This option records the first load ending point. This operation is used when executing an initial load from an active database without a snapshot. It is invoked at the end of an initial-load package to record the current LSN in the source database after the initial-load package finishes reading the source tables. This LSN is determined by recording the time when this operation occurred and then querying the cdc.lsn_time_mapping table in the CDC database, looking for a change that occurred after that time.
- Mark CDC start—This option records the beginning of the CDC range. This operation is used when the initial load is made from a snapshot database or from a quiescence database. It is invoked at any point within the initial-load package. The operation accepts a parameter which can be a snapshot LSN, a name of a snapshot database (from which the snapshot LSN will be derived automatically), or it can be left empty, in which case the current database LSN is used as the start LSN for the change processing package. An important note about this operation is that it can be used instead of the Mark Initial Load Start and Mark Initial Load End operations.
- Get processing range—This option retrieves the range for the CDC values. This operation is used in a change processing package before invoking the data flow that uses the CDC Source data flow. It establishes a range of LSNs that the CDC Source data flow reads when invoked. The range is stored in an SSIS package variable that is used by the CDC Source during data flow processing.
- Mark processed range—This option records the range of values processed. This operation is used in a change processing package at the end of a CDC run (after the CDC data flow is completed successfully) to record the last LSN that was fully processed in the CDC run. The next time GetProcessingRange is executed, this position determines the start of the next processing range.
Save and close this task editor. Open the Mark initial load end task to tell the CDC mechanism that this initial load has ended. If you don’t mark this end state and you try to process the next range of data, SSIS will give you an error. The configuration of this task only differs from the previous one on the operation type.
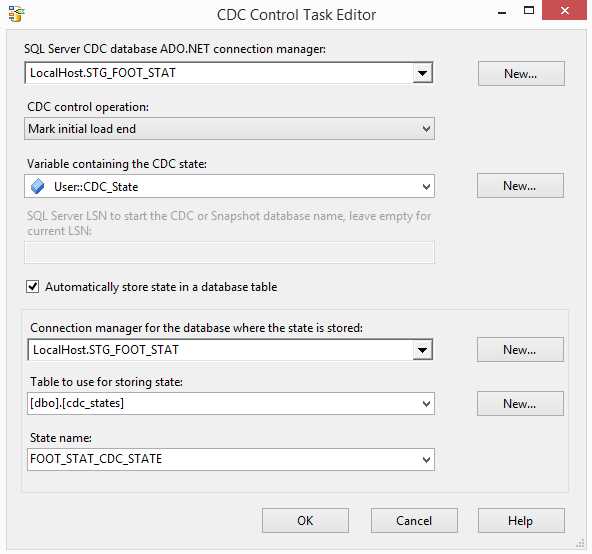
- Configuring the Mark initial load end CDC Control task
To process incremental updates, you just need to develop new packages or reuse the current ones and change their operation type as follows:
- Mark initial load start > Get processing range
- Mark initial load end > Mark processed range
Create the CDC Data Flow
After developing the control flow, we need to develop the data flow that is going to process the changed data. To do so, start by opening the data flow, and then drag and drop a new CDC source object into it.

- CDC Source
The next step is to configure this CDC source. This configuration involves setting the following properties:
- ADO.NET connection manager: The connection must be to a SQL Server database that is enabled for CDC and where the selected change table is located.
- CDC-enabled table: Select the CDC source table that contains the captured changes that you want read and feed to downstream SSIS components for processing.
- Capture instance: Select or type in the name of the CDC capture instance with the CDC table to be read. A captured source table can have one or two captured instances to handle seamless transitioning of table definition through schema changes. If more than one capture instance is defined for the source table being captured, select the capture instance you want to use here.
- CDC processing mode: Select the processing mode that best handles your processing needs.
- Variable containing the CDC state: Select the SSIS string package variable that maintains the CDC state for the current CDC context.
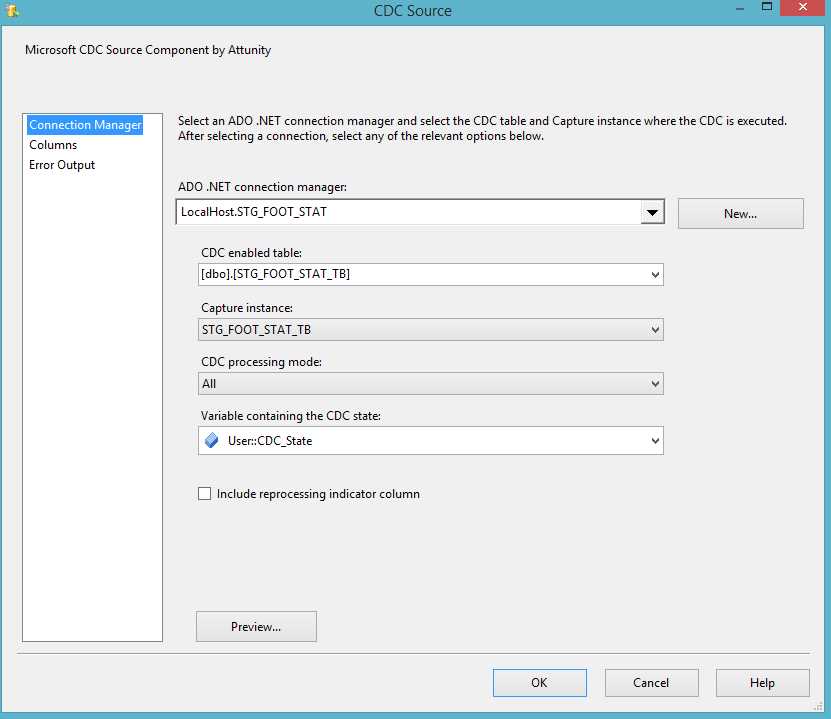
- Configuring the CDC source
You can see the column that is being added to your data flow by selecting the Columns tab in this CDC source object.
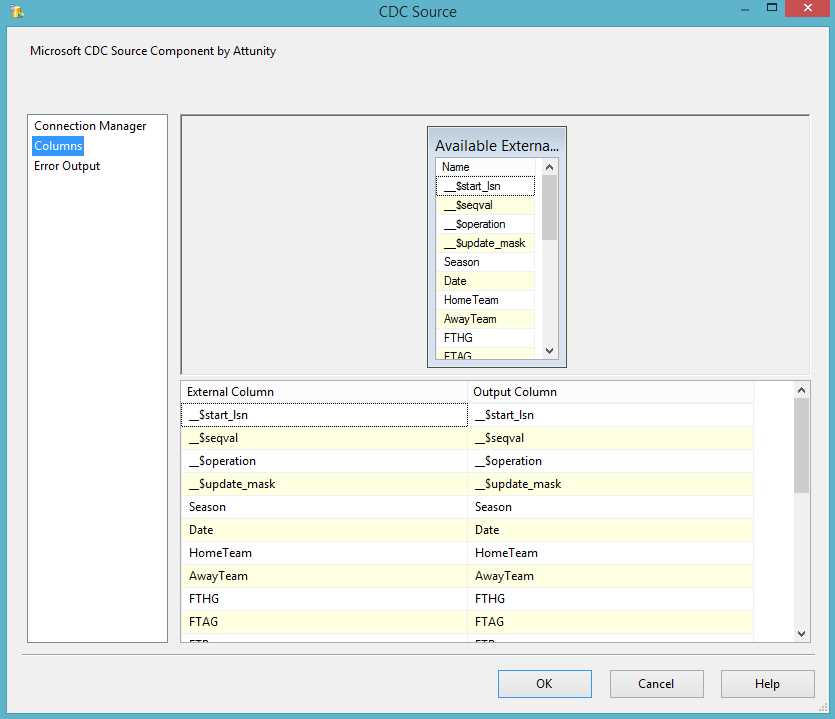
- CDC Source Columns
The next step is to add a CDC splitter which will create three different paths according to the records’ change operation type (insert, update, or delete). In this object, you don’t need to make any configuration. Just connect the CDC source to this object and the data flow engine will resolve it for you.
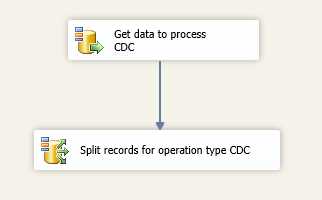
- CDC Splitter
You can now make the logics you need by using the correct paths and changing its output when connecting the CDC splitter to another object.
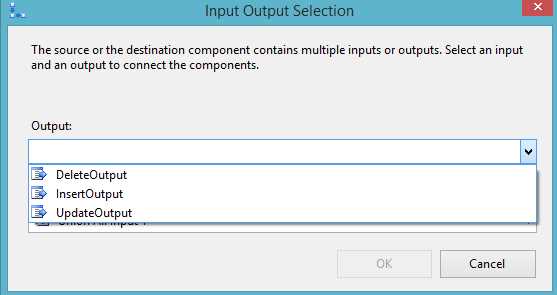
- Configuring the Ouputs
In this example, I am using a Union All object just to be able to see the data through data viewers. You can make whatever developments you wish.
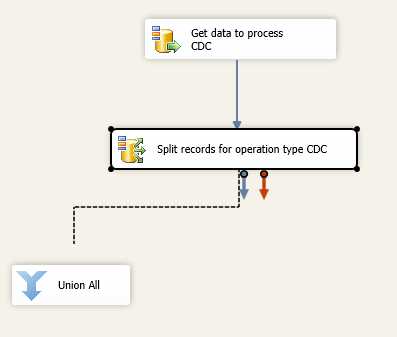
- Developing Your Logics
And that’s it! By using these components, you are able to process only changed records that are coming through your source systems. The following figure shows my final result.
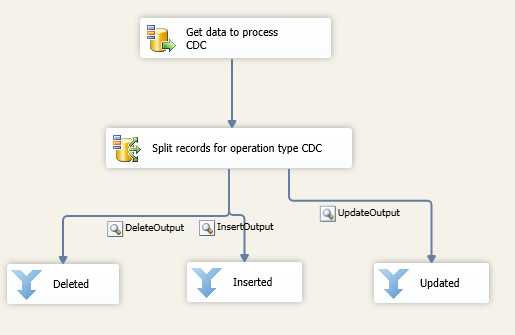
- Final Data Flow
If you run this data flow, the result will be shown in the data viewers we have configured.
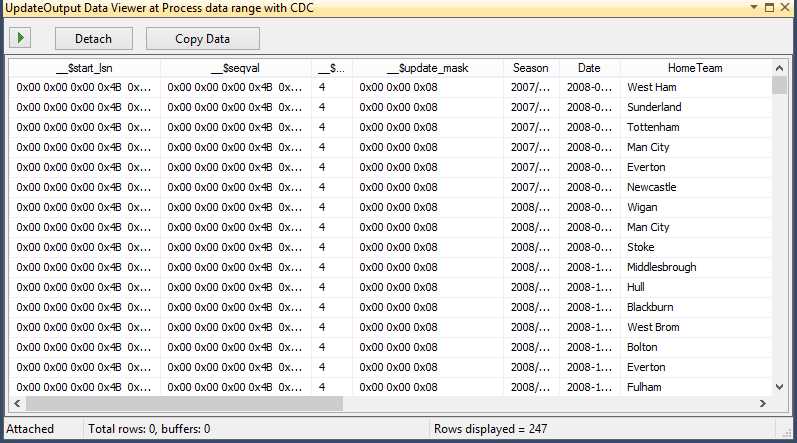
- Data Flow Result
- 1800+ high-performance UI components.
- Includes popular controls such as Grid, Chart, Scheduler, and more.
- 24x5 unlimited support by developers.