
SSIS Succinctly®

CHAPTER 3
Packages
Introduction
Packages are the output of an Integration Services project; they are the executables you are going to run in order to process an ETL task. The best definition of a package defines it as a collection of connections, control flow elements, data flow elements, event handlers, variables, parameters, and settings that you assemble by either using the graphical design tools that SQL Server Integration Services provides or by building programmatically.
These tasks will be pulled together using the SSIS Designer; it is a very easy process of connecting them using arrows. However, internally, the Integration Services engine will use precedence constraints to not only connect the tasks together but to also manage the order in which they execute. The engine does this based on what happens in each task or based on rules that are defined by the package developer.
This is a basic definition of a package. It is important to understand that package development is not just about adding tasks. When you finish a package, you can add advanced features such as logging and variables to extend the package functionality. When you finish the package developments, they need to be configured by setting package-level properties that implement security, enable restarting of packages from checkpoints, or incorporate transactions in package workflows.
The package output file will have the .dtsx file extension which holds inside it an XML structure with all the operations needed to execute in order to meet the developer’s needs. Similar to other .NET projects, the file-based code is marked up using the development environment. It can then be saved and deployed to a SQL Server so that you can schedule its execution. However, this is not the only way to execute these packages. You can, for example, use PowerShell scripts to get the same results or even use SSIS DB-stored procedures.
Hello World Package—Import and Export Wizard
Although we will be using the SSIS Designer to create custom packages with all control flow tasks and data flow transformations, SSIS comes with an Import and Export Wizard that assists in creating simple “from source to target” packages. This wizard allows you to configure a source, a destination, and only a few more options to copy data. An important note about this wizard is that the target table will be created when you run this package; however, as you will see in the following steps, you will also be able to configure a “drop” and “create” (re-create) operation.
Note: You can open the Import and Export Wizard by using the Run window and typing “DtsWizard”.
Although the wizard can be opened from outside the SSIS Designer, we will use it inside the SSIS Designer to create this first “Hello world” package. To do so, right-click the SSIS Package in the Solution Explorer and choose the option SSIS Import and Export Wizard, as shown in the following figure.
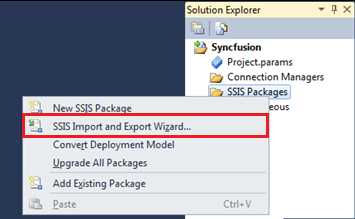
- Opening the Import and Export Wizard
Once you click it, SSIS will display the first screen of the Import and Export Wizard. This is just a simple information screen; you have to click Next to start the configuration of this package.
In the following screen, you need to configure the source database from which you want to retrieve data. You just need to set the data source of the package (which, in my example, will be SQL Server), the server name (which, in my example, will be “localhost” but you can use “.” or “(local)” to identify localhost), the authentication type (which, in my example, will be Windows Authentication), and the source database. The following figure shows my example’s configuration.
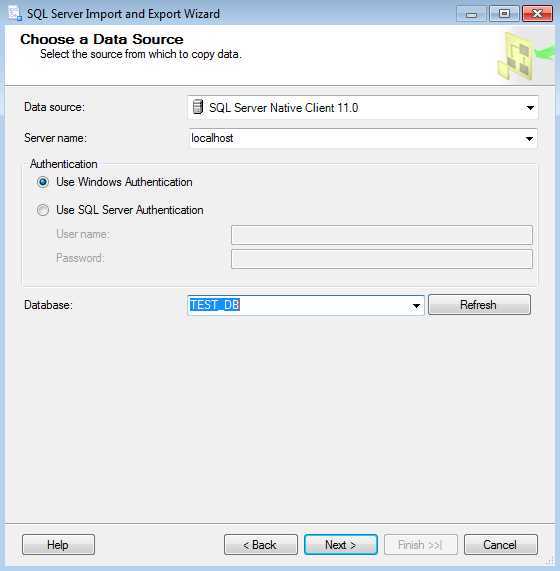
- Configuring the Source
Once you click Next, you will be prompted with a similar screen to configure the target database. You should make the same configurations you did for the source and click Next.
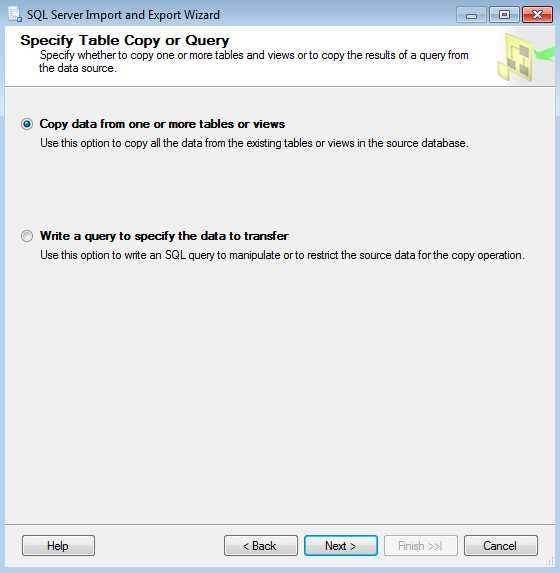
- Choosing how to retrieve data from the source
Now comes one of the most important steps. This step is when you decide how you want to retrieve the data from the source, by either doing so directly from a table or view, or by writing your own query. The choice between one and the other is not linear. However, based on my experience, I can advise you to keep the retrieve logic in a view that is stored in your database, and inside your packages, to retrieve the data from them.
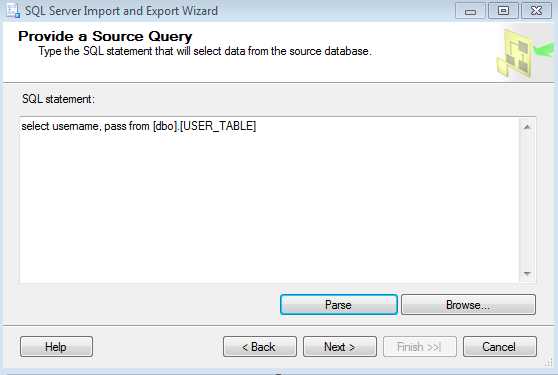
- Query for Retrieving Data
This way, if your target database changes, you can dynamically change the view, and, for example, change the format of your columns. You can even apply transformations (using SQL functions) to them without having to change, save, and redeploy your packages.
In our example, we will choose the second option: writing a simple query that will retrieve just two columns from a source table. Once again, this is not a best practice because, if some target columns changed, I would need to open the package, change the query, save, and redeploy it. However, for this simple “Hello World”, it won’t be a problem.
Once you complete this step, click Next and a new screen will be displayed. This screen allows you to select the tables and views you want to copy to the target database. Because we have created a custom SQL query, you will only have one option (which is a “Query” object as you can see in the following figure).

- Choosing tables and views to copy
Once you finish selecting the tables and views you want to copy, click Next. However, before doing so, it is worthwhile to explore some of the interesting options in this screen. As shown in the previous figure, there are two important buttons: Preview, which allows you to see the data being copied, and Edit Mappings, which we will discuss in further detail later. If you click the Edit Mappings button, you will see the following screen.
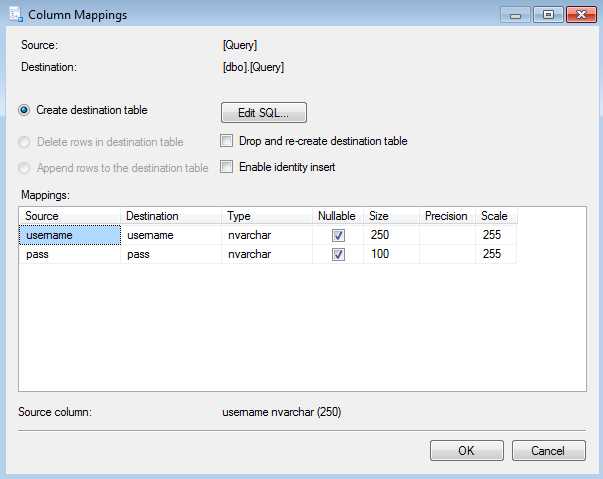
- Column Mappings
If you have chosen, like I did, to retrieve data using a SQL query, the wizard will only allow you to create a new table in the destination database as it assumes there isn’t any data in the the Query columns. However, you have two available check boxes. The first check box is “Drop and re-create destination table” which will re-create the destination table if it already exists. This is a dangerous option as it will drop the table whether or not you know it exists. The second check box is “Enable identity insert” which allows the values to be inserted in the identity field. This way, the exact identity values are moved from the source database to the destination table.
You can also edit the destination table column names and types by editing the mappings grid (also available in this screen). Once you set up all the settings, click OK. In the Select Source Tables and Views window, click Next.
This page is the last step in the Import and Export Wizard. You will be able to review all your configurations. If everything is correct, click Next to generate the package.
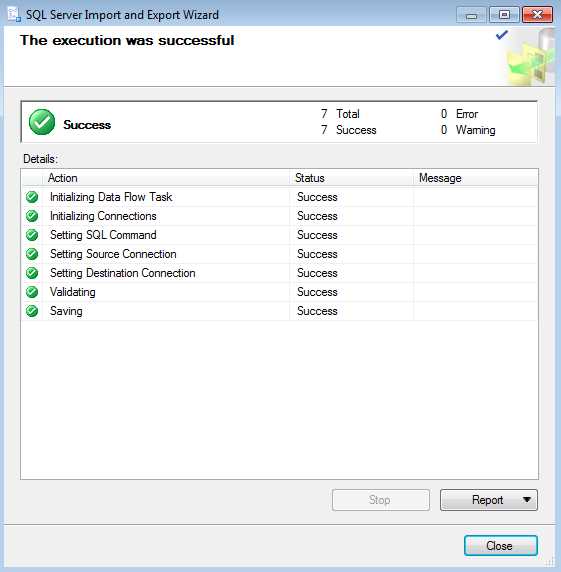
- Generating the Package
Now the package will become available in the Solution Explorer. You can try to run it by right-clicking the package and selecting Execute Package. And that’s it! You have just created your first package. Next, we will learn how to create custom packages with more logics and transformations.
Custom Packages
Introduction
Although the Import and Export Wizard is a very powerful tool for simple ETL jobs, in most cases, when using Integration Services, you are going to need more complex structures with execution logics that involve more than just a single data flow. You may need to execute SQL queries to create support tables, send emails if something went wrong in the process, make several data transformations, and even process multiple data sources to create a single insert. By using the Import and Export Wizard, you are using just a small percentage of Integration Services’ capabilities.
The following chapters will show you how SSIS can easily become your best friend in extract, transform, and load operations using some out-of-the-box, reusable components. These components will save you a lot of time and allow you to maintain and evolve your projects. It’s important to understand that most of the development logics provided by SSIS could be made using SQL queries and programming languages such as C# or PowerShell (with some considerable effort). However, the beauty of SSIS is, without developing a single line of code, you can create fantastic data-oriented solutions without losing time thinking about how to implement an algorithm. You just need to focus on the most important thing: creating a stable solution that’s easy to maintain and understand, using a very friendly design environment.
Adding a New Package to a Project
To add a new package to our Integration Services project, right-click the SSIS Packages folder in the Solution Explorer, and then select New > SSIS Package. This will create a blank package that is ready for you to develop.
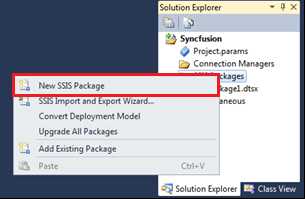
- New SSIS Package
This will automatically add a new package to your project that is visible in the Solution Explorer and has a default name. To change the package name after it has been added to the project, right-click the package and select Rename.
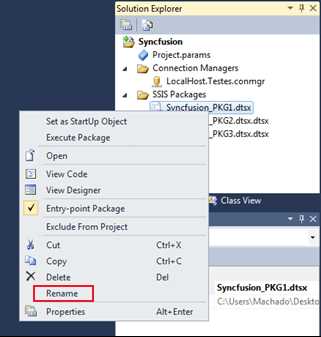
- Rename Package
After adding your new package to the project, you will need to configure your control flow. Although it’s not mandatory to start defining all of the control flow tasks of your package, you can only start developing the transformation logics after adding a data flow task to it. This way, the control flow is the first component you will look at after adding a new package to a project. To open the newly added packages, just double-click them in the Solution Explorer.
Executing the Packages
Executing the packages is very easy to do in Integration Services. You have several options. The first and more visible option is to click the Play button icon on the toolbar as shown in the following figure.
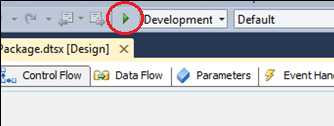
- Execute Project
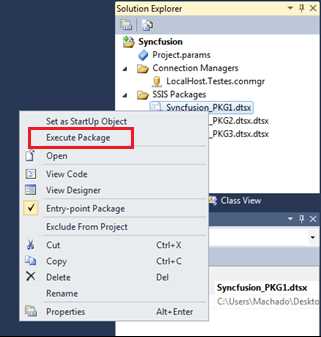
The second option is to use the Solution Explorer. You can right-click the package you want to execute and then select Execute Package as shown in the following figure. This is the most often used technique because, when you click Play, the SQL Server Data Tools will create a new build of the entire project and run every single project inside it in debug mode. After execution, it leaves the execution window open so that you can evaluate the execution steps. By selecting Execute Package, you will only run the packages you want.

- Execute Package
Once the execution ends, you need to stop the debug mode to go back to the development environment. Do this by clicking Stop Debug in the toolbar.
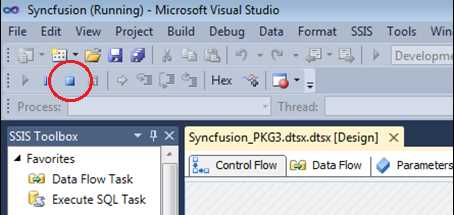
- Stop Debug
One last component of the package execution options is a window labeled Execution Progress, which allows you to see the log results of the package execution, including errors if something went wrong, or just the execution time and steps if everything executed correctly. You can access this window by clicking the Progress tab that is shown after running a package. The following figure shows the location of the Progress tab.
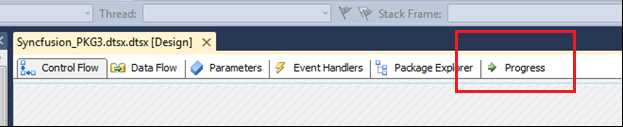
- Progress tab to view execution results
This window will show you a hierarchical structure showing all the objects inside the package and all of its execution results. You can see the start date, end date, error messages, and other log messages which can be used to evaluate if everything is working as it should. The following figure shows an example of an execution result in which an Execute SQL task was used to create a table, but an error was displayed stating that this particular table already exists in the target database.
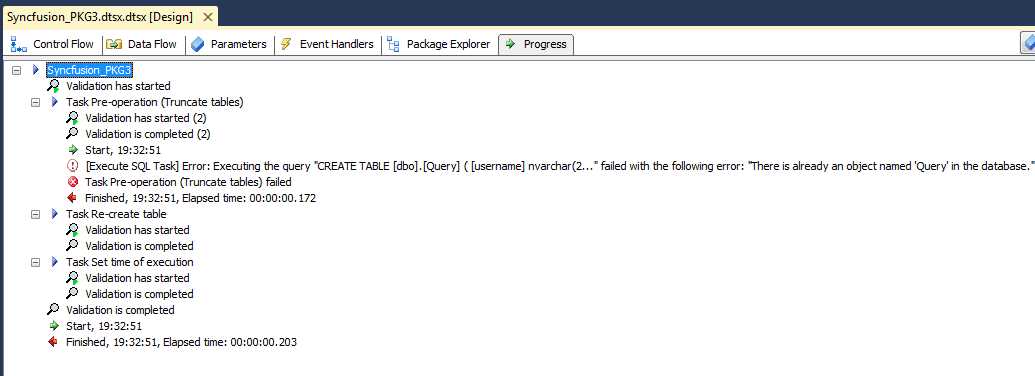
- Execution Progress
You might face some difficulties when trying to read a full message. If you do, you can copy and paste the message to an external text editor and evaluate the message there in full detail.
Package Explorer
The Package Explorer is a very useful tool to get an overview of all your package’s objects. With its hierarchical view, you are able to navigate between all of your design panes with all its tasks, connections, containers, event handlers, variables, and transformations. It basically summarizes your developments and allows you to easily navigate between the properties of all your objects and change them.
To access the Package Explorer, open a package, click the Package Explorer tab, and expand the objects you want to edit. Or just follow the structure as a single view.

- Package Explorer Tab
Once you open the Package Explorer, you will see the hierarchical view that shows the various objects you have added to control flows and data flows.
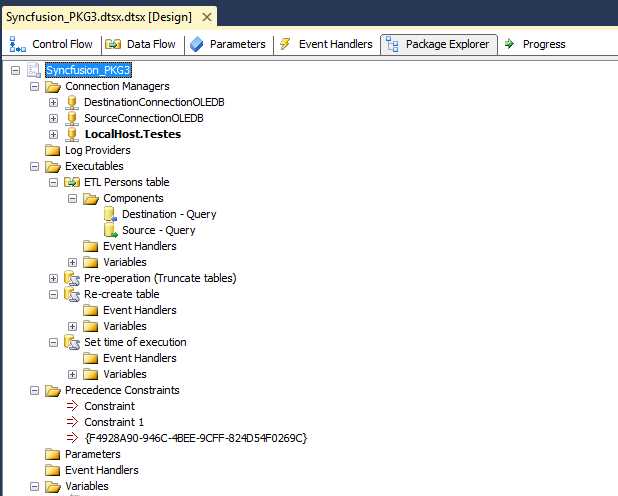
- Package Explorer
Package Properties
Like any other object that is clicked in a Visual Studio-based solution, when you open a package in the Integration Services design environment, because that object gets the focus of the IDE, the Properties window will reflect that particular object properties. In this case, these are packages. These properties allow you to change basic attributes such as the package name and version, but they also allow you to add important attributes such as passwords to execute the package.
In this section, I will guide you in the analysis of every property of packages in Integration Services so that you can understand its important features. The first thing is to clarify where you can find these properties. So, start by opening a package and then look at the Properties window. The following figure shows the package properties.
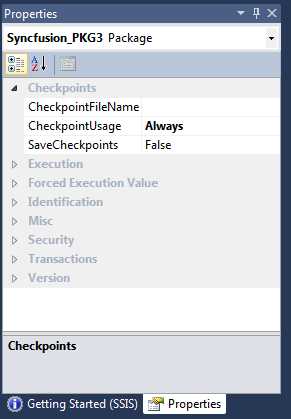
- Package Properties
As you can see in the previous figure, package properties are organized into eight groups:
- Checkpoints
- Execution
- Forced Execution Value
- Identification
- Misc
- Security
- Transactions
- Version
Before explaining each group of properties, there is an important topic I cannot avoid discussing and that is checkpoints. When activated, checkpoints force SSIS to maintain a record of the control flow executables that have successfully run. In addition, SSIS records the current values of user-defined variables. This current context will be stored in an XML file which is defined in the package property window. After that, if a package fails during execution, SSIS will reference the checkpoint file when you try to rerun the package. It will first do so by retrieving the current variable values as they existed prior to package failure and, based on the last successful executable that ran, start running the package where it left off. That is, it will continue executing from the point of failure, assuming we’ve addressed the issue that caused the failure in the first place.
My goal in this section is more than teaching you how to apply these properties and how they can be used in your scenarios—my goal is to teach you about their existence. This way, when a particular problem appears, you will know its source. The following sections will help you understand which properties exist and for what reason.
Checkpoints
- CheckpointFileName—File name of the checkpoint context values. This file is deleted after a successful run of the package.
- CheckpointUsage—Tells when a checkpoint file should be used (Always, never, or if the file exists).
- SaveCheckpoints—Allows you to enable and disable checkpoints.
Execution
- DelayValidation—Indicates whether package validation is delayed.
- Disable—Indicates whether the package is disabled.
- DisableEventHandlers—Specifies whether the package event handlers run.
- FailPackageOnFailure—Specifies whether the package fails if an error occurs in a package task.
- FailParentOnError—Specifies whether the parent container fails if an error occurs in a child container.
- MaxConcurrentExecutables—The number of executable files that the package can run concurrently (-1 indicates no limit).
- MaximumErrorCount—The maximum number of errors that can occur before a package stops running.
- PackagePriorityClass—The Win32 thread priority class of the package thread.
Forced Execution Value
- ForcedExecutionValue—If ForceExecutionValue is set to True, this is a value that specifies the optional execution value that the package returns.
- ForcedExecutionValueType—The data type of ForcedExecutionValue.
- ForceExecutionValue—A Boolean value that specifies whether or not the optional execution value of the container should be forced to contain a particular value.
Identification
- CreationDate—Date the package was created.
- CreatorComputerName—Computer on which the package was developed.
- CreatorName—Name of the package developer.
- Description—Description of the package functionality.
- ID—The package GUID which is assigned when the package is created. This property is read-only.
- Name—Package name.
- PackageType—The package type.
Misc
- Configurations—Package configurations (only available for Package Deployment Approach).
- Expressions—Create expressions for the package. Allows you to set properties based on attributes or parameters.
- ForceExecutionResult—The execution result of the package. The values are None, Success, Failure, and Completion.
- LocaleId—A Microsoft Win32 locale.
- LoggingMode—A value that specifies the logging behavior of the package. The values are Disabled, Enabled, and UseParentSetting.
- OfflineMode—Indicates whether the package is in offline mode.
- SuppressConfigurationWarnings—Indicates whether the warnings generated by configurations are suppressed.
- UpdateObjects—Indicates whether the package is updated to use newer versions of the objects it contains, if newer versions are available.
Security
- PackagePassword—The password for package protection levels (EncryptSensitiveWithPassword and EncryptAllWithPassword) that require passwords.
- ProtectionLevel—The protection level of the package. This property is used to specify how sensitive information is saved within the package and also whether or not to encrypt the package or the sensitive portions of the package.
Transactions
Packages use transactions to bind the database actions that tasks perform into atomic units. By doing this, they maintain data integrity. In other words, they allow developers to group tasks together to be executed as a single transaction.
- IsolationLevel—Sets the way locking works between transactions.
- TransactionOption—The transactional participation of the package. The values are NotSupported, Supported, and Required.
Version
- VersionBuild—The version number of the build of the package.
- VersionComments—Comments about the version of the package.
- VersionGUID—The GUID of the version of the package. This property is read-only.
- VersionMajor—The latest major version of the package.
- VersionMinor—The latest minor version of the package.
And that’s it. While some properties seem useful only when reading their definitions, others will only show their applicability when your needs demand it. Integration Services is an aggregation of many components and tools; some projects might require you to use all of them, while others just demand a small set.
Now it’s time to start digging into the main components of this platform and start developing our packages. The first thing we need to learn about is the control flow. We will be learning all the control flow tasks, how you can connect them, and even about how these tasks connect to external systems.
- 1800+ high-performance UI components.
- Includes popular controls such as Grid, Chart, Scheduler, and more.
- 24x5 unlimited support by developers.