
SSIS Succinctly®

CHAPTER 7
Deploying the Packages
Introduction
After you have finished all the developments and checked to make sure that everything works as it should, it’s time to deploy your solution to the server. For doing so, Integration Services 2012 comes with two deployment models:
- Project deployment model
- Package deployment model
The first model, project deployment, is a new feature of SSIS 2012. It uses an SSIS catalog that should be created in a SQL Server instance to store all the objects in a deployed project. When you deploy a project using this model, it will aggregate all the objects inside your project and deploy them as one to the server, creating an .ispac file.
In the second case, the package deployment model (which has been used since SSIS 2005), the packages aren’t deployed as one; they are either treated separately where you can deploy one package at a time if you want, or a deployment utility can be used to deploy all of them.
Although one of the concerns related to these deployment models is the atomicity of the project objects, there are some other differences between the project and package deployment models. To better understand the differences, take a look at the following table.
- Project deployment model vesus the package deployment model
Project Deployment Model | Package Deployment Model | |
|---|---|---|
Unit of Deployment | Project | Package |
Assignment of Package Properties | Parameters | Configurations |
File output | Project deployment file (.ispac extension). | Packages (.dtsx extension) and configurations (.dtsConfig extension) are saved individually to the file system. |
Deployment | A project containing packages and parameters is deployed to the SSISDB catalog on an instance of SQL Server. | Packages and configurations are copied to the file system on another computer. Packages can also be saved to the MSDB database on an instance of SQL Server. |
Package Validation | Projects and packages in the catalog can be validated on the server before execution. You can use SQL Server Management Studio, stored procedures, or managed code to perform the validation. | Packages are validated just before execution. You can also validate a package with dtExec or managed code. |
Running and Scheduling Packages | Packages are run in a separate Windows process. SQL Server Agent is used to schedule package execution. | Same as project deployment model. |
Event Handling | During execution, events that are produced by the package are captured automatically and saved to the catalog. | During execution, events that are produced by a package are not captured automatically. A log provider must be added to the package to capture events. |
Environment Specific variables | Environment-specific parameter values are stored in environment variables. | Environment-specific configuration values are stored in configuration files. |
CLR Integration | CLR integration is required on the database engine. | CLR integration is not required on the database engine. |
Now that we understand the main differences between these two models, let’s learn how we can use them so that our projects can go into a production environment.
Project Deployment Model
As I have explained before, this is the new deployment model that SSIS 2012 has introduced. It’s very important to keep in mind that, if you want to use the new parameters component, your projects should be deployed using this model. So, to deploy a project using this model, you must start by creating a new SSIS catalog which will store your deployed projects. To do so, you should open SQL Server Management Studio. After connecting to the SQL Server instance into which you want the project to be deployed, locate the Integration Services Catalogs folder in the Object Explorer.
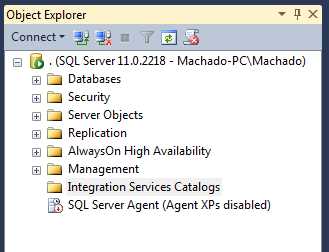
- Integration Services Catalogs folder
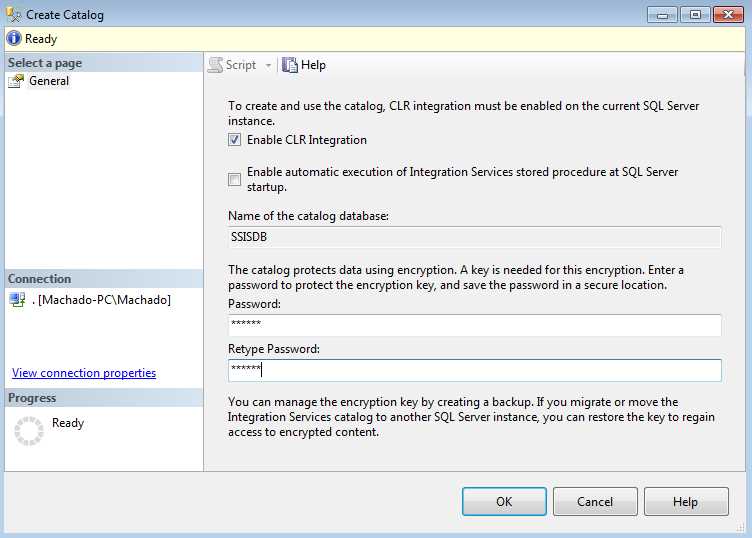
After locating the Integration Services Catalog folder in the Object Explorer, right-click it and select Create Catalog. This will open a new Create Catalog window in which you only need to select the Enable CLR Integration check box to enable CLR integration; otherwise you will not be able to create the catalog and configure your catalog password. Don’t forget that this will store your developed objects with all parameters included. Since you don’t want anyone to access them and ruin your developments, being able to set a password is an important feature.
- Creating a new catalog
After setting all the required property values, click OK. Now you are able to see a new catalog inside your Integration Services Catalog folder. If you expand the folder, you’ll see the new catalog folder inside.

- New Catalog Created
Now that you have a catalog, you are able to deploy your project to it. To start the deployment, go to your SQL Server Data Tools and open the project to be deployed. Once you have the project open, right-click your project node (root) and select Deploy as shown in the following figure. This will start the deployment tool.

- Starting the deployment tool
Once the tool starts, you will need to complete a wizard that will assist you in the deployment process. This wizard has the following four steps; however, the most important ones are Select Source and Select Destination:
- Select Source
- Select Destination
- Review
- Results
In the Select Source screen, you need to specify the project you want to deploy (which will be our example) and if you want another SSIS catalog coming from another server. In the Select Source screen, select the project deployment file option and SSIS will automatically set the path of the project to the one that is currently open.
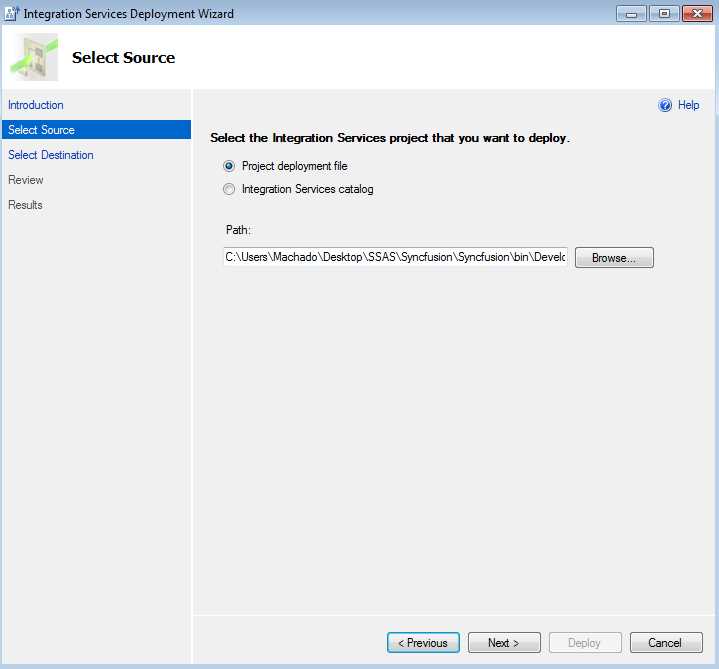
- Selecting a project to deploy
The next step is to select the destination. In the Select Destination screen, you need to specify the server into which you want to deploy the project and the path to the SSIS catalog folder to which it will be deployed. Because an SSIS catalog may store multiple SSIS projects, you need to create a new folder for this new project. If you were redeploying a solution, you would select an existing one.
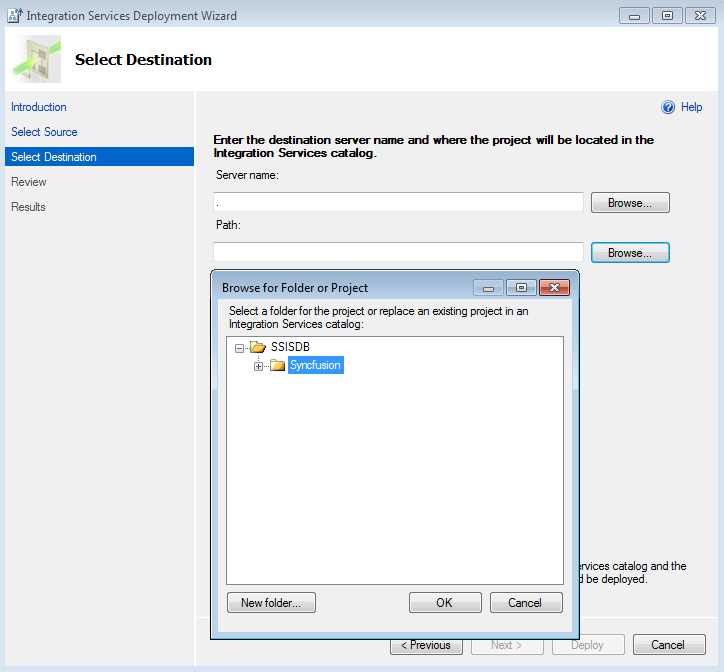
- Select Destination
And that’s it! The final screen allows you to validate the settings you have just set in the Select Source and Select Destination screens. If everything is as it should be, click Deploy to finish the deployment. After the deployment is over, go to the Management Studio and expand the Integration Services Catalog folder. You should now see your project deployed. If you want to know how to view and change your project parameters, revisit the Variables, Expressions, and Parameters chapter.
- Deployed Project
Package Deployment Model
The package deployment model is a legacy model for package deployment that it is based on packages instead of projects. This means that each package deploys independently. In my personal opinion, if you are developing new SSIS projects, you should take the project model approach. However, the package deployment model can still be useful for legacy projects that you need to maintain, for example. Once again, be aware that you cannot use parameters in this project model.
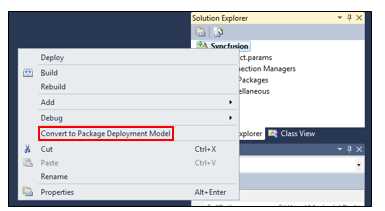
The first step is to change your deployment model inside your project. To do this, go to SQL Server Data Tools and open the project that has the packages you want to deploy. Once you have the project open, right-click your project node (root) and select Convert to Package Deployment Model as shown in the following figure. Before you do that, there are some particular things you should be aware of: You cannot have any project-level objects such as connection managers; instead, you can use data sources but you need to manually add one to each package you have. Another thing to note is that you do not have parameters to work with; instead, you need to use package configurations, once again adding them manually to each package.
- Convert to Package Deployment Model option
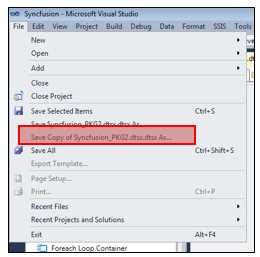
Once you finish this step, your project will be under the package deployment model. Now it’s time to deploy our individual packages. To do this, open the package you want to deploy. Next, click an empty area in the control flow and then open the File menu. Select Save Copy of [package name] as shown in the following figure. It’s important that you are aware that you can deploy all of your packages at once by using a deploy manifest. However, like the project deployment model, this is an “all-or-nothing” method, which means you cannot select which packages you want to deploy; it will deploy all of them. If you want to learn more about this method, use this reference on the Microsoft TechNet website. On that page it will explain how to create a deployment utility (manifest).
- Saving a copy of a package
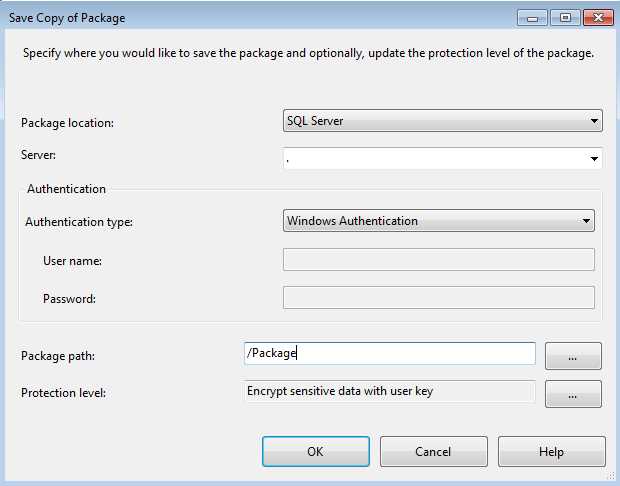
Now comes the last step. We are going to deploy the package to a SQL Server instance. In the Save Copy of Package screen, select SQL Server as the Package location and set the server name and authentication. Last but not least, select the Package root folder as the Package path.
- Saving to SQL Server
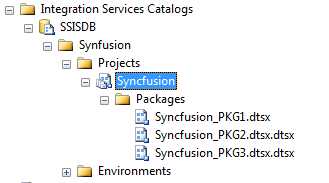
Now you can see the package if you connect to your Integration Services server type using the SQL Server Management Tools. It will be under Stored Packages in the MSDB folder.
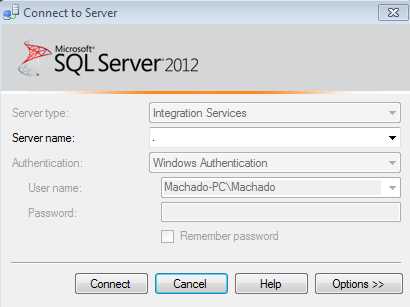
- Connecting to SSIS 2012
3 |
- 1800+ high-performance UI components.
- Includes popular controls such as Grid, Chart, Scheduler, and more.
- 24x5 unlimited support by developers.