
SQL on Azure Succinctly®

CHAPTER 9
Security in Azure SQL Database
Security is one of the important consideration when hosting your data in cloud. Azure SQL Database provides authentication and authorization options to limit access to your database, encryption to protect the data at rest and auditing capabilities to monitor the data access. In this chapter you will understand the various security features available in Azure SQL Database and how to leverage them to protect the data in cloud.
Connection Security
Azure SQL Database restricts the connection to the server and the database by server-level and database-level firewall. Hence only the IP addresses and address range explicitly specified and whitelisted in the firewall rules are allowed to make a connection to server and database. This limits any unwanted access to the database and hence as a best practice only the application server or client machines IP addresses should be defined in the firewall to allow access to the database. As discussed earlier, you can configure server level firewall rules and database level firewall rules using Azure Management Portal, PowerShell, T-SQL as well as REST APIs.
Azure SQL Database supports network encryption (SSL/TLS) while data is in transit to and from the database. In your application's connection string, you must specify parameters to encrypt the connection and not to trust the server certificate, otherwise the connection will not verify the identity of the server and will be susceptible to "man-in-the-middle" attacks. When you copy the connection string from Azure Management portal, it automatically appends the parameter to encrypt the connection and not trust the server certificate. For the ADO.NET driver these connection string parameters are Encrypt=True and TrustServerCertificate=False. For more information, see Azure SQL Database Connection Encryption and Certificate Validation.
Authentication
Authentication is the process of the validating a user’s credentials and allowing the entry if the user’s credentials are legitimate. Unlike box version of SQL Server which supports Windows and SQL Authentication, Azure SQL Database currently only supports SQL Authentication. The support for Azure Integrated AD Authentication might come in future but currently only SQL Authentication is supported.
When you provision a logical server for hosting your Azure SQL Database, you specify an login and password for the server admin which acts like a sysadmin on the server and has permissions to create or drop a database and acts db_owner for all the database hosted in that server. DBAs or individuals responsible for managing the server can use that credentials to login to the server to perform admin or management activity on the server.
However as a best practice, for each application or non-admin connections to the database, you should create a separate account for authentication to limit the permissions granted to the account thereby minimizing the surface area of attack if that account is compromised for any reason. The preferred approach is to create a contained database user which can be authenticated by the database itself and allows the application to directly connect to the database thereby reducing the risk of malicious activity or SQL Injections if the application has vulnerability and if the code is compromised.
You can create a contained database user by executing the following T-SQL while connected to your user database with your server admin login:
Code Listing 30: Creating a contained database user
CREATE USER user1 WITH password='<Strong_Password>' |
A strong password is a password which meets the following requirements:
- Does not contain all or part of the user's account name
- Is more than eight characters in length
- Contains characters from at least three of the following categories:
- English uppercase characters (A through Z)
- English lowercase characters (a through z)
- Base 10 digits (0 through 9)
- Nonalphabetic characters (for example: !, $, #, %)
Additional contained database users can be created by any user with the ALTER ANY USER permission.
Authorization
Authorization is the process of limiting the access of authenticated users to avoid undesired access. After a user is authenticated by providing its username and password in the database, the user is authorized by the roles and permissions within the database. As a best practice, you should always grant users with least required privileges.
Azure SQL Database provides the following options to limit the access of authenticated users
Database Roles
The Database roles in azure sql database are no different than database roles available in on premise version of SQL Server. Every database user belongs to the public database role. When a user has not been granted or denied specific permissions on a securable object, the user inherits the permissions granted to public on that object. You can add the user to any of the fixed database roles available by default or flexible database roles which you create. You can create new flexible database roles by grouping the permissions which you would like to grant to the group of users.
You can find further details on Database Roles in the following MSDN article
https://msdn.microsoft.com/library/ms189121
Database Permissions
Besides creating and granting database roles to users, you can also grant individual database level permissions to the users. The database permissions in Azure SQL Database is again similar to the permissions in on premise version of SQL Server and is listed in following MSDN article
https://msdn.microsoft.com/library/ms191291
If there are a group of permissions to be assigned to a group of users, it would make sense to create database role by assigning the permissions to that role and then assigning group of users to that new role. If there are few users then it would make sense to assign them the granular most permissions to the users thereby giving them the least necessary privilege.
Using Stored Procedure, Impersonation and Module Signing
Impersonation and Module signing are another technique in SQL Server to control the access and securely allow the users to elevate the permissions temporarily in a controlled manner. As a security best practice it is recommended for the applications to access the data using stored procedure and thereby using ownership chaining allows you to revoke or deny the access to the user on the underlying base tables while the user can still access the data using stored procedure. Owner chaining is possible when the stored procedure and the base tables are owned by same user. However if they are owned by different user, you can use EXECUTE AS to impersonate a different user while executing the stored procedure. By this method, the user never has access to base table and his access to the data is controlled by stored procedure execution.
Module signing allows you to sign the stored procedure with a certificate or asymmetric key. This is designed for scenarios when permissions cannot be inherited through ownership chaining or when the ownership chain is broken, such as dynamic SQL. You then create a user mapped to the certificate, granting the certificate user permissions on the objects the stored procedure needs to access.
When the stored procedure is executed, SQL Server combines the permissions of the certificate user with those of the caller. Unlike the EXECUTE AS clause, it does not change the execution context of the procedure. Built-in functions that return login and user names return the name of the caller, not the certificate user name.
A digital signature is a data digest encrypted with the private key of the signer. The private key ensures that the digital signature is unique to its bearer or owner. You can sign stored procedures, functions, or triggers.
Row-level Security
Row-level security is a new feature which was recently released by Microsoft in Azure SQL Database and which is scheduled to be released in box version of SQL 2016. As the name suggests, it allows you to control the access at the row-level within a table. Previously, the granular level of access control you can grant or deny to the user within a database was table-level. As a result of this if you do not want a user to see a subset of rows in that table, you would be required to create a separate table or view and grant access to that table or view to the user or control the security from the application layer. Row-level security helps to simplify the physical design of the database by allowing you to store all the data in the same table and access to the rows is evaluated by runtime characteristics of the user. Hence now you can store all employee’s salary information in a single table and grant them row-level access to only their records which allows them to see only their data. Similarly, you can store all the customer data in a single table and grant row-level access to customerid who would be able to see on their own records.
You can find further details on the implementation of row-level security from the following MSDN article
https://msdn.microsoft.com/library/dn765131
Dynamic Data Masking
Azure SQL Database Dynamic Data Masking limits sensitive data exposure by masking it to non-privileged users. Dynamic data masking is currently in preview for all service tiers in the V12 version of Azure SQL Database.
Dynamic data masking helps prevent unauthorized access to sensitive data by enabling developers to designate how much of the sensitive data to reveal with minimal impact on the application layer. It’s a policy-based security feature that hides the sensitive data in the result set of a query over designated database fields, while the data in the database is not changed.
For example, a call center support person may identify callers by several digits of their social security number or credit card number, but those data items should not be fully exposed to the support person. A developer can define a masking rule to be applied to each query result that masks all but the last four digits of any social security number or credit card number in the result set. For another example, by using the appropriate data mask to protect personally identifiable information (PII) data, a developer can query production environments for troubleshooting purposes without violating compliance regulations.
You can setup dynamic data masking for your database using Azure Management portal, PowerShell or REST APIs.
You can use the following steps to configure dynamic data masking
- Logon to Azure Portal with admin privileges to your database, Click Browse all, Select SQL Databases, Select the database for which you would like to configure Dynamic Data Masking and Click Dynamic Data Masking in the database blade as shown in the figure
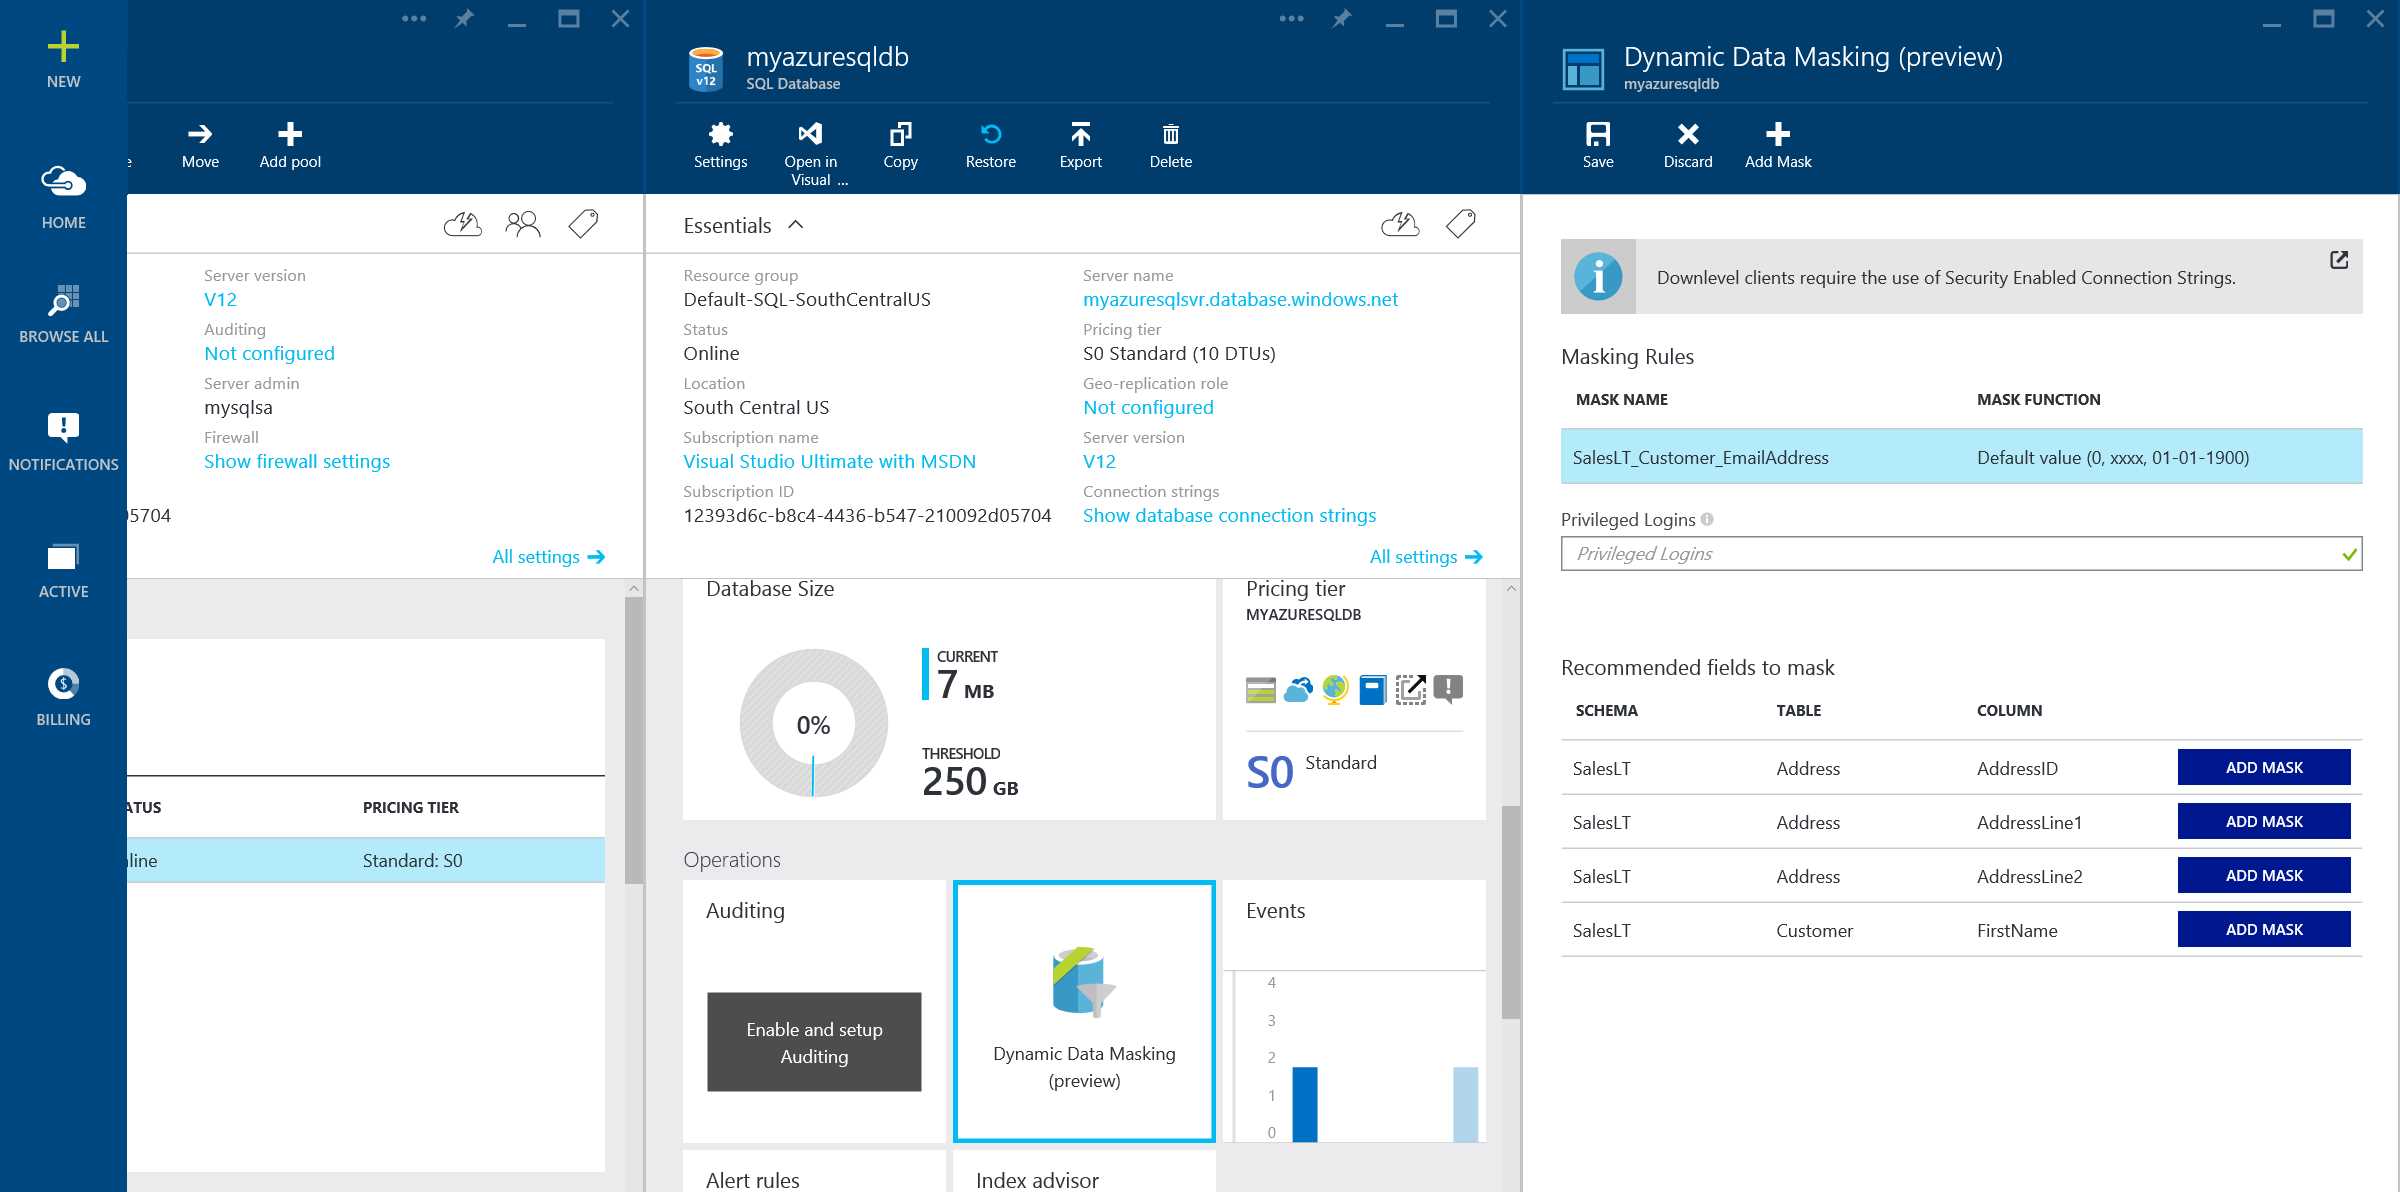
Figure 27: Configuring Dynamic Data Masking
- In the Dynamic Data Masking configuration blade, click Add Mask to open the Add Masking Rule configuration blade.
- Select the Table and Column, to define the designated fields that will be masked and choose the masking field format. In the figure below, we choose the Customer table from SalesLT schema and mask the email address column of table using the Email Masking format as shown
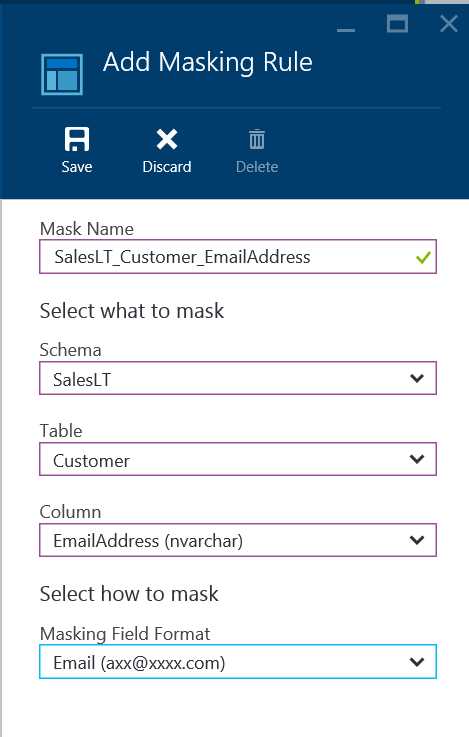
Figure 28: Adding Masking Rule for a column in the table
- Click Save in the data masking rule blade to update the set of masking rules in the dynamic data masking policy and Type the privileged logins that should have access to the unmasked sensitive data.
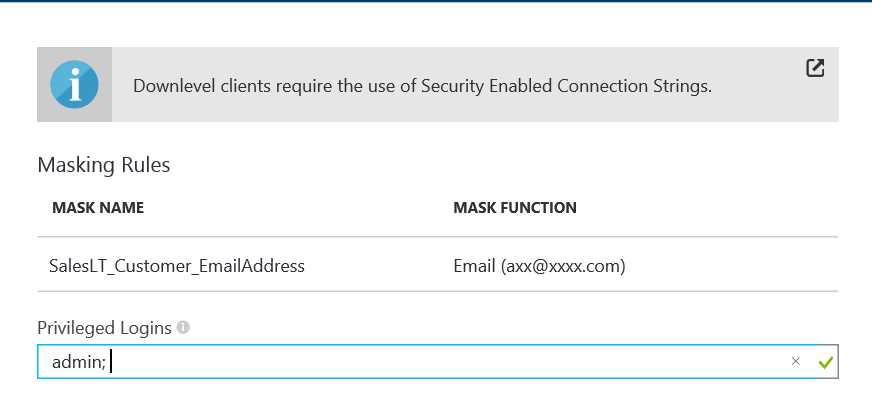
Figure 29: Adding the Privileged login for masking rule
- Click Save in the data masking configuration blade to save the new or updated masking policy.
- If you are using a Downlevel Client, then you must update existing clients to use a modified connection string format. For more information, see Downlevel clients.
You can also set the data masking policy and rules using Set-AzureSqlDatabaseMaskingPolicy and Set-AzureSqlDatabaseMaskingRule PowerShell Cmdlet.
Encryption
Azure SQL Database supports Transparent Data Encryption which was first introduced in box version of SQL 2008 to protect the data when it is at rest or stored in database files and backups. The feature is still in preview and will go live soon in most Azure data center regions. Transparent Data Encryption (TDE) as the name suggests is transparent to the application and doesn’t require any special handing or code changes in the application. TDE encrypts the files of an entire database by using a symmetric key called the database encryption key. The database encryption key is protected by a built-in server certificate. The built-in server certificate is unique for each SQL Database server. If a database is in a Geo Replication relationship, it is protected by a different key on each server. If 2 databases are connected to the same server, they share the same built-in certificate. Microsoft automatically rotates these certificates at least every 90 days.
In order to enable TDE on Azure SQL Database, you need to login to the database as admin or member of dbmanager role in master database and execute following T-SQL code to create a database encryption key and turn on database encryption.
Code Listing 31: Turning on Transparent Data Encryption
-- Create the database encryption key that will be used for TDE. CREATE DATABASE ENCRYPTION KEY WITH ALGORITHM = AES_256 ENCRYPTION BY SERVER CERTIFICATE ##MS_TdeCertificate##; -- Enable encryption ALTER DATABASE [myazuresqldb] SET ENCRYPTION ON; GO |
For further details on TDE, you can refer to following MSDN article
https://msdn.microsoft.com/library/dn948096.aspx
In addition to TDE, Azure SQL Database also supports Column level encryption to encrypt a column of the table by using symmetric key to prevent any unauthorized access of the data outside application. This is useful when you do not want DBAs or high privileged user to see the data outside from application.
Auditing
Auditing and tracking database events can help you maintain regulatory compliance and identify suspicious activity. SQL Database Auditing allows you to record events in your database to an audit log in your Azure Storage account. SQL Database Auditing can also be integrated with Microsoft Power BI to facilitate drill-down reports and forensic analytics.
Setting up Auditing on Azure SQL Database
You can follow the steps mentioned in this section to turn ON auditing for your Azure SQL Database
- Logon to Azure Portal with admin privileges to your database, Click Browse all, Select SQL Databases, Select the database for which you would like to configure Auditing and click Settings to open settings blade, Click Auditing to open Auditing blade as shown in the figure
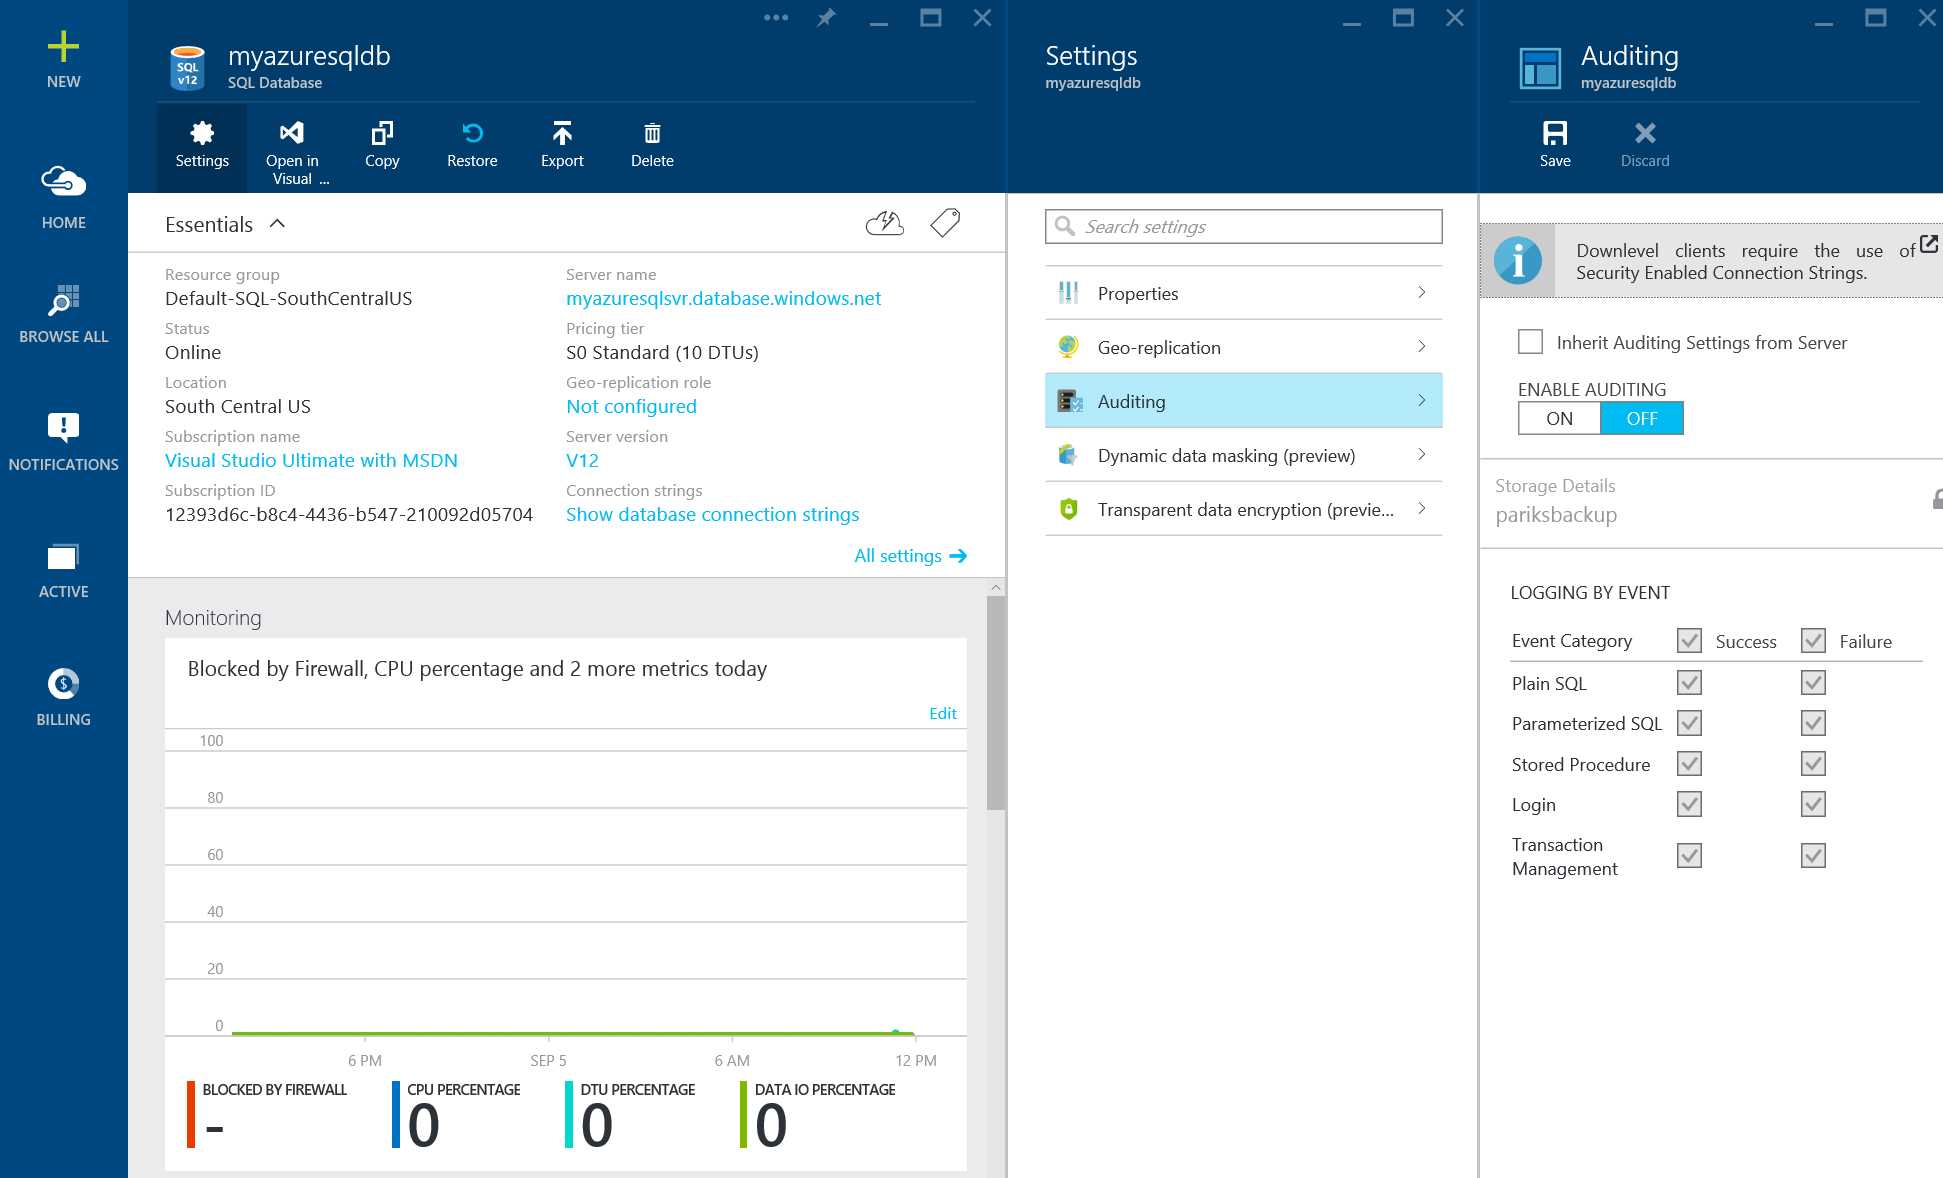
Figure 30: Enabling Auditing on Azure SQL Database
- In the auditing configuration blade after enabling auditing by clicking on ON, select STORAGE DETAILS to open the Audit Logs Storage Blade. Select the Azure storage account where logs will be saved and, the retention period.
Tip: Use the same storage account for all audited databases to get the most out of the preconfigured reports templates.
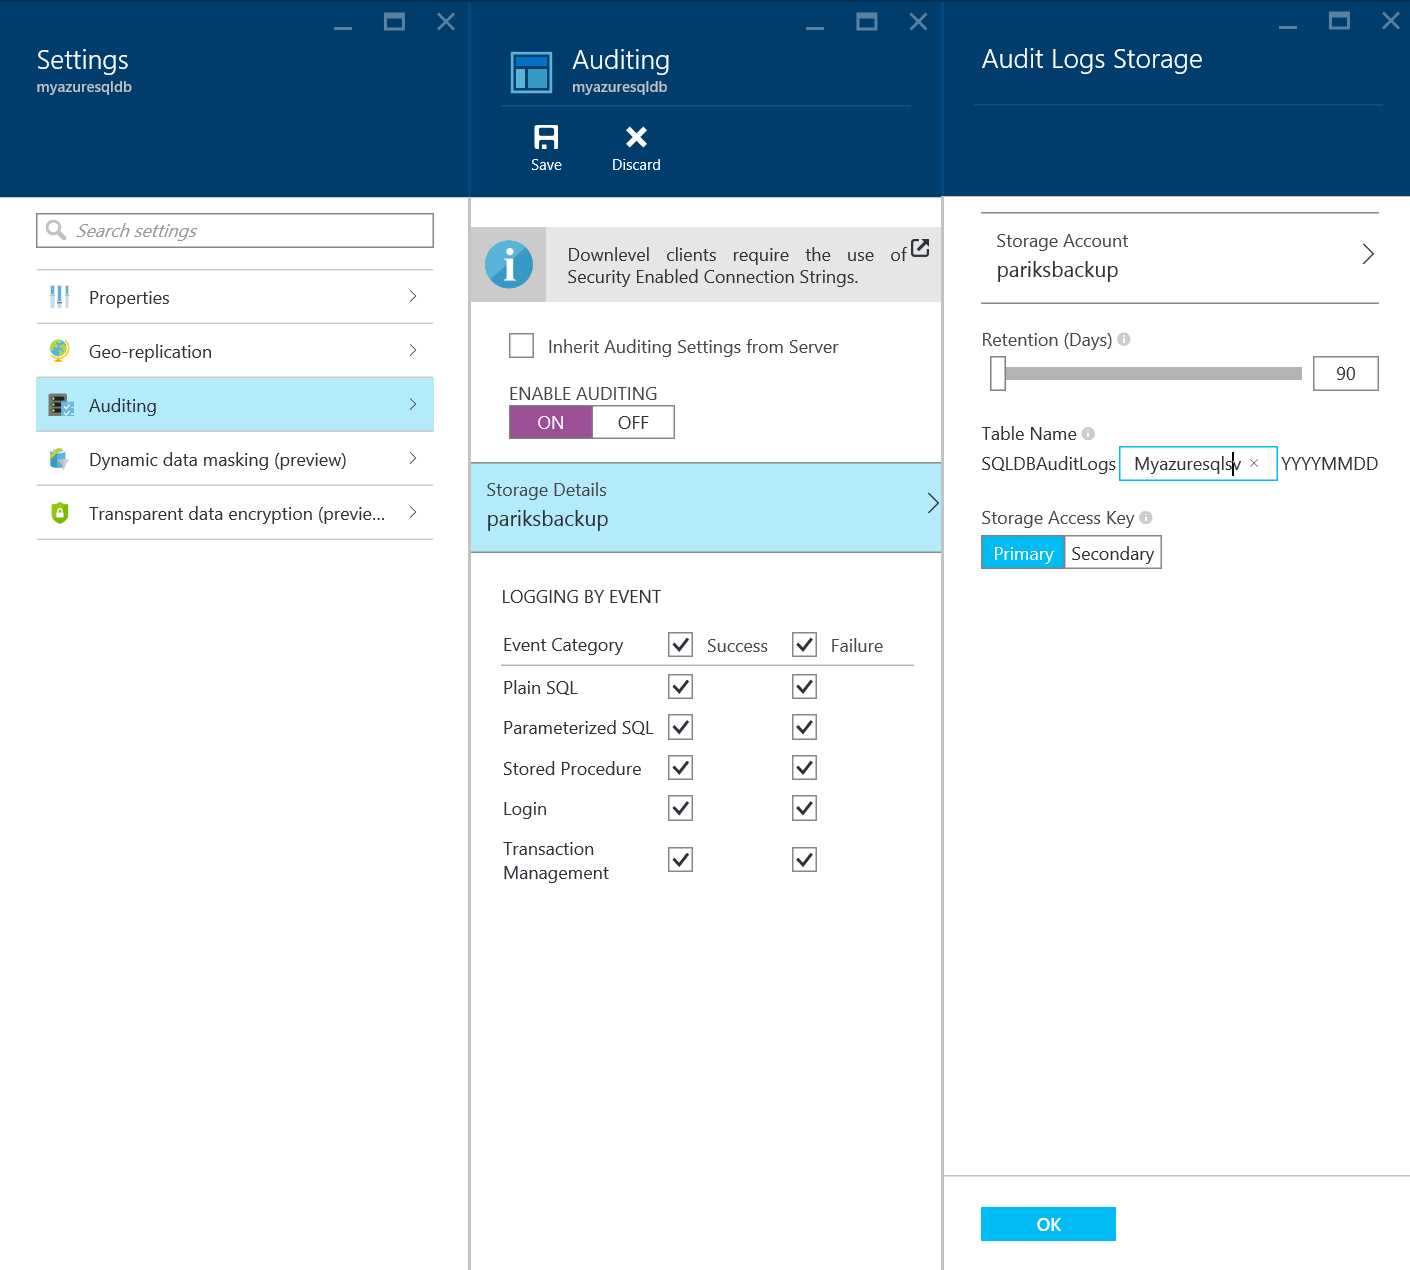
Figure 31: Configuring Auditing settings for Azure SQL Database
- Click OK to save the Storage Settings for Audit Logs Storage.
- Under LOGGING BY EVENT, click SUCCESS and FAILURE to log all events, or choose individual event categories.
- Click Save to turn ON Auditing for the Azure SQL Database.
Analyzing the Audit Logs
Audit logs are aggregated in a collection of Store Tables with a SQLDBAuditLogs prefix in the Azure storage account you chose during setup. You can view log files using a tool such as Azure Storage Explorer.
Microsoft Product Team has also created a preconfigured dashboard report template which is available as a downloadable Excel spreadsheet to help you quickly analyze log data. To use the template on your audit logs, you need Excel 2013 or later and Power Query, which you can download here.
The template has fictional sample data in it, and you can set up Power Query to import your audit log directly from your Azure storage account. For more detailed instructions on working with the report template, read the How To (doc download).
- 1800+ high-performance UI components.
- Includes popular controls such as Grid, Chart, Scheduler, and more.
- 24x5 unlimited support by developers.