
SQL on Azure Succinctly®

CHAPTER 2
Installing and Configuring SQL Server on Azure VMs
To create a SQL Server virtual machine in Azure, you must first obtain an Azure Platform subscription. You can purchase an Azure subscription or sign up for Azure free trial subscription.
Microsoft Azure supports the following options to install and configure SQL Server in Azure Virtual Machines:
- Create a Syspreped image of SQL Server in Hyper-V & upload it to Azure
- Provision a Windows image from Azure Gallery & install SQL Server in it
- Provision a SQL Server image from Azure Gallery using the portal or PowerShell.
The method you choose is largely influenced by SQL Server Licensing policy you want to use for your deployment. With SQL Server in Azure VM, you can utilize traditional SQL Server licensing. You can either use the platform-provided SQL Server image or bring your SQL Server license to Azure. When using the SQL Server platform-provided images, the cost depends on the VM size as well as the version of SQL Server you choose. Basically, you pay per minute licensing cost of SQL Server, the per-minute licensing of Windows Server, and the Azure storage cost. The per-minute billing option allows you to use SQL Server for as long as you need it without buying a full SQL Server license. If you bring your own SQL Server license to Azure, you are charged for Azure compute and storage costs only. For more information, see License Mobility through Software Assurance on Azure.
In this chapter, we will briefly discuss the first two options and focus mainly on provisioning and configuring a SQL Server image from Azure Gallery using PowerShell Cmdlets. In a later part of this chapter, we will discuss post-deployment tasks that needs to be performed after SQL Server is installed.
Creating a Syspreped image of SQL Server in Hyper-V & adding it to Azure
This method is used for installing SQL on Azure VM when you prefer to bring your own license as part of License Mobility supported by Azure and would like to pay only for Azure compute and storage cost incurred for hosting your VM on Azure. SQL Server setup supports preparation of Sysprep image for installation starting SQL 2008 R2; hence, it is easy to create a Syspreped image of SQL Server.
This method involves the following steps:
- Prepare a Sysprep image with SQL Server installed in a Hyper-V VM.
- Upload the VHD file of the VM to Azure Blob storage.
- Create an image from the uploaded VHD from Azure Management portal or PowerShell.
Note: The VHDX format is not supported in Microsoft Azure. You can convert the disk to VHD format using Hyper-V Manager or Convert-VHD PowerShell cmdlet.
The following articles provide detailed instructions on creating and uploading a Windows Server VHD to Azure.
Provision a Windows Gallery Image & Install SQL Server in the VM
This method is used for installing SQL on Azure VM when you want to bring your SQL Server License but not Windows License. In this case, you pay per minute for the Azure Compute, Storage and Windows License but not for SQL Server License.
This method involves the following steps:
- Provision a Windows Server Image from Azure Gallery as shown in the following image.
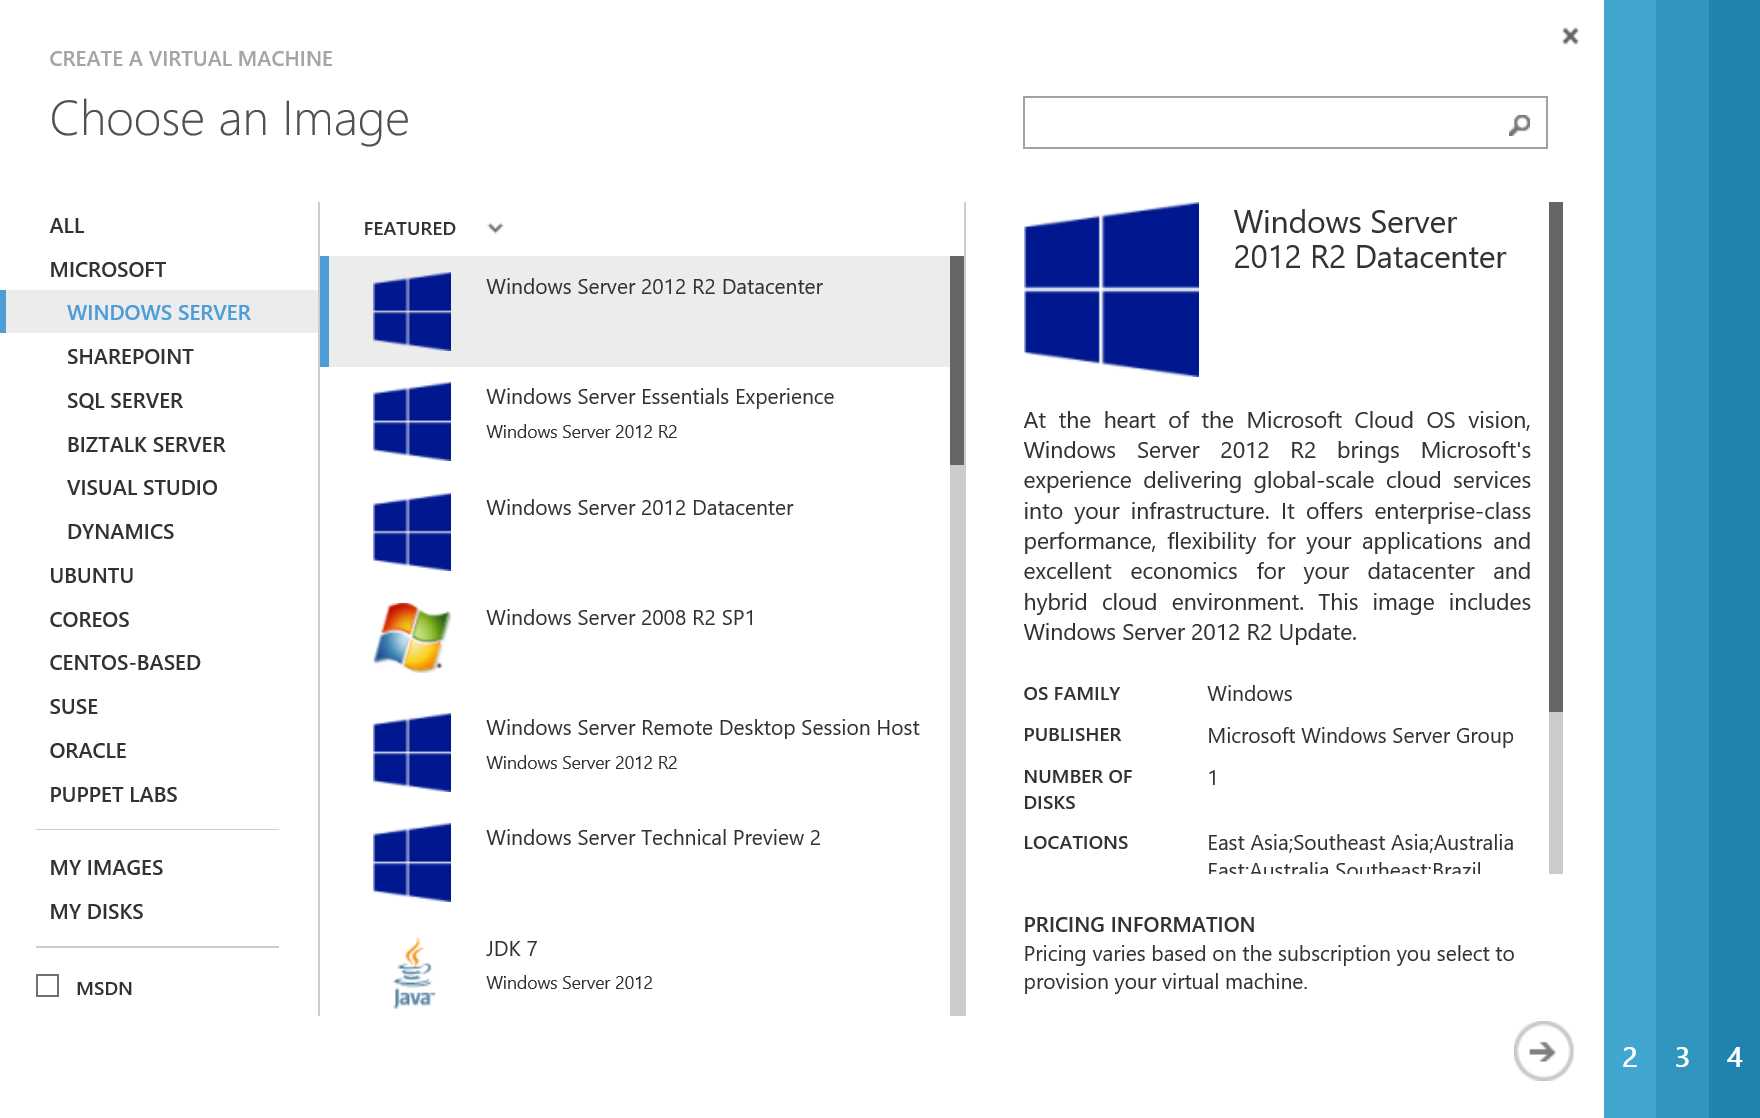
Figure 4: Provisioning a Windows Server Image from Azure Gallery
- Download or copy the SQL Server setup files into the VM.
- Install SQL Server in VM using your own License PID.
The following article provides a detailed instruction on provisioning a Windows Server Image from Azure Gallery:
https://azure.microsoft.com/en-us/documentation/articles/virtual-machines-windows-tutorial/
Provisioning a SQL Server image from Azure Gallery using the Azure Management Portal
This method is used when you do not own or do not want to use your SQL Server License and would prefer to pay per minute for SQL Server License along with Azure Compute, Storage and Windows License. This is preferred for short-term projects or if you are unsure if this project would sustain and would like to start with Azure platform-provided SQL Server image.
This method involves provisioning a VM from the list of pre-configured SQL Server images available in Azure Gallery. The Azure Gallery provides all the SQL Server builds images from SQL 2008 R2 – SQL 2016 at various Service Pack levels, which greatly reduces the time to build, install and configure SQL Server at desired Service Pack level.
The following figure gives a glimpse of SQL Server images in Azure Gallery. The figure doesn’t show the complete list of available SQL Server images since the list is too long to be covered in a single frame.

Figure 5: SQL Server Images Available in Azure Gallery
The detailed steps to provision a SQL Server image using portal is described in the following article:
https://azure.microsoft.com/en-us/documentation/articles/virtual-machines-provision-sql-server/
Provisioning a SQL Server image from Azure Gallery using Azure PowerShell
This method is no different from the previous one except that the VM is provisioned using Azure PowerShell. You can use Windows PowerShell to perform a variety of tasks in Azure, either interactively at a command prompt or automatically through scripts. Azure PowerShell is a module that provides cmdlets to manage Azure through Windows PowerShell. You can use the cmdlets to create, test, deploy, and manage solutions and services delivered through the Azure platform. In most cases, you can use the cmdlets to perform the same tasks that you can perform through the Azure Management Portal. For example, you can create and configure cloud services, virtual machines, virtual networks, and web apps.
You can download and install the Azure PowerShell modules by running the Microsoft Web Platform Installer. When prompted, click Run. The Web Platform Installer installs the Azure PowerShell modules and all dependencies. Follow the prompts to complete the installation. This installation will also create an Azure PowerShell console, which you can access from your Programs or apps depending on the version of Windows you are using.
Note: In this section we will discuss only the PowerShell Cmdlets relevant for the provisioning of a SQL Server image in Azure. The complete list of Azure PowerShell Cmdlet along with its definition can be found in the following link: https://msdn.microsoft.com/library/azure/jj554330.aspx
Connecting to Azure Subscription
In order to connect to Azure Subscription using PowerShell, follow the following steps:
- Open Azure PowerShell console.
- Type the following command in PowerShell window.
Code Listing 1: Connecting to Azure Subscription
Add-AzureAccount |
- In the window, type the email address and password associated with your account.
- Azure authenticates and saves the credential information, and then closes the window.
Selecting Azure Subscription
A given Azure account can be mapped to multiple Azure subscriptions. Use the following Cmdlet to enlist all the Azure subscription mapped to your Azure account.
Code Listing 2: Identify the list of Azure Subscriptions mapped to the Azure Account
Get-AzureSubscription |
If there are multiple subscription assigned, it is important to choose the right subscription where you would like to provision the VM since each subscription might be mapped to different Azure Location and support different VM sizes.
Use the following Cmdlet to select the desired subscription. The subscription name can be obtained from the output of Get-AzureSubscription cmdlet
Code Listing 3: Selecting the Azure Subscription to be used for provisioning of VM
Select-AzureSubscription –SubscriptionName <<Subscription Name>> |
Creating or Identifying an Azure Storage account
Before preparing to provision a VM in Azure, you need to have an Azure Storage account which will be used to host the vhds for the VMs. A given Azure subscription can have multiple storage accounts. Every storage account has a limitation on the number of IOPs it can handle; hence, it is recommended to create multiple Storage accounts to avoid storage contention.
To identify the list of Azure Storage accounts created in the Azure Subscription, use the following Cmdlet
Code Listing 4: Identify the list of Azure Storage Account available in the current subscription
Get-AzureStorageAccount |
To create a new Azure Storage account in the given Subscription, use the following Cmdlet
Code Listing 5: Creating a new Azure Storage Account in Azure Subscription
New-AzureStorageAccount -StorageAccountName <<String>> -AffinityGroup <<String>> -Description <<String>> -Label <<String>> -Type <<String>> New-AzureStorageAccount [-StorageAccountName] <<String>> -Location <<String>> -Description <<String>> -Label <<String>> -Type <<String>> |
The AffinityGroup or Location parameters are mutually exclusive and cannot be used together. The AffinityGroup specifies the name of an existing affinity group in the current subscription while Location specifies the location of the Azure data center where the storage account is created. You can get the Locations supported by the given subscription by firing the Get-AzureLocation Cmdlet.
The Type parameter specifies the type of the storage account. Valid values are:
- Standard_LRS
- Standard_ZRS
- Standard_GRS
- Standard_RAGRS
If you do not specify this parameter, the cmdlet uses a default value of Standard_GRS. Standard_ZRS accounts cannot be changed to other account types, and vice versa.
Creating a New Azure Cloud Service
Cloud Service is a DNS name for the azure service which is used for connectivity to the service. In order to access the VM remotely, you need to ensure it is mapped to cloud service. Further you need to ensure that Cloud service must be created in the same location as storage account. The following PowerShell Cmdlet is used to create New Cloud Service:
Code Listing 6: Creating a new Cloud Service for provisioning of VM
New-AzureService –ServiceName <<New ServiceName>> –Location <<Locationname>> |
Identifying the SQL Server Image to be provisioned
As discussed earlier, Azure Gallery provides a list of SQL Server images ranging from SQL 2008 R2 – SQL 2016 at various Service Pack Level. The following PowerShell Cmdlet can be used to list & filter the images to SQL 2014 images.
Code Listing 7: Getting a list of SQL 2014 images from the Gallery
Get-AzureVMImage | where { $_.os –eq “Windows” –and $_.ImageFamily –like “*SQL*2014*” } | Sort-Object -Property PublishedDate -Descending |
Identifying the Azure VM Size to be provisioned
The VM Size decides the compute capacity as well the per-minute cost of the VM. The virtual machines in Azure are categorized as A-series, D-series, DS-series and G-series VMs. You should understand the difference between each of them first.
A-series VMs have basic azure data disks which can support upto 500 IOPs at moderate latency. As you move from sizes A0 to A11 the number of cores and memory increases. Further the VM Size A8-A11 uses Intel® Xeon® E5-2670 2.60 Ghz which provides superior computing performance compared to lower VM sizes. As you move from A0 to A11, the per-minute compute cost of the VM also increases proportionally.
D-series VMs were introduced later on to provide fast performance for applications needing fast, local ephemeral storage. D-series VMs are similar to A-series VMs except for the fact that they have local temporary storage drive (D drive) which is SSD and provide fast, low latency response. In case of SQL Server, the temporary drive is useful for hosting tempdb which is cleaned & recreated on every restart of the service.
DS-Series VMs are new azure premium storage-backed VMs. Azure Premium Storage is a new type of SSD-based storage, designed to support I/O intensive workloads. With Premium Storage, you can provision a persistent disk and configure the size and performance characteristics that will meet your requirements. You can then attach several Premium Storage-backed data disks to a VM, stripe across them and deliver to your applications up to 32 TB of storage per VM with more than 50,000 IOPS per VM with extremely low latencies. For more information on Premium Storage, see Premium Storage Overview.
G-series VMs is the recent addition to the family that provides the most memory, the highest processing power and the largest amount of local SSD of any Virtual Machine size currently available in the public cloud. G-series offers up to 32 vCPUs using the latest Intel® Xeon® processor E5 v3 family, 448GB of memory, and 6.59 TB of local Solid State Drive (SSD) space. This powerful VM size easily handles deployments of mission critical applications such as large relational database servers (SQL Server, MySQL etc.,) and large NoSQL databases (MongoDB, Cloudera, Cassandra etc.).
Full detailed specs of each of the VM size offered in Azure is described in the following article https://azure.microsoft.com/en-us/documentation/articles/virtual-machines-size-specs/
Use the following PowerShell Cmdlet to identify the VM sizes supported by the current Azure subscriptions since not all VM sizes are available in all Azure locations.
Code Listing 8: Listing the VM Role Size available in given Azure Subscription
Get-AzureRoleSize |
Provisioning a SQL Server Image VM
The following Cmdlet is used to provision a new Azure VM of specified size within the specified Cloud Service with the specified image from Azure Gallery.
Code Listing 9: Provisioning a SQL Server Image VM
New-AzureQuickVM -Windows -ServiceName <<ServiceName>> -Name <<VMName>> -ImageName <<ImageName.imagename>> -Password <<password>> -AdminUsername <<AdminAccount>> -InstanceSize <<VmSize>> -EnableWinRMHttp | out-null |
The –EnableWinRMHttp is used to open up the endpoints for Remote Desktop and PowerShell remoting.
Finally, using all the Cmdlets discussed above, we create the following script which can be used to automate the SQL Server VM provisioning in Azure.
Code Listing 10: Complete Script to Automate Provisioning of SQL Server Image VM in Azure
# The original script for Provisioning of SQL Server Azure VM was created by Sourabh Agrawal and Amit Banerjee # The script is modified by Parikshit Savjani to suit the readers of the book SQL on Azure Succintly Add-AzureAccount | out-null # Make sure the Authentication Succeeded. If ($?) { Write-Host "`tSuccess" } Else { Write-Host "`tFailed authentication" -ForegroundColor Red Exit } #Select the desired Azure Subscription [array] $AllSubs = Get-AzureSubscription If ($AllSubs) { Write-Host "`tSuccess" } Else { Write-Host "`tNo subscriptions found. Exiting." -ForegroundColor Red Exit } #Write-Host "`n[Select Option] - Select a Subscription to Work With" -ForegroundColor Yellow $count = 1 ForEach ($Sub in $AllSubs) { $SubName = $Sub.SubscriptionName Write-host "`n$count - $SubName" -ForegroundColor Green $count = $count+1 } $SubscriptionNumber = Read-Host "`n[SELECTION] - Select a Subscription to Provision the VM" If($SubscriptionNumber -gt $count) { Write-Host "`Invalid Subscription Entry - Existing" -ForegroundColor Red Exit } $SelectedSub = Get-AzureSubscription -SubscriptionName $AllSubs[$SubscriptionNumber - 1].SubscriptionName 3>$null $SubName = $SelectedSub.SubscriptionName Write-Host "`n Selected Subscription - $SubName" -ForegroundColor Green $SelectedSub | Select-AzureSubscription | out-Null #Identify the Azure Storage Account to be used to provision the VM $StorAccName = Read-Host "`nEnter Azure Storage Account Name" if(Get-AzureStorageAccount -StorageAccountName $StorAccName) { Write-Host "`n[INFO] - Using Storage Account - $StorAccName" -ForegroundColor Yellow } else { Write-Host "Storage Account $StorAccName does not Exists - Please Create it" -ForegroundColor Red Exit } # Identify the Cloud Service to Use to Provision the VM $ServiceName = Read-Host "`nEnter your Cloud Service Name for VM" if(Get-AzureService -ServiceName $ServiceName) { Write-Host "`n [INFO] - Cloud Service $ServiceName already exists, using the same..." -ForegroundColor Yellow } else { $Location = (Get-AzureStorageAccount -StorageAccountName $StorAccName).Location.ToString() 3>$null New-AzureService -ServiceName $ServiceName -Location $Location|Out-Null Write-Host "`n [INFO] - Cloud Service $ServiceName created..." -ForegroundColor Yellow } $azureService = Get-AzureService -ServiceName $ServiceName #Get the name for the Azure VM $VMName = Read-Host "`n Enter the name for the Azure VM" $VMName = $VMName.ToLower() #Using PreConfigured Values for VM Size $VmSize = "Standard_D11" [array] $AllImageFamily = get-azurevmimage |where {$_.os -eq "Windows" -and $_.ImageFamily -like "*SQL*2014*" } | Sort-Object -Property PublishedDate -Descending $cnt = 1 ForEach ($ImgFamily in $AllImageFamily) { $ImgName = $ImgFamily.Label Write-host "`n$cnt - $ImgName" -ForegroundColor Green $cnt = $cnt+1 } $ImageNo = Read-Host "`n[SELECTION] - Select the Image to install" If($ImageNo -gt $cnt) { Write-Host "`Invalid Subscription Entry - Existing" -ForegroundColor Red Exit } $ImgName =$AllImageFamily[$ImageNo - 1].Label Write-Host "`nCreating a VM of size $VMSize, with $ImgName " -ForegroundColor Green #Identify the Admin Account and Password to be used for VM $AdminAccount = Read-Host "`n Enter the Admin account name" $password = Read-Host "`n Enter the password" #Select the Storage to be used and Create the VM. Set-AzureSubscription -SubscriptionName $SubName -CurrentStorageAccountName $StorAccName Write-Host "`n[INFO] - Script is creating a $ImgName image, Please wait...." -ForegroundColor Yellow New-AzureQuickVM -Windows -ServiceName $ServiceName -Name $VMName -ImageName $AllImageFamily[$ImageNo - 1].imagename -Password $password -AdminUsername $AdminAccount -InstanceSize $VmSize -EnableWinRMHttp | out-null #Check to make sure that vm wac created $CreatedVM = Get-AzureVM -ServiceName $ServiceName -Name $VMName -ErrorAction SilentlyContinue If ($CreatedVM) { Write-Host "`tVM Created Successfully" } Else { Write-Host "`tFailed to create VM" -ForegroundColor Red Exit } |
Post Deployment Configuration of Provisioned SQL Server VM
Attaching Data Disks
After the creation of SQL Server on Azure VM, it is essential to add Data Disk to the VMs that will be used to host the database files. As a best practice for SQL Server, it is recommended to have separate dedicated disks for System databases, Transaction log files, User data files and Tempdb files.
Hence, in general we would need to add at least four data disks to our VMs. The maximum data disks that can be attached to a VM is dependent on the VM Size. The max number of data disk supported by A-series (A7-A11) VMs is 16, while that of D-series (D14) VMs is 32 and that of G-series VMs (G5) is 64. Each data disk can have a maximum size of 1024GB (or 1 TB).
We can use the following PowerShell Cmdlet to attach a Data Disk to a VM.
Code Listing 11: Attaching a Data Disk to a VM
Add-AzureDataDisk –VM <<vm>> -CreateNew -DiskSizeInGB <<size>> -DiskLabel <<diskname>> -LUN <<LUN>> -HostCaching None |
We can use the following PowerShell script to attach 4 data disk to our SQL Server VM created earlier.
Code Listing 12: Attaching Multiple Data Disks for SQL Server VM
# The original script for Provisioning of SQL Server Azure VM was created by Sourabh Agrawal and Amit Banerjee # The script is modified by Parikshit Savjani to suit the readers of the book SQL on Azure Succintly #Create and Attach the Disks Write-Host "`n[INFO] - Script is creating and attaching 4 data disks, Please wait." -ForegroundColor Yellow for($i = 0; $i -lt 4; $i++) { $disklabel = "disk$VMName" $diskname = $disklabel + $i.ToString() Add-AzureDataDisk -VM $vm -CreateNew -DiskSizeInGB 20 -DiskLabel $diskname -LUN $i -HostCaching None | out-null } $vm | Update-AzureVM | out-null #Make Sure all Disks are attached and working.. $vm = Get-AzureVM -Name $VMName -ServiceName $ServiceName [array]$CreatedDataDisks = Get-AzureDataDisk -VM $vm $CreatedDataDisksCount = $CreatedDataDisks.Count If($CreatedDataDisksCount -eq 4) { Write-Host "`nDisk Creation Successfull - All 4 disks are up and running" -ForegroundColor Green } else { Write-Host "`nData disk creation failed " -ForegroundColor Red Exit } # check to make sure vm is done building Write-Host "`n[INFO] - Script is checking to see if VM is ready, Please wait." -ForegroundColor Yellow $iteration = 0 while($vm.status -ne "ReadyRole" -and $iteration -lt 60) { Start-Sleep -Seconds 30 $vm = Get-AzureVM -Name $vmname -ServiceName $ServiceName write-host "`tVM status is:" $vm.status $iteration++ } |
Adding TCP/IP Endpoints for SQL Server Listener
Azure VMs run within the Cloud Service in Microsoft Datacenter, hence in order to communicate or connect to server remotely you need to create endpoints in the VMs that will open up the firewall ports for communication into the VM for the specified communication protocol.
A default instance of SQL Server listens on TCP port 1433 while a named instance listens on dynamic port that requires SQL Browser Service running for discovery to assist the clients to connect to SQL Server at current port on which it is running. However for a SQL Server instance running on Azure VM, you need to ensure SQL Server runs on a static port to create TCP/IP Endpoints only for the ports for which SQL Server is listening. The following blog post describes the accurate steps to assign a static port to a named instance of SQL Server:
Use the following PowerShell Cmdlet to add endpoints to the Azure VMs.
Code Listing 13: Adding an Endpoint to Azure VM
Add-AzureEndpoint -Name <<Endpoint Name>> -Protocol tcp -LocalPort <<LocalPort>> -PublicPort <<Public Port>> -VM <<vm>> |
Public Port is the port which will be used along with the Cloud Service Name by the external clients to connect to the Azure Service while Local Port is the actual port within the VM on which the service is running. The connections to Public port are internally mapped and routed to Local port in Azure VM. You can use same port no. for Public Port and Local port but endpoints also gives us flexibility to hide Localport by keeping the Public and Local port separate.
For the SQL Server VM created earlier, you can use the following PowerShell script to create SQL Listener Endpoint with LocalPort 1433 and PublicPort 14481.
Code Listing 14: Adding an SQL Listener Endpoint to Azure VM
Add-AzureEndpoint -Name "SQL Listener Port" -Protocol tcp -LocalPort 1433 -PublicPort 14481 -VM $vm | Update-AzureVM | Out-Null |
Connecting to SQL Server instance on Azure VM using SSMS
Finally, after the installation and configuration of SQL Server on Azure VM, it is important to validate the connectivity to SQL Server from an external client before the system is handed over to application team.
SQL Server Management Studio (SSMS) is a popular client tool used by DBAs to manage and administer SQL Server instances. You can use SSMS installed on any client workstation to connect to SQL Server. The connection string for your SQL Server would be of the form
<Cloud Service Name>.cloudapp.net,<Public Port>
However if Azure Virtual Network is configured in your organization, the Azure VM can be brought in your network and domain. When the Azure VM is brought in your OU in Active directory, the AD admin can apply the group policy settings which are applicable to any servers in your network. If the Azure VM is brought in your organization’s domain, the connection string will be of the format
<Cloud Service Name>.<FQDN>,<Public Port>
Once the connectivity to SQL Server instance is verified, SQL Server is ready for application deployment and user workload.
- 1800+ high-performance UI components.
- Includes popular controls such as Grid, Chart, Scheduler, and more.
- 24x5 unlimited support by developers.