
SQL Server for C# Developers Succinctly®

CHAPTER 2
SQL Server Management Studio
If you followed the steps in the introduction, you now have a clean installation of both Visual Studio and SQL Server. So let’s open up SQL Server Management Studio (SSMS for short). Log in to your default instance, which is localhost\name_of_your_instance (default name is MSSQLEXPRESS) with Windows Authentication if you followed the defaults. You should now see the following window:
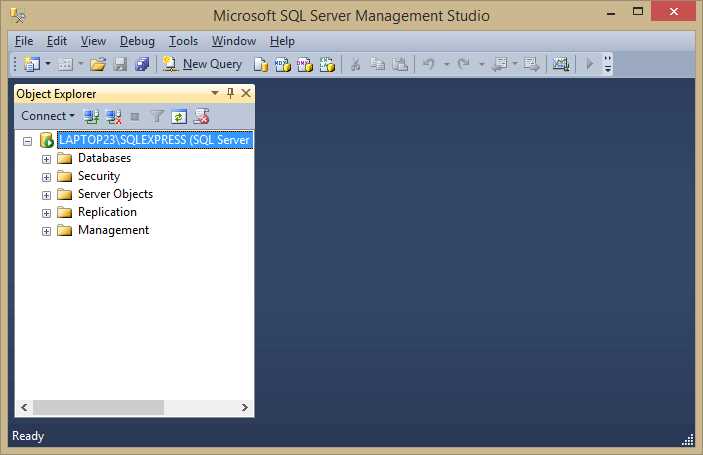
Figure 1: Microsoft SQL Server Management Studio
I’ve always found SSMS very intuitive to use. To execute any script, simply click New Query in the toolbar. Make sure you select the correct database (if applicable) in the upper-left corner (or put USE [database_name] GO in your script). Now let’s create a database to use in future examples. In the Object Explorer, open up the Databases node. It’s probably empty, so right-click on the Databases node and click New database. Pick a name (for this book we’ll use SuccinctlyExamples), leave all the defaults, and click OK. Now that you have a database, you can open that node and view all tables, views, and stored procedures.
So let’s create a table. Right-click the Tables node and click Table. Now create the table in the following figure. Make sure to set the Id column as Primary Key and make it auto-increment (which is what the Identity Specification property does).
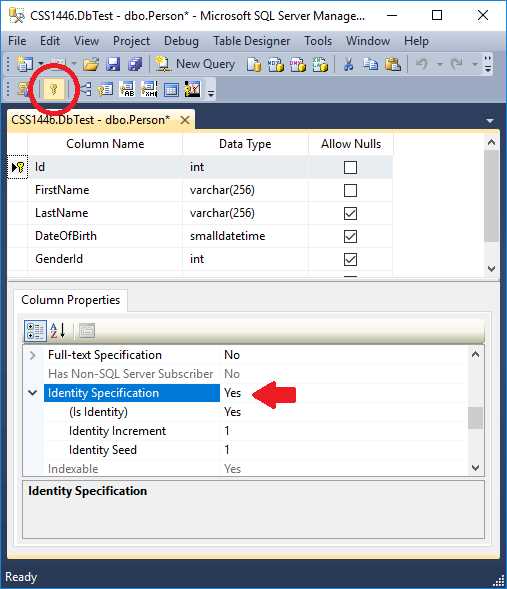
Figure 2: Person table
When saving, name the table Person. To see the table in your Object Explorer, you may have to refresh (right-click the Tables node and click Refresh). Notice that I’ve picked datatype int for GenderId, which seems a little odd at first. However, I’d like to create another table that has all the possible genders and refer to that table here.
Note: I’ve called the table Person (singular) and not Persons or People (plural). The naming of tables can be rather religious for some. One compelling reason for singular naming is that it will make your life a lot easier when you’re going to use an Object Relational Mapper (ORM). For more arguments (for and against), check out this thread on StackOverflow.
Note: Related is the naming for GenderId in Person (rather than just Gender). One reason for this naming is that it really is an ID referring to a gender. And again, this naming convention will make your life easier when using an ORM. That said, I’ve seen (and used) just Gender many times as well.
In the same manner as before, create the following table (no Identity Specification on Id this time):
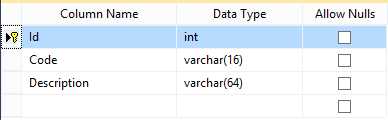
Figure 3: Gender table
When saving this table, name it Gender.
Now go back to your Person table. If you’ve closed the tab, you can right-click the table and click Design. Now right-click anywhere, and then click Relationships. Add a new one, click Tables and Columns Specification, and make sure it looks as follows:
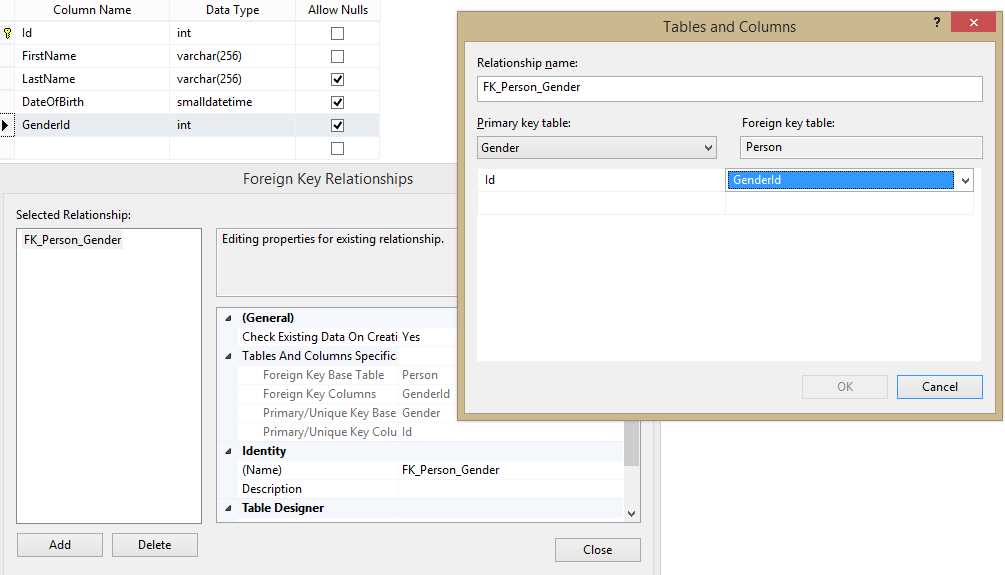
Figure 4: A foreign key relationship
SSMS will automatically name your foreign key FK_Person_Gender, so you can leave all the rest and save. You have now told SQL Server that the GenderId column in the Person table may only contain values that are also a value in the Id column of the Gender table.
Note: Many people believe that relational databases are called so because it is possible to define foreign key relationships between tables. That is not true though. A foreign key is nothing more than a constraint, guaranteeing data integrity. The actual reason relational databases are called so is because the mathematical term for a table is a relation. A relation is an unordered set of values. A set is a collection of unique values. A value in SQL Server is a tuple, which is a collection of values. Uniqueness of a value is guaranteed by a primary key. That also means that any table (or view) without a unique primary key is actually not a relation!
Now, right-click the Gender table and click Edit Top 200 Rows. It doesn’t really matter what you insert, but maybe you should follow my example.
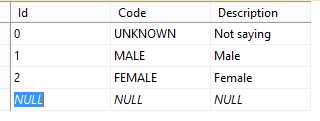
Figure 5: Genders
Now we can also insert one or more people in the Person table.

Figure 6: People
So that was easy. We’ve set up two tables, created a foreign key, and inserted some data. We are missing one thing though… the scripts! You’re going to need the scripts if you ever want to do these steps on a different database (or the same database on another environment). Luckily, SSMS has a few options for generating scripts.
The first method is to right-click an object, select Script [Object] as >, and make your pick. This only scripts out entire objects, though. This is probably fine for everything but tables (which can’t be overwritten without losing data). For example, the Person table CREATE script is as follows:
Code Listing 1: CREATE TABLE [dbo].[Person]
CREATE TABLE [dbo].[Person]( [Id] [int] IDENTITY(1,1) NOT NULL, [FirstName] [varchar](256) NOT NULL, [LastName] [varchar](256) NULL, [DateOfBirth] [smalldatetime] NULL, [GenderId] [int] NULL, CONSTRAINT [PK_Person] PRIMARY KEY CLUSTERED ( [Id] ASC )WITH (PAD_INDEX = OFF, STATISTICS_NORECOMPUTE = OFF, IGNORE_DUP_KEY = OFF, ALLOW_ROW_LOCKS = ON, ALLOW_PAGE_LOCKS = ON) ON [PRIMARY] ) ON [PRIMARY] GO SET ANSI_PADDING OFF GO ALTER TABLE [dbo].[Person] WITH CHECK ADD CONSTRAINT [FK_Person_Gender] FOREIGN KEY([GenderId]) REFERENCES [dbo].[Gender] ([Id]) GO ALTER TABLE [dbo].[Person] CHECK CONSTRAINT [FK_Person_Gender] GO |
That’s awesome, but do note that we need the Gender table first, or this script will fail. We added the foreign key constraint later, but it’s all here in this one script.
For updates to tables, we can go into the Design window, add a column, change a type, add a constraint, and then right-click, and choose Generate Change Script. For example, I’ve added a LastLoginTime column, and I’ve changed GenderId to be non-nullable.
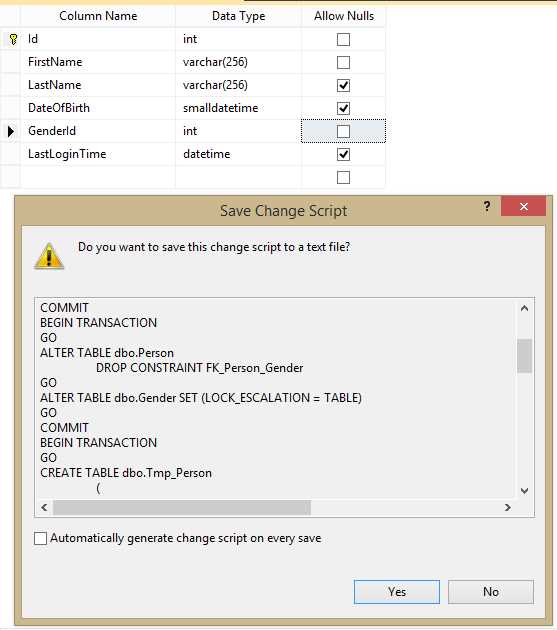
Figure 7: Save Change Script
As you can see, SQL Server actually creates a temporary table, drops the table, and makes the changes. It does more than you’d think! You can save this script and then execute it on another environment effortlessly (or even automated). Unfortunately, dropping and recreating a table is pretty slow and resource-heavy, so you might want to write your own change scripts anyway.
You can open a new query window using the New Query button in the menu near the upper-left side of the screen, or by using Ctrl + N. Be mindful to make sure you execute scripts (using the Execute button or F5) on the correct database—a common mistake is executing scripts on the master database, which is selected as default.
The following simple script will also add the LastLoginTime column and make GenderId non-nullable.
Code Listing 2: ALTER TABLE
ALTER TABLE dbo.Person ADD LastLoginTime DATETIME ALTER TABLE dbo.Person ALTER COLUMN GenderId INT NOT NULL |
Tip: It is possible to execute only certain parts of scripts in a single query window. Simply select the part of the query that you want to execute and hit F5. This is especially handy when you’re testing some software and you’d like to inspect the data, reset the data, run your code again, and repeat. Write a SELECT statement and an UPDATE/INSERT/DELETE statement in a single window, and you can execute the two (or more) statements independently, without having to switch windows all the time.
Last, but not least, you can script a database with all or some selected objects, and with or without data. Right-click your database, go to Tasks >, and then choose Generate Scripts. Go through the wizard and experiment with it (it’s not very complicated, but it has a lot of options). Here is the generated script for the Gender table, including data.
Code Listing 3: CREATE TABLE [dbo].[Gender] including data
CREATE TABLE [dbo].[Gender]( [Id] [int] NOT NULL, [Code] [varchar](16) NOT NULL, [Description] [varchar](64) NOT NULL, CONSTRAINT [PK_Gender] PRIMARY KEY CLUSTERED ( [Id] ASC )WITH (PAD_INDEX = OFF, STATISTICS_NORECOMPUTE = OFF, IGNORE_DUP_KEY = OFF, ALLOW_ROW_LOCKS = ON, ALLOW_PAGE_LOCKS = ON) ON [PRIMARY] ) ON [PRIMARY] GO SET ANSI_PADDING OFF GO INSERT [dbo].[Gender] ([Id], [Code], [Description]) VALUES (0, N'UNKNOWN', N'Not saying') GO INSERT [dbo].[Gender] ([Id], [Code], [Description]) VALUES (1, N'MALE', N'Male') GO INSERT [dbo].[Gender] ([Id], [Code], [Description]) VALUES (2, N'FEMALE', N'Female') GO |
That was a brief introduction to SQL Server Management Studio. The tree view combined with right-click context menus work very well. Of course, you can use all kinds of shortcut keys if you want; just look them up in the menus. We’re going to use SSMS more often throughout this book.
Tip: When creating new objects in your database, you will not get full design time support when writing queries against these newly created objects. They won’t show up in autocomplete, and SSMS will tell you these objects don’t exist if you manually type them in your query. Your queries will run successfully, though. Even a database refresh will not help you here. For a long time, I thought restarting SSMS was the only way to load new objects into the SSMS object cache. It turned out Ctrl + Shift + R also does the trick—no more red squiggly lines under objects you’ve just created!
- 1800+ high-performance UI components.
- Includes popular controls such as Grid, Chart, Scheduler, and more.
- 24x5 unlimited support by developers.