
SQL Server for C# Developers Succinctly®

CHAPTER 6
SQL Server Data Tools
Using the Visual Studio SQL Server Data Tools, you can create databases in pretty much the same way you can in SQL Server Management Studio. It gets better though—you can compare and deploy databases with ease. For this chapter, I have undone all the changes we made to the SuccinctlyExamples database in the previous chapters, so I’m starting fresh again.
If you followed all my steps during the Visual Studio installation, you should have the SQL Server Data Tools. If you haven’t, you can change your installation by going to the Windows Control Panel, then Programs and Features. In the list of programs, look for Microsoft Visual Studio X (with Update Y), select it, and click Change. Now make sure you select the Data Tools.
I should mention that I got a new laptop between writing the previous chapters and this one, so instead of LAPTOP23\SQLEXPRESS, you’ll see CSS1446. All the above still applies, of course; it’s just a name change.
Database Project
Start Visual Studio—you don’t even have to start or open a project. In the menu, go to View and then SQL Server Object Explorer. You should now get a window on the right or left side of the screen (depending on your settings) showing two nodes, SQL Server and Projects. Right-click SQL Server and then click Add SQL Server. You should now see a tree view similar to that in SSMS.
As you right-click on the objects, you’ll notice that you can add tables, columns, and other objects. You can generate scripts of objects, execute scripts, and add or alter data. It’s all pretty cool that you can do this in Visual Studio, but you could do this in SSMS as well.
Now here comes the awesome part—right-click the SuccinctlyExamples database, and click Create New Project. Choose a name for your project, ideally the name of your database (I was lazy and kept the default, Database1). You’ll probably want to check Create new solution, and possibly Create directory for solution; they’re off by default, so I’ll leave it to you. Click Start, and a new database project will be created. In the new solution, your Solution Explorer should now look something like this.
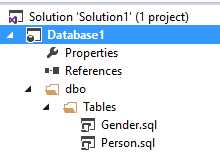
Figure 14: Database project Solution Explorer
An alternative method for creating a database project, even when you don’t have an existing database, is by simply starting a new project and choosing SQL Server Database Project from the installed templates. In the new project, you can create objects and deploy them, or import an existing database by right-clicking your database project in the Solution Explorer, selecting Import, and then selecting Database.
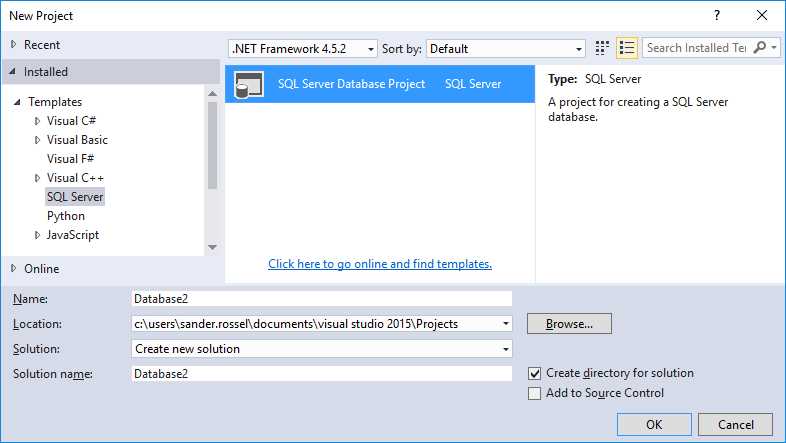
Figure 15: The SQL Server Database Project template
Let’s continue with the Database1 project. By double-clicking on a table, you get to the designer, which is pretty similar to that of SSMS. Here you can add new columns and foreign keys, change columns, etc. In the lower part of the screen you’ll see the SQL script for the table; it changes as you change the table.
Publishing
Before you do anything, let’s assume the SuccinctlyExamples database is production ready, so we want to deploy it. Right-click your database project in the Solution Explorer and choose Deploy. In the Publish Database window, select a database connection. The following window is a bit confusing, as you’re presented some recent connections, but your current connection is hidden. To show your current connection details, click Show Connection Properties. You can just pick the SuccinctlyExamples database for now.
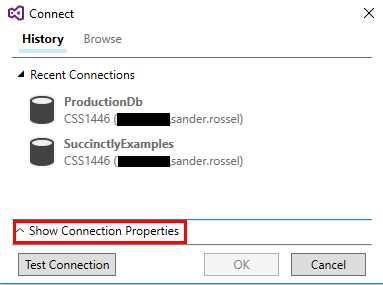
Figure 16: The Connect window
Back in the Publish database window, pick a database name. We’re going to create a new database, so let’s pick a name that doesn’t exist yet. I’ve called it ProductionDb. In a real environment you’d probably have the same database name, but another server instance. Since we don’t have spare servers lying around, we’re going to use the same server instance, but using a different database name. You can choose a name for the generated script as well. You can enable or disable numerous options under the Advanced menu as well, most notably if data loss is allowed. Unless you uncheck Block incremental deployment if data loss might occur, you’ll never be able to delete columns in tables that have rows. There are too many options to discuss them all, but be sure to look at them.
Now you can either view the script, examine it, change it, and run it (in the upper left), or just run the script directly. If you run the script directly, it will be placed in the bin folder of your project. Also, a Data Tools Operations window opens, allowing you to open the script directly. Whichever method you choose, you should now have a new ProductionDb database that is the same as the SuccinctlyExamples database. That’s pretty awesome!
Updating
Now that we have deployed our database, we’re going to get change requests. Let’s add a column to the Person table. Double-click the Person.sql script in the Visual Studio Solution Explorer. You can right-click in the white space of the table designer to add or remove designer columns such as Length, Description, and Identity. Now simply add a column, let’s say Title. Save it.
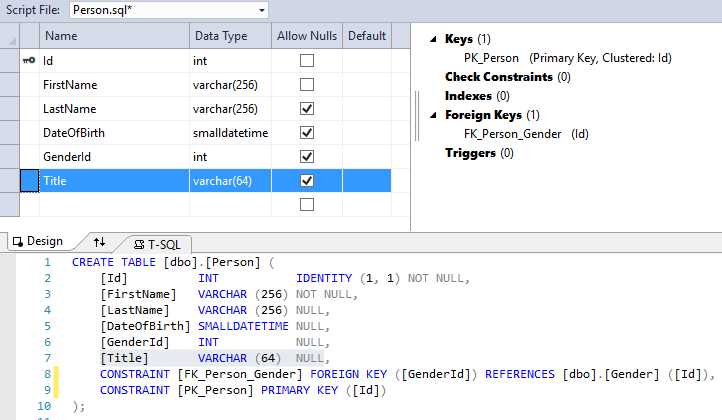
Figure 17: Title column
Now publish the database again, but this time, simply publish to the SuccinctlyExamples database. Instead of a CREATE script, Visual Studio will now generate an ALTER script. If you run it (directly or by generating the script and then running), your database will now have the new Title column.
Updating a table or column—that is, changing it—results in a refactorlog file (or an update thereof). This file is necessary for Visual Studio to figure out that it has to rename the table or column rather than drop the table or column with the old name and create the table or column with the new name. Once you publish the change, a system table is created on your database called __RefactorLog (note the two underscores). The table contains a single column indicating which schema changes have been published.
Comparing
Another cool feature of the Data Tools is to compare databases. We have a few options: compare database schemas against other databases, compare schemas against database projects, and compare data between databases.
Let’s start with comparing schemas between databases. Right-click on the database project and then click Schema Compare. In the window that opens, you can now choose a source and a target. The source is your current project by default. Change the source to the SuccinctlyExamples database and the target to the ProductionDb database. Now simply click Compare in the upper-left corner, and Visual Studio will visually show you the differences. You can now, again, update the target automatically or generate a SQL script and run it manually. You can also pick objects to exclude from the generated script in the Action column. So now, simply update the ProductionDb any way you want.
We can also compare a project to a database, which is basically an alternative to Deploy (except it won’t recognize renames). It works exactly the same as a compare between databases, except that your source is now a database project. Things get interesting when you put the database as your source and the project as your target (you can easily switch them with the button between source and target). This enables you to make changes to your database from an external source and then import them into your project.
So let’s open up SSMS and make a change to the Person table. The Visual Studio table designer has no support for Computed Columns, so we’re going to add one. In SSMS, open the designer for the Person table and add the following column.
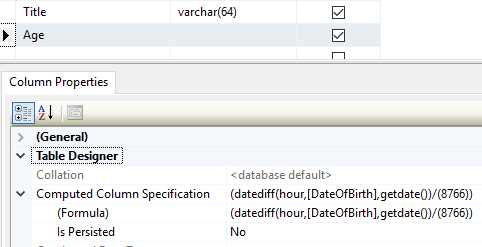
Figure 18: A Computed Column
The formula is the same as the one I used in the IQueryable<Person> OlderThan extension method in the Entity Framework chapter. Now go back to Visual Studio and do a compare between the SuccinctlyExamples database and your database project. The column shows up as being added. You cannot generate a script this time, which kind of makes sense as you’re not updating a (scripted) database, but a Visual Studio SQL Database Project. Simply click Update, and the column gets added to your project.
The data compare is a little different. Let’s make sure we have some data in our database. Run the following script on the SuccinctlyExamples database to insert some data.
Code Listing 62: INSERT data
INSERT INTO [dbo].[Gender] ([Id], [Code], [Description]) VALUES (1, N'UNKNOWN', N'Not saying') INSERT INTO [dbo].[Gender] ([Id], [Code], [Description]) VALUES (2, N'MALE', N'Male') INSERT INTO [dbo].[Gender] ([Id], [Code], [Description]) VALUES (3, N'FEMALE', N'Female') |
This is the kind of data you want to keep synchronized between your databases. Users, even admins, may not be able to enter this data anywhere in the application, and without it your application does not work correctly. So let’s make sure we have all the data we need. For some reason we can’t do a data compare from our database project, so go to the SQL Server Object Explorer instead. Right-click on either the SuccinctlyExamples database or the Gender table and select Data compare. Set the SuccinctlyExamples database as your source (it probably already is) and the ProductionDb as your target. Click Next to pick the tables and views you wish to compare, and then click Finish. You now get an overview of tables that were compared. Only tables and views that have matching names, column names, column types, and primary keys can be compared. Names are case-sensitive. Once compared, you can (as always) create a script and manually execute it, or automatically update the target database.
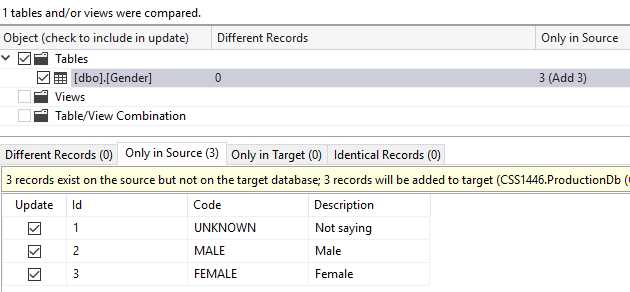
Figure 19: SQL data compare
While what we’ve seen here is incredibly useful, it comes at a cost, and with certain dangers. There was a time when I did all my deployments manually using schema compare. And then I accidentally deployed a change that was not meant to go into production yet, and caused an entire factory to go down for about five minutes. Oops! If you’re not careful, you might execute scripts that you didn’t quite mean to execute. A lot of scripts are generated, and they can be executed with a single button press, so be careful.
Last, but not least, I wanted to mention the data-tier application (for some reason abbreviated as DAC). A DAC is basically a sort of database project. The difference between the two is mostly the way in which it is published. In data-tier applications, publish packages are created by developers, which can then be used by DBAs to perform the updates. If you right-click on the Databases node in the Object Explorer in SSMS, you’ll notice the options “Deploy Data-tier Application…” and “Import Data-tier Application.” It is possible to convert a database project to a DAC, and vice versa. I must confess I’ve never used it, so I won’t say much about it. If you want to know more about them, I suggest you read about it on MSDN and try it out for yourself.
- 1800+ high-performance UI components.
- Includes popular controls such as Grid, Chart, Scheduler, and more.
- 24x5 unlimited support by developers.