
SQL Server for C# Developers Succinctly®

CHAPTER 5
Entity Framework Code First
Now that we’ve seen EF Database First, how to use it, and some of its quirks, let’s try Code First. You can simply write the classes that would be generated by Database First yourself. Code First is especially awesome when you’re working in a team and everyone has their own local copy of the database. Updating databases and inserting data is very easy, and can even be done automatically—no more having to run and update scripts manually. Once again, create a new Console Application and install EF (using NuGet).
Now, add the following classes to your project. Also make sure you add the CodeFirst connection string to your config file (without EF metadata, just a “plain” connection string).
Code Listing 44: EF Code First classes
public class Person { public int Id { get; set; } public string FirstName { get; set; } public string LastName { get; set; } public DateTime? DateOfBirth { get; set; } public int? GenderId { get; set; } public Gender Gender { get; set; } } public class Gender { public int Id { get; set; } public string Code { get; set; } public string Description { get; set; } public virtual ICollection<Person> People { get; set; } } public class CodeFirstContext : DbContext { public CodeFirstContext() : base("CodeFirst") { } public DbSet<Person> People { get; set; } } |
Those classes may look familiar. It’s pretty much what EF database first generated for us earlier. Please note the virtual keyword for the ICollection. At runtime, EF will create a proxy class for Gender, overriding the People property, and have it return some ICollection that supports lazy-loading. Now simply run your application with the following code.
Code Listing 49: Run EF Code First
using (CodeFirstContext context = new CodeFirstContext()) { context.People.Add(new Person { FirstName = "Sander", Gender = new Gender { Id = 1, Code = "MALE", Description = "A true man!" } }); context.SaveChanges(); } |
This will actually create your database and insert a new person and a new gender.
If you take a look at the database, you’ll notice your tables are called dbo.People and dbo.Genders. Genders is not a DbSet in your DbContext, but it is still a table in the database. EF figured that out through Person. There is also a table called dbo.__MigrationHistory (note there are two underscore characters); we’ll look at that in a bit. Let’s first fix the plural naming by overriding OnModelCreating in the DbContext.
Code Listing 50: Non-pluralizing DbContext
public class CodeFirstContext : DbContext { public CodeFirstContext() : base("CodeFirst") { } protected override void OnModelCreating(DbModelBuilder modelBuilder) { modelBuilder.Conventions.Remove<PluralizingTableNameConvention>(); } public DbSet<Person> People { get; set; } } |
There are a lot of conventions like that, and you can add your own. Delete the database by right-clicking on it in SSMS and click Delete. In the dialog, check Close existing connections. When you run the application again, your tables will now be named dbo.Person and dbo.Gender. If you don’t delete your database, you’ll get a runtime exception—we’ll fix that in a minute.
Looking further at the database, you’ll notice that all string properties are translated to nvarchar(max). You probably don’t want this. Furthermore, FirstName is non-nullable, so let’s fix that too. This is actually pretty easy using data annotations (in the System.ComponentModel.DataAnnotations namespace). Simply add some Attributes to your model.
Code Listing 45: DataAnnotations
[Required] [MaxLength(256)] public string FirstName { get; set; } [MaxLength(256)] public string LastName { get; set; } |
Again, delete your database and run the code again. These fields will now be generated as nvarchar(256) not null and nvarchar(256) null, respectively. You can tweak a lot more, for example, by not having an autogenerated key, mapping to another column name in the database, changing generated types, or making properties named Key a primary key by default.
Code Listing 52: Non-autogenerated key
[DatabaseGenerated(DatabaseGeneratedOption.None)] public int Id { get; set; } |
By overriding OnModelCreating of Dbcontext, you have a lot of flexibility in customizing generation.
Code Listing 46: Customizing in OnModelCreating
protected override void OnModelCreating(DbModelBuilder modelBuilder) { modelBuilder.Conventions.Remove<PluralizingTableNameConvention>(); modelBuilder.Entity<Person>() .Property(p => p.DateOfBirth) .HasColumnName("DOB") .HasColumnType("smalldatetime"); modelBuilder.Properties() .Where(p => p.Name == "Key") .Configure(p => p.IsKey()); } |
By using the NotMappedAttribute, a property is ignored by EF altogether (for example, a FullName property that you’re going to compose using FirstName and LastName).
Code Listing 47: A property that's not mapped to the database
[NotMapped] public int FullName { get; set; } |
You probably get the gist of Code First: write code and configuration and have EF create a database for you.
Migrations
Up to now, we had to delete the database every time we made a change to our model. That, of course, won’t work very well in the real world. EF has a few options for the creation of a database: CreateDatabaseIfNotExists (the default), DropCreateDatabaseIfModelChanges, and DropCreateDatabaseAlways. These are called DatabaseInitializers. You probably see some trouble with those. If you have any data or nonmapped entities in your database, you’ll lose them when EF drops the database and recreates them (imagine that happening in production). Newer versions of EF introduced the MigrateDatabaseToLatestVersion. Up to now that hasn’t worked so well—after all, you get an exception when your model changes.
To enable Migrations, use the NuGet Package Manager Console. In the menu, select Tools > NuGet Package Manager > Package Manager Console. Make sure the console targets the project that has your DbContext class. Next, type enable-migrations.
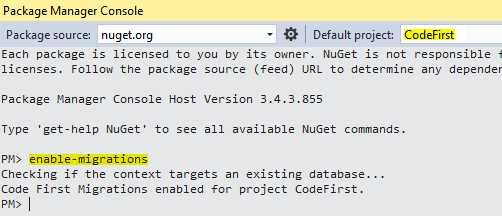
Figure 12: Enable Migrations using NuGet Console
You’ll find that a class called Configuration will be created for you.
Code Listing 48: Generated Configuration class
namespace CodeFirst.Migrations { using System; using System.Data.Entity; using System.Data.Entity.Migrations; using System.Linq; internal sealed class Configuration : DbMigrationsConfiguration<CodeFirst.CodeFirstContext> { public Configuration() { AutomaticMigrationsEnabled = false; } protected override void Seed(CodeFirst.CodeFirstContext context) { // ... } } } |
Automatic migrations
For now, you’ll want to change AutomaticMigrationsEnabled to true.
Code Listing 49: Enable automatic migrations
AutomaticMigrationsEnabled = true; |
The next thing we need to do is use this configuration in our DbContext. We can set it in the constructor.
Code Listing 50: Configure the DbContext for migrations
public CodeFirstContext() : base("CodeFirst") { Database.SetInitializer(new MigrateDatabaseToLatestVersion<CodeFirstContext, Migrations.Configuration>("CodeFirst")); } |
Now add a new class, Company, and give Person two new properties, CompanyId and Company. Make sure CompanyId is nullable, or you might get an error saying that an already existing person cannot be updated (after all, it would have NULL for non-nullable CompanyId).
Code Listing 51: Make a change to the model
public class Person { // ... public int? CompanyId { get; set; } public Company Company { get; set; } } public class Company { public int Id { get; set; } public string Name { get; set; } |
Now, run the application using the following code (the previous code won’t work, as Gender 1 will be re-inserted, but it already exists and we do need some query, or EF won’t update the database).
Code Listing 52: Force automatic migration
using (CodeFirstContext context = new CodeFirstContext()) { context.People.ToList(); } |
Now, do a few migrations (make some more changes) and check out the dbo.__MigrationHistory table. That’s where everything is stored, so you can check if some migration was successful.
You may have noticed that adding classes and properties is no problem, but when you try to delete something, you will get an AutomaticDataLossException. That may not come as a surprise, as you don’t expect that removing a property in a model leads to data loss in a database. However, that may still be exactly what you want. You can configure this in the Configuration class.
Code Listing 60: AutomaticMigrationDataLossAllowed
public Configuration() { AutomaticMigrationsEnabled = true; AutomaticMigrationDataLossAllowed = true; } |
Because automatic migrations may be dangerous (after all, you have little control over what’s happening), there is an option to disable database initialization (including migrations) in your app.config (or web.config) file. It’s actually not a bad idea to disable automatic migrations on your production environment. Chances are that your customers don’t even allow it because database changes must go through a DBA or be requested in writing.
Code Listing 53: Disable database initialization in config
<?xml version="1.0" encoding="utf-8"?> <configuration> <!-- ... --> <entityFramework> <!-- ... --> <contexts> <context type="CodeFirst.CodeFirstContext, CodeFirst" disableDatabaseInitialization="true" /> </contexts> </entityFramework> <!-- ... --> </configuration> |
Another option is to disable it in code.
Code Listing 54: Disable database initialization in code
public CodeFirstContext() : base("CodeFirst") { Database.SetInitializer<CodeFirstContext>(null); } |
By doing this, you must update your database manually. We’ll look at some deployment options later.
Code First migrations
An alternative to automatic migrations is Code First migrations. Disable your automatic migrations by setting AutomaticMigrationsEnabled on false in the Configuration class. Now make some changes to your models, for example, by adding FullName to your Person class.
Code Listing 55: FullName property
[MaxLength(512)] public string FullName { get; set; } |
Now open up the NuGet Package Manager Console again, make sure the project with your DbContext is selected, and type add-migration “Add Person.FullName”. In the Migrations folder, you now get a new file called [current_date_and_time]_Add Person.FullName containing a class named AddPersonFullName. In it, there’s some C# update “script” since your last migration. It also has a “script” to revert those changes.
Code Listing 56: A code first migration
namespace CodeFirst.Migrations { using System; using System.Data.Entity.Migrations;
public partial class AddPersonFullName : DbMigration { public override void Up() { AddColumn("dbo.Person", "FullName", c => c.String(maxLength: 256)); }
public override void Down() { DropColumn("dbo.Person", "FullName"); } } } |
In the Package Manager Console, type update-database, and your database will be updated. You can run your code and query again against an updated database. Make sure you don’t give two migrations the same name, or you will get name conflicts in your C# code.
Now add another property on Person, for example, int Age, and run another add-migration “Add Person.Age” and update-database. Unfortunately, for whatever reason, your last database change has to be rolled back. Luckily, Up and Down methods are generated, so this should be easy. To revert updates, simply update to an older migration and newer migrations will be rolled back. In the console, type “update-database -TargetMigration:”Add Person.FullName”. Run it and Add Person.Age will be reverted.
As I was playing around with migrations, I created FullName, removed it, added it again, and as a result I was left with two C# classes AddPersonFullName. No problem, I just deleted the oldest and ran my migration. However, when rolling back, I got a conflict as Add Person.FullName was ambiguous. Luckily, everything you do is saved in dbo.__MigrationHistory and you can easily get the unique ID for every migration from there. Simply run “update-database -TargetMigration:”2016052111803411_Add Person.FullName” instead to remove the ambiguity. That said, it’s best not to mess up your migrations too much, or you’ll find yourself doing a lot of tedious manual fixing.
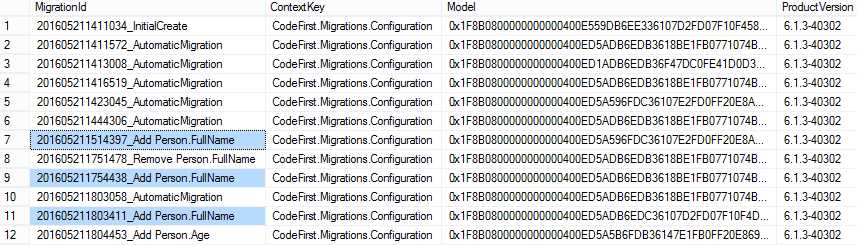
Figure 13: dbo.__MigrationHistory
Another option for you to consider is to get the actual SQL script that Migrations generates. For example, I added Person.FullName and generated the script. You can generate the script using update-database -Script from the Package Manager Console. You’ll get something like the following script.
Code Listing 57: Generated SQL script
ALTER TABLE [dbo].[Person] ADD [FullName] [nvarchar](512) INSERT [dbo].[__MigrationHistory]([MigrationId], [ContextKey], [Model], [ProductVersion]) VALUES (N'201605221001289_AutomaticMigration', N'CodeFirst.Migrations.Configuration', 0x1F/*...*/ , N'6.1.3-40302') |
Seeds
Another thing that makes Code First pretty awesome is the ability to seed your database with some initial data. You may have already noticed it when we created the Configuration class, but there is a Seed method with some example in a comment. So let’s make sure that we at least have our Genders in place and a Person to use for testing.
Code Listing 58: The Seed method
protected override void Seed(CodeFirstContext context) { context.Genders.AddOrUpdate(new[] { new Gender { Id = 0, Code = "UNKNOWN", Description = "Not saying" }, new Gender { Id = 1, Code = "MALE", Description = "Male" }, new Gender { Id = 2, Code = "FEMALE", Description = "Female" } }); context.People.AddOrUpdate(p => new { FirstName = p.FirstName, LastName = p.LastName }, new Person { FirstName = "Sander", LastName = "Rossel", GenderId = 1 }); } |
We can simply insert our three Genders. EF will check if the ID is already present in the database and do an insert or update based on that. The Id of Gender is not an autonumbering field, so we have to set it ourselves. The Id of a Person is not known to us, though, since it’s autonumbering. With autonumbering, there is no way for us to insert a Person with a specific Id, and EF will just happily insert the same Person every time (giving it some autonumber Id). We can, however, specify an alternative means of looking up a specific entity. This is the first parameter to AddOrUpdate, which takes an anonymous object containing all the fields that make up for a unique Person. In this example, I’ve taken the combination of FirstName and LastName to be the alternative key. If the combination of FirstName and LastName isn’t present in the database, EF will insert the Person, otherwise it will do an update. Now if you run the code, these rows will be inserted into the database if they’re not already present.
If you would like to start with a fresh database (including an initial test set) every time you start your debug session, you may opt for a custom IDatabaseInitializer. I already mentioned a few, so let’s simply create one. The following initializer will always recreate a database and seed some data.
Code Listing 59: A custom DatabaseInitializer
public class CleanDbInitializer : DropCreateDatabaseAlways<CodeFirstContext> { protected override void Seed(CodeFirstContext context) { context.Genders.AddOrUpdate(new[] { new Gender { Id = 0, Code = "UNKNOWN", Description = "Not saying" }, new Gender { Id = 1, Code = "MALE", Description = "Male" }, new Gender { Id = 2, Code = "FEMALE", Description = "Female" } }); context.People.AddOrUpdate(p => new { FirstName = p.FirstName, LastName = p.LastName }, new Person { FirstName = "Sander", LastName = "Rossel", GenderId = 1 }); } } |
To get it working, simply go to your DbContext and change the constructor. Make sure you don’t have any migrations (delete the Migrations folder), or your database won’t actually get deleted, and you will get an exception.
Code Listing 60: Usage of CleanDbInitializer
public CodeFirstContext() : base("CodeFirst") { Database.SetInitializer(new CleanDbInitializer()); } |
It is also possible to change the initialization using your App.config or Web.config file. Simply remove the SetInitializer from your DbContext constructor and add the following value in your config file.
Code Listing 61: MigrateDatabaseToLatestVersion with Configuration in config
<contexts> <context type="CodeFirst.CodeFirstContext, CodeFirst"> <databaseInitializer type="System.Data.Entity.MigrateDatabaseToLatestVersion`2[[CodeFirst.CodeFirstContext, CodeFirst], [CodeFirst.Migrations.Configuration, CodeFirst]], EntityFramework"/> </context> </contexts> |
Now we’re switching to our custom initializer.
Code Listing 70: Custom initializer in config
<contexts> <context type="CodeFirst.CodeFirstContext, CodeFirst"> <databaseInitializer type="CodeFirst.CleanDbInitializer, CodeFirst" /> </context> </contexts> |
As you can see, by using Code First, Migrations, and Seeds, working with multiple local database instances while still making daily database updates becomes a breeze.
- 1800+ high-performance UI components.
- Includes popular controls such as Grid, Chart, Scheduler, and more.
- 24x5 unlimited support by developers.