
SQL Queries Succinctly®

CHAPTER 2
Basic CRUD
CRUD is a common acronym that refers to the basic data manipulation language statements CREATE, READ, UPDATE, and DELETE; or INSERT, SELECT, UPDATE, and DELETE (but ISUD does not sound nearly as cool).
We will look at each of these types of statements in turn. In this chapter we will go over the basics for working with each of these statements. Chapter 3 will cover some more advanced scenarios with these basic statements. The rest of this book will focus on all the variations and complexities associated with reading or selecting data. After all, it’s with SELECT statements that we slice and dice our data.
For our discussion of basic CRUD statements, we will often use the simple data model shown in Figure 2-1 relating employees and departments:
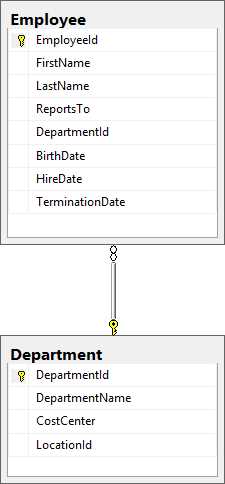
Figure 2-1: Our simple data model
The SQL to generate these tables is shown in Code Listing 2-1.
Code Listing 2-1: Creating the Employee and Department tables
CREATE TABLE [dbo].[Employee]( [EmployeeId] [int] IDENTITY(1,1) NOT NULL, [FirstName] [varchar](50) NOT NULL, [LastName] [varchar](50) NOT NULL, [ReportsTo] [int] NULL, [DepartmentId] [int] NULL, [BirthDate] [datetime] NULL, [HireDate] [datetime] NOT NULL, [TerminationDate] [datetime] NULL, CONSTRAINT [PK_Employee] PRIMARY KEY CLUSTERED ([EmployeeId] ASC) ) CREATE TABLE [dbo].[Department]( [DepartmentId] [int] IDENTITY(1,1) NOT NULL, [DepartmentName] [varchar](50) NULL, [CostCenter] [varchar](50) NULL, [LocationId] [int] NULL, CONSTRAINT [PK_Department] PRIMARY KEY CLUSTERED ([DepartmentId] ASC) ) ALTER TABLE [dbo].[Employee] WITH CHECK ADD CONSTRAINT [FK_Employee_Department] FOREIGN KEY([DepartmentId]) REFERENCES [dbo].[Department] ([DepartmentId]) |
Insert statements
We get data into the database with INSERT statements. In general, these will be handled with business logic in your application code. We generally don’t do a lot of ad hoc inserting into the database. Business logic in your application may handle referential integrity and other constraints that may not be fully defined in the database. You may also have auditing and tracking mechanisms in your application that should not be bypassed.
Business applications are really SQL-level firewalls controlling access to the database. Business logic can implement rules that cannot easily be defined with database constraints, and can define process flows that may change over time or with different business areas, making them impractical to embed in the database structures. Regardless of the reasons, you probably will have rules that need to be followed, but are implemented only in the application logic.
Tip: Ideally, all of these constraints would be baked into the database. In reality, there will be many constraints that the database will know nothing about and can do nothing to help ensure that they are adhered to.
If you find an INSERT statement that you need to run regularly, it will be in your best interests to get it properly integrated into your application code, and not rely on getting it right every time someone needs to run it manually.
With all the warnings out of the way, let’s look at the basic INSERT statement; we will use the Employee table.
The general form for the INSERT statement is:
Code Listing 2-2: The basic INSERT statement
INSERT INTO dbo.Employee ( FirstName , LastName , ReportsTo , DepartmentId , BirthDate , HireDate , TerminationDate ) VALUES ( '' , -- FirstName - varchar(50) '' , -- LastName - varchar(50) 0 , -- ReportsTo - int 1 , -- DepartmentId - int GETDATE() , -- BirthDate - datetime GETDATE() , -- HireDate - datetime GETDATE() -- TerminationDate - datetime ) |
The key thing to get right here is making sure the column order in the INSERT clause matches the column order in the VALUES clause. If you skip a column in the INSERT clause, you must skip it in the VALUES clause as well. If a column is skipped, you will not be inserting a value into that column.
Note: Because we have defined a foreign key from the Employee table to the Department table, we need to give a valid Department value. We can leave the DepartmentId blank (with a NULL value), and it will still pass the referential constraints, but if we assign it a value, it must match a value in the Department table. If we want to ensure that we always get a valid value for the Department, and it is not left blank, we would need to mark the column as Not Null, as well as set the foreign key relationship.
Default values
If we don’t specify the value for a column, it will get the default value for that column. If you don’t specify a default value for a column and don’t specify a value during the insert, the column will get a value of NULL.
Note: NULL is different from being left blank. For text fields like First and Last Name, you could specify the value as ‘’ to leave it blank, but it still has a value. But if you don’t specify a value and there are no default values associated with the column, the value will default to NULL.
Now let’s look at some of the details for the Employee table definition. We might have a default department that new employees get added to. If this is the case, and we don’t specify the department, the newly inserted record will be associated with that department. If you do specify a value for a column with a default value, the value you specify will take precedence.
To set the default value for the DepartmentId column to 1, we can define that column like this:
Code Listing 2-3: Specifying the default department
ALTER TABLE dbo.Employee ADD DEFAULT (1) FOR DepartmentId, |
You may also want to default the HireDate to today’s date:
Code Listing 2-4: Specifying the default hire date
ALTER TABLE dbo.Employee ADD DEFAULT (GETDATE()) FOR HireDate |
Tip: The important thing to remember here is that even if you don’t specify a value during the INSERT statement, the new record may have a value if there is a default value associated with the column.
Identity columns
You may have noticed that in our standard syntax, we did not mention the EmployeeId column. This is a special case for the default value. It’s a common best practice to associate the primary key for a table with an identity column. This is how SQL Server handles keeping track of valid values, the next value, etc. We have a few important rules to bear in mind when dealing with identity columns:
- You can assign the identity property to columns when they are created either as part of the initial table creation, or when the column is altered by adding a new column.
- Once a column has been added, you cannot alter it to add the identity property to it; it needs to be added when the table is created or the column is added.
- You can only have one identity column per table.
- You cannot explicitly set the value for an identity column. We will see the exception to this in a moment.
- You also cannot update the value for an identity column.
This helps ensure data integrity for this table and any table that depends on it, but it can make it harder to import data from an alternate source, such as copying data from one environment to another.
Note: DBAs have developed intricate strategies for dealing with the identity columns on tables in a replication environment. For the most part, you will not be affected by these issues unless you are the DBA. We just need to be aware that many of these strategies will result in gaps in the identity values.
For various reasons, you may find that you have a legitimate need to insert a specific value into an identity column. Despite what we have said so far, it turns out that you can directly change this value, but you have to jump through some hoops to do so, and you need to be careful because you could easily compromise data integrity or create future primary key violations.
Code Listing 2-5: Overriding the identity column during insert
SET IDENTITY_INSERT dbo.Employee ON; INSERT INTO dbo.Employee ( EmployeeId, FirstName, LastName ) VALUES ( 200, 'Nick', 'Harrison' );
SET IDENTITY_INSERT dbo.Employee OFF; |
Tip: Always make sure to explicitly turn the identity insert as soon as you have finished. Otherwise you could put your data integrity at risk.
Constraints
Constraints can be defined to limit the values that can go in a column. This helps ensure data integrity, but it can also cause confusion during inserts if you are not following the rules defined in the constraints.
Let’s revisit the Employee table and add a constraint that says that the TerminationDate must be after the HireDate.
Code Listing 2-6: Constraining when we can terminate an employee
ALTER TABLE dbo.Employee ADD CONSTRAINT ck_termination_date CHECK ( TerminationDate > HireDate); |
Now if we try the original INSERT statement that we saw earlier with the standard syntax, we will get an error, because an employee cannot be hired and terminated at the same time.
Code Listing 2-7: INSERT statement violating constraints
INSERT INTO dbo.Employee ( FirstName , LastName , ReportsTo , DepartmentId , BirthDate , HireDate , TerminationDate ) VALUES ( 'New' , -- FirstName - varchar(50) 'Employee' , -- LastName - varchar(50) 0 , -- ReportsTo - int 0 , -- DepartmentId - int GETDATE() , -- BirthDate - datetime GETDATE() , -- HireDate - datetime GETDATE() -- TerminationDate - datetime ) Msg 547, Level 16, State 0, Line 1 The INSERT statement conflicted with the CHECK constraint "ck_termination_date". The conflict occurred in database "Playground", table "dbo.Employee". The statement has been terminated. |
Tip: If you are designing a database, define all reasonable constraints you can. This will ensure that validation rules cannot easily be violated. If you are using a pre-existing data model, be aware that many constraints will be missing, so you may have to work harder with application-based business logic to ensure data integrity.
Triggers
Triggers are bits of logic that will fire in the database without any direct intervention from you. They are like events for the database. For example, we can have a trigger for insert that will be called whenever a record is inserted into that table. This can be used to further support referential integrity, to set up auditing of changes to key tables, or to enforce business rules in the database.
Tip: Enforcing business rules through triggers in the database means that the business rule cannot be bypassed, but it is easy to overlook. When the rule changes, you may have trouble remembering that the rule was implemented in a trigger because they easily go unnoticed. Also, if multiple applications are using the same database, they may not all agree on these business rules, so their implementation would be best met in the application code.
Looking back at the Employee table we have been using, we may want to define an EmployeeAudit table that would track whenever anyone modifies data in this table. Triggers could be used to easily handle such tracking.
Start by creating a new table called EmployeeAudit with the same columns as the Employee table. For this new table, the EmployeeId will not be the primary key. It will also not be an identity column. Instead, we will add a new column called EmployeeAuditId, which will be the primary key as well as the identity column. Let’s also add a couple of new columns for AuditAction and AuditDate.
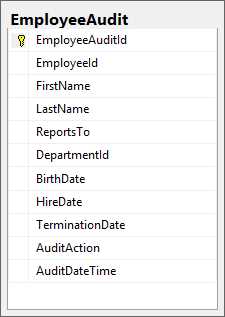
Figure 2-2: A simple audit table
Tip: Even though we want to define as many constraints as is practical in the Employee table, we will want to disable most of the constraints on the Audit table. This way we can log everything that happens to the Employee table, even if a constraint is temporarily disabled.
Code Listing 2-8: Creating the EmployeeAudit table
CREATE TABLE [dbo].[EmployeeAudit]( [EmployeeAuditId] [int] IDENTITY(1,1) NOT NULL, [EmployeeId] [int] NOT NULL, [FirstName] [varchar](50) NOT NULL, [LastName] [varchar](50) NOT NULL, [ReportsTo] [int] NULL, [DepartmentId] [int] NULL, [BirthDate] [datetime] NULL, [HireDate] [datetime] NOT NULL, [TerminationDate] [datetime] NULL, [AuditAction] [char](1) NOT NULL, [AuditDateTime] [datetime] NOT NULL, CONSTRAINT [PK_EmployeeAudit_1] PRIMARY KEY CLUSTERED ([EmployeeAuditId] ASC) ) |
Now that we have our Audit table in place, let’s look at what the insert trigger for the Employee table might look like.
Code Listing 2-9: Trigger to audit inserts into the Employee table
CREATE TRIGGER trEmployeeInsert ON dbo.Employee FOR INSERT AS INSERT INTO dbo.EmployeeAudit ( EmployeeId , FirstName , LastName , ReportsTo , DepartmentId , BirthDate , HireDate , TerminationDate , AuditAction , AuditDateTime ) SELECT Inserted.EmployeeId , Inserted.FirstName , Inserted.LastName , Inserted.ReportsTo , Inserted.DepartmentId , Inserted.BirthDate , Inserted.HireDate , Inserted.TerminationDate, 'I' , -- I is for insert GETDATE() FROM Inserted; |
Note: We will explore the syntax for this insert statement more fully in the next chapter. The SQL INSERT statement combined with a SELECT statement is one technique you can use to support logging when the insert operation adds multiple records into a table.
The Inserted table mentioned in the Trigger definition is a memory-only table that SQL Server maintains for us. We cannot modify this table by adding an index or manipulating any of the data, but it can be very helpful in tracking what was inserted and taking appropriate action.
Now when we insert a record into the Employee table, we will get a copy of what was inserted in the EmployeeAudit table.
Code Listing 2-10: Insert triggers may change the number of rows affected by the INSERT statement
INSERT INTO dbo.Employee ( FirstName , LastName , ReportsTo , DepartmentId , BirthDate , HireDate , TerminationDate ) VALUES ( 'New' , -- FirstName - varchar(50) 'Employee' , -- LastName - varchar(50) 0 , -- ReportsTo - int 1 , -- DepartmentId - int GETDATE() , -- BirthDate - datetime GETDATE() , -- HireDate - datetime GETDATE() + 60 -- TerminationDate - datetime ) (1 row(s) affected) (1 row(s) affected) |
If you run this command in Management Studio, you will see that two rows were affected: the new record in the Employee table, and a new record in the EmployeeAudit table.
Note: With triggers, you may have a single INSERT statement affect more than one record, potentially records in different but related tables.
Let’s now look at how to enforce business rules in a trigger. Suppose your company has a rule that all employees must be at least 18 years old. You could potentially implement this rule with a trigger like this:
Code Listing 2-11: Defining a trigger to enforce business logic
CREATE TRIGGER trEmployeeInsertVerifyAge ON dbo.Employee AFTER INSERT AS IF EXISTS ( SELECT * FROM Inserted WHERE DATEDIFF(YEAR, Inserted.BirthDate, GETDATE()) < 18 ) BEGIN RAISERROR ('New hires must be at least 18 years old', 16, 10); ROLLBACK TRANSACTION; RETURN; END; |
Now if we run the INSERT statement, we will get an error complaining about the age of the new employee.
Code Listing 2-12: Insert trigger defines business rules that cannot be bypassed
INSERT INTO dbo.Employee ( FirstName , LastName , ReportsTo , DepartmentId , BirthDate , HireDate , TerminationDate ) VALUES ( 'New' , -- FirstName - varchar(50) 'Employee' , -- LastName - varchar(50) 0 , -- ReportsTo - int 1 , -- DepartmentId - int GETDATE() , -- BirthDate - datetime GETDATE() , -- HireDate - datetime GETDATE() + 60 -- TerminationDate - datetime ) Msg 50000, Level 16, State 10, Procedure trEmployeeInsertVerifyAge, Line 8 New hires must be at least 18 years old Msg 3609, Level 16, State 1, Line 1 The transaction ended in the trigger. The batch has been aborted. |
Because we rolled back the transaction, there will not be a record in either the Employee or EmployeeAudit tables.
Note: This is not a good way to verify the age of the employee. There are many scenarios where this simple test would incorrectly fail, as well as incorrectly pass. Determining the age is a little bit more complex, but for the purpose of showcasing a trigger, let’s keep it simple.
Select statements
We read data from the database the SELECT statement. In its simplest form, we have:
Code Listing 2-13: The basic SELECT statement
SELECT fields FROM table WHERE conditions ARE true |
We will see a few variations on this pattern here, and then spend the rest of the book exploring all the variations you could ever want to see.
Single table
As long as we are only considering a single table, the query stays relatively simple.
Code Listing 2-14: Querying from a single table
SELECT EmployeeId , FirstName , LastName , ReportsTo , DepartmentId , BirthDate , HireDate , TerminationDate FROM dbo.Employee WHERE EmployeeId < 100; |
This will give us a list of all employee records with an EmployeeId value that is less than 100. This is not necessarily the same as the first 100 employees. Had any been deleted, there would be gaps in the EmployeeId sequence, and you would not get 100 records.
To get the first 100 employee records, we can run a slightly different query.
Code Listing 2-15: Getting the first 100 employee records
SELECT TOP 100 EmployeeId , FirstName , LastName , ReportsTo , DepartmentId , BirthDate , HireDate , TerminationDate FROM dbo.Employee ORDER BY EmployeeId |
Any column from the Employee table can be used to filter the records returned in the WHERE clause.
Code Listing 2-16: Filtering records in the WHERE clause
SELECT EmployeeId , FirstName , LastName , ReportsTo , DepartmentId , BirthDate , HireDate , TerminationDate FROM dbo.Employee WHERE ReportsTo = 51486 AND ( HireDate < '01/01/2000' OR BirthDate < '01/01/1980' ) AND ( TerminationDate IS NULL OR TerminationDate > GETDATE() ) ORDER BY EmployeeId; |
We can combine these various filters any way we want to. Here we will get a list of employees who report to a specific employee and were either hired before the year 2000, or were born before 1980, and are either not terminated or scheduled to be terminated in the future.
Inner join
It is common to need to combine multiple tables to get the data that you need. The simplest way to combine data from two tables is with an inner join. With an inner join, the corresponding data used to define the join must be in both tables.
We could join the Employee and Department tables to a list of employees who have been terminated this year, and their departments:
Code Listing 2-17: Joining two tables using the foreign key
SELECT FirstName , LastName , TerminationDate, DepartmentName , CostCenter , LocationId FROM dbo.Employee INNER JOIN dbo.Department ON Department.DepartmentId = Employee.DepartmentId WHERE TerminationDate > DATEADD(yy, DATEDIFF(yy, 0, GETDATE()), 0); |
If the employee did not have a DepartmentId set, or the DepartmentId was not in the Department table, that employee record would not be returned. Any department that does not have a record matching the filters in the WHERE clause will also be omitted.
Note: Because we added referential constraints through the foreign key definition between Employee and Department, any DepartmentId listed in the Employee table will be in the Department table, but not all Departments may be listed in the Employee table. Hopefully every department has not fired someone this year.
Note: Don’t worry about the date functions in the WHERE clause. We will explore all things date-related in Chapter 6. The end result of these functions is to get the first day of the current year.
Outer join
Outer joins can be a little bit more complicated. To appreciate the differences associated with the various forms that an outer join can take, let’s add a couple of new tables to consider.
Let’s call them Left and Right:
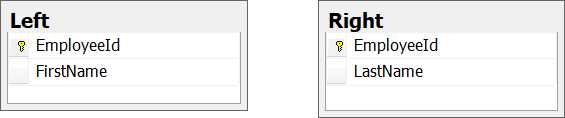
Figure 2-3: Contrived sample tables to showcase the different types of outer joins
We will join these two tables on the EmployeeId. Since we are explicitly showcasing what happens when both tables don’t have all of the same records, we left off the foreign key constraints, and neither of these primary keys are set up as an identity column.
Note: In actual practice you would never set up a couple of tables like this, but this makes it easy to showcase data scenarios that legitimately may crop up, but under more arcane business scenarios than we want to deal with here.
Let’s load these tables with some sample fictitious data. For the table Left:
EmployeeId | FirstName |
|---|---|
1 | Fred |
2 | Barney |
3 | Buzz |
4 | Han |
5 | Wedge |
Result Set 2-1: Data in table Left
And for table Right:
EmployeeId | LastName |
|---|---|
1 | Flintstone |
2 | Rubble |
6 | Organo |
7 | Jetson |
8 | Parker |
Result Set 2-2: Data in table Right
With this data loaded, we can see that we will have some matching records and some records that will not match.
A simple inner join will return the following records:
Code Listing 2-18: An inner join between Left and Right
SELECT * FROM dbo.[Left] JOIN [Right] ON [Right].[EmployeeId] = [Left].[EmployeeId]; |
Note: If the join is not explicitly specified, the join type is an inner join.
EmployeeId | FirstName | EmployeeId | LastName |
|---|---|---|---|
1 | Fred | 1 | Flintstone |
2 | Barney | 2 | Rubble |
Result Set 2-3: Only records with matches in both tables are shown
We get all of the matching records. A left outer join will return the following records:
Code Listing 2-19: Left outer join between left and right
SELECT * FROM dbo.[Left] LEFT OUTER JOIN [Right] ON [Right].[EmployeeId] = [Left].[EmployeeId]; |
This is all the records from the first table in the join plus the matching records from the second table. For the records without a matching record in the second table, we fill in the blanks with NULL.
EmployeeId | FirstName | EmployeeId | LastName |
|---|---|---|---|
1 | Fred | 1 | Flintstone |
2 | Barney | 2 | Rubble |
3 | Buzz | NULL | NULL |
4 | Han | NULL | NULL |
5 | Wedge | NULL | NULL |
Result Set 2-2: All records from the Left table plus any matching records from the Right table
A right outer join will return the following records:
Code Listing 2-20: Right outer join between Left and Right
SELECT * FROM dbo.[Left] RIGHT OUTER JOIN [Right] ON [Right].[EmployeeId] = [Left].[EmployeeId] |
This is all the records from the second table plus the matching records from the first table in the join.
EmployeeId | FirstName | EmployeeId | LastName |
|---|---|---|---|
1 | Fred | 1 | Flintstone |
2 | Barney | 2 | Rubble |
NULL | NULL | 6 | Organo |
NULL | NULL | 7 | Jetson |
NULL | NULL | 8 | Parker |
Result Set 2-1: All of the records from Right, and any matches from Left
A full outer join will return the following records.
Code Listing 2-21: A full outer join between Left and Right
SELECT * FROM dbo.[Left] FULL OUTER JOIN [Right] ON [Right].[EmployeeId] = [Left].[EmployeeId]; |
This is all the records from both tables matching the ones that have matches, filling in the blanks from either table with NULL values.
EmployeeId | FirstName | EmployeeId | LastName |
|---|---|---|---|
1 | Fred | 1 | Flintstone |
2 | Barney | 2 | Rubble |
3 | Buzz | NULL | NULL |
4 | Han | NULL | NULL |
5 | Wedge | NULL | NULL |
NULL | NULL | 6 | Organo |
NULL | NULL | 7 | Jetson |
NULL | NULL | 8 | Parker |
Result Set 2-2: Records from either table matching where possible
A cross join will return every combination from both tables. In this case, it will return 25 records.
Code Listing 2-22: A cross join between the Left and Right tables
SELECT * FROM dbo.[Left] CROSS JOIN [Right] |
Tip: Very rarely will you want to use a cross join because of the number of records that it can return; plus, it can often return meaningless data. We will see a couple of practical examples a little later on.
Update statements
UPDATE statements allow us to change data in the database. Unlike the INSERT statement that we saw earlier, UPDATE statements do not result in a new record; they operate on an existing record. The data in the original record is replaced with the new values you specify.
An example of a simple UPDATE statement is:
Code Listing 2-23: The general UPDATE statement
UPDATE dbo.Employee SET FirstName = 'New Value' , LastName = 'New Last Name' , ReportsTo = 1 , DepartmentId = 0 , BirthDate = '7/4/1776' , HireDate = '1/20/2017' , TerminationDate = NULL WHERE EmployeeId = 404; |
We can update any number of columns in the set clause. The updated values can be based on other column values, can be the result of calculations, or maybe the result of manipulating their original values.
In the WHERE clause, we can filter down to the specific records that we want to update. Updating by the primary key is very common. You know that you will only update a single record.
Tip: The WHERE clause from an UPDATE statement can be used in a SELECT clause to know ahead of time how many records will be affected.
Let’s look at a few examples.
Suppose you want to change the Employee table so that all employees who report to the person with ID 34149, now report to the person with ID 35624:
Code Listing 2-24: A basic UPDATE statement moving employees from one manager to another
UPDATE dbo.Employee SET ReportsTo = 35624 WHERE ReportsTo = 34149; |
We may want to delay firing by 30 days for anyone who hasn’t already been terminated:
Code Listing 2-25: Adjusting the termination date based on the WHERE condition
UPDATE dbo.Employee SET TerminationDate = DATEADD(DAY, 30, TerminationDate) WHERE TerminationDate > GETDATE(); |
Identity column
You may find that you need to change the existing values for existing identity columns. Unfortunately, we cannot update the value of an identity column. Even though we can use Set IdentityInsert to insert a specific value, there is no Set Identity_Update.
We may still need to be able to change the value for the identity column, but we have a few extra steps to go through.
- Create a new staging table based on the table that we want to update, but don’t make the primary key an identity column.
- Insert the values that need to be updated into this new table, specifying whatever value you need for the primary key.
- Delete the records that you wanted to update from the original table.
- Turn Identity INSERT on.
- Insert the records from the staging table back into the original table.
- Turn Identity INSERT off.
Note: These are a lot of steps, but they’re not difficult to do. In the next chapter, we will see an easy way to move a set of records from one table to another.
Triggers
Triggers for updating a table are similar to insert triggers with just a couple of differences. Conceptually, we can think of an update as a DELETE followed by an INSERT. The values for the record being updated are inserted into the table after the original record is deleted. As we have already seen, an UPDATE statement can and often does affect many records.
In the body of the trigger, we get two tables that SQL Server maintains for us: the Inserted table that we saw in the INSERT trigger, and a Deleted table. In the case of updates, the Inserted table will track the new values for the records after they have been updated, and the Deleted table will track the original values as they were before the update.
We can join these two tables to track how the values change over time.
Code Listing 2-26: Tracking changes with an update trigger
CREATE TRIGGER trEmployeeUpdate ON dbo.Employee FOR UPDATE AS SELECT CONVERT(VARCHAR(10), Deleted.EmployeeId) + ' becomes ' + CONVERT(VARCHAR(10), Inserted.EmployeeId) AS EmployeeId , Deleted.FirstName + ' becomes ' + Inserted.FirstName AS FirstName , Deleted.LastName + ' becomes ' + Inserted.LastName AS LastName , CONVERT(VARCHAR(10), Deleted.ReportsTo) + ' becomes ' + CONVERT(VARCHAR(10), Inserted.ReportsTo) AS ReportsTo , CONVERT(VARCHAR(10), Deleted.DepartmentId) + ' becomes ' + CONVERT(VARCHAR(10), Inserted.DepartmentId) AS DepartmentId , CONVERT(VARCHAR(23), Deleted.BirthDate, 126) + ' becomes ' + CONVERT(VARCHAR(23), Inserted.BirthDate, 126) AS BirthDate , CONVERT(VARCHAR(23), Deleted.HireDate, 126) + ' becomes ' + CONVERT(VARCHAR(23), Inserted.HireDate, 126) AS HireDate , CONVERT(VARCHAR(23), Deleted.TerminationDate, 126) + ' becomes ' + CONVERT(VARCHAR(23), Inserted.TerminationDate, 126) AS TerminationDate FROM deleted JOIN inserted ON Inserted.EmployeeId = Deleted.EmployeeId; |
The only thing complicated here is the data manipulation to concatenate all the original and new values as strings.
Tip: In actual usage, you would probably want to take the output of this join and store into a logging table. You probably would never want a trigger to directly return a Result Set; this is for illustration purposes only.
Any business rules that you implement as an INSERT trigger should also be implemented as an UPDATE trigger. SQL Server makes this is easy. In the CREATE TRIGGER statement, specify that it is for both INSERT and UPDATE.
Code Listing 2-27: Implementing business logic with update triggers
CREATE TRIGGER trEmployeeInsertVerifyAge ON dbo.Employee AFTER INSERT, UPDATE AS IF EXISTS ( SELECT * FROM Inserted WHERE DATEDIFF(YEAR, Inserted.BirthDate, GETDATE()) < 18 ) BEGIN RAISERROR ('New hires must be at least 18 years old', 16, 10); ROLLBACK TRANSACTION; RETURN; END; |
There are also some domain-specific business rules that are relevant for updates and not inserts that you may want to consider, for example:
- Prevent updates after an employee has been terminated.
- Prevent changes to a loan after closing.
- Prevent updates to an order after it has been shipped.
Delete statements
Sometimes we have to remove data from the database. We do this with the DELETE statement, which deletes the identified records from the database.
A sample DELETE statement in its simplest form is:
Code Listing 2-28: The basic DELETE statement
DELETE FROM dbo.Employee WHERE EmployeeId = 44068 |
Just like with UPDATE statements, the WHERE clause for a DELETE statement can be used in a SELECT statement to verify the records that will be affected. Anything that you can do in the WHERE clause for a SELECT or UPDATE statement, you can also do in a DELETE statement.
Tip: Always run a Select with the same Where clause before deleting records to verify how many records will be removed by the Delete.
In some environments you may not use DELETE statements. For some businesses, data may never be deleted but simply marked as no longer active. In such cases, the DELETE statement will take the form of a soft delete, implemented as an UPDATE statement. Generally, this will involve updating the record that you want to delete and setting a value for a column indicating that the record has been deleted, such as DeletedDate and maybe DeletedBy.
Referential constraints
One of the problems that can arise from deleting records is the havoc that it can play with referential integrity. For example, you delete a record from the Department table while there are still employee records associated with the deleted department. As long as the foreign key relationships are properly defined, the database will not allow the delete.
Code Listing 2-29: Referential constraints blocking a delete
DELETE FROM dbo.Department WHERE DepartmentId = 1 The DELETE statement conflicted with the REFERENCE constraint "FK_Employee_Department". The conflict occurred in database "SQL", table "dbo.Employee", column 'DepartmentId'. |
If the foreign key relationships are not properly defined, you are at risk for data integrity problems.
Tip: If you cannot properly define a foreign key in the database and allow the database to guarantee referential integrity, run reports periodically to ensure that your data is still clean.
Cascading deletes
A foreign key can be defined with an option to On Delete Cascade. This means that when a record is deleted, every record in related tables will be deleted as well. Obviously this can be dangerous, but can also simplify some data management tasks.
Naturally, we would not want to enable cascade delete between Department and Employee. It would not make sense to delete an employee record when a department is deleted.
Tip: If the foreign key column can be NULL, it is not a good candidate for cascade delete. If a record can exist without the foreign table, it should not be deleted when the foreign table is deleted.
In an order-tracking database, we may want to add cascading deletes to automatically delete OrderDetail records when the Order record is deleted. Without cascading deletes, you would have to delete the OrderDetail records before you could delete the Order record.
Code Listing 2-30: Constraints preventing deletes
DELETE FROM dbo.[Order] WHERE OrderId = 1; The DELETE statement conflicted with the REFERENCE constraint "FK_LoanCode_LoanCodeType". The conflict occurred in database "SQL", table "dbo.OrderDetail", column 'OrderId'. |
If we delete an Order record without first deleting the associated OrderDetail record, we get the reference constraint violation shown in Code Listing 2-30.
If we define the constraint enabling cascade deletes:
Code Listing 2-31: Alter table to cascade delete
ALTER TABLE dbo.OrderDetail WITH CHECK ADD CONSTRAINT [FK_OrderDetail_Order] FOREIGN KEY([OrderId]) REFERENCES dbo.[Order] ([OrderId]) ON UPDATE CASCADE ON DELETE CASCADE; |
Now if we execute the same DELETE statement, we won’t get an error even if there are multiple records in the OrderDetail table.
Code Listing 2-32: Cascade delete bypasses constraint violations
DELETE FROM dbo.[Order] WHERE OrderId = 1; |
The message that we get back simply states that one record was affected, even though all of the related OrderDetail records were also deleted.
Tip: Be careful when cascade deletes are enabled—more records than reported may be deleted.
The importance of transactions
Deletes are permanent under normal circumstances. Once you issue a DELETE statement, the record is gone unless it was deleted as part of a transaction.
A database transaction represents a logical unit of work. Logical units of work have four properties, collectively known as ACID:
- Atomicity means that the transaction cannot be split into parts. Either all statements of the transaction succeed, or none of it succeeds.
- Consistency means that at the end of the transaction, all of the data is in a consistent state with all of the constraints and data integrity rules adhered to. If not, the transaction would have been rolled back to the state it was in before the transaction started.
- Isolation means that modifications made inside the transaction are kept isolated from the transaction until the transaction is complete. Also, changes made outside of the transaction are kept separate from the transaction until the transaction is complete.
- Durability means that once the transaction is complete, all of the changes made as part of the transaction are permanent. These changes have been made and stored on disk so that they would survive even a system failure.
Transactions help ensure data integrity and that business logic can be evaluated in a known state. They also provide a safety net for UPDATE and DELETE statements. If you start a transaction before executing a DELETE or UPDATE statement and these statements do not affect the number of records expected, you can roll back the transaction and undo any SQL statements executed.
Code Listing 2-33: DELETE as part of a transaction
-- Show the contents of the Order table before the Transaction Begins. SELECT * FROM dbo.[Order] BEGIN TRANSACTION -- Delete the contents of a single order. DELETE FROM dbo.[Order] WHERE OrderId != 1; -- Show the contents of the Order table after deleting an Order. SELECT * FROM dbo.[Order] -- Rollback will discard all changes made since the transaction. started ROLLBACK -- Show and confirm that the Order table is back to where we started from. SELECT * FROM dbo.[Order] |
Summary
In this chapter we have seen the basics of the essential CRUD operations. We saw how to create data with an INSERT statement, how to read data with a SELECT statement, and how to use the UPDATE and DELETE statements to round out these operations.
We covered a lot of material, but if you have looked at the SQL in a typical application, you know that we have barely scratched the surface. In the next chapter we will pull the covers back a bit and explore versions of the basic operations that are just a bit more complex.
- Direct integration with SQL databases for real-time data access
- Interactive dashboards for deeper data exploration
- Advanced analytics to uncover hidden patterns and trends
- Enhanced decision-making with data-driven insights