
Skype Bots Succinctly®

CHAPTER 1
Regex Bots
Quick intro
Bots are a great way to interact with users in Skype or Skype for Business. Bots are conversational agents that users can interact with—to some extent—as though conversing with a person.
In my e-book Microsoft Bot Framework Succinctly, I cover most of the aspects of creating and working with bots along with publishing a bot to Skype.
Even though you should be able to fully understand this chapter fairly easily, you might want to take a quick look at that e-book as a way to gain some familiarity with the Bot Framework and understand the basic foundational blocks for building bots, which won’t be completely covered in this chapter.
Instead, we’ll focus our attention on aspects of bots that were not discussed in Microsoft Bot Framework Succinctly. So, let’s get started.
The full source code for this chapter can be found here.
Setting up our bot project
In order to get started creating our Cake Bot, we need to first install the Bot Template for Visual Studio.
Once you have the template downloaded, unzip it and place it under this folder: %USERPROFILE%\Documents\Visual Studio 2017\Templates\ProjectTemplates\Visual C#\. This will display a Bot Application template, which we’ll use to create our bot.
First, let’s fire-up Visual Studio 2017, and let’s create our new bot by using the Bot Application template. You can do this by opening the New Project window as follows: File > New > Project.
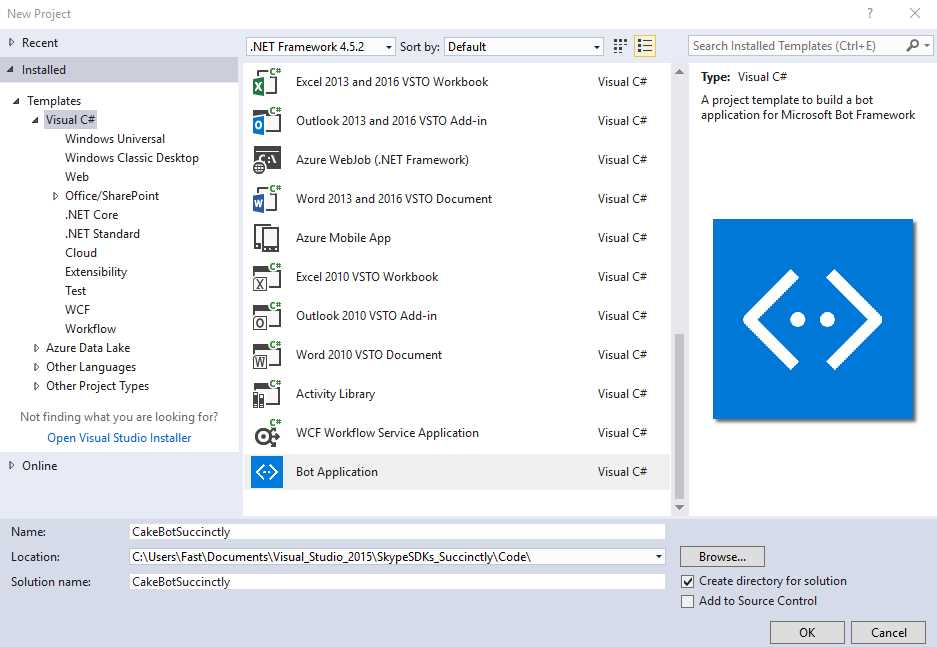
Figure 1-a: Creating a New Bot Application Project
I’ve decided to call the new project CakeBotSuccinctly, but you may choose any other name you wish.
With the project created, let’s define the structure by creating some files we’ll need.
But first things first—let’s resolve any missing dependency issues. Open Solution Explorer, right-click References, and then select Manage NuGet Packages. We do this because it might be possible that not all required references are up-to-date.
In my case, several references are in this situation (not up-to-date), as can be seen in the following figure.
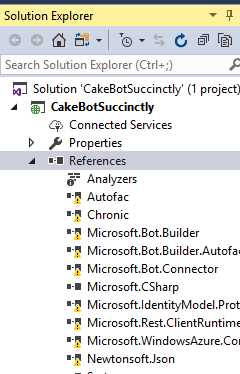
Figure 1-b: Project References Needing an Update
So, let’s update them using the NuGet Package Manager. Click Restore at the upper right side of the screen, as can be seen in the following figure.

Figure 1-c: Updating Project References
Once you’ve clicked Restore, all references that are not up-to-date will be updated. This can be confirmed by clicking on any of the references seen in the Solution Explorer that open up the Object Browser. Notice how, after clicking on one of them—shortly after the Object Browser opens up—all the references now appear as correct.

Figure 1-d: Updated Project References
Awesome! We now have all our project references updated. With this out of the way, let’s create the basic project structure and add the files we’ll need for creating our Skype bot application.
Bot project structure
When creating a Skype bot—or, in general, any bot using the Microsoft Bot Framework, there is no specific rule on how to organize the project files that will be used. However, some recommendations can be made on how to define an easy-to-follow project structure that is simple to remember and implement. This is what we’ll focus our attention on now.
The Bot Template for Visual Studio does a pretty good job of defining a basic project structure for our bot; however, there are still a few things missing, and that’s what we will add now.
The most important elements that the Bot Template defines are the Controllers and Dialogs folders.

Figure 1-e: Basic Bot Project Structure
The Dialogs folder is where we’ll create the dialog classes that our bot will be using. We’ll also create a Models folder, where we’ll add our bot’s data model and any FormFlow logic needed.
First, let’s create a WelcomeDialog.cs file under the Dialogs folder. To do so, right-click on the Dialogs folder, click Add, and then click Class. We’ll use the WelcomeDialog.cs file to hold all the logic that our bot will use to greet users.
Next, let’s create a CakeBotDialog.cs file following the same steps we’ve just used for creating WelcomeDialog.cs. Our CakeBotDialog.cs file will contain the dialog logic for our bot.
With that out of the way, let’s now create a Models folder, which will contain the C# class that will contain the bot’s FormFlow logic. We can create the Models folder by right-clicking on the bot’s name—in my case, CakeBotSuccinctly—and then Add > New Folder.
Under Models, create a new C# class file—I’ll call mine Cakes.cs—which we’ll use for most of the bot’s conversational FormFlow logic, data-model, and data-validation. You can do this by clicking on the Dialogs folder, then click Add, and click Class.
Great—having followed these steps, our bot’s project structure should now look like Figure 1-f.

Figure 1-f: Updated Bot Project Structure
RootDialog.cs contains dialog logic that was added automatically by the Bot Template, and for now we won’t use it; instead, we’ll use CakeBotDialog.cs.
With this structure in place, we can now start adding logic to our bot in an organized way.
The bot’s Welcome dialog
The purpose of the WelcomeDialog.cs file is to include the necessary bot logic in order to start the bot’s conversation with the user. Let’s jump straight into the code. This is what the complete WelcomeDialog.cs file looks like:
Code Listing 1-a: WelcomeDialog.cs
using System; using System.Threading.Tasks; using Microsoft.Bot.Builder.Dialogs; using Microsoft.Bot.Connector; using CakeBotSuccinctly.Models; namespace CakeBotSuccinctly.Dialogs { [Serializable] public class WelcomeDialog : IDialog { public async Task StartAsync(IDialogContext context) { // Str class defined in Models.Cakes.cs await context.PostAsync(Str.cStrHi); await Respond(context); context.Wait(MessageReceivedAsync); } private static async Task Respond(IDialogContext context) { var userName = string.Empty; context.UserData.TryGetValue(Str.cStrName, out userName); if (string.IsNullOrEmpty(userName)) { await context.PostAsync(Str.cStrNameQ); context.UserData.SetValue(Str.cStrGetName, true); } else { await context.PostAsync( string.Format( "Hi {0}, how may I help you today? You may order...", userName)); await context.PostAsync(string.Join(", ", Str.CakeTypes)); } } public async Task MessageReceivedAsync(IDialogContext context, IAwaitable<IMessageActivity> argument) { var msg = await argument; string userName = string.Empty; bool getName = false; context.UserData.TryGetValue(Str.cStrName, out userName); context.UserData.TryGetValue(Str.cStrGetName, out getName); if (getName) { userName = msg.Text; context.UserData.SetValue(Str.cStrName, userName); context.UserData.SetValue(Str.cStrGetName, false); } await Respond(context); context.Done(msg); } } } |
Let’s now dissect this code into smaller chunks in order to understand what is happening. The first thing we need to do is to add using statements that reference the namespaces we’ll need.
Code Listing 1-b: The WelcomeDialog Class References
using System; using System.Threading.Tasks; using Microsoft.Bot.Builder.Dialogs; using Microsoft.Bot.Connector; using CakeBotSuccinctly.Models; |
The most important ones we’ll need are Microsoft.Bot.Builder.Dialogs and Microsoft.Bot.Connector.
Because WelcomeDialog.cs resides under the Dialogs folder within our Visual Studio project structure, our WelcomeDialog class belongs to the CakeBotSuccinctly.Dialogs namespace by default.
It’s very important that we set the Serializable attribute to the WelcomeDialog class, in order for the Bot Framework to treat it as a bot dialog—if not, a runtime exception will be produced when the bot is executed.
It is also essential that WelcomeDialog inherits from the IDialog interface. This requires the class to implement the StartAsync method, which triggers the start of this dialog.
Code Listing 1-c: The StartAsync Method
public async Task StartAsync(IDialogContext context) { await context.PostAsync(Str.cStrHi); await Respond(context); context.Wait(MessageReceivedAsync); } |
Within StartAsync, context.PostAsync is invoked, which is responsible for sending a hi string message to the user. This string is represented by the constant cStrHi, which belongs to the Str class of Cakes.cs (which we’ll look at later). The Str class is simply used to store string constants that our bot will use. Another approach is to use the .NET resources storage technique.
Then, a call to the Respond method is invoked (which we’ll look at next), and, finally, context.Wait is called, passing the MessageReceivedAsync method as a callback function.
Let’s have a look at what happens within the Respond method.
Code Listing 1-d: The Respond Method
private static async Task Respond(IDialogContext context) { var userName = string.Empty; context.UserData.TryGetValue(Str.cStrName, out userName); if (string.IsNullOrEmpty(userName)) { await context.PostAsync(Str.cStrNameQ); context.UserData.SetValue(Str.cStrGetName, true); } else { await context.PostAsync( string.Format( "Hi {0}, how may I help you today? You may order...", userName)); await context.PostAsync(string.Join(", ", Str.CakeTypes)); } } |
The idea behind the WelcomeDialog class logic is that the bot will greet the user and then ask for the user’s name. This way, an amicable conversation can be initiated by prompting for the next question with the user’s name included.
In order to make this happen, the Respond method will call context.UserData.TryGetValue to check whether the user’s name has been stored in the bot’s state—which would indicate that the user’s name has already been provided (entered by the user). The value stored in the bot’s state is then assigned to the userName variable.
If there’s no value assigned to the userName variable, then the bot will respond by requesting the user’s name—this is done by invoking context.PostAsync—and then a flag called GetName (represented by the constant Str.cStrGetName) is set to true within the bot’s state. This is done so that the bot knows that it has requested the name to the user.
On the contrary, if userName does have a value assigned to it, this indicates that the bot knows who the user is, and replies back by suggesting what orders can be placed. This is also done by calling context.PostAsync twice within the else clause.
Let’s now look at the implementation of the MessageReceivedAsync method.
Code Listing 1-e: The MessageReceivedAsync Method
public async Task MessageReceivedAsync(IDialogContext context, IAwaitable<IMessageActivity> argument) { var msg = await argument; string userName = string.Empty; bool getName = false; context.UserData.TryGetValue(Str.cStrName, out userName); context.UserData.TryGetValue(Str.cStrGetName, out getName); if (getName) { userName = msg.Text; context.UserData.SetValue(Str.cStrName, userName); context.UserData.SetValue(Str.cStrGetName, false); } await Respond(context); context.Done(msg); } |
Basically, this method checks the bot’s state in order to know if the Name and GetName variables have been set.
If GetName has been set to true—which is done by the Respond method—then it is assumed that the user’s response contained within msg.Text is the user’s name (entered by the user following the bot’s request).
In this case, the user’s name is stored within the bot’s state using the UserName variable, and GetName is set to false—meaning that the user’s name is known and the bot doesn’t need to ask for it.
Finally, the Respond method is invoked, followed by a call to context.Done. So, this concludes the bot’s WelcomeDialog logic. It was actually very straightforward and not complicated at all.
We’ll now move our attention to CakeBotDialog.cs, where we’ll learn some new and exciting techniques.
The Cake bot dialog
In this first iteration of our bot, we won’t be using any AI features yet—such as LUIS, which we’ll explore and look at later.
Because our bot has no sophisticated (AI-powered) way of knowing the user’s intent (the action the user wants to perform), we must somehow instruct the bot which dialog it should use in order to respond to the user’s request. This is the main objective of the logic that will be created within CakeBotDialog.cs.
So, how can the bot then anticipate where to route user intents—which dialog to use in order to respond to a given request? It’s a good question, to which there’s not a single answer. One way is by using Switch statements. So, let’s see how we can implement this dialog routing logic. This approach is sometime called rule-based logic.
The first thing we need to do is to go to the Solution Explorer within Visual Studio and double-click on the CakeBotDialog.cs file in order to open it. Within the CakeBotDialog class, add the following read-only variable, called dialog, as follows.
Code Listing 1-f: Starting the CakeBotDialog Class
using Microsoft.Bot.Builder.Dialogs; namespace CakeBotSuccinctly.Dialogs { public class CakeBotDialog { public static readonly IDialog<string> dialog; } } |
This dialog is going to create a chain, which is simply a series of dialogs that get called, one after the other.
The first thing we do after creating the snippet shown in Code Listing 1-f is to write Chain.PostToChain, which basically says: take a message that we get back from the user and start running it through a chain. Then we are going to select what we need from that message and use a select statement.
As we’ll see shortly in the code listing that will follow, all we really care about is the value of the msg.Text property, so that’s what we’ll base our select statement logic on.
We’ll need to choose from two dialogs: one is the WelcomeDialog, and the other is CakeBotDialog.
The objective is that when a user types the word “hi,” we are able to instantiate the WelcomeDialog class, and when the user types anything else, we want to fall into the FormFlow logic of CakeBotDialog—this happens after the conversation has started and the bot knows the user’s name.
In order to achieve this, we’ll need to use a Switch statement and use a regular expression to search for the word hi. We’ll first put in the Switch statement, and then put in a regular expression, RegexCase.
RegexCase is basically a callback function that passes context and text to the next dialog in the chain, which will be the WelcomeDialog.
RegexCase is going to look for a regular expression, checking to see if it can find the word “hi” (ignoring the case), and then calling the next dialog in the chain.
In order to continue with the WelcomeDialog, we need to use the Chain.ContinueWith method, which will take two variables: one is the dialog that we want to chain and use, and the other is what will get invoked after the dialog has been finished.
The first variable will be a new instance of WelcomeDialog, and the second one will be a new method called AfterWelcomeContinuation, which we’ll create shortly.
This takes care of one routing. Code Listing 1-g shows what the code now looks like.
Code Listing 1-g: Continuing the CakeBotDialog Class
using Microsoft.Bot.Builder.Dialogs; using System.Text.RegularExpressions; namespace CakeBotSuccinctly.Dialogs { public class CakeBotDialog { public static readonly IDialog<string> dialog = Chain.PostToChain() .Select(msg => msg.Text) .Switch( new RegexCase<IDialog<string>>(new Regex("^hi", RegexOptions.IgnoreCase), (context, text) => { return Chain.ContinueWith(new WelcomeDialog(), AfterWelcomeContinuation); } ) } } |
Notice that this code is not yet syntactically correct—we are still missing part of the Switch statement details, and also the implementation of the AfterWelcomeContinuation method.
The idea is to show you step-by-step what is being done and how, rather than to show the finished CakeBotDialog class in one go.
Let’s explore the other routing path—what happens when a user types anything other than “hi"—after the conversation has started.
This other path is going to use the default case, which is simply going to take in a callback to the next part of the dialog chain, for which we’ll use the ContinueWith method.
Within ContinueWith, we’ll be calling FormDialog.FromForm, passing a BuildForm method—which we’ll create later within our Cakes.cs file. The BuildForm method is going to return a FormDialog object.
To FormDialog.FromForm, we want to also pass in the option PromptInStart, which will automatically kick off our FormFlow when we fall into this section of the code. This is done because otherwise we’ll have to send an additional message to the bot in order to start the dialog.
The second ContinueWith takes in a call to the AfterFormFlowContinuation callback method. Finally, after Switch, there’s a call to the Unwrap and PostToUser methods.
Code Listing 1-h shows what the code looks like now, without yet implementing the AfterWelcomeContinuation and AfterFormFlowContinuation methods.
Code Listing 1-h: Continuing the CakeBotDialog Class
using CakeBotSuccinctly.Models; using Microsoft.Bot.Builder.Dialogs; using Microsoft.Bot.Builder.FormFlow; using System.Linq; using System.Text.RegularExpressions; using System.Threading.Tasks; namespace CakeBotSuccinctly.Dialogs { public class CakeBotDialog { public static readonly IDialog<string> dialog = Chain.PostToChain() .Select(msg => msg.Text) .Switch( new RegexCase<IDialog<string>>(new Regex("^hi", RegexOptions.IgnoreCase), (context, text) => { return Chain.ContinueWith(new WelcomeDialog(), AfterWelcomeContinuation); }), new DefaultCase<string, IDialog<string>>((context, text) => { return Chain.ContinueWith(FormDialog.FromForm(Cakes.BuildForm, FormOptions.PromptInStart), AfterFormFlowContinuation); })) .Unwrap() .PostToUser(); private async static Task<IDialog<string>> AfterWelcomeContinuation(IBotContext context, IAwaitable<object> item) { } private async static Task<IDialog<string>> AfterFormFlowContinuation(IBotContext context, IAwaitable<object> item) { } } } |
With this done, let’s implement the AfterWelcomeContinuation and AfterFormFlowContinuation methods.
Code Listing 1-i: The Continuation Methods Implementation
private async static Task<IDialog<string>> AfterWelcomeContinuation(IBotContext context, IAwaitable<object> item) { var tk = await item; string name = "User"; context.UserData.TryGetValue("Name", out name); return Chain.Return("Type one..." + name); } private async static Task<IDialog<string>> AfterFormFlowContinuation(IBotContext context, IAwaitable<object> item) { var tk = await item; return Chain.Return("Thanks, you're awesome"); } |
The AfterWelcomeContinuation method returns a message to the current user asking for input—so that the user can indicate the desired CakeTypes value: Cup Cake, Triple Layer Cake, or Cream Cake. These values will be defined later in Cakes.cs.
There is no actual validation of the CakeTypes value entered by the user.
The AfterFormFlowContinuation method, on the other hand, simply sends back a thank you message to the user, after the FormFlow process has been completed.
The complete source code of the CakeBotDialog class should now look like Code Listing 1-j.
Code Listing 1-j: The CakeBotDialog Class
using CakeBotSuccinctly.Models; using Microsoft.Bot.Builder.Dialogs; using Microsoft.Bot.Builder.FormFlow; using System.Linq; using System.Text.RegularExpressions; using System.Threading.Tasks; namespace CakeBotSuccinctly.Dialogs { public class CakeBotDialog { private const string cStrUser = "User"; private const string cStrName = "Name"; private const string cStrTypeOne = "Type one..."; public static readonly IDialog<string> dialog = Chain.PostToChain() .Select(msg => msg.Text) .Switch( new RegexCase<IDialog<string>>(new Regex("^hi", RegexOptions.IgnoreCase), (context, text) => { return Chain.ContinueWith(new WelcomeDialog(), AfterWelcomeContinuation); }), new DefaultCase<string, IDialog<string>>((context, text) => { return Chain.ContinueWith(FormDialog.FromForm(Cakes.BuildForm, FormOptions.PromptInStart), AfterFormFlowContinuation); })) .Unwrap() .PostToUser(); private async static Task<IDialog<string>> AfterWelcomeContinuation(IBotContext context, IAwaitable<object> item) { var tk = await item; string name = cStrUser; context.UserData.TryGetValue(cStrName, out name); return Chain.Return($"{cStrTypeOne} {name}"); } private async static Task<IDialog<string>> AfterFormFlowContinuation(IBotContext context, IAwaitable<object> item) { var tk = await item; return Chain.Return("Thanks, you're awesome"); } } } |
As you can see, the only difference is that we’ve created some string constants at class level, instead of using those strings directly inside the AfterWelcomeContinuation method; the rest remains the same.
So, we are now done with our CakeBotDialog class. Let’s wire this up in our MessagesController.cs file.
Wiring things up in MessagesController
Go to the Solution Explorer and open the MessagesController.cs file under the Controllers folder. The Post method of the MessagesController class looks like Code Listing 1-k.
Code Listing 1-k: The “Out-of-the-Box” Post Method of the MessagesController Class
public async Task<HttpResponseMessage> Post([FromBody]Activity activity) { if (activity.Type == ActivityTypes.Message) { await Conversation.SendAsync(activity, () => new Dialogs.RootDialog()); } else { HandleSystemMessage(activity); }
var response = Request.CreateResponse(HttpStatusCode.OK); return response; } |
The Post method is where our bot will receive any incoming requests.
We won’t be using the RootDialog class for now, and because we want to wire up our WelcomeDialog and CakeBotDialog classes, what need to do is to change new Dialogs.RootDialog() to Dialogs.CakeBotDialog.dialog.
So let’s go ahead and do this. The Post method should now look as follows.
Code Listing 1-l: The “Wired Up” Post Method of the MessagesController Class
public async Task<HttpResponseMessage> Post([FromBody]Activity activity) { if (activity.Type == ActivityTypes.Message) { await Conversation.SendAsync(activity, () => Dialogs.CakeBotDialog.dialog); } else { HandleSystemMessage(activity); }
var response = Request.CreateResponse(HttpStatusCode.OK); return response; } |
With things wired up, we can now focus our attention on the FormFlow logic. The next thing we’ll do is implement Cakes.cs, which will contain our bot’s model as well.
The bot’s FormFlow and model
The Cakes.cs file under the Models folder is where we’ll create the bot’s FormFlow logic, and also its model.
Let’s start off by creating the FormFlow that our bot conversation will follow. In order to do that, let’s create a Cakes serializable class, which will contain the following logic.
Code Listing 1-m: The Cakes FormFlow Class
[Serializable] public class Cakes { [Prompt(Str.cStrQuantity)] public string Quantity; [Prompt(Str.cStrOptions)] public string When; public static IForm<Cakes> BuildForm() { OnCompletionAsyncDelegate<Cakes> processOrder = async (context, state) => { context.UserData.SetValue(Str.cStrGetName, true); context.UserData.SetValue(Str.cStrName, string.Empty); await context.PostAsync( $"{Str.cStrProcessingReq} {Validate.DeliverType}"); }; return new FormBuilder<Cakes>() .Field(nameof(Quantity)) .Message(Str.cStrWhen) .Field(nameof(When), validate: async (state, value) => { return await Task.Run(() => { string v = value.ToString(); return Validate.ValidateType (state, value.ToString(), Str.DeliverTypes); }); }) .OnCompletion(processOrder) .Build(); } } |
Let’s look at what is going on here. The Cakes class contains two questions that our bot will ask users in a sequential way.
The first question, represented by the variable Quantity, prompts the user to indicate how many cakes he or she would like to order.
The second question, represented by the variable When, prompts the user to specify when he or she would like the order delivered—the preferred delivery option.
Both are questions because they have a prompt attribute that indicates the question being asked, which is specified by two constants: Str.cStrQuantity and Str.cStrOptions, which we’ll declare shortly.
The third and most important part of the Cakes class is the BuildForm method. In order to understand what it does, let’s divide it into two parts.
The first part of the BuildForm method is OnCompletionAsyncDelegate. This gets executed at the end of the FormFlow, when both questions have been answered by the user. You can think of it as the event that gets executed when a cake order has been submitted.
The second part of the BuildForm method is the FormBuilder chain. This raises the first question (for which no validation takes place). When the user has answered it, a second question is raised and then validated—in order to check if the response provided by the user for that second question is valid. If so, OnCompletionAsyncDelegate is executed when OnCompletion(processOrder) is invoked.
It is important to notice that the validation process for the second question is executed through an anonymous async function that receives the FormFlow’s current state and the value entered by the user for that second question.
There’s no technical reason why the full validation of the question’s input cannot be done inside the anonymous async function itself. However, I think it’s nicer and cleaner to have the specific validation logic inside a separate class dedicated specifically for this purpose—which we’ll call Validate.
Because the Validate class is tied up in the bot’s FormFlow logic—in other words, to the Cakes class logic—we’ll declare the Validate class inside the same Cakes.cs file, so both go hand-in-hand.
Tuples
Before we write the code for the Validate class, I’ll be making use of an improved feature in C# 7 called tuples that will come in handy now. In order to use tuples, we’ll first need to add a NuGet package to our bot project, which is external from Visual Studio.
Adding an external dependency for a barely useful construction is not extremely exciting. However, for our bot example, it is useful to have certain validations that return more than one value—thus in this case, it is a good chance to showcase this C# feature—even though it is not essential for the Bot Framework.
Open Solution Explorer, right-click on References, and select Manage NuGet Packages.
Once the NuGet Package Manager window is open, with the Browse item selected, in the search, type in System.ValueTuple. Then, select this package and click Install.

Figure 1-g: The System.ValueTuple NuGet Package
When the package has been installed, we can write the Validate class code, which is what we’ll do next.
The Validate class
A common good practice is to have separation of concerns within our code. A way to achieve this is by having the bot’s FormFlow validations managed by its own class—this is what we’ll focus now on. Here’s the full source code for the Validate class, which belongs to the CakeBotSuccinctly.Models namespace.
Code Listing 1-n: The Validate Class
public class Validate { public static string DeliverType = string.Empty; public static (bool v, string t) TypeExists(string c, string[] types) { bool v = false; string t = string.Empty; foreach (string ct in types) { if (ct.ToLower().Contains(c.ToLower())) { v = true; t = ct; break; } } return (v, t); } public static ValidateResult ValidateType(Cakes state, string value, string[] types) { ValidateResult result = new ValidateResult { IsValid = false, Value = string.Empty }; var res = TypeExists(value, types); string r = $"{Str.cStrDeliverBy} {res.t}"; DeliverType = res.t; return (res.v) ? new ValidateResult { IsValid = true, Value = res.t, Feedback = res.t } : result; } } |
Let’s try to understand what is going on. The ValidateType method returns a ValidateResult object; by default, its IsValid property is set to false, and its Value property is set to an empty string—which means that the user’s input could not be found (validated).
All the ValidateType method does is to call the TypeExists method, which returns a tuple that includes a Boolean variable—set to true (if a DeliverTypes value is found), and the actual DeliverTypes value that corresponds to the user’s input—which is assigned to the static DeliverType variable.
The DeliverType value is then used within OnCompletionAsyncDelegate of the Cakes class.
The TypeExists method basically loops through the existing DeliverTypes (represented by the string array types variable) and checks whether the user’s input (represented by the string variable c) matches any of the DeliverTypes.
If a match is found, the tuple’s v variable is set to true, and its t variable is set to the matching DeliverTypes value.
Notice that the ValidateType method is only invoked when the second question of the FormFlow—“When would you like the cake delivered?”—is executed.
So that concludes the Validate class. In order to finalize our Cakes.cs file, let’s implement the remaining part that corresponds to the Str class—which contains the DeliverTypes values and other useful constants used throughout the bot.
The Str class
All of the bot’s constants are implemented in the Str class, which is all that this class does. The code looks as follows.
Listing 1-o: The Str Class
public class Str { public const string cStrHi = "Hi, I'm CakeBot"; public const string cStrNameQ = "What is your name?"; public const string cStrName = "Name"; public const string cStrGetName = "GetName"; public const string cStrWhen = "When would you like the cake delivered?"; public const string cStrProcessingReq = "Thanks for using our service. Delivery has been scheduled for: "; public const string cStrDontUnderstand = "I'm sorry I don't understand what you mean."; public const string cStrQuantity = "How many?"; public const string cStrOptions = "Now or Tomorrow"; public const string cStrDeliverBy = "Deliver by: "; public static string[] DeliverTypes = new string[] { "Now", "Tomorrow" }; public static string[] CakeTypes = new string[] { "Cup Cake", "Triple Layer Cake", "Cream Cake" }; public static string cStrNoPush = "NO_PUSH"; public static string cStrTemplateType = "template"; public static string cStrPayloadTypeGeneric = "generic"; } |
The Str, Validate, and Cakes classes all belong to the CakeBotSuccinctly.Models namespace.
That concludes our bot’s code. But before we can run it, make sure you install the Bot Framework Emulator, which can be found here. You may get a firewall warning.
Remember that the full source code is available at the beginning of this chapter for download.
Running our bot
With the Bot Framework Emulator installed, open it up and run your Visual Studio solution. Click Run, which in my case is set by default to use Google Chrome.
On the first run, you will receive instructions on how to register your bot with Microsoft, which requires a web server or endpoint that has HTTPS protocol capability—a relatively new requirement, as of June 23, 2016 (see this link).

Figure 1-h: The Run Button in Visual Studio
Once our application and the emulator are running, let’s start a very basic conversation by greeting the bot with a hi message—which triggers the bot’s WelcomeDialog class logic.
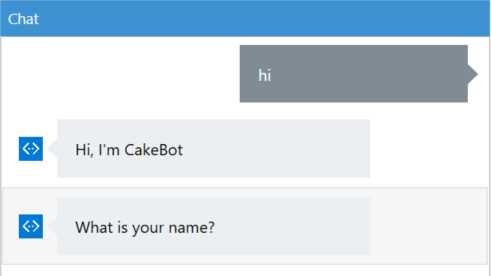
Figure 1-i: Starting a conversation with our Bot using the Emulator
Depending on the version of the Bot Emulator that you installed, the screen might slightly defer from the screen shot in Figure 1-i. In my case, I’m using the Bot Emulator version 3.0.0.59.
Notice that because we have entered the word hi, the RegexCase in CakeBotDialog.cs has triggered the execution of the WelcomeDialog object, which is why the bot is asking us for our name.
Although this is not highly sophisticated, because we need to properly start the conversation by typing the word hi, it’s a good example of how we can use the Chain.PostToChain and Chain.ContinueWith methods in order to kick off a conversation, and how we can combine dialogs with FormFlow.
We’ll later look at improving this, by being able to use other words to start off a conversation, when we explore LUIS.
Let’s carry on the conversation with our bot by providing our name and answering any other questions.
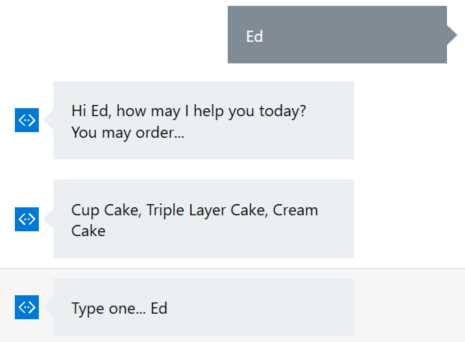
Figure 1-j: Continuing the Conversation with Our Bot Using the Emulator
We can see in Figure 1-j that the first two responses from the bot correspond to logic contained within the Respond method of WelcomeDialog.cs. The third response corresponds to the execution of the AfterWelcomeContinuation method contained within CakeBotDialog.cs.
Let’s indicate a response to the bot. In my case, I’ll type in Triple Layer. Notice that this value is not being validated at all—we could potentially just type anything, but let’s not do that.

Figure 1-k: Continuing the Conversation with Our Bot Using the Emulator
After indicating my answer to the bot’s previous question, notice how the FormFlow dialog is triggered, and we are asked how many cakes we want.
So at this stage, the WelcomeDialog.cs logic execution has finalized, and control has been passed to the FormFlow logic—which has been triggered by the execution of the logic contained within the DefaultCase section of CakeBotDialog.cs.
Next, I’ll provide an answer to the FormFlow’s first question. I’ll indicate 2 as my answer.

Figure 1-l: Continuing the Conversation with Our Bot Using the Emulator
Notice how the bot requests an input to the second question of the FormFlow and provides two possible answer alternatives—the available DeliverTypes: Now or Tomorrow—which will be validated by the Validate class within Cakes.cs.
I’ll indicate an answer to the question, which in my case will be Now. Once I do that, OnCompletionAsyncDelegate of the Cakes class is executed, and I get the following output from the bot.

Figure 1-m: Continuing the Conversation with Our Bot Using the Emulator
Finally, there’s one last bit that will get executed: the AfterFormFlowContinuation method of the CakeBotDialog class.
The final output looks like this:

Figure 1-n: Final Response from Our Bot
By following this small but interesting conversation, we’ve seen how all parts of the various classes we’ve written so far tie nicely together.
The conversation flows between the WelcomeDialog.cs and FormFlow logic contained within the Cakes class.
Summary
In this chapter, we’ve looked at how to build a basic bot that goes beyond FormFlow—which was mostly the scope of Microsoft Bot Framework Succinctly. We’ve also managed to combine dialogs and FormFlow into one single codebase.
We’ve also seen how to use chaining in order to trigger the correct flow: either a simple dialog or FormFlow dialog—depending on the input provided by the user—and seen how this all ties nicely together by running our bot.
Separation of concerns has been taken into account, in order to keep a concise codebase that is easy to maintain and update.
Despite this implementation, we’ve noticed that we’re a bit limited in how we can initiate a conversation, as we necessarily have to start off by typing “hi.”
In the next chapter, we’ll start exploring LUIS, which will give our application superpowers so that we can start off the conversation with additional words and use other variations throughout the conversation—without the need to use any RegexCase or Switch statements.
Don’t forget that the full source code for this chapter can be found here. More awesome stuff lies ahead!
- 1800+ high-performance UI components.
- Includes popular controls such as Grid, Chart, Scheduler, and more.
- 24x5 unlimited support by developers.