
Skype Bots Succinctly®

CHAPTER 2
LUIS Bots
Quick intro
In the previous chapter, we created a Skype bot that was able to combine standard dialogs and a FormFlow dialog, which is a very powerful feature. However, the disadvantage we ran into is that triggering the conversation was limited to using one word.
In the real world, we’d like our bot to be a bit smarter and behave more like a human, and also be capable of responding to various user intents, in order to start a conversation.
LUIS is a service from Microsoft that allows us to add conversational intelligence to our apps in a relatively easy way—it provides an API that allows us to make out bots more “self-aware.”
LUIS provides an endpoint that will take the sentences you send it and interpret them according to the intention they convey and the key entities that are present. It easily integrates with the Bot Framework and is the next step in making our bot a bit smarter.
What we’ll do in this chapter is to modify and adapt the bot we previously wrote so that it is capable of working with LUIS and being able to process various user intents—this will allow our bot to process multiple inputs instead of having one single entry point into conversation.
Sounds exciting, right? Let’s get started. The full source code for this chapter can be found here.
Key aspects of LUIS
LUIS is designed to enhance your bot’s understanding of natural language through the use of interactive machine learning.
What LUIS really does behind the scenes is play the role of a translator for our bot, but instead of translating one language into another, it’s literally translating the user’s requests into actions for our bot. So, in a world without LUIS, and based on the previous example bot we wrote, a typical workflow would be like this.
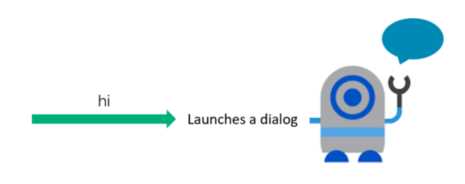
Figure 2-a: A World without LUIS
In this workflow, the bot itself is doing the heavy lifting—based on conditions as to which dialog or sequence of dialogs it must start whenever a user sends an intent.
The problem with this method is that it is extremely limited. What happens when the user enters “hello” instead of “hi”?
I think you know the answer to that one, but in case you don’t, let’s quickly run our bot again using this scenario. Let’s have a look.
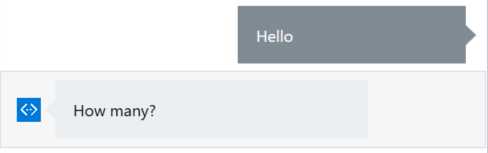
Figure 2-b: Oops… What Happened to Our WelcomeDialog?
Wait a second… isn’t “hello” supposed to have the same meaning as “hi”? Well, for us humans, yes—and for LUIS too, once trained. However, for our bot, because we are using a RegexCase, only when we enter “hi” is the WelcomeDialog class logic triggered.
Otherwise, the FormFlow (Cakes) logic is triggered, which is what just happened by typing “hello.” That’s what LUIS solves.
I suppose we could always write a better regular expression in the CakeBotDialog class to take care of recognizing “hi” and “hello,” but that’s cumbersome, and there could be other ways to initiate a conversation. So, making the regular expression range wider (with more words) is not really an option if you want to scale and have a smarter bot.
In a world with LUIS, our greeting workflow would look like this instead.
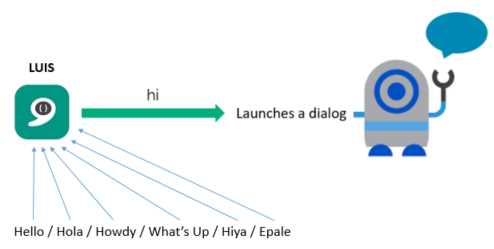
Figure 2-c: A World with LUIS
In this scenario, we have the ability to filter all of our requests through the LUIS framework—taking the user’s intents (requests) and running them through its natural language-processing engine.
This will in turn indicate to our bot that hi, hola, and howdy all mean the same thing, and all these requests should get funneled to the WelcomeDialog class logic.
This also means we don’t need to use any more any RegexCase or Switch statements to trigger dialogs or FormFlow.
Of course, I’m vastly oversimplifying the process here—and what happens internally—for LUIS to make such routing decisions based on the user’s intent. But it’s important that you understand as a general principle that LUIS does a lot of the heavy lifting of figuring out the subtle nuances of natural language understanding.
Intents
You can think of intents as the verbs of the LUIS world. They are defined as any action that you want your bot to take.

Figure 2-d: An Intent Triggers an Action—It’s the Spark in the Bulb
With our Cake bot, we can easily identify two intents: one is the welcome sequence, and the other is the actual cake order itself (the FormFlow part) in which we are asked for the quantity and delivery. These two intents are two actions that our bot can take based upon what we have coded so far.
Once we’ve created these two intents, LUIS can then use machine learning in order to make a best guess as to what the user wants when a request is sent.
A great aspect of LUIS is that it has the ability to learn over time using active learning. With active learning, LUIS is capable of identifying which user requests it’s unsure about—and how to respond to it—and will ask the developer to clarify which intent should go with that request.
As more of these tricky situations are clarified, LUIS will get better at making the right best guess for our bot.
Entities
If intents are the verbs of the LUIS world, then entities can be thought of as the nouns. Entities can be defined as the things that your bot is taking action on.
In our Cake bot, we have the intent to order a cake—the FormFlow process. This intent could be enhanced by adding entities to it. An example would be a phrase like: ordering a cheese cake every Saturday in Paris near the Eiffel Tower.
In order to make things easier, I’ve highlighted the intent in yellow and the entities in blue.
In this case, we’re taking the basic intent of ordering a cake and adding various entities to it, such as Eiffel Tower, which indicates the location; Paris, which indicates the city; and Saturday, which indicates the day. The word ordering would be the actual intent.
By adding entities, it is possible to use the same intent for many different actions. Entities help LUIS do a better job of figuring out what the user wants.
Entities can pass information over to the bot, and you can then do something with it in the code—think of them as parameters that are passed to an action, which help you decide in your code what the bot should do.
Utterances
Given that intents are the verbs and entities the nouns of the LUIS world, then utterances are the sentences—they use both intents and entities to form ideas that LUIS can draw from in order to make conclusions.
So: “ordering a cheese cake every Saturday in Paris near the Eiffel Tower” is actually an utterance.
To understand this better, imagine that instead of the words order or ordering, someone uses the word buy. As humans, we know that in such a context, buy means the same as order or ordering.
However, LUIS must try to interpret which intent the phrase with the word buy is trying to target—in other words, which action to trigger. So, you can start to see that it’s not a simple one-to-one match as if the user had used the word order or ordering.
Instead, LUIS has to infer that the word buy really means the same as order or ordering. In some instances, LUIS is able to make this leap with the power of active learning. However, sometimes we have to give LUIS a little help—and this is why we have utterances.
By specifying an utterance, we can tell LUIS that when a user uses the word buy, they are looking to place an order. Utterances help LUIS to have a bit more flexibility in understanding what exactly the user wants.
So, given our example phrase, an utterance would be: buy a cheesecake.
The LUIS UI
Now that we’ve explored the fundamental concepts behind LUIS, let’s have a go at it. We’ll now explore its UI and set things up.
To get started, you can go to the LUIS website and use your Microsoft account (Outlook.com, MSN, or Live) to sign in.
If you don’t have any of these accounts, you’ll need to sign up for one. Once you’ve logged in, the UI should look similar to the following screenshot.
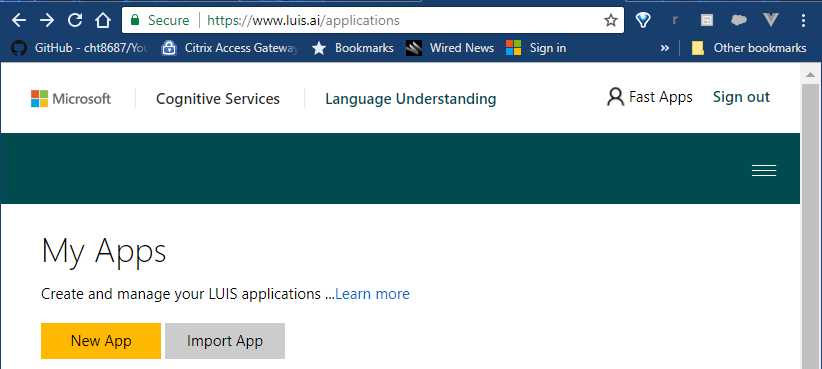
Figure 2-e: The LUIS UI
As Microsoft sometimes tends to update the look and feel of its sites, by the time you are reading this e-book, the UI might look slightly different. However, you should be able to find your way around by following the steps described here.
First, click New App. You’ll see the following pop-up window on the screen.
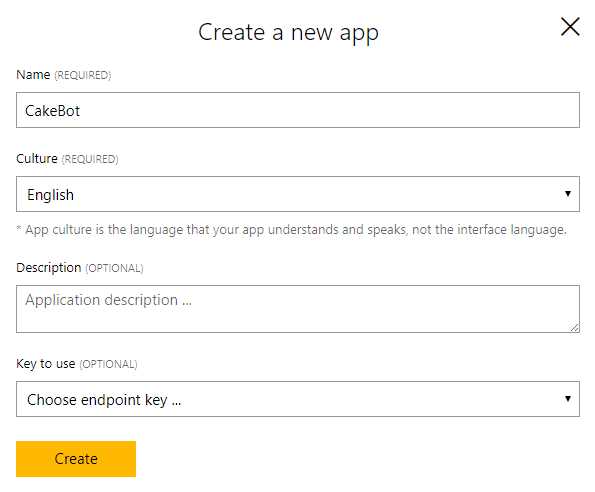
Figure 2-f: A New LUIS App
Let’s give the app a name—in my case, I’m going to call it CakeBot, and select English as the app’s culture. The other two fields are optional, and for now, let’s leave them as is.
If you have an Azure LUIS service active, it’s best to use it as the endpoint. This will allow you to consume Azure resources and credits rather than leaving the endpoint key field blank, which limits the number of requests that you’ll be able to consume from LUIS (which can run out pretty quickly). But for now, let’s leave it blank so we’ll be consuming what LUIS gives us out of the box.
Click Create, and you’ll see an overview of the app created, as follows.

Figure 2-g: Overview of the LUIS App
As you can see in Figure 2-g, LUIS reminds us that this app has no intents. Let’s go ahead and create one—click Create an intent. You’ll see a screen similar to Figure 2-h. Here’s where we’ll enter our bot’s intents.
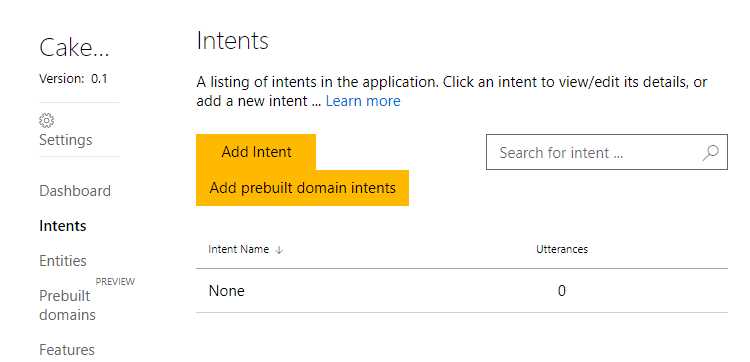
Figure 2-h: The LUIS Intents Screen
Click Add Intent, which will show the following pop-up window asking for the intent’s name.
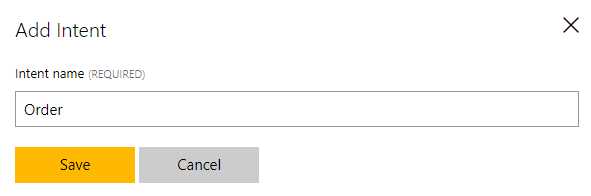
Figure 2-i: Adding a New Intent
Our bot has two intents: one is to start the conversation, which corresponds to the WelcomeDialog class logic, and the other is the actual cake order process. Let’s name our first intent Order and click Save.
Now we can add any utterances (sentences) that will help the bot determine that the user’s intent is to order a cake.
Entering an utterance is very easy—all we have to do is to type it in and press Enter. Let’s add a few that represent the cake order intent.
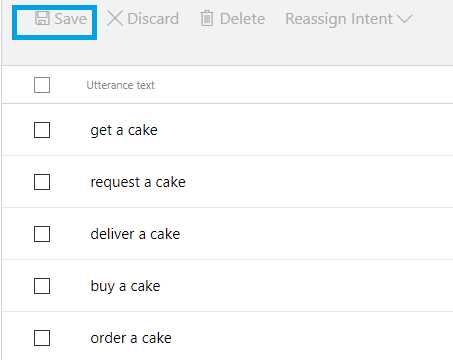
Figure 2-j: Order Cake Intent Utterances
As you can see, I’ve added a few short sentences that could represent the user’s intent to order a cake. Once added, I also clicked Save at the top of the list.
We’ll need to train LUIS to recognize these utterances and associate them with the intent to order a cake—but before we do that, let’s create an intent for our WelcomeDialog class and add some utterances to it.
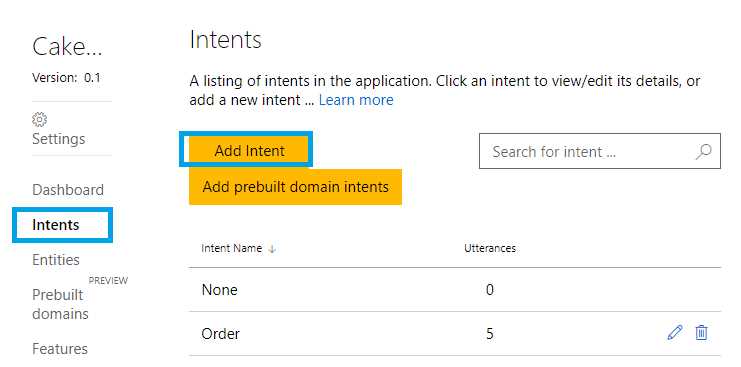
Figure 2-k: Adding Another Intent
In order to do that, click on the Intent link on the right side of the screen, which will take you to the intents list. You’ll see that our Order intent is there. Click the Add intent button. When prompted, give it a name—in my case, I’ll call it Welcome. Once created, let’s add some utterances to it.
Figure 2-l shows the utterances I’ve added following the same steps I took for adding the ones related to the Order intent. Pretty straightforward.
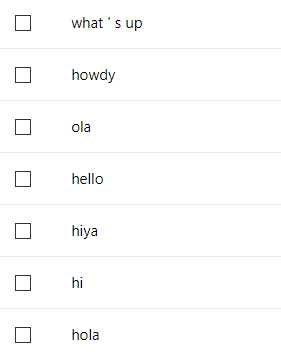
Figure 2-l: Welcome Intent Utterances
With these intents and utterances in place, the next step is to train our bot to use them.
Click on the Train & Test link on the right side of the screen.
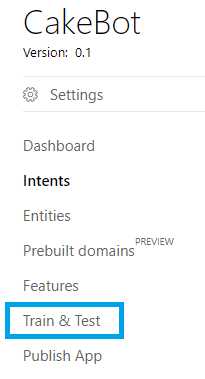
Figure 2-m: The “Train & Test” Option
This will take you to the following screen, where we can perform the training required for LUIS to do its magic.
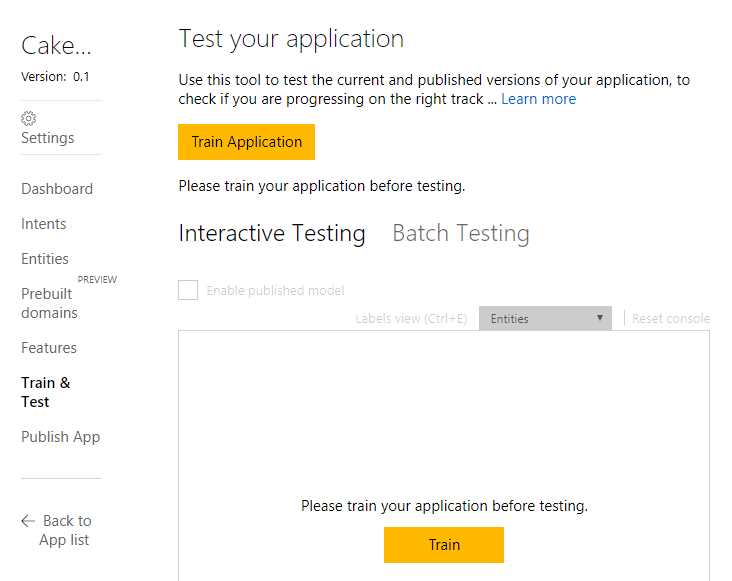
Figure 2-n: The “Train & Test” Screen
All we need to do is to click on either the Train Application or Train button. Let’s go ahead and do this to see what happens.
After clicking on the Train button, you’ll see how LUIS queues the application for training, and just a couple of seconds later, the application has been trained and is ready. At this point, you should see a screen like Figure 2-o.
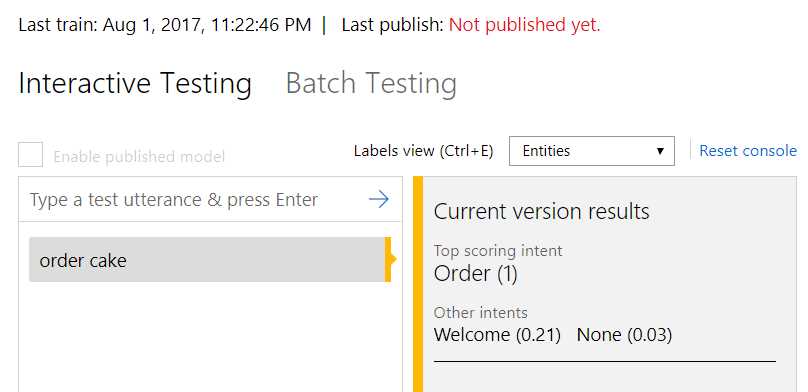
Figure 2-o: The Interactive Testing Screen
What we can do here is quickly test our LUIS application by entering a sentence in the text box. I’ve entered order cake and pressed Enter. Immediately, LUIS gave me the result that the top scoring intent was Order with a score of 1 (100% certainty).
Let’s do another quick test—what happens if I type in the word hallo (German for “hello”)? Interestingly enough, LUIS is able to determine the correct intent for this utterance, as we can see in Figure 2-p, with a confidence of 0.83 (83% certainty).

Figure 2-p: The Interactive Testing Screen
How cool is that? The Welcome intent has been correctly matched to the user’s input.
Obviously, these are still small inputs, but without LUIS, it would have been very difficult to reach these results without a lot of programming logic—extensive use of regular expressions and conditions in our bot’s code.
Now that we’ve seen what LUIS can do for us, how do we actually integrate this into our bot application and make use of it? This is what we’ll explore next.
Integrating LUIS into our bot
Isn’t it cool that we’ve managed to create two LUIS intents in a few minutes and can now add some natural language processing capabilities to our bot? I think it’s awesome and mind-blowing. So, what do we need to do now?
After we have taken care of configuring the LUIS side of things, we can now go back to Visual Studio and our bot code to make the appropriate changes so we can use this framework.
The first thing we’re going to do is to create a new dialog, which is going to be called LuisDialog. In Visual Studio, open the Solution Explorer, and under the Dialogs folder, create a new class with this name.
Our bot’s project structure should now look as follows.
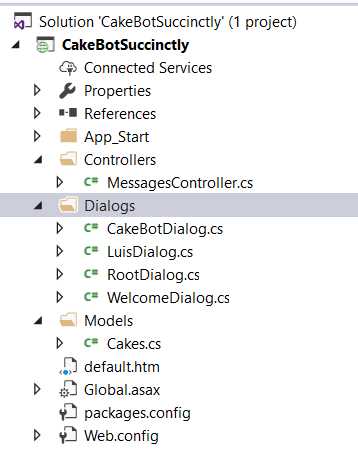
Figure 2-q: The Bot’s Project Files after Adding LuisDialog
Once added, open LuisDialog.cs. The first thing we are going to do is to decorate this class with the necessary attributes.
In order to do that, we need to define it as a LUIS model—so we’re going to put in LuisModel at the top of the class as a decorator.
This attribute will take in two parameters—one is the LUIS App ID, and the other is the LUIS programmatic API Key. These values can be found on the LUIS website—we’ll look at this shortly, but first let’s focus on the code.
Code Listing 2-a: The LuisDialog Class
using CakeBotSuccinctly.Models; using Microsoft.Bot.Builder.Dialogs; using Microsoft.Bot.Builder.Luis; using System; namespace CakeBotSuccinctly.Dialogs { [LuisModel("<< App ID >>", "<< API Key >>")] [Serializable] public class LuisDialog : LuisDialog<Cakes> { } } |
As with any other dialog, we need to mark the class with the Serializable attribute. It is also important that this class must inherit from LuisDialog<Cakes> instead of IDialog.
Remember that Cakes contains our bot’s model and FormFlow process. We now have the basic structure of our LuisDialog class, so let’s write the methods that correspond to the intents we’ve defined in our LUIS app.
First, let’s define the method that corresponds to this intent. We can do this as follows.
Code Listing 2-b: The Welcome Intent Method
[LuisIntent("Welcome")] public async Task Welcome(IDialogContext context, LuisResult res) { await Task.Run(() => context.Call(new WelcomeDialog(), Callback)); } |
As we can see, all we need to do is to decorate the Welcome method with the LuisIntent attribute—this is how the Bot Framework is able to execute this method when LUIS has correctly identified the user’s intent as Welcome.
The logic inside the method itself is quite straightforward and simple. All it does is invoke context.Call and create an instance of WelcomeDialog, passing a Callback method as a parameter.
That was quite easy, wasn’t it? Before we write the method that corresponds to the Order intent, let’s take care of a few basic class constructs that we need to have in place.
Code Listing 2-c: Basic Class Constructs
private readonly BuildFormDelegate<Cakes> OrderCake; [field: NonSerialized()] protected Activity _msg; protected override async Task MessageReceived(IDialogContext context, IAwaitable<IMessageActivity> item) { _msg = (Activity)await item; await base.MessageReceived(context, item); } public LuisDialog(BuildFormDelegate<Cakes> orderCake) { OrderCake = orderCake; } [LuisIntent("")] public async Task None(IDialogContext context, LuisResult res) { await context.PostAsync(Str.cStrDontUnderstand); context.Wait(MessageReceived); } |
So, what are these class constructs for? Let’s start from the bottom rather than the top. We can see that there’s a None method that has been decorated with an empty LuisIntent attribute.
The None method will get executed when LUIS cannot confidently identify any of the user’s intents and cannot match either the Welcome or Order intents.
Next (from the bottom up), we have the LuisDialog constructor. The constructor initializes the OrderCake delegate, which will be used for the Order intent, in order to run the FormFlow process.
There’s a MessageReceived method that is responsible for awaiting user responses, and it simply invokes the base method, with the same name of the LuisDialog class.
This MessageReceived method uses a _msg variable, which is non-serializable, as it is for internal use only. This variable is not exposed by the bot to users.
Finally, we have the OrderCake delegate that will be used within the Order method to kick off the FormFlow process.
With this logic in place, the only bit we are missing is the method corresponding to the Order intent itself, which looks like this:
Code Listing 2-d: The Order Intent Method
[LuisIntent("Order")] public async Task Order(IDialogContext context, LuisResult res) { await Task.Run(async () => { bool f = false; var r = Validate.ValidateWords(res.Query.ToLower()); if (r.v) f = true; if (f) { var cakeOrderForm = new FormDialog<Cakes>(new Cakes(), OrderCake, FormOptions.PromptInStart); context.Call(cakeOrderForm, Callback); } else { await context.PostAsync(Str.cStrDontUnderstand); context.Wait(MessageReceived); } }); } |
As we can see, the Order method has been decorated with the Order attribute, which makes the Bot Framework route to it any user intents that correspond to a cake order.
Inside the method itself, what happens is that we pre-validate and check if the user’s input corresponds to a potential cake order. This is done with the ValidateWords method, which is part of the Validate class of Cakes.cs.
Notice that we haven’t yet implemented the ValidateWords method—we’ll do that later.
If the user’s input has been successfully pre-validated—which means that the user’s input does indeed contain words that correspond to a cake order (this is the purpose of the ValidateWords method), then the FormFlow process is initiated. This is done by creating a new instance of FormDialog and then invoking context.Call.
If the user’s input has not been pre-validated—meaning that it doesn’t contain words that correspond to a cake order—then the bot returns a message back to the user saying that the input is not understood. This is represented by Str.cStrDontUnderstand, which is invoked by context.PostAsync.
To wrap up the LuisDialog class, the only thing we are missing is the implementation of the Callback method invoked by the Welcome and Order methods. Let’s go ahead and implement it as follows.
Code Listing 2-e: The Callback Method
private async Task Callback(IDialogContext context, IAwaitable<object> result) { await Task.Run(() => context.Wait(MessageReceived)); } |
The Callback method executes context.Wait by passing the MessageReceived method we previously declared as a parameter.
That wraps up all the logic of the LuisDialog class. The Code Listing below contains the full source code of this class.
Code Listing 2-f: The LuisDialog Class
using System; using CakeBotSuccinctly.Models; using Microsoft.Bot.Builder.Dialogs; using Microsoft.Bot.Builder.FormFlow; using Microsoft.Bot.Builder.Luis; using Microsoft.Bot.Builder.Luis.Models; using Microsoft.Bot.Connector; using System.Threading.Tasks; namespace CakeBotSuccinctly.Dialogs { [LuisModel("<< App ID >>", "<< API Key >>")] [Serializable] public class LuisDialog : LuisDialog<Cakes> { private readonly BuildFormDelegate<Cakes> OrderCake; [field: NonSerialized()] protected Activity _msg; protected override async Task MessageReceived(IDialogContext context, IAwaitable<IMessageActivity> item) { _msg = (Activity)await item; await base.MessageReceived(context, item); } public LuisDialog(BuildFormDelegate<Cakes> orderCake) { OrderCake = orderCake; } [LuisIntent("")] public async Task None(IDialogContext context, LuisResult res) { await context.PostAsync(Str.cStrDontUnderstand); context.Wait(MessageReceived); } [LuisIntent("Welcome")] public async Task Welcome(IDialogContext context, LuisResult res) { await Task.Run(() => context.Call( new WelcomeDialog(), Callback)); } private async Task Callback(IDialogContext context, IAwaitable<object> result) { await Task.Run(() => context.Wait(MessageReceived)); } [LuisIntent("Order")] public async Task Order(IDialogContext context, LuisResult res) { await Task.Run(async () => { bool f = false; var r = Validate.ValidateWords(res.Query.ToLower()); if (r.v) f = true; if (f) { var cakeOrderForm = new FormDialog<Cakes>(new Cakes(), OrderCake, FormOptions.PromptInStart); context.Call(cakeOrderForm, Callback); } else { await context.PostAsync(Str.cStrDontUnderstand); context.Wait(MessageReceived); } }); } } } |
Now we almost have a working bot using LUIS, but we have a couple of things pending.
One is to implement the ValidateWords method within the Validate class of Cakes.cs, and another is to actually route all requests within the Post method of MessagesController.cs to the LuisDialog class.
Finalizing the Validate class
Our Validate class is still missing an important part—the ValidateWords method—which will be used in order to pre-validate and check if the input entered by the user is a possible cake order.
Let’s go ahead and add it. Within Visual Studio, go to the Solution Explorer and open the Cakes.cs file. Within the Validate class, add the following code.
Code Listing 2-g: The ValidateWords Method within the Validate Class
public static (bool v, string t) ValidateWords(string wrds) { var r = (v: false, t: string.Empty); string[] wd = wrds.Split(' '); foreach (string w in wd) { r = TypeExists(w, Str.CakeTypes); if (r.v) break; } return r; } |
What this method does is quite simple—it checks if the user’s input, represented by the wrds variable, is one of the valid CakeTypes. This is done with the program-defined TypeExists method in the Validate class.
With this method added, the Validate class now looks as follows.
Code Listing 2-h: The Updated Validate Class
public class Validate { public static string DeliverType = string.Empty; public static (bool v, string t) TypeExists(string c, string[] types) { bool v = false; string t = string.Empty; foreach (string ct in types) { if (ct.ToLower().Contains(c.ToLower())) { v = true; t = ct; break; } } return (v, t); } public static (bool v, string t) ValidateWords(string wrds) { var r = (v: false, t: string.Empty); string[] wd = wrds.Split(‘ ‘); foreach (string w in wd) { r = TypeExists(w, Str.CakeTypes); if (r.v) break; } return r; } public static ValidateResult ValidateType(Cakes state, string value, string[] types) { ValidateResult result = new ValidateResult { IsValid = false, Value = string.Empty }; var res = TypeExists(value, types); string r = $”{Str.cStrDeliverBy} {res.t}”; DeliverType = res.t; return (res.v) ? new ValidateResult { IsValid = true, Value = res.t, Feedback = res.t } : result; } } |
Adjusting the Post method
Now we need to adjust the Post method of the MessagesController.cs file in order to trigger the LuisDialog class. The Post method currently looks as follows.
Code Listing 2-i: The Current Post Method
public async Task<HttpResponseMessage> Post([FromBody]Activity activity) { if (activity.Type == ActivityTypes.Message) { await Conversation.SendAsync(activity, () => Dialogs.CakeBotDialog.dialog); } else { HandleSystemMessage(activity); } var response = Request.CreateResponse(HttpStatusCode.OK); return response; } |
What we must do now is change Dialogs.CakeBotDialog.dialog for something else—which will be an entry point to a LuisDialog instance. We can achieve this by creating a new method called MakeLuisDialog, which we can pass as the second parameter to the Conversation.SendAsync method.
We could do this directly on Conversation.SendAsync, without creating a separate method—but that would be a bit messy, and more difficult to understand.
Code Listing 2-j: The MakeLuisDialog Method
private IDialog<Cakes> MakeLuisDialog() { return Chain.From(() => new LuisDialog(Cakes.BuildForm)); } |
The MakeLuisDialog method creates a chain from a new instance of the LuisDialog class by invoking Cakes.BuildForm—which returns an Iform<Cakes> object, consumed by Chain.From—which kicks off the LuisDialog logic within our bot.
Let’s change our Post method to reflect this.
Code Listing 2-k: The “LUIS-aware” Post Method
public async Task<HttpResponseMessage> Post([FromBody]Activity activity) { if (activity.Type == ActivityTypes.Message) { await Conversation.SendAsync(activity, MakeLuisDialog); } else { HandleSystemMessage(activity); }
var response = Request.CreateResponse(HttpStatusCode.OK); return response; } |
We have now finalized everything we need in order to adapt our bot to do some natural language processing using LUIS.
All we need to do now is test it using the emulator—this is what we’ll do next.
The full source code for this chapter can be found here.
Testing our LUIS-enabled bot
We’ve converted our bot into a more advanced one by giving it LUIS superpowers.
Now, let’s test it out using the emulator to see if the correct method—and subsequently, conversational dialog—is triggered whenever the user enters a new intent. We want to see how the conversation flows compared to how it was before.
First, we’ll add the LUIS App ID and App Key. Let’s go back to the LUIS website and fetch them.
The App ID is easy to see immediately. Once you’ve logged in to LUIS and clicked on your app, it’s just below the Overview header, as seen in the following figure.
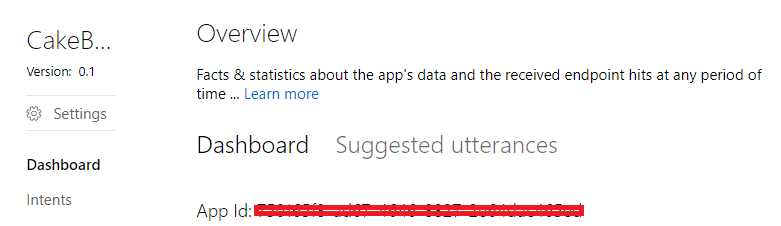
Figure 2-r: The LUIS App ID
You can find the Programmatic API Key or App Key by clicking on the My keys option from the top menu.
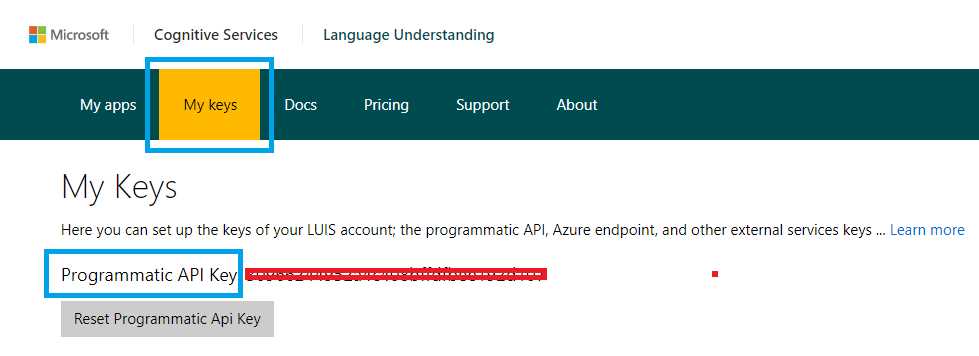
Figure 2-s: The LUIS App Key
Copy and paste them onto the placeholders defined on the LuisDialog class decorator, as shown in Code Listings 2-a and 2-f.
Now we are ready to run a quick test using the emulator, so open it up. In Visual Studio, click Run.

Figure 2-t: Run Button in Visual Studio
Once the application is running, go to the emulator, and let’s greet our bot by typing hi. We’ll see what is shown in Figure 2-u.
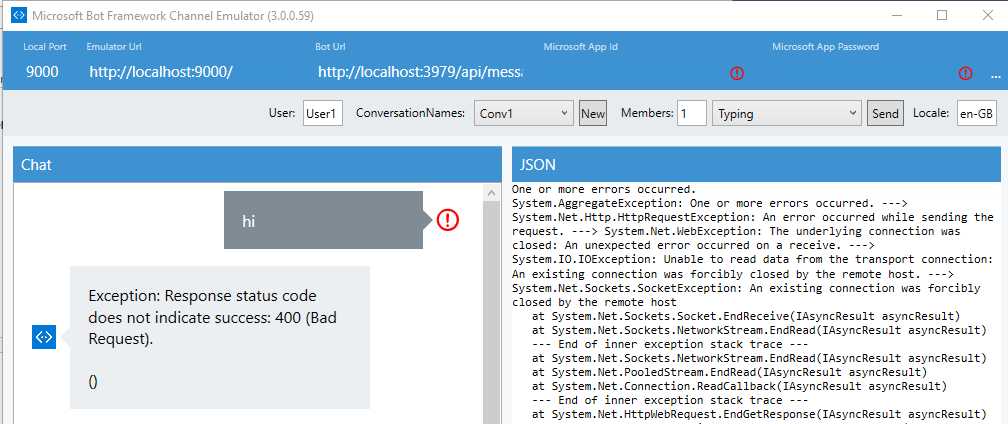
Figure 2-u: Oops—A Bot Exception
What happened here? If our code is correct—which it certainly is—why is a bad request being returned when the bot runs?
The reason for this bad request is that when the bot tries to connect to the web endpoint that represents the LUIS service indicated by the App ID and App Key, it is unable to get any response back—thus resulting in a 404 error.
This is due to the fact that the LUIS endpoint has not been published. To solve this, go back to the LUIS UI, and under the Publish App option, click Publish. This will make the LUIS endpoint publicly available to our code.
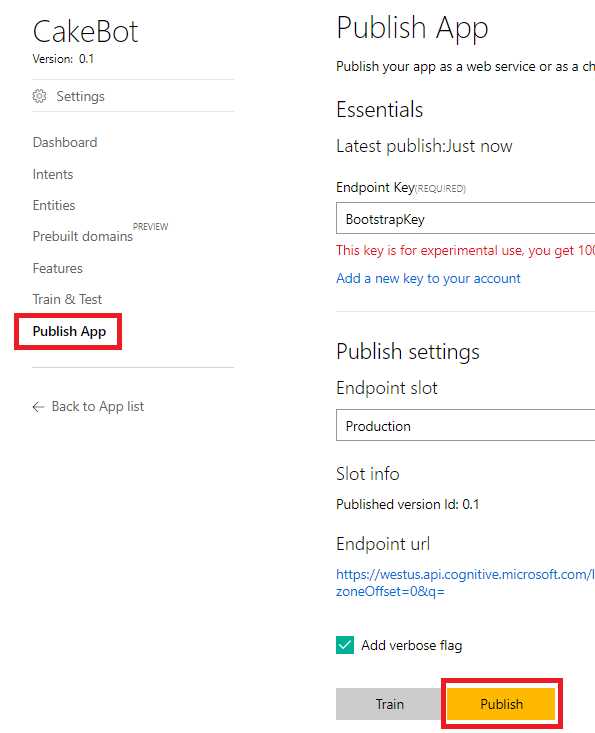
Figure 2-v: Publish Option in LUIS
Once published, we can try again. Let’s now type in hola (which means “hello” in Spanish) to see if the correct method of the LuisDialog class is executed.
I’ve set a breakpoint on the Welcome method of the LuisDialog class to see if this LUIS intent is executed when I type in this word.
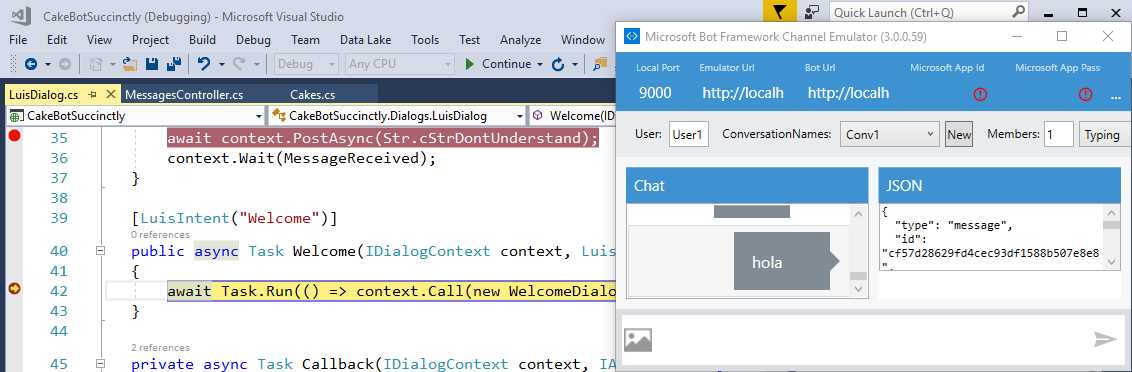
Figure 2-w: Welcome Intent Execution
In Figure 2-w, we can clearly see that the word “hola” has correctly triggered the execution of the Welcome method—which means it has been identified by LUIS as the right intent.
That’s the magic of LUIS: without breaking our heads, and without having to write complex regex routing conditions—by simply using the LuisIntent method decorator—we are able to tell LUIS which method it needs to execute when the user’s intent has been correctly identified.
If we now press F10 in Visual Studio, we should be able to follow the bot’s conversational logic. The WelcomeDialog class logic will be executed first, and shortly after, the FormFlow logic, where a cake order can be placed.
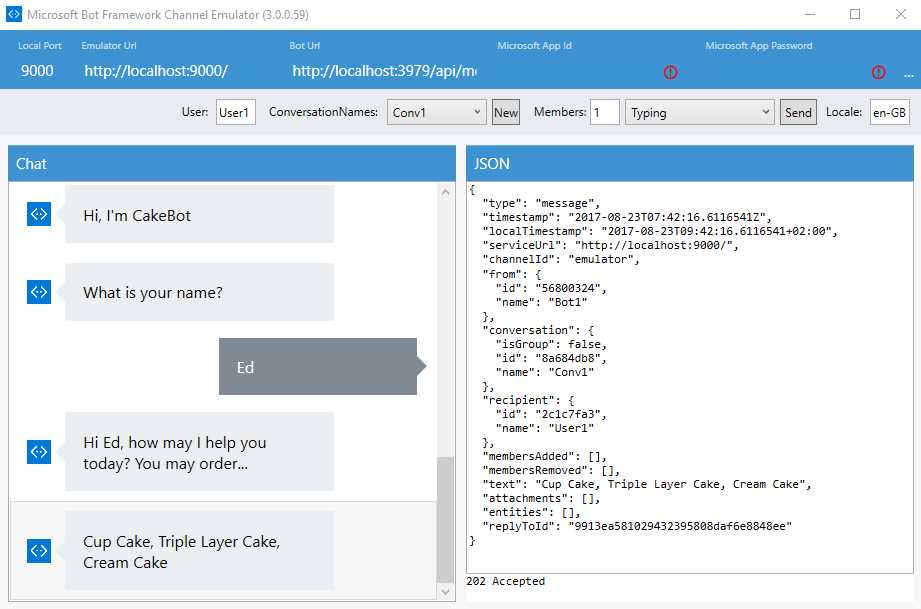
Figure 2-x: WelcomeDialog Execution
In Figure 2-x, we clearly see the full execution of the logic contained within the WelcomeDialog class.
At this stage, the bot is waiting for the user’s input and expecting to pre-validate the type of cake the user is interested in, which should trigger the execution of the Order method of the LuisDialog class.
So, let’s type in cup cake in order to continue the conversation. Once the Order method of the LuisDialog class has correctly pre-validated cup cake as a valid response, the FormFlow process kicks in, as can be seen in the following figure.
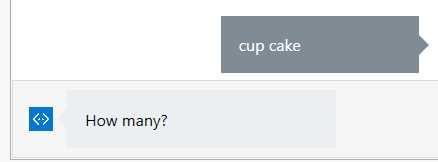
Figure 2-y: FormFlow Started
The bot is now executing the logic of the BuildForm method contained within the Cakes class of Cakes.cs. When we typed in cup cake, LUIS was able to determine that the word “cake” matches the Order intent.
LUIS was able to infer this because we entered multiple utterances (sentences) for this intent using the word cake, such as deliver a cake, on the LUIS UI.
What would have happened if instead we had typed in triple layer, cream, or simply cup?
The answer is quite simple—basically the Order method would not have been triggered, thus not initiating the FormFlow process. This is because neither triple layer, cream, or cup are utterances of the Order intent—they have not been defined yet.
Instead, the None or Welcome methods of the LuisDialog class would have been triggered, depending on the score LUIS might have given to the user’s input.
So, in order to overcome this and make our bot a bit more robust, we can add these small utterances: triple layer, cream, or cup to the Order intent within the LUIS UI.
By taking this approach and testing various scenarios, using different keywords, it is possible to fine-tune LUIS and make our bot more robust—which, in essence, means that the bot will be able to respond better to user requests—by being able to match better user inputs to intents, thus triggering the right method within the LuisDialog class.
Let’s continue the conversation by answering the questions from the FormFlow process.
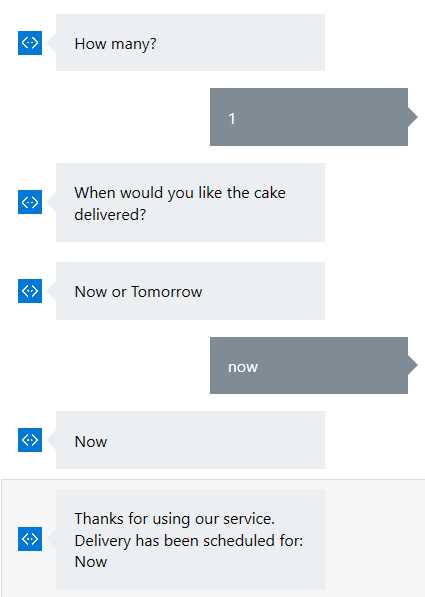
Figure 2-z: FormFlow Finished
As we can see in Figure 2-z, the BuildForm method—responsible for running the FormFlow process—of the Cake class (Cakes.cs) has been fully executed and the conversation has been finalized.
Summary
Throughout this chapter we’ve seen how integrating LUIS capabilities into our bot will drastically reduce the complexity of routing user requests to the correct conversational dialogs.
By using LUIS and adding a few decorators to some of our bot’s methods, we are able to easily make our bot execute the right method in order to trigger the appropriate dialog or FormFlow process.
In the next chapter, we’ll explore how we can use the QnA Maker Service in order to build, train, and publish a question and answer bot based on FAQ URLs, or structured lists of questions and answers.
- 1800+ high-performance UI components.
- Includes popular controls such as Grid, Chart, Scheduler, and more.
- 24x5 unlimited support by developers.