
ServiceStack Succinctly®

CHAPTER 7
Authentication
We have seen how to create the service, and now we want to control access to it. In this chapter, we will look at some options for securing a web application from unauthorized users.
Note: Authentication is all about knowing the identity of the user.
Authorization is deciding whether or not a user is allowed to perform an action.
ServiceStack contains a built-in authentication mechanism which enables services to authenticate users, register new users, and manage roles. The authentication feature is organized into four different components and an authentication domain object model:
- Authentication providers
- Authentication session cache clients
- User authentication repository
- Authentication services
- Domain object model: AuthUserSession, UserAuth, and UserOAuthProvider
How Does the Authentication Work?
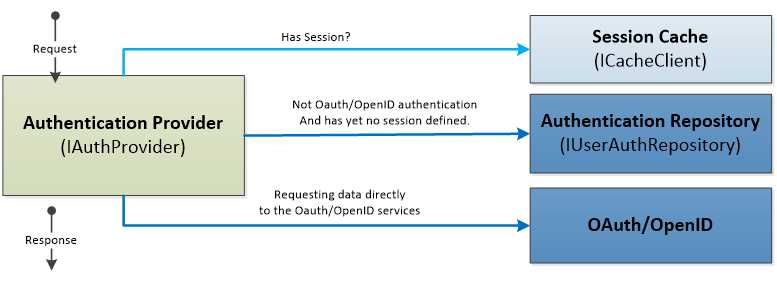
The authentication provider is responsible for defining the way in which the authentication and authorization is going to happen. In order to retrieve the information about the user, the provider will directly communicate with the authentication repository, and after the successful retrieval of the user data and de facto authentication of the user, the Session for the given user will be stored in the cache for a limited time.
In the case of the OAuth[24] or OpenID[25] authentication, the information about the user will be directly provided by the service (Twitter, Google, Facebook, etc.).
- Authentication provider
Where do we start? As we have already seen several times, everything starts in the application host configuration where we need to enable the authentication feature. Before going into details and explaining all of the aforementioned components, let’s take a look at the minimum configuration needed in order to run the Basic Authentication with the OrmLite Repository.
By using the Plugins.Add(new AuthFeature()…), we are instructing ServiceStack to enable the authentication feature. This is where the session (AuthUserSession) and the providers (IAuthProvider[]) are registered as shown in the following code example.
Plugins.Add(new AuthFeature(() => new AuthUserSession(), new IAuthProvider[] { new BasicAuthProvider() //new DigestAuthProvider() //new CredentialsAuthProvider() })); |
Authenticate Attribute
For ServiceStack to know which service requires authentication, it has to be marked with the Authenticate attribute.
[Authenticate (ApplyTo.Get | ApplyTo.Post] public class ProductService : ServiceStack.ServiceInterface.Service { //.. } |
By default, all of the verbs of the service marked with the Authenticate attribute require authentication. However, it is possible to refine the control of what verb needs authentication by specifying the list of verbs directly in the attribute declaration (e.g., ApplyTo.Get).
OrmLiteRepository
OrmLiteRepository is the built-in authentication repository that uses the database as the storage for the authentication. The repository needs the OrmLiteConnectionFactory object which simply defines the connection string and the actual type of the database being used.
If instructed to do so, the repository will create all of the necessary tables in the database when calling the CreateMissingTables method. It is also possible to use DropAndReCreateTables. Both options are very useful when doing unit testing or on the application’s first run, but I would suggest you avoid using this in a production system.
In order for the example to be realistic, we create a simple user so that when the application starts, we will have at least one user in the system that will be used to test the authentication.
Authentication Providers
Authentication providers constitute the heart of the authentication functionality; they define the actual type of the authentication to be used. The authentication provider communicates with the authentication repository in order to retrieve the information about the user or it communicates directly with the cache in order to retrieve information about the cached session.
As shown in the following class diagram, the main interface from which every provider inherits is the IAuthProvider, and the abstract base class that implements this interface is AuthProvider.

- Authentication providers’ hierarchy
ServiceStack currently supports the following providers.
- Supported authentication providers
Provider | Description |
|---|---|
Basic authentication | Implemented as BasicAuthProvider class. It offers the standard basic authentication mechanism. Basic authentication relies on the user authentication repository (IUserAuthRepository) to retrieve the existing users. |
Digest authentication | Implemented as DigestAuthProvider class. Digest authentication relies on the user authentication repository (IUserAuthRepository) to retrieve the existing users. |
Credentials authentication | CredentialsAuthProvider provides a mechanism for authenticating with a username and password by posting the request to the /auth/credentials service. It relies on the user authentication repository (IUserAuthRepository) to retrieve the existing users. |
OAuth[26] providers | ServiceStack implements Twitter, Facebook, and Yammer OAuth, which is a standardized open protocol to allow secure authorization from web, mobile, and desktop applications. |
OpenID[27] providers | As a separate download from NuGet, the package ServiceStack.Authentication.OpenId has the providers for the OpenID protocol for:
|
Extensibility
By inheriting from the CredentialsAuthProvider class, ServiceStack offers a great extensibility point for creating a customized authentication provider based on the username and password. This is as easy as overriding the TryAuthenticate method.
User Authentication Repository
Authentication repositories are used to manage users with your back-end database or other resource management systems. Through the repository, the authentication mechanism will be able to read, write, or authenticate the user against the repository. IUserAuthRepository is the base interface which the repository has to implement. The system already provides several implementations of repositories as shown in the following class diagram: Redis, InMemory, and OrmLite which, on its own, supports several mainstream databases (Redis, SQL Server, Oracle, MySQL, etc.).

- Authentication repository class diagram
The following table details a few other implementations that can be downloaded separately and are available on NuGet.
- Available authentication repositories
Repository (Database) | NuGet package |
|---|---|
MongoDB | ServiceStack.Authentication.MongoDB through the class MongoDBAuthRepository |
RavenDB | ServiceStack.Authentication.RavenDB through the class RavenUserAuthRepository |
NHibernate | ServiceStack.Authentication.NHibernate through the class NHibernateUserAuthRepository |
Authentication Session Cache
Once the authentication happens, the AuthUserSession model is populated and stored in the cache. The cache uses the standard ServiceStack caching mechanism through the ICacheClient interface. The cache is used to keep the information about the session of the currently authenticated user and it is managed internally by the ServiceStack framework.
How Does It Work?
After the successful authentication, the client will receive a cookie with a Session ID. The information stored in the cookie in the second request will be used to retrieve the correct session information from the ICacheClient. All this is done internally by ServiceStack. If we would like to check what the session currently contains, this information can be accessed by using the Service.GetSession() method as shown in the following code.
[Authenticate] public class SomeService : ServiceStack.ServiceInterface.Service { public object Get(ServiceRequest request) { IAuthSession session = this.GetSession(); return new ServiceResponse() {Message = "You're " + session.FirstName }; } } |
Services
There are mainly four services exposed that are related to the authentication, and as shown in the following figure, all inherit from the Service class which makes those very ordinary ServiceStack services.
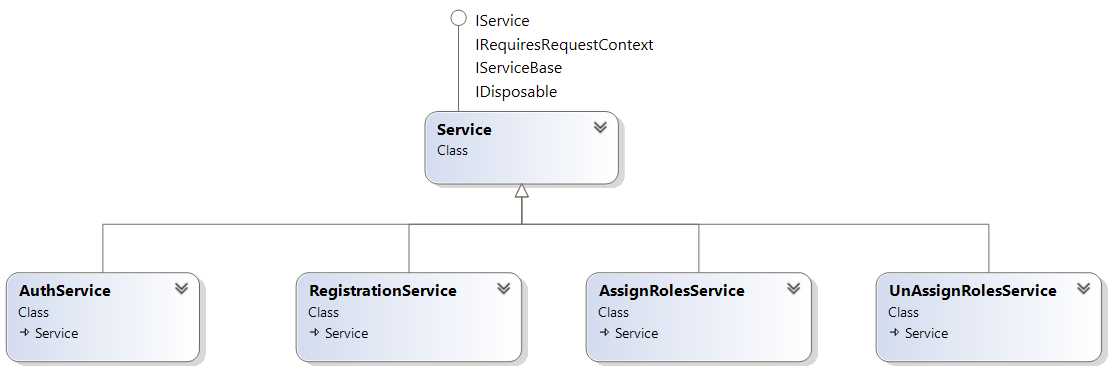
- Authentication services
The following table contains the list of available services with their description and URI.
- Authentication services explained
Service | Exposed Path | Description | ||||||||||||||||||||
AuthService | /auth/{provider} | Executes the authentication and returns the currently logged user. The {Provider} parameter defines the name of the provider, and it can be one of the following.
| ||||||||||||||||||||
AssignRolesService | /assignroles | Assigns roles to an already existing user. | ||||||||||||||||||||
UnAssignRolesService | /unassignroles | Removes the roles from an already existing user. | ||||||||||||||||||||
RegistrationService | /register | Enables the creation of new users. |
The registration service can be enabled or disabled through the application host by configuring the Registration feature.
Plugins.Add(new RegistrationFeature()); |
Authenticating the User
The following unit test shows how to authenticate an existing user and get the data from the ProductService. In this example, we will see how to use RestSharp (which is just another REST client library) in order to get the ProductResponse.
The following test method is doing exactly the same thing but using the ServiceStack client.
Basic Authentication with jQuery
Calling the service from jQuery is not that different from calling it from C#. By using the $.ajax function, it is possible to set the Authorization header and send the username and password.
For the full implementation, check the ProductData.html file provided in the sample project, available at https://bitbucket.org/syncfusiontech/servicestack-succinctly.
<script type="text/javascript"> function make_base_auth(user, password) { var tok = user + ':' + password; var hash = btoa(tok); return "Basic " + hash; }
function authenticate() { //Getting the username and password. var username = $("input#username").val(); var password = $("input#password").val();
$.ajax({ type: "GET", url: "/products/1", async: false, dataType: 'json', beforeSend: function (xhr) { xhr.setRequestHeader('Authorization', make_base_auth(username, password)); }, success: function (result) { //Displaying the values. $('#product_id').val(result.Id); $('#product_name').val(result.Name); }, }); } </script> |
Registering a New User
By using the RegistrationService, it is possible to register new users through the /register URI. The following unit test shows how to register a new user. The response of the POST action is a custom UserResponse which returns the new UserId, the current SessionId, and the UserName that registered the user—in this case, “johnd”.
[TestMethod] public void RegisterNewUser() { var client = new RestClient("http://localhost:50712"); client.Authenticator = new HttpBasicAuthenticator("johnd", "mypassword");
var request = new RestRequest("register", Method.POST); request.RequestFormat = DataFormat.Json; request.AddBody(new { UserName = "JaneR", FirstName = "Jane", LastName = "Roe", DisplayName = "Jane Roe", Email = "[email protected]", Password = "somepassword", AutoLogin = true }); var response = client.Post<UserResponse>(request);
Assert.IsTrue(response != null); Assert.IsTrue(response.Data.UserId != null); } public class UserResponse { public string UserId { get; set; } public string SessionId { get; set; } public string UserName { get; set; } } |
Assigning Roles to an Existing User
By using the AssignRolesService, it is possible to change the Roles and Permissions of an existing user through the /assignroles URI as shown in the following unit test.
[TestMethod] public void AssignRoles() { var client = new RestClient("http://localhost:50712"); client.Authenticator = new HttpBasicAuthenticator("johnd", "mypassword");
var request = new RestRequest("assignroles", Method.POST); request.RequestFormat = DataFormat.Json; request.AddBody(new { UserName = "JaneR", Permissions = "some_permissions", Roles = "Admin, Reader" });
var response = client.Post<AssignRoleResponse>(request);
Assert.IsTrue(response != null); } public class AssignRoleResponse { public string AllRoles { get; set; } public string AllPermissions { get; set; } public object ResponseStatus { get; set; } } |
Note: As unassigning roles follow the same structure, the actual code example is omitted.
Tip: The user that assigns or unassigns roles has to be an Admin.
Authorization
Together with authentication, ServiceStack also offers an authorization mechanism. There is a way to control which Role or Permission is allowed to execute a certain service or method.
We have seen that it is possible to register a user and, consequently, to assign roles and permissions. Therefore, whenever the user authenticates, all of this information will be available in the session.
How to Control the Access to the Service
There are mainly two attributes to look into: RequiredRole and RequiredPermission.
The attributes can be associated with:
- The service itself.
- Any service method.
- The Request DTO declaration.
[Authenticate] public class ProductService : ServiceStack.ServiceInterface.Service { [RequiredRole(RoleNames.Admin)] [RequiredPermission("some_permission")] public ProductResponse Get(GetProduct request) { … } //To execute this method a user has to be authenticated. public List<ProductResponse> Get(GetProducts request) { … } } //This is the equivalent declaration. [Authenticate] [RequiredRole(RoleNames.Admin)] [RequiredPermission("some_permission")] public class GetProduct { … } [Authenticate] public class GetProducts { … } |
In case the user doesn’t have the correct Role or Permission assigned, the 403 Invalid Role or 403 Invalid Permission statuses will be returned.
- Flexible data integration with REST-based APIs
- Supports various authentication methods, including basic HTTP and no authentication
- Handles diverse data formats like JSON, CSV, and XML
- Dynamic data retrieval with date parameter filtering