
Scala Succinctly®

CHAPTER 5
Arrays and Lists
Storing objects in collections is a common practice is Scala. Two of the most basic and fundamental collection types are the array and the list. In this section, we will examine how to store data in these simple collections, and we’ll look at some of the rich collection features that Scala offers for manipulating these collections.
Arrays
Arrays store a collection of objects with the same data type in contiguous RAM. Arrays are of a fixed size, so that after the array is defined, we cannot add and remove items. If you want to add and remove items from an array-like structure, see the next section on lists.
Code Listing 33: Defining Arrays
// Array of 5 Ints var myIntArray: Array[Int] = new Array[Int](5) // Array of 10 Doubles var myDoubleArray = new Array[Double](10) // Array of 3 Strings val myStringArray = new Array[String](3) |
Code Listing 33 shows the definition of three arrays. In order to define an array, we use the var or val keyword, followed by an identifier name. We follow this with Array[dataType], where dataType is whatever type we want the array to store. Then we use = new Array[dataType](count), where count is the number of elements in the array. Alternatively, we can skip the redundant declaration part of the definition and use a shortcut notation, as in myDoubleArray.
Accessing and setting elements
In order to access elements of an array, either for setting or for reading, we use parentheses (normal brackets are used, as opposed to other C-based languages that use square brackets). It is very important to note that array access is 0-based. This means that when we create an array of n elements, the first element has an index of 0 and the final element has an index of n-1. Code Listing 34 shows several examples of setting elements of arrays manually, one at a time.
Code Listing 34: Setting and Accessing Elements
object MainObject { def main(args: Array[String]): Unit = { // Define a double array with 5 elements: val doubleArray: Array[Double] = new Array[Double](5)
// Set the values of the array doubleArray(0) = 99.0 doubleArray(1) = 25.5 / 100.0 doubleArray(2) = Math.sqrt(10) doubleArray((7 >> 2) + 2) = 4.0 doubleArray(4) = 3.14 // doubleArray(5) = 100 // Illegal!
// Access elements and output. println("doubleArray(0) = " + doubleArray(0)) println("doubleArray(1) = " + doubleArray(1)) println("doubleArray(2) = " + doubleArray(2)) println("doubleArray(3) = " + doubleArray(3)) println("doubleArray(4) = " + doubleArray(4))
// println("doubleArray(5) = " + doubleArray(5))// Illegal! } } |
Code Listing 34 shows a basic example of a Double array with five elements. We can set the values of the elements by employing the array identifier followed by the index in brackets. Note that doubleArray(0) means the first element and doubleArray(4) means the final element. And there is no element (5)—elements are numbered 0 to n-1.
When we set the value of an array element, we can use any expression we like because each element is a perfectly normal double var. Note also that we can access elements with expressions. In Code Listing 34, the value of doubleArray(3) is set using an expression for the index: ((7>>2)+2). This expression evaluates to 3. The expressions must evaluate to a positive integer when we use them to access array elements—there is no element 3.5 or -6 of an array.
Figure 15 shows an illustration of the double array from Code Listing 34 before and after the values of the elements are set.
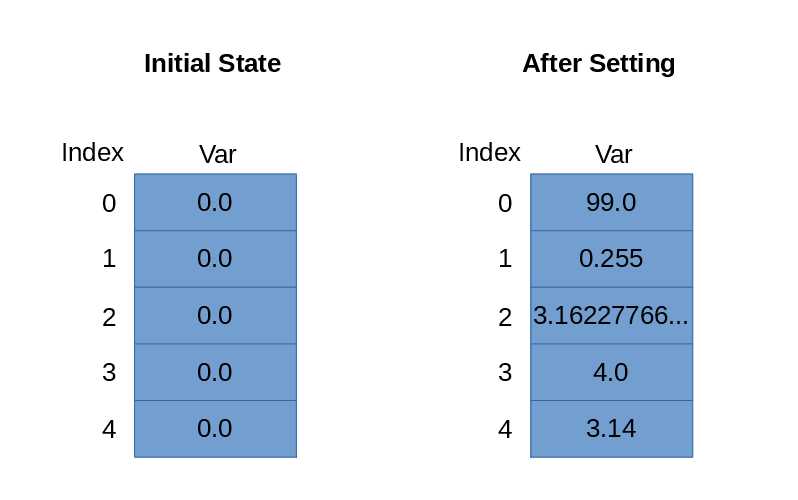
Figure 15: Array before and after Settings Elements
Val vs. var arrays
Code Listing 35 illustrates the difference between a val and a var array. If we define a val array, we are not able to point the array identifier to someOtherArray because it is a val. However, we can change the elements of a val array. The elements of a val array are var and can be changed as needed.
Code Listing 35: Val vs. Var Arrays
object MainObject { def main(args: Array[String]): Unit = { // Define a val and var array: val myValArray = new Array[Int](10) var myVarArray = new Array[Int](10) // Define some other array: var someOtherArray = new Array[Int](10)
// Set the var array to point to someOtherArray myVarArray = someOtherArray // myValArray = someOtherArray // Illegal!
// However, we can change the elements of a val array! myValArray(0) = 100 } } |
A var array can point to a new array, and in Code Listing 35 we create a var array, then we point it to someOtherArray. As with a val array, the elements of a var array are themselves var and we are free to change them to whatever values we need.
Multidimensional arrays
Multidimensional arrays are useful for storing objects in grids, box-like arrangements, or higher dimensions, and they are often very large in terms of how many elements they have and the amount of RAM they require. It is common to process them using nested loops or for loops with multiple iterators.
Code Listing 36: 2D Array
object MainObject { def main(args: Array[String]): Unit = { // Declare a 2D array of Int val array2D = Array.ofDim[Int](5, 5)
// Set elements in the array: array2D(2)(0) = 100 array2D(3)(4) = 99
// Read elements: println("Element(0)(0): " + array2D(0)(0)) println("Element(2)(0): " + array2D(2)(0)) println("Element(3)(4): " + array2D(3)(4)) } } |
Code Listing 36 shows how to create a multidimensional array. We use the syntax val name =, where name is the identifier for the array. We set this to Array.ofDim[dataType], where dataType is the type for the elements of our array. Then we specify the size of the dimensions, which is (5, 5) in this example. This will create a 2D matrix of Int, and each element will be initialized to 0. Figure 16 shows an illustration of the array from Code Listing 36 after the elements are set to 100 and 99, as in the Code Listing.
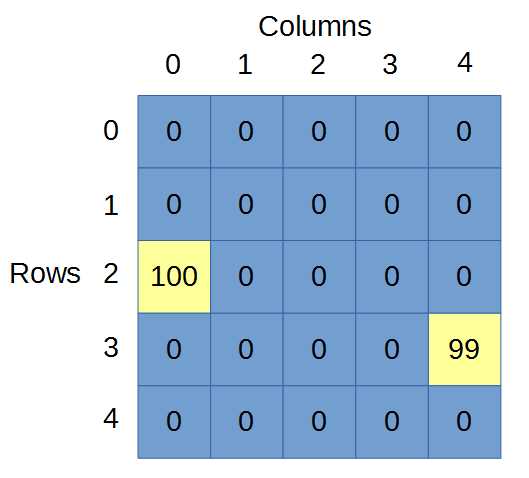
Figure 16: 2D Array
Figure 16 shows the array2D array drawn out with the first index representing the row and the second representing the column. This decision is arbitrary, and we could easily draw the array in other orientations.
The line in Code Listing 36 that reads array2D(2)(0) = 100 sets the value of the array at row 2, column 0 to 100. And the line that reads array2D(3)(4) = 99 sets the value of the array at row 3, column 4 to 99.
Higher dimensional arrays are also possible. We could define a 3D array with something like var my3DArray = Array.ofDim[Int](10, 10, 10). As with 2D arrays, the orientation of the elements in a 3D array is purely conceptual, what matters is that we envisage and illustrate the array in the same way every time we access elements.
Note: Higher dimensional arrays can quickly consume massive amounts of memory. The total number of elements in an array is the product of the dimension sizes. So, if we have an Int array with three dimensions and each dimension has 100 elements, the total number of Int variables in our array is 100*100*100, which is one million. Each Int variable consumes four bytes of memory to store in the system, therefore a 100x100x100 Int array will require approximately four megabytes of memory.
Tip: If you have many arrays, or if you would like to use several of the helpful functions provided in Scala for use with arrays, you can import Array at the top of your program. When you import Array, you can define a new array using the shorthand var someArray = ofDim[Int](10, 10) rather than var someArray = Array.ofDim[Int](10, 10).
ArrayBuffer
An ArrayBuffer is similar to an array, except that we can add and remove items. Code Listing 37 shows a basic example of an ArrayBuffer. The program reads a list of doubles from the user, stores them in an ArrayBuffer, and computes the sum. Note that to use an ArrayBuffer, we import scala.collection.mutable.ArrayBuffer.
Code Listing 37: ArrayBuffer Basics
import scala.io.StdIn._ import scala.collection.mutable.ArrayBuffer object MainObject { def main(args: Array[String]) {
val userInput = ArrayBuffer[Double]()
while(true) { // Output a prompt: print("Input a number (use -1.0 to continue): ")
// Read some input: val x = readDouble
// If the user inputs something other than -1 // add it to the array buffer: if(x != -1) userInput += x // += adds the item to the end end //userInput.insert(0, x)// We can also insert items at the start // When the user inputs -1: else { // Init a summation variable var sum = 0.0 // Use a for loop to add the items together for(y <- userInput) { print("Adding " + y + " ") sum += y }
// Output the sum of items: println("Sum is " + sum)
return // Return from main } } } } |
We can add multiple items at once to an array by using the ++= operator. We can also add multiple items at once to any position of the ArrayBuffer by supplying multiple values to the insert method. Code Listing 38 shows several examples of adding and removing single and multiple items from an ArrayBuffer.
Code Listing 38: Adding and Removing Items from ArrayBuffers
import scala.io.StdIn._ import scala.collection.mutable.ArrayBuffer object MainObject { def printArrayBuffer(arr: ArrayBuffer[Int]) {
print("Array Buffer: ")
// Print out the values in the array buffer for(x <- arr) print(x + " ")
// Print a new line: println }
def main(args: Array[String]) {
// Create a new ArrayBuffer val nums = new ArrayBuffer[Int]() // Add a 1 to end of the array buffer: nums += 1 printArrayBuffer(nums)
// Add multiple items at once to the end: nums ++= Array(2, 5) printArrayBuffer(nums)
// Add a 3 and a 4 after position 2: nums.insert(2, 3, 4) printArrayBuffer(nums) // To remove an item by its index: nums.remove(3) printArrayBuffer(nums) // Remove 2 items beginning at index 1: nums.remove(1, 2) printArrayBuffer(nums) } } |
Note that iterating through an ArrayBuffer is similar to an Array. We can use a simple for loop as per Code Listing 38. We can also use the property called ArrayBuffer.length and loop through the items.
Lists
Lists are similar to arrays, except instead of being stored in contiguous memory, the elements are stored as a linked list. Lists are quick to traverse from start to finish, but they are slow to look up items in the middle. Also, we cannot change the items in a list, they are immutable. Code Listing 39 shows some examples of defining and traversing simple lists.
Note: The various collection types each have different implementations. This leads to different performance for different tasks. For instance, we can add items to the beginning or the end of a list in constant time; however, an ArrayBuffer adds elements to the end in constant time, but adding an element to the start takes linear time. For a complete comparison of the performance of certain tasks, see http://docs.scala-lang.org/overviews/collections/performance-characteristics.html.
Tip: When selecting a collection for an algorithm, we typically minimize the amount of time taken to perform the operations on the collection. If you frequently need to add items to the start of the collection, you should use a collection that is implemented as a linked list, such as a list. If you need to reference or index elements at arbitrary positions (such element number 1000 or element number 789), you should use a collection stored in contiguous memory, such as an Array.
Code Listing 39: Lists
object MainObject { def main(args: Array[String]) { // List of 3 integers: var integerList: List[Int] = List(100, 101, 102)
// List of strings: var capitalCities: List[String] = List( "Melbourne", "Hobart", "Brisbane", "Sydney")
// Concatenate items to a list: capitalCities = capitalCities.:::(List[String]("Darwin"))
// Print out the items of a list: println(capitalCities)
// Traverse a list: for(i <- integerList) println("Element: " + i) } } |
We can also define lists using ::, which is called cons and which is short for construct, and we can use Nil, which acts as the tail of the list. When you create lists in this way, you should always use Nil at the end to finish the list (see Code Listing 40, and note this is not a complete Code Listing and cannot be run as a program).
Code Listing 40: Lists with Cons and Nil
// Empty list: var anEmptyList = Nil // List with cons and Nil var directions = "North" :: "South" :: "East" :: "West" :: Nil |
There are other ways to create simple lists in Scala. For example, we can also use the List.range method, which allows us to quickly create a list of items in numerical order. There is also the List.fill method, which allows us to create a list of items all set to the same value, as in Code Listing 41.
Code Listing 41: Creating Lists with Range and Fill
// Create a list of 100 integers from 1 to 100: var rangeList = List.range(1, 100) // List filled with 10 copies of String 'Empty' var filledList = List.fill(10)("Empty") |
Lists have three very important methods: head, tail, and isEmpty. Method head points to the first element of the list, method tail points to all elements after the first. Method isEmpty is used to determine whether or not the list is empty. Code Listing 42 shows an example of using head, tail, and isEmpty
Code Listing 42: Head, Tail, and IsEmpty
// Empty list: var anEmptyList = Nil // List with cons and Nil var directions = "North" :: "South" :: "East" :: "West" :: Nil println("First element of directions: " + directions.head) println("Final element of directions: " + directions.tail) println("Directions is empty? " + directions.isEmpty) println("anEmptyList is empty? " + anEmptyList.isEmpty) |
Multiple dimensional lists
We can also create lists of lists. These are lists in which each element is itself a list. Conceptually, this is the same as creating a multiple dimensional list. Code Listing 43 shows an example of creating a simple 2D list of integers.
Code Listing 43: 2D Lists
// Create a list of lists: var twoDList = List( List(1, 2, 3), List(4, 5, 6), List(7, 8, 9) ) // Loop1: for(l1 <- twoDList) { println("Element: " + l1) } // Loop2: // Traverse using nested for loops for(l1 <- twoDList) { for(l2 <- l1) { println(l2) } } |
Code Listing 43 creates a list called twoDList that consists of three elements, each of which is a List itself. In order to traverse the list, we can use a simple for loop, but this will only access each of the inner lists. In order to traverse every element of the nested lists, we can nest for loops. The output of Code Listing 43 is shown in Code Listing 44.
Code Listing 44: Output from Code Listing 43
Element: List(1, 2, 3) Element: List(4, 5, 6) Element: List(7, 8, 9) 1 2 3 4 5 6 7 8 9 |
Useful methods on lists
There are many useful methods available for lists and the other collections, such as List.length, which returns the numbers of elements in the list; List.last, which returns the final element of the list; and List.first, which returns the first element in the list. The following section provides a few extra examples that use other operators and methods available to lists. The interested reader should look up the documentation for each of the collection types in order to gain a full appreciation of the diversity of these objects. The documentation for the List class is available from http://www.scala-lang.org/api/2.7.7/scala/List.html.
Tabulate method
We can also create lists using tabulate. This allows us to create complex patterns of items in our lists using expressions or even “if” statements for each item in the list.
Code Listing 45: Tabulated List
object MainObject { def main(args: Array[String]) { // Create a tabulated list: val tabulatedList = List.tabulate(10)(n => if(n % 2 == 0) "" + n + " is even" else "" + n + " is odd") // Print the items of the list: for(s <- tabulatedList) println(s) } } |
Code Listing 45 shows an example of creating a tabulated list. The Code Listing uses the tabulate method and the => operator in order to create a list of alternating n is even and n is odd elements. We will see more of the => operator in a moment; for now the important aspect of this Code Listing is the tabulate method. For each element in the list, the “if” statement will be applied with the result, so that either n is even or n is odd will become the elements of our list.
Concatenate operator
In order to join two lists together, we use the concatenate operator, which is represented by three colons, :::. Code Listing 46 shows an example of using the concatenate operator to join two lists together and produce a third.
Code Listing 46: Concatenate Operator
object MainObject { def main(args: Array[String]) {
// Create some lists var list1 = List(1, 2, 3) var list2 = List(4, 5, 6)
// Concatenate list1 and list2 var list3 = list1 ::: list2
// Print 1, 2, 3, 4, 5, 6 for(i <- list3) println(i) } } |
Take, drop, and SplitAt
Code Listing 47: Take, Drop, and SplitAt
object MainObject { def main(args: Array[String]) { // Create a list: var integerList = List( 1, 2, 3, 4, 5, 6, 7, 8, 9, 10)
// Take: Prints List(1, 2, 3, 4, 5) println(integerList take 5)
// Drop: Prints List(6, 7, 8, 9, 10) println(integerList drop 5)
// SplitAt: Prints (List(1, 2, 3, 4, 5),List(6, 7, 8, 9, 10)) println(integerList splitAt 5) } } |
Code Listing 47 shows an example of using take, drop, and splitAt operators on a list. The take method creates a list with a specified number of items. In the example, the number supplied is 5, which means the first five items of integerList will be returned as a new list.
The operator drop is the opposite of take—in fact, drop will remove x number of items from the list and return a new list. In the example, the number supplied for the drop is 5, so the first five items from the integerList will be removed, leaving 6, 7, 8, 9, and 10.
The final example shows how to split a list into smaller lists using the splitAt operator. The call to splitAt 5 will cause the list to be split into two smaller lists, the first containing elements 0 to index 4 (i.e. five elements) and the second containing elements from index 5 to tail.
Folding
Folding is a technique for working with lists. Imagine we want to take some input, x, and perform an operation on x with each item in a list, then return x. For instance, let’s say we want to begin with 0 and add each integer from an Int list to compute the sum of the elements of a list. We can do this with a for loop without too much trouble, as per Code Listing 48.
Code Listing 48: Summing List Elements Using For Loop
object MainObject { def main(args: Array[String]): Unit = { // Define a list: val myList = List(1, 2, 3, 4, 5)
// Define a summing variable: var sum = 0
// Sum the elements using a for loop: for(listElement <- myList) sum += listElement
// Output the total: println("Sum is: " + sum) } } |
Scala also offers another interesting approach to this problem called folding. Code Listing 49 shows the same example as Code Listing 48, only this time we use foldLeft.
Code Listing 49: Summing List Elements Using foldLeft
object MainObject { def main(args: Array[String]): Unit = {
// Define a list: val myList = List(1, 2, 3, 4, 5)
// Define the sum, foldLeft using a closure: var sum = myList.foldLeft(0)((x,y) => x+y)
// Output the total: println("Sum is: " + sum) } } |
The foldLeft function belongs to the List class. It takes two parameters, the first, (0), is an integer. The second is a function to perform (this function is actually a closure—we will look at closures in more detail in a separate chapter). In the Code Listing 49 example, we say that the value of x starts at 0. Each of the list items is then passed to the closure (x, y) => x+y. Each list element acts as the y variable in the closure, and the value of x will sum the elements one after the other. If this is confusing, Chapter 9 will focus on the syntax of closures.
We can start the x variable at values other than 0. For instance, if we begin the x variable at 10, then the sum will be reported as 25 because 10+1+2+3+4+5 is 25.
Tip: We can also use foldRight, which is the same as foldLeft, except that the iteration through the list occurs in the reverse order. When we use foldLeft, the list is iterated through from the first element to the last. With foldRight, the list is iterated through from the final item to the first.
This has been a very brief look at Scala’s folding function. The operation is similar to reduce, and the interested reader can look up other topics, such as foldRight and reduce.
- 1800+ high-performance UI components.
- Includes popular controls such as Grid, Chart, Scheduler, and more.
- 24x5 unlimited support by developers.