
Roslyn Succinctly®

CHAPTER 4
Writing Code Analyzers
Visual Studio has always offered integrated analysis to detect code issues. In previous versions, some code issues were detected by the background compilers as you typed, and the IDE immediately reported errors and warnings with squiggles in the code editor, showing the related error or warning messages in the Error List window. In specific scenarios, the code editor also offered an option to edit the code issues with proper fixes, but the majority of errors and other code issues could only be detected when compiling a solution. Also, code analysis was limited to rules coded at Microsoft, but it was impossible to enhance the code analysis engine with domain-specific rules, at least in the code editor.
The .NET Compiler Platform brings revolutionary changes. With the new Compiler APIs, not only does live static code analysis detect any code issues as you type, but it can be extended with custom, domain-specific analysis rules. In this chapter, you’ll learn how to build a code analyzer for custom syntax rules that plugs into the Visual Studio 2015 code editor, as well as many other concepts about syntax.
Note: When coding analyzers, you often use asynchronous methods and the async/await pattern. This requires you to have at least basic knowledge of how an asynchronous method works, the async and await keywords, and the concept of cancellation tokens. The MSDN Library has a specific page about this programming pattern, which you are strongly encouraged to read before going on with this chapter if you are new to this way of coding.
Writing Code Analyzers
A code analyzer is a library that includes one or more custom rules for detecting domain-specific errors and code issues as you type. One rule and all the related information the compiler collects about it is referred to as a diagnostic. A code analyzer (or simply analyzer) can also suggest proper fixes within the light bulb, as discussed in Chapter 2. In this chapter, you will create an analyzer that detects if the source code improperly assigns the System.DateTime type to a variable in Windows Store and Windows Phone projects, where you should use the System.DateTimeOffset type instead, at least when you work with user controls that allow manipulating dates.
Note: Examples in this book do not provide the ultimate solution to a specific problem or completely address every possible situation. In most cases, they will need to be improved to fit into real-world scenarios. However, they have been architected in a way that makes it easier for you to get started with syntax, to learn the right approach, and to understand all the concepts related to building developer tools with the Roslyn APIs. After reading this chapter and the next one, you will have all the required fundamentals to explore additional APIs and to create your custom analysis rules for any scenario.
Creating an Analyzer with Code Fix Project
To create an analyzer, select File > New Project, and then in the Extensibility node under the language of your choice, select the Analyzer with Code Fix (NuGet + VSIX) project template, as shown in Figure 28.
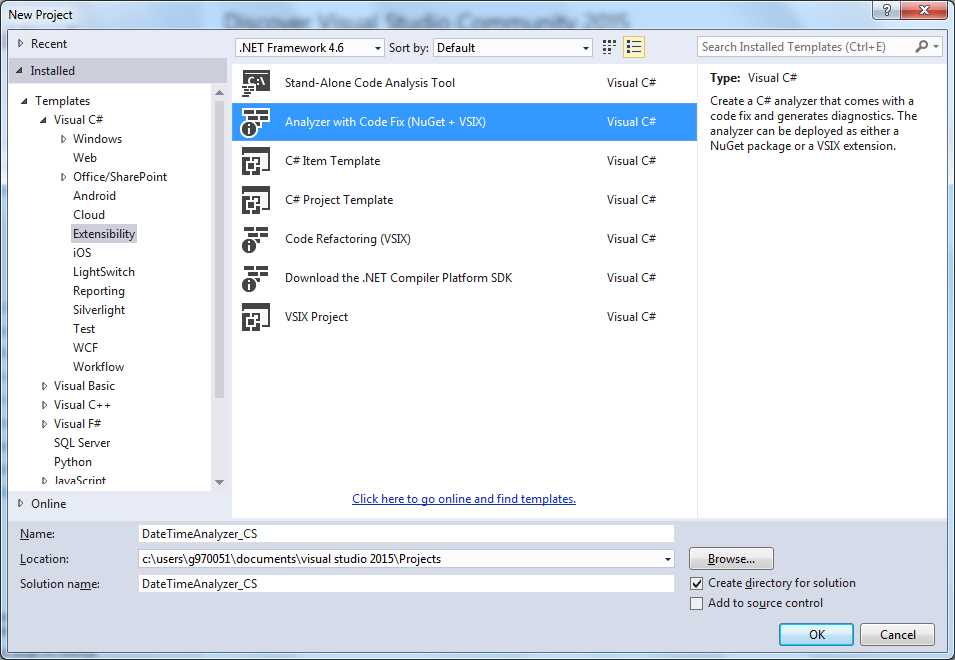
Figure 28: Creating an analyzer project
Type DateTimeAnalyzer_CS as the C# project name, or DateTimeAnalyzer_VB as the Visual Basic project name, and then click OK. In the following explanations, I’m using the C# project name, but the same procedure applies to Visual Basic (VB).
The selected project template generates a sample analyzer whose instructional purpose is detecting and fixing lowercase letters within type names. I will not discuss the auto-generated sample; instead, I will show you how to start from scratch, but you can definitely take a look at the source code as an exercise. With this template, Visual Studio 2015 generates a solution with three projects:
- DateTimeAnalyzer_CS (Portable), a portable class library that implements the analyzer. This project contains two files: DiagnosticAnalyzer.cs (or .vb), which is responsible for implementing the analysis logic and raises the proper errors or warnings, and CodeFixProvider.cs (or .vb), which is where you implement code fixes that integrate into the light bulb. These are conventional file names that you can rename with more meaningful names. This is something you definitely want to do when adding multiple analyzers and code fixes to a single project.
- DateTimeAnalyzer_CS.Test, a project that contains unit tests to test your analyzer in a separate environment. This particular project is not discussed in this book because I can’t assume you have knowledge of unit testing and of test projects. It is not mandatory to create and deploy analyzers, though.
- DateTimeAnalyzer_CS.Vsix, which packages the analyzer into a VSIX package. The generated VSIX package can be used to publish your analyzer to the Visual Studio Gallery (see Chapter 7), but most importantly at this point, it is used by Visual Studio to install the analyzer into the experimental instance of the IDE, which is necessary to debug your analyzers (and code refactorings).
Understanding Syntax Elements to Work With
Before you implement the analysis logic, you must first understand which syntax elements you need to work with. To do this, you use the Syntax Visualizer tool discussed in Chapter 3. For instance, consider Figure 29, where you can see the code declares a variable called oneDate, of type System.DateTime.
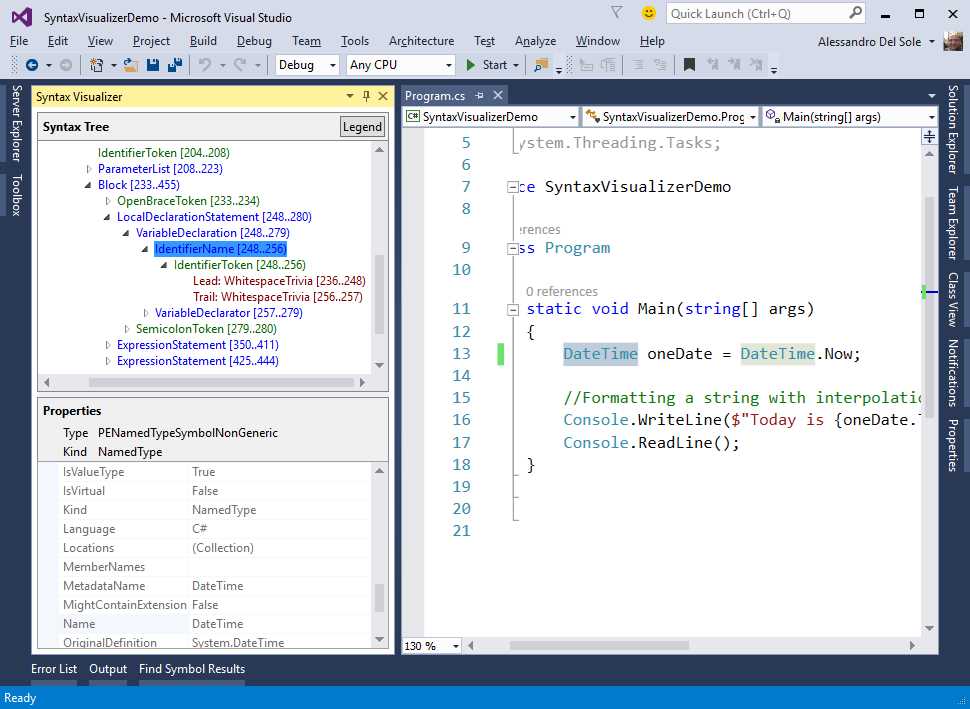
Figure 29: Using the Syntax Visualizer to investigate a syntax node
Suppose your analyzer needs to report a warning every time it detects the DateTime type in a Windows Store app. The first thing you need to do is understand how DateTime is represented with Roslyn. As you can see from Figure 29, it is represented by an IdentifierName syntax node of type IdentifierNameSyntax. The Properties area is useful to understand properties for this kind of syntax node, but it might be more useful to discover if this identifier has a matching symbol, which provides much more information. To accomplish this, right-click IdentifierName and then select View Symbol (if any). Now the Properties area shows symbol information, such as the syntax kind, the containing assembly, the base type, and the type name, which you will use shortly. This kind of symbol is called PENamedTypeSymbolNonGeneric, and is represented by a .NET interface called INamedTypeSymbol.
The analysis logic in the analyzer will:
- Focus only on IdentifierName syntax nodes. This improves the analysis performance by avoiding the need of investigating an entire syntax tree, excluding all the other kinds of syntax nodes from the analysis.
- Get the symbol information for these kinds of syntax nodes.
- Focus only on named type symbols.
- Detect if the analyzed named type symbol is called DateTime, and if so, the analyzer will create a new diagnostic and report a warning so that the code editor will display a green squiggle beneath the named type.
Tip: As a general rule, you can determine the exact syntax node you want to analyze with the Syntax Visualizer by selecting a sample line of code so that you can exclude all the other syntax nodes from the analysis. This is the very first step in architecting efficient analysis logics.
Understanding Common Elements
Domain-specific rules, diagnostics, and the analysis logic are defined in a class that inherits from Microsoft.CodeAnalysis.Diagnostics.DiagnosticAnalyzer and must be decorated with the DiagnosticAnalyzer attribute, whose argument is a constant from the LanguageNames class, representing the target programming language (CSharp or VisualBasic).
Visual Studio automatically generates a class that meets these requirements when you create an analyzer project whose name is based on the project name. Open the DiagnosticAnalyzer.cs (or .vb) file, and consider Code Listing 3, which already includes some edits to the auto-generated code.
Code Listing 3 (C#)
[DiagnosticAnalyzer(LanguageNames.CSharp)] public class DateTimeAnalyzer_CSAnalyzer : DiagnosticAnalyzer { public const string DiagnosticId = "DTA001"; // You can change these strings in the Resources.resx file. // If you do not want your analyzer to be localize-able, // you can use regular strings for Title and MessageFormat. private static readonly LocalizableString Title = new LocalizableResourceString(nameof(Resources.AnalyzerTitle), Resources.ResourceManager, typeof(Resources)); private static readonly LocalizableString MessageFormat = new LocalizableResourceString(nameof(Resources. AnalyzerMessageFormat), Resources.ResourceManager, typeof(Resources)); private static readonly LocalizableString Description = new LocalizableResourceString(nameof(Resources. AnalyzerDescription), Resources.ResourceManager, typeof(Resources)); private const string Category = "Naming"; |
Code Listing 3 (Visual Basic)
<DiagnosticAnalyzer(LanguageNames.VisualBasic)> Public Class DateTimeAnalyzer_VBAnalyzer Inherits DiagnosticAnalyzer Public Const DiagnosticId = "DTA001" ' You can change these strings in the Resources.resx file. 'If you do not want your analyzer To be localize-able, 'you can use regular strings For Title And MessageFormat. Private Shared ReadOnly Title As LocalizableString = New LocalizableResourceString(NameOf(My.Resources.AnalyzerTitle), My.Resources.ResourceManager, GetType(My.Resources.Resources)) Private Shared ReadOnly MessageFormat As LocalizableString = New LocalizableResourceString(NameOf(My.Resources. AnalyzerMessageFormat), My.Resources.ResourceManager, GetType(My.Resources.Resources)) Private Shared ReadOnly Description As LocalizableString = New LocalizableResourceString(NameOf(My.Resources. AnalyzerDescription), My.Resources.ResourceManager, GetType(My.Resources.Resources)) Private Const Category = "Naming" |
Note: Visual Studio names the analyzer’s root namespace and the auto-generated class based on the project name, adding the Analyzer suffix. So, like in the current example, the namespace is DateTimeAnalyzer_CS, but the class name is DateTimeAnalyzer_CSAnalyzer. If you think this double suffix might be confusing or you simply don’t like it, don’t add the Analyzer suffix when you name a new project or rename the analyzer class to remove this suffix.
The DiagnosticId constant represents a unique identifier for the analyzer, and in Code Listing 3, the default ID has been changed with a custom one. Of course, you are free to write a different ID. Together with the value of MessageFormat, the diagnostic ID is displayed in the Error List window. DiagnosticId, MessageFormat, and Title are also displayed in the diagnostic’s tooltip that appears when the pointer hovers over a squiggle or when a light bulb over a code issue is enabled. Description provides a way to describe the diagnostic in greater detail.
By default, Title, MessageFormat, and Description are of type LocalizableResourceString, and their value is supplied via the project’s default resources through the Resources.resx file. This approach makes it easier to implement the analyzer’s localization, but you can definitely use regular strings if you do not want an analyzer to be localized. To understand how this is defined, in the Solution Explorer, double-click the Resources.resx file (for Visual Basic, you must first enable the Show All Files view and then expand My Project) so that the resource editor appears, as shown in Figure 30.
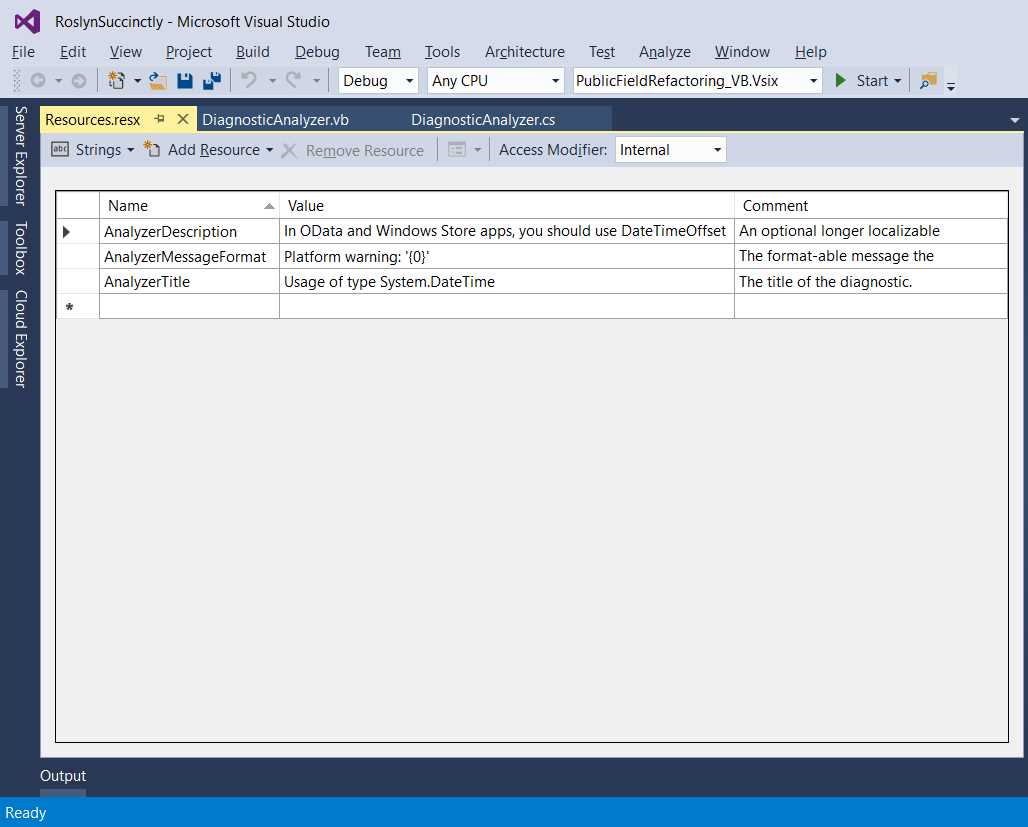
Figure 30: Editing resource strings
There are three string resources defined by default. Replace the Value column with the content shown in Figure 30 ("In OData and Windows Store Apps, you should use DateTimeOffset"), which shows proper strings for the current example. The Category constant represents the category the analyzer belongs to, such as naming, syntax, maintainability, design, and so on. The category you choose does not influence the way an analyzer works. It is instead a way to give developers additional information.
Tip: A useful list of category names can be found at https://msdn.microsoft.com/en-us/library/ee1hzekz.aspx.
For each rule you add to the analyzer, you need a so-called diagnostic descriptor, which is an instance of the Microsoft.CodeAnalysis.DiagnosticDescriptor class. This describes a diagnostic in a way that can be understood by tools such as Visual Studio. A DiagnosticDescriptor instance exposes properties containing the following information about a diagnostic:
- The values of DiagnosticId, MessageFormat, Title, Category, and Description, represented by properties with matching names.
- If it must be enabled by default, or if it must be enabled manually in the rule set editor. This piece of information is held by the IsEnabledByDefault Boolean property.
- The diagnostic’s severity level, which is represented by the DefaultSeverity property, and whose value can be a value from the Microsoft.CodeAnalysis.DiagnosticSeverity enumeration, such as Warning, Error, Info, or Hidden. Remember that only the Error severity level prevents a project from being compiled until a code issue is fixed.
- An optional URI to the analyzer’s online documentation (if any), which developers will open by clicking the diagnostic ID in the Error List. This is represented by the HelpLinkUri property. Note that if no custom URI is supplied, Visual Studio 2015 will start a Bing search based on the diagnostic ID and title. At this time, there is no option to change the default search engine (unless you provide a custom URI).
A diagnostic descriptor is exposed via an immutable property called SupportedDiagnostics, which returns a System.Collections.Immutable.ImmutableArray<DiagnosticDescriptor>. Normally, this immutable array contains only the diagnostic descriptor’s instance. The implementation for both the diagnostic descriptor and the immutable array is shown in Code Listing 4.
Code Listing 4 (C#)
private static DiagnosticDescriptor Rule = new DiagnosticDescriptor(DiagnosticId, Title, MessageFormat, Category, DiagnosticSeverity.Warning, isEnabledByDefault: true, description: Description, helpLinkUri: "https://github.com/AlessandroDelSole/RoslynSuccinctly/wiki/DTA001"); public override ImmutableArray<DiagnosticDescriptor> SupportedDiagnostics { get { return ImmutableArray.Create(Rule); } } |
Code Listing 4 (VB)
Private Shared Rule As New DiagnosticDescriptor(DiagnosticId, Title, MessageFormat, Category, DiagnosticSeverity.Warning, isEnabledByDefault:=True, description:=Description, helpLinkUri:= "https://github.com/AlessandroDelSole/RoslynSuccinctly/wiki/DTA001") Public Overrides ReadOnly Property SupportedDiagnostics As _ ImmutableArray(Of DiagnosticDescriptor) Get Return ImmutableArray.Create(Rule) End Get End Property |
Now it is time to implement the actual analysis logic.
Implementing the Analysis Logic
The analysis logic requires two fundamental steps: writing a method that will perform the code analysis over a given syntax node, referred to as action, and registering the action at the analyzer’s startup so that the analyzer can respond to compiler events, such as finding syntax nodes or declaring symbols.
You can implement and register multiple actions for a syntax node. This can be useful if you want to detect multiple issues and offer multiple fixes. You register actions inside the Initialize method, which is the main entry point of an analyzer. This method takes an argument called context, of type AnalysisContext, which represents the context for initializing an analyzer. The AnalysisContext type exposes a number of methods that you use to register actions, as described in Table 1.
Table 1: Methods for registering actions
Method Name | Description |
|---|---|
RegisterSyntaxTreeAction | Registers an action that is executed after a code file is parsed. |
RegisterSyntaxNodeAction | Registers an action that is executed at the completion of the semantic analysis of a syntax node. |
RegisterSymbolAction | Registers an action that is executed at completion of the semantic analysis over a symbol. |
RegisterSemanticModelAction | Registers an action that is executed after a code document is parsed. |
RegisterCompilationStartAction | Registers an action that is executed when compilation starts. |
RegisterCompilationEndAction | Registers an action that is executed when compilation completes. |
As I mentioned previously (see Figure 29), you must analyze an IdentifierName node, which is represented by the IdentifierNameSyntax type, and therefore a syntax node. For this reason, you need to register an action invoking the RegisterSyntaxNodeAction method, as shown in Code Listing 5.
Code Listing 5 (C#)
public override void Initialize(AnalysisContext context) { context.RegisterSyntaxNodeAction(AnalyzeDateTime, SyntaxKind.IdentifierName); } |
Code Listing 5 (VB)
Public Overrides Sub Initialize(context As AnalysisContext) context.RegisterSyntaxNodeAction(AddressOf AnalyzeDateTime, SyntaxKind.IdentifierName) End Sub |
The first parameter of RegisterSyntaxNodeAction is a delegate that will perform the actual code analysis, whereas the second argument is the syntax kind (see Chapter 3 for details about kinds). This is specified by picking one of the values from the SyntaxKind enumeration, in this case IdentifierName, which represents an IdentifierName syntax node.
Note: The SyntaxKind enumeration exposes almost 800 values, so it’s impossible to provide a description for each value in this book. However, IntelliSense always does a great job describing values, and you can just right-click the enumeration in the code editor and select Go To Definition to explore all the available syntax kinds.
It’s finally time to analyze a syntax node. This is done in a method we call AnalyzeDateTime, whose code is shown in Code Listing 6. Read the comments carefully. Additional explanations will follow shortly.
Code Listing 6 (C#)
private void AnalyzeDateTime(SyntaxNodeAnalysisContext context) { // Get the syntax node to analyze var root = context.Node; // If it's not an IdentifierName syntax node, // return if (!(root is IdentifierNameSyntax)) { return; } // Convert to IdentifierNameSyntax root = (IdentifierNameSyntax)context.Node; // Get the symbol info for // the DateTime type declaration var dateSymbol = context.SemanticModel. GetSymbolInfo(root).Symbol as INamedTypeSymbol; // If no symbol info, return if (dateSymbol == null) { return; } // If the name of the symbol is not // DateTime, return if (!(dateSymbol.MetadataName == "DateTime")) { return; } // Create a diagnostic at the node location // with the specified message and rule info var diagn = Diagnostic.Create(Rule, root.GetLocation(), "Consider replacing with DateTimeOffset"); // Report the diagnostic context.ReportDiagnostic(diagn); } |
Code Listing 6 (VB)
Private Sub AnalyzeDateTime(context As SyntaxNodeAnalysisContext) 'Get the syntax node to analyze Dim root = context.Node 'If it's not an IdentifierName syntax node, 'return If TypeOf (root) Is IdentifierNameSyntax 'Convert to IdentifierNameSyntax root = CType(context.Node, IdentifierNameSyntax) Else Return End If 'Get the symbol info for 'the DateTime type declaration Dim dateSymbol = TryCast(context.SemanticModel. GetSymbolInfo(root).Symbol, INamedTypeSymbol) 'If no symbol info, return If dateSymbol Is Nothing Then Return End If 'If the name of the symbol is not 'DateTime, return If Not dateSymbol.MetadataName = "DateTime" Then Return End If 'Create a diagnostic at the node location 'with the specified message and rule info Dim diagn = Diagnostic.Create(Rule, root.GetLocation, "Consider replacing with DateTimeOffset") 'Report the diagnostic context.ReportDiagnostic(diagn) End Sub |
Retrieving a Syntax Node’s Information
The AnalyzeDateTime method has a parameter of type SyntaxNodeAnalysisContext, which represents the context for a syntax node and holds information about a syntax node from the compiler’s point of view. This object exposes a property called Node, of type SyntaxNode, which represents the actual syntax node you work with. As you learned in Chapter 3, SyntaxNode is at the root of the syntax hierarchy, and therefore, you need a more specialized object. So the code attempts to convert the syntax node into an IdentifierNameSyntax object, which is the one representing the DateTime type. If the conversion fails, it means that the current node is not an IdentifierName, so the execution of the method terminates. If the conversion succeeds, then the current node is an IdentifierName, and the code attempts to retrieve symbol information for the node.
Retrieving Symbol Information
Retrieving symbol information for the node is accomplished by invoking the GetSymbolInfo method over the SemanticModel of the syntax node’s context, and then converting the Symbol property into an object of type INamedTypeSymbol, which derives from ISymbol and is designed to represent named types like DateTime.
If the result of this invocation and conversion is null, it means that there is no symbol information associated with this IdentifierName node, and the method execution terminates. If it’s not null, the code checks if the value of the MetadataName property is DateTime. MetadataName contains the type name for the symbol being examined. In this example, if MetadataName is equal to DateTime, it means that the current IdentifierName node represents a DateTime type, and therefore it is a node we want to report a diagnostic for.
An important consideration at this point: The Syntax Visualizer tool shows the full list of properties of each syntax node and each symbol, if any. With regard to this example, if you take a look back at Figure 29, you will see how the Syntax Visualizer is showing symbol information for DateTime, including the MetadataName property. So once again, the Syntax Visualizer tool is very important, because it shows the full list of properties that you can investigate to determine any information about a syntax node.
As another example, the IMethodSymbol type exposes a property called ReturnType, which contains the fully-qualified name of the type returned by a method, and can be very useful to determine if a method being analyzed is the one you expect. Never forget to keep the Syntax Visualizer open when you want to analyze a syntax node that you do not know very well; it will give you the full list of properties exposed and information returned by any syntax node.
Reporting Diagnostics
Going back to the code, if the value of MetadataName is DateTime, you need to create a diagnostic that will squiggle the type name in the code editor. To do this, you invoke the static Create method from the Microsoft.CodeAnalysis.Diagnostic class. This method takes three arguments: the instance of the diagnostic descriptor (Rule), the diagnostic position in the code editor (root.GetLocation), and a descriptive message. Notice that any syntax node class exposes the GetLocation method, which corresponds to the currently investigated syntax node, in this case the IdentifierNameSyntax node. Finally, you report the diagnostic by invoking the ReportDiagnostic method of the context class. In this way, tools like Visual Studio will receive the diagnostic instance and use its information to highlight the code issue and display information about it.
A Quick Look at Code Fixes
So far, you have completed the first part of the analyzer, which is the diagnostic. The next step is providing a code fix that will help developers solve the code issue by showing potential fixes within the light bulb.
Remember: Offering code fixes is not mandatory. There are plenty of built-in diagnostics in the VB and C# compilers that only report warnings and errors without suggesting code fixes, and there might be many situations and reasons to not provide a code fix. If you think of regular expressions, you might write an analyzer that checks if a string literal does not match a particular regex, but you cannot really predict all the possible ways to write a correct literal. In that case, you might just want to report a code issue.
Tip: Actions you code inside an analyzer are invoked at every keystroke. This means you must design your analyzers efficiently, so that they do not affect the code editor’s performance. The secret to creating efficient analyzers is implementing small tests, one at a time, instead of performing one heavy analysis. The preceding example is very efficient, because it implements small tests in sequence before creating and reporting the diagnostic.
You might argue at this point that, for Visual Basic, the sample code is incomplete because this language also offers the Date keyword, which is used instead of DateTime. This is a particular scenario of those APIs that are tailored to a specific language, and it is described later in the section Language-Tailored APIs. For now, it’s time to provide a code fix.
Implementing Code Fixes
A code fix is a quick action that integrates into the light bulb and suggests a possible solution to a code issue. You implement a code fix in the CodeFixProvider.cs (or .vb) file.
Tip: Always keep in mind that both DiagnosticAnalyzer.cs and CodeFixProvider.cs are conventional names that you can replace with more meaningful file names. For the sake of consistency, I use the default file names in this book.
A code fix is represented by a class that inherits from Microsoft.CodeAnalysis.CodeFixProvider, which provides common infrastructure for code fixes. For this example, Visual Studio 2015 has generated a class called DateTimeAnalyzer_CSCodeFixProvider, which inherits from CodeFixProvider and is decorated with the ExportCodeFixProvider attribute. The latter requires two arguments: The target language (still specified via the LanguageNames enumeration) and the name.
CodeFixProvider exposes three methods that derived classes must override:
- FixableDiagnosticIds, which returns an immutable array with one element representing the diagnostic ID associated to it, and can be fixed with the current code fix provider.
- GetFixAllProvider, which defines a way to provide fixes that you can select from the FixAllProvider class.
- RegisterCodeFixesAsync, where you implement the code that solves an issue.
RegisterCodeFixesAsync requires special attention, so the first part of the code for the DateTimeAnalyzerCodeFixProvider class is about its definition and about the first two methods in the previous list. Code Listing 7 shows this piece of code.
Code Listing 7 (C#)
[ExportCodeFixProvider(LanguageNames.CSharp, Name = nameof(DateTimeAnalyzer_CSCodeFixProvider)), Shared] public class DateTimeAnalyzer_CSCodeFixProvider : CodeFixProvider { private const string title = "Replace with DateTimeOffset"; public sealed override ImmutableArray<string> FixableDiagnosticIds { get { return ImmutableArray. Create(DateTimeAnalyzerAnalyzer.DiagnosticId); } } public sealed override FixAllProvider GetFixAllProvider() { return WellKnownFixAllProviders.BatchFixer; } |
Code Listing 7 (VB)
<ExportCodeFixProvider(LanguageNames.VisualBasic, Name:=NameOf(DateTimeAnalyzer_VBCodeFixProvider)), [Shared]> Public Class DateTimeAnalyzer_VBCodeFixProvider Inherits CodeFixProvider Private Const title As String = "Replace DateTime with DateTimeOffset" Public NotOverridable Overrides ReadOnly Property FixableDiagnosticIds As ImmutableArray(Of String) Get Return ImmutableArray. Create(DateTimeAnalyzer_VBAnalyzer.DiagnosticId) End Get End Property Public NotOverridable Overrides Function _ GetFixAllProvider() As FixAllProvider Return WellKnownFixAllProviders.BatchFixer End Function |
Registering Actions
The core of a code fix is the RegisterCodeFixesAsync method, where you register an action that will solve the code issue. Of course, you can provide multiple actions for different potential fixes. Code Listing 8 shows the implementation for the current example (read the code comments for details).
Code Listing 8 (C#)
public sealed override async Task RegisterCodeFixesAsync(CodeFixContext context) { // Get the root syntax node for the current document var root = await context.Document. GetSyntaxRootAsync(context.CancellationToken). ConfigureAwait(false); // Get a reference to the diagnostic to fix var diagnostic = context.Diagnostics.First(); // Get the location in the code editor for the diagnostic var diagnosticSpan = diagnostic.Location.SourceSpan; // Find the syntax node on the span // where there is a squiggle var node = root.FindNode(context.Span); // If the syntax node is not an IdentifierName // return if (node is IdentifierNameSyntax == false) { return; } // Register a code action that invokes the fix // on the current document context.RegisterCodeFix( CodeAction.Create(title:title, createChangedDocument: c=> ReplaceDateTimeAsync(context.Document, node, c), equivalenceKey:title), diagnostic); } |
Code Listing 8 (VB)
Public NotOverridable Overrides Async Function _ RegisterCodeFixesAsync(context As CodeFixContext) As Task 'Get the root syntax node for the current document Dim root = Await context.Document. GetSyntaxRootAsync(context.CancellationToken). ConfigureAwait(False) 'Get a reference to the diagnostic to fix Dim diagnostic = context.Diagnostics.First() 'Get the location in the code 'editor for the diagnostic Dim diagnosticSpan = diagnostic.Location.SourceSpan 'Find the syntax node on the span 'where there is a squiggle Dim node = root.FindNode(context.Span) 'Register a code action that invokes the fix 'on the current document context.RegisterCodeFix( CodeAction.Create("Replace with DateTimeOffset", Function(c) ReplaceDateTimeAsync(context.Document, node, c), equivalenceKey:=title), diagnostic) End Function |
The method takes a parameter called context, of type Microsoft.CodeAnalysis.CodeFixes.CodeFixContext, which is a value type that represents the current context for code fixes. Context refers to syntax nodes that have diagnostics.
Getting a Reference to Diagnostics
The RegisterCodeFixesAsync method first retrieves the root syntax node for the current document (that is, the source code file) via the GetSyntaxRootAsync method. Next, it gets a reference to the diagnostic to fix by invoking First over the immutable array of code fixes. After that, the code retrieves the diagnostic position in the code editor via the diagnostic.Location.SourceSpan property and retrieves the related syntax node via the root.FindNode method.
Integrating Registered Actions with the Light Bulb
The last step in this method is registering a code action via the static Microsoft.CodeAnalysis.CodeAction.Create method, which takes as parameters the title that will be shown in the light bulb, a delegate that performs the actual work to fix the syntax node, a unique identifier called equivalenceKey, and the instance of the diagnostic. This delegate, which is called ReplaceDateTimeAsync in the current example, typically receives three arguments: An instance of the Document class representing the source code file that contains the syntax node you want to fix, the instance of the syntax node, and a cancellation token.
Generating a New Syntax Node
At this point, the goal is creating a new syntax node where the code issue has been solved based on the syntax node that has the diagnostic, and replacing the latter with the new node, returning a new Document instance. This is demonstrated in Code Listing 9.
Code Listing 9 (C#)
private async Task<Document> ReplaceDateTimeAsync(Document document, SyntaxNode node, CancellationToken cancellationToken) { // Get the root syntax node for the current document var root = await document.GetSyntaxRootAsync(); // Convert the syntax node into the specialized kind var convertedNode = (IdentifierNameSyntax)node; // Create a new syntax node var newNode = convertedNode?.WithIdentifier(SyntaxFactory. ParseToken("DateTimeOffset")). WithLeadingTrivia(node.GetLeadingTrivia()). WithTrailingTrivia(node.GetTrailingTrivia()); // Create a new root syntax node for the current document, // replacing the syntax node that has the diagnostic with // a new syntax node var newRoot = root.ReplaceNode(node, newNode); // Generate a new document var newDocument = document.WithSyntaxRoot(newRoot); return newDocument; } |
Code Listing 9 (VB)
Private Async Function ReplaceDateTimeAsync _ (document As Document, node As SyntaxNode, cancellationToken As CancellationToken) _ As Task(Of Document) 'Get the root syntax node for the current document Dim root = Await document.GetSyntaxRootAsync 'Convert the syntax node into the specialized kind Dim convertedNode = DirectCast(node, IdentifierNameSyntax) 'Create a new syntax node Dim newNode = convertedNode. WithIdentifier(SyntaxFactory. ParseToken("DateTimeOffset")). WithTrailingTrivia(node. GetTrailingTrivia) 'Create a new root syntax node for the current document, 'replacing the syntax node that has the diagnostic with 'a new syntax node Dim newRoot = root.ReplaceNode(node, newNode) 'Generate a new document Dim newDocument = document.WithSyntaxRoot(newRoot) Return newDocument End Function |
The first two lines of code retrieve the root syntax node for the current document and convert the current syntax node instance into the expected type, which is IdentifierNameSyntax. The core of the logic is in the newNode variable declaration; the goal is modifying the syntax node that has diagnostics with the DateTimeOffset type name instead of DateTime. Syntax nodes are immutable, so you cannot edit convertedNode directly. Instead, you create a new syntax node (newNode) starting from the existing one.
To make your edit, you invoke the WithIdentifier method, which allows supplying a new identifier to an IdentifierNameSyntax node. WithIdentifier’s argument is a SyntaxToken; because you cannot supply a SyntaxNode directly, you use the ParseToken method from the SyntaxFactory class, which parses a string and returns a SyntaxToken. Because the original syntax node might have white spaces, comments, and terminators, you also invoke the WithTrailingTrivia method. Since you don’t need to change the original trivia, you simply pass the invocation to node.GetTrailingTrivia, which obtains the trailing trivia from the original syntax node.
The next step is generating a new root syntax node. Because syntax nodes are immutable, you cannot edit the original root syntax node directly. Instead, you create a new one by replacing the old syntax node with the new node (ReplaceNode).
Finally, you generate a new document by invoking WithSyntaxRoot and passing the new root syntax node as the argument. This invocation returns a new Document instance that represents the current source file where the code issue has been fixed. Before doing any other work, it is important to stop for a moment and discuss important objects in the Roslyn APIs.
Tip: Types deriving from SyntaxNode expose a number of With methods, which you invoke to create a new syntax node, supplying updated information. Using With methods is very common when implementing code fixes and refactorings, and IntelliSense is your best friend in this, showing the full list of available methods and their descriptions for each class that inherits from SyntaxNode.
Generating Syntax Nodes: SyntaxFactory and SyntaxGenerator
With Roslyn, you can perform different kinds of code-related tasks, such as code generation and analysis, starting from source text or working against existing syntax nodes. In the second case, because of immutability, you create a new syntax node based on an existing one and make the proper edits, which includes adding or removing members.
Whether you need to create new syntax trees and nodes from scratch, or make edits to an existing syntax node, you need to work with syntax nodes. The .NET Compiler Platform offers two objects for generating any kind of syntax nodes: the SyntaxFactory class and the SyntaxGenerator class. Let’s start with SyntaxFactory.
Generating Syntax Nodes with SyntaxFactory
There are specific versions of this class for Visual Basic (Microsoft.CodeAnalysis.VisualBasic.SyntaxFactory) and C# (Microsoft.CodeAnalysis.CSharp.SyntaxFactory) because these languages have different lexicons and syntax. For instance, in C# you have brackets to delimit a method definition, whereas in Visual Basic you have the Sub and Function keywords, plus an End statement.
Because every single thing you type must have a syntactic representation, you can understand why there are two different implementations of SyntaxFactory. This exposes a number of methods that allow generating syntax elements. For instance, imagine you want to create a syntax node that represents the class shown in Code Listing 10.
Code Listing 10 (C#)
public abstract class Person : IDisposable { public void IDisposable.Dispose() { // Leaving blank for simplicity } } |
Code Listing 10 (VB)
Public MustInherit Class Person Implements IDisposable Public Sub Dispose() Implements IDisposable.Dispose 'Leaving blank for simplicity End Sub End Class |
Though this class definition might seem very simple, it has enough syntax members for you to understand how the syntax generation works. In fact, here you have a class definition with modifiers and accessors. The class implements an interface, and exposes a method that implements a method required by the interface.
Take a moment to browse the definition of this simple code with the Syntax Visualizer. Once you have a more precise idea of the syntax elements that compose this node, look at Code Listing 11 and discover how you can generate the syntactic definition with SyntaxFactory.
Code Listing 11 (C#)
var classBlock = SyntaxFactory.ClassDeclaration( @"Person") .WithModifiers( SyntaxFactory.TokenList( new[]{ SyntaxFactory.Token( SyntaxKind.AbstractKeyword), SyntaxFactory.Token( SyntaxKind.PublicKeyword)})) .WithKeyword( SyntaxFactory.Token( SyntaxKind.ClassKeyword)) .WithBaseList( SyntaxFactory.BaseList( SyntaxFactory.SingletonSeparatedList<BaseTypeSyntax>( SyntaxFactory.SimpleBaseType( SyntaxFactory.IdentifierName( @"IDisposable")))) .WithColonToken( SyntaxFactory.Token( SyntaxKind.ColonToken))) .WithOpenBraceToken( SyntaxFactory.Token( SyntaxKind.OpenBraceToken)) .WithMembers( SyntaxFactory.SingletonList<MemberDeclarationSyntax>( SyntaxFactory.MethodDeclaration( SyntaxFactory.PredefinedType( SyntaxFactory.Token( SyntaxKind.VoidKeyword)), SyntaxFactory.Identifier( @"Dispose")) .WithModifiers( SyntaxFactory.TokenList( SyntaxFactory.Token( SyntaxKind.PublicKeyword))) .WithExplicitInterfaceSpecifier( SyntaxFactory.ExplicitInterfaceSpecifier( SyntaxFactory.IdentifierName( @"IDisposable")) .WithDotToken( SyntaxFactory.Token( SyntaxKind.DotToken))) .WithParameterList( SyntaxFactory.ParameterList() .WithOpenParenToken( SyntaxFactory.Token( SyntaxKind.OpenParenToken)) .WithCloseParenToken( SyntaxFactory.Token( SyntaxKind.CloseParenToken))) .WithBody( SyntaxFactory.Block() .WithOpenBraceToken( SyntaxFactory.Token( SyntaxKind.OpenBraceToken)) .WithCloseBraceToken( SyntaxFactory.Token( SyntaxKind.CloseBraceToken))))) .WithCloseBraceToken( SyntaxFactory.Token( SyntaxKind.CloseBraceToken)). NormalizeWhitespace(); |
Code Listing 11 (VB)
Dim ClassBlock = SyntaxFactory.ClassBlock( SyntaxFactory.ClassStatement("Person"). AddModifiers(SyntaxFactory.ParseToken("MustInherit"), SyntaxFactory.ParseToken("Public"))). AddImplements(SyntaxFactory. ImplementsStatement(SyntaxFactory. ParseTypeName("IDisposable"))). AddMembers(SyntaxFactory. MethodBlock(SyntaxKind.SubBlock, SyntaxFactory.SubStatement(Nothing, SyntaxFactory.TokenList( SyntaxFactory.ParseToken("Public")), SyntaxFactory.ParseToken("Dispose()"), Nothing, Nothing, Nothing, Nothing, SyntaxFactory.ImplementsClause( SyntaxFactory.ParseToken("Implements"), SyntaxFactory. SingletonSeparatedList(Of QualifiedNameSyntax) _ (SyntaxFactory.QualifiedName(SyntaxFactory. ParseName("IDisposable"), SyntaxFactory.ParseName("Dispose"))))), SyntaxFactory.EndSubStatement)). NormalizeWhitespace() |
Creating Syntax Nodes Programmatically
Each syntax node you see in the Syntax Visualizer tool has a corresponding method exposed by the SyntaxFactory class. These methods allow for creating syntax nodes, and their names are really self-explanatory; the arguments they take are other syntax nodes or syntax tokens.
For instance, the ClassBlock method in Visual Basic generates a Class..End Class block and takes an argument which is the ClassStatement method. This ClassStatement method represents the Class statement (which includes the class name), modifiers (such as Public and MustInherit in Code Listing 11), Implements statements (AddImplement plus the ImplementsStatements), Inherits statements, and so on.
Adding Members to Syntax Nodes
The ClassBlock method also allows adding members, such as methods, to the class, each represented by an invocation to the MethodBlock method. It is worth mentioning the SyntaxFactory.QualifiedName, which generates a fully-qualified type name, and SyntaxFactory.ParseName, which parses a type name and returns an IdentifierNameSyntax object.
The same considerations apply to C#, but method names are slightly different, according to the different lexicon and semantics. It is always important to invoke the NormalizeWhitespace method, which supplies the proper indentation and line terminators to the generated syntax nodes.
Using the SyntaxFactory class with the help of IntelliSense is so straightforward that listing any possible method is not necessary at this point, and once you understand how any syntax nodes you see in the Syntax Visualizer can be created with methods exposed by SyntaxFactory, everything will be much easier.
Generating Syntax Nodes with SyntaxGenerator
Though the SyntaxFactory class is very powerful and allows generating any possible syntax element, you use it differently according to the programming language you are working with. The .NET Compiler Platform also offers the Microsoft.CodeAnalysis.Editing.SyntaxGenerator class, which is a language-agnostic factory for creating syntax nodes. This class allows for creating language-specific syntax nodes that are semantically similar between languages. In simpler words, it exposes the same members for both VB and C#, and you use it the same way against both languages.
In order to use SyntaxGenerator, you need an instance of this class that you get by invoking its static GetGenerator method. This requires either a Document instance (which represents a source code file) or a workspace. In the case of a Document, you can work with syntax nodes within an existing code file and GetGenerator will automatically detect the language it’s written with. In the case of a workspace, you can also create syntax nodes from scratch, and you pass both an instance of the MSBuildWorkspace class and the name of the programming language as arguments.
The Workspaces APIs and the MSBuildWorkspace class will be discussed in Chapter 8, but what you need to know at this point is simply that this type represents a workspace that can be populated with MSBuild solutions and projects. Code Listing 12 shows how to generate a syntax node that represents the content of Code Listing 10, using SyntaxGenerator. You will be surprised at how both C# and Visual Basic use exactly the same APIs.
Note: In order to complete and compile the example shown in Code Listing 12, you can either create a console application and then install the Microsoft.CodeAnalysis package from NuGet, or you can create a console application using the Stand-Alone Code Analysis Tool project template, which is available in the Extensibility node of the New Project dialog. The latter is discussed more thoroughly in Chapter 8, and automatically installs all the necessary NuGet packages to work with Roslyn.
Code Listing 12 (C#)
//Requires the following using directives: //using Microsoft.CodeAnalysis; //using Microsoft.CodeAnalysis.Editing; //using Microsoft.CodeAnalysis.MSBuild; static void Main(string[] args) { //Create a workspace var ws = MSBuildWorkspace.Create(); //Get an instance of SyntaxGenerator for //the specified workspace in C# var generator = SyntaxGenerator. GetGenerator(ws, "C#"); //Generate a qualified name for IDisposable var interfaceType = generator.DottedName("IDisposable"); //Generate a public method called Dispose var methodBlock = generator.MethodDeclaration( "Dispose", accessibility: Accessibility.Public); //Make the method implement IDisposable.Dispose var methodBlockWithInterface = generator. AsPublicInterfaceImplementation(methodBlock, interfaceType); //Generate a public abstract class //that implements the previous interface //and with the specified members var classBlock = generator.ClassDeclaration("Person", accessibility: Accessibility.Public, modifiers: DeclarationModifiers.Abstract, members:new SyntaxNode[] { methodBlockWithInterface }, interfaceTypes:new SyntaxNode[] { interfaceType }). NormalizeWhitespace(); Console.WriteLine(classBlock.ToFullString()); Console.Read(); } |
Code Listing 12 (VB)
'Requires the following Imports directives: 'Imports Microsoft.CodeAnalysis 'Imports Microsoft.CodeAnalysis.Editing 'Imports Microsoft.CodeAnalysis.MSBuild Sub Main() 'Create a workspace Dim ws = MSBuildWorkspace.Create() 'Get an instance of SyntaxGenerator for 'the specified workspace in VB Dim generator = SyntaxGenerator. GetGenerator(ws, "Visual Basic") 'Generate a qualified name for IDisposable Dim interfaceType = generator.DottedName("IDisposable") 'Generate a Public method called Dispose Dim methodBlock = generator.MethodDeclaration( "Dispose", accessibility:= Accessibility.Public) 'Make the method implement IDisposable.Dispose Dim methodBlockWithInterface = generator. AsPublicInterfaceImplementation(methodBlock, interfaceType) 'Generate a public abstract class 'that implements the previous interface 'and with the specified members Dim classBlock = generator.ClassDeclaration("Person", accessibility:= Accessibility.Public, modifiers:= DeclarationModifiers.Abstract, members:={methodBlockWithInterface}, interfaceTypes:={interfaceType}). NormalizeWhitespace Console.WriteLine(classBlock.ToFullString) Console.Read() End Sub |
Here are a few things to note at this point:
- You use the same APIs for both Visual Basic and C#.
- SyntaxGenerator allows generating syntax nodes via methods that represent the semantics of both Visual Basic and C#. By using IntelliSense, you will see the full list of methods, whose names recall the name of the type or member they generate (e.g., ClassDeclaration to generate a class, InterfaceDeclaration to generate an interface, PropertyDeclaration to generate a property, and so on).
- Methods from SyntaxGenerator return SyntaxNode and, in many cases, their parameters are either of type SyntaxNode, or collections or arrays of SyntaxNode objects. Working with SyntaxNode instead of derived objects gives SyntaxGenerator great flexibility.
- You can invoke the DottedName method to parse a qualified type name into a SyntaxNode that can be passed as an argument to any method that requires a SyntaxNode for representing a type name.
As for SyntaxFactory, both IntelliSense and the source definition will help you get the full list of available methods and understand their purpose.
Note: You might wonder why you should use SyntaxFactory when SyntaxGenerator provides a language-agnostic way to generate syntax nodes. First, SyntaxFactory fits well with syntax generation with APIs that are tailored for a specific language. Second, SyntaxFactory has existed from the very first community technology previews of Roslyn, and has been widely used over the years to create syntax nodes. SyntaxGenerator is much more recent, and does not have the same diffusion yet. If you search for examples about generating syntax nodes on the web, you will find that more than 90 percent of the examples use SyntaxFactory. For these reasons, you must have knowledge of both types.
Language-Tailored APIs
Though the Diagnostic APIs offer a huge number of types and members that are common to both C# and Visual Basic, there are situations where you need APIs that are tailored for a given language. With regard to the sample analyzer discussed so far, the Visual Basic language has the Date keyword, which you can use instead of System.DateTime (and which has the same return type). For the sake of completeness, you have to perform code analysis over the Date keyword as well. With the help of the Syntax Visualizer, you can discover how the Date keyword is represented by a syntax node called PredefinedType, mapped by a PredefinedTypeSyntax object. This implies that you need to register an additional action in the Initialize method, and you need to perform code analysis over this kind of node. That said, you have to perform the following tasks:
- Register an additional syntax node action that checks for the PredefinedType syntax kind, in the Initialize method of the diagnostic class.
- Edit the AnalyzeDateTime method in the diagnostic class to check if the current syntax node is either an IdentifierName or a PredefinedType.
- In the code fix provider class, register an additional action that will also offer a fix for the PredefinedType syntax node.
- Implement a new method that specifically works against the Date keyword to solve the code issue.
Code Listing 13 shows edits to the DiagnosticAnalyzer.vb file, whereas Code Listing 14 shows edits in the CodeFixProvider.vb file.
Code Listing 13 (VB)
Public Overrides Sub Initialize(context As AnalysisContext) context.RegisterSyntaxNodeAction(AddressOf AnalyzeDateTime, SyntaxKind.PredefinedType) context.RegisterSyntaxNodeAction(AddressOf AnalyzeDateTime, SyntaxKind.IdentifierName) End Sub Private Sub AnalyzeDateTime(context As SyntaxNodeAnalysisContext) 'Get the syntax node to analyze Dim root = context.Node 'If it's not an IdentifierName syntax node, 'return If TypeOf (root) Is PredefinedTypeSyntax Then root = CType(context.Node, PredefinedTypeSyntax) ElseIf TypeOf (root) Is IdentifierNameSyntax 'Conver to IdentifierNameSyntax root = CType(context.Node, IdentifierNameSyntax) Else Return End If 'Get the symbol info for 'the DateTime type declaration Dim dateSymbol = TryCast(context.SemanticModel. GetSymbolInfo(root).Symbol, INamedTypeSymbol) 'If no symbol info, return If dateSymbol Is Nothing Then Return End If 'If the name of the symbol is not 'DateTime, return If Not dateSymbol.MetadataName = "DateTime" Then Return End If 'Create a diagnostic at the node location 'with the specified message and rule info Dim diagn = Diagnostic.Create(Rule, root.GetLocation, "Consider replacing with DateTimeOffset") 'Report the diagnostic context.ReportDiagnostic(diagn) End Sub |
Code Listing 14 (VB)
Private Async Function ReplaceDateTimeAsync _ (document As Document, node As SyntaxNode, cancellationToken As CancellationToken) _ As Task(Of Document) 'Get the root syntax node for the current document Dim root = Await document.GetSyntaxRootAsync Dim newRoot As SyntaxNode = Nothing 'Convert the syntax node into the specialized kind If TypeOf (node) Is IdentifierNameSyntax Then Dim convertedNode = DirectCast(node, IdentifierNameSyntax) 'Create a new syntax node Dim newNode = convertedNode. WithIdentifier(SyntaxFactory. ParseToken("DateTimeOffset")). WithTrailingTrivia(node. GetTrailingTrivia) newRoot = root.ReplaceNode(node, newNode) ElseIf TypeOf (node) Is PredefinedTypeSyntax Dim convertedNode = DirectCast(node, PredefinedTypeSyntax) Dim newIdentifierName = SyntaxFactory. IdentifierName(SyntaxFactory. ParseToken("DateTimeOffset")). WithTrailingTrivia(node. GetTrailingTrivia) newRoot = root.ReplaceNode(node, newIdentifierName) End If 'Create a new root syntax node for the current document, 'replacing the syntax node that has the diagnostic with 'a new syntax node 'Generate a new document Dim newDocument = document.WithSyntaxRoot(newRoot) Return newDocument End Function |
As you can see in Code Listing 13, you need an additional check to determine if the syntax node is either a PredefinedTypeSyntax or an IdentifierNameSyntax, and perform the proper conversion. You do not need to change the rest of the code because the symbol information for Date is the still obtained from the same SyntaxNode.
In Code Listing 14, you see how the ReplaceDateTimeAsync method has been enhanced to check if the node is either an IdentifierNameSyntax or a PredefinedTypeSyntax, and to supply a new syntax node based on the node’s type. In the current example, you are not changing properties of an existing node (PredefinedType). Instead, you need to create a totally different kind of syntax node (IdentifierName) that will replace the previous one in the root node, so you cannot use any methods whose names begin with With.
Here you create a new IdentifierNameSyntax, using the SyntaxFactory.IdentifierName method, which returns an object of type IdentifierNameSyntax and takes an argument of type SyntaxToken. This syntax token contains the name of the identifier (DateTimeOffset) and is generated with SyntaxFactory.ParseToken. The newly generated IdentifierNameSyntax will replace the PredefinedTypeSyntax in the root syntax node. With this approach, you have also addressed the requirement of providing a code fix for the Date keyword as well. This will be demonstrated in practice shortly, when testing the analyzer.
Hints for Improving the Sample Analyzer
The DateTimeAnalyzer sample has been designed to make it easier for you to understand the concepts and the logic behind the Diagnostic APIs. However, it has some limitations, and it can be certainly improved in different ways. For example, because the constructor of DateTimeOffset has an overload that takes one argument of type DateTime, when the code declares a new instance of a DateTime object, you should consider providing a code fix that specifies the DateTime declaration as the argument of the DateTimeOffset’s constructor like this: DateTimeOffset myDate = new DateTimeOffset(new DateTime(2015, 09, 09));.
Additionally, for Windows Store and Windows Phone apps, you could restrict the diagnostic to be reported only if a DateTime is assigned to the Date property of the DatePicker control (which is of type DateTimeOffset). In this way, the improper assignment to the user control would be reported as a code issue, but developers would be free to use DateTime outside of that context. With the help of the Syntax Visualizer, it will be easier to understand which syntax nodes you need to work with for these scenarios.
Restricting Code Analysis to Specific Platforms
In many cases, you might want diagnostics to be applied only in certain development platforms. For instance, the diagnostic in the current sample analyzer makes sense only within Windows Store, Windows Phone, and OData Web API applications. The Compilation class exposes a method called GetTypeByMetadataName that can be used to determine if the analyzed project has a reference to any libraries that define the specified type name. If there is no reference, the method returns null; a null result means that your analyzer is not running on a given platform.
For a better understanding, let’s consider the case of Windows Store and Windows Phone apps. The Windows Runtime defines an object called Windows.Storage.StorageFile, which represents a file on disk. You can invoke Compilation.GetTypeByMetadataName by passing Windows.Storage.StorageFile or any other type name defined in the Windows Runtime, to detect if the project has a reference to libraries that define this type. If the result is null, it means that your analyzer is running on neither Windows 8.1 nor Windows Phone 8.1, and therefore, the code analysis can be skipped (which also improves performance).
Many developers used to place this check inside the delegate that performs the code analysis (AnalyzeDateTime in the current example). This definitely works, but the check would be executed every time the delegate is invoked (that is, at every key stroke). A better approach is to register a compilation start action in the Initialize method and perform this check only once. To accomplish this, you invoke the AnalysisContext.RegisterCompilationStartAction, which executes an action when compilation starts. Code Listing 15 demonstrates this.
Code Listing 15 (C#)
public override void Initialize(AnalysisContext context) { context. RegisterCompilationStartAction( (CompilationStartAnalysisContext ctx) => { var requestedType = ctx.Compilation. GetTypeByMetadataName("Windows.Storage.StorageFile"); if (requestedType == null) return; ctx.RegisterSyntaxNodeAction(AnalyzeDateTime, SyntaxKind.IdentifierName); }); } |
Code Listing 15 (VB)
Public Overrides Sub Initialize(context As AnalysisContext) context.RegisterCompilationStartAction( Sub(ctx As CompilationStartAnalysisContext) Dim requestedType = ctx.Compilation. GetTypeByMetadataName("Windows.Storage.StorageFile") If requestedType Is Nothing Then Return ctx.RegisterSyntaxNodeAction(AddressOf AnalyzeDateTime, SyntaxKind.PredefinedType) ctx.RegisterSyntaxNodeAction(AddressOf AnalyzeDateTime, SyntaxKind.IdentifierName) End Sub) End Sub |
If GetTypeByMetadataName returns null, it means there is no reference to Windows.Storage.StorageFile, and therefore the analyzer is not running on Windows 8.1 or Windows Phone 8.1 projects. If it returns a non-null result, the syntax node action is finally registered.
Testing and Debugging an Analyzer
It’s time to test and debug the sample analyzer. Generally speaking, to test an analyzer, you first make sure the .Vsix project is set as the startup project, and then you just press F5. At this point, Visual Studio 2015 deploys and installs the auto-generated VSIX package for the analyzer to the experimental instance of the IDE. When this starts, you can simply create a new project or open an existing one and test if your analyzers work.
For the current sample analyzer, make sure the DateTimeAnalyzer.Vsix project is the startup project, and then press F5. When the experimental instance is ready, create a new Windows 8.1 project (or a Windows Phone 8.1 project) and place a DateTime declaration anywhere in the code editor (see Figure 31).
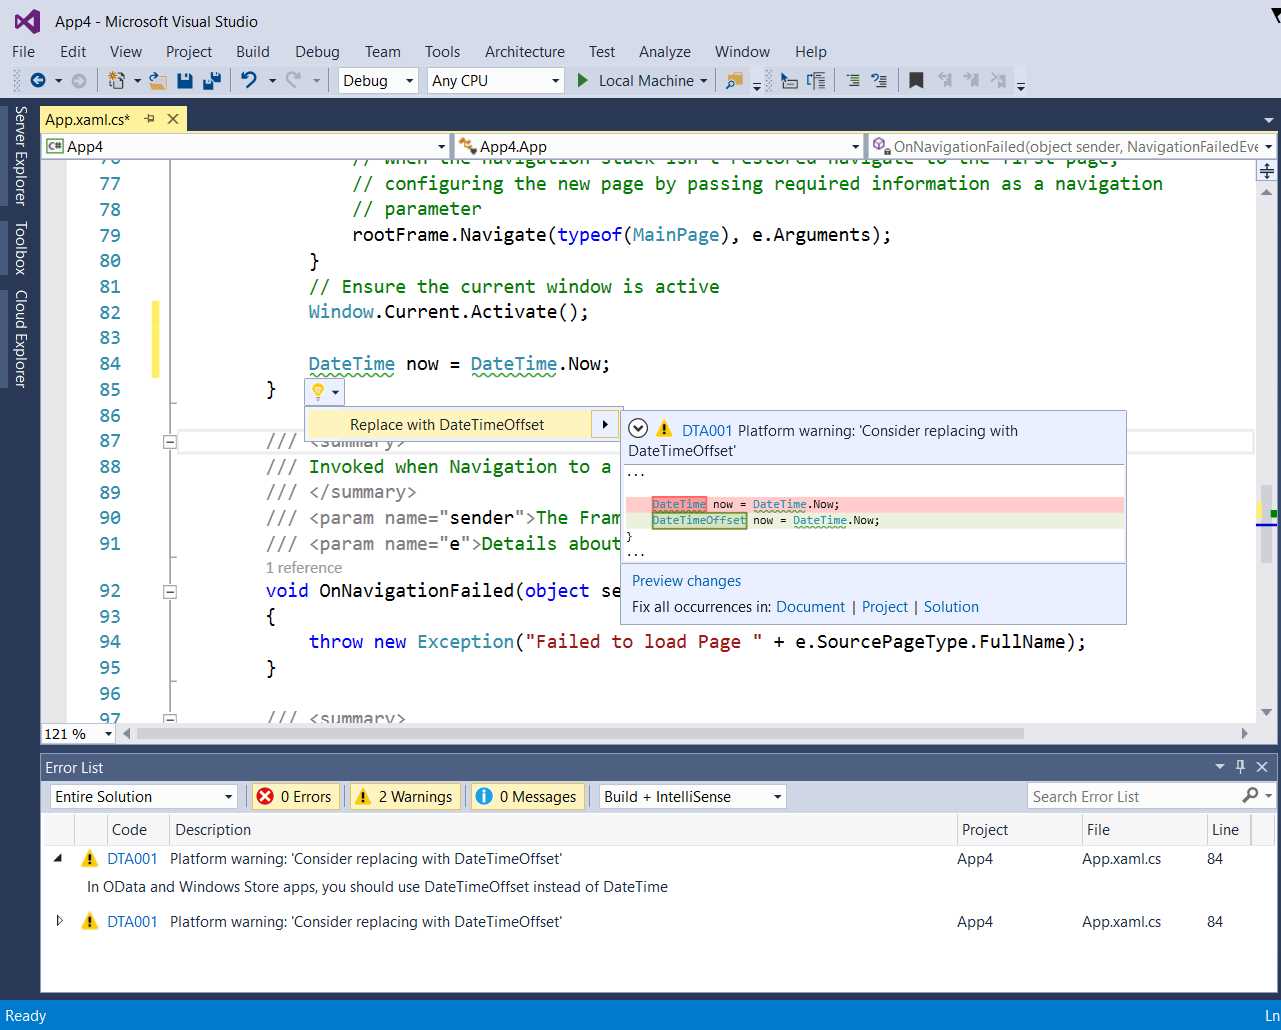
Figure 31: The DateTimeAnalyzer detects the expected issue and suggests code fixes
As shown in Figure 31, the use of DateTime is correctly identified as a code issue, so the code editor reports a warning with the specified message and diagnostic ID. The light bulb suggests fixes and shows the live preview. You can decide to apply the code fix to all the instances in the document or in the solution. Also notice how the Error List window shows the full message for the code issue, and if you click the error code, you will be able to visit the documentation page on GitHub.
For the sake of completeness, you could also try to create a different project and see how the analyzer will not work because it has been restricted to specific development platforms. You can also use the full debugging instrumentation offered by Visual Studio 2015 to debug an analyzer. This will be important when an analyzer does not work as expected. You can place breakpoints and use all the diagnostic windows you already know, as demonstrated in Figure 32.
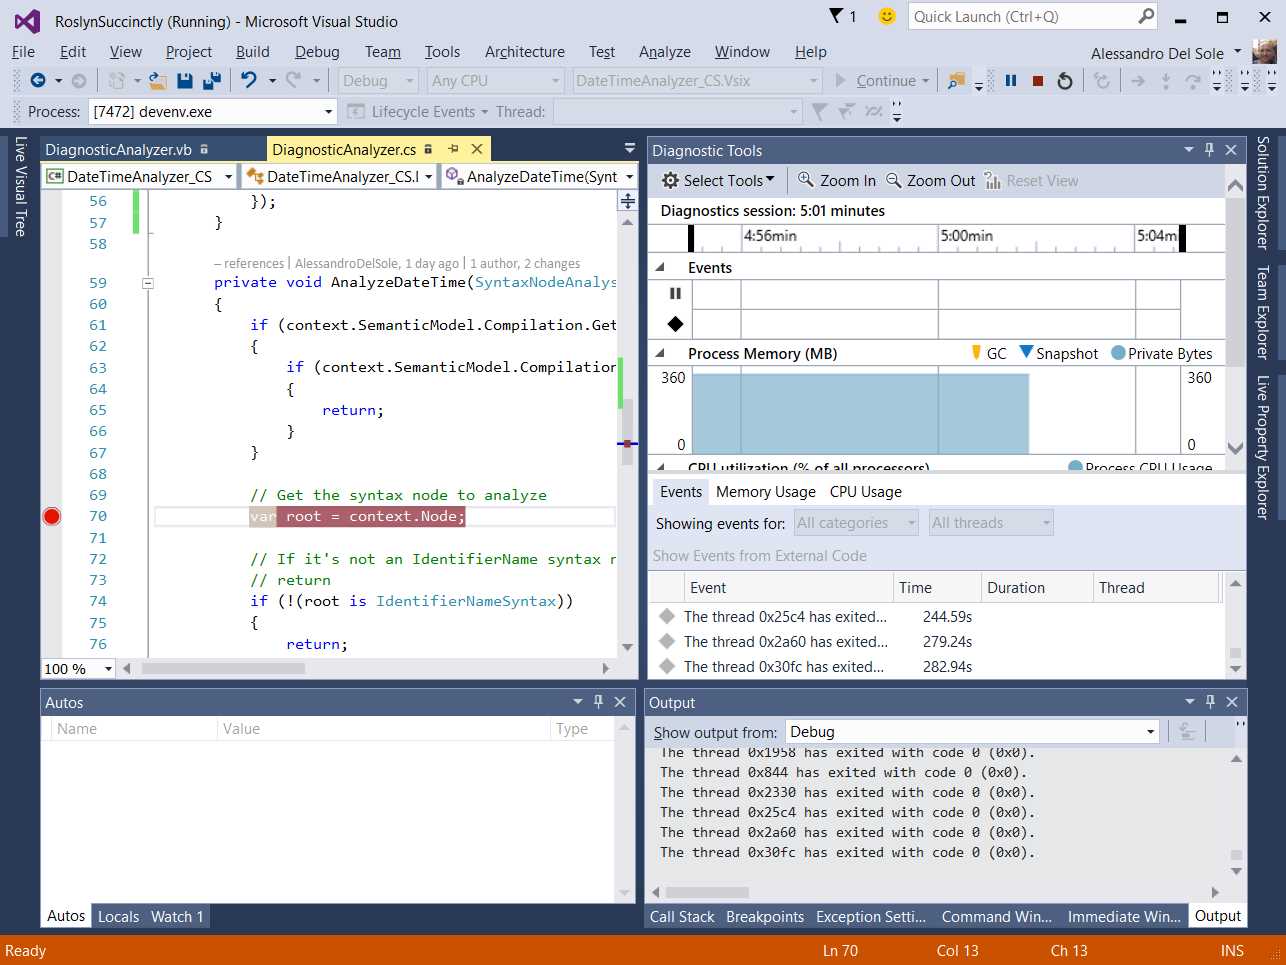
Figure 32: Debugging an analyzer
You can manage installed analyzers and code refactorings in the experimental instance by selecting Tools > Extensions and Updates. Figure 33 shows how the sample analyzer appears inside the list of installed extensions.
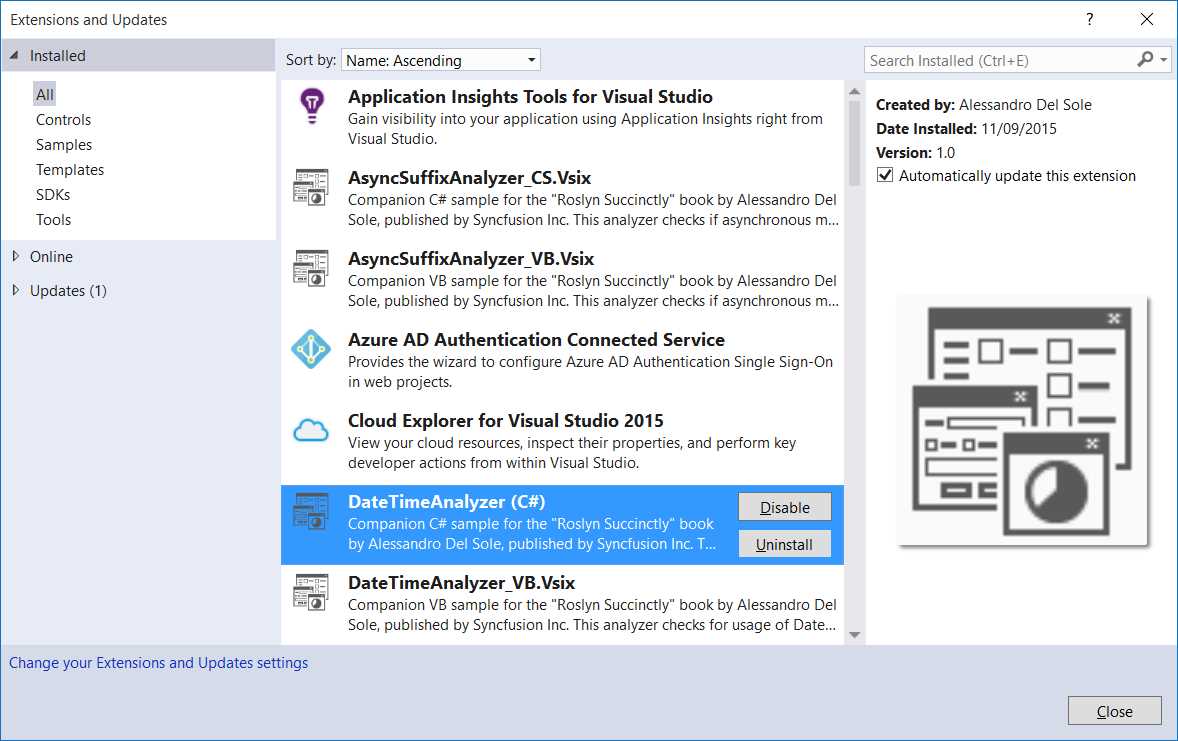
Figure 33: Managing installed analyzers and refactorings in the experimental instance
You can disable or remove installed analyzers as you would do with any other Visual Studio extension. This gives you an idea of what happens when an analyzer or code refactoring is distributed to the public as a VSIX package; this is an important topic and is described in Chapter 7, “Deploying Analyzers and Refactorings to the Visual Studio Gallery”.
Tip: If you uninstall an analyzer from the experimental instance, the next time you open the analyzer project in Visual Studio and press F5 for debugging, the build process could fail. This is because the analyzer is not found in the experimental instance. Should this happen, upgrade the VSIX version number in the VSIX manifest designer that you enable by double-clicking the Source.vsixmanifest file in the Solution Explorer. At this point, rebuilding the solution will succeed.
Adding Multiple Diagnostics to an Analyzer Library
An analyzer library you create via the Diagnostic with Code Fix project template can contain and expose many diagnostics and code fixes. The .NET Compiler Platform SDK also installs the following specific item templates to Visual Studio:
- Analyzer: This adds a new code file containing a diagnostic analyzer to the project.
- Code Fix: This adds a new code file containing a code fix to the project and requires the project to contain at least a diagnostic. Remember to edit the auto-generated code in order to match the proper diagnostic ID.
- Refactoring: This adds a new code file containing a code refactoring to the project (see Chapter 5).
To use one of these templates, either select Project > Add New Item or right-click the project name in Solution Explorer, then select Add > New Item. When the Add New Item dialog appears, select the Extensibility node.
Chapter Summary
In this chapter, you have built your first Roslyn code analyzer. You learned how to use the Syntax Visualizer to understand the syntax elements you need to work with, and then you started working with the Diagnostic with Code Fix project template. You saw the most important .NET objects in a code analyzer, and you wrote a diagnostic, learning where and how to implement the code analysis logic with a number of syntactical elements that you will often find when working with the Roslyn APIs. Next, you implemented a code fix that integrates into the light bulb and fixes a code issue. You discovered important concepts about generating syntax elements, APIs tailored for the VB and C# languages, and how to restrict code analysis to specific development platforms.
Finally, you learned about testing and debugging an analyzer, discovering how you can use the debugging tools in Visual Studio 2015 that you already know. You are at a very good point now—you have in your hands all you need to create great diagnostics. But to complete the job, you have to learn how to create a code refactoring, which is the topic of the next chapter.
- 1800+ high-performance UI components.
- Includes popular controls such as Grid, Chart, Scheduler, and more.
- 24x5 unlimited support by developers.