
Roslyn Succinctly®

CHAPTER 3
Walking through Roslyn: Architecture, APIs, Syntax
The .NET Compiler Platform is built upon several API layers and services. Some of these layers allow exposing the compilers’ APIs to consumers and let you take advantage of code analysis to build amazing developer tools. This chapter gives you an important conceptual overview of the .NET Compiler Platform architecture, describing the API layers and services and providing the basis for concepts and topics you will face in the chapters that follow. You will also get started with the fundamental concept of syntax, discovering how the .NET Compiler Platform allows working against source code via managed objects with the help of a visual tool called the Syntax Visualizer, which will become your best friend when coding for Roslyn. That said, take your time to read this chapter carefully. It is all about theory, but it’s important to understand before you move on to practice.
The Compiler Pipeline
The .NET Compiler Platform offers open source Visual Basic (VB) and C# compilers with rich code analysis APIs. Code analysis does not mean just searching for code issues and reporting errors in the source code; instead, code analysis means opening compilers to share all the information they have about our code via APIs that developers can use to execute code-related tasks in their applications or tools. To accomplish this, compilers implement an API layer that mirrors the classic compiler pipeline. As shown in Figure 21, the traditional compiler pipeline is made of the following different phases:
- The parse phase, where the compiler tokenizes the source code and parses it into syntax based on the given language grammar.
- The symbols and metadata phase, which generates named symbols from declarations and imported metadata.
- The binder phase, where identifiers are assigned to symbols.
- The IL emitter phase, where the compiler builds up all the information from the previous phases, emitting an assembly.
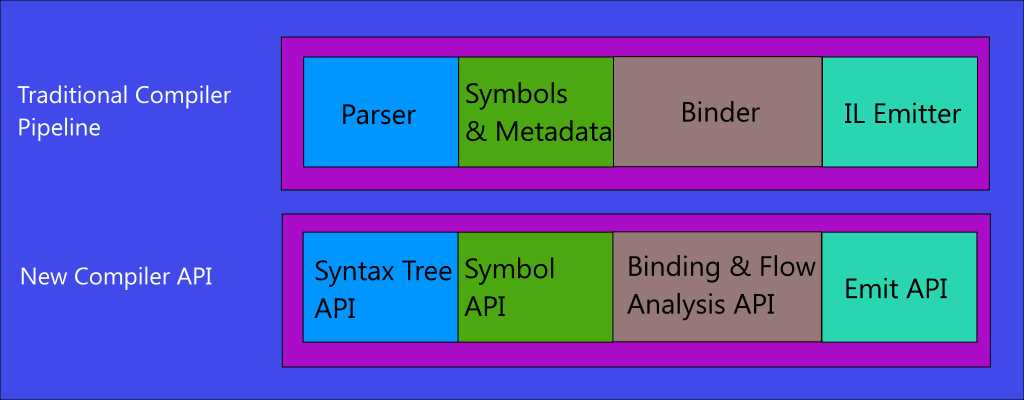
Figure 21: Traditional compiler pipeline and new compiler APIs
In the .NET Compiler Platform, every phase in the compilation process is treated as a separate component surfaced by an object model that exposes information for that phase in the form of .NET objects. The parsing phase is now represented by a syntax tree (see “Working with Syntax” later in this chapter). The symbols and metadata phase is represented by a hierarchical symbol table. The binder phase is now represented by an object model that exposes the result of the semantic analysis the compiler performs over the information collected at that point. The IL emitter phase is represented by the Emit API, which produces Intermediate Language (IL) byte codes.
These re-architected phases are also shown in Figure 21, and are referred to as Compiler APIs, which will be discussed in more detail shortly. Understanding this change is very important. In fact, it is the first conceptual step you must make to consider the VB and C# compilers as platforms, because it’s here that information starts to be open.
The .NET Compiler Platform’s Architecture
The .NET Compiler Platform’s architecture is made of two main layers and one secondary layer: The Compiler APIs and Workspaces APIs, and the Feature APIs, as shown in Figure 22.

Figure 22: The .NET Compiler Platform’s layered architecture
Both layers will be detailed shortly; however, a summary explanation can be useful to give you a starting point. The Compiler APIs layer offers an object model that holds information about syntax and semantics exposed at each phase of the compiler pipeline. The compiler not only performs its natural tasks (that is, producing assemblies from source code), but it also shares information about each phase of the pipeline via proper .NET objects. The Compiler APIs also include an immutable snapshot of a single invocation of a compiler, which includes source code files, options, and assembly references.
The second main layer is the Workspaces APIs layer, which exposes an object model that holds and organizes all the information in a solution. By using this layer, you can perform code analysis across an entire solution and access the compiler’s object model without parsing source code files or configuring compiler options and dependencies.
The Feature APIs layer is an additional layer that is specifically designed to offer code fixes and refactorings, and relies on the other layers. Now it is time for a more thorough discussion about the fundamental building blocks of the .NET Compiler Platform and how to work with it.
Assemblies and Namespaces
The .NET Compiler Platform exposes the Compiler APIs and the Workspaces APIs through a set of .NET assemblies. The following is a list of the most important assemblies:
- Microsoft.CodeAnalysis.dll, which exposes the language-agnostic set of the Compiler APIs.
- Microsoft.CodeAnalysis.VisualBasic.dll, which exposes the Compiler APIs tailored for Visual Basic.
- Microsoft.CodeAnalysis.CSharp.dll, which exposes the Compiler APIs tailored for C#.
- Microsoft.CodeAnalysis.Workspaces.dll, which exposes a common set of the Workspaces APIs.
- Microsoft.CodeAnalysis.VisualBasic.Workspaces.dll, which exposes Workspaces APIs tailored for Visual Basic.
- Microsoft.CodeAnalysis.CSharp.Workspaces.dll, which exposes Workspaces APIs tailored for C#.
- Microsoft.CodeAnalysis.Common.dll, which exposes common utilities for code analysis.
- System.Collections.Immutable.dll, which exposes special, immutable collections used to work with syntax trees’ immutability.
These assemblies are installed in your projects via NuGet. They are automatically installed in any project you create using the templates offered by the .NET Compiler Platform SDK, but you can also download and install them manually to different kinds of projects using the NuGet Package Manager tooling, for instance, if you want to implement code generation inside a stand-alone application. They have corresponding namespaces, such as Microsoft.CodeAnalysis, Microsoft.CodeAnalysis.VisualBasic, Microsoft.CodeAnalysis.CSharp, and so on, which expose the .NET objects required for code analysis.
Tip: The full list of Roslyn assemblies and the full source code can be easily investigated by browsing the online reference source.
The Concept of Immutability
As you will discover in the next sections, the .NET Compiler Platform offers hundreds of types to represent all the information compilers expose. Most of these types, such as Solution, Document, SyntaxTree, and SyntaxNode, are immutable. Immutability is a key concept in Roslyn and provides thread-safety so that multiple developers can work against the same object without any locks or duplication.
For instance, if you want to make changes to a source code file, which is represented by the Document class, you actually create a new Document based on the existing one, and supply the required changes. The way you create new objects in code based on existing, immutable objects is shown in practice in Chapters 4 and 5. For now, keep in mind what immutability is, because you will find many references to it throughout this chapter.
The Compiler APIs
The Compiler APIs layer offers an object model related to syntactic and semantic information exposed at each phase of the compiler pipeline. This layer also includes an immutable snapshot of a single invocation of a compiler, which includes assembly references, compiler options, and source code files. There are two distinct compiler APIs for Visual Basic and C#, which are very similar but tailored for high-fidelity to each language. This layer has a fundamental characteristic: it has no dependencies on any Visual Studio components, so any developer can use it in stand-alone applications, too.
Diagnostic APIs
When the compiler analyzes the source code, other than producing an assembly, it may also produce a set of diagnostics that cover syntax and semantics, reporting squiggles, errors, warnings, or informational messages for each code issue. These diagnostics are exposed by the Compiler APIs through the Diagnostic APIs, an extensible set of APIs that allows developers to plug their custom analyzers and diagnostics into the compilation process alongside compiler-defined diagnostics. In this way, this set of APIs can integrate naturally with tools such as MSBuild and Visual Studio 2015, which leverage the Diagnostic APIs to show live squiggles, halt a build on errors, and suggest code fixes.
The Diagnostic APIs have no dependencies on any Visual Studio component, and therefore you could use these libraries to plug an enhanced experience into your developer tools such as code editors. The Diagnostic APIs is the set you will work with more in this book. In fact, both Chapter 4 and Chapter 5 discuss how to create custom, domain-specific analyzers and refactorings that rely on the Diagnostic APIs. Also, any developer who starts working with the .NET Compiler Platform typically begins with the Diagnostic APIs, because they give you a precise idea of what you can do with the Roslyn platform.
Scripting APIs
As part of the Compiler APIs, the .NET Compiler Platform team at Microsoft has created the Scripting APIs, which allow you to compile and execute code snippets and accumulate a runtime execution context. At the time of this writing, this layer is available in the source reference page on GitHub, but has not shipped with .NET Compiler Platform 1.0, and there is no official news about its release.
The Workspaces APIs
The Workspaces APIs layer constitutes the starting point for performing code analysis and refactoring over entire solutions and projects. These APIs organize all the information about the projects in a solution into a single object model and offer direct access to the compiler’s object model so that you do not need to parse source code files, configure compile options, or manage projects and their dependencies.
This layer has no dependencies on any Visual Studio components, but it offers a common set of APIs host environments such as IDEs (like Visual Studio 2015) can use to implement code analysis, code refactoring, code formatting and colorization, and more. For instance, Visual Studio 2015 uses these APIs to implement the Find All Reference and Document Outline windows, format and colorize source code in the editor, and perform code generation. The .NET Compiler Platform exposes the Workspaces APIs via specific .NET objects, which are described in the next section and reexamined in Chapter 8 with more examples.
Understanding Workspaces, Solutions, Projects, and Documents
A workspace is an instance of the Microsoft.CodeAnalysis.Workspace object, and is the representation of an MSBuild solution as a collection of projects, each with a collection of documents where each document represents a .vb or .cs source code file. More specifically:
- A solution is an immutable model of projects and documents that is represented by an instance of the Microsoft.CodeAnalysis.Solution type. Because of immutability, the solution model can be shared without locking or duplication. You can get an instance of the current solution in the workspace with the Workspace.CurrentSolution property, which is of type Solution, and which never changes because of its immutable nature. You can modify a solution by creating a new one based on an existing solution plus the required changes. The newly created solution must be applied back to the workspace in order to reflect the supplied changes.
- A project is an immutable instance of the Microsoft.CodeAnalysis.Project class and is a collection of all the source code documents, assembly references, project-to-project references, parse options, and compilation options. From Project, you can access information about the compilation without the need to parse source code files or iterating project references, and you can also access information such as the solution name, assembly name, version, and output file path.
- A document represents a single source code file and is represented by an instance of the Microsoft.CodeAnalysis.Document class. This allows accessing the source text of the file and elements such as the syntax tree and the semantic model, both of which are described shortly.
Because the Workspaces APIs have no dependencies on Visual Studio 2015, every host environment, such as custom IDEs, can access the object model of a solution. This allows host environments to retrieve all the solution information, or perform code-related tasks such as code analysis, refactorings, or formatting over an entire solution, a project, or a single document.
Tip: You can also create stand-alone workspaces that are disconnected from the host environment or use workspaces inside applications that do not act as host environments. You will see an example of the latter scenario in Chapter 8, “Workspaces, Code Generation, Emit”.
Working with Syntax
With the Roslyn APIs, you can analyze and generate Visual Basic and C# source code. This can happen against source code opened inside a Visual Studio solution, source code that an application produces at runtime, source code from files on disk, and, more generally, source code from any location.
Source code is actually text. Whether you need to parse source text to generate binary objects or round-trip back to source text from binary objects, you need a structured way to represent the source code. Programming languages like C# and Visual Basic have their own lexicon, syntax, semantics, and everything that is needed to write a program.
In the .NET Compiler Platform, the lexical and syntactic structure of the source code is represented by syntax trees. Syntax trees are represented by instances of the Microsoft.CodeAnalysis.SyntaxTree class and hold the source information in full fidelity, so they are important for the following reasons:
- They allow rearranging the source code in a managed, .NET way instead of working with pure text.
- They allow Visual Studio 2015 to elaborate the syntactic structure of the source code in a solution.
- Compilation, code analysis, code generation, and code refactoring are built upon them.
- They represent every single item the compiler detects in the source code, such as code blocks, syntactical constructs, comments, and white spaces, exactly as they were typed. As an implication, a syntax tree can be used to round-trip source code back to the text it was parsed from.
As you’ll learn shortly, syntax trees are represented by .NET objects. This provides a way to replace a syntax tree with a new one in a managed way, without working against pure text. An important fact to consider about syntax trees at this point is that once you create a syntax tree or you get an instance of an existing tree, this never changes. In fact, syntax trees are immutable. Now you will get started with a visual tool called the Syntax Visualizer, which allows you to get more familiar with syntax elements.
Investigating Syntax with the Syntax Visualizer
I have stated several times that in Visual Studio 2015 the code editor has been rebuilt on top of the .NET Compiler Platform. This means that Visual Studio itself and managed compilers use syntax trees to parse and analyze the source code you write.
For a better and deeper understanding of the syntactic structure of source code, the .NET Compiler Platform SDK offers a nice tool window called the Syntax Visualizer, which you enable via View > Other Windows > Syntax Visualizer. The Syntax Visualizer makes it easier to browse the source code in a Roslyn-oriented way, showing the syntax trees and child elements a code block is made of. For instance, consider the code in Code Listing 2, which is referred to as a console application.
Code Listing 2
using System; using System.Collections.Generic; using System.Linq; using System.Text; using System.Threading.Tasks; namespace SyntaxVisualizerDemo { class Program { static void Main(string[] args) { DateTime oneDate = new DateTime(2015, 8, 19); //Formatting a string with interpolation Console.WriteLine($"Today is {oneDate.ToShortDateString()}"); Console.ReadLine(); } } } |
The code is very simple; it just creates a new instance of the System.DateTime object and prints the date properties to the Console window. This small piece of code is enough to help you understand many concepts about syntax trees.
Enable the Syntax Visualizer and then click anywhere in the code editor. When you click, the Syntax Visualizer starts representing the content of the code file in a hierarchical way, as shown in Figure 23.
The Syntax Visualizer is made of two areas: Syntax Tree and Properties. The Syntax Tree area provides a hierarchical view of the syntax for the current file. Every item in the hierarchy is colored according to its meaning: Blue represents a syntax node, green represents a syntax token, and maroon represents a syntax trivia (all of these elements are discussed shortly). You can click the Legend button to get an explanation about the colors.
The Properties area shows details about the currently selected item in the syntax tree. As you will discover in Chapter 4, “Writing Code Analyzers,” the Properties area is also useful to determine which .NET types map the selected syntax node, token, or trivia depending on its kind, and it makes it easier to understand what .NET objects you need to parse or generate code blocks. You will use the Syntax Visualizer many times in this book, so do not worry if something is not clear at this point.
As you can see in Figure 23, at the first level of the hierarchy, there is the CompilationUnit. A CompilationUnit represents the whole structured content of a source code file (.cs or .vb). If you expand such an element, you can find many nested elements, each representing a part of the source code.
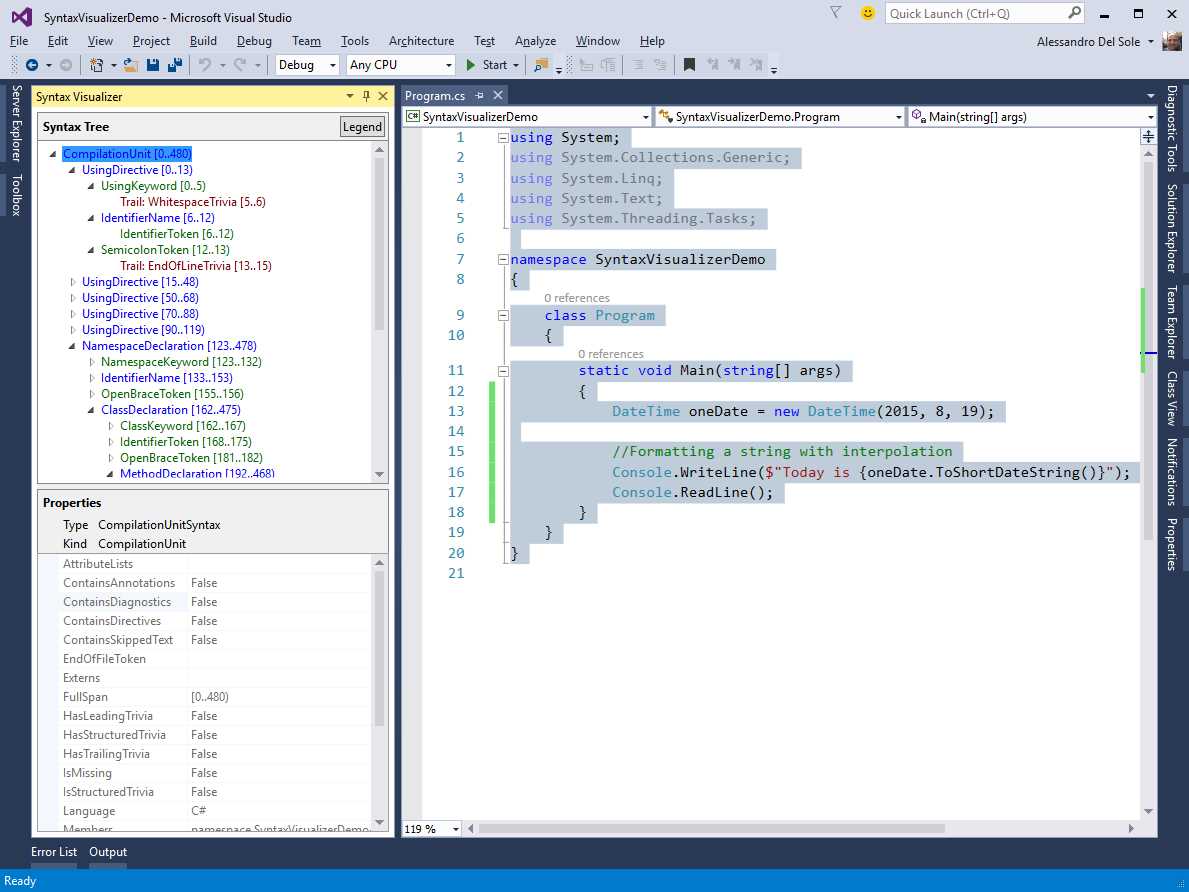
Figure 23: The Syntax Visualizer allows inspecting the syntactic structure of source code
For example, if you expand the CompilationUnit you find, among the others, a NamespaceDeclaration that represents a namespace definition and its content. If you expand the NamespaceDeclaration, you see a ClassDeclaration and its syntax elements. In this case, you see how the Program class is defined. Within the ClassDeclaration, if you click and expand the MethodDeclaration element, you can see all the parts that constitute the Main method definition (see Figure 24).
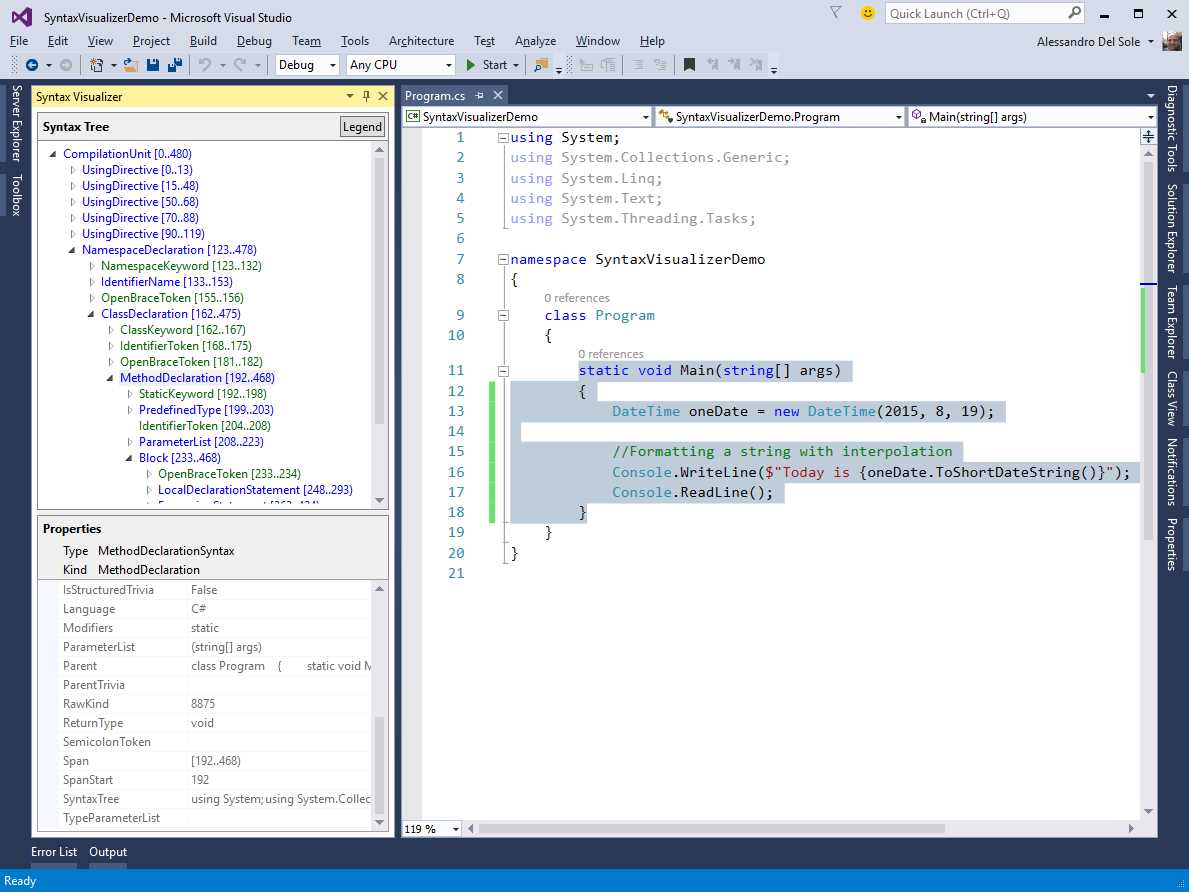
Figure 24: Understanding a method block definition
As you can see, the MethodDeclaration represents a method definition as a whole. For each of these elements, you will find an object that represents every keyword, every white space, every punctuation element, every type name, and so on, exactly as typed in the source text. If you walk through the syntax elements that compose the method definition, you can find one called LocalDeclarationStatement, which represents the entire line of code that declares and instantiates an object of type System.DateTime. The LocalDeclarationStatement has nested elements, each representing a type name, a white space, the object initialization expression, and the semicolon. This is shown in Figure 25.

Figure 25: Understanding how an object is declared and instantiated
If you select the line of code that contains the Console.WriteLine statement, you will see a syntax element called ExpressionStatement, which is made of nested elements such as the method invocation, the interpolated string, the invocation to ToShortDateString, and all the necessary elements. This is demonstrated in Figure 26.
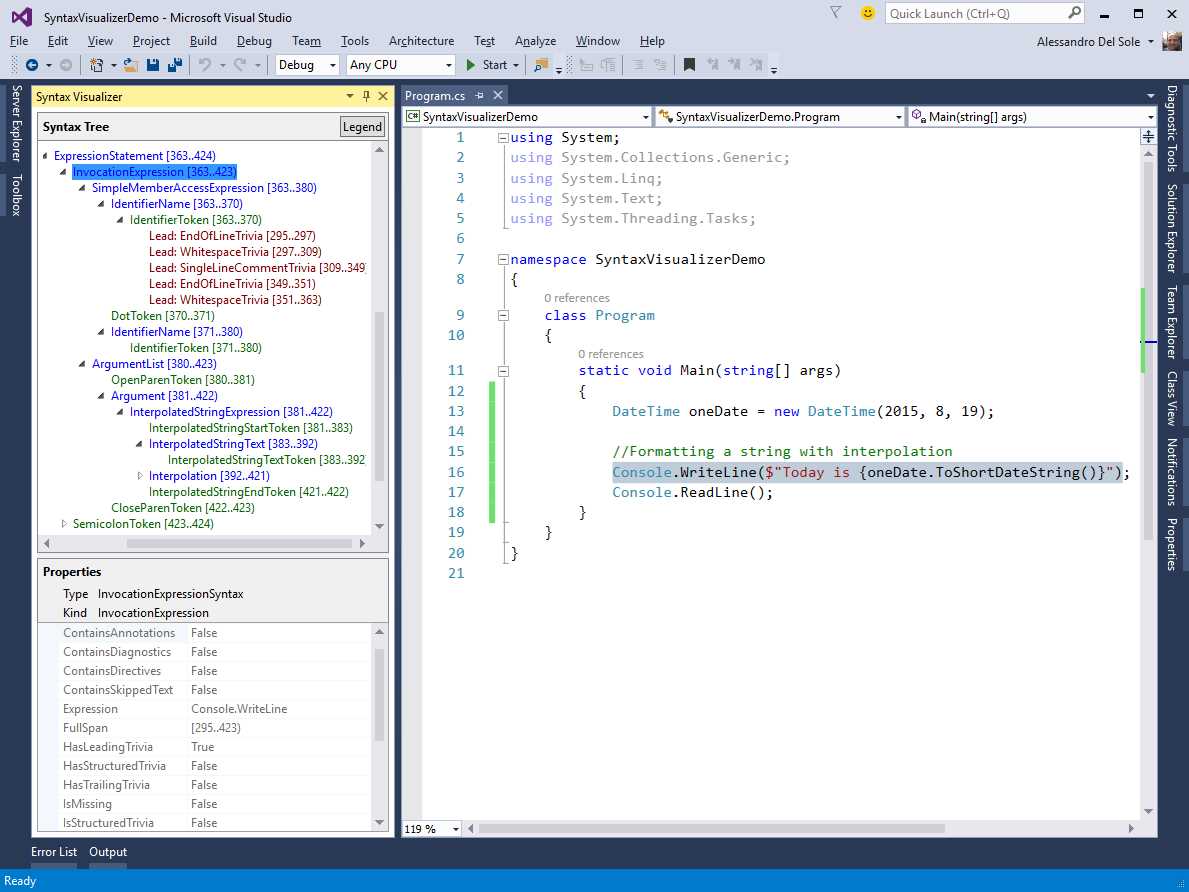
Figure 26: Understanding method invocations with arguments
Not all of the syntax elements involved in the hierarchy have been mentioned, and this is intentional. In fact, I want to encourage you to practice with the Syntax Visualizer on your own by selecting and expanding many of the nodes in the syntax tree to get more familiar with the Roslyn representation of the source text. In the sections that follow, you will get more detailed information about syntactical elements, and in Chapters 4 and 5 you will use many syntax elements in practice with the help of the Syntax Visualizer.
For now, click in the editor, expand the Syntax Tree, and try to check the meaning of syntax elements in the Properties area of the Syntax Visualizer. You will discover how intuitive it is understanding the syntactical representation of the code in the .NET Compiler Platform.
Understanding Syntax Elements
Syntax trees have a hierarchical structure with descendant nodes, called syntax nodes, that have child syntax elements, as you can see by using the Syntax Visualizer tool. This section describes syntax nodes and other syntax elements.
Tip: All the syntax elements described in this section will be revisited and discussed in practice in Chapters 4 and 5.
Syntax Nodes
Syntax nodes represent syntactical constructs within syntax trees, such as expressions, class blocks, statements, and clauses. The most basic representation of a syntax node is an instance of the Microsoft.CodeAnalysis.SyntaxNode class, which is the base class for more specialized objects representing different kinds of constructs. For instance, the ClassStatementSyntax class represents a syntax node related to a class declaration in Visual Basic, and the base class in its inheritance hierarchy is SyntaxNode.
Tip: You can explore a syntax node’s complete inheritance hierarchy with the Object Browser tool window.
In the Syntax Visualizer tool, syntax nodes are represented in blue. If you look back at Figure 24, you can see some examples of syntax nodes, such as UsingDirective and NamespaceDeclaration.
The following is a list of characteristics of syntax nodes:
- They always have other child nodes and tokens.
- They expose a ChildNodes method, which returns a sequential list of nested syntax nodes, but does not return syntax tokens.
- They expose an immutable Parent property, which allows accessing the parent node.
- They expose Descendant methods like DescendantNodes, DescendantTokens, and DescendantTrivia, which allow accessing child elements of a syntax node and return a list of nodes, a list of tokens, and a list of trivia, respectively, within the subnode.
- Each specialized syntax node class allows accessing named properties. For instance, the NamespaceDeclarationSyntax class, which represents a namespace’s syntax node, has NamespaceKeyword and Name properties, representing the namespace keyword and the namespace name, respectively.
Syntax nodes are primary elements in the syntax hierarchy. You will work with specialized syntax node classes very often when writing code analyzers and refactorings, as you will see in more detail in the next two chapters.
Syntax Tokens
Syntax tokens represent identifiers, punctuation, literals, and keywords. They are never parents of syntax nodes or other syntax tokens. If you take a look back at Figure 24, you can see how the NamespaceKeyword element is a syntax token; in the Syntax Visualizer tool, syntax tokens are represented in green.
Syntax tokens are represented by the Microsoft.CodeAnalysis.SyntaxToken structure. It is a value type for efficiency purposes, and unlike syntax nodes, there is only one SyntaxToken structure for all kinds of tokens with a number of properties that are common to every value they represent. Among others, SyntaxToken exposes the following properties:
- Value (of type Object), which returns the raw value of the object it represents.
- ValueText (of type String), which returns the result of invoking the ToString() method on Value.
The difference between the two properties can be summarized as follows: Imagine you have an integer literal token, such as 1000. Value returns the exact decoded integer value 1000. ValueText can recognize Unicode characters identified by an escape sequence; therefore, it can contain 1000, but also &H3E8 (hexadecimal) or &O1750 (octal). These three tokens have different text, but they have the same value (1000).
Syntax Trivia
Syntax trivia represent portions of the source text that the compiler ignores to emit the IL, such as white spaces, comments, XML comments, preprocessing directives, and end-of-line terminators. They exist to maintain full fidelity with the original source text, but they are not included in a syntax tree’s child nodes. So, when you generate a new tree based on an existing syntax tree, you must explicitly include trivia. A trivia is represented by the Microsoft.CodeAnalysis.SyntaxTrivia structure, another value type. You will use the LeadingTrivia and TrailingTrivia collections to investigate a node’s trivia.
Kinds
More often than not, you need to identify the exact syntax node type you are working with, or disambiguate syntax node types that share the same node class. To make things easier, syntax nodes, syntax tokens, and syntax trivia expose a Kind extension method that returns an integer value from the SyntaxKind enumeration, which identifies the exact syntax element represented. SlashToken and ForKeyword are examples of syntax elements represented by values in the enumeration. They also expose an IsKind extension method that returns a Boolean value indicating if the syntax node is of the specified syntax kind.
Tip: There are separate SyntaxKind enumerations for VB and C#. In VB, you use the Microsoft.CodeAnalysis.VisualBasic.SyntaxKind enumeration, whereas in C# you use the Microsoft.CodeAnalysis.CSharp.SyntaxKind enumeration.
Spans
Especially when producing diagnostics, the host environment must know where to place error and warning squiggles or highlights in the code editor. Syntax nodes, tokens, and trivia know their position within the source code and the number of characters they consist of. This information is referred to as spans, and is represented via the TextSpan object. Syntax nodes expose the Span and FullSpan properties, both of type TextSpan. Both represent the text span from the start of the first token in the syntax node’s subtree to the end of the last token, but Span does not include the span of any trivia, whereas FullSpan does.
Errors
Roslyn can expose a full syntax tree that can be round-tripped back to the source text even if it contains syntax errors. In this particular case, the parser uses one of the following techniques to create a syntax tree:
- If the parser expects a particular kind of token but does not find it, it may add a missing token into the syntax tree in the location where the token was expected. This SyntaxToken has an empty span, and its IsMissing property returns true.
- The parser skips tokens until it finds one where it can continue to parse. Skipped tokens are collected as a token’s trivia whose kind is SkippedTokens.
You can easily demonstrate this by adding any intentional error in your code and seeing how the Syntax Visualizer highlights in red the lines of code that contain diagnostics, maintaining a hierarchical syntax tree anyway.
Introducing Semantics
While syntax trees represent the lexical and syntactic structure of the source code, they are not enough to represent everything that is necessary to produce a program. In fact, it is necessary to apply the language rules to produce meaningful results, and there is the need to determine what is being referenced. For instance, you might have types and members with the same name across the source code, and therefore you need a way to determine what type or member an identifier refers to. Additionally, a program can have references to compiled libraries, and even if the source code is not available, a program can still use types they define. Semantics encapsulate all the information required to produce a program into an object model made of different components, each described in the next sections.
Understanding Compilation
The compilation represents everything needed to compile a C# or Visual Basic program and is represented by an object of type Microsoft.CodeAnalysis.Compilation. Compilation includes source files, but also assembly references and compile options. It represents each declared type, member, or variable as a symbol. The Compilation class exposes a number of methods that make it easier to find and relate symbols, no matter if they have been declared in the source code or imported from an assembly. A compilation is also immutable, which means that it cannot be changed once created. You can, however, create a new compilation based on an existing one, making the necessary changes, such as adding assembly references.
Understanding Symbols
Types, namespaces, methods, parameters, properties, fields, events, variables, and every distinct element either declared in the source code or imported from an assembly is represented by a symbol. Symbols contain information that the compiler determines from the source or from the assembly’s metadata, including referenced symbols. Each kind of symbol is represented by specialized interfaces derived from ISymbol, each tailored for the symbol it needs to represent.
For instance, the IMethodSymbol interface represents information that the compiler collected about a method. Its ReturnType property determines the method’s return type. Symbols are particularly important in the .NET Compiler Platform, and the Syntax Visualizer allows you to get a visual representation of symbols. To demonstrate this, right-click a syntax node, such as the ExpressionStement node associated with the Console.ReadLine() statement, and then select View Symbol (if any). At this point, the Properties area of the Syntax Visualizer shows full symbol information for the selected syntax node, as shown in Figure 27.
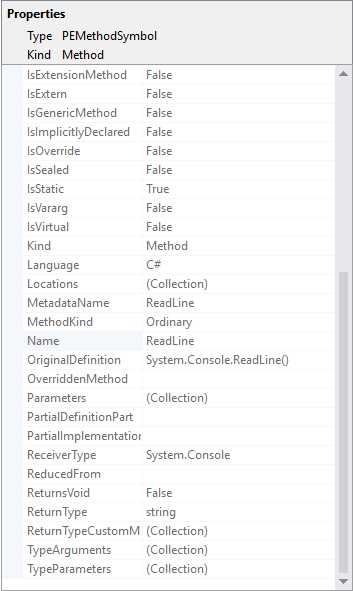
Figure 27: Viewing symbol information in the Syntax Visualizer
The Compilation class exposes a number of methods and properties that help you find symbols from source or imported metadata. Symbols are conceptually similar to the Reflection APIs in the CLR type system, but they are the representation of language concepts, not CLR concepts. It is worth mentioning that symbols are not available for syntax tokens and syntax trivia. Symbols can save you a lot of time, and you will understand their importance as you get more familiar with the Roslyn APIs.
Introducing the Semantic Model
All the semantic information for a source file is represented by a semantic model, mapped by an object of type Microsoft.CodeAnalysis.SemanticModel. This model helps you discover the following information:
- All the diagnostics (errors and warnings).
- Symbols referenced at a specific location.
- Result types for any expressions.
- The flow of variables across regions in the source code.
Each syntax tree in a compilation owns an instance of the SemanticModel class. The semantic model is also very useful, and you will use it many times in both analyzers and refactorings.
Chapter Summary
This chapter offered a high-level overview of the .NET Compiler Platform’s architecture and APIs. You first saw how the classic compiler pipeline has been rewritten through a mirrored series of .NET objects. Then you saw how the architecture is made of two main layers: The Compiler APIs and the Workspaces APIs. You learned about the concept of immutability, which is so important in the .NET Compiler Platform, and you learned about workspaces, which give you an option to access an object model that represents a solution with its projects and documents.
You then moved to the core of the .NET Compiler Platform, which is syntax, and learned how to use the Syntax Visualizer tool and what syntax elements are available to represent the source code in a structured, hierarchical, and managed way. Finally, you were introduced to semantics, which represent everything needed to compile a program, and provide an object model you can use to access the compilation properties and every declared symbol.
Theory is enough for now. You have all the necessary foundations required to start using the Roslyn APIs in code, and you will begin writing your first code analyzer in the next chapter.
- 1800+ high-performance UI components.
- Includes popular controls such as Grid, Chart, Scheduler, and more.
- 24x5 unlimited support by developers.