
Robotic Process Automation Succinctly®

CHAPTER 3
File Operations
Quick intro
Now that we know how to access files and folders, read their contents, get all the files within a directory tree, and find out what files have changed, we can focus on understanding how to perform specific file and folder operations.
We can then use these file and folder operations to design our configurable backup script. Let’s jump right in!
Copying files
An essential aspect of any backup script is the ability to copy files. Let’s explore how we can copy files in Python.
To do that, let’s create a new Python file called filecopy.py and add the following code to it.
Code Listing 3-a: Copying Files with Python (filecopy.py)
import os import shutil def mergepaths(path1, path2): pieces = [] parts1, tail1 = os.path.splitdrive(path1) parts2, tail2 = os.path.splitdrive(path2) result = path2 parts1 = tail1.split('\\') if '\\' in tail1 else tail1.split('/') parts2 = tail2.split('\\') if '\\' in tail2 else tail2.split('/') for pitem in parts1: if pitem != '': if not pitem in parts2: pieces.append(pitem) for piece in pieces: result = os.path.join(result, piece) return result def filecopy(fname, fld, dest): fn = os.path.join(fld, fname) d = mergepaths(fld, dest) try: if not os.path.exists(d): os.makedirs(d) shutil.copy(fn, d) except BaseException as err: print('ERROR: ' + fname + ' in ' + fld + ' with: ' + str(err)) finally: print('Copied file: ' + fname + ' in ' + fld) def getallfilesfld(path): files = [] # r=root, d=directories, f=files for r, d, f in os.walk(path): for file in f: if not '.db' in file: files.append(os.path.join(r, file)) return files def copyall(origin, dest): files = getallfilesfld(origin) for f in files: if os.path.isfile(f): o = os.path.dirname(os.path.abspath(f)) filecopy(os.path.basename(f), o, dest) origin = os.path.dirname(os.path.abspath(__file__)) copyall(origin, origin + '\\Copied') |
Let’s break this code into smaller parts to understand what is going on.
We first reference the shutil built-in library, which contains some useful utility functions for working with files in Python, such as copying, moving, and deleting files. We can see that the mergepaths functions is used, which we explored in the previous chapter.
Next, we find the filecopy function, which is responsible for calling the mergepaths function and copying a specific file (fname) from the origin folder (fld) to the destination folder (dest).
def filecopy(fname, fld, dest):
fn = os.path.join(fld, fname)
d = mergepaths(fld, dest)
try:
if not os.path.exists(d):
os.makedirs(d)
shutil.copy(fn, d)
except BaseException as err:
print('ERROR: ' + fname + ' in ' + fld + ' with: ' + str(err))
finally:
print('Copied file: ' + fname + ' in ' + fld)
If the destination folder does not exist, the filecopy function will create it.
Then, we have a function called getallfilesfld, which is responsible for returning a list of all the files present within the origin folder.
def getallfilesfld(path):
files = []
# r=root, d=directories, f=files
for r, d, f in os.walk(path):
for file in f:
if not '.db' in file:
files.append(os.path.join(r, file))
return files
The getallfilesfld function loops through the directory tree of the origin folder (path) to get a list of all the files contained within each of the subfolders found under that path.
Next, the copyall function loops through all the files returned by the getallfilesfld function and calls the filecopy function for every file (f) within that list of files.
def copyall(origin, dest):
files = getallfilesfld(origin)
for f in files:
if os.path.isfile(f):
o = os.path.dirname(os.path.abspath(f))
filecopy(os.path.basename(f), o, dest)
The origin for each file (o) is determined by returning the directory name (os.path.dirname) of the file’s (f) absolute path (os.path.abspath).
The copying process is initiated by calling the copyall function as follows.
origin = os.path.dirname(os.path.abspath(__file__))
copyall(origin, origin + '\\Copied')
The origin folder is determined by returning the directory name (os.path.dirname) of the absolute path (os.path.abspath) of Python script (__file__).
The destination folder is the origin concatenated with the following string: '\\Copied'.
Let’s execute the script from the command prompt or built-in terminal within VS Code with the following command.
Code Listing 3-b: Command to Execute the Python Script (filecopy.py)
python filecopy.py |
In my case, the results look as follows.
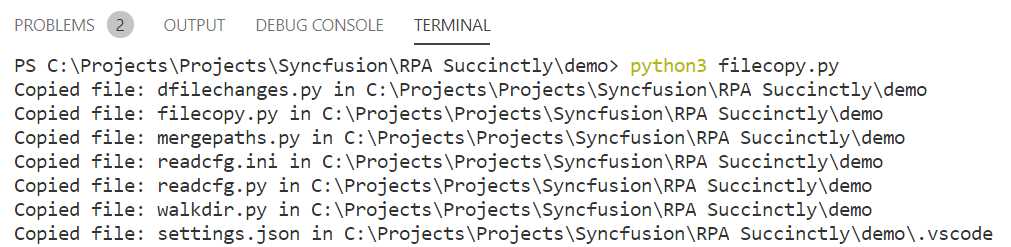
Figure 3-a: The Execution of the filecopy.py Script (Files Copied)
If I open the folder where the filecopy.py file is located on my machine, I can see a Copied folder as follows.

Figure 3-b: The Copied Folder within the Origin Folder
If I now look inside the Copied folder, I can see all files copied. If you have followed these exact steps, you should see the same or similar results.
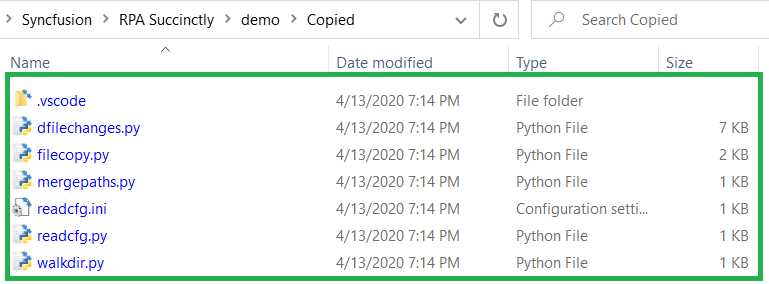
Figure 3-c: The Contents of the Copied Folder
Awesome—we now know how to copy files within any folder. Let’s apply this same concept, but for moving files.
Moving files
Moving files is almost identical to the process of copying files. Let’s expand the filecopy.py script to include this functionality.
We need to include a filemove function, which looks almost identical to the filecopy function—the only difference is that we’ll use shutil.move instead of shutil.copy.
def filemove(fname, fld, dest):
fn = os.path.join(fld, fname)
d = mergepaths(fld, dest)
try:
if not os.path.exists(d):
os.makedirs(d)
shutil.move(fn, d)
except BaseException as err:
print('ERROR: ' + fname + ' in ' + fld + ' with: ' + str(err))
finally:
print('Moved file: ' + fname + ' in ' + fld)
The filemove function is invoked by the moveall function, which is almost identical to the copyall function.
def moveall(origin, dest):
files = getallfilesfld(origin)
for f in files:
if os.path.isfile(f):
o = os.path.dirname(os.path.abspath(f))
filemove(os.path.basename(f), o, dest)
The rest of the code remains the same. Both the filemove and moveall functions can be added to the existing filecopy.py codebase.
The moveall function can be invoked as follows—we can comment out the call to the copyall function.
origin = os.path.dirname(os.path.abspath(__file__))
#copyall(origin, origin + '\\Copied')
moveall(origin, origin + '\\Moved')
Let’s execute the code and see what results we get. Here are the results from the execution of the code on my machine.
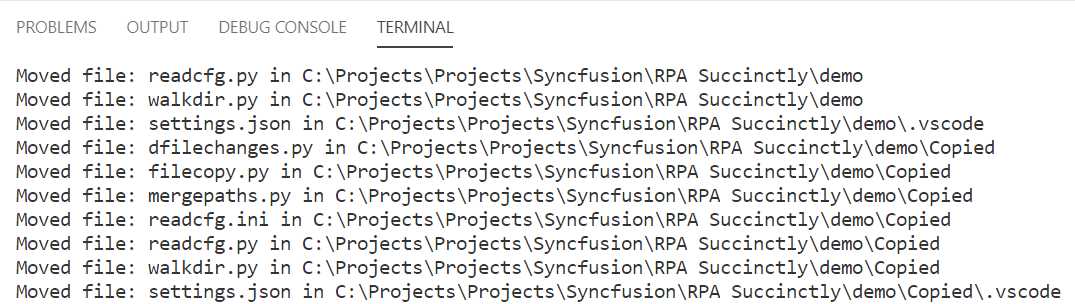
Figure 3-d: The Execution of the filecopy.py Script (Files Moved)
Let’s check the origin and Moved folders. In the following figure, we can see that the files have been moved from the original folder.

Figure 3-e: Files Moved from the Original Location
We can also inspect the content of the Moved folder and see the files inside.
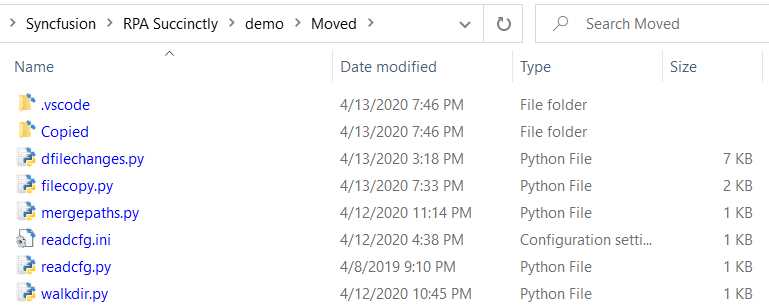
Figure 3-f: Files Found within the Moved Folder
Note: To continue to work and execute the scripts we are working with, please ensure you manually move back the files from the Moved folder to the original directory.
Uncomment the call to the copyall function and comment out the call to the moveall function, as follows.
origin = os.path.dirname(os.path.abspath(__file__))
copyall(origin, origin + '\\Copied')
#moveall(origin, origin + '\\Moved')
Another option is to save all the changes related to moving files onto another Python script called filemove.py.
Full copy files script
Here is the code for the full filecopy.py Python script.
Code Listing 3-c: Full filecopy.py Script
import os import shutil def mergepaths(path1, path2): pieces = [] parts1, tail1 = os.path.splitdrive(path1) parts2, tail2 = os.path.splitdrive(path2) result = path2 parts1 = tail1.split('\\') if '\\' in tail1 else tail1.split('/') parts2 = tail2.split('\\') if '\\' in tail2 else tail2.split('/') for pitem in parts1: if pitem != '': if not pitem in parts2: pieces.append(pitem) for piece in pieces: result = os.path.join(result, piece) return result def filecopy(fname, fld, dest): fn = os.path.join(fld, fname) d = mergepaths(fld, dest) try: if not os.path.exists(d): os.makedirs(d) shutil.copy(fn, d) except BaseException as err: print('ERROR: ' + fname + ' in ' + fld + ' with: ' + str(err)) finally: print('Copied file: ' + fname + ' in ' + fld) def getallfilesfld(path): files = [] # r=root, d=directories, f=files for r, d, f in os.walk(path): for file in f: if not '.db' in file: files.append(os.path.join(r, file)) return files def copyall(origin, dest): files = getallfilesfld(origin) for f in files: if os.path.isfile(f): o = os.path.dirname(os.path.abspath(f)) filecopy(os.path.basename(f), o, dest) origin = os.path.dirname(os.path.abspath(__file__)) copyall(origin, origin + '\\Copied') |
Full move files script
Here is the code for the full filemove.py Python script.
Code Listing 3-d: Full filemove.py Script
import os import shutil def mergepaths(path1, path2): pieces = [] parts1, tail1 = os.path.splitdrive(path1) parts2, tail2 = os.path.splitdrive(path2) result = path2 parts1 = tail1.split('\\') if '\\' in tail1 else tail1.split('/') parts2 = tail2.split('\\') if '\\' in tail2 else tail2.split('/') for pitem in parts1: if pitem != '': if not pitem in parts2: pieces.append(pitem) for piece in pieces: result = os.path.join(result, piece) return result def filemove(fname, fld, dest): fn = os.path.join(fld, fname) d = mergepaths(fld, dest) try: if not os.path.exists(d): os.makedirs(d) shutil.move(fn, d) except BaseException as err: print('ERROR: ' + fname + ' in ' + fld + ' with: ' + str(err)) finally: print('Moved file: ' + fname + ' in ' + fld) def getallfilesfld(path): files = [] # r=root, d=directories, f=files for r, d, f in os.walk(path): for file in f: if not '.db' in file: files.append(os.path.join(r, file)) return files def moveall(origin, dest): files = getallfilesfld(origin) for f in files: if os.path.isfile(f): o = os.path.dirname(os.path.abspath(f)) filemove(os.path.basename(f), o, dest) origin = os.path.dirname(os.path.abspath(__file__)) moveall(origin, origin + '\\Moved') |
Now that we know how to copy and moves files, let’s have a look at how we can delete files from folders.
Deleting files
Deleting files is quite similar to copying or moving files. The biggest difference from those two operations is that, when deleting files, there is no need to merge paths, as the deletion operation takes place within the origin folder—there is no destination folder.
Let’s see what a deletion script would look like. The logic behind this script is quite straightforward, as you can see.
Code Listing 3-e: Full filedelete.py Script
import os import shutil def filedelete(fname, fld): fn = os.path.join(fld, fname) try: os.unlink(fn) except BaseException as err: print('ERROR: ' + fname + ' in ' + fld + ' with: ' + str(err)) finally: print('Deleted file: ' + fname + ' in ' + fld) def getallfilesfld(path): files = [] # r=root, d=directories, f=files for r, d, f in os.walk(path): for file in f: if not '.db' in file: files.append(os.path.join(r, file)) return files def deleteall(origin): files = getallfilesfld(origin) for f in files: if os.path.isfile(f): o = os.path.dirname(os.path.abspath(f)) filedelete(os.path.basename(f), o) origin = os.path.dirname(os.path.abspath(__file__)) deleteall(origin + '\\Copied') |
We have a filedelete function that invokes the os.unlink method, which performs the deletion of the file.
The getallfilesfld function is the same one we used in the filecopy.py and filemove.py scripts.
The deleteall function is almost identical to the copyall or moveall functions. The major difference is that filedelete is invoked instead. Another difference is that the filedelete or deleteall functions don’t require a destination location (dest) parameter.
Notice that on the call to deleteall, I’m passing the location of the Copied folder as the origin—which means that the files contained within this folder will be deleted once the script is executed.
To run the script, go to the command prompt or built-in terminal within VS Code and enter the following command.
Code Listing 3-f: Command to Execute the Python Script (filedelete.py)
python filedelete.py |
The execution of the script returns the following output on my machine.
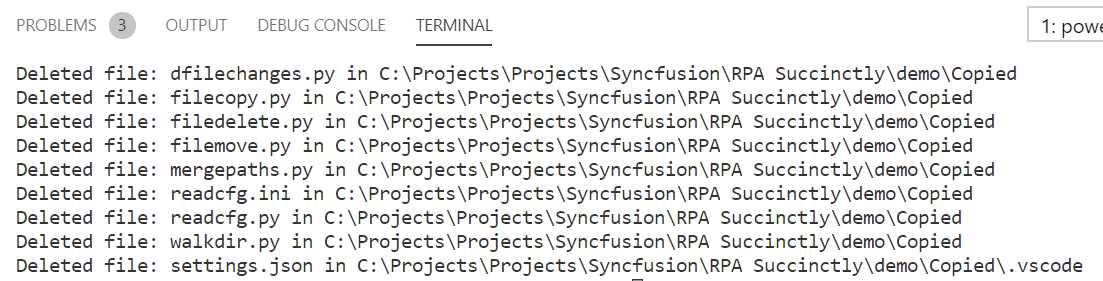
Figure 3-g: Files Deleted within the Copied Folder
If I inspect the content of the Copied folder, I can see that the files have been deleted.
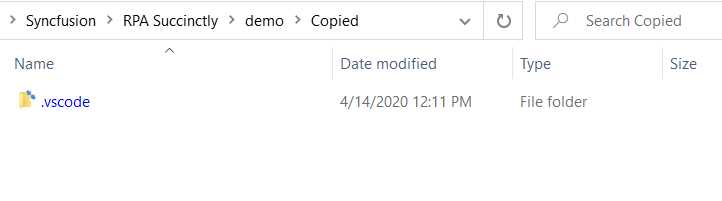
Figure 3-h: Empty Copied Folder (No Files)
Notice that the folder still contains a subfolder, which means that our script was able to delete all the files contained within the Copied folder, but it was not able to remove the subfolder.
This is because the filedelete function only removes files (by calling the os.unlink method), it doesn’t execute any instructions for removing folders.
Deleting folders
Deleting folders with Python is a relatively easy and straightforward process. This is how it can be done.
Code Listing 3-g: Deleting Nested Subfolders with Python - folderdelete.py
import os import shutil origin = os.path.dirname(os.path.abspath(__file__)) shutil.rmtree(origin + '\\Copied', ignore_errors=False, onerror=None) |
This script can easily delete any nested subfolder contained within the Copied folder and the Copied folder itself. Feel free to execute this script to see the result, either from the command prompt or built-in terminal within VS Code, by using the following command.
Code Listing 3-h: Command to Execute the Python Script (folderdelete.py)
python folderdelete.py |
Creating a zip file
When there are many files to back up, it’s usually a good idea to create one or more zip files to save space on disk.
In Python, creating archives is a relatively easy and straightforward process. There is a built-in library called zipfile that provides developers with an easy way of working with zip files.
When working with zip files in general, it is recommended to work with file systems that allow for big archives. So in the Windows world, if you are going to be programmatically creating very large zip files with Python, use an NTFS file system drive, rather than a drive with a FAT file system, to avoid zip file creation errors.
Let’s see how we can use Python to easily create a zip file with just a few lines of code. Here is the createzip.py script.
Code Listing 3-i: Creating a Zip File with Python - createzip.py
import os import time import zipfile def filezip(zipf, fname, fld): fn = os.path.join(fld, fname) try: zipf.write(fn) except BaseException as err: print('ERROR: ' + fname + ' in ' + fld + ' with: ' + str(err)) finally: print('Zipped file: ' + fname + ' in ' + fld) def getallfilesfld(path): files = [] # r=root, d=directories, f = files for r, d, f in os.walk(path): for file in f: if not '.db' in file: files.append(os.path.join(r, file)) return files def addtofilename(fname): datet = str(time.strftime("%Y%m%d-%H%M%S")) if '%%' in fname: fname = fname.replace('%%', datet) return fname def zipall(origin, dest): zipf = zipfile.ZipFile(addtofilename(dest), 'w', allowZip64=True) files = getallfilesfld(origin) for f in files: if os.path.isfile(f): o = os.path.dirname(os.path.abspath(f)) filezip(zipf, os.path.basename(f), o) if not zipf is None: zipf.close() origin = os.path.dirname(os.path.abspath(__file__)) zipall(origin + '\\Copied', origin + '\\Copied_%%.zip') |
We can run this script from the command prompt or built-in terminal within VS Code by running the following command.
Code Listing 3-j: Command to Execute the Python Script (createzip.py)
python createzip.py |
Here are the results from running the script on my machine.
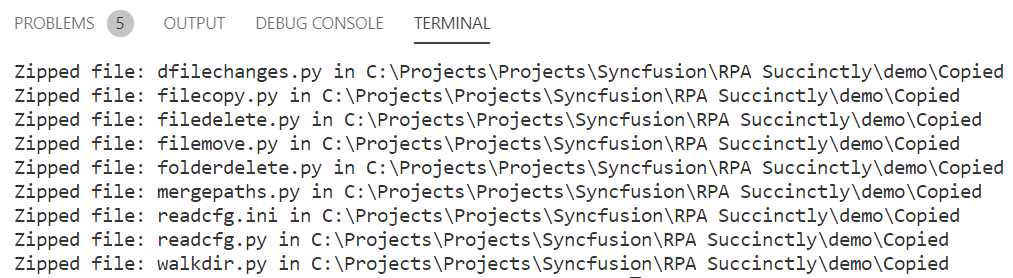
Figure 3-i: Files Zipped within the Copied Folder
If I now check my origin folder, which is the directory where the Python scripts reside, I can see that a zip file has been created.
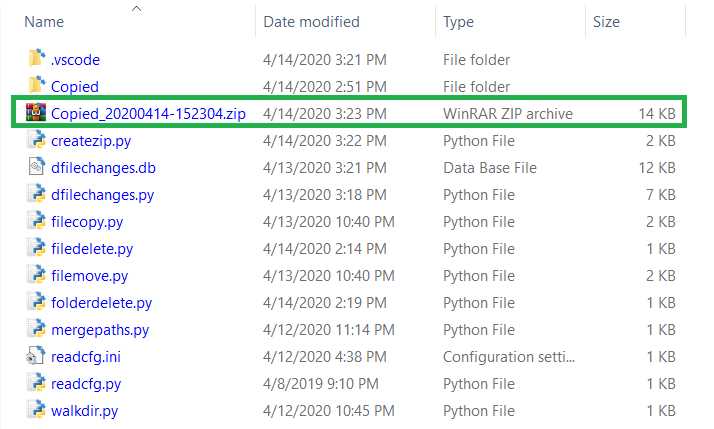
Figure 3-j: Zip Archive Created
By checking the contents of the created zip file, I’m able to see the following files—which are the same ones that exist within the Copied folder.
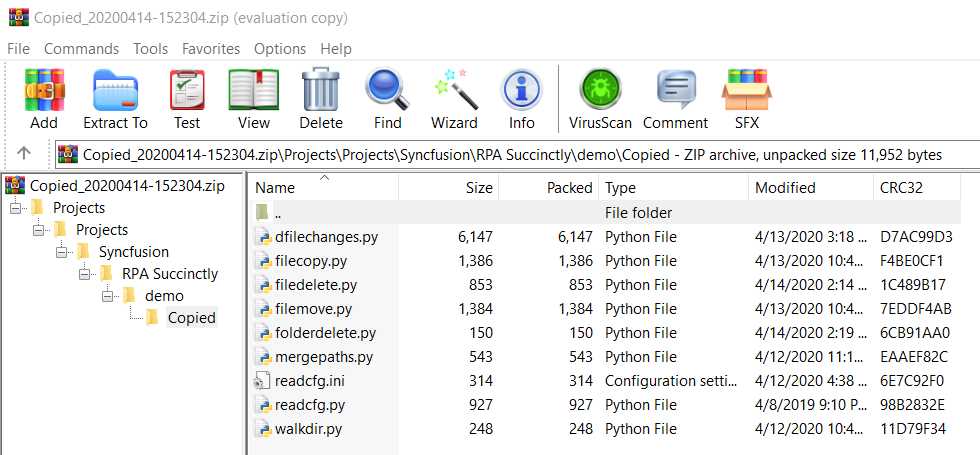
Figure 3-k: Contents of the Zip File Created
Notice that the archive file name contains the date and time when it was created, which in my case is 20200414-152304.
Another interesting fact is that the original full path for each file zipped is preserved—which is quite useful in case you need to unzip the archive and restore the files to their original folders.
Now that we have verified that this worked, let’s have a look at the code in detail, which we can do by exploring each function.
We started by importing the following two Python libraries, which we have not used in previous scripts.
import time
import zipfile
The time library was used for generating the date and time that is part of the resultant archive name, whereas the zipfile library was used for creating the archive itself.
Next, the filezip function is responsible for adding each of the files from the origin folder (fld) to the zip archive (zipf)—one file (fname) at a time.
def filezip(zipf, fname, fld):
fn = os.path.join(fld, fname)
try:
zipf.write(fn)
except BaseException as err:
print('ERROR: ' + fname + ' in ' + fld + ' with: ' + str(err))
finally:
print('Zipped file: ' + fname + ' in ' + fld)
The filezip function can do this by calling the zipf.write method. The zipf object represents the archive being created.
The getallfilesfld function, as we have seen from previous examples, just returns a list of the files to process within a specific directory.
Next we have the addtofilename function, which adds the date and time when the archive is created by replacing the string %% placeholder from the file name.
def addtofilename(fname):
datet = str(time.strftime("%Y%m%d-%H%M%S"))
if '%%' in fname:
fname = fname.replace('%%', datet)
return fname
The generated string that replaces the %% placeholder has the format 20200414-152304, which means:
2020 – Year
04 – Month
14 – Day
15 – Hour
23 – Minute
04 – Second
Then we have the zipall function, which gets the list of all the files we want to archive (getallfilesfld) and adds them to the archive (dest).
def zipall(origin, dest):
zipf = zipfile.ZipFile(addtofilename(dest), 'w', allowZip64=True)
files = getallfilesfld(origin)
for f in files:
if os.path.isfile(f):
o = os.path.dirname(os.path.abspath(f))
filezip(zipf, os.path.basename(f), o)
if not zipf is None:
zipf.close()
The archive is created by invoking the method zipfile.ZipFile, which returns a reference to the resultant zip file (zipf).
The first parameter passed to the zip file is the file name (addtofilename(dest)). The second parameter is 'w', which indicates that the zip file has been opened in write mode.
The third parameter, allowZip64=True, indicates that the zip file will be created using the ZIP64 extension, which is useful when the zip file is larger than 2GB to prevent runtime errors.
For each of the files to process, the filezip function is invoked—which adds each file to the resultant archive.
Finally, when all the files have been added to the zip file, the archive can be closed, which is done by invoking the zipf.close method.
As you have seen, zipping files is quite easy to achieve with Python.
Summary
We’ve now covered all the essential operations to perform on files and folders. Now that we know how to access files and folders, and perform common operations with them, we are ready to create a configurable backup script with Python.
That is what we are going to do in the next chapter. Sounds exciting!
- 1800+ high-performance UI components.
- Includes popular controls such as Grid, Chart, Scheduler, and more.
- 24x5 unlimited support by developers.