
Robotic Process Automation Succinctly®

CHAPTER 5
Assisted Data Entry Automation
Quick intro
One of the fundamental challenges of business process automation, in general, is how to efficiently extract data from semi-structured or unstructured sources, such as PDF files, and use that data to automatically perform data entry on other systems, with little or no need for human intervention.
This is what we are going to explore in this chapter. We are going to create a Python script that can read PDF form documents, extract specific data from them, and automatically fill in the same data on a web-based system.
To understand this process better, let’s have a look at the following diagram.

Figure 5-a: PDF Form Data Extraction to Automatic Data Entry Workflow
We can see that our data source is going to be made up of PDF form documents. These are PDF files that have fields that can be filled in by users.
Each PDF file is going to be read by a Python script (which we will create) that is able to extract each field value and generate JavaScript code that can be pasted into the browser’s console, which can automatically fill in the values of elements for a specific webpage. In our case, it is going to be a Salesforce Opportunity webpage.
In essence, each PDF form document is going to represent a new Salesforce opportunity that someone would have to manually fill in.
This process would normally be done manually by going through the list of PDFs, opening one PDF at a time, copying each of the field values from the PDF to the webpage, and saving the information to Salesforce.
Carrying out such a manual process is not only prone to errors, but it can be very time-consuming if the number of documents and fields per document to process is high. It can result in a very tedious and repetitive task for any user.
The goal is to facilitate the process for users performing manual data entry by reading all the PDF form documents present on a given folder and, for each document, generating a text file containing JavaScript code that can simply be pasted into the browser’s console to fill in the values of the Salesforce Opportunity web form elements.
The Python script will generate the JavaScript code, which then the user will manually copy and paste into the browser’s console. This is why the chapter is called Assisted Data Entry Automation—there is still a human element to the process.
We could automate the whole process by creating a browser script with Selenium WebDriver or another browser automation tool, which would be able to open a new Salesforce Opportunity webpage and enter the data for each PDF form document processed. However, we won’t take this example that far. Nevertheless, if you want to take the Python script to that level of browser automation, you are encouraged to do so, and I’d love to hear about it.
Reading PDF forms
The PDF file format is a versatile document format. It is one of the world’s most-used file formats, along with Microsoft Excel and Word. The world runs on these three essential file formats. This means that more data is contained within these types of documents than probably in most databases.
The PDF file format is versatile because it supports various types of content, such as scanned documents, standard text printed content, and content with fields. In this case, we will focus on how to read PDF forms, which corresponds to content with fields that are part of a PDF file.
To be able to read PDF form documents, we need to install the PyPDF2 library, which can be installed from the command prompt or built-in terminal within VS Code, using the following command.
Code Listing 5-a: Command to Install the PyPDF2 Library
pip install PyPDF2 |
With some Python 3.X installations, pip3 can also be used instead of pip. Both do the same job. Once the library has been installed, we can start writing our script.
The command shown in Code Listing 5-a will install the latest version of PyPDF2 (version 1.26.0), which is very stable and reliable.
Let’s start by importing the modules and libraries that our script will require, which we can see in the following listing.
Code Listing 5-b: Importing the Required Modules
import os import sys import PyPDF2 from collections import OrderedDict |
We will be using an ordered dictionary (OrderedDict) to return the list of fields read from a PDF form document. We can read any fields within a PDF form document by using the following function.
Code Listing 5-c: Reading PDF Fields – Part 1
def readfields(obj, t=None, res=None, fo=None): fa = {'/FT': 'Field Type', '/Parent': 'Parent', '/T': 'Field Name', '/TU': 'Alternate Field Name', '/TM': 'Mapping Name', '/Ff': 'Field Flags', '/V': 'Value', '/DV': 'Default Value'}
if res is None: res = OrderedDict() items = obj.trailer["/Root"] if "/AcroForm" in items: t = items["/AcroForm"] else: return None if t is None: return res obj._checkKids(t, res, fo) for attr in fa: if attr in t: obj._buildField(t, res, fo, fa) break if "/Fields" in t: flds = t["/Fields"] for f in flds: fld = f.getObject() obj._buildField(fld, res, fo, fa) return res |
Let’s explore this function in detail. We start by specifying the AcroForm (Adobe Acrobat form) field attributes that are used within PDF form documents.
fa = {'/FT': 'Field Type', '/Parent': 'Parent',
'/T': 'Field Name', '/TU': 'Alternate Field Name',
'/TM': 'Mapping Name', '/Ff': 'Field Flags',
'/V': 'Value', '/DV': 'Default Value'}
These attributes are checked whenever the function runs into a potential field and needs to verify the type of field it is and whether it has any value that can be read.
The first step in this process is finding the PDF document root (/Root) and checking whether it contains a form (/AcroForm).
if res is None:
res = OrderedDict()
items = obj.trailer["/Root"]
if "/AcroForm" in items:
t = items["/AcroForm"]
else:
return None
if t is None:
return res
If the PDF document contains a form, then a tree object with the potential fields is returned, which is then inspected. This is done with the following code.
obj._checkKids(t, res, fo)
for attr in fa:
if attr in t:
obj._buildField(t, res, fo, fa)
break
if "/Fields" in t:
flds = t["/Fields"]
for f in flds:
fld = f.getObject()
obj._buildField(fld, res, fo, fa)
The fields that are identified as PDF form fields are returned in an ordered dictionary, which contains each field with its respective value as a set of key-value pairs. This is what the function returns.
return res
By calling the readfields function, we can read the PDF form fields of any particular PDF that contains a form that follows the AcroForm file specification.
However, to be able to do that, we need to first open the PDF file and read its content, which we can do with the following function.
Code Listing 5-d: Reading PDF Fields – Part 2
def getfields(infile): infile = PyPDF2.PdfFileReader(open(infile, 'rb')) fields = readfields(infile) return OrderedDict((k, v.get('/V', '')) for k, v in fields.items()) |
This function essentially opens the PDF file (infile) in read-only binary mode (rb) and reads its full content by calling the PdfFileReader method from the PyPDF2 library.
Once that full content has been read, it is passed to the readfields function, which checks if there’s a form embedded within the PDF, and if so, extracts each of the fields contained within.
Those fields are then returned in a new ordered dictionary as key-value pairs, such as the following.
OrderedDict([('Field1', '0001'), ('Field2', '0002'), ('Field3', '0003')])
Generating the browser script
Now that we know how to extract fields from PDF form documents, the most logical and straightforward way to assign field values extracted from those PDF documents to fields on webpages is to use JavaScript—the native language of browsers.
We can do this by using Python to generate for each PDF file a script that can be executed within the browser’s console, employing copy and paste to automatically fill in field values on a webpage.
Code Listing 5-e: Generating the Browser Script – Part 1
def rselects(fn): lst = [] with open(fn, 'r') as fh: for l in fh: lst.append(l.rstrip(os.linesep)) return lst def sselectitm(l, k, v): l.append('function setItem(s, v) {') l.append('for (var i = 0; i < s.options.length; i++) {') l.append('if (s.options[i].text == v) {') l.append('s.options[i].selected = true;') l.append('return;') l.append('}') l.append('}') l.append('}') l.append('setItem(document.getElementById("' + k + '"), "' + v + '");') def bscript(si, items, pdff): if pdff: of = os.path.splitext(pdff)[0] + '.txt' lns = [] for k, v in items.items(): if (k in si): sselectitm(lns, k, v) print('Selectable: ' + k + ' -> ' + v) else: lns.append( "document.getElementById('" + k + "').value = '" + v + "';\n") print('Normal: ' + k + ' -> ' + v) scriptf = open(of, 'w') scriptf.writelines(lns) scriptf.close() |
The first step consists of identifying which of the webpage fields that will be filled in by the generated browser script are text fields, and which are selectable (drop-down) fields.
First, we have the rselects function. It reads a file called selects.ini that will contain the IDs of the fields on the webpage, which are selectable (drop-down) fields.
This function returns a list (lst) of all the lines read from the selects.ini file.
def rselects(fn):
lst = []
with open(fn, 'r') as fh:
for l in fh:
lst.append(l.rstrip(os.linesep))
return lst
To find the IDs of the fields on the webpage, we’ll need to use our browser’s dev tools. For a quick overview on how to find field IDs using your browser, please check out this short video.
For more in-depth information on how to use Chrome Developer Tools to inspect web elements, this free crash course is a great resource for diving deeper into this subject.
Imagine that the webpage you want the generated browser script to fill in has a selectable field that looks as follows.
<div class="form-group"><p>Selectable Field<span></span></p>
<select name="CONCEPT" id="CONCEPT" style="width:250px">
<option value="This is a Concept">This is a concept</option>
<option value="This is another concept">This is Another concept</option>
</select>
</div>
We would need our Python script to generate a JavaScript function (setItem) that would be responsible for selecting the item that corresponds to the value of v (extracted from the PDF) on the selectable field (where s is the selectable field with its various options).
function setItem (s, v) {
for (var i = 0; i < s.options.length; i++) {
if (s.options[i].text == v) {
s.options[i].selected = true;
return;
}
}
}
We would need our generated browser script to invoke the setItem function as follows.
setItem(document.getElementById("CONCEPT"), "This is a Concept");
This is exactly what the sselectitm function does within our Python script.
def sselectitm(l, k, v):
l.append('function setItem(s, v) {')
l.append('for (var i = 0; i < s.options.length; i++) {')
l.append('if (s.options[i].text == v) {')
l.append('s.options[i].selected = true;')
l.append('return;')
l.append('}')
l.append('}')
l.append('}')
l.append('setItem(document.getElementById("' + k + '"), "' + v + '");')
The sselectitm function essentially creates an instance of the setItem JavaScript function for each selectable field required and assigns the correct value to it. Then, the complete browser script is generated (including regular text fields found on the webpage) by the bscript function.
def bscript(si, items, pdff):
if pdff:
of = os.path.splitext(pdff)[0] + '.txt'
lns = []
for k, v in items.items():
if (k in si):
sselectitm(lns, k, v)
print('Selectable: ' + k + ' -> ' + v)
else:
lns.append(
"document.getElementById('" + k + "').value = '" + v + "';\n")
print('Normal: ' + k + ' -> ' + v)
scriptf = open(of, 'w')
scriptf.writelines(lns)
scriptf.close()
The bscript function loops through the ordered dictionary of extracted PDF fields (items) and checks if any of those PDF field names is a selectable field (si). If so, the sselectitm function is invoked.
For each of those PDF field names that is not a selectable field, the bscript function simply creates a document.getElementById instruction with the name of the PDF field (which needs to be the same as the ID of the webpage element to fill in), assigning it the value extracted from the PDF field.
Note: for this to work, all the PDF form fields extracted must have the same names as the IDs of the fields or elements of the webpage to be filled in. These names are case sensitive.
The following figure shows side by side the destination webpage (in my case a Salesforce opportunity), which needs to be filled in by the generated script (seen on the left-hand side), and the PDF form document that contains the information that will be extracted by the Python script (seen on the right-hand side).
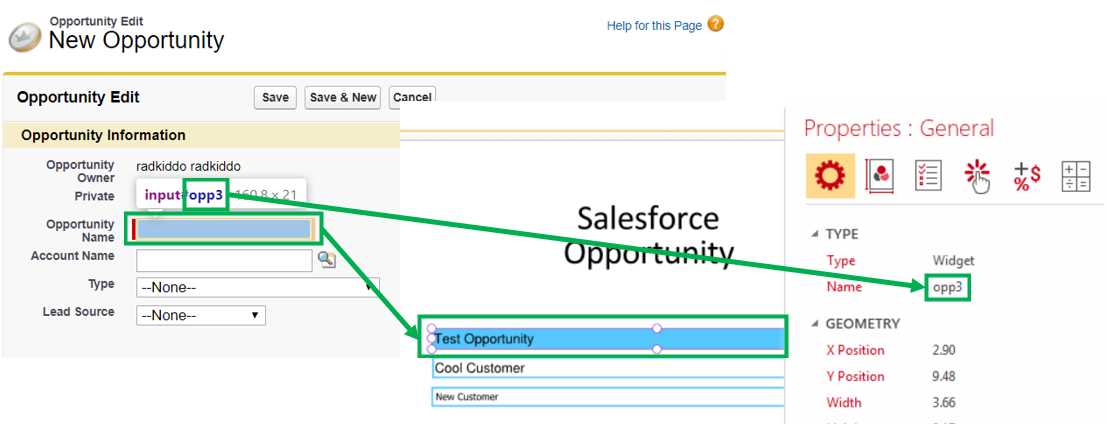
Figure 5-b: Webpage Field Name = PDF Form Field Name
Each of the fields on the webpage that needs to be filled in must be inspected, and their IDs retrieved. Selectable (drop-down) fields must be identified and saved in the selects.ini file, one field per line. For this particular example, the following web elements correspond to selectable fields and need to be included in the selects.ini file.
opp5
opp11
opp6
The fields on the PDF form document must be named as the webpage IDs that will be filled in. There must be a one-to-one match between PDF field names and webpage element IDs.
This means that you should design your PDF form documents so that fields have the same names as their corresponding webpage element IDs that you want the script to fill in.
You can design PDF form documents with various desktop applications, such as Adobe Acrobat, PDF Element, PDF Desktop, or others.
To bind this all together, we need to define a function that executes these functions in the right sequence, which is what the run function does.
Code Listing 5-f: Generating the Browser Script – Part 2
def run(args): try: si = rselects('selects.ini') if len(args) == 2: pdf_file_name = args[1] items = getfields(pdf_file_name) bscript(si, items, pdf_file_name) else: files = [f for f in os.listdir('.') if os.path.isfile(f) and f.endswith('.pdf')] for f in files: items = getfields(f) bscript(si, items, f) except BaseException as msg: print('An error occured... :( ' + str(msg)) |
This function receives a command line parameter (args) that can be the name of a specific PDF file to process.
If the name of a PDF file is specified (pdf_file_name) when executing the Python script—if len(args) == 2, then (as we will see shortly) the script only executes the fields extraction operation (getfields) on that specific PDF and generates the corresponding browser script for that PDF (as a .txt file).
If no PDF file is specified when executing the Python script, then for all the PDF files found within the same folder as the Python script, the fields extraction operation on each PDF file will take place, and for each PDF file, a corresponding browser script (with the .txt extension) will be generated.
Code Listing 5-g: Invoking the run Function
if __name__ == '__main__': run(sys.argv) |
The AutoForm script
So, let’s put all the functions we’ve explored so far throughout this chapter into a single code block, which we will call autoform.py.
Code Listing 5-h: The AutoForm Script
import os import sys import PyPDF2 from collections import OrderedDict def readfields(obj, t=None, res=None, fo=None): fa = {'/FT': 'Field Type', '/Parent': 'Parent', '/T': 'Field Name', '/TU': 'Alternate Field Name', '/TM': 'Mapping Name', '/Ff': 'Field Flags', '/V': 'Value', '/DV': 'Default Value'} if res is None: res = OrderedDict() items = obj.trailer["/Root"] if "/AcroForm" in items: t = items["/AcroForm"] else: return None if t is None: return res obj._checkKids(t, res, fo) for attr in fa: if attr in t: obj._buildField(t, res, fo, fa) break if "/Fields" in t: flds = t["/Fields"] for f in flds: fld = f.getObject() obj._buildField(fld, res, fo, fa) return res def getfields(infile): infile = PyPDF2.PdfFileReader(open(infile, 'rb')) fields = readfields(infile) return OrderedDict((k, v.get('/V', '')) for k, v in fields.items()) def rselects(fn): lst = [] with open(fn, 'r') as fh: for l in fh: lst.append(l.rstrip(os.linesep)) return lst def bscript(si, items, pdff): if pdff: of = os.path.splitext(pdff)[0] + '.txt' lns = [] for k, v in items.items(): if (k in si): sselectitm(lns, k, v) print('Selectable: ' + k + ' -> ' + v) else: lns.append( "document.getElementById('" + k + "').value = '" + v + "';\n") print('Normal: ' + k + ' -> ' + v) scriptf = open(of, 'w') scriptf.writelines(lns) scriptf.close() def sselectitm(l, k, v): l.append('function setItem(s, v) {') l.append('for (var i = 0; i < s.options.length; i++) {') l.append('if (s.options[i].text == v) {') l.append('s.options[i].selected = true;') l.append('return;') l.append('}') l.append('}') l.append('}') l.append('setItem(document.getElementById("' + k + '"), "' + v + '");') def run(args): try: si = rselects('selects.ini') if len(args) == 2: pdf_file_name = args[1] items = getfields(pdf_file_name) bscript(si, items, pdf_file_name) else: files = [f for f in os.listdir('.') if os.path.isfile(f) and f.endswith('.pdf')] for f in files: items = getfields(f) bscript(si, items, f) except BaseException as msg: print('An error occured... :( ' + str(msg)) if __name__ == '__main__': run(sys.argv) |
Before we run the script and try it with the PDF form document I have designed, I would suggest that you quickly sign up for a free trial Salesforce account, so you can follow along and run the test yourself.
Signing up for a free trial Salesforce account is easy; you will be asked to fill in a small registration form, which takes less than a minute to complete. Once you have submitted your details, you will be immediately redirected to the Salesforce solution, which you can start experimenting with.
When you are in, click on the avatar icon and choose the option Switch to Salesforce Classic, as shown in Figure 5-c, which, for this demo, is easier to navigate and use.
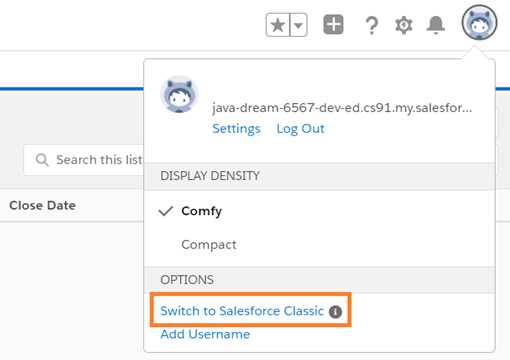
Figure 5-c: Switch to Salesforce Classic Option
When you are in the Salesforce Classic mode, click the Opportunities tab to create a new opportunity. You will see the following screen.
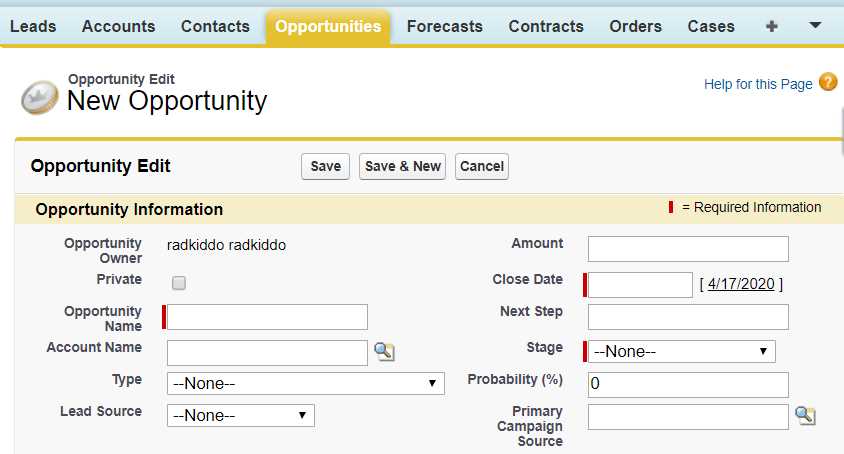
Figure 5-d: New Salesforce Opportunity Webpage (Classic Mode)
Now it’s time to run the script. But before we do that, make sure you have downloaded the sample PDF form document for this demo, from this URL.
The sample PDF form document contains the following details seen in Figure 5-3. Make sure you place this PDF file within the same folder as the Python script.
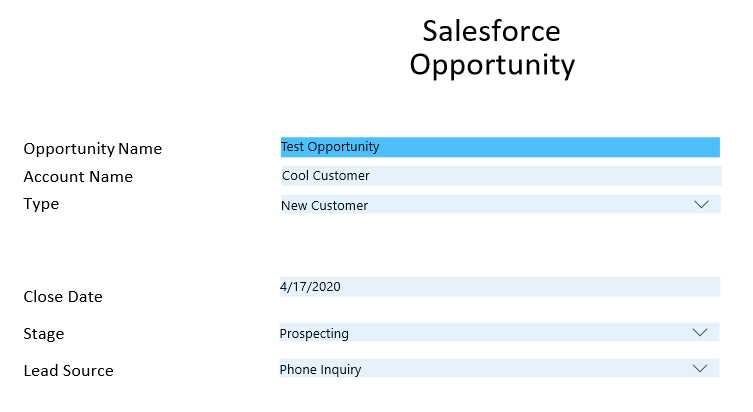
Figure 5-e: Sample PDF Form Document
The Python script can be executed with the following command from the command prompt or within the built-in terminal in VS Code.
Code Listing 5-i: Executing the Script for One PDF File
python autoform.py opportunity.pdf |
Alternatively, you can execute the script as follows. This is how it should be executed when there is more than one PDF form document to process.
Code Listing 5-j: Executing the Script for Multiple PDF Files
python autoform.py |
The execution of the Python script should result in the creation of a .txt file (with the same name as the PDF file) for each PDF file found within the script’s folder.
In my case, the execution of the Python script has resulted in the creation of an opportunity.txt file in the same folder as the Python script. The console output in VS Code was as follows.
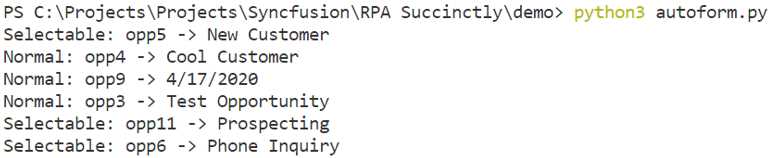
Figure 5-f: VS Code Script Execution Console Output
Let’s now open the opportunity.txt file, copy its content, and go to the Salesforce New Opportunity webpage. Within Chrome Developer Tools, go to the Console section, paste the content copied, and select the Enter key.
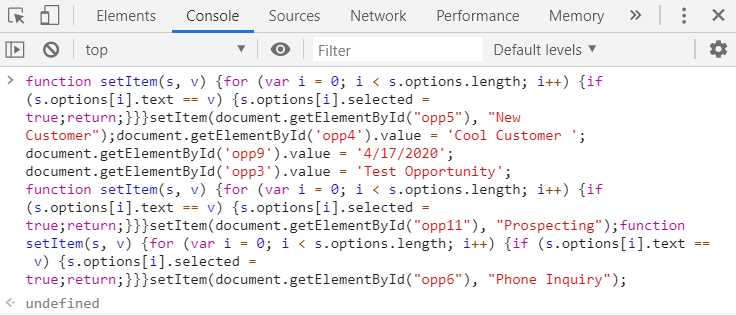
Figure 5-g: The Generated Browser (JavaScript) Code
Once the browser has executed the code (which happens immediately after you select Enter), you should see an undefined output on the console. This indicates that the script has executed.
The execution of the script by the browser immediately results in the fields on the webpage being automatically filled in, as you can see in the following figure.

Figure 5-h: Webpage Fields Filled In
There you go—we now have a way to extract data from PDF form documents and generate a script for each PDF file that can semi-automatically fill in elements on a webpage corresponding to fields on PDF forms.
With just a little extra effort, such as programmatically opening the browser console, pasting the generated script, and repeating the process multiple times, we can achieve a complete data entry automation scenario for submitting new Salesforce opportunities.
This was just a demonstration of concept, using one specific web application and one specific PDF form document. Now that you understand the idea behind it, I’m sure you can appreciate it’s potential and how it can be applied elsewhere—to other web apps, and using other PDF documents.
Finished code
You can download all the code written throughout this book, as well as supporting material, such as configuration or test files, from the following URL.
Scanned or text PDFs
Throughout this chapter, we explored how to extract data from PDF form documents, but what about extracting data from scanned PDFs, text-based PDFs, or even images?
Extracting data from scanned-based PDFs and images requires optical character recognition (OCR) technology. There are open-source libraries that can be used with Python to assist with the job, such as OpenCV.
However, the challenge of extracting data from sources that are unstructured, such as scanned PDFs, images, and text-based PDFs, is that even after OCR has been performed, what you have as a result are simply lines of text, words, and characters.
In other words, there are no relationships between those lines of text, and no definition of fields and values. This means you still have to write a layer of logic, to interpret the text extracted by using business rules or even multiple templates.
Say you would be processing invoices to automate an accounts payable system. It wouldn’t be enough to perform OCR and extract the text from the scanned or text-based PDF invoices. You would need to have some sort of logic capable of finding supplier information, invoice line items, purchase order numbers, bank account details, and other values to be able to do meaningful invoice processing.
That is a tough task. There are many companies with proprietary solutions that solely focus on automating invoice processing and accounts payable systems.
So, if you want to extract meaningful data from scanned PDFs, images, or text-based PDFs using Python, without having to write your layer of logic, there are two excellent options, both cloud services that can return key-value pairs (field information) and table details from unstructured documents using a machine-learning approach.
These services are Amazon Textract and Azure Forms Recognizer—both support Python and provide amazing results. In my opinion, they are two of the best and most cost-effective methods to extract meaningful data from unstructured documents.
Delving into either one would require a book of its own, and this is well beyond the scope of this particular book, but both offer great possibilities for working with unstructured documents with Python.
Imagine having to extract correctly all the values for the following receipt (which is available on the Forms Recognizer website as an example).

Figure 5-i: Forms Recognizer Sample Image (Courtesy of Microsoft)
I recently (briefly) experimented with Forms Recognizer, and to give you a sense of how a Python script that can extract key-value pairs from a reciept like this would look, I’ve placed the complete script in the following code listing.
Code Listing 5-k: Forms Recognizer Demo Script
########### Python Form Recognizer Async Layout ############# import json import time from requests import get, post # Endpoint URL endpoint = r"https://formsrecogtest.cognitiveservices.azure.com/" apim_key = "<< Your Forms Recognizer key goes here >>" post_url = endpoint + "/formrecognizer/v2.0-preview/prebuilt/receipt/analyze" source = r"contoso.jpg" headers = { # Request headers 'Content-Type': 'image/jpeg', 'Ocp-Apim-Subscription-Key': apim_key, } params = { "includeTextDetails": True } with open(source, "rb") as f: data_bytes = f.read() try: resp = post(url = post_url, data = data_bytes, headers = headers, params = params)
if resp.status_code != 202: print("POST analyze failed:\n%s" % resp.text) quit() print("POST analyze succeeded:\n%s" % resp.headers) get_url = resp.headers["operation-location"] except Exception as e: print("POST analyze failed:\n%s" % str(e)) quit() n_tries = 10 n_try = 0 wait_sec = 6 while n_try < n_tries: try: resp = get(url = get_url, headers = {"Ocp-Apim-Subscription-Key": apim_key}) resp_json = json.loads(resp.text) if resp.status_code != 200: print("GET Layout results failed:\n%s" % resp_json) quit() status = resp_json["status"] if status == "succeeded": print("Layout Analysis succeeded:\n%s" % resp_json) quit() if status == "failed": print("Analysis failed:\n%s" % resp_json) quit() # Analysis still running. Wait and retry. time.sleep(wait_sec) n_try += 1 except Exception as e: msg = "GET analyze results failed:\n%s" % str(e) print(msg) quit() |
Executing this Python script produces the results shown in Code Listing 5-l. Please keep in mind that to achieve this, you will need to sign up for Forms Recognizer and set up an instance of the service within the Azure Portal.
The results are way beyond what I expected. Not only was Forms Recognizer able to detect fields (key-value pairs) from unstructured text, but it was able to do so by analyzing an image that is not even straightened—you can see from the sample image that the original paper receipt that was scanned is skewed. Now to me, that is impressive.
Code Listing 5-l: Forms Recognizer Script Results
Merchant: Contoso Address: 123 Main Street Redmond, WA 98052 Phone number: +9876543210 Date: 2019-06-10 Time: 13:59:00 Subtotal: 1098.99 Tax: 104.4 Total: 1203.39 |
Final thoughts
We’ve reached the end of this chapter and book. It’s given you a good taste of what robotics process automation (RPA) can achieve by mostly using out-of-the-box Python modules and libraries. However, we barely scratched the surface of what can be done with RPA using Python.
RPA is not only about automation, but also about imagination. It’s about how far you can let your imagination run wild and see which day-to-day tasks you can automate. It’s about testing, experimenting, iterating, seeing what works and what doesn’t, and ending up with code that can solve a particular problem—while saving time.
I will leave you with a teaser and a challenge. Go to GitHub and search for RPA, and you’ll be surprised how many projects exist that are dedicated to this fascinating subject.
One of my favorites is Automagica, which is a Python library completely dedicated to RPA, leveraging multiple applications, such as Excel, Word, browsers, and many others.
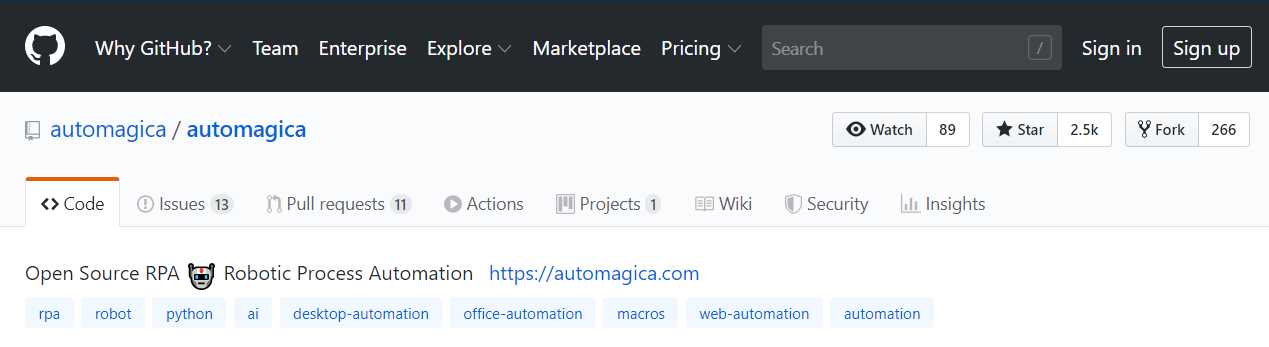
Figure 5-i: GitHub Automagica Repo
Exploring Automagica, or any other specialized RPA framework, would require a book all on its own. The beauty of RPA is not only the prospects it gives us by saving valuable time, but also that, with some out-of-the-box thinking; an easy, yet powerful programming language; and some imagination, time-saving and interesting utilities can be developed, making us more productive and better at what we do.
I sincerely hope this book has inspired you and encouraged you to dig deeper into this promising technology and shown you that robots are not as scary as Hollywood movies portray them, after all.
There’s a final teaser before wrapping up the book, which is included as an appendix. It’s part of a multi-file Python 2.7 backup script I wrote that uses classes. It’s my backup script (it includes FTP functionality), which keeps my data safe. I use it on all my computers. With one click, it backs up all my data to different locations.
Until next time, thank you for reading and following along. Stay well, and be awesome!
- 1800+ high-performance UI components.
- Includes popular controls such as Grid, Chart, Scheduler, and more.
- 24x5 unlimited support by developers.