
Rider Succinctly®

CHAPTER 4
Search and Navigation
In a small project or solution, written by you, there is no danger of getting lost. You know what’s where and can probably just click the right item in the solution tree if you need to. However, in larger solutions maintained by a large number of people, or in situations when you’re working with third-party code, getting lost in the complexity is a real possibility.
While Rider cannot help you figure out what the code does, it can present you with the structure of the code and let you traverse it with ease.
Go to Declaration
By far the most common use of navigation is to go to the declaration of the symbol you are currently on. For example, you are standing on a symbol called meaningOfLife and you have no idea whether it’s a method parameter, field, or just a local variable. By pressing a simple shortcut (F12 in VS layout), you can jump right to the location where that symbol is declared—even if it’s in another file.
Rider is smart enough to figure out whether the symbol under the caret has just one incarnation, or more. This is relevant for partial classes: firing Go to Declaration while on class name of a partial class cycles through the other incarnations of that partial class’s definitions.
If you have access to the sources of the symbol, then the navigation naturally happens to those sources. Otherwise, Rider will attempt to decompile the source code and show that to you instead.
The Go to Declaration shortcut has another interesting feature: if, after navigating to declaration, you now press that same shortcut once again, you jump back to the place where you started searching from and, from then on, the behavior of that same shortcut is modified; instead of taking you back to where the symbol was declared, Rider will start taking you sequentially to all the locations where that symbol is actually being used.
Usages of Symbol
The command Usages of Symbol (Shift+Alt+F12 in VS layout) finds all locations where a symbol is used and shows them in a pop-up list without any additional information (for example, whether the access is read or write).
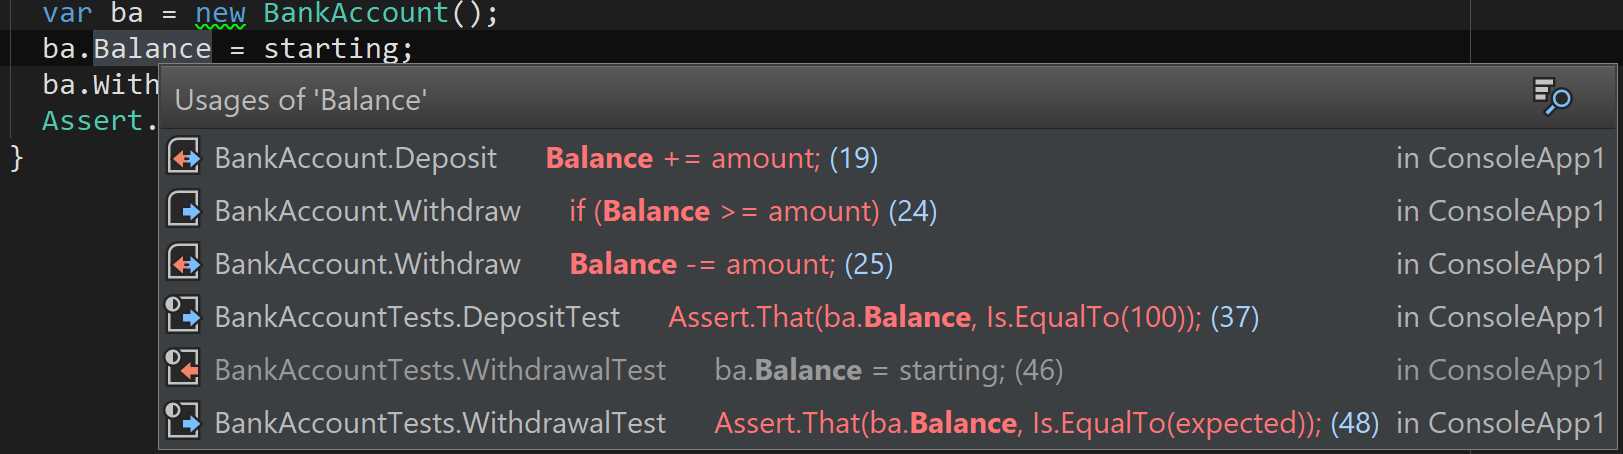
Figure 43
You can use the keyboard to walk up and down this list and press Enter to go to that location in code. Notice how the icons on the left give you a hint as to whether this is a write (red), read (blue), or both.
Find Usages
The command Find Usages (Shift+F12 in VS layout) finds all locations where a symbol is being used. Unlike Usages of Symbol command, you get presented with a tool window that helps you navigate all the usages:
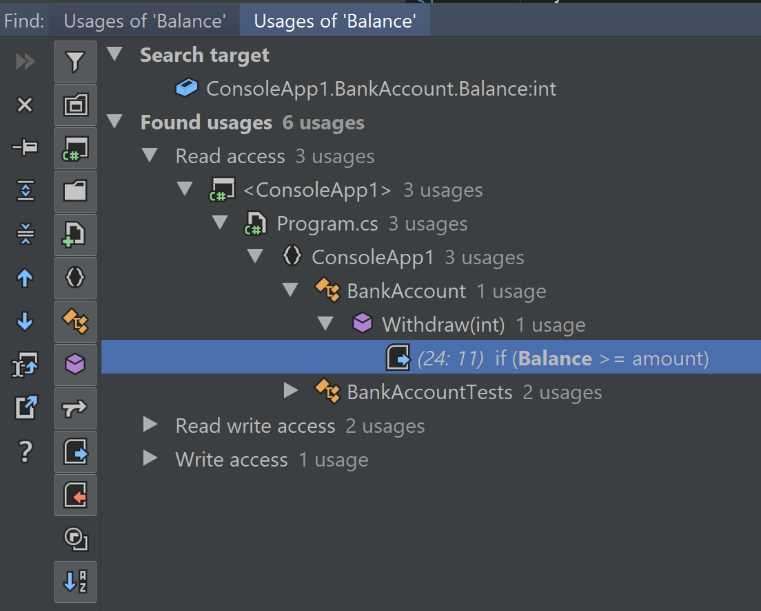
Figure 44
The usages are grouped by type of access: read, write, or read-write. Inside those, you get to see the entire hierarchy of projects, files, and data structures where those statements occur. As you can see on the left-hand side of Figure 44, Rider offers extensive sets of options for filtering and presentation of the results.
Search Everywhere
Sometimes you want to find a class with a specific name. Sometimes you need a symbol, a file, or a folder. Whatever the case, Rider provides a unified experience with a pop-up dialog box that searches all types of symbols by default. Simply use the shortcut (Ctrl+T in VS layout) and enter the text into the search bar:
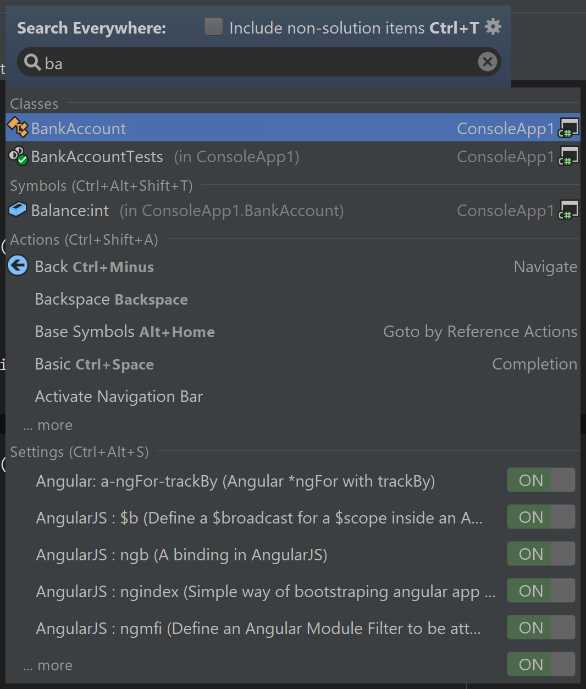
Figure 45
That’s quite a lot, isn’t it? The reason we’re seeing so much is because, for the search string ba, we’re getting symbols that contain those letters next to one another (for example, the Balance variable), but also those cases where a name is camel-cased and contains those two letters in capital. This is called CamelHumps, and it’s very useful for optimizing your searches: instead of searching for MainControllerFactory, you can search for mcf.
But let’s get back to why this list is so big. The first three items are fairly obvious: they are two classes. They have different icons because one is an ordinary class, and another is a TestFixture. The third item is a field, so that’s okay. But then we also get a list of actions whose description (in fact, one or more words in its description) starts with the two letters we’re looking for. These actions are listed with their keyboard shortcuts (if they have any), the area of functionality they come from (such as Completion), and their icons, where relevant. You’ll notice the …more menu item under a few items: this means plenty more elements starting with ba were found, but the list was deliberately truncated.
Next up is a whole block of settings that also includes the letters. You even have an option to turn the setting on or off here.
Note how each of the section headers (Symbols, Actions, Settings) have shortcuts next to them. What do you think will happen if you press one of those shortcuts while the original pop-up window is open? That’s right—each of those settings will filter the available items to only the affected types of entries. For example, suppose you start with Go to Anything, but actually want to filter all the symbols. Press a shortcut (Ctrl+Alt+Shift+T in VS layout), and your search will be restricted to symbols (class and member names) that contain the search string. Or press Ctrl+T again, and you’ll filter by type name.
Navigating type hierarchies
Rider helps you easily find base and derived types of a particular type. The shortcuts for finding base and derived symbols (Alt+Home and Alt+End in VS layout) each act such that, if there is a single base or derived member, they simply take you to that member; otherwise, Rider presents a pop-up menu where you can choose the members from a list:
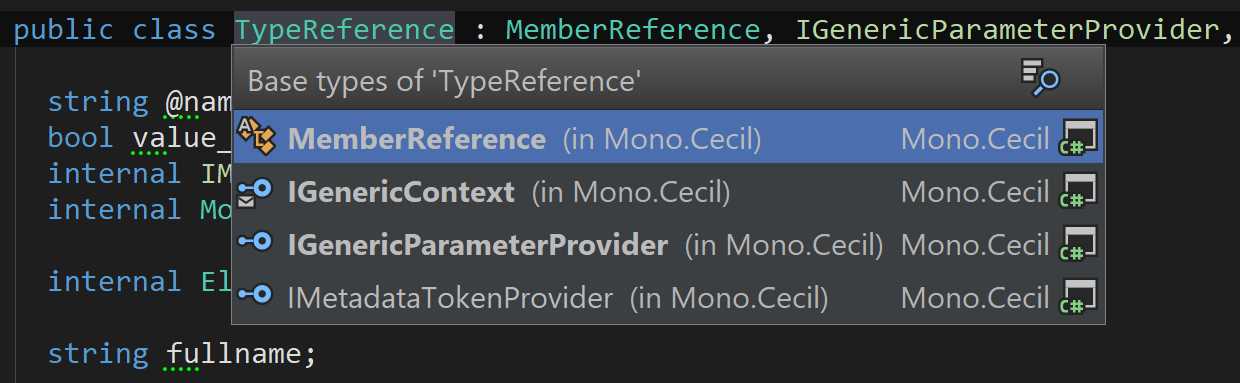
Figure 46
In the case of inheritance, you’ll also notice gutter icons representing that fact by showing a circle with an up or down arrow. This is shown on classes as well as class members. You can click each of those icons (or use Alt+Enter) to see a pop-up menu with all the possible navigation actions on the related code element:

Figure 47
Navigation bar
The Navigation bar is a bar on top of the screen that you can jump to using a keyboard shortcut (Ctrl+F2 in VS layout). It shows the current file as well as the entire set of structures (solution, project, and any number of folders) that actually contain it. You can use the arrow keys to move left and right to select each logical level of the path, and then press down to see a dropdown list of all elements contained in that level of structure (for example, a project). Filtering is also available:

Figure 48
If you don’t like the Navigation bar, you can easily disable it: just press Alt+Enter anywhere, type in navigation bar, and you should see an option for turning it on or off:
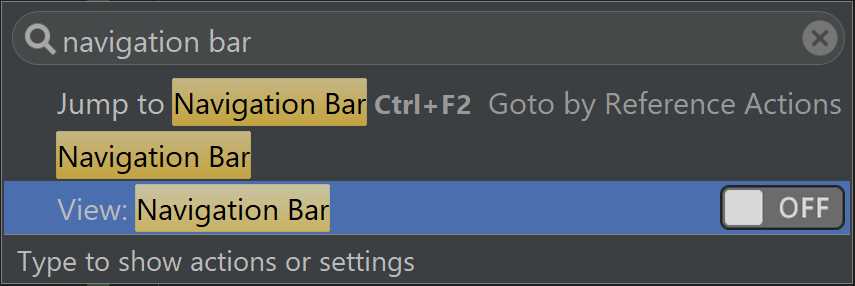
Figure 49
Bookmarks
Bookmarks allow you to mark places in code you might want to come back to. Thanks to the clever shortcuts in Rider, adding, removing, and navigating to bookmarks is easy.
To add a shortcut, press Ctrl+Shift+<Digit> where the digit is 0 to 9 inclusive. This creates a bookmark that is also made visible right next to the line of code where you added it:
![]()
Figure 50
Now, this being bookmark 1, I can press Ctrl+1 to return to this bookmark any time I want. I can also press Ctrl+Shift+1 on this line to remove the bookmark.
I can also bring up a separate Bookmarks window (Ctrl+` [backtick character] in VS layout) that shows every single bookmark together with a preview of the code where it’s set:
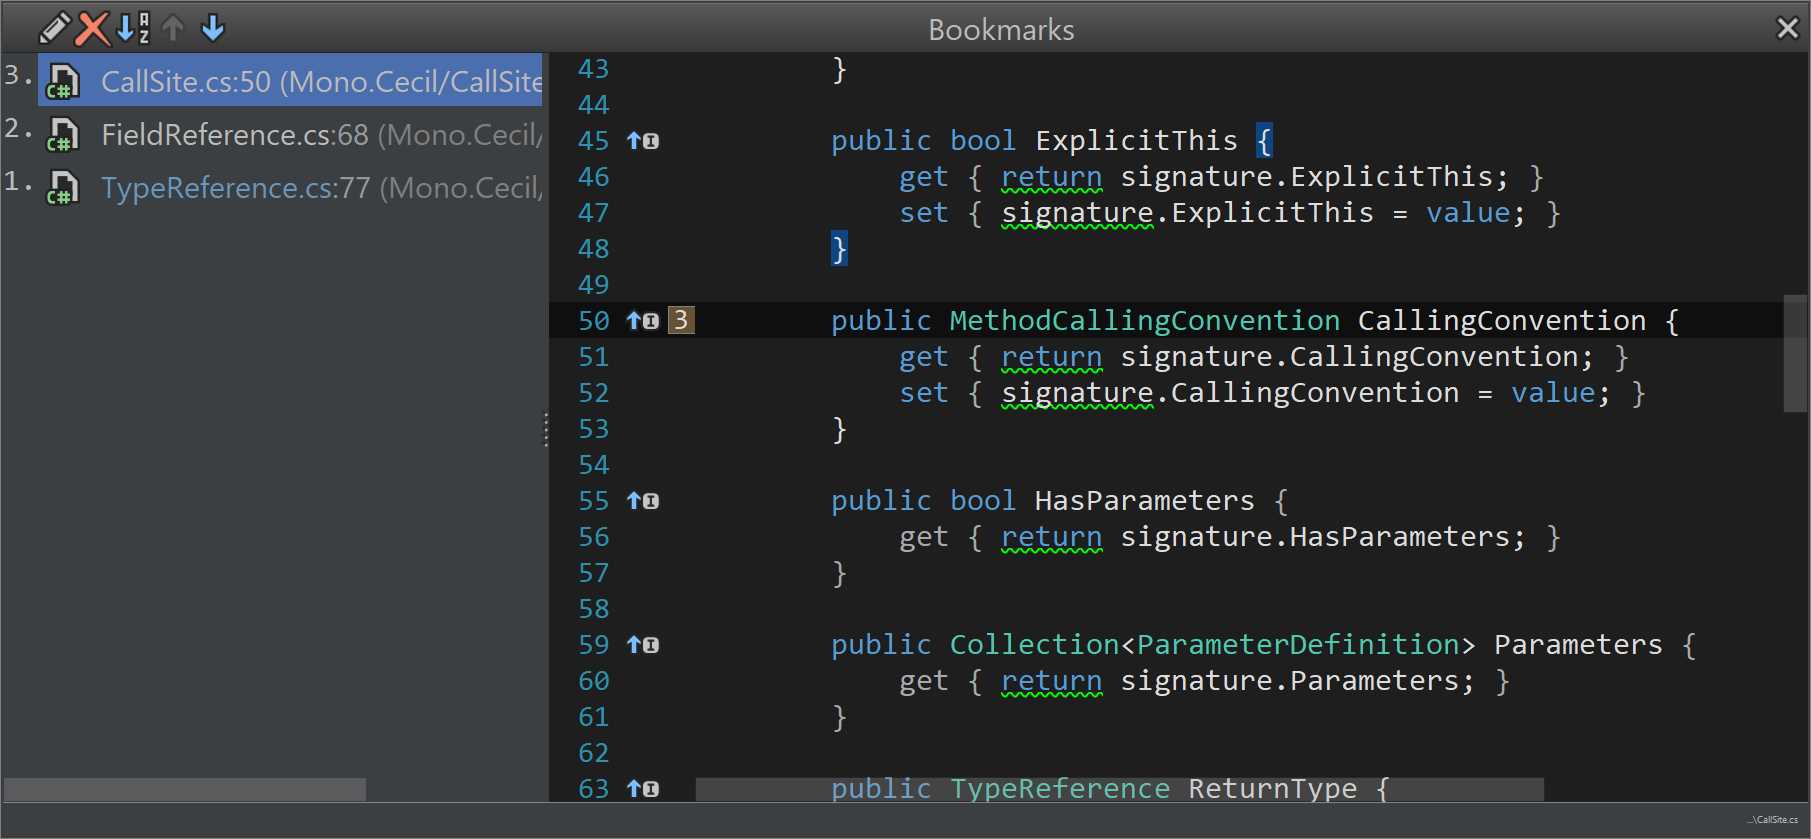
Figure 51
Navigate To menu
Rider has made great efforts to group functionality into related menus, so in a similar fashion to the menus we’ve already seen, such as Generate, it comes with a Navigate To menu that shows the sum total of options that are available on a current symbol:
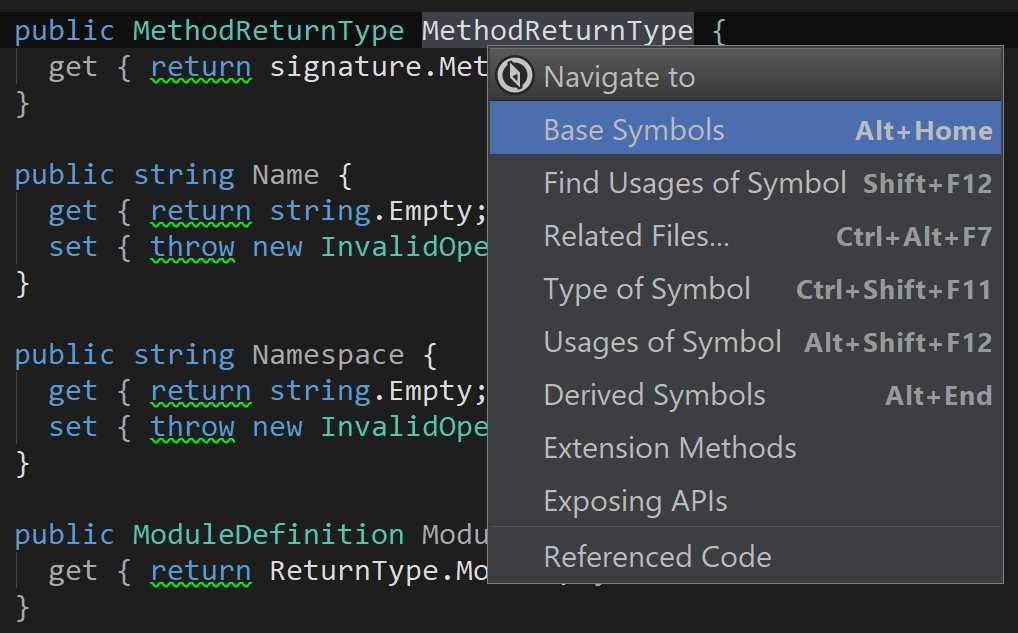
Figure 52
We’ve already met some of the options listed in Figure 52, such as the search for a base or derived symbols, and the search for usages of symbol. But there are other options, including the following:
- Related Files: Takes you to a file that is somehow referenced from the current file. How this works really depends on the language and frameworks you’re using. For example, in ASP.NET this would let you travel between the view and associated controller action.
- Type of Symbol: Takes you to the type of the symbol under cursor.
- Extension Methods: This lets you find all extension methods defined on the chosen type.
- Exposing APIs: This option lets you find all methods that actually return the chosen type in one way or another.
- Referenced Code: This searches directly for the code element that’s being invoked. For example, suppose you are on a constructor call. Finding referenced code will find the constructor as well as all other calls that happen within the constructor at the call site. A separate dialog box is used to present this information:

As always, double-clicking on any of the terminal nodes takes you to the right location in code.
- 1800+ high-performance UI components.
- Includes popular controls such as Grid, Chart, Scheduler, and more.
- 24x5 unlimited support by developers.