
Rider Succinctly®

CHAPTER 7
Refactoring
A refactoring is a change that keeps the code operating as before, but leaves the code looking much better and in a more maintainable state. Automated refactorings provided by Rider always leave the code consistent (or, at worst, warn explicitly that you’ll end up with broken code).
First and foremost, you need to be aware of the Refactor This menu (Ctrl+Shift+R in VS Layout or Refactor > Refactor This from the menu bar). The menu gives you a list of all the refactorings that can be done on code at the caret position:
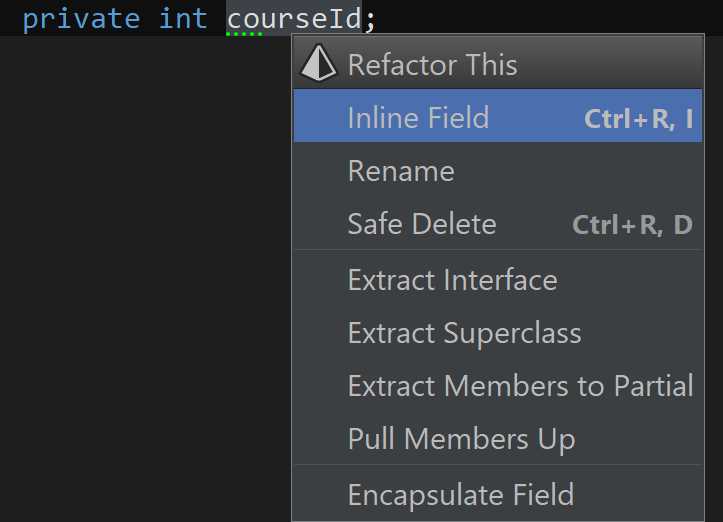
Figure 78
What follows is a discussion of the individual refactorings and the different ways in which they can be invoked.
Rename refactoring
The Rename refactoring is probably the most used refactoring out there. Not only does it rename the symbol under the caret (that is pretty much a given), but Rename also proceeds to search related symbols. Optionally, you can also choose to search for the symbol in comments and string literals.
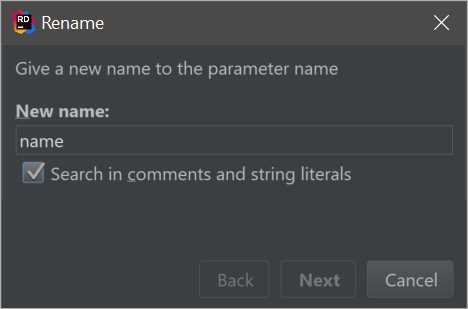
Figure 79
For example, a field’s name may be related to the name of a constructor parameter or a property. In this case, Rider reports it as such:
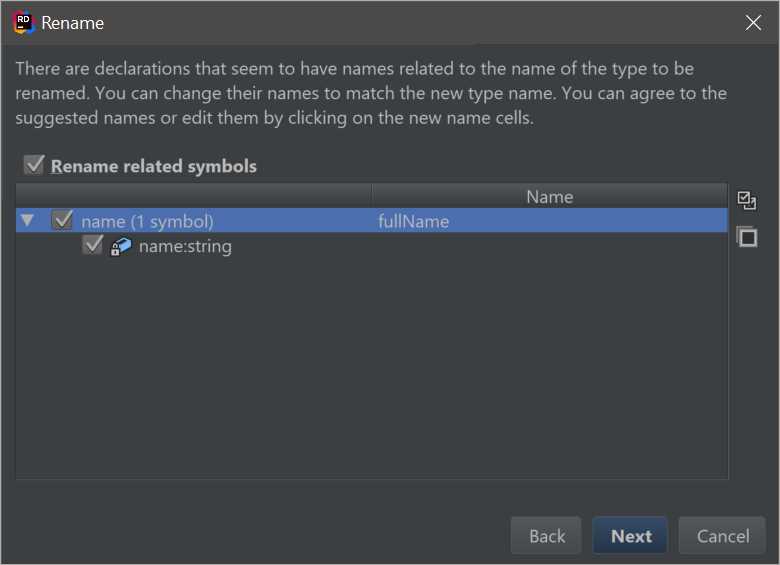
Figure 80
Conveniently, Rider will also search for the name in comments and XML documentation, again offering to replace it with the updated name.
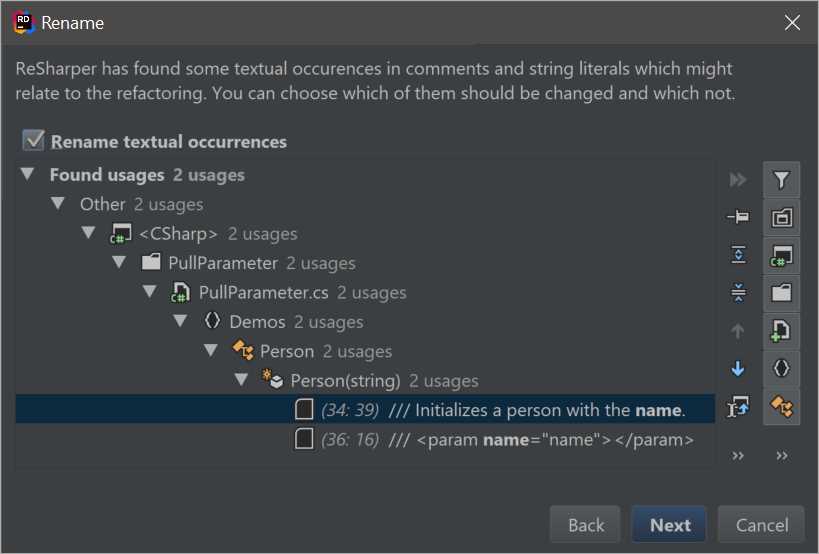
Figure 81
As you can see, this is a very sophisticated dialog box. Not only does it show you the exact locations of the mentions of the symbol you are renaming, but also has plenty of filtering options. Furthermore, for each found element, you can jump to the source code in the editor, and naturally, you can remove it from the refactoring.
Introduce refactorings
The Introduce family of refactorings allows you to take an arbitrary expression and turn it into a field, variable, or parameter of the enclosing method. This allows, for example, the very quick promotion of magic constants into private constants.
Introduce Variable allows you to take subexpressions and turn them into local variables right beside the code. For example, you can easily turn this:
Code Listing 7
var rootDisc = Math.Sqrt(b * b - 4 * a * c); |
Into this:
Code Listing 8
This goes a long way towards making your code more readable.
Extract/Inline method
Sometimes you want to take a part of a method and put it into a separate method. For example, consider the code that solves a quadratic equation:
Code Listing 9: Quadratic Equation Solver
public class QuadraticEquationSolver { public static (double, double) Solve(double a, double b, double c) { var rootDisc = Math.Sqrt(b * b - 4 * a * c); return ((-b + rootDisc) / 2 / a, (-b - rootDisc) / 2 / a); } } |
Suppose you want to move the calculation of the discriminant (the b2-4ac bit) to a separate class. First of all, with the cursor somewhere inside the Math.Sqrt() call, we use the Expand Selection shortcut (Ctrl+W in VS layout) until the entire subexpression is selected.
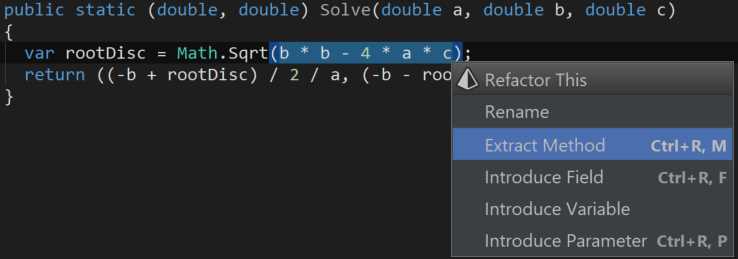
Figure 82
Then, invoking the Extract Method refactoring, we first see this rather unimpressive dialog box:
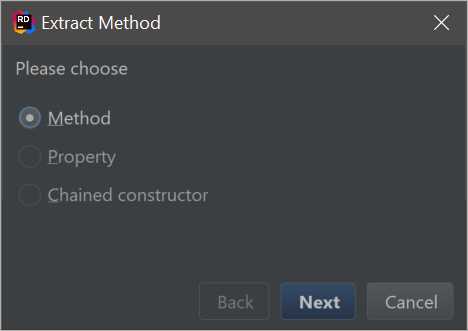
Figure 83
As you can see, even though we are restricted to extracting a method in the current context (since the chunk of code is dependent upon local parameters), in theory you could also extract the invocation into a readonly property (which is effectively a method) or, in some cases, into a chained constructor call.
Anyways, having chosen the only option available, we now get presented with the following, much more comprehensive dialog box:
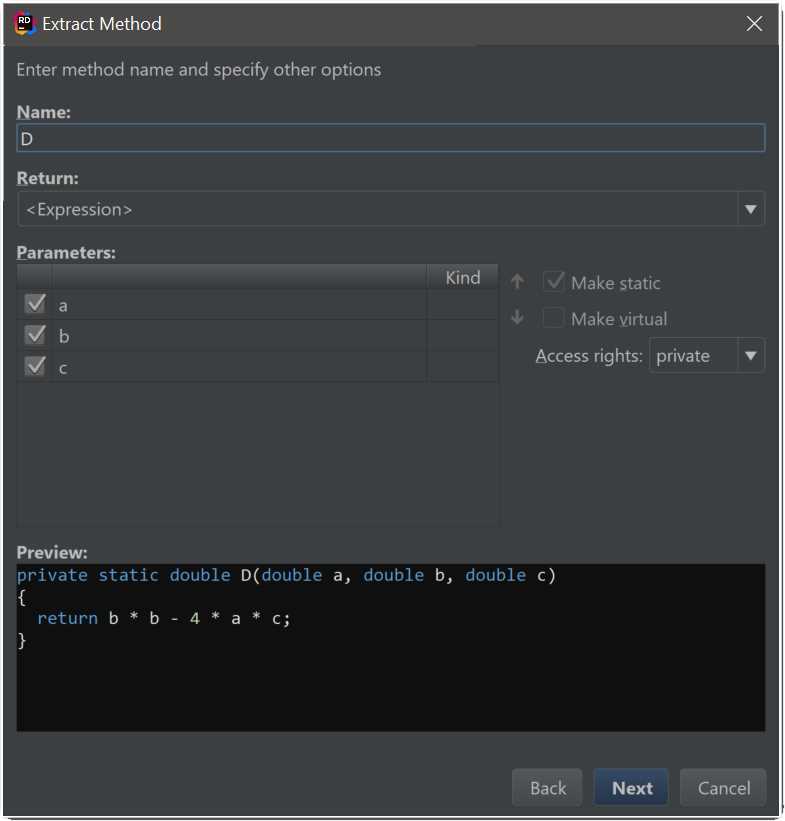
Figure 84
This is where you get to pick the new name for the method, which parameters to take, and some additional options. Note how Rider has correctly determined that the method can be made static. Towards the bottom, you get to see the preview of the generated method.
As soon as you click Next, the new method will be added to the current class, and the chunk of code currently selected will be replaced by a call to the new method—with all the right arguments, of course!
Extracting interfaces and classes
The Extract family of refactorings allow you to take any number of class/interface members and extract them into a superclass, an interface, or a partial class.
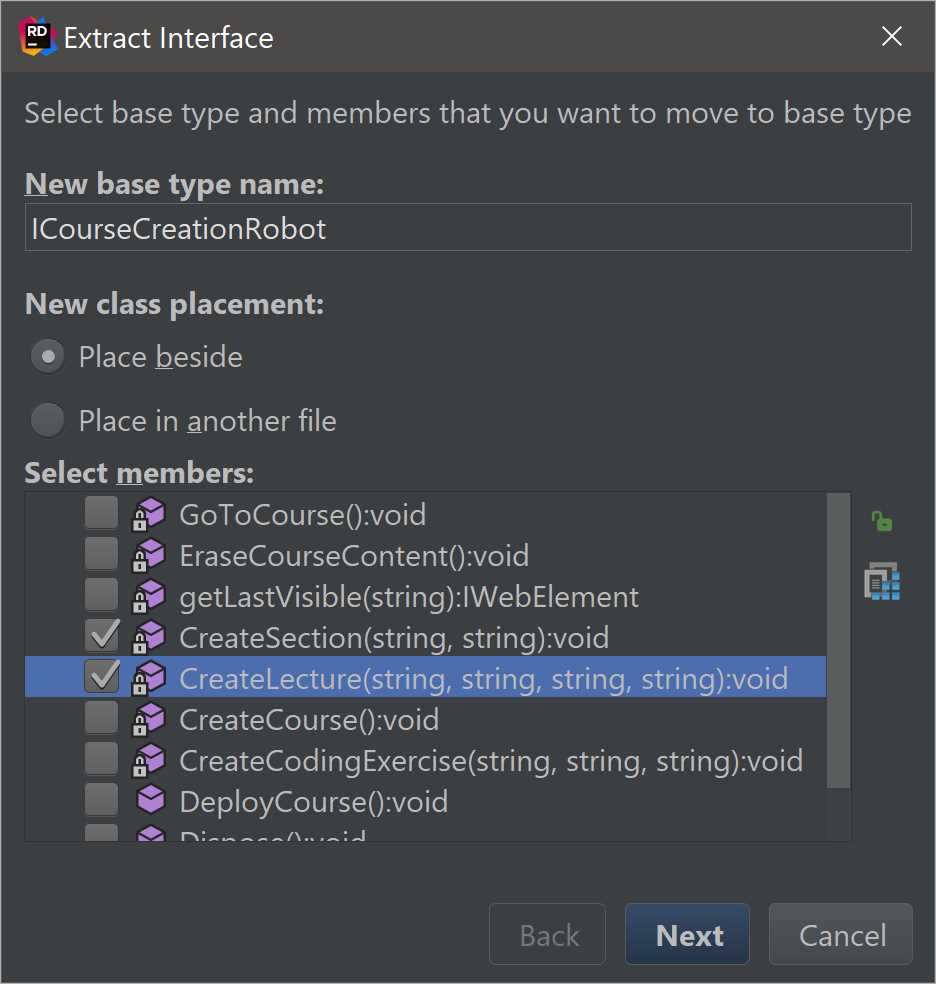
Figure 85
When extracting members of a class, you have a couple of options: you can specify what the newly generated type is going to be called, whether it’s placed in the same file or a brand new file and, crucially, what members you actually want to extract.
It’s worth noting that Rider is very careful when it comes to access modifiers: for example, if you try to extract a private member into a base class and that member is used elsewhere in the original class, its visibility will be automatically changed to protected to keep the code working.
More refactorings
It’s impossible to cover every single refactoring in Rider, but I wanted to mention a few more instead of just referring you to read Rider’s documentation.
Convert Abstract Class To Interface and Convert Interface To Abstract Class are symmetric refactorings that switch a data structure from one type to another. If you try to convert an interface to an abstract class and there are implementors of that interface that already have base classes defined, Rider will will present an error:
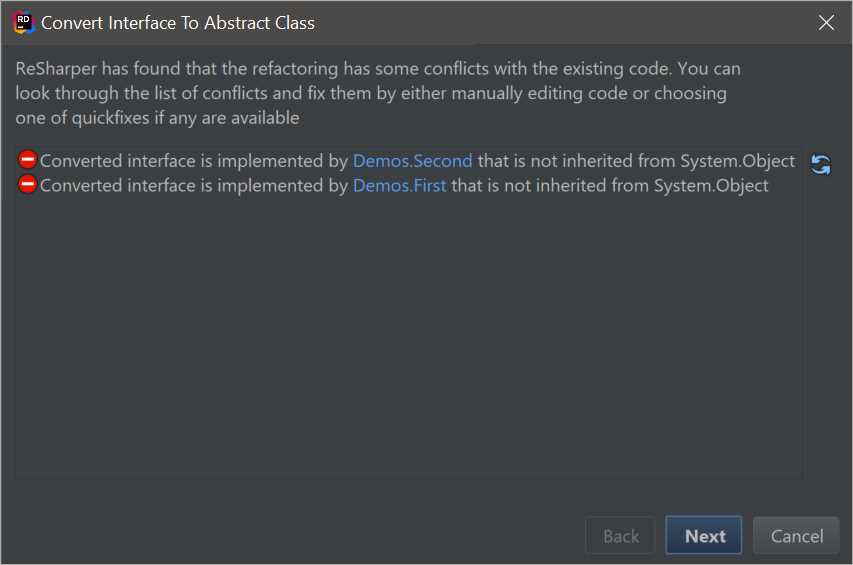
Figure 86
Change Signature is a refactoring that becomes available when Rider detects that you’ve changed the signature of a method. For instance, you might have just added a new parameter to a method, making existing invocations of this method invalid:
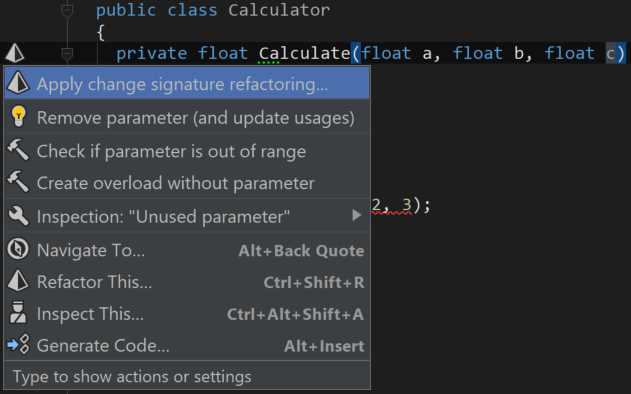
Figure 87
The dialog box of the Change Signature refactoring presents you with an illustration of what actually changed. In the case of an extra parameter being added, we get the following:
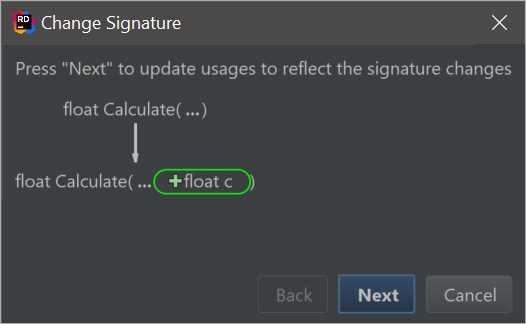
Figure 88
Now that we’ve added an extra parameter, calls to this method become invalid because there’s a parameter missing. How can we fix this? Well, Rider offers no less than four different possibilities for correcting the situation:
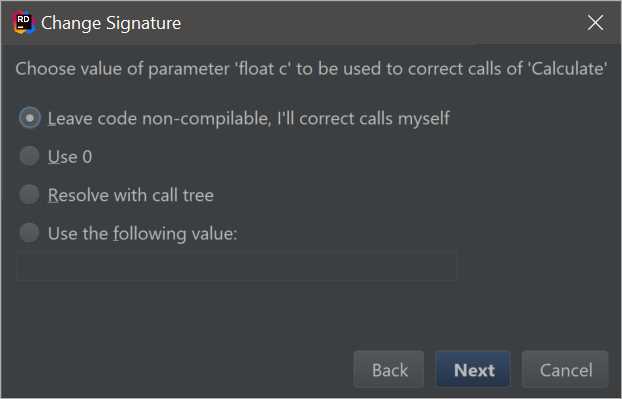
Figure 89
Let’s discuss all the possible options:
- If you choose Leave code non-compliable, you’ll subsequently have to go through every single location where the invocation is broken and correct it manually. Luckily, those places are easy to find (even without compilation), thanks to Rider’s Solution-Wide Analysis.
- The option to Use 0 (zero) basically suggests adding the argument to every call with a default value for that type. Since our method got a new parameter of type float, Rider is offering to add a value of zero.
- Use the following value allows you to specify your own value to be added.
The final option here is called Resolve with call tree, and it’s a bit special. Choosing this option shows you a tool window with a dropdown list of additional options:
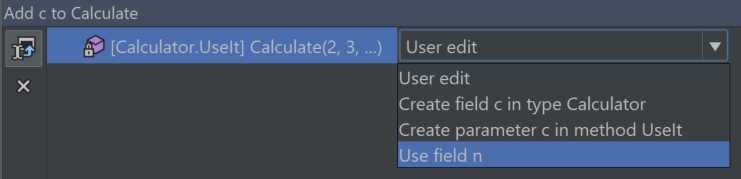
Figure 90
The list on the left of the tool window lists all the locations where the parameter needs to be specified. In our case we only have one, but in a real-world setup you could have dozens of places. On the right, you get a dropdown list of options for this location. You can certainly opt to edit the location yourself, but you can also create a parameter in each containing method; you can also create a field in the containing class or, alternatively, use an existing field as seen in the last of the options.
File and project-level refactorings
Most of Rider’s refactorings are concentrated at the level of code: you put the caret over a code element and call a refactoring on it. However, Rider also comes with some higher-level refactorings that are available in the Solution Explorer.
Just as with ordinary code editing, we get the Refactor This menu:
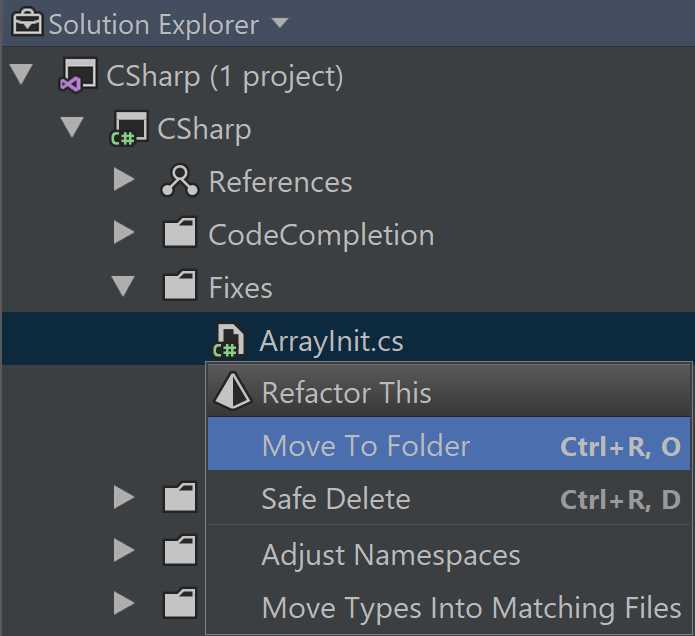
Figure 91
The refactorings listed in Figure 91 are fairly self-explanatory, but let’s discuss them anyway:
- Move To Folder moves the file to a folder of your choice. Note that, in general, Rider tries to preserve internal consistency between the name of the namespace declared in a file and its location on disk.
- Safe Delete is a command to remove the file safely, checking that the code isn’t used before the removal is made. Incidentally, this command is also available on individual classes.
- Adjust Namespaces enforces internal consistency by making sure the namespaces of types correspond to their physical location. As you may have guessed, it also adjusts their usages (the imports, specifically), so that even after the namespaces are changed, the rest of the code using those types is still valid.
- Move Types Into Matching Files attempts to enforce the one-class-per-file rule, moving each separate top-level class into its own separate file.
This set of refactorings can be applied to both individual files and folders. The commands Adjust Namespaces and Move Types Into Matching Files can also be invoked on a project or solution.
Refactorings for other languages
All of the examples I’ve shown here have concentrated on pure C#. It’s worth noting that Rider also has plenty of refactorings for other programming languages. These include the web triad (HTML/CSS/JavaScript), as well as its interaction with view engines such as Razor. It’s also worth noting that these capabilities are available in languages being used inside other languages. For example, if you use JSON inside C# inside a Razor view, you get a consistent experience—not just in terms of refactorings, of course, but also other features, such as navigation.
There are additional groups of refactorings available different markup languages (such as XAML), as well as different programming languages (F#) that Rider also supports.
- 1800+ high-performance UI components.
- Includes popular controls such as Grid, Chart, Scheduler, and more.
- 24x5 unlimited support by developers.