
ReSharper Succinctly®

CHAPTER 7
Code Refactoring Tools
We all know the drill—Red, Green, Refactor—it's the staple diet of agile, test-driven teams all over the world these days.
The problem is, refactoring is a very complex procedure; renaming that critical method in an object, then going and finding every point in the solution where it was used, is a very easy way to use up an entire week.
It comes as no surprise that R# provides some amazingly useful tools to help with this task. In fact, it could be said that the main reason R# came to market in the first place was to service this need, given that the tools in VS at the time where very primitive in comparison.
R#'s refactoring tools are mostly keyboard-driven (more so than most of the functionality we've seen so far); this is primarily because most of the refactoring tools are designed to be used in process while in a typical coding session.
So what exactly is the art of refactoring?
Well that depends on exactly which way you look at it—to some, refactoring is just general code tidying; to others, it's completely restructuring a complex project.
In general, anything that involves renaming methods, objects or properties, or involves moving chunks of code around and generally rearranging things, is classed as refactoring. It’s for this reason that refactoring is probably one of the most volatile tasks a busy developer would have to do.
Imagine for just a moment that you have the following class:
public class MyClass { public string returnTwo() { return "2"; } } |
We can clearly see it returns a string. Now let's suppose we use this as a utility class in lots of places in a huge web project. In fact, every time we want to present the number 2 in the web layer, we call this method, in this class.
As you can likely visualize in your head, this could be a lot of inbound calls.
Now let's suppose we want to move this method into a utility class that exists outside the web layer. This will allow us to reuse the functionality in other places where we need a number 2 as a string.
Typically, without R#'s help, this would involve us copying and pasting the class into a new file, then going through our solution looking for all the references to the class or method and fixing the links up manually so that things compile once again.
With R# we can simply place our cursor on the method or class signature, and with a few key presses, have everything changed in a matter of minutes.
Let's suppose we have the following class in our web project:
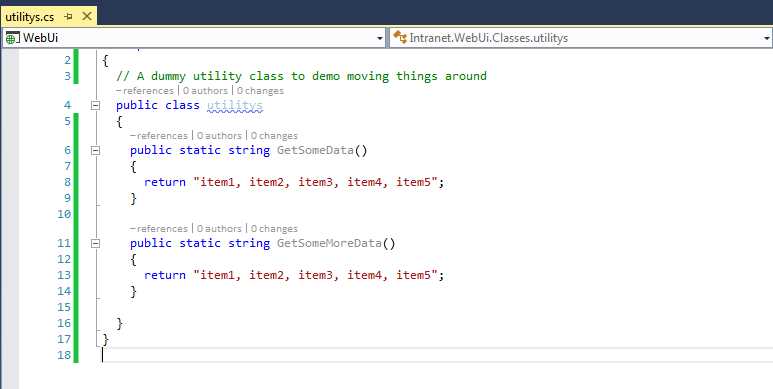
- Demo class in our web project to refactor
And let's suppose we have the following usages:
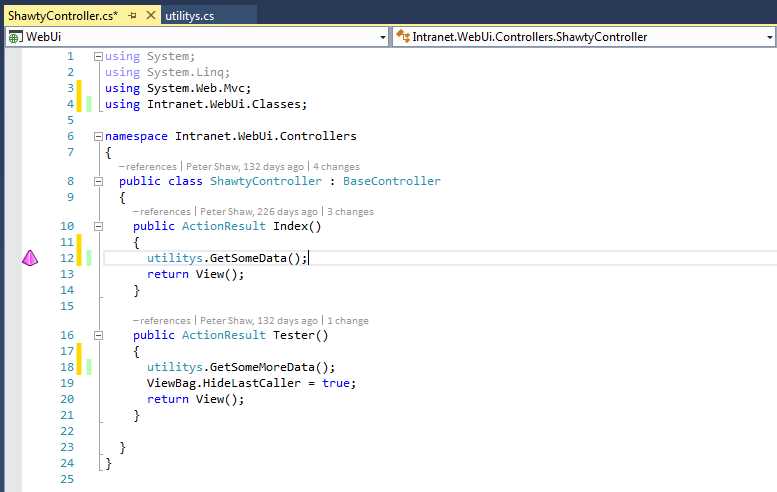
- Usages of our demo code in Figure 118
As you can see, we have the correct using statement in our usage code and all is happy.
Now let's rename one of our methods.

- Renamed method in our demo code
You'll immediately see that the code where we use that method starts showing as an error.
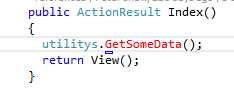
- Usage code showing an error after a rename
In this case it’s only one instance, but it could easily be 100. If we used R#'s refactor methods to rename this however, we could have done all of those renames all in one go.
Ctrl+Z the renamed method, then position your cursor on the now original name and press Ctrl+R, R (that’s Ctrl+R twice in rapid succession), and you should be greeted with the following:

- R# reference Rename dialog box
Now type your new name in the name field, then click Next and go through the wizard defaults.
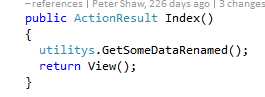
As you can see, you've renamed your method in its source file.

- Source method renamed
If you look at your usages, you also see that R# has found and renamed those for you too.
- Usage renamed by R#
The time savings alone here are in the orders of hours, not just minutes, and this is just the tip of the iceberg.
Let’s once again undo all of the renames we previously performed, then go back to our dummy class. This time, use the "Refactor, Move" key press Ctrl+R, Ctrl+O. You should get the following dialog box:
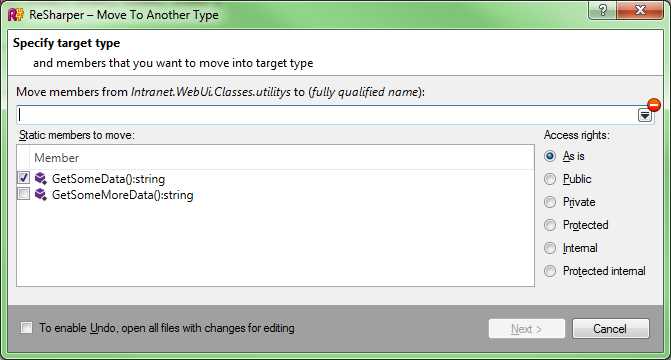
- R# Refactor, Move dialog box
In this case, we only have one method selected, but we could easily select all of them if we wanted to. You can also see that we can change the access type when we move, should we wish to.
If you click on the small drop-down arrow at the end of the text input box, you'll get a navigator that allows you to pick where in your solution you wish to move the method to.
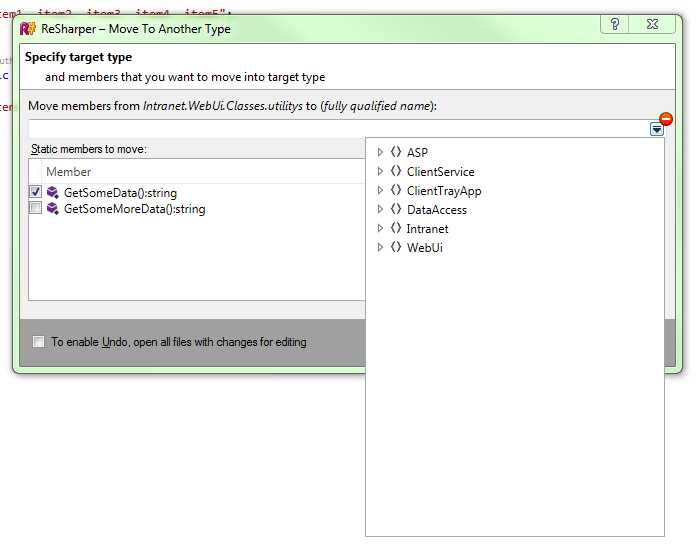
- Refactor, Move dialog box showing namespace navigator
If I pick a new place to move the method to, R# will perform any work it needs to do to move the method and fix up any used references.
If we open the file I moved the method into, you'll see it sitting there as expected:

- Test method moved to another class
You'll also see that it's been removed from its original file.

- Dummy class with test method removed
And our usage has been fixed up to reference the new location of the method.

- Usages fixed up after a method move
R# has many more such operations. The main menu from the Visual Studio toolbar looks like this when a method signature is selected:

- R# main Refactor menu
We’ve already seen the Rename and Move options. Safe Delete is used to remove a method from your project, and then clean up any remaining usages afterwards.
Change Signature is used to change a method signature, allowing you to swap parameters around, change types, or do things the safe way and construct an override.
Select your method signature and press Ctrl+R, Ctrl+S, and you should see the Change Signature dialog box:

- R# Change Signature dialog box
For our demo method, we have no parameters currently on it—let's change that and add some. We’ll make this a modification rather than a delegate. Make sure that the Modify option is selected, then click Add, set the type to string and the name to dataName with no modifier, and then click Next.
Because where adding something that wasn't originally there, we'll see a further dialog box:
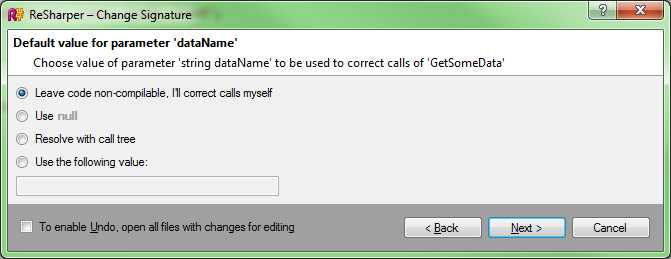
- Parameter addition dialog box
As you can see, R# will ask you how you'd like to set the value of the new parameter when it makes changes to the signature at the points of usage.
The default is that you need to change things yourself (you'll get compiler errors when you build). You can add a null value, set a static value, or build a call tree, all designed so you can maintain an error-free compile while altering what you need to.
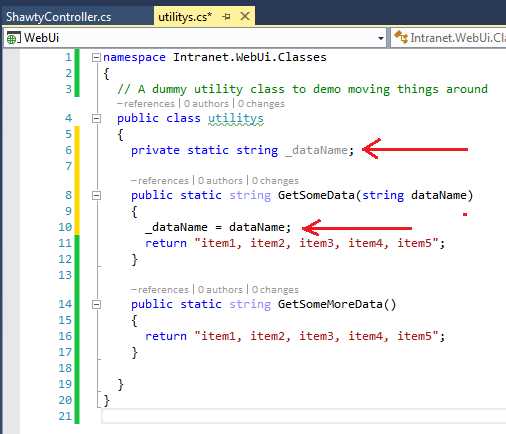
For this example, I've chosen null, which gives the following results:

- Our test method with a parameter added
As expected, our usage has also been updated to match:

- Usage updated by parameter addition
If you refactor a method to take a new parameter, there's often a use case that the parameter will be used to initialize or set a value in the class the method is part of. R# can help further after a refactor by helping you “introduce” properties and variables into a containing class.
Position your cursor on the string dataName parameter you've just added to your test method, then click on RESHARPER > Refactor > Introduce Field or press Ctrl+R, Ctrl+F. You should get the Introduce Field dialog box that looks like the following:

- R# introduce field dialog box
From here, you can set the field name, accessibility type, and other settings. Select the options you wish to use, then click Next.
You should see that your method source is now changed to look like the following:
- Result of asking R# to introduce a field to our class
It may not seem like much, but you've just saved yourself over 50 key strokes with those couple of mouse clicks, and considering that you can introduce multiple instances very rapidly, you can quickly see how fast you might be able to flesh out a fully decoupled class dependency ready to consume classes using a Dependency Injection (DI) based pattern or something similar.
One of the more useful of R#'s refactoring commands comes into its own when you’re copying and pasting methods in from other projects.
Let's imagine we just pasted the code in our dummy class, in from a different project all together. We might expect that the namespace is different to where we want to use it:

- Demo code showing misnamed namespace
As you can see in Figure 137, our class namespace is highlighted with a blue squiggle; this is because R# can see that it's been pasted into a class that lives in Intranet.WebUI.Classes, but the actual namespace in the file is Intranet.DummyUtils.
At this point I could simply just move my cursor to the namespace line and tap Alt+Enter twice to active R#'s default fix mechanism. We can also use the extended tools from the various menus.
We can access the namespace fix by right-clicking on the class in Solution Explorer and selecting the Refactor submenu.

- Adjust namespace accessed from Solution Explorer
This will give you a dialog box allowing you to choose which namespaces you want to correct.
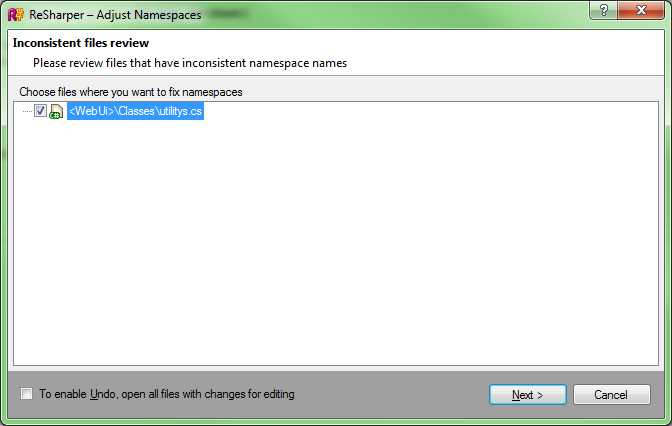
- R# namespace choose dialog box
In this case I've only selected one file, but you can also select multiple files (for example if you just copied some files from a different project), allowing you to correct the names paces for each of them all in one go. As expected, when you click Next, the namespace is adjusted correctly in each of the files you check in the dialog box.
You'll also notice in the menu above that our old friend Refactor, Move is also available from here. When invoked here at a class or file level, it's slightly more powerful than simply using it to move a method, as we did previously.
If you select the Move option from here, you'll be greeted with the following dialog box:

- Refactor, Move dialog box when called from the Solution Explorer
As before, you can drop the destination field down to select where in your solution you'd like to move the file to. This time, however, you'll get much more in the navigator:

- Refactor, Move dialog box with extended navigator
You can see straight away that not only do you get to navigate namespaces, but you also get to navigate the full solution hierarchy. Because you’re moving an entire file, you get the choice to choose not only its namespace, but its physical location too.
As with the many other refactor options, when you use this, everything in the file will be relocated, usages will be fixed up, namespaces will be adjusted to match the new location, and using statements in files that use this class will also be updated to reference the new location.
The main reason purpose of this feature is to break complex code out into simpler units.
If you have a collection of utility libraries that are used in many different places, you may want to put these into a completely separate class library project. The extended move feature helps with this task almost effortlessly, and again, reduces what otherwise might be a half a day’s work, into nothing more than a few clicks of the mouse.
There are still more refactoring options
If what we've already covered isn't enough for you, there's still more in the refactoring menu if you dig deep enough. If we follow RESHARPER > Refactor > Convert, we get the following third-level submenu.

- Third-level Refactor, Convert menu
If we position our cursor on a method, we can convert that to a property, as you can see in Figure 142. Others are enabled depending on the member type selected, but you can easily see the extent of the conversions we can do.
In my copy, I don’t have shortcut keys assigned to a lot of these, but you can (and you should), allowing you to do ALL of these conversion on the fly, again following the R# mantra of keeping your fingers on the keyboard.
There's still more—if you venture down the Extract third-level submenu, you'll find the following:
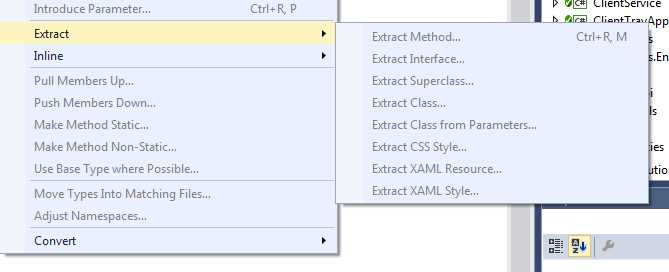
- Refactor third-level Extract submenu
The options here are used to extract various entities into separate files and constructs, or to create derived implementations based on the source.
For example, if you’re positioned at a class level, you might want to extract an interface, which can then be used to aid with the construction of an interface-driven architecture.

- Extract Interface dialog box
The code produced by the choices in Figure 144 is placed in IUtilities.cs and looks like the following:

- Code produced by extracting an interface off our test class
Your source class will also get updated to use the new interface:

- Source file updated to use the extracted interface
There's such a sheer amount of functionality in the refactoring section of R# that it's absolutely possible that there are commands that you may never even know are there. Indeed, in the process of researching topics for this book, I found functionality that I never knew existed.
All I can recommend is that you explore the menus. Create a dummy project or two, then select and move your cursor to different locations.
The JetBrains website does its best to group things into functional groups so that you can find things based on the job you’re looking to do, rather than by ordering in the menus. This goes a long way to helping you explore. By far the best means, however, is to just play with the product.
The rest of the refactoring options I'll leave as an exercise to the reader—it's much more fun that way.
- 1800+ high-performance UI components.
- Includes popular controls such as Grid, Chart, Scheduler, and more.
- 24x5 unlimited support by developers.