
ReSharper Succinctly®

CHAPTER 5
Code Generation
There's one thing that R# does, and does amazingly well: it generates code. From snippets to templates, from wraps to conversions, R#'s tools were among the first things added to the product, and continue today to be one of its outstanding features.
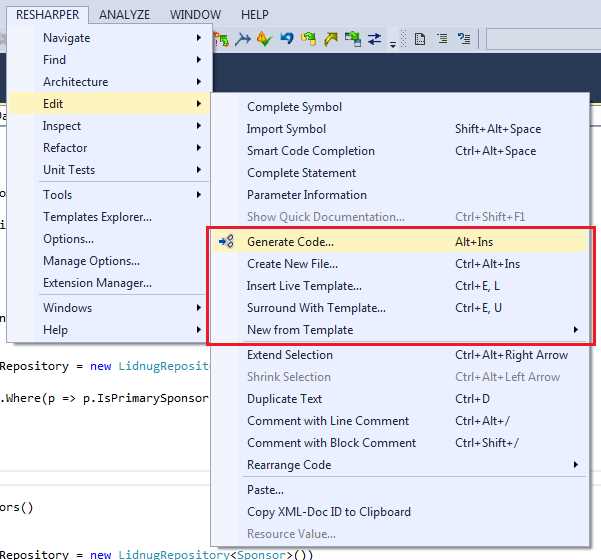
- R# code generation features on the Edit menu
In the second group of options in our Edit menu, you'll see just a few of the options R# provides for helping you in your daily task of writing the application code for the products you and your team build.
So what exactly can R# generate?
Let's start with the Generate Code option (Alt+Ins). This option is geared specifically to one task that we as developers do very often, and that’s create classes for objects.
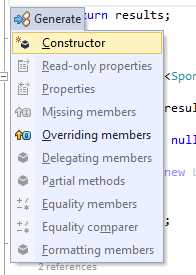
- R# Generate Code menu
If you place your cursor anywhere in a source file, then activate the Generate Code pop-up menu, you'll see something that looks like Figure 77. We can get a better feel for what each option does however, if we create an empty class, then go through the options in turn. Create an empty class in your code, something like the following:

- Empty class created to demo the create code functions
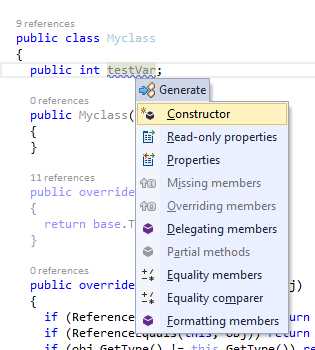
Now position your cursor inside the empty class and press Alt+Ins (or use the menu) and pop open Generate Code menu once again. You should now see that there are a few more options available on the pop-up than there were last time.

- Generate Code pop-up menu in an empty class definition
The four options available are tasks that R# considers important to the creation of an empty class. If you select Constructor, you should get a default constructor:

- Empty constructor created by Generate Code
Your cursor will be automatically positioned, so you can immediately start to type your parameter list. This may not be a groundbreaking feature to most people, but when you consider that you just did that in about two key strokes, long-term usage really builds up a picture of how many minutes, even hours, it can save you.
Looking back at Figure 79, you'll see Overriding members, Equality members, and Equality comparer listed as options. Anything in your base class that can be overridden, or set up to make an .Equals class-specific call can be created and injected with these three calls.
If you select Overriding members for example, you'll get a pop-up menu that looks like the following:
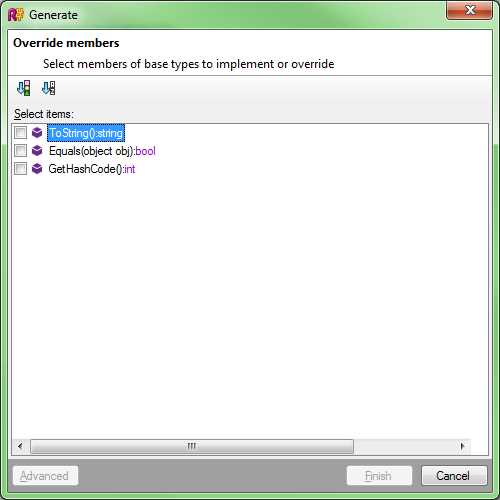
- Override members dialog box
Anything on the class that can be overridden will be listed here. In this case, I've got just a simple class, so just the general .NET base calls are available. If I select all three and click Finish, I get the following code:

- Code generated by R#'s Overriding Members option
Note: You might have noticed by now that in some of the screenshots, the color of some of the code is faded. This is another of R#’s helpful code diagnosis tools that helps you see how good your code coverage is. In Figure 82, all three of the overrides are faded, simply because they haven’t yet been customized, and so offer no value to the code base. We’ll cover this more in later sections.
As you can see, you now have a ToString, Equals, and GetHashCode ready to fill out with our own custom code. Once we add our code into these, then .NET will call those methods when and where they’re needed.
You might have noticed that I've gone down the code generation menu from top to bottom, as I have done with most of the other menus in this book. This might not show ReSharper's code generation functionality in the best light, simply because I've added code into my class that ends up creating redundant code. In a real project, you'd likely want to use one or the other based on your project’s needs. I've done things the way I have to keep things simple for the beginner user of ReSharper. As you gain experience with the product, it's worth remembering that many of the tools do duplicate functionality, and on occasion blindly activating things without first making an educated decision can sometimes create more work than it saves.
As a final demonstration, place your cursor back inside your class definition, and activate the Generate Code option once more.
This time, select Equality Members, and you should see that because of the previous Overridden Members option, it asks you to confirm if it should change the Equals stub, which is already generated:

- Confirmation that you are about to replace an existing overridden method
In this case I chose to replace them, since I hadn’t put any custom code in the method. If I had, then I could have skipped the implementation, or gotten something called “Side by Side,” which would have injected the code in a manner that would not have caused any problems with my existing implementation while allowing me to see the code that would be generated.
If we now look at the code once more, you'll see that some slightly more boilerplate code has been created for you to make use of:

- Empty class code after running Equality Members
Implementing the Equality Comparer option stubs out the code needed to make use of the IEqualityComparer interface. This further allows you to create and support dynamic comparison interfaces in your code, giving you the ability to delegate the comparison to an external class while still retaining the ability to control the result.
Like many of R# other options, the rest of the menu is context-specific. First add a property to your class as follows:

- Dummy class with a property added
If you then position your cursor on the property, and press Alt+Ins, four more options become available:
- Generate Code menu with property based options available
Choosing the Read-only properties option gives you the following dialog box, asking you which properties in your class you would like to generate read-only stubs for:
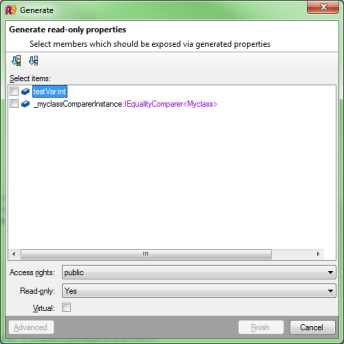
- R# read-only properties dialog box
In this example, I selected testVar and clicked Finish, ending up with the following code:

- Class showing testVar read-only property
If I wished to, I could now use Alt+Enter on the green underlined public accessor or the class variable, change the access to protected, internal, or private, and force all reads to the Var to come into the class via the read-only accessor.
The Properties option does a similar thing, but it creates full read/write property accessors in the process, rather than the read-only ones we've just seen.
The remaining options, Delegating members, Missing members, and Partial classes, are all used to generate code stubs for things like interface contracts, extensions of existing partial classes, and the creation of method stubs used to delegate access to the given property or variable.
Just that one menu option alone has the power to reduce your daily key press count by a factor of about 100, and we haven't even gotten started on code and snippet templates yet.
And that brings us onto the next stop on our tour, Create New File.

- Create New File
Unlike many of these menus, Ctrl+Alt+Ins is not context-sensitive. This means that you can press these keys just about anywhere, from your code editor to a highlighted solution tree root.
So what's the advantage of using this over the standard Visual Studio’s “Add new…” dialogs? Well for one, the actual contents of the menu are context-sensitive. If I locate myself in an MVC project and press Ctrl+Alt+Ins, I get this pop-up menu:

- Create File From Template pop-up menu for an MVC project
However, if I locate myself in a standard class library, I only get this:

- Create File From Template pop-up menu for a class library project
Different project types show different options on the menu, and as you might have already guessed, all of this is customizable in the R# options. If you click on the R# main menu in Visual Studio, in the second section you'll see an option marked Templates Explorer.
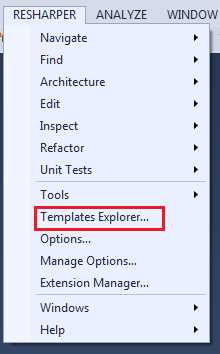
- R# Templates Explorer menu
If we click on this option, we get a rather large Visual Studio editor window called the Templates Explorer, with three tabs in it. The tab we’re interested in is the File templates tab.

- R# File Templates editor
Immediately, you can see in the right-hand pane that we have the In Quick List and Not in Quick List options, which as you might guess, determine whether or not this entry will appear in our pop-up menu when we press Ctrl+Alt+Ins to insert a file.
If we look at the right-hand side of the dialog box, we can see various scenarios such as Global, C#, and ASP.NET. These scenarios control which project types the different lists work with. If you work your way down the list, you should see in the left-hand pane each of the groups in turn that I demonstrated previously.
I'm going to leave the Templates Explorer for now, but we'll come back to it very soon. For now, click the Close icon on the top right of the templates editor, and let's return to looking at our code-editing capabilities.
If you select a file to insert from the Create new File menu, you'll get the usual experience of R# highlighting some areas in the template with a red border, requesting that you fill some things in, like variable names or layout names.
The convenience of this menu is that it's one key press away, and it's quick and uncomplicated. The Visual Studio Add New menu and dialog box often requires you to read the menu options to make sure the item you want is on there, and if it's not, then you need to go into the full dialog and look through the installed templates.
Once again, R# makes an already existing process quicker and easier to activate, and without having to reach for your mouse.
Live templates (accessed by Insert Live template from the Edit menu, or Ctrl+E followed by an L) are similar to inserting files. The difference here is that the code snippet is inserted directly into your source code at the position of your cursor. The default menu on a blank line in a razor view file looks like this:
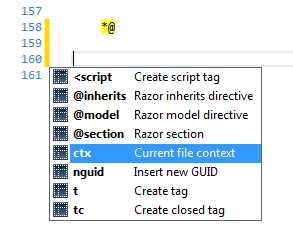
- R# insert live template menu
And like the File menu, it will change depending on file type and scenario of intended usage.
The last option in the second group is Surround with Template (Ctrl+E followed by U). Like its two predecessors it generates code, but instead of linear code generation, it works by wrapping a selected region.
It's of most use when editing HTML and Razor code, whereby if you select an area of text in your HTML source, you can easily place a new tag around it. For example, if we had a paragraph without P tags, we could select the text and activate Surround with Template, choose tag, and type in the tag name. Other uses for this tool include adding compiler conditionals such as #if blocks and language constructs such as try/catch and loop structures.
Of course, this doesn't have to be just a tag; it can be parenthesis, curly braces, or anything else that normally would have some kind of opening and closing delimiter.
The best part about this tool is, because this is such a common operation, R# will often add the Surround with… quick menu icon to the left margin action bar, meaning that you can very often get directly at the wrap template function with nothing more than a couple of taps on Alt+Enter.

- R# Surround with Alt+Enter menu
As you saw briefly a few pages back, ReSharper has a template editor. This editor allows you to customize everything you've just seen, and make your own custom files, wraps and live templates available for your own use.
There are hundreds of possible combinations, and even more macros to use with them. Unfortunately, there's no room in this book for me to list every one of them, so instead, we'll make a quick useful template for each of the three scenarios, and I'll leave you to explore the rest.
Let's start with a live code template. Open the Template Explorer from the R# main menu, and make sure the Live Templates tag is selected.
We'll make a template to help us create HTML forms using Razor in an ASP.NET MVC project, so click on Razor in the right-hand list of the live templates. You should see something like the following:

- Visual studio showing the live templates editor for Razor
On the toolbar above your templates list, you can see a black and gray checkbox next to the blue bar. Check this box to create a new template; your display should change to look something like the following (bear in mind I have my windows docked):

- Visual studio showing the New Template editor
In the main section in the center we have a normal editor, which functions just like any other editor in Visual Studio. To the right of this editor, we have the parameters for our template.
Shortcut: this is the text we want R# to recognize before it offers to complete the template for us.
Description: This is the human readable description you'll give to your template. This will show in tool tips when referencing it.
Reformat: With this option, R# will reformat your code to match your current coding styles once the expansion is complete.
Shorten Qualified References: This instructs R# to make any references in your template as short as possible. For example, if you have MyLib.Namespace.Function in your template, and you already have MyLib.Namespace in your using list, R# will automatically change the reference to just Function.
Availability: This will open a dialog box allowing you to choose exactly where your template will appear, by default this will say "Razor" as we selected razor from our left hand list. You can however go much further than just "Razor", you can select a great many options that allow you to choose exactly how and when your live template will be available.
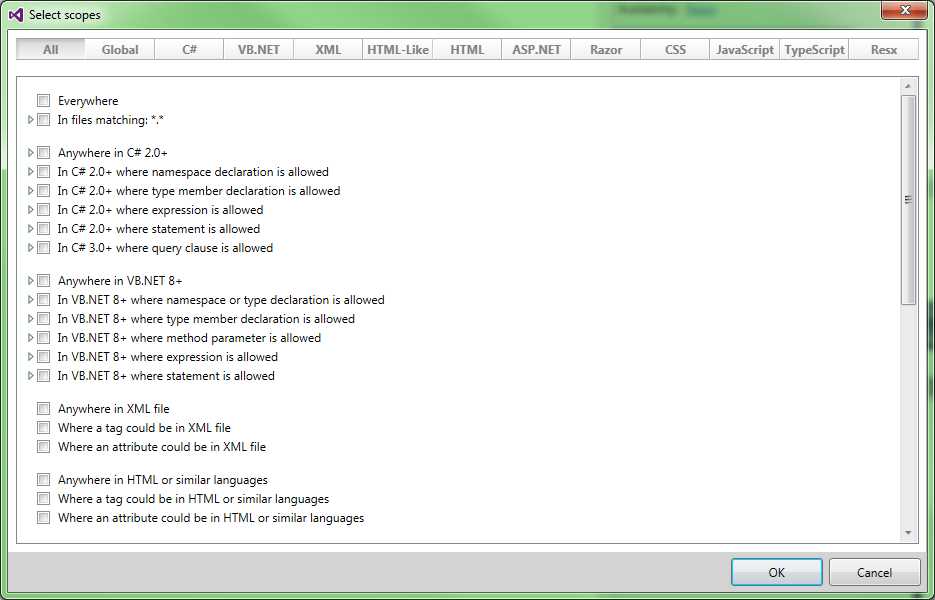
- Scope selection dialog box to choose where a template is allowed
Finally, we have our Parameters section. As you add expandable parameters to your template, they will appear here, and allow you to pick which of R#’s many macros apply to them.
Parameters are introduced into your template by surrounding the parameter name on both sides with a $ symbol. For example if you wanted the parameter Name in your template, you'd specify it using $Name$. This would in turn automatically add it to the parameters section in the editor, allowing you to assign a ReSharper macro to it.
Once you declare a parameter, you can use it as many times as you like. Whichever value is expanded into it will be used everywhere in your template that you declare a use of the parameter.
For our live template, we want to expand a typical using enclosure used when creating forms in Razor, so we start by putting the following code into our Template editor:

- Initial code in our Template Explorer for our Razor live template
In the code in Figure 99, we want to replace the Upload strings with attributes allowing the user to fill in the controller and action names, and in the { } section, we need to tell R# where the end is.
There are some special parameter tags that are reserved by R#, you can see one of them below, $END$.
To add the required parameters, we change our code to look like this:
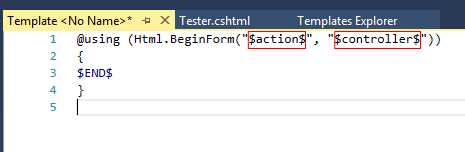
- Template code from Figure 99 with the parameters added
One thing to note from Figure 99 is that the END template is not right at the end of the template.
This is because END marks the point in the template where you would like the cursor to be placed once expansion is complete. In this case, we want the cursor placed so that the end user can continue typing the inner code for the form.
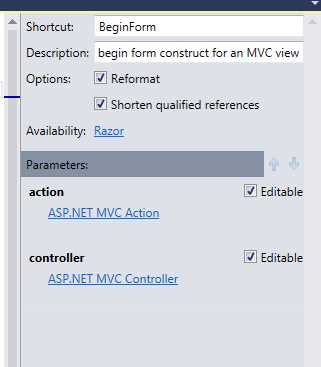
Once you enter the parameters into your live template and fill in the other details, you should now see that the right-hand side in your editor looks like this:
- Settings for our new Razor live template
At this point, we can now click on the blue Choose Macro links, allowing us to choose an appropriate macro that R# will use when assigning a value to our parameter.
You'll also notice that each parameter has an “editable” tick box; if you select an appropriate macro, you can get R# to fill that in automatically and not allow the end user to actually change anything. In practice though, I've never seen any templates that use this.
Click on the macro entry for Action, and you should see the following:

- R# Choose Macro dialog box
Choose ASP.NET MVC Action for our action parameter, then repeat the same steps for Controller, except this time choose the appropriate controller macro.
Feel free to explore the other macro types available—you'll quickly see that you can do everything from specify a hard-coded list of options, right through to searching every assembly on your machine for possible namespace matches.
If you now click Save (or press Ctrl+S) to save the template, you should immediately be able to start using it.
Open or create a Razor view, and type BeginForm. If you pause, you should see R# display a tooltip inviting you to complete the template expansion using the Tab key.
If you then press Tab, you should see your template appear, and your cursor be placed allowing you to choose an action and controller for the form.

- Visual Studio showing our template expansion in progress
A small word of warning: when you’re defining your template names (especially with things like Razor) don't be tempted to put an asterisk @ in front of the template name. Being able to type and expand @BeginForm would be great, BUT… the Razor interpreter will try to make sense of it, preventing R# from being able to manage it. The worst part about it is, you'll often not realize straight away why your template expansion isn’t working. The first time I encountered this, it had me scratching my head for a good few hours.
For the next example we'll create a surround/wrap template that will help us to create anchor tags wrapped in an <li> </li> (the type of layout that would typically be used in a navigation menu, for example).
The process for creating a surround template is nearly identical to that of a live code template, except for one crucial difference. Instead of using $END$ to mark the end of template expansion, you use $SELECTION$ to mark the bit of code in your document to be wrapped.
Unlike with Live templates, you'll find that in your settings section, all you have is a description. This makes sense, as there is no shortcut code to trigger the process. Instead, the option will be displayed from either the menu or the template chooser, depending on whether you decided to add the template to the quick list or not.
For the surround example, create a new template in the Surround Templates tab of the Template Explorer, then enter the following code and settings:
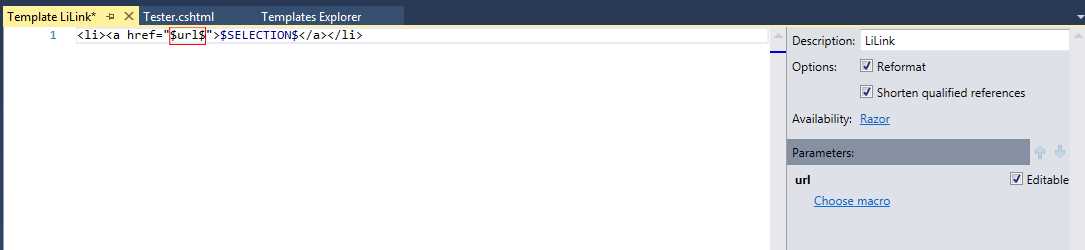
- Our example Surround template
As you can see in Figure 104, I've left the URL parameter as Choose macro. This is intentional and will allow the end user of the template to type their own choice of content into the place holder.
Once we save our template, we then use the Template Explorer to move the new template entry so that it appears in our quick list.
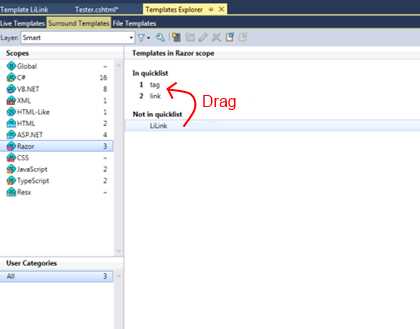
- Moving our Surround template to the quick list
If we switch back to a Razor view and try it, we should see the following:
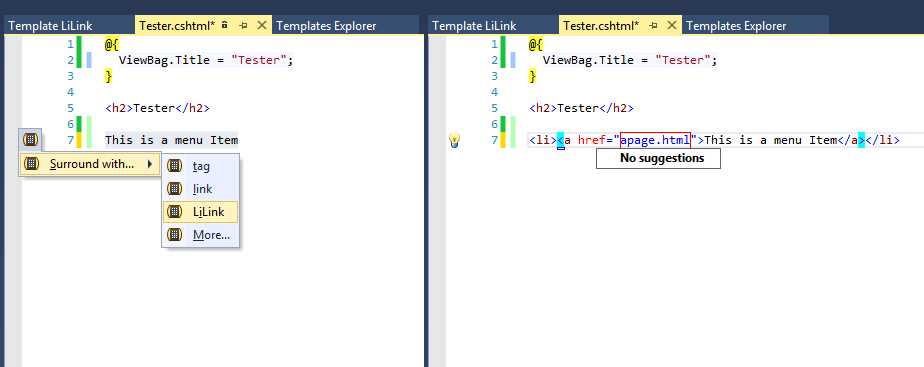
- Our new Surround template in action
I'll leave an exploration of creating a new file template to the reader at this point; the process is exactly the same as for the other two.
The last thing to know about live templates are the remaining predefined template variables.
You've already met END and SELECTION; there are two more in the form of SELSTART and SELEND. These remaining two variables are used to mark the start and end of a section of template text that you would like to be preselected once the template expansion is complete.
The idea here is that you can place some default text in the template (for example a Console.Writeline statement in an exception handler), but you can have it preselected so that as soon as the end-user starts typing anything new, it gets automatically replaced.
The remaining entries on the Edit menu are mostly involved with simple cursor movements.
Extend Selection and Shrink Selection deal with intelligently changing the selection size, and will attempt to extend to cover words and variable names, all while taking into account things like underscores, coding style, and white space.
Duplicate text (Ctrl+D) will make a duplicate of the currently selected text after the selection; if the selection covers a carriage return, then the new text will be placed on the next line.
This is useful for quickly duplicating similar lines that have small modifications with relative speed.
Comment with Line Comment and Comment with Block Comment again do exactly as the names suggest—they select an item of text and either enclose the entire multi-line selection in a block, or just place the // at the front of the first line to mark that line as a comment.
The Rearrange Code submenu is designed to allow you to move entire blocks of code around in your file, for example, to assist with reordering function calls or property declarations.
Finally, we have the Paste option, which opens a clipboard history window containing the most recently used pastes in the project, allowing you to potentially go back to a previous snippet and paste it again. This option is followed by the Copy XML Doc ID…, which copies the XML Documentation node ID for the selected code member to the clipboard. The last option, Copy Resource Value, will copy the value associated with the selected resource file identifier to the clipboard, ready to be pasted elsewhere.
- 1800+ high-performance UI components.
- Includes popular controls such as Grid, Chart, Scheduler, and more.
- 24x5 unlimited support by developers.