
Real-World Xamarin.Forms Succinctly®

CHAPTER 7
App Center: Drive Business Decisions with Analytics
Every project depends on a budget. Decision-makers in a company invest budget on a project to make money. That’s how business works, said in two sentences. Projects are an offer to customers, and for stakeholders, investors, and decision-makers, it’s extremely important to understand how to improve the quality of the product (an app) and make customers happy.
People who invest money in the project you are working on will often ask about how many active users the app has, how much time users spend on it, what the most and least used features are, and how reliable the app is. Generally speaking, they will ask you about numbers. This is where analytics come in.
Analytics allow developers to collect information about the usage of an app and will help you understand what features are most used and how reliable the app is. The Microsoft App Center offers an extremely powerful analytics engine that will help you provide answers to decision-makers and investors, so that they can drive their business decisions in the direction of success. This chapter explains what the Microsoft offering is for analytics, and how to set up both the App Center and apps to collect analytic data about app usage, while keeping privacy considerations in mind.
Note: This chapter describes everything that is useful for analyzing app usage, but App Center offers much more than this. You can bookmark the documentation for further studies.
Analytics and diagnostic data
Among all the possibilities offered by Microsoft’s Visual Studio App Center, this chapter focuses on two features:
- Analytics: This allows you to understand a user’s app usage by collecting events. An event can be a tap gesture, navigation to a page, and so on. Analytics also include the phone model of the user, the operating system, the OS version, the country of the user (based on the phone carrier), the number of sessions per day and week, and much more (see the section called “Understanding analytic data” later in this chapter).
- Diagnostics: This tracks errors and crashes that happened during the application lifetime, and stores the .NET exception information for a full understanding of the problem, such as reading the stack trace.
App Center also collects common information that is independent from analytics and diagnostics. For example, it generates a session every time a device connects to the analytics engine, assigning a GUID to the session to make this identifiable. It also collects other information such as the IP address, the session duration and, in general, information that helps you understand how much time the user spent on the app without any details on the actions taken.
Setting up a sample project
Because the focus of this chapter is analytics and collecting usage data, the sample application will be very simple. Create a new Xamarin.Forms blank project and add the XAML shown in Code Listing 21 to the MainPage.xaml file.
Code Listing 21
<?xml version="1.0" encoding="utf-8" ?> <ContentPage xmlns="http://xamarin.com/schemas/2014/forms" xmlns:x="http://schemas.microsoft.com/winfx/2009/xaml" x:Class="AnalyzingActions.MainPage"> <StackLayout VerticalOptions="Center"> <Button x:Name="FirstPageButton" Text="Open first page" Clicked="FirstPageButton_Clicked"/> <Button x:Name="SecondPageButton" Text="Open second page" Clicked="SecondPageButton_Clicked"/> <Button x:Name="HelpButton" Text="Help" Clicked="HelpButton_Clicked"/> </StackLayout> </ContentPage> |
The app will simply allow for navigating between two pages and will allow you to show a help dialog. The reason behind this is that we want to track page navigation, how many times a page is opened instead of another one, and how many times the user is tapping a button (in this case to ask for help).
Next, add two content pages to the project: one called FirstPage.xaml, and one called SecondPage.xaml, leaving the autogenerated XAML markup. In App.xaml.cs, enable navigation by changing the assignment of the MainPage property as follows:
MainPage = new NavigationPage(new MainPage());
You will need to add other pieces, such as event handlers for the buttons, but this will be done after setting up App Center.
Configuring the App Center
App Center is a complete solution for build automation and continuous integration, automated tests, app distribution, analytics, and diagnostics. In this chapter, I will demonstrate only the analytics and diagnostics features, but it’s really worth mentioning that you can take full advantage of the App Center to automate builds from a code repository, with automated testing and distribution of the app to the selected people for testing and creating different kinds of releases, such as alpha, beta, production, and enterprise.
You will first need to log into the App Center. You can register using a Microsoft, GitHub, Facebook, or Google account. When logged in, you will see the welcome message shown in Figure 16.
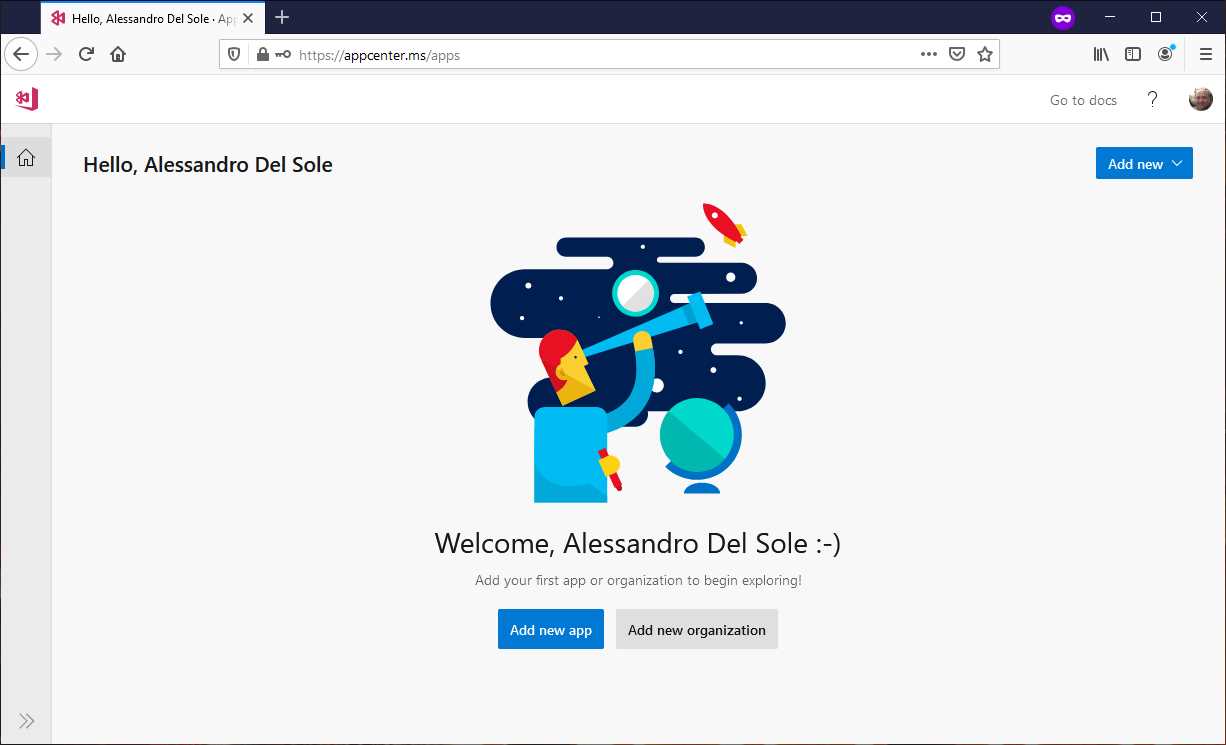
Figure 16: Logging into the App Center
Click Add new app. As you can see in Figure 17, you will be asked to enter an app name, the target operating system, and the platform used for development. In the case of a Xamarin.Forms project, the platform will always be Xamarin. For the operating system, you will need to select which one you want to target, for example iOS, like in Figure 17.
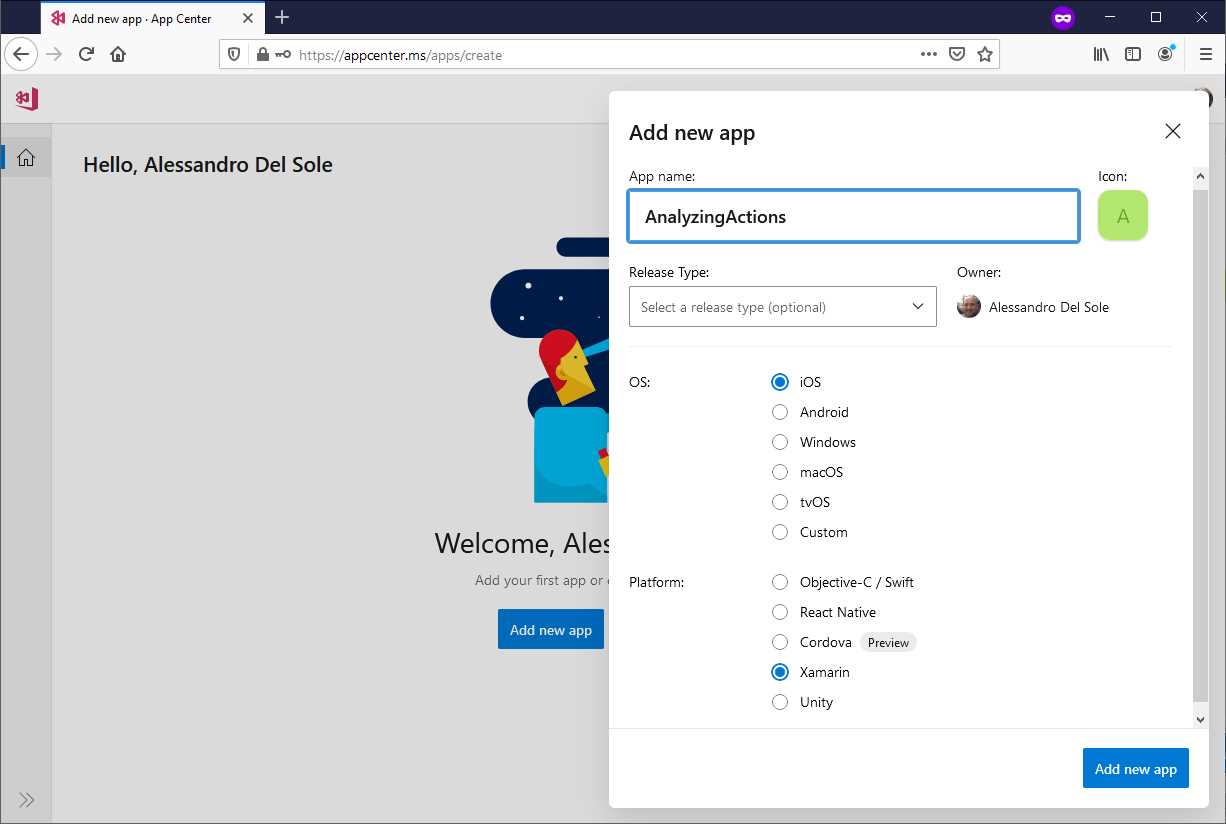
Figure 17: Adding an app to App Center
You will need to add an app for each OS you want to target, so if you are targeting iOS and Android, you will repeat the same steps to add an app, specifying Android as the OS and Xamarin as the platform. In summary, you will have at least two apps; and you can have more if you target, for example, UWP.
When the app has been added, App Center should automatically display the instructions to set up a Xamarin project. If this does not happen, you can click the Overview button (the one below the app icon on the toolbar at the left side of the page). Figure 18 shows the instructions to set up a Xamarin.Forms project to work with analytics.
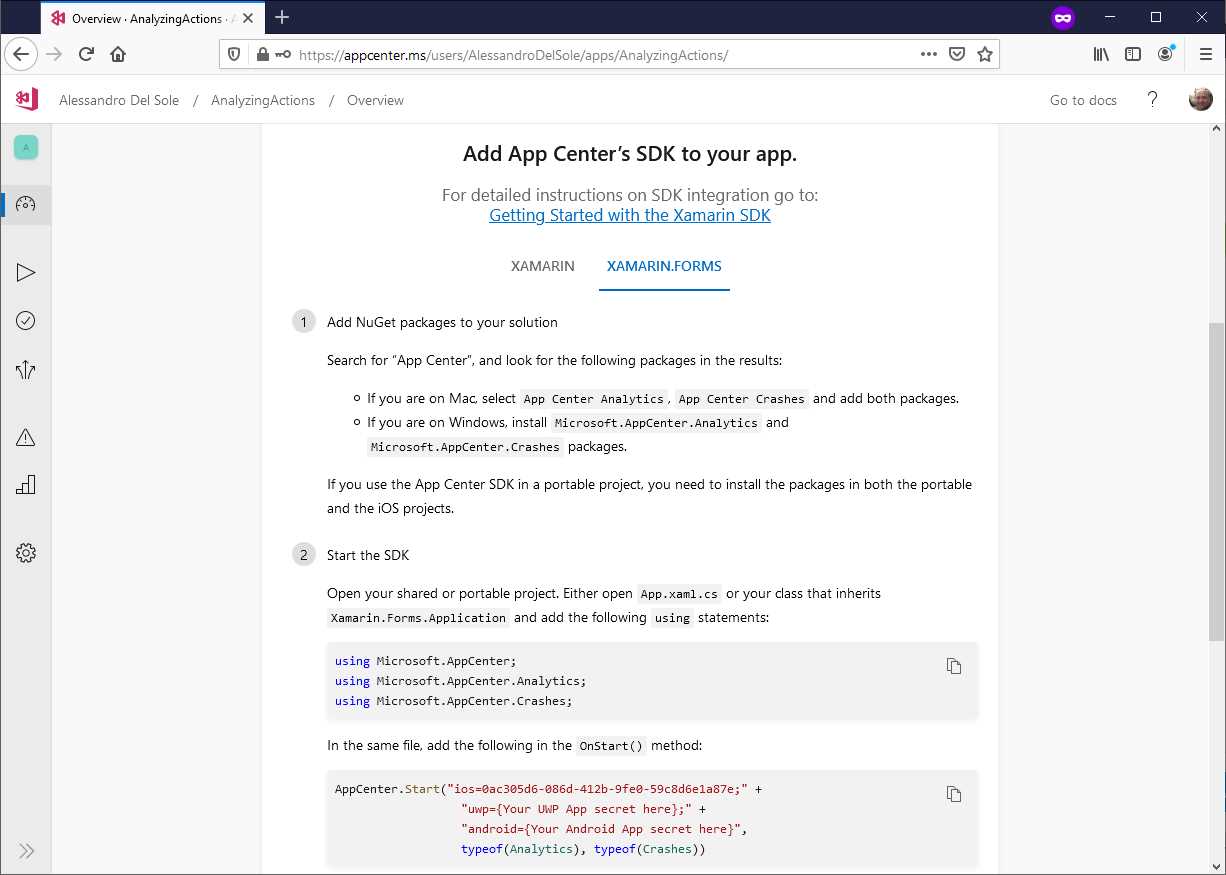
Figure 18: The instructions to set up a Xamarin.Forms project to work with analytics
As you can see, the instructions explain how to include both analytics and diagnostics information in the code. The next paragraph walks through the complete steps to set up the project.
Adding analytics and privacy consent to the app
Before writing code, you need to install a few NuGet packages. More specifically, you need the following (see Figure 19):
- Microsoft.AppCenter
- Microsoft.AppCenter.Analytics
- Microsoft.AppCenter.Crashes
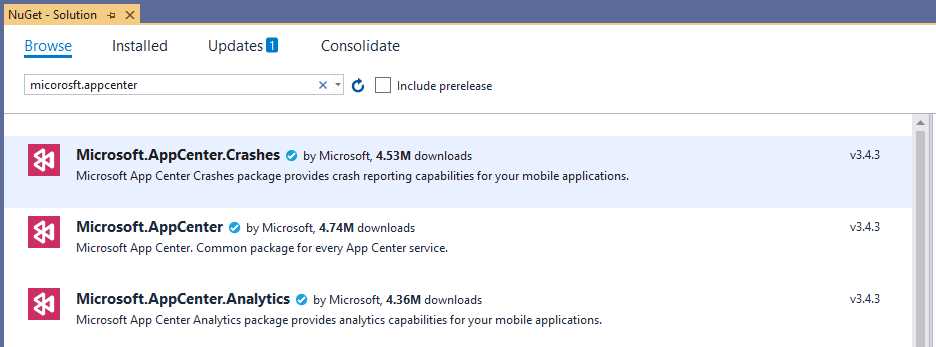
Figure 19: Analytics NuGet packages
Make sure that these NuGet packages are installed to all the projects in the solution.
Tip: Because Microsoft.AppCenter is a dependency for the other packages, you can start installing one between Microsoft.AppCenter.Analytics and Microsoft.AppCenter.Crashes, and Microsoft.AppCenter will be automatically installed.
When you created the iOS and Android apps in App Center, an app secret was created. An app secret is a GUID that connects your app to your App Center account, and one has been generated for all the apps you added. You can find the app secret in the code presented in the instructions inside App Center.
Once you have taken all the app secrets, you can add the following code in the OnStart method of the App class, replacing the app secrets with yours:
protected override void OnStart()
{
AppCenter.Start("android=ANDROID_SECRET_GOES_HERE;" +
"ios=iOS_SECRET_GOES_HERE;",
"uwp=UWP_SECRET_GOES_HERE;",
typeof(Analytics), typeof(Crashes));
}
An app secret is connected to a specific release. In the current example, I only got a default release when I added the apps, but if you create more app releases (such as alpha, beta, and production), you will get a different app secret for each kind of release. As an implication, you will need to add as many AppCenter.Start invocations as releases you have (or you might implement your own detection mechanism for the release and switch between app secrets with an if or switch block).
Tracking events and errors
With analytics, you can track events and .NET exceptions occurring during the app lifetime. Events can be any actions the user takes while using the app, such as tapping buttons, opening pages, scrolling lists, and so on. Events can be tracked using the Microsoft.AppCenter.Analytics class, which exposes the TrackEvent method. In order to understand how it works, add the following event handler for the Help button in the MainPage.xaml.cs file:
private async void HelpButton_Clicked(object sender, EventArgs e)
{
await DisplayAlert("Help",
"This app will help you understand how App Center Analytics work",
"OK");
Analytics.TrackEvent("Help button pressed");
}
As you can see, when the user presses a button, in addition to performing a task (in this case showing an alert), an event is sent to the analytics engine in a very detailed way. TrackEvent is very flexible, as it allows you to specify additional, custom information to the event. This is done by adding Dictionary<string, string> as an argument, like in the following example, which demonstrates how to group events by category:
Analytics.TrackEvent("Help button pressed",
new Dictionary<string, string> { { "Category", "UI" } });
In this way, you could divide events by category and filter them more easily in App Center. Let’s keep the simpler way for now. First, add the following event handlers for the buttons that open the two pages:
private async void FirstPageButton_Clicked(object sender, EventArgs e)
{
await Navigation.PushAsync(new FirstPage());
}
private async void SecondPageButton_Clicked(object sender, EventArgs e)
{
await Navigation.PushAsync(new SecondPage());
}
In the FirstPage.xaml.cs file, add the following code:
protected override void OnAppearing()
{
base.OnAppearing();
Analytics.TrackEvent("First Page opened");
}
protected override void OnDisappearing()
{
base.OnDisappearing();
Analytics.TrackEvent("First Page closed");
}
It is useful to track both the opening and closing events to understand how much time the user spends on a page. In the SecondPage.xaml.cs file, the code will also simulate an exception for error tracking:
protected override void OnAppearing()
{
base.OnAppearing();
Analytics.TrackEvent("Second page opened");
}
protected override void OnDisappearing()
{
try
{
base.OnDisappearing();
Analytics.TrackEvent("Second page closed");
throw new InvalidOperationException();
}
catch (Exception ex)
{
Crashes.TrackError(ex);
}
}
The Microsoft.AppCenter.Crashes.Crashes class exposes the TrackError method, which receives an object of type Exception (or derived) as an argument. TrackError will send the full exception information, including the stack trace, to the analytics engine, and this will be crucial to help developers debug any possible error. You will shortly see the result of event and error tracking in the App Center website, but an important piece is still missing: the user consent for analytics.
Managing the user consent for analytics
You cannot use analytics and track the user’s behavior without the user’s explicit permission. This is required by laws and regulations, and it’s something you cannot forget. You should not even track any information that could explicitly identify the user. This info isn’t necessary for the purpose of analytics, which is intended for usage and behavior analysis only.
Note: Privacy is a crucial topic for mobile apps in general, and especially if an app uses analytics. I would recommend you ask a lawyer or specialized companies about privacy consent before implementing analytics, and before writing and presenting to the user any privacy policy text and analytics consent text. It is important that you do not underestimate this point.
In the current example, the user’s explicit permission is asked in a very simple way through an alert. In your apps, you will want to present the full text of the privacy policy and store the acceptance or rejection inside the app settings or a database.
Add the following code to the MainPage.xaml.cs file:
bool? isAnalyticsConsentSet = null;
protected override async void OnAppearing()
{
base.OnAppearing();
if (!isAnalyticsConsentSet.HasValue)
{
bool result = await DisplayAlert("Consent",
"Do you provide your consent for analytics?", "Yes", "No");
await Analytics.SetEnabledAsync(result);
await Crashes.SetEnabledAsync(result);
isAnalyticsConsentSet = result;
}
}
The user’s choice is stored inside an in-memory variable for the sake of simplicity, but do not forget the aforementioned considerations. The key point here is the SetEnabledAsync method exposed by both the Analytics and Crashes classes. You can enable or disable analytics and crash tracking by simply passing true (enabled) or false (disabled) to this method and leave all the existing tracking code you wrote unchanged.
Running the app and doing actions
If you run the sample app, the first thing you will see is the analytics consent request, as shown in Figure 20.

Figure 20: Asking user’s permission for analytics
Tap Yes, then alternately open the two pages, go back, and tap the Help button several times. This will generate a number of analytics events.
Tip: A nice way to collect sample analytics data would be to use the app on different devices, in different days, and setting different languages on the devices. This will help with creating more structured views in App Center.
After running the app a few times, some analytics data should be available. The next section describes analytics data that you can find in App Center.
Understanding analytics data
All the analytics data is available in App Center. Select one of the apps you created previously (Android or iOS), and then click Analytics in the toolbar at the left side of the screen. The first piece of information you get is about users. More specifically, unique active users, shown in a graph that shows the development of user access over time. Daily sessions per user shows how many times a user entered the app every day, Session duration shows how much time the user spent in the app every time they used it, and Top devices shows a list of the most used devices for the selected operating system. Figure 21 shows this information.
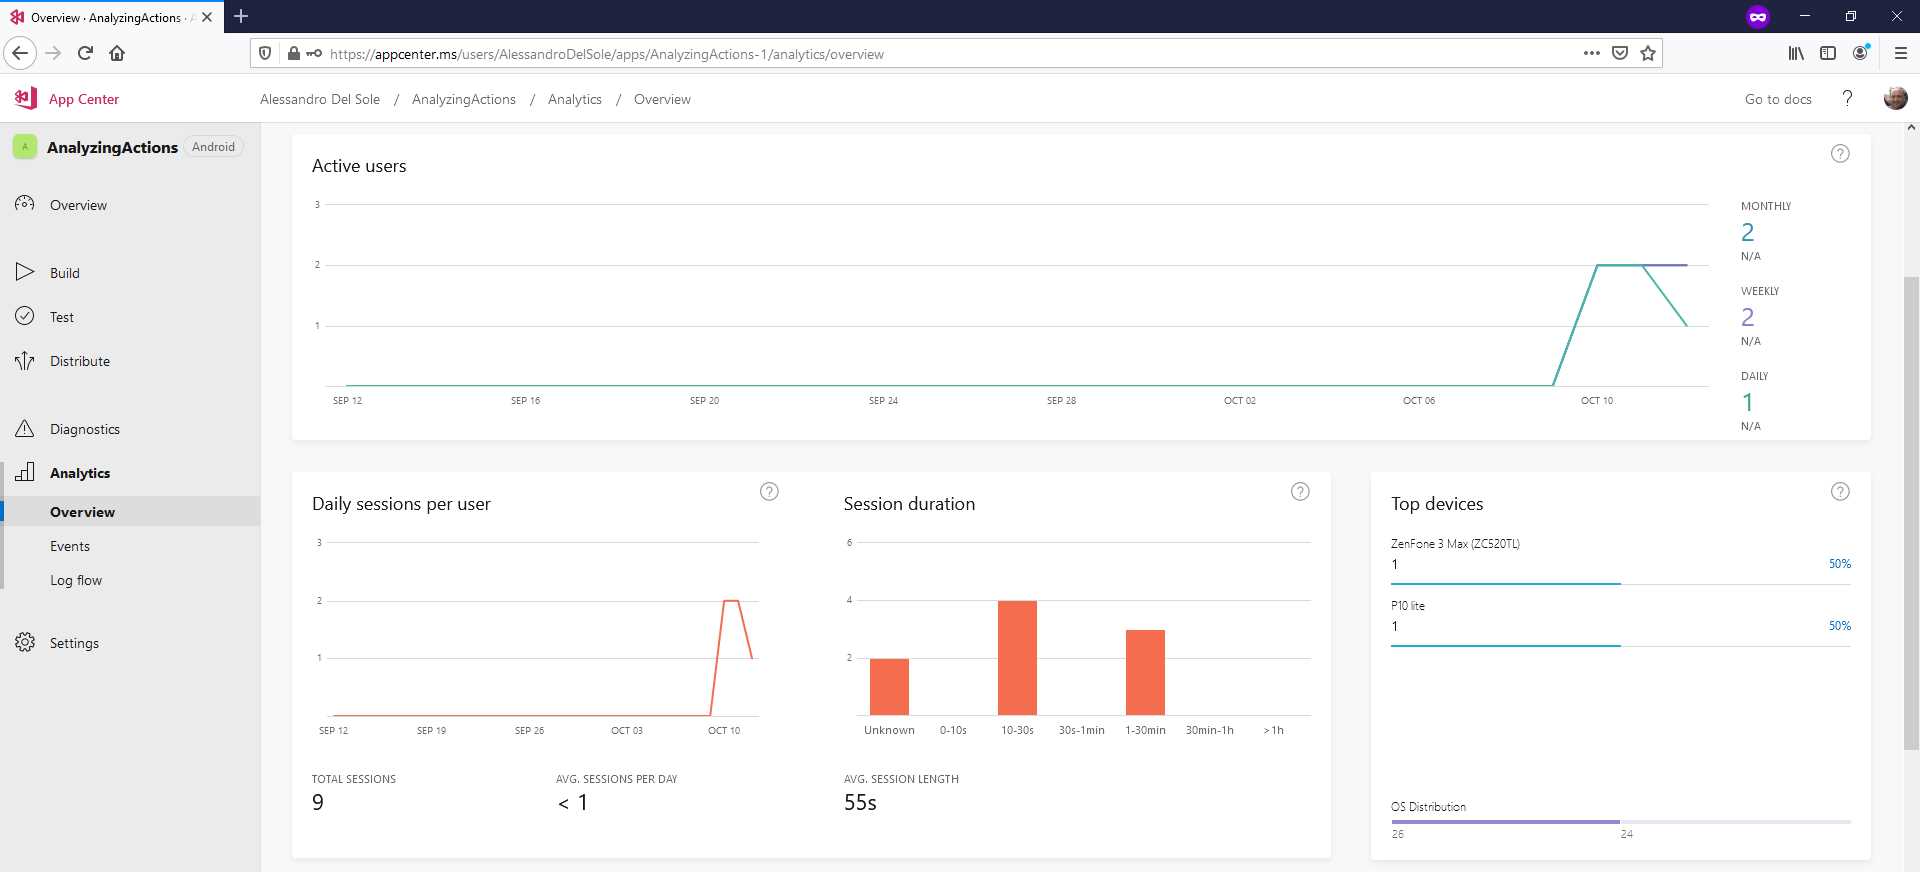
Figure 21: Analyzing user access
Scrolling down the page (see Figure 22), you will see additional information about countries and languages. Sometimes it takes time for the analytics engine to collect information, so the Countries area might stay empty for a while, like in Figure 22, but here you will see where your users come from, and what language they have set on their device.
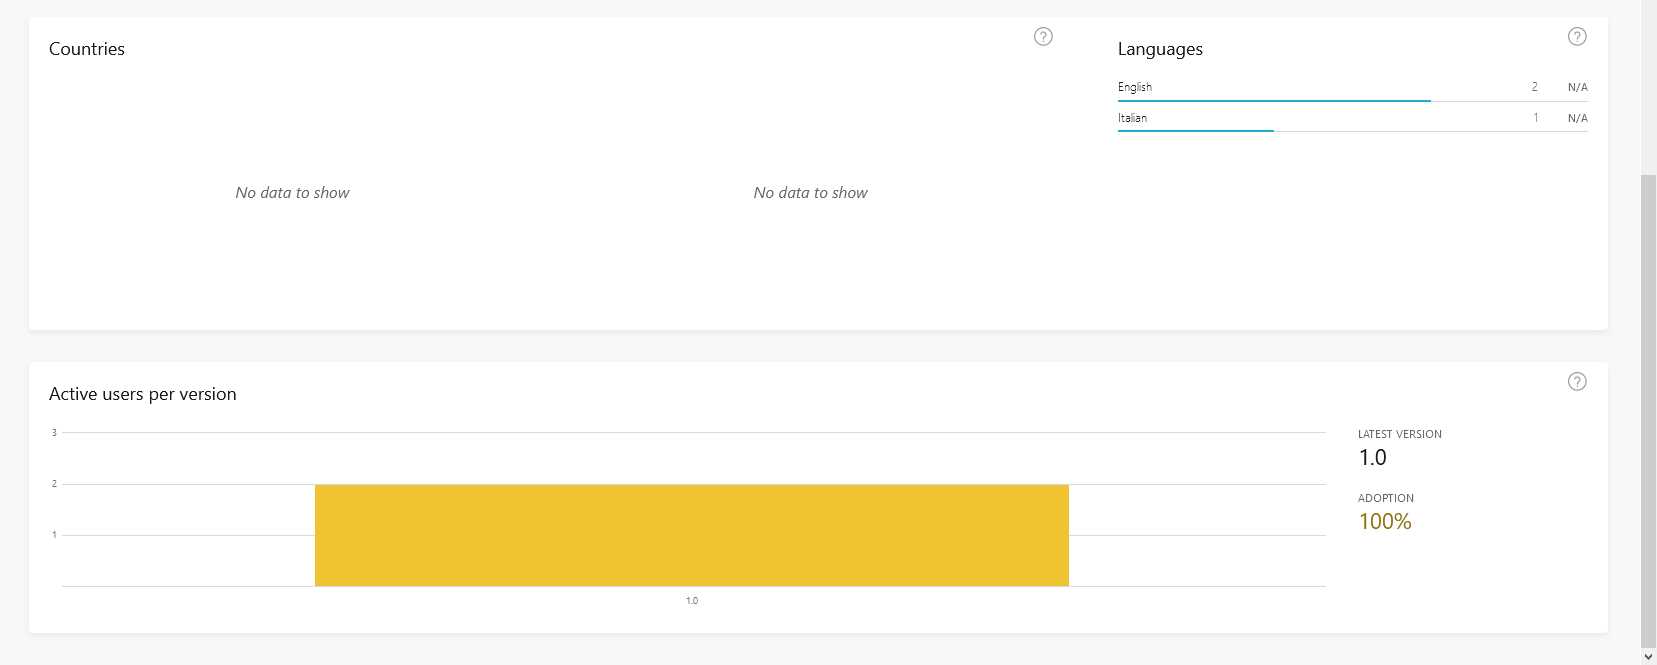
Figure 22: Countries and language information
If multiple versions of your app are currently available, the Active users per session area will show a report about how many users are using each version. The next group of information is about events, and probably is the most interesting when it comes to deciding in which features to invest more (or less). Click Events in the toolbar at the left. You will see the full list of events that you tracked invoking the Analytics.TrackEvent method, as shown in Figure 23.
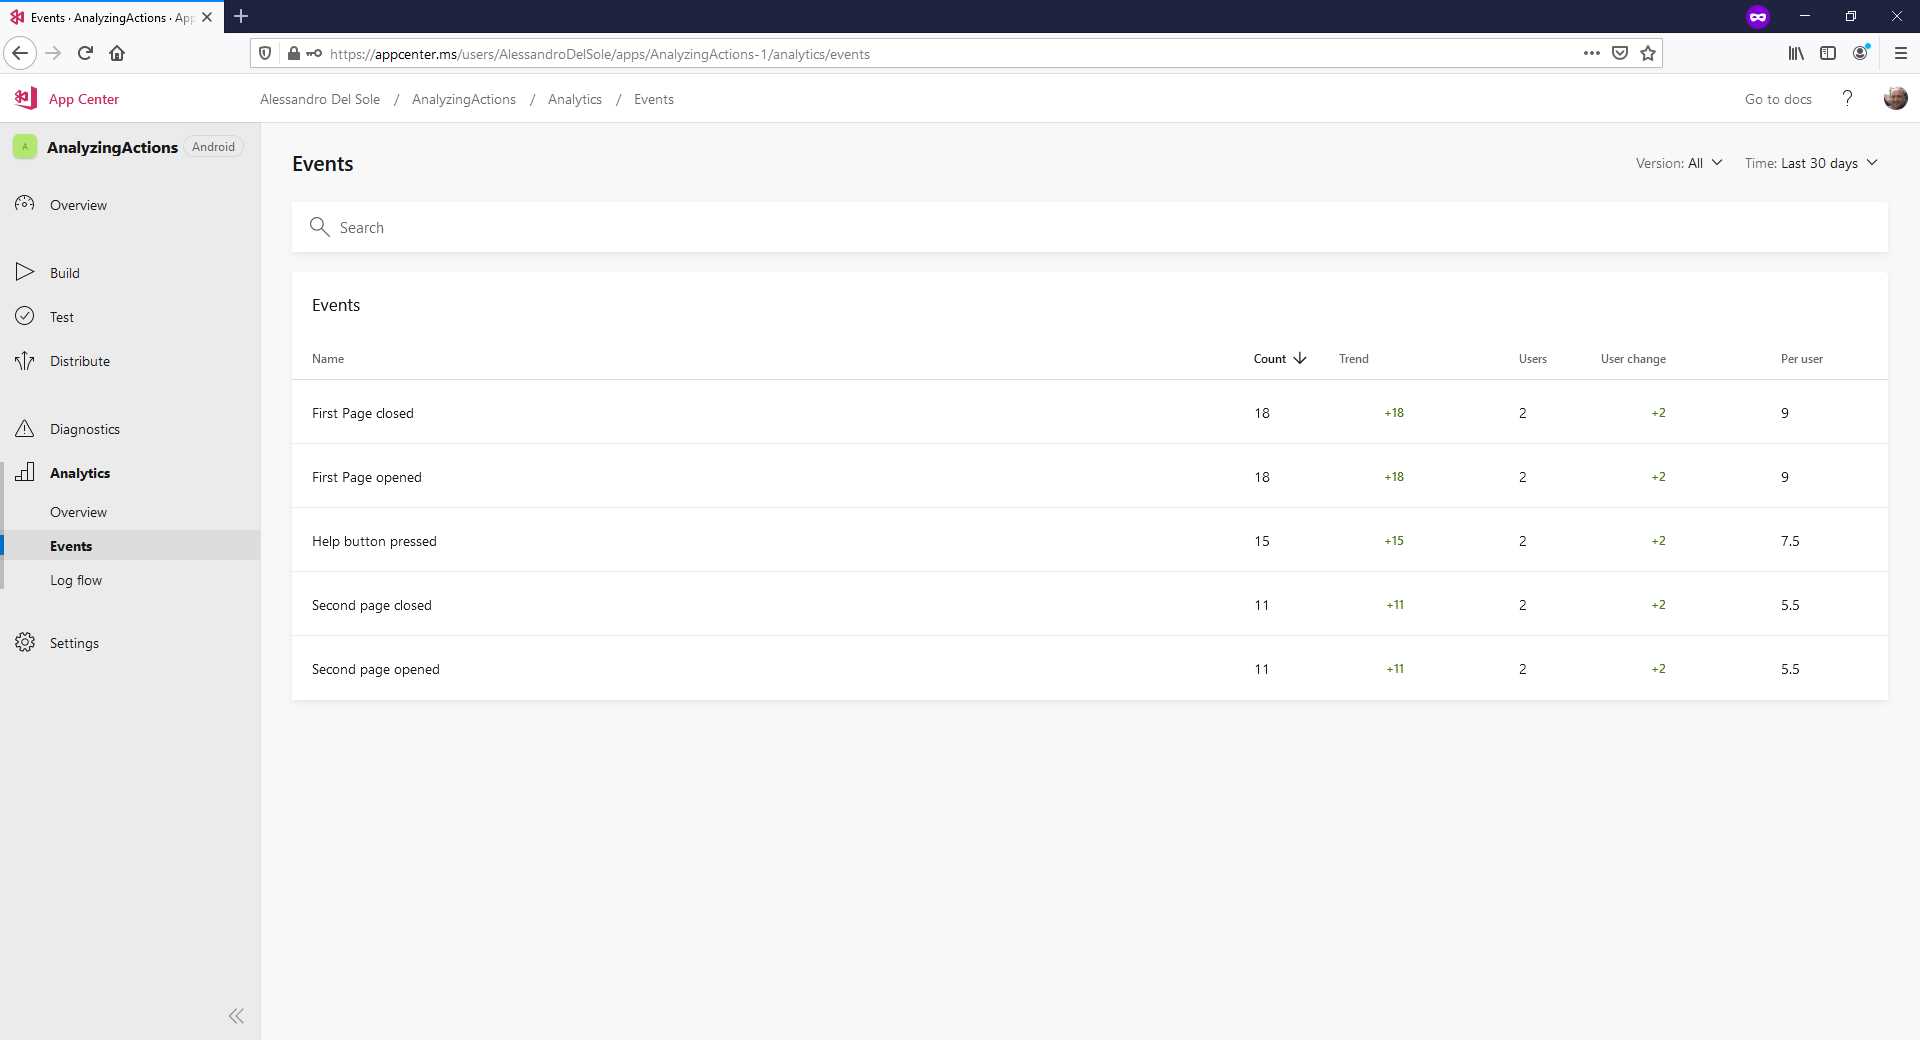
Figure 23: Analyzing events
For each event you will see the total count, the positive or negative trend, how many users are involved, and the count of events per user. The default timeframe is the last 30 days, but you can select a different interval with the dropdown at the upper-right corner. Here you basically get a summary of how much features are used. You can also click individual events to see more detailed information, and Figure 24 shows an example.
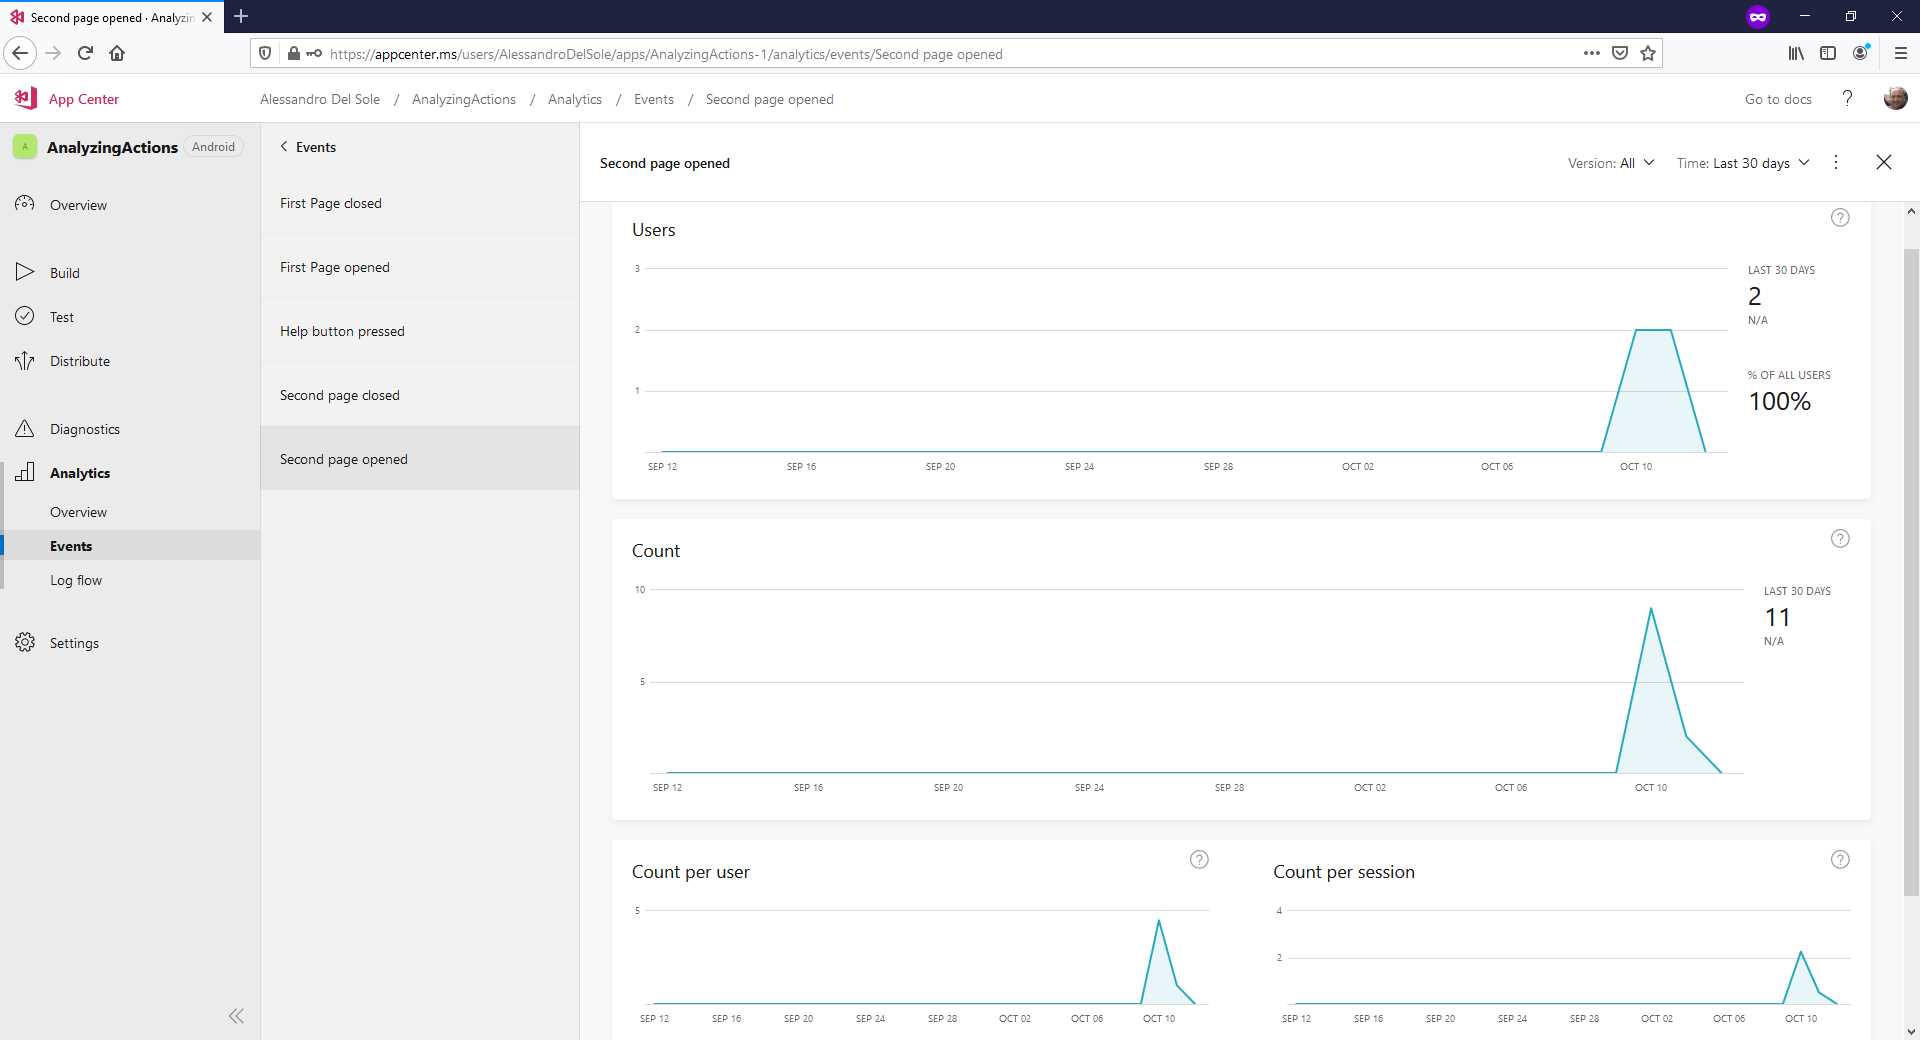
Figure 24: Event details per user
In this detailed view, you can see graphs that show how users interacted with the feature that raised the event over time. This is another important way to analyze the app usage; for example, it gives you an idea of how a feature is used since its release, and it can help you understand if the feature was easy to find, easy to use, useful for the user, and so on.
The last piece of analytic data to walk through is diagnostic data. Click Diagnostics in the toolbar at the left. When the page is opened, you will see issues grouped by crashes and errors. In the current example, there are errors raised intentionally by the app and tracked. Figure 25 shows what the page looks like.
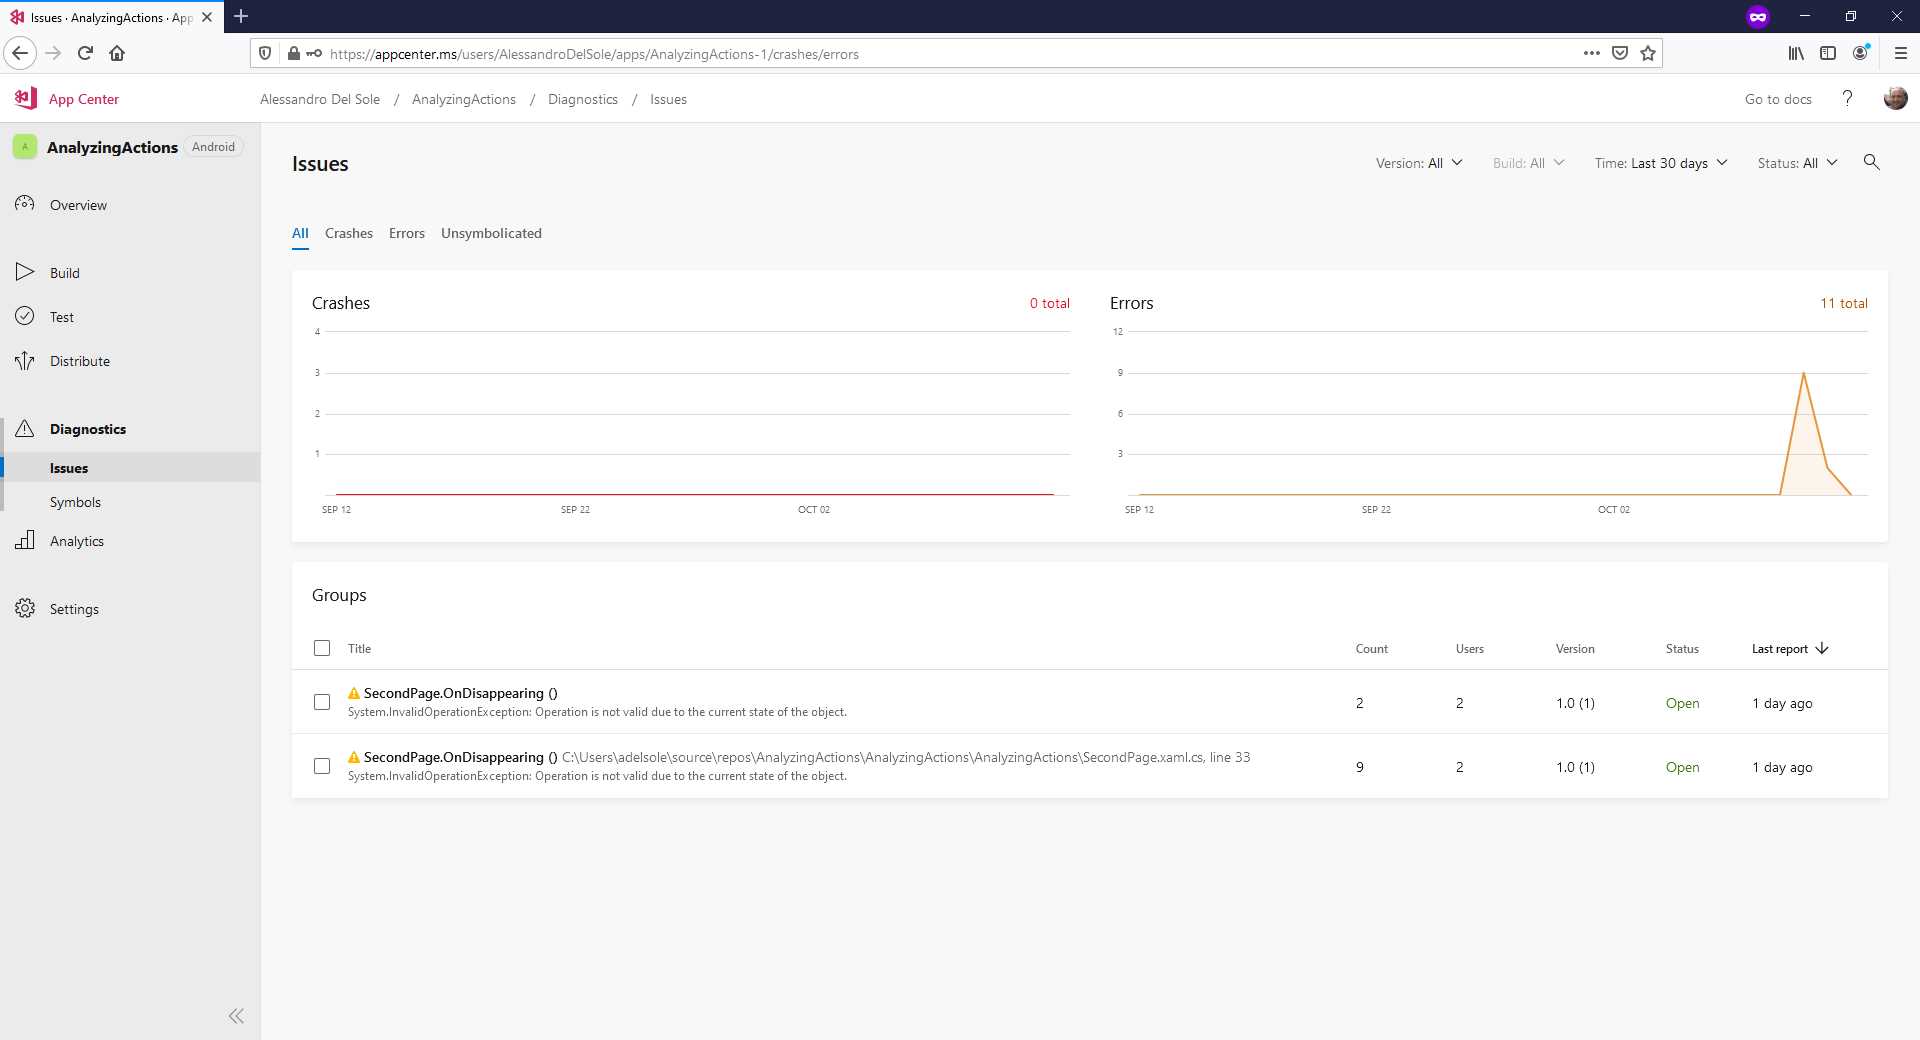
Figure 25: Diagnostic information
You have graphs to see crashes and errors over time, but the most useful information here is probably the list of .NET errors at the bottom of the page. In the current example, these have been raised intentionally to make the analytics engine generate reports, but in your apps, it will be important to add Crashes.TrackError invocations inside Try..Catch blocks. If you click an error, you will get a detailed view that includes the stack trace, as shown in Figure 26.

Figure 26: Detailed view of .NET exceptions
Diagnostic information here includes the stack trace, including the line of code and file that caused the error, a graph that shows how many times it happened, a graph that shows the number of users affected, and a summary of the most affected devices and operating systems.
In my experience, Android 9 is an operating system that needs more attention than its predecessors and successors due to its API, so having information on the OS version has been crucial. With all this information in hand, all the roles involved in the project will have an option to increase the quality and success of an app—from stakeholders and investors that will spend more budget on features that are useful for the customers, to developers and designers who will better understand how to fix problems and improve the interaction.
Hints about Application Insights
The way App Center collects information is certainly clear and useful for most of the roles in the project, but for further queries, data grouping, and advanced analysis, the best way is connecting your App Center account to Application Insights in Microsoft Azure. Application Insights also offers a structured query language to write powerful, custom queries. This is not in the scope of this chapter, but it is worth a mention. You can find more information in the documentation.
Chapter summary
Decision-makers need to understand where to drive the budget for a project, and analytics can help. With analytics, you can track events and errors that happen in your app, understanding what features users like most, how much time they spend on a specific part, and more. In this way, all roles involved in the project can give their best contributions to improve the product. As a developer, you are interested in writing code, and the Analytics and Crashes classes, with their TrackEvent and TrackError methods, make it extremely easy to send analytics information.
Last but not least, these classes also make it simple to handle the user’s explicit permission to collect analytics, by passing true or false to the SetEnabledAsync method that allows you to leave the rest of the code unchanged. Improving the product quality is also possible by providing the user the best experience, which also comes through a nice user interface. This can be easily enriched with Lottie animations, which are discussed in the next chapter.
- 155+ high-performance Xamarin controls, including DataGrid, Charts, and ListView.
- Elegant XAML layouts for common scenarios.
- Layouts optimized for mobile and desktop.