
Real-World .NET MAUI Succinctly®

CHAPTER 5
Local Data Access with SQLite
More often than not, applications work with data, and mobile apps are no exception. In many cases, mobile apps exchange data over networks and take advantage of cloud storage and services such as push notifications. However, there are situations in which mobile apps only need to store data locally. For app settings, you can use the techniques described in Chapter 2. In the case of complex, structured data, applications need a different way to store information.
The good news is that you can easily include local databases in your mobile app using SQLite. This is an open-source, lightweight, serverless database engine that makes it simple to create local databases and perform operations on data. Information is stored inside tables, and data operations can be performed writing C# code and LINQ queries. SQLite is perfectly suited for cross-platform development because it’s a portable database engine that’s preinstalled on both iOS and Android, and it can be easily deployed to Windows.
In this chapter, I will describe how to implement local data access with SQLite and a step further: securing the database with a password.
Note: The code example provided in this chapter is based on the Model-View-ViewModel pattern. If you are not familiar with it, you can read an introduction from the .NET MAUI Succinctly ebook. This is important advice, because I will assume you already know some concepts.
Choosing and installing the SQLite libraries
SQLite libraries targeting C# and .NET for your apps are available through NuGet. There are several editions, each targeting different platforms. For .NET MAUI, you have a couple of options:
· sqlite-net-pcl is a cross-platform, open-source library that enables creating databases, reading data, and writing data. Don’t be confused by the pcl (portable class library) literal; the library works with .NET MAUI and .NET standard projects, as well.
· sqlite-net-sqlcipher, also known as SQLCipher, works like sqlite-net-pcl, but also adds the possibility to secure the database with a password assigned in the connection string.
Securing the local database is a very good idea, especially if you store sensitive data, or simply because your company might want to add an additional level of security. However, the sample project in this chapter is based on the regular sqlite-net-pcl so that every reader can follow along with the code, regardless of company requirements.
Note: SQLCipher used to be a paid library, and has been recently open-sourced. A paid version still exists, however, and the subscription offers technical support, custom builds, and additional options for enterprises.
Now, assuming you have created a new .NET MAUI project and removed all the unnecessary code for the MainPage.xaml and MainPage.xaml.cs pages as we discussed previously, it is time to install the appropriate NuGet packages. Whether your choice is sqlite-net-pcl or sqlite-net-sqlcipher, you also need to install the SQLitePCLRaw.bundle_green package. This is necessary to expose the SQLite capabilities to all platforms. The sample project will allow you to show and edit a list of customers retrieved from and saved to a SQLite local database.
Installing the SQLite NuGet packages
You can install the following packages from the NuGet Package Manager:
· sqlite-pcl-net
· SQLitePCLRaw.bundle_green (minimum version is 2.0.4)
However, many developers (including myself) have experienced the following runtime error when a connection to the SQLite database was being established:
The type initializer for 'SQLite.SQLiteConnection' threw an exception
For some unclear reasons, this might depend on how NuGet packages are installed. If you experience this exception, you can follow these steps:
- Uninstall both libraries.
- Install the sqlite-pcl-net package via the Package Manager Console with the following command:
> Install-Package sqlite-net-pcl -Version 1.8.116
- The previous command will also automatically install version 2.0.4 of the SQLitePCLRaw.bundle_green package, but you might want to update this to the latest version as follows:
> Install-Package SQLitePCLRaw.bundle_green
- Save the solution and close Visual Studio.
- Locate the project folder and delete the bin and obj subfolders.
- Re-open Visual Studio and the solution.
In this way, you should no longer experience the exception previously mentioned.
Setting up the database connection
Your code will access an SQLite database through a connection string, exactly like it would do with any other database. So, the connection string is the first thing you need to build. Because an SQLite database is a file that resides in a local folder, constructing the connection string requires the database pathname. Unlike in Xamarin.Forms, where you had to do this in the platform projects, in .NET MAUI you can write the code for the connection string just once.
To accomplish this, add a new class called DatabaseConnection. Code Listing 7 shows the first part of the code for this new class.
Code Listing 7
using SQLite;
namespace LocalDataAccess { public class DatabaseConnection { public const string DatabaseFilename = "Customers.db3";
public const SQLiteOpenFlags Flags = // Open the database in read/write mode. SQLiteOpenFlags.ReadWrite | // Create the database if it doesn't exist. SQLiteOpenFlags.Create | // Enable multi-threaded database access. SQLiteOpenFlags.SharedCache;
public static string DatabasePath { get { return Path.Combine(FileSystem.AppDataDirectory, DatabaseFilename); } }
SQLiteAsyncConnection Database;
public DatabaseConnection() { }
async Task Init() { if (Database is not null) return;
Database = new SQLiteAsyncConnection(DatabasePath, Flags); var result = await Database.CreateTableAsync<Customer>(); } } } |
The DatabaseFilename constant contains the filename for the database. By convention, SQLite database files have .db3 extensions. The Flags constant, of type SQLiteOpenFlags, combines values from this enumeration in order to establish which operations are allowed over a database (see the comments in the code).
The DatabasePath read-only property returns the database pathname. This is made of the app directory and the database filename. In .NET MAUI, you can retrieve the app directory via the FileSystem.AppDataDirectory property without dealing with platform-specific code.
The Database field, of type SQLiteAsyncConnection, represents the actual connection string. It is assigned inside the Init method, which will be invoked by data access methods that will be implemented shortly. This approach is called lazy initialization, because access to the database is only initialized when required. The method creates a new connection, passing the pathname of the database and the flags to the constructor of the SQLiteAsyncConnection class. If the database does not exist, it is created.
Finally, the CreateTableAsync method exposed by the SQLiteAsyncConnection class creates a table in the database if it does not exist; otherwise, it is simply ignored. This is a generic method, and the type parameter is the data object that you use to represent your entities. This is not implemented yet, but it will be shortly.
Creating a data model
Let’s imagine the app provides a piece of user interface to manage a list of your customers. First of all, you need a Customer class to model your data. Code Listing 8 demonstrates this in a way that satisfies the needs of SQLite.
Code Listing 8
using SQLite; using System.ComponentModel; namespace LocalDataAccess { [Table("Customers")] public class Customer : INotifyPropertyChanged { private int _id; [PrimaryKey, AutoIncrement] public int Id { get { return _id; } set { this._id = value; OnPropertyChanged(nameof(Id)); } } private string _companyName; [NotNull] public string CompanyName { get { return _companyName; } set { this._companyName = value; OnPropertyChanged(nameof(CompanyName)); } } private string _physicalAddress; [MaxLength(50)] public string PhysicalAddress { get { return _physicalAddress; } set { this._physicalAddress = value; OnPropertyChanged(nameof(PhysicalAddress)); } } private string _country; public string Country { get { return _country; } set { _country = value; OnPropertyChanged(nameof(Country)); } } public event PropertyChangedEventHandler PropertyChanged; private void OnPropertyChanged(string propertyName) { this.PropertyChanged?.Invoke(this, new PropertyChangedEventArgs(propertyName)); } } } |
The first thing you notice is the Table attribute at the class level, which maps the class to a table name. Because the SQLite libraries act as an ORM, the logic is that it the library maps the class’s properties to table columns in the database. So, at property levels, you will notice annotations such as Autoincrement and PrimaryKey for the Id property (which maps the same-named column) and other annotations that apply constraints such as NotNull and MaxLength. The implementation of the INotifyPropertyChanged interface is useful to notify the user interface of changes on the data, but it will be ignored by the SQLite library so this interface implementation and the data annotation can coexist.
Now that you have a data model, you need to implement methods that execute operations against data.
Reading, filtering, and writing data
The SQLite and SQLCipher libraries offer all the methods you need to read and write data, and you can use LINQ to filter your query results. In this section, you learn how to query and write data to the local database via the appropriate methods from the SQLiteAsyncConnection class. Open the DatabaseConnection class and add here all the code that you find in this section.
Reading data
Suppose you want to read the full list of records from the Customers table, and that you want to retrieve an individual record. The first task is accomplished via the following, simple method:
public async Task<List<Customer>> GetCustomersAsync()
{
await Init();
return await Database.Table<Customer>().ToListAsync();
}
The Table<T> method returns a AsyncTableQuery<T> object, which is a collection that implements the IEnumerable interface. However, an explicit conversion via ToListAsync is done to ensure maximum compatibility outside of the SQLite environment. Notice how the Init method is invoked first, to ensure that a connection to the database is established.
Retrieving an individual record is still simple, and it can be accomplished with the following code:
public async Task<Customer> GetCustomerAsync(int id)
{
await Init();
return await Database.Table<Customer>().
Where(i => i.Id == id).FirstOrDefaultAsync();
}
Here you get a first example of data filtering with LINQ. In fact, the FirstOrDefaultAsync method is invoked on the collection to retrieve the first record that matches the supplied id, with filtering that happens via a lambda expression.
More complex LINQ queries can be performed over the result of Table<T> to filter the list based on a given criterion. The following method demonstrates how to filter the list of customers based on their country of residence:
public async Task<List<Customer>> GetFilteredCustomersAsync
(string countryName)
{
var query = from cust in Database.Table<Customer>()
where cust.Country == countryName
select cust;
return await query.ToListAsync();
}
It is worth mentioning that SQLite also supports the SQL language directly. For example, you could rewrite the method body as follows:
await Database.QueryAsync<Customer>($"SELECT * FROM Item WHERE Country =
'{countryName}'");
Writing data
SQLite supports both insert and update operations. You can easily detect if an object instance must be inserted or updated if its Id is equal to zero, like in the following method that saves an individual Customer instance:
public async Task<int> SaveCustomerAsync(Customer item)
{
await Init();
if (item.Id != 0)
return await Database.UpdateAsync(item);
else
return await Database.InsertAsync(item);
}
The code is very simple: if the value for the Id property of the Customer instance is zero, it means that it has never been persisted to the database, so InsertAsync is invoked. Otherwise, the record just needs to be updated, and therefore, UpdateAsync is called.
The SQLiteAsyncConnection class also exposes the InsertAllAsync and UpdateAllAsync methods, which allow for inserting and updating all the objects inside an IEnumerable<T> collection. Though this is very convenient, the problem happens when you have a mixed list of new and updated objects. The solution is then represented with the following method, whose purpose is saving an entire IEnumerable<Customer> collection:
public async Task SaveAllCustomersAsync(IEnumerable<Customer> items
{
await Init();
foreach(var item in items)
{
if (item.Id != 0)
await Database.UpdateAsync(item);
else
await Database.InsertAsync(item);
}
}
Basically, you apply the same logic of the previous method inside a foreach loop.
Deleting data
Deleting data is also an easy task, keeping in mind it’s a one-way operation that cannot be reverted. The following code deletes an individual record from the table:
public async Task<int> DeleteCustomerAsync(Customer item)
{
await Init();
return await Database.DeleteAsync(item);
}
The DeleteAsync method requires the ID of the record you want to delete. Another method called DeleteAllAsync allows for deleting all the objects in a table. You can also completely delete an entire table via the DropTableAsync method. You will need to invoke the CreateTableAsync method shown at the beginning to create the table again.
If your app handles very sensitive data, I would recommend you add a Boolean column to the table called IsDeleted, or similar, which you set as true if you want to mark the record as deleted, and then you update the record instead of physically deleting it. This allows you to keep a history of the data, even if some records will not be used anymore.
Note: There is more in the SQLite database engine; for example, it supports transactions, indexes, and backups, and the SQLiteAsyncConnection class also exposes the TableChanged event that is raised when a table is changed. For further details, have a look at the GitHub repository for the library.
Implementing Model-View-ViewModel logic
A good approach when working with databases is implementing separation between data models, data access, business logic, and the user interface. The Model-View-ViewModel pattern is perfect for accomplishing this. In the previous section, you wrote a data model and a class for data access—now it’s time to write a ViewModel.
In summary, the ViewModel needs to expose the following objects that will be data-bound to the user interface:
· A collection of Customer objects.
· An individual Customer object (useful to represent the selection in a list).
· Command objects that invoke methods in the DataAccess class and execute operations against data.
Code Listing 9 shows the full code for the ViewModel, and comments on the relevant points will follow.
Code Listing 9
using System.Collections.ObjectModel; using System.ComponentModel;
namespace LocalDataAccess { public class CustomerViewModel : INotifyPropertyChanged { private ObservableCollection<Customer> _customers; public ObservableCollection<Customer> Customers { get { return _customers; } set { _customers = value; OnPropertyChanged(nameof(Customers)); } }
private Customer _selectedCustomer; public Customer SelectedCustomer { get { return _selectedCustomer; } set { _selectedCustomer = value; OnPropertyChanged(nameof(SelectedCustomer)); } }
private DatabaseConnection dataAccess;
public CustomerViewModel() { dataAccess = new DatabaseConnection(); Customers = new ObservableCollection<Customer>();
Task.Run(async () => { var customers = await dataAccess. GetCustomersAsync(); if (customers.Any()) { Customers = new ObservableCollection<Customer>(customers); } else await AddCustomerAsync(); }); }
private async Task AddCustomerAsync() { var newCustomer = new Customer { CompanyName = "Company name...", PhysicalAddress = "Address...", Country = "Country..." };
Customers.Add(newCustomer); await dataAccess.SaveCustomerAsync(newCustomer); }
public Command SaveAllCommand { get { return new Command(async () => await dataAccess. SaveAllCustomersAsync(Customers)); } }
public Command AddNewCommand { get { return new Command(async () => await AddCustomerAsync()); } }
public Command DeleteCommand { get { return new Command(async () => { if (SelectedCustomer != null) { Customers.Remove(SelectedCustomer); await dataAccess. DeleteCustomerAsync(SelectedCustomer); } }); } }
public event PropertyChangedEventHandler PropertyChanged; private void OnPropertyChanged(string propertyName) { PropertyChanged?.Invoke(this, new PropertyChangedEventArgs(propertyName)); } } } |
Here are some relevant points to note about Code Listing 9:
· The implementation of the INotifyPropertyChanged interface allows for notifying the bound views in the user interface so that they can automatically reflect changes.
· The constructor loads existing data and adds a new customer if no data is found. Notice that the Task.Run method is used to invoke an asynchronous method from synchronous code (as the constructor is).
· The AddCustomerAsync method adds a new Customer object to the Customers collection and inserts the new object into the database at the same time. This is also to demonstrate how updating an existing Customer works.
· Command objects, which will be bound to buttons in the user interface, call methods in the DatabaseConnection class, according to the MVVM principles.
The final step is implementing a user interface. This is going to be very simple, but with all the pieces required to work with the database.
Creating the user interface with data binding
The user interface for the sample app is defined inside the MainPage.xaml file. A good choice for displaying the list of customers is the CollectionView control. It has a simple DataTemplate where a Label displays the value of the Customer.Id property, so that it cannot be edited, and where Entry views allow for editing the values of the other properties. Code Listing 10 shows the full XAML code.
Code Listing 10
<?xml version="1.0" encoding="utf-8" ?> <ContentPage xmlns="http://schemas.microsoft.com/dotnet/2021/maui" xmlns:x="http://schemas.microsoft.com/winfx/2009/xaml" x:Class="LocalDataAccess.MainPage"> <Grid Margin="10"> <Grid.RowDefinitions> <RowDefinition /> <RowDefinition Height="40"/> </Grid.RowDefinitions>
<CollectionView x:Name="CustomersView" SelectedItem="{Binding SelectedCustomer, Mode=TwoWay}" ItemsSource="{Binding Customers}" SelectionMode="Single"> <CollectionView.ItemTemplate> <DataTemplate> <StackLayout Orientation="Vertical" Margin="0,10,0,0"> <Label Text="{Binding Id}" FontSize="Medium"/> <Entry Text="{Binding CompanyName}" FontSize="Medium" /> <Entry Text="{Binding PhysicalAddress}" FontSize="Medium"/> <Entry Text="{Binding Country}" FontSize="Medium"/> </StackLayout> </DataTemplate> </CollectionView.ItemTemplate> </CollectionView>
<StackLayout Orientation="Horizontal" Spacing="5" Grid.Row="1"> <Button Text="Add" Command="{Binding AddNewCommand}" WidthRequest="90"/> <Button Text="Remove" Command="{Binding DeleteCommand}" WidthRequest="90"/> <Button Text="Save all" Command="{Binding SaveAllCommand}" WidthRequest="90"/> </StackLayout> </Grid> </ContentPage> |
For the CollectionView, the SelectedItem property is bound to the SelectedCustomer property of the ViewModel; ItemsSource is bound to the Customers property, representing the full list of records coming from the database; and SelectionMode is Single to allow for selection of one object. The Label and the Entry views in the data template are bound to related properties in each instance of the Customer object. Finally, there are three buttons, each bound to a command in the ViewModel, that allow for performing operations against the data with an approach based on layers separation. The final step is instantiating the ViewModel and using this as the page’s data context. Code Listing 11 shows the C# code that you will add to the code-behind file for the page.
Code Listing 11
namespace LocalDataAccess;
public partial class MainPage : ContentPage { private CustomerViewModel ViewModel { get; set; }
public MainPage() { InitializeComponent(); ViewModel = new CustomerViewModel(); BindingContext = ViewModel; } } |
Now you can run the sample project and see the result of the work done so far.
Running the example
When you run the app for the first time, there will be no records in the database, so the code will add a new Customer instance, which is added to the Customers collection and automatically saved to the Customers table in the SQLite database. You can edit the new instance and add new instances, as demonstrated in Figure 11.
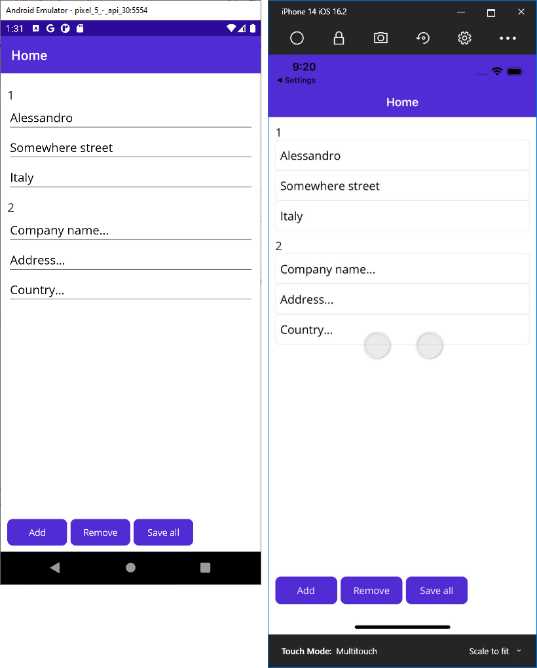
Figure 11: The sample app running and showing data from the database
Based on the code, when a new instance is added, it is automatically inserted into the database—but if you make changes to the values, you will need to save the data manually. This will perform an update operation.
Chapter summary
SQLite is an open-source, serverless database that applications written with .NET MAUI can leverage to store complex data locally within tables. In this chapter, you have seen how to create tables and read/write data, and how to display them in the user interface with data-binding.
The Model-View-ViewModel pattern has been used for true separation between data, data access, business logic, and the user interface; this is the approach you should also use in the real world for better code maintenance. There are certainly points for improvement, which depend on the needs of you and your company, but you have seen how simple it is to implement local data access securely.
Managing data is certainly important, and data does not only mean databases. There are other sources for data in mobile apps, such as Web API and JSON, which are discussed in the next chapter.
- An ever-growing .NET MAUI control suite with rich feature sets.
- DataGrid, Charts, ListView, Scheduler, and more.
- Active community and dedicated support.
- Phone, tablet, and desktop support.